
Ok, now that we have our character's base code set up, we can modify the blueprint abstraction of the ANSCharacter class to meet our requirements. During this section of the book, we will be creating all of the engine-side assets that we need for our ANSCharacter Blueprint. This includes the force feedback asset, adding a socket to the 3rd person skeletal mesh, creating the custom collision channel, and I will also show you the vector parameter we are changing from within ANSCharacter::SetTeam().
Start by importing the BulletParticle.uasset included with this book. You can do this by either using the in-editor import options or copy and pasting the file into the NS content folder directory. Unfortunately, there is not enough time in this book to cover the creation of particle effects as it is a very in-depth and complex topic. If you wish to learn more about creating particle systems with the UE4 particle editor, go to https://docs.unrealengine.com/latest/INT/Engine/Rendering/ParticleSystems/index.html.
Before we start modifying any blueprints, let's prepare the assets we are going to be using. Navigate to UE4_Mannequin_Skeleton in /Game/AnimStarterPack/UE4_Mannequin/Mesh/ in the Content Browser. With the skeleton open, you will be able to see a large list of all of the bones within the skeleton on the left-hand side of the window:

Right-click on the hand_r bone found about one-third of the way down the list and select Add Socket. This will create a socket called hand_rSocket. We now need to position the socket via the in-viewport window transform so it sits in the center of the palm, as so:

It is with this socket that we are attaching our 3rd person version of the gun mesh. We do this so the gun mesh position will update with the transformation of this bone.
Force feedback assets are very easy to create, as they are essentially curves that dictate the strength of a given vibration motor in a controller. Navigate to /Game/FirstPersonCPP/Blueprints/ and right-click in the Content browser and, under the Miscellaneous section, select Force Feedback Effect:

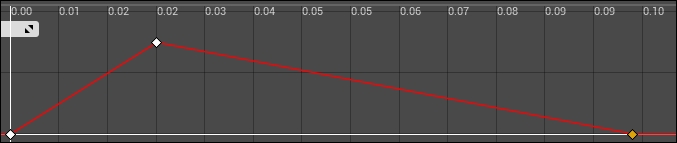
Call this new Force Feedback Effect HitMarkerEffect then open the asset. The editor is quite simple; it boasts a single details panel with some expandable sections. Expand the channel details section now. This will present you with four Boolean flags that represent which motors to affect, and then a curve that is how much you want the motors to vibrate over time.
We want our vibration to affect all motors and we want it to be a short 0.1-second burst of vibration. To dictate how this will work on the curve, we can right-click anywhere on the curve to add a key. Keys are time/value combinations that let us modify the curve itself. Add a curve key at 0.0 seconds, at 0.02 seconds, and at 0.1 seconds. You can simply add keys then modify the time values in the boxes provided with the key selected (it will be yellow):

Have the value of the first key be 0, the second key be 10, and the third key be 0. If your values are too small or too varied to see the curve properly, you can hit the expand to fit horizontally and expand to fit vertically buttons found on the curve editor:
The curve should appear like this:
This will be a short burst of vibration power to the controller that will inform the client of a successful hit.
Just like we did in BossMode, we need to add a custom collision channel for our raycast collisions against the player. Luckily, the template has already added one for us. If you navigate to Edit | Project Settings | Collision under the Object Channels section, you will see Projectile. Simply select this collision channel then hit edit and call it Character!
Now let's look at the vector parameter node that we are modifying at runtime via the ANSCharacter::SetTeam() method. Navigate to /Game/AnimStarterPack/UE4_Mannequin/Materials/ and open the M_UE4Main_Body material. Find the BodyColor VectorParameter node. It appears as follows in the graph:

Currently set to an off-beige, we are going to be accessing this parameter by its name (BodyColor) and setting it to either red or blue based off of the team. As this parameter node is plugged into the calculations for the rest of the material, we are able to manipulate this one parameter so it has a drastic effect on the material appearance.
The last thing we need to make is the anim montage assets that will be used for the 1st and 3rd person fire animations. The first person montage has already been made for us and set on the character. We just need to deal with the Fire_Rifle_Hip animation found at /Game/AnimStarterPack/. Navigate to this asset now then right-click in the Content browser and make a new Montage asset. When prompted, select to base this asset on UE4_Mannequin_Skeleton and name it HipFireMontage. Open the montage asset and click and drag the Fire_Rifle_Hip animation from the Asset List on the right-hand side of the window onto the montage timeline. The final timeline should appear as follows:

Now address the Anim Asset Details panel. Change the Blend In Time to 0.0 and the Blend Out to 0.0. We need to do this as our animation is so short that having a blend in and out would remove a lot of the animation's articulation. The last thing we need to do is make some modifications to UE4ASP_HeroTPP_AnimBlueprint. This file can be found under Game/AnimStarterPack/. Navigate to and open this file now. Navigate to the Anim Graph for this Anim BP and modify it so it matches the following:

With all of our assets prepared, we can now construct the physical arrangement of our character's components in a blueprint abstraction of ANSCharacter. Thankfully, one has already been created for us; navigate to the FirstPersonCharacter Blueprint at /Game/FirstPersonCPP/Blueprints/. Open the Blueprint now.
First off, select the mesh component and address the Details panel. Ensure that the SK_Mannequin mesh is set as the SkeletalMesh property of the Mesh section, and that the Anim Blueprint Generated Class is set to UE4ASP_HeroTPP_AnimBlueprint under the Animation section. Then ensure the Transform matches this:
This will include and position our 3rd person mesh so it appears as follows:

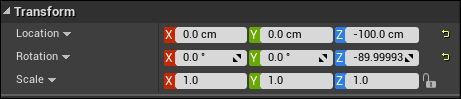
As you can see, the head of this mesh is occluding much of what the camera can observe. This is why we have set it so that the owner of the mesh cannot see it, otherwise their view would be filled with their own character's head. Next, select the TP_Gun component and ensure the SkeletalMesh property is set to SK_FPGun, and ensure that the Transform of the component matches the following:
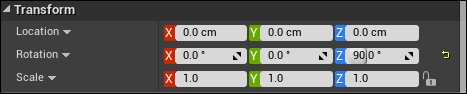
Now we can add the 3rd person gunshot particle. Select the TP_GunShotParticle and address the Components panel. Under the Particles section, set the Template to P_Explosion. We will also temporarily set the Auto Activate property under the Activation section to true so we can test our particle changes. What we need to do is scale and position this particle system so it plays at the tip of our 3rd person gun and is the right size. We can do this by matching these transform properties in the Transform section of the following Details panel:

Next, we can do the same with the FP_GunShotParticle but this time we need to position this system so it exists at the tip of the 1st person gun mesh instead. We do this because if you only used the 3rd person particle effect when the owning-client shot a bullet, it would look as though the projectile explosion is coming from his hips. To position and scale this system correctly, match the following transform:

Before moving on, be sure to set the Auto Activate property to false on both particle systems as we only want them to activate on command. Finally, we can set the BulletParticle to be the P_BulletLine particle effect imported to the project. Then set the transform to match the following:

This will position the particle system so the visual effect begins its lifetime right at the start of the barrel! The last thing we need to do is populate the asset handles with the assets we just made. In the Components panel select the FirstPersonCharacter(self) component. Under the Gameplay section, match the following properties:

The last thing we need to do is ensure our custom collision channel is set on our capsule. Select the Capsule Component and address the Details panel, and ensure the Collision section matches the following:

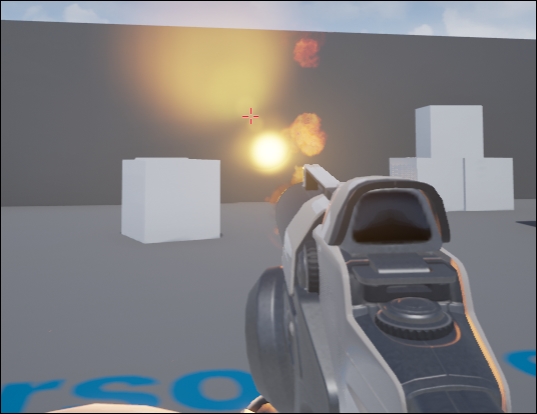
Now we can test our player! Run a PIE session and run around, jump, and shoot! All of our effects and animations play in first person just great. You will also notice a big red debug line to show that our shot has been performed on the server (as there is only one PIE session running, you are the server). You should see something similar to this:
Unreal Engine has provided us with a great way to test multiplayer projects within the editor itself. We can do this by setting the editor to run multiple players when we press Play. We do this by selecting the dropdown next to the play button and changing the number of players to three:

This will give us one server (the main editor window) and two clients (the two windows that will pop up). There is even an option to run a dedicated server turning the editor also into a client. With this arrangement, we can now test all of the functionality required, as we have a server authority, an owning-client autonomous proxy, and a simulated proxy instance! Try this now:

You may notice that the server instance, that being the editor window itself, has the players still colored white! That is because we have yet to set the team color on the server. We specified in the BeginPlay() of ANSCharacter to only call SetTeam() if the role of the character was not Role_Authority. As every one of the character instances on the server is the authority instance, none of them will be colored. Now, here is another cool test. You will notice that if you fire on the server, a red line will appear (being the debug line that was included in the raytrace code). However, if you fire on one of the clients, it will not. That is because our raytrace code is only taking place on the server. What you will notice, however, is that when a client fires, the debug line is still drawn on the server! That is because the code is being executed on the server instance of the game client, thus the debug line code is being hit.
Here is an example screenshot:

The previous screenshot is a view of the same game state; however, we can now see all of the fired shots from the clients. With all of the clients now on screen, we can also test our 1st and 3rd person visual assets. We can see that the fire animation and fire particles are playing appropriately.