
One of the key elements of BarrelHopper is punishing the player for unsuccessfully jumping over a barrel. What we need to do is reset the player to the default starting position every time it is hit a by a barrel. The goal is for the player to reach the top of the level in the shortest amount of time possible. In this chapter, we are going to create a rudimentary respawn system that utilizes Event Delegate. What we want to do is have our game mode respawn our player after a certain amount of time when the OnDestroyed event is fired from within our BH_Character. We are going to have to detect collisions with our barrels, destroy our actor, and then ensure that the desired respawning functionality takes place. We will do this via a delegate.
To begin, open the BH_Gamemode blueprint we created earlier in the chapter and navigate to the event graph. We need to graph some functionality that will get the Player Character reference, cast the Player Character to the BH_Character type, and then bind the OnDestroyed event of the BH_Character to a custom event in the game mode. Next, right-click on the event graph and type Add Custom Event. This will create a new event node in the graph, rename this node to Character_Respawn now. You will notice that on the top right-hand of the event node is a little red square. We will come back to this later.
Next, drag an execution line from the Event BeginPlay node that is present by default in the event graph; then, search for the function Cast To BH_Character. This function will attempt to cast from any provided object to our BH_Character. The node has one input pin for the object you wish to cast from, and one output pin for the resultant BH_Character reference. You will notice that the node has two execution path pins: One for a successful cast and another for a failed cast. Before we go any further, we need to provide this cast with a target. Right-click on the graph and search for the node GetPlayerCharacter. This node takes in a player ID (0 by default) and outputs a reference to a character object. Plug this output reference into the cast node. This cast will be successful as our BH_Character inherits from character.
Drag a line from the output reference of our cast node and search for the Bind Event to OnDestroyed node. This will provide you with a node that has an execution path input pin, a reference to the target input pin, and a small red square input pin called Event. Remember the similar looking small red square on our custom event Character_Respawn we made earlier? We are going to join these pins together, thus, binding them. Now, whenever OnDestroyed is hit in our BH_Character, Character_Respawn will also be hit in our game mode. You graph should look similar to something like this:

This kind of binding is known as a delegate. Character_Respawn is now a delegate of the OnDestroyed event. Simply put, delegates are triggered for execution when the owning function or event is triggered. We are able to bind multiple delegates to a single event if we wish. This means we can have different objects execute functionality based off of one event.
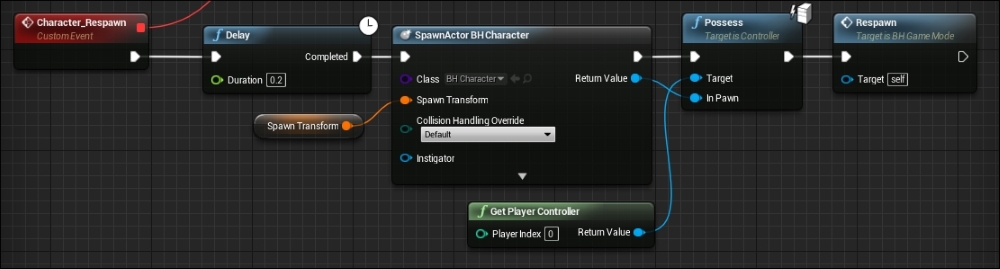
Now, we need to create some functionality for this newly bound event to execute. Let's start by creating a delay node. It is used to stall execution along an execution path for a given period of time. To create one, simply right-click on the event graph and search for Delay. Connect the execution pin from our Character_Respawn event to that of the Delay node. Then under the duration value input 1.5 as we wish for the player have a respawn timer of 1.5 seconds. The next thing we need to do is spawn a new character. To do this create a SpawnActor From Class node; this time specify the class type to be BH_Character.
Now, we have encountered our first problem, how are we going to specify which transform to use for our player start? Easy, we can set it to the initial position of our player when it is created for the first time. For now, create a variable in the BH_GameMode blueprint titled spawnTransform that is of type transform. Then, get a reference to this variable in your graph, and plug it into the Spawn Transform input pin of our spawn actor node.
The next thing we need to do is ensure that our player can control the new character we just created. This introduces you to a new concept Player Controllers. The only reason we can control our BH_Character is that by default at game start up, our character is assigned our Player Controller, meaning that any input we provide to the game through the keyboard or mouse is sent to our BH_Character. In a single player game such as Barrel Hopper, this is easy as there is only one Player Controller. In local-multiplayer games, this can become a much bigger challenge as there is a Player Controller for each player connected to the game.
For now, all we need to do is find a node called Get Player Controller that takes in a player index and returns the associated controller. We can leave the input index at 0 as there is only one player. Drag a line from the output pin and search for a function node called Posses. This node will take in a target, which is the player controller and In Pawn. This will then direct any inputs from the target controller to the provided pawn. Plug the output reference pin from our Spawn Actor BH_Character node and plug it into this in pawn pin. Your complete functionality should look like this:
The last thing we need to do in our BH_Gamemode is ensure that this newly created character has its OnDestroyed event bound to the Character_Respawn event in the game mode as the Begin Play event we used previously will not be called again. This is easy to solve. Simply create another custom event within our game mode, and call it respawn. Have the event node for our respawn have its execution path feed into the functionality that trails our Begin Play event. Next, call the new respawn event at the end of the Character_Respawn functionality chain. This ensures that our new character's OnDestroyed event is bound to the Character_Respawn event. You can see the call to the respawn event in the preceding image. The graph around our being play event now looks like this as well:

Now, we have to detect for barrel collisions from within our player. To do this, all we need to do is utilize an event called Event Hit. This event functions in a very similar way to OnActorBeginOverlap. The only difference is this event is called when a physical collision takes place. It is important that we use this event when dealing with collisions between BH_Character and BH_Barrel, as both objects contain rigid physics bodies that will not allow for penetration; thus, no overlapping. The process that will follow Event hit is nearly identical. We will be taking the other output pin from Event hit which is a reference to the offending actor and checking to see if it is of type barrel. If this is true, we can destroy our character! The required functionality can be seen here:

All we have left to do is set the value of that spawnTransform variable when our character is created for the first time. To do this, all we have to do is get the game mode in our BH_Character, cast it to BH_Gamemode, and then set the spawnTransform variable to the transform of the BH_Character. Do all of this when event beginPlay is hit, and you can ensure that the transform specified is that of the first spawn location. You can see the required functionality here:

Now, run the project and enjoy the base game of what is Barrel Hopper!!