
We are going to be creating our first UE Character. To construct our character, we will create a new Blueprint that inherits from the UE4 UCharacter class. UCharacters are designed to be possessed and controlled by various controllers while utilizing UE character movement and physics backend. As UCharacter is at the bottom of the UObject hierarchy, it is the most developed of the objects, inheriting all of the parent object's public or protected functionality. The relationship between UCharacters and the engine will be described in more detail in Chapter 4, Unreal Engine, C++, and You.
Before we create the character, we need to set up our file hierarchy in the Content Browser so that our assets are organized in a logical manner. To create folders simply right-click on the folder hierarchy on the left-hand side of the Content Browser panel and select New Folder. Create a folder now titled Barrel_Hopper, and within that folder, create one titled Character. Every time we make a new category of object, it is a good idea to add a folder in the content browser that will let you group assets together that are associated with that category of object. You should have a hierarchy that looks similar to this:

To create the character blueprint, select the newly created character folder and right-click within the large area in the center of the panel. This opens up a menu of objects that we could create within this folder as new content. Click on the Blueprint option now. This will open the blueprint creation wizard; from here, you can select which class you would like to inherit from to create the Blueprint. For our purposes, we wish to create a character so select the Character option. This will create a new blueprint within our Character folder, name this character BH_Character. If is not already, open this blueprint now.
As you can see our BH_Character blueprint is void of any functionality and only has a few components. The Capsule component will act as the root component and will be used as the colliding volume for the character. The Arrow component is an in editor tool that shows us which way our character's forward vector points while being placed in a scene. The Mesh component is used to visually represent our character; at the moment, we have no mesh specified so nothing is shown.
Finally, the last component present is the CharacterMovement component. This component is responsible for all character movement and the variables that dictate how the character will move through the 3D world. You will also note that all of these components are specified as inherited that is because these components exist in the UCharacter code created base class that our new BH_Chracter blueprint inherits from.
I would strongly suggest looking at the Details panel each time you encounter a new component so that you may better understand the workings of the component and how you can manipulate it for your needs. Do this now for the CharacterMovement component; we will be changing a few of these variables later. As you can see, we have the ability to set the walking speed of the character, how much gravity affects the character, and other movement based variables.
Currently, we only have a shell for a character that we need to fill to fully realize our
Barrel Hopper Character! The first thing we need to do is attain the assets that we require to visualize and later animate our character. To do this, we are going to transfer some of Unreal Engine's provided content to our blank project. While keeping our current project open, create another new blueprint project. This time we want to create a project from the Side Scroller template. We are going to be migrating their mannequin assets to our current content folder. To do this, we need to navigate to the folder we wish to migrate from the new Side Scroller project via the Content Browser.
In our case, we need to navigate to Content | Mannequin. Right-click on the Mannequin folder and choose the migrate option. This will prompt you to select the content folder you wish to migrate these assets too. Direct this path to the content folder of our Barrel Hopper project. Your content folder should be located at (Project Directory) BarrelHopperContent.
Once you have migrated the files, return to your original project to find that the migrated mannequin folder can be found within our content browser. Now, all we need to do is tidy up our content browser by moving around some of the assets. Under Mannequin | Character, there should be three folders Materials, Mesh, and Textures. Highlight these folders by shift clicking them, then click and drag the folders into our Character folder. You will be prompted to choose, copy, or move the folders; select the move option. We will be returning to our Mannequin folder to later retrieve the animation assets we require in Chapter 3, Advanced Blueprint, Animation, and Sound.
Now that we have the visual assets we require for our character, we can begin to construct our character blueprint. From within the Blueprint window for our BH_Character, select the Mesh component. In the Details panel, you will see a drop-down field for Skeletal Mesh. Using this drop-down field, select SK_Mannequin. You will see that, when the mesh is brought into our Character blueprint, the mesh sits too high within our capsule and is facing the wrong way.
You will also notice that the capsule is just too small for our new mesh. We could scale the mesh so that it fits within the capsule, but that will not always work. Instead, you can change the width and height of the Capsule component so that it encompasses the character mesh vertically and is roughly 1.5x wider than the chest of the character. In this instance, we only want our colliding volume to encompass the core body of the character, we do not require rough collision on body extremities such as arms. To do this, select the capsule component and adjust the Capsule Half Height and Capsule radius variables found under the Shape section.
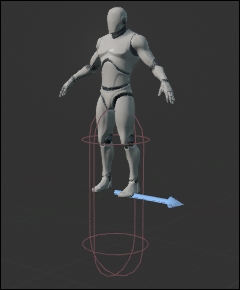
To fix the mesh displacement issue, select the Mesh component and use the transform widgets to bring the mesh down so that the heels of the feet are in line with the bottom of the capsule (~ -85cm on the z-axis) and rotate the mesh so that it is facing down the direction of the Arrow component. Your finished alignment should look something like this:

We need to add a camera to our character blueprint, so we can have our viewport update with our character's movements. This requires two new components—a Camera component that will act as the main camera for our game scene, and a SpringArm component that will be used to position the camera appropriately in 3D space. Add these two components to the Blueprint now. Ensure that they are child components of the Capsule component as we wish their positions to update relative to the capsule component. Also ensure that the Camera component is a child of the SpringArm component, as we will be using the spring arm to position and rotate the camera.
With the SpringArm component selected, check the Details Panel for the property titled Arm Length, and set this to 550cm now. As you can see, our camera is pushed back away from our character. We need to ensure our spring arm is positioned so that the camera will maintain a side on view as our character traverses the world. Pitching the camera up slightly as well will provide a better view of our level to the end user.
We can do this by setting variables in the Transform section of Details panel. Set the Y value (Pitch) of the transform Rotation property now to -2.5 now. Also, underneath arm length, there is a vector property titled Socket offset, set the Z component of this offset to be 75cm. This will displace the camera upwards along the z-axis. You will see something similar to this:

As you can see, from within the Blueprint Editor Viewport, our camera does not currently take a side on view of the Character. That is ok. In the world we are about to create, we need to ensure that the camera continues to look down the x-axis regardless of the character's current rotation. We will then limit the character's movement, so it can only move along the axis that is at right angles with the look direction of the camera. With both of these constraints in place, we will have a suitable side scrolling environment. To ensure that our camera does not rotate with our character, select the SpringArm component, within the Details panel for this component. Under the Camera Settings section, there are three checkboxes: inherit yaw, inherit pitch, and inherit roll. Uncheck all of these checkboxes and save the blueprint. We also need to ensure our character does not inherit its rotation from its owning controller. What controllers are and how to use them will be covered later in this book. For now, select BH_Character(Self) from the Components panel. Then within the Details panel, uncheck the property Use Controller Rotation Yaw; it can be found in the Pawn section.