
We have successfully created and integrated a power-up plugin and plugin module into our game project. Now we can utilize the functionality of this plugin to incorporate power ups in the Bounty Dash project. We are going to have to create a way for the power ups to spawn, collide, and affect the game state of the Bounty Dash character. Let's start by spawning the power ups.
Instead of creating a whole new spawner object for power ups, we can augment one of our previously created objects to incorporate power-up spawns. As our coin spawner already provides most of the functionality we require, we can modify this class. We are going to adjust this class so that every time a coin would be spawned, there is a chance that a random power up will be spawned in its place. We will start by modifying the class definition. Under the public section of the ACoinSpawner class definition found in CoinSpawner.h, add the following properties:
UPROPERTY(EditAnywhere)
TSubclassOf<class ABountyDashPowerUp> PowerUpObject;

UPROPERTY(EditAnywhere, meta = (ClampMin = "0.0", ClampMax = "100.0", UIMin = "0.0", UIMax = "100.0"))
int32 PowerUpChance;
The first is simply a TSubclassOf<class ABountyDashPowerUp> that will hold the type of ABountyDashPowerUp we created earlier. We are using this instead of ABountyDashPowerUp::StaticClass() to spawn our power ups in case we wish to extend ABountyDashPowerUp into different blueprint objects at some point.
The next property, PowerUpChance, is simply an int32 that will hold the percentage chance that any given coin to be spawned will be a power up instead. The interesting thing about this property is the meta data we have added to the UPROPERTY macro. First, we have exposed this value with EditAnywhere so that we may adjust this value from the editor. Second, we also included some new meta data that you will be unfamiliar with. Under the element meta, we have specified four values: ClampMin, ClampMax, UIMin, and UIMax.
These values represent the limits of the value when edited from the level editor. The Clamp values are used to set physical clamp limitations so that the user may not adjust the value of powerUpChance past 100 or below 0. The UIMin and UIMax values are used to restrict the value that is presented when adjusting the variable from the editor. If your UIMin or UIMax values are outside the bounds of your Clamp values, it will appear to the user that they may set greater or smaller values than allowed; however, in the backend, the value will still be clamped. The result of adding this meta data is that, instead of a textbox field presented to edit the value, we are given a slider! A slider that can be adjusted from 0 to 100.
Next, we need to add a function we can use to spawn power ups. Under the protected section of the class definition, add the follow function declaration:
void SpawnPowerUp();
We are simply going to use this to group and separate the power-up spawn functionality from that of the coin spawn functionality. Navigate to CoinSpawner.cpp now. The first thing we need to do is add #include "BountyDashPowerUp.h" to the include list at the top of CoinSpawner.cpp. Next, we must make a small edit to the SpawnCoin() function so that we can check whether a random number generated between 0 and 99 inclusive is less than the powerUpChance value. If so, we must spawn a power up instead of a coin.
Now, modify the code of ACoinSpawner::SpawnCoin() to match the following:
if (FMath::Rand() % 100 < PowerUpChance)
    {
        SpawnPowerUp();
        NumCoinsToSpawn--;
    }
    else
    {
        FActorSpawnParameters spawnParams;

        FTransform coinTransform = SpawnTransforms[TargetLoc]->
        GetTransform();

        coinTransform.SetLocation(FVector(SpawnPoint, coinTransform.GetLocation().Y, coinTransform.GetLocation().Z));


        ACoin* spawnedCoin = GetWorld()->
        SpawnActor<ACoin>(CoinObject, coinTransform, spawnParams);

        if (spawnedCoin)
        {
            spawnedCoin->SetKillPoint(KillPoint);

            USphereComponent* coinSphere = Cast<USphereComponent>(spawnedCoin->
            GetComponentByClass(USphereComponent::StaticClass()));

            if (coinSphere)
            {
                float offset = coinSphere->
                GetUnscaledSphereRadius();

                spawnedCoin->
                AddActorLocalOffset(FVector(0.0f, 0.0f, offset));
            }

            NumCoinsToSpawn--;
        }
    }

    if (NumCoinsToSpawn <= 0)
    {
        FTimerManager& worldTimeManager = GetWorld()->
         GetTimerManager();

         worldTimeManager.SetTimer(CoinSetTimerHandle, this, &ACoinSpawner::SpawnCoinSet, CoinSetTimeInterval, false);

        worldTimeManager.ClearTimer(CoinTimerHandle);
    }
As you can see, we have made adjustments so that every time a coin would be spawned, a quick check is carried out (FMath::Rand() % 100 < powerUpChance). This checks whether the mod 100 of a random number is less than powerUpChance. This will push the value generated between a range of 0 and 99. If this is resolved to true (and the generated number is within our generation percentage chance), we need to call SpawnPowerUp().
Next, we need to define the SpawnPowerUp() method. This function will be similar to the other spawn functions we have created thus far. Add the following code to CoinSpawner.cpp:
void ACoinSpawner::SpawnPowerUp()
{
    FActorSpawnParameters SpawnInfo;

    FTransform myTrans = SpawnTransforms[TargetLoc]->
    GetTransform();

    myTrans.SetLocation(FVector(SpawnPoint,
    myTrans.GetLocation().Y, myTrans.GetLocation().Z));

    ABountyDashPowerUp* newObs = GetWorld()->
    SpawnActor<ABountyDashPowerUp>(PowerUpObject, myTrans,
    SpawnInfo);

    if (newObs)
    {
        newObs->SetKillPoint(KillPoint);

USphereComponent* powerUpSphere = Cast<USphereComponent>(newObs->
GetComponentByClass(USphereComponent::StaticClass()));

        if (powerUpSphere)
        {
            float offset = powerUpSphere->
GetUnscaledSphereRadius();

            newObs->AddActorLocalOffset(FVector(0.0f, 0.0f,
offset));
        }
    }
}Now we can compile this code and build the project again. Before we play the project, we need to make some edits to the Coin Spawner that exists in the level. Select the Coin Spawner from the World Outlier and navigate to the Details panel found on the right-hand side of the level editor. Ensure that the details under the Coin Spawner section of the panel match the following:
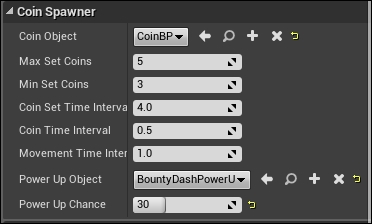
As you can see, we have set the PowerUpObject property to BountyDashPowerUp and we have set the PowerUpChance to 30 using the slider we included through the UPROPERTY macro. This power-up chance is very high and should be reduced to 10, but we will leave it high for now so we can test that the power ups will actually spawn.
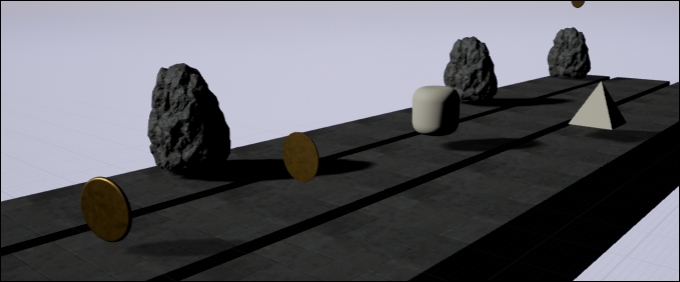
Now we can run the game! What I would suggest doing is pausing the play session as soon as you can by selecting the Pause button in the Toolbar Panel, then eject from the character by pressing the Eject button in the same panel. Move your now free camera to the end of the track where the power ups will be spawning, and watch as power ups begin to spawn and travel down the map!
Now that our power ups are spawning and traveling down the game field, we can add the collision functionality that we require for the power ups. The first thing we need to do is add a short function to the ABountyDashCharacter class definition. Navigate to the BountyDashCharacter.h and add the following line to the public section of the class definition:
void PowerUp(EPowerUp Type);
As we are referencing the enum type in our plugin, we must also add #include "PowerUpObject.h" to the include list of BountyDashCharacter.h.
Then navigate to BountyDashCharacter.cpp and add a blank definition for this function, as follows:
void ABountyDashCharacter::PowerUp(EPowerUp Type)
{

}
We have added this now as we will be calling this function from the MyOnActorOverlap function found within ABountyDashPowerUp. Let's finish the definition for that function now. Navigate to BountyDashPowerUp.cpp and add the following code to the MyOnActorOverlap definition:
if (otherActor->GetClass()->IsChildOf(AObstacle::StaticClass()))
{
    USphereComponent* otherSpehre = Cast<USphereComponent>(otherAct or->
    GetComponentByClass(USphereComponent::StaticClass()));

    if (otherSpehre)
{
        AddActorLocalOffset(FVector(0.0f, 0.0f, (otherSpehre->
        GetUnscaledSphereRadius()) + Collider->
        GetUnscaledSphereRadius() * 2));
    }
}
Here, we are simply performing the same obstacle collision check we perform on the ACoin object to ensure that no power ups are spawned clipping into a spawned obstacle. Next, we need to add the code to this function that will detect collisions with the ABountyDashCharacter. If this happens, we need to inform the character of this collision and pass the correct power-up type to the characters so that we may change the state of that character appropriately. Add the following code to the function now:
if (otherActor->GetClass()->
    IsChildOf(ABountyDashCharacter::StaticClass()))
    {
        ABountyDashCharacter* thisChar = Cast<ABountyDashCharacter>(o therActor);

        if (thisChar)
        {
            thisChar->PowerUp(PowerUp->GetType());
            GetWorld()->DestroyActor(this);
        }
    } // <- closing ABountyDashPowerUp::MyOnActorOverlap()
Here, we are simply checking whether the offending overlapping actor is a child of ABountyDashCharacter (or is of that type). If so, we are going to inform the offending character that they just collided with a power up by passing the type of the UPowerUpObject contained within ABountyDashPowerUp to the PowerUp() method we created earlier. We then destroy this power up as it is no longer needed in the game world. Along with this code, also add #include"Obstacle.h" and #include BountyDashCharacter.h to the include list for BountyDashPowerUp.cpp. Now we can write the code that will power up our character!
We need to augment the ABountyDashCharacter to support power ups. There are three different types of power up that we have listed in the EPowerUp enum class—SPEED, SMASH, and MAGNET. We need to create three different sets of functionality that can accommodate for these three power-up types:
SPEED: The game speed will reduce so that the player may balance out game speed as they pick up coins. The game speed cannot slow down past the speed that is set at the beginning of the game.SMASH: The character will be able to literally smash through any of the obstacles set in their path. We will be leveraging the Destructible Mesh capabilities of Unreal Engine to create this effect.MAGNET: Coins in all lanes will attract the character so that the player no longer has to manually collide with the coins to pick them up.
The last two power ups should only last for a certain amount of time so that the game does not become too easy. Let's start by modifying the class definition to accommodate for this new power-up functionality. Add the following properties to the protected section of the ABountyDashCharacter class definition:
// Smash Time
    UPROPERTY(EditAnywhere, Category = PowerUps)
    float SmashTime;

    // Magnet Time
    UPROPERTY(EditAnywhere, Category = PowerUps)
    float MagnetTime;

    UPROPERTY(EditAnywhere, Category = PowerUps)
    float MagnetReach;
We have exposed all of these properties to the editor so that we may tweak the values of these power-up properties in the editor. The first two will dictate how long the smash and magnet power ups last. The last property will dictate the radius around the player within which coins will attract. Next we need to add the Boolean flags that we can check against to see which power ups are active. Add the following private members to the ABountyDashCharacter class definition now:
// Power up properties
bool CanSmash;
bool CanMagnet;
Finally, we need to add two short functions that we will call via two new timers. Add the following protected functions to the ABountyDashCharacter class definition now:
UFUNCTION()
void StopSmash();

UFUNCTION()
void StopMagnet();
Let's start with the simplest power up, reducing the game speed. This power up will reduce the game speed by the same amount it is increased by when the coin limit is reached. To accommodate for this power up, we have to add a short function to the ABountyDashGameMode. Navigate to BountyDashGameMode.h now. Under the public section of the class definition, add the following function:
void ReduceGameSpeed();
Then navigate to BountyDashGameMode.cpp. We are going to be adding a definition for this function with the following:
void
ABountyDashGameMode::ReduceGameSpeed()
{
    if (gameSpeed > 10.0f)
    {
        gameSpeed -= gameSpeedIncrease;
        gameLevel--;
    }
}
This function simply ensures that the game speed is currently greater than that of the game speed at game start (10m/s). If so, we will reduce the game speed by gameSpeedIncrease. This means that the player will be able to balance these power ups with the amount of coins picked up to mediate the game speed. We also reduce the gameLevel variable for later use in animation.
With this small method in place, we can now flesh out the PowerUp() function we created in the character earlier. Navigate to BountyDashCharacter.cpp and find the empty ABountyDashCharacter::PowerUp() function definition. Modify this function definition so it appears as follows:
void ABountyDashCharacter::PowerUp(EPowerUp Type)
{
    switch (Type)
    {
    case EPowerUp::SPEED:
    {
        GetCustomGameMode<ABountyDashGameMode>(GetWorld())->
        ReduceGameSpeed();
        break;
    }
    case EPowerUp::SMASH:
    {
        CanSmash = true;

        FTimerHandle newTimer;
        GetWorld()->GetTimerManager().SetTimer(newTimer, this,
        &ABountyDashCharacter::StopSmash, SmashTime, false);

        break;
    }
    case EPowerUp::MAGNET:
    {
        CanMagnet = true;

        FTimerHandle newTimer;
        GetWorld()->GetTimerManager().SetTimer(newTimer, this,
        &ABountyDashCharacter::StopMagnet, MagnetTime, false);

        break;
    }
    default:
        break;
    }
}
Here, we have implemented a switch case based off of the type of power up that has been collided with. As you can see, if the power up is of type SPEED then we will call the function we just created in the ABountyDashGameMode through the GetCustomGameMode() function. If the power up is of time SMASH or MAGNET, we simply set the CanMagnet or CanSmash Booleans to true, and set a timer that will execute our stop functions after the given time period. Now add the following function definitions to BountyDashCharacter.cpp:
void ABountyDashCharacter::StopMagnet()
{
    CanMagnet = false;
}

void ABountyDashCharacter::StopSmash()
{
    CanSmash = false;
}
All we need to do now is check on these logical values during the characters Tick() and enact the appropriate power-up functionality.
To make the coin magnet, we are going to have to check every frame that we should still be pulling coins towards the character. If so, we need to iterate through all of the coins and interpolate the coin position towards that of the player. Start by adding the following function declaration to the ABountyDashCharacter class definition under the protected section:
// Power up functions
void CoinMagnet();
We also need to add a new member to the ACoin object class definition. Navigate to Coin.h now and add the following member to the class definition:
public:
bool BeingPulled;
This flag is going to be used when checking for coin collisions with obstacles, as we do not wish for the coin to adjust position when being pulled. Therefore, we must also modify the MyOnActorOverlap() function in Coin.cpp. Modify the first if statement in ACoin::MyOnActorOverlap so that it matches the following:
void ACoin::MyOnActorOverlap(AActor* otherActor)
{
    if (otherActor->GetClass()->
    IsChildOf(AObstacle::StaticClass()) && !BeingPulled)
    {
With these changes in place, we can finish our modifications to ABountyDashCharacter. Navigate to BountyDashCharacter.cpp and add the following code to ABountyDashCharacter::Tick():
    if (CanMagnet)
    {
    CoinMagnet();
    }
This will simply check against the Boolean flag we declared earlier and execute the CoinMagnet functionality if it resolves to true. Now we must define the CoinMagnet() function. Add the following to ABountyDashCharacter.cpp:
void ABountyDashCharacter::CoinMagnet()
{
    for (TActorIterator<ACoin> coinIter(GetWorld()); coinIter;
        ++coinIter)
    {
        FVector between = GetActorLocation() - coinIter->
        GetActorLocation();

        if (FMath::Abs(between.Size()) < magnetReach)
        {
            FVector CoinPos = FMath::Lerp((*coinIter)-> GetActorLocation(), GetActorLocation(), 0.2f);

          (*coinIter)->SetActorLocation(CoinPos);
          (*coinIter)->BeingPulled = true;
        }
    }
}
This function iterates through all of the active coins within the current level through a TActorIterator of type ACoin. We will increment this iterator with each iteration of the for loop. This will traverse across all active ACoins until the iterator becomes invalid. For each ACoin found, we check whether the ACoin is within the magnet pull radius of the character. If so, we then interpolate the ACoin position towards the character through FMath::Lerp(). We then set the position of the ACoin by de-referencing the ACoin iterator, thus exposing the actual ACoin handle, then using SetActorLocation(), passing the interpolated coin position as the input. We then set the BeingPulled flag we created earlier to true. As we just referenced the ACoin object, be sure to add #include "Coin.h" to the include list of the BountyDashCharacter.cpp.
Before we go on to create the smash power-up functionality, now is a good time to compile and run the new code we just implemented!
The next power-up type, SMASH, is going to require a new Unreal Engine feature we have yet to work with and that is the Destructible Mesh feature supported by the PhyX integration featured in UE4. We are also going to have to adjust the AObstacle object to accommodate for a Destructible Mesh instead of a standard static mesh. Let's start by creating our very own Destructible Mesh!
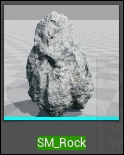
In the UE4 level editor, use the Content browser to navigate to the location of the obstacle Mesh. It will be located under Content/StarterContent/Props/SM_Rock or simply search for SM_Rock. You will be presented with the following asset:
Right-click this thumbnail in the content browser and select Create Destructible Mesh:

This will create a new Destructible Mesh SM_Rock_DM and open up the Destructible Mesh editor. This is fairly simple and does not require much of an explanation, and appears as follows:
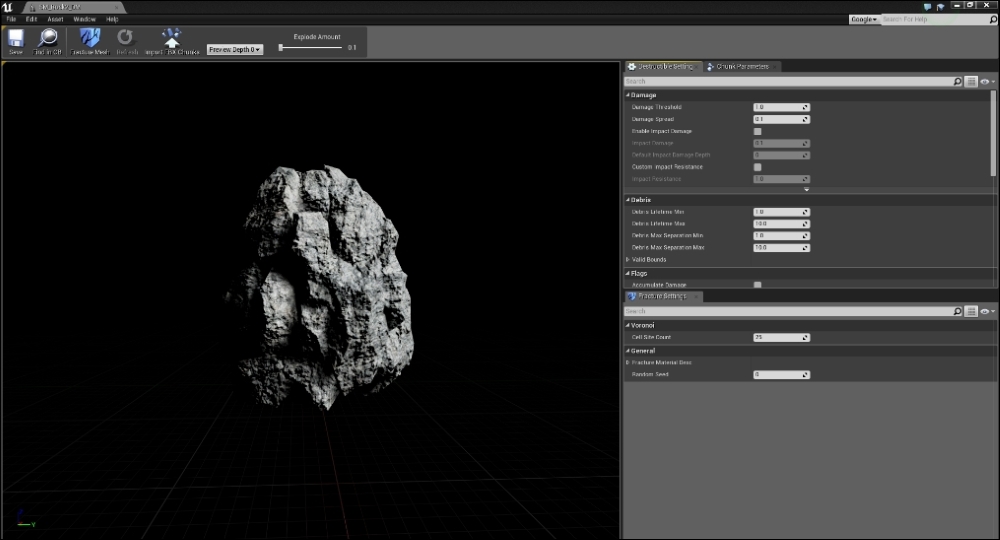
As you can see, it boasts a Viewport to preview the state of the Destructible Mesh, and a
Toolbar with options that allows you to perform actions on the Destructible Mesh. On the right-hand side of the editor, you are presented with the Destructible Mesh Settings panel. It is here where you can set the various properties of the Destructible Mesh such as Damage Threshold, Damage Spread, and, if you are to, Enable Impact Damage. Underneath this panel, we have the Fracture Setting Panel. This panel is used to determine how many pieces the Destructible Mesh will smash into and how the material of the Mesh will apply to the split chunks.
For our Mesh, we need a few of these settings to be changed from the default. First, ensure that the Damage section of the Destructible Setting Panel matches the following (for the key differences, look for the small arrows):
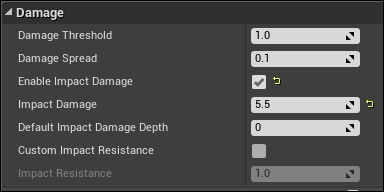
The previous settings will ensure that when the Mesh receives a damage value greater than 1, it will shatter. We have also enabled impact damage, meaning if the Mesh is hit by something with force, it will suffer impact damage. We have then set the Impact Damage value to 5.5. These two settings are important as we can only shatter a Destructible Mesh by applying damage to the Mesh. We then need to ensure the Mesh will fracture properly by adjusting the Fracture Settings panel to the following:
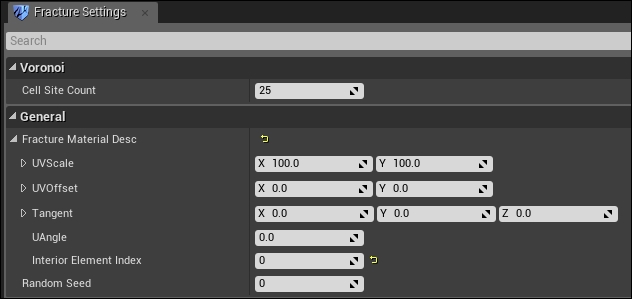
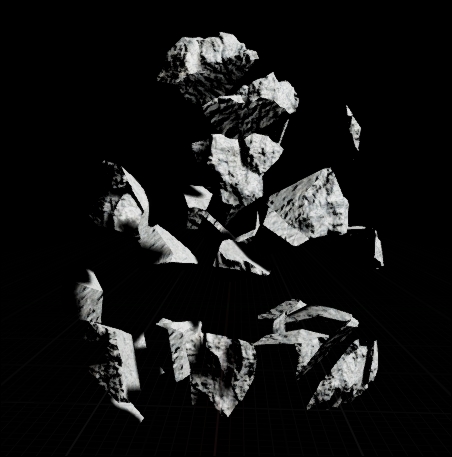
This arrangement of settings will have the Mesh split into 25 different chunks. We then want these chunks to use the first material index for their interior material, as can be seen by the property Interior Element Index, which is set to 0. Test these settings all work, and address the Toolbar at the top of the editor. Press the Fracture Mesh button now. This will create the appropriate fracturing for the Mesh. You are able to preview the Mesh fracture by adjusting the Explode Amount slider, also featured in the toolbar. When you are done, you should see something similar to the following:
Congratulations! You just created your first destructible Mesh in UE4! We can now modify our AObstacle class. Because we abstracted all of the base functionality out of AObstacle earlier, we are able to make drastic changes to this object without worrying about the flow-on effects it will have on other objects. Navigate to the Obstacle.h file now. We are going to be replacing the UStaticMeshComponent handle for a UDestructibleComponent handle, and adding a get method for this destructible component. Modify for the class definition of AObstacle now so it matches the following:
UCLASS(BlueprintType)
class BOUNTYDASH_API AObstacle : public ABountyDashObject
{
    GENERATED_BODY()
public:
    // Sets default values for this actor's properties
    AObstacle();

    UDestructibleComponent* GetDestructable();

protected:
    UPROPERTY(EditAnywhere)
    UDestructibleComponent* Mesh;
};
We then need to modify the AObstacle constructor slightly to accommodate this change. Navigate to Obstacle.cpp and adjust AObstacle::AObstacle() to match the following:
// Sets default values
AObstacle::AObstacle()
{
    // Set this actor to call Tick() every frame.  You can turn this off to improve performance if you don't need it.
    PrimaryActorTick.bCanEverTick = true;

    Mesh = CreateDefaultSubobject<UDestructibleComponent>(TEXT("Me sh"));
    check(Mesh);

    Mesh ->AttachTo(Collider);
    Mesh ->SetCollisionResponseToAllChannels(ECR_Ignore);
}
As you can see, we initialize the UDestructibleComponent in exactly the same way as other components. We also need to add a definition for the getter method we have declared for the UDesctructibleComponent:
UDestructibleComponent* AObstacle::GetDestructable()
{
return Mesh;
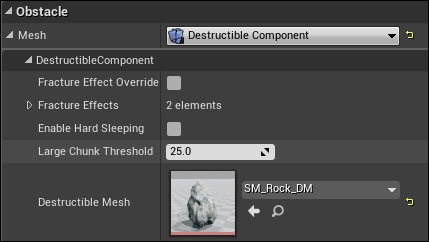
}The last thing we need to do to finish our adjustment of the AObstacle object is modifying the RockObstacleBP we created earlier and setting the destructible component to SM_Rock_DM. Do this now by navigating to and opening RockObstacleBP. In the Components Panel, select the Mesh(inherited) element, then address the Details Panel. Navigate to Mesh | DestructibleComponent, adjust the Destructible Mesh property so that it is populated with SM_Rock_DM, like so:
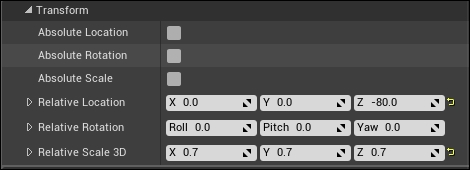
Ensure that the new Destructible Mesh is positioned correctly within the Viewport so that it assumes the same position and scale as the old static Mesh. I used the following transform settings:
We are now done modifying our AObstacle! The next thing we need to do is add the functionality to ABountyDashCharacter to shatter the Destructible Mesh upon impact!
To actually shatter the destructible mesh, we need to modify ABountyDashCharacter::myOnComponentOverlap. We will still perform the same angle of impact check we were doing previously; however, if it resolves to true, we also need to check whether the character can currently smash. If so, destroy the Mesh of the obstacle we just encountered; if not, simply set bBeingPushed to true. Modify the appropriate section of ABountyDashCharacter::myOnComponentOverlap() to match the following:
if (AngleBetween < 60.0f)
{
AObstacle* pObs = Cast<AObstacle>(OtherActor);
if (pObs && CanSmash)
{
pObs->GetDestructable()->ApplyRadiusDamage(10000, GetActorLocation(), 10000, 10000, true);
}
else
{
bBeingPushed = true;
}
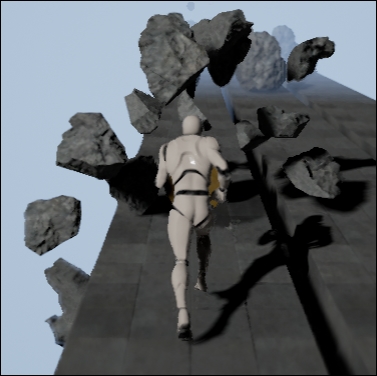
}Here, you can see that if the other offending actor is successfully cast to an AObstacle, we also check whether the character can smash. If so, we get the destructible component from the offending AObstacle through the getter method GetDestructible(). With this reference, we then call ApplyRadiusDamage() on it. This function takes in a base damage value, a damage origin, a damage radius, an impulse force amount, and whether the full damage will be received. We have set all the damage parameters to large values to ensure a shattering of the mesh takes place. For the location of the damage, we have simply provided the location of the ABountyDashCharacter. This function will apply damage to the destructible mesh with the parameters provided. The resultant effect will be the obstacle exploding around the character when they run through it!
Now it is time to test that this works! You may either play Bounty Dash until a smash power up spawns to test the functionality, or temporarily remove the canSmash check so that the Destructible Mesh is always shattered. I prefer the second option. Build and run the code now, then play the game. You should have an effect that is similar to this:
We are done implementing our power ups! Awesome work! Take a quick break and enjoy playing around with power-up spawn frequencies and timers to fine-tune the gameplay of BountyDash. The next thing we are going to be doing is creating our very own HUD class!