
Chapter 8: Using MetaHuman to Create a Photorealistic Human for UE5
In the previous chapter, you learned how to import your assets into UE5. Then, you learned how to create materials and assign them to your assets.
In this chapter, you will learn how to create a photorealistic human character for UE5 by using the free cloud-based app from Epic called MetaHuman Creator.
MetaHumans are essentially digital humans (photorealistic 3D models of humans). The MetaHuman Creator app allows you to customize the facial features of the digital human you are creating. Furthermore, you can choose from a selection of body shapes, facial textures, and hairstyles and select between three sets of clothing and accessories.
Note that, at the time of writing, the MetaHuman Creator app is still in development.
I expect that when the full release version of MetaHuman becomes available, it will have a lot more outfits, accessories, and hairstyles to choose from. This will allow you to create even more variety in your characters.
In this chapter, we will explore the MetaHuman app's UI, as well as its basic navigation and functions, before moving on to a practical step-by-step tutorial to show you how to create a female sci-fi-style character that would play the role of the main character in your 3D movie.
I will show you how to import your newly created sci-fi character into UE5, assign materials to it, and assign sci-fi armor to her body.
In this chapter, we're going to cover the following main topics:
- What is MetaHuman Creator?
- Creating a photorealistic female sci-fi character
- Adding your MetaHuman to Unreal Engine 5
- Customizing your character's clothing
By the end of this chapter, you will be able to create a photorealistic human character for use in UE. You will also know how to customize the character's clothes so that they match the theme of your 3D movie.
In the next section, we will take a more in-depth look at what the MetaHuman Creator app is.
Technical requirements
You will need the following technical skills and software to complete this chapter:
- A computer that can run basic 3D animation software.
- You need to have installed Unreal Engine 5.0.1. You can download it from https://www.unrealengine.com/en-US/download.
- For the MetaHuman Creator app, you will need an internet connection with a Chrome, Edge, Firefox, or Safari-based web browser. You will also need a computer with Windows 10 (or higher) that supports DirectX 12 or a macOS operating system and a ray-tracing capable NVIDIA graphics card to access the MetaHuman Creator cloud-based app.
- You must have a basic understanding of how to navigate the Unreal Engine 3D user interface. If you skipped ahead, then don't worry – this was covered in Chapter 6, Exploring Unreal Engine 5.
The files related to this chapter are placed at https://github.com/PacktPublishing/Unreal-Engine-5-Character-Creation-Animation-and-Cinematics/tree/main/Chapter08
What is MetaHuman Creator?
MetaHuman Creator is a free cloud-based app that's used for creating photorealistic human characters.
At the time of writing, this app does not allow you to create young people yet, but you might be able to create young people in the full release version.
This app is made by Epic, the creator of UE. All the MetaHuman characters that the app creates are fully compatible with UE5. The MetaHuman app runs in your internet browser window.
The app gives you fine controls to customize your MetaHuman's face. At the time of writing, a small number of options are available for the body shapes, hairstyles, and clothes. For the clothes and accessories, we currently only have a choice between three varieties of tops, bottoms (pants/trousers), and shoes.
Despite the current minor limitations, this app is the best tool that's available for creating photorealistic adult humans.
With that, you've learned what MetaHuman Creator is. In the next section, we will learn how to gain access to the MetaHuman Creator app.
For more information about MetaHumans, please take a look at the official UE5 documentation: https://docs.metahuman.unrealengine.com/en-US/overview/.
Getting access to MetaHuman Creator
Since MetaHuman Creator is in early access at the time of writing, you need to request access from Epic. Follow these steps to do so:
- Go to https://www.unrealengine.com/en-US/metahuman-creator. On the page that opens, scroll down a bit and click on the link/button that says Request Early Access.
- When you click on the link, it will take you to a page where you can log into your Epic Games Account.
- You will be notified by email as soon as you've been granted access to the MetaHuman Creator app.
- Once you've been granted access, simply go to the following website to start using the MetaHuman Creator app: https://metahuman.unrealengine.com/.
In this section, you learned how to gain access to the MetaHuman Creator cloud-based app.
In the next section, we will launch the MetaHuman Creator app and explore the MetaHuman Preset Selection screen.
Launching MetaHuman Creator
It will take a few minutes to launch the MetaHuman Creator cloud-based app and open your session.
At the time of writing, MetaHuman allows users to access the app for a maximum session time of 1 hour. Once this session time has expired, you can request as many new sessions as you want. The time limit (of 1 hour per session) will still apply for any new sessions.
When the MetaHuman app finally launches, it will open the MetaHuman Preset Screen in your browser window. You will see something similar to the following:
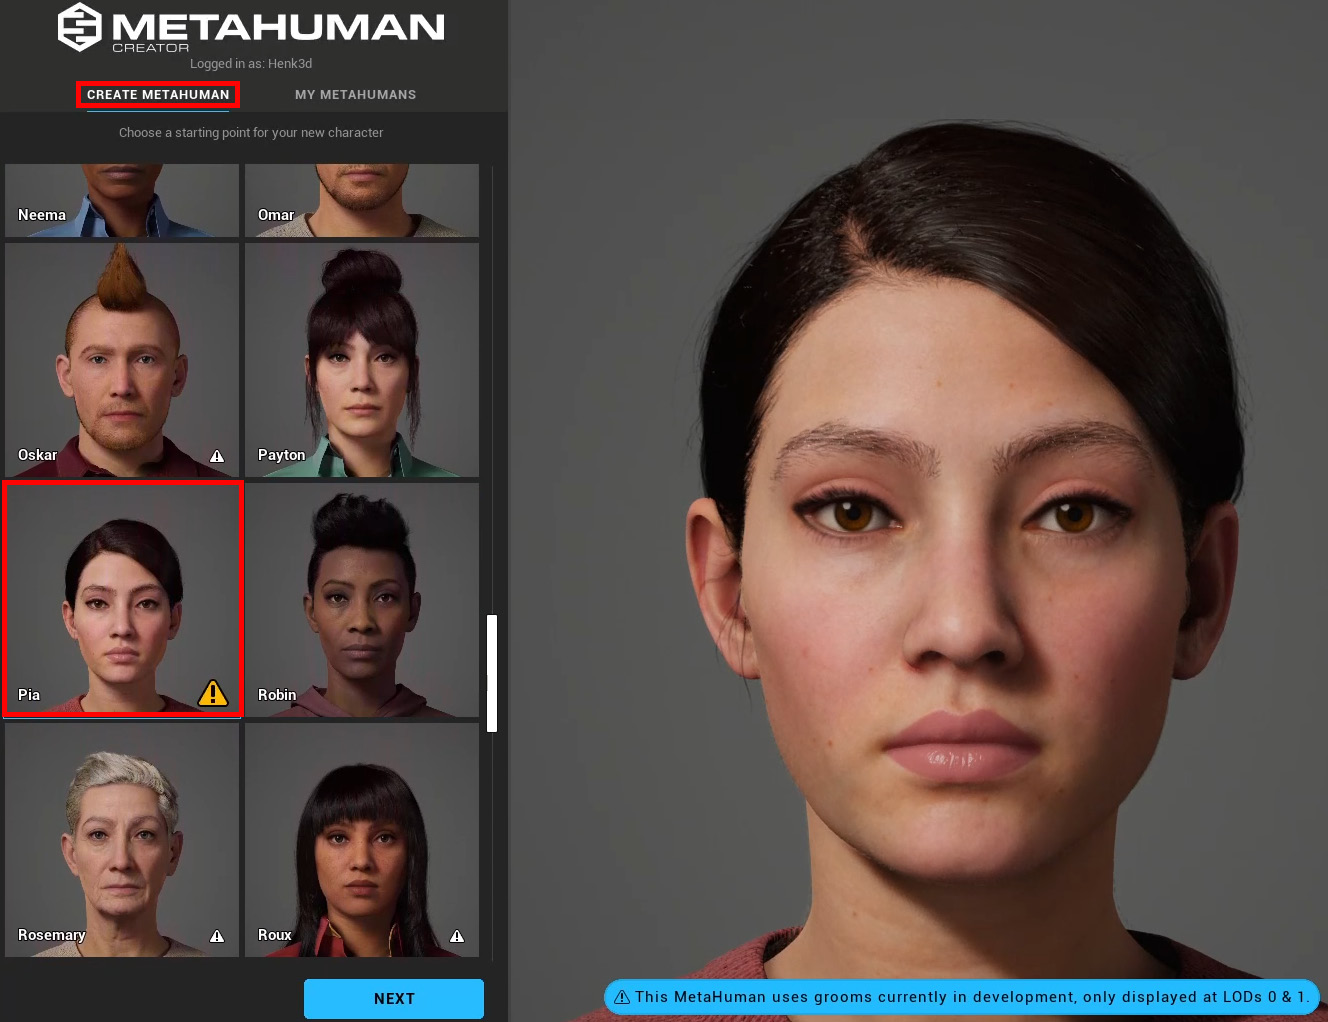
Figure 8.1 – The MetaHuman preset screen
Using the preceding screenshot as a reference, you will see that there are two headings below the MetaHuman tile, as follows:
- CREATE METAHUMAN: This option gives you a selection of MetaHuman presets that you can choose from to use as a starting point for creating your own MetaHuman. On the left-hand side of the screen, you will see the Character Preset pane, which contains many MetaHuman portraits, and a scrollbar on the right-hand side.
- MY METAHUMANS: This option will show you any MetaHumans that you've created previously.
Let's get started with our tutorial:
- Select the CREATE METAHUMAN option, as shown in the preceding screenshot.
- Use the scrollbar to scroll down the selection of MetaHuman portraits. Then, click on the portrait of the female named Pia, who is shown in the highlighted portrait in the preceding screenshot. She will serve as the starting point for the female sci-fi character for your 3D movie.
- Click on the Next button. When you click on this button, it will launch MetaHuman Creator in Edit Mode so that you can customize the preset character that you selected in Step 2.
Note
If you wish to experiment with some of the MetaHumans, you can select any of the other MetaHuman preset characters by clicking on a character portrait in the character preset pane, as shown in the preceding screenshot. Once you are in Edit Mode, you are free to tweak and navigate the character model to get a better idea of how this app works. Then, select the Pia female character (as your starting point for this tutorial) and return to this point.
You have just learned how to launch the MetaHuman Creator app and select a preset character that will serve as your starting point for your own MetaHuman.
In the next section, we will look at the user interface and basic controls of MetaHuman Creator.
MetaHuman's UI
Now that the MetaHuman Creator app has been launched with your preset character in Edit Mode, you will see a screen that looks similar to the following:
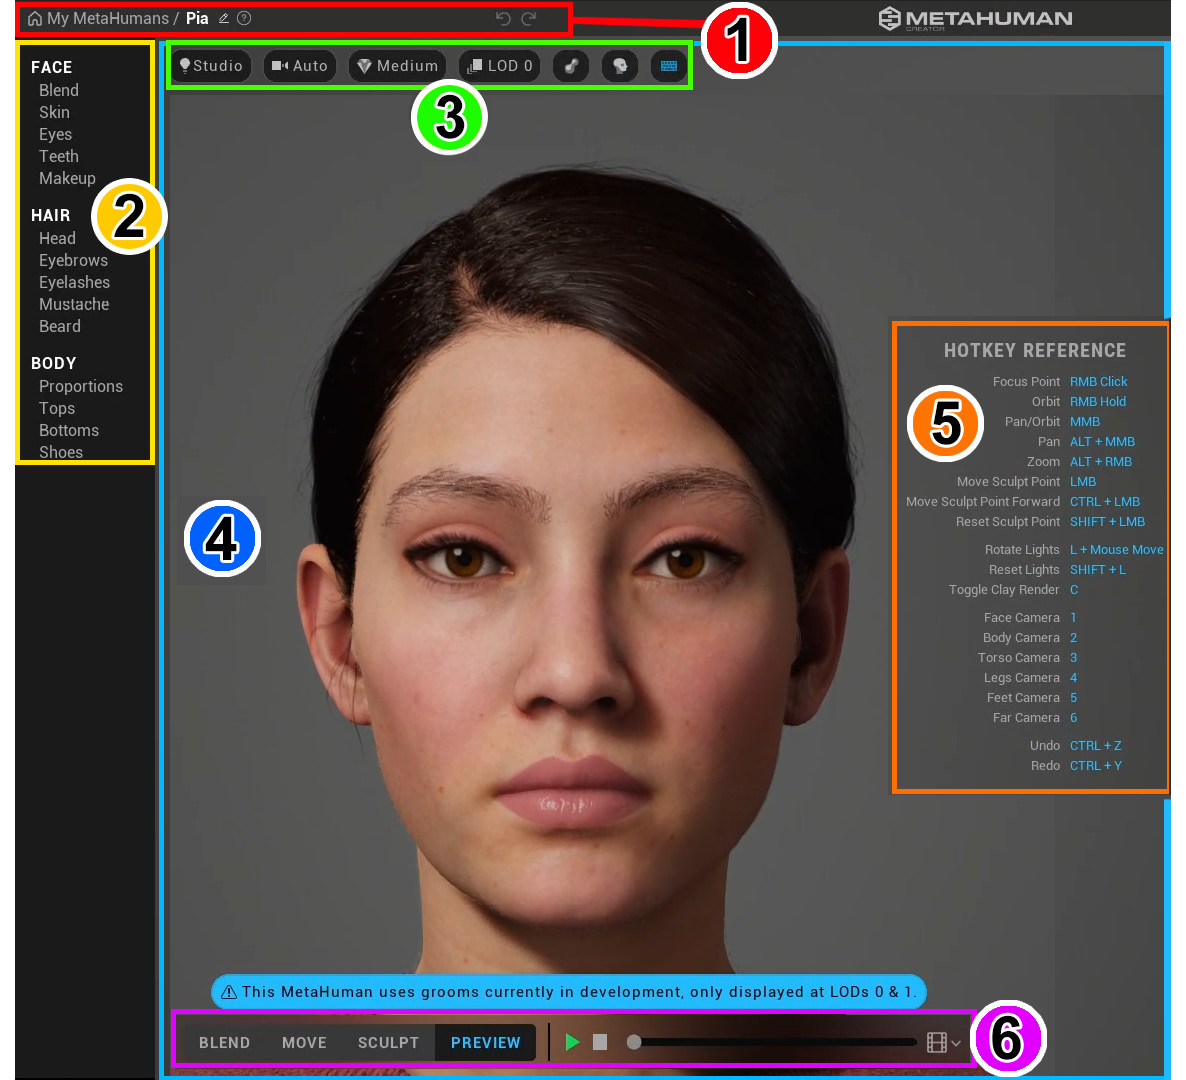
Figure 8.2 – MetaHuman Creator's user interface regions
Here, you can see that the UI regions are highlighted and numbered for explanation purposes. Let's go over these numbered regions now:
- Title bar: This UI region contains a link to return to the My MetaHumans gallery. On the right of this link, there is the option to edit your character's name. Then, there are icons for Help, Undo, and Redo.
- Attributes and Properties selection: Here, you will find all the customizable attributes for your MetaHuman. These attributes are divided into three groups – Face, Hair, and Body. Each of these attributes can be customized by changing its properties.
- Viewport Environment and Quality toolbar: This menu bar contains various controls. Starting from the left-hand side, the options are as follows:
- Studio (Lightbulb icon): This allows you to choose between various image-based environment lighting options.
- Auto (Camera icon): This allows you to change the camera focus to view a specific part of the character.
- Medium (Diamond icon): This provides options to choose between rendering quality settings.
- LOD 0: This is the level of detail (LOD) controls – you do not need to change anything here, but make sure it stays on LOD 0.
- Toggle Clay Material icon: This will toggle the display of your MetaHuman in gray.
- Head icon: This toggle will hide or unhide the hair.
- Keyboard icon: This toggles whether the hotkey reference (keyboard shortcut list) is displayed (see Region 5).
- Render preview of your MetaHuman: This is the viewport where you can see what your MetaHuman looks like as you make changes to it and preview it in real time.
- Hotkey Reference panel: This displays a list of keyboard and mouse shortcuts for easy reference. The keyboard icon (in the menu bar of Region 3) will toggle the display of this list.
- Viewport Sculpting and Animation toolbar: This menu bar has toggle buttons for three different Viewport sculpting tools. These tools allow you to edit facial geometry. These tools are Blend, Move, and Sculpt. We will go over these in more detail in the next section.
The Preview button allows you to preview your Viewport sculpting edits in real time with animations. There are buttons to Play, Stop, and Scrub through animations. At the end of this menu bar is a Film Frame icon, which allows you to select different preview animations for the face and body.
You have just learned about the UI and the keyboard shortcuts for MetaHuman Creator.
In the next section, I will take you through the step-by-step process of customizing your MetaHuman preset character so that your new character will become unique.
Creating a photorealistic female sci-fi character
Now that you have the MetaHuman Creator app open, and Pia has been loaded as your preset character, we can start the editing (customization) part of this tutorial:
- You will notice that, by default, your character is moving around. In the Viewport Sculpting and Animation toolbar (Region 6 of Figure 8.2), click on the Stop icon (square) to stop the animation.
- The first thing we want to do is establish the proportions of the female sci-fi character that we will create for your 3D movie. In Region 2 of Figure 8.2, you will see a list of all the adjustable attributes and properties that you can edit for your MetaHuman. In the Body section of this list, click on Proportions to open the Proportions menu.
- The default Pia preset character has her proportions set to Short (height) and her body weight set to Normal. Let's change her proportions so that she's Average height, while still keeping her body weight set to Normal, as shown in the following screenshot:
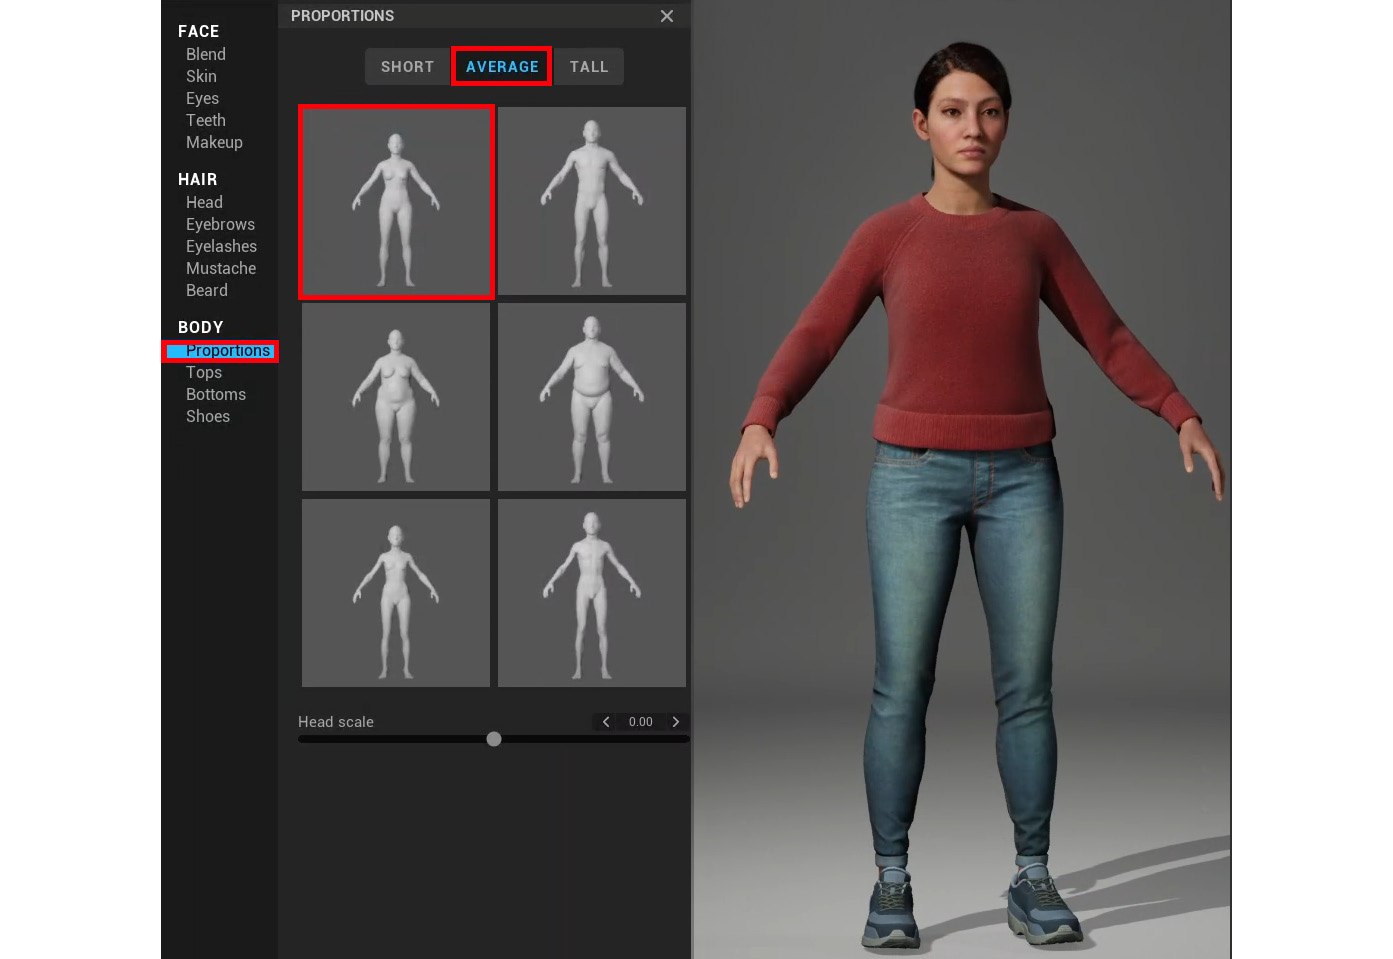
Figure 8.3 – Changing the character's body proportions
- In Region 2 of Figure 8.2, under the Body section, click on Shoes. This will open a menu with four kinds of shoes to choose from. Select Boots from this menu.
- Let's change the color of the boots. Still inside the Shoes section, look for the Primary Color heading in the menu. Click on the color bar to change the color to a medium-light gray.
We will keep her current top and bottom as-is since these are the closest in appearance to sci-fi-style clothes that are available in MetaHuman Creator at the time of writing. However, we can change the color of the clothes to appear more sci-fi-looking. To do this, click on Tops (Region 2, under the Body section) and change Primary Color from the default red to a medium-dark gray.
- Click on Bottoms (Region 2, under the Body section) and change the Primary Color setting of the pants/trousers to dark gray.
- Next, let's change her hairstyle. In Region 2, under the Hair section, click on Head. This will open the Hairstyles presets menu. Scroll a bit down in this menu to near the bottom. Here, you will find a female hairstyle named Side Swept Fringe. Click on this hairstyle to apply it to your character:
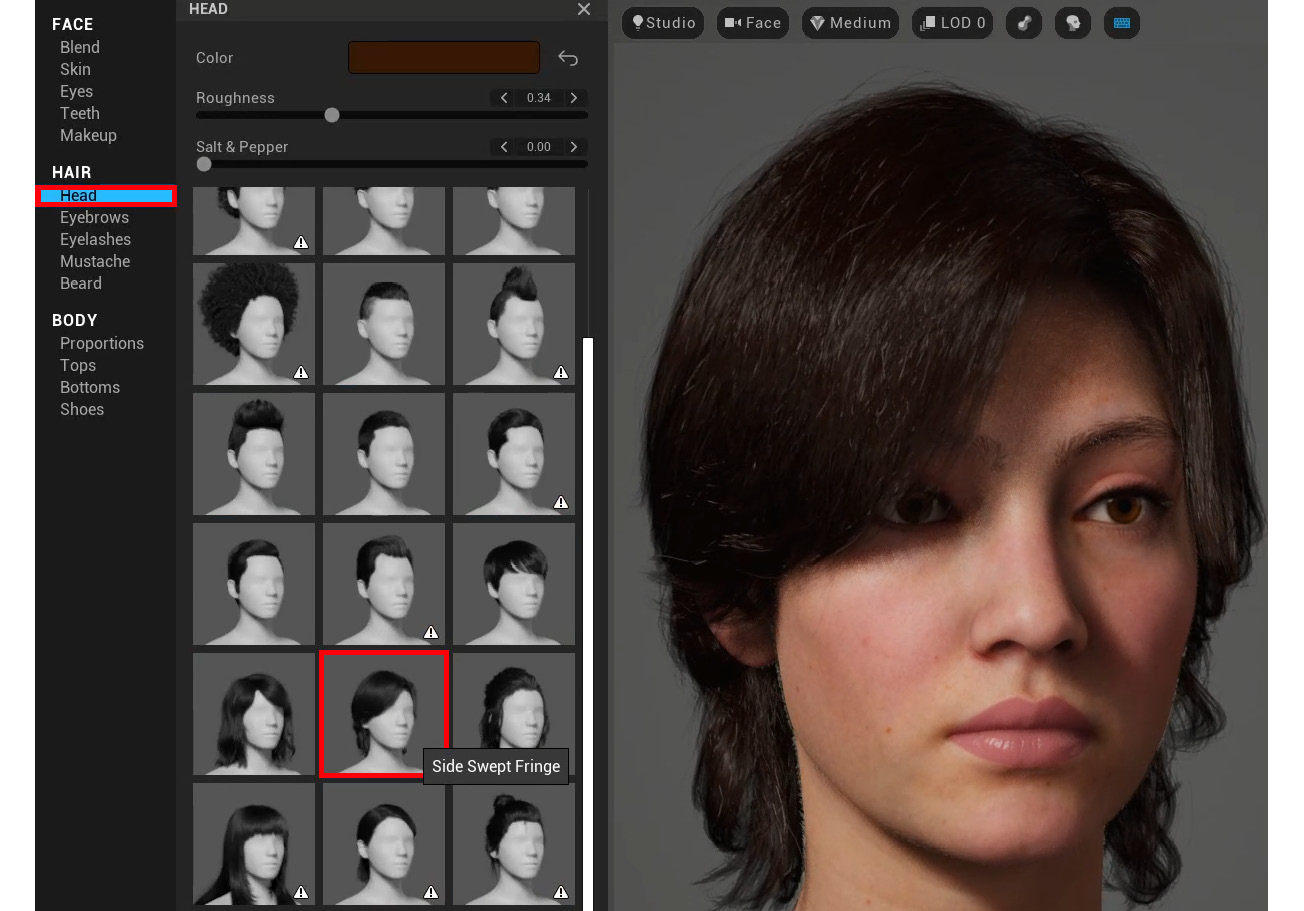
Figure 8.4 – Selecting a new hairstyle
- Now that your character has a great new hairstyle, let's customize her hair color. Click on the color tab next to Color, which is shown near the top of the preceding screenshot. The hair color menu will open. Inside this menu, check the checkbox for Enable Hair Dye and choose a custom color (use the values that are shown in the following screenshot to change her hair color to a dark red tone):
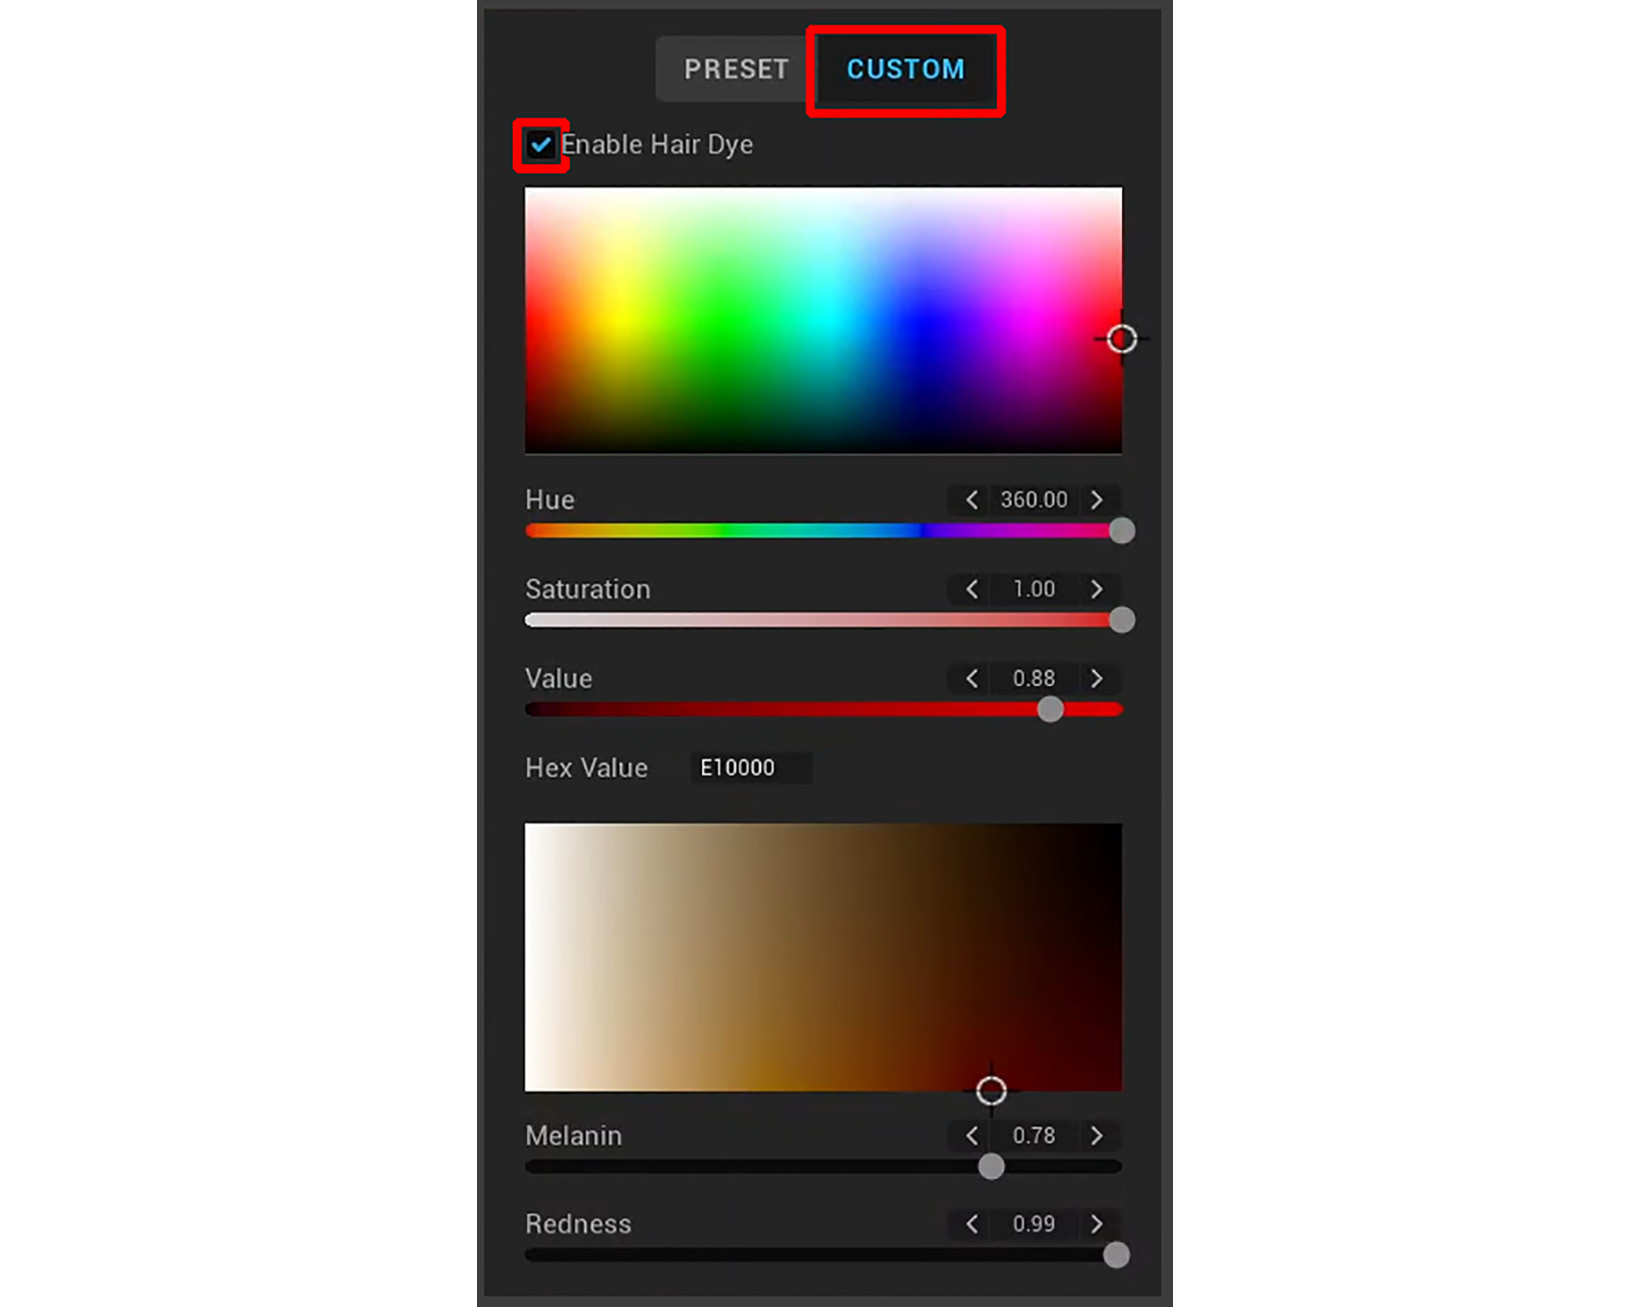
Figure 8.5 – Customizing the hair color
- Next, let's change her eye color and iris pattern. In the Eyes menu (Region 2, under the Face section) select Preset 010, then click on the Iris tab at the top of the menu. Select the iris in the middle of the selection, as shown in the following screenshot:
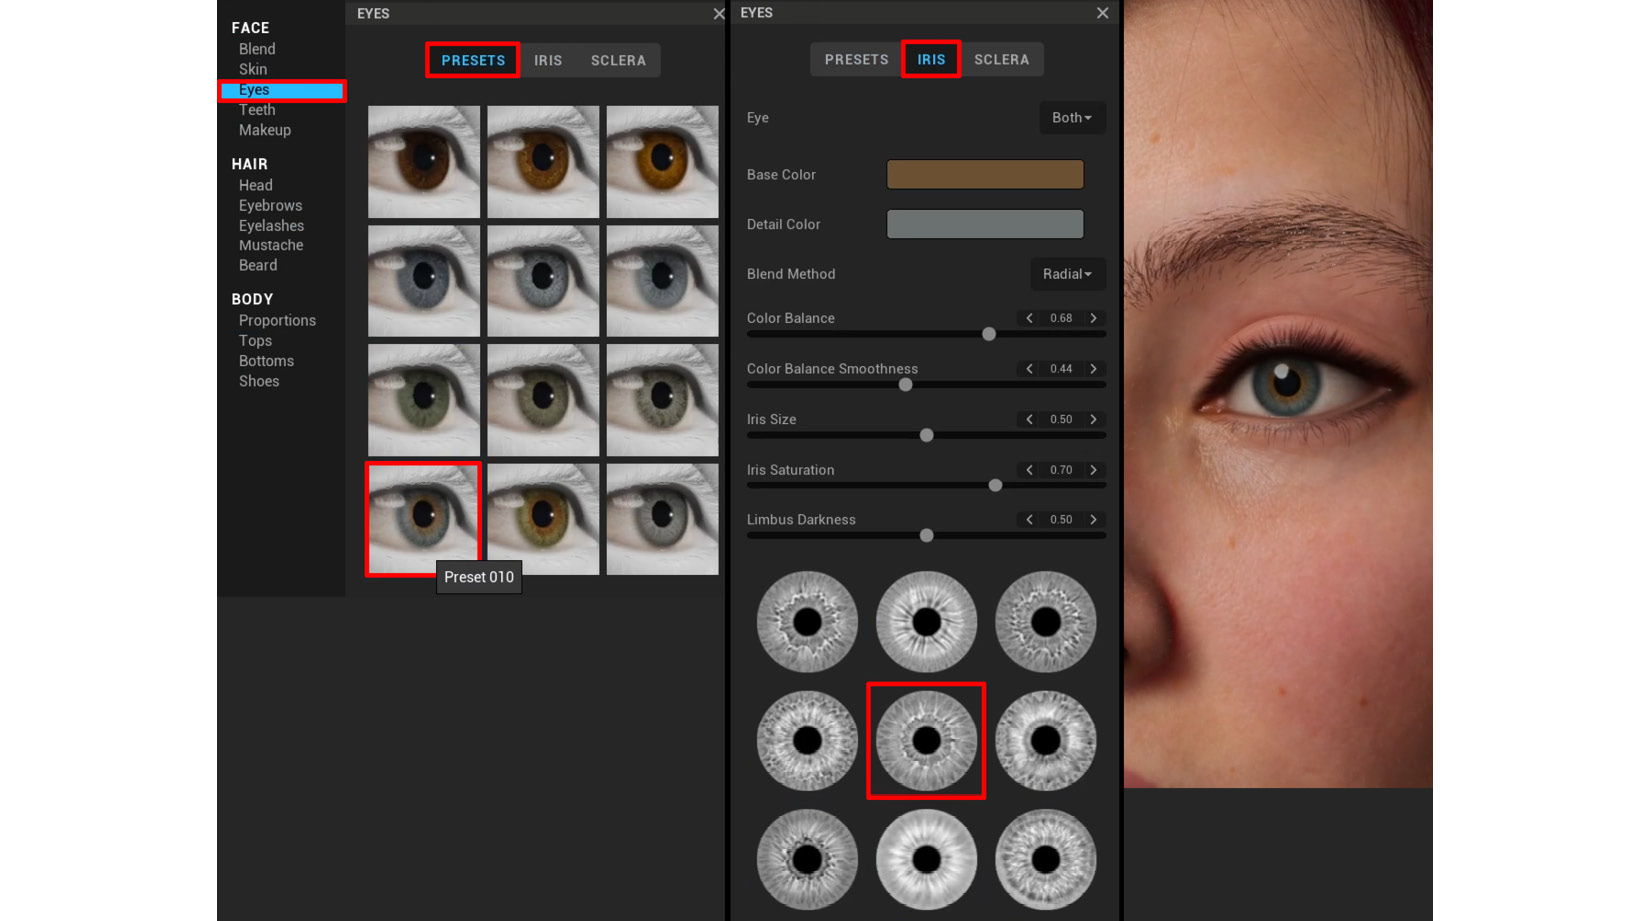
Figure 8.6 – Customizing your MetaHuman's eyes
- You'll notice that her lipstick has a hard edge. Let's change her lips so that they have no lipstick on them, making them look more natural. Click on Makeup (Region 2, under the Face section) and, from the menu, select the icon of the lips with no makeup on, as highlighted in the following screenshot. Your MetaHuman's face should now look as follows:
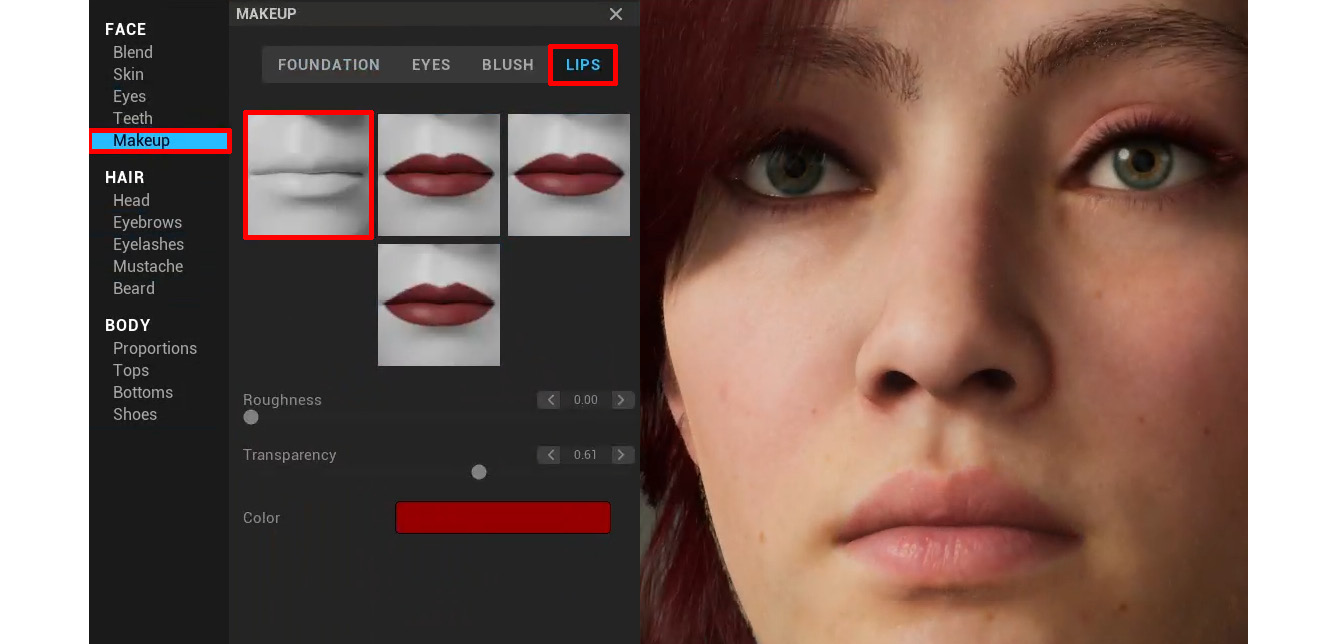
Figure 8.7 – Removing the MetaHuman's makeup
- In the Teeth menu (Region 2, under the Face section) change Variation to 0.26. This will add a bit of random variation deformation to the teeth to make them look more realistic.
- In the Skin menu (Region 2, under the Face section), click on the Freckles tab and choose the second freckled face image (from the selection of four). Set Density to 0.18, Strength to 0.20, Saturation to 0.34, and Tone shift to 0.5.
- The last feature we need to change on your MetaHuman's face is her eyebrows. Click on Eyebrows (Region 2, under the Hair section) and, in the menu that opens, select Medium Thick Eyebrows (the fifth eyebrow image from the selection of 11).
- Rename your character SciFiGirl in the Title bar (Region 1, as shown in Figure 8.2).
You've now made some basic changes to your MetaHuman character.
What remains now is perhaps the most important step – to customize the features of your MetaHuman's face (their facial geometry).
In the next section, I will show you the tools that you can use to customize the shape of your character's face.
Customizing the shape of your character's face
We are now ready to start customizing your character's facial shape. There are three different tools that we can use for this task. These three tools are called the Viewport Sculpting tools, and they are as follows:
- Blend tool: This tool blends the features of different characters' faces.
- Move tool: This tool lets you use guidelines to move parts of the face.
- Sculpt tool: This tool lets you push and pull control points on the face.
The goal of using these three tools is to customize the shape of your character's face. This helps to make your character unique-looking since nobody else would modify their character's face in the same way.
You can use any of these three tools to change the shape of the face or even use all three tools together – the choice is yours.
By learning how to use the three Viewport Sculpting tools, you can modify any character's face as you like.
Now, let's explore these three Viewport Sculpting tools in more depth, starting with the Blend tool.
The Blend tool
The Blend tool allows you to edit facial geometry, and it works by blending (also known as morphing) between the facial features of three preset characters in predefined areas.
First, we need to tell the MetaHuman Creator app which characters we want to blend between. We can do this by placing the preset character's portrait icon into a slot on the Blend Circle. Once you've placed all three preset characters into their slots, we can begin blending.
Let's use the Blend tool to customize the shape of your MetaHuman's face:
- Click on Blend (Region 2, under the Face section). Blend is also highlighted in the following screenshot.
- A menu will open with a portrait of Pia (your original present character) inside the Blend Circle. This circle is surrounded by three slots (these slots are placeholders for characters that you need to pick from the Presets Selection panel, as shown in the following screenshot).
- Drag and drop the Zhen preset character into the bottom left-hand side slot on the Blend Circle, as shown in the following screenshot. Here, I have indicated the Zhen preset character with a red circular highlight. You can also see the white arrow that indicates into which slot you have to drag and drop Zhen. With that, you've placed your first preset character into a slot:
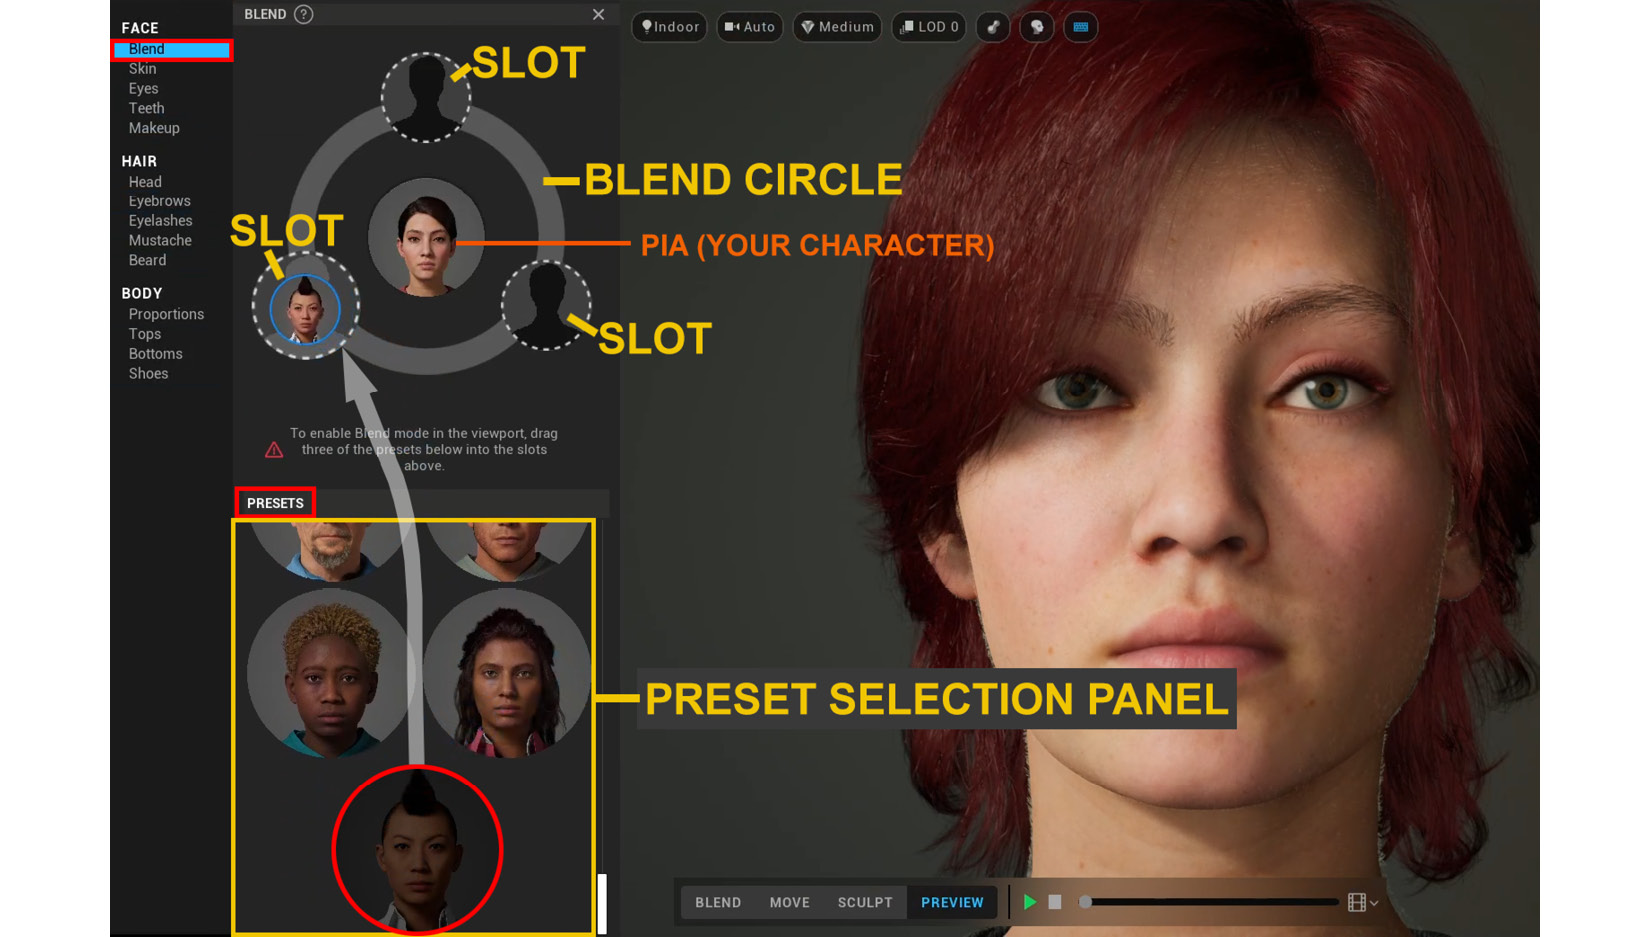
Figure 8.8 – Dragging and dropping the preset character into a slot on the Blend Circle
- Drop Valerie into the bottom right-hand side slot, as shown in the following screenshot.
- Then, drop Irene into the top slot, as shown in the following screenshot:
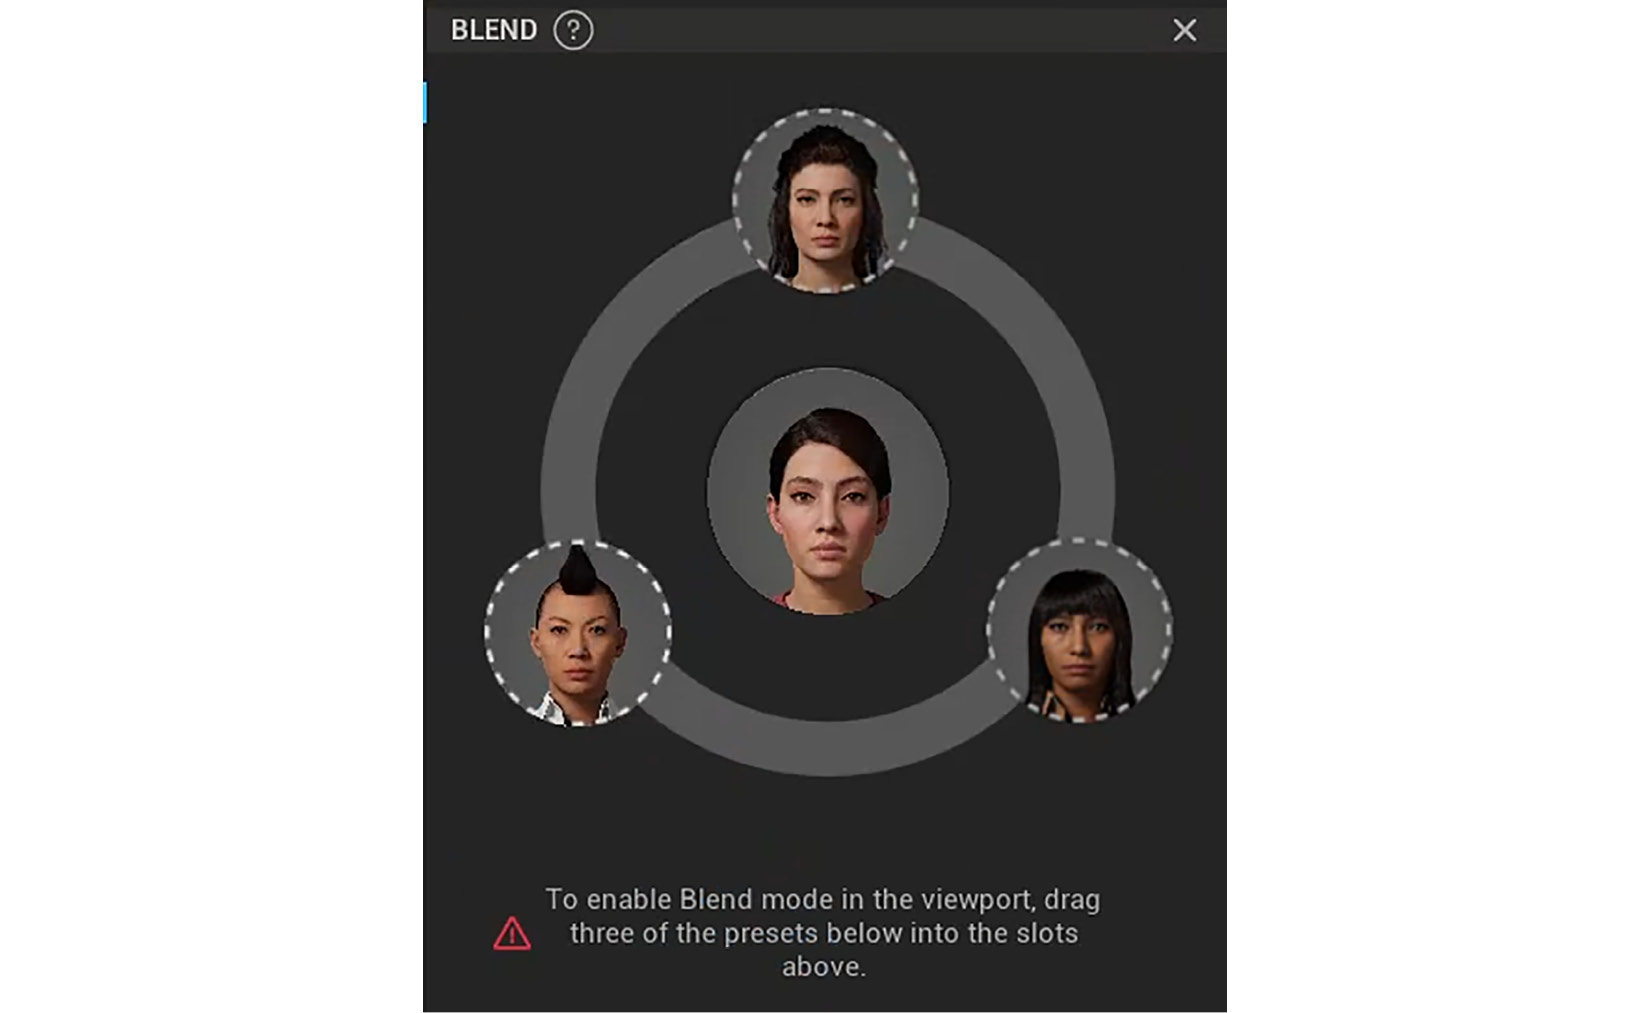
Figure 8.9 – All three preset characters are now in the slots on the Blend Circle. Now, we can start blending their features with the Blend tool
I used these three preset characters for my sci-fi tutorial, but when you are creating MetaHumans for future projects, you can select any preset characters that you want.
- Click on the Blend button in the Viewport Sculpting and Animation toolbar (Region 6 of Figure 8.2). Once you have clicked this button, small white circles will appear over different parts of the character's face. These white circles show you the areas on the face where can use the Blend tool.
- Rotate the camera so that you are viewing the face from a ¾ angle. This camera angle is better because you can see when you make changes to the face in three dimensions. When you view from the front, you can only notice changes in two dimensions.
- Left-click and hold your cursor on the white circle in the center of the lips and drag the white circle to a position between the top and the right gray circles. These gray circles are shown in the following screenshot, and they represent the slots (these slots are shown in Figure 8.8). This will blend the lips to the geometric shape that is the middle ground between Valerie's and Irene's lips:
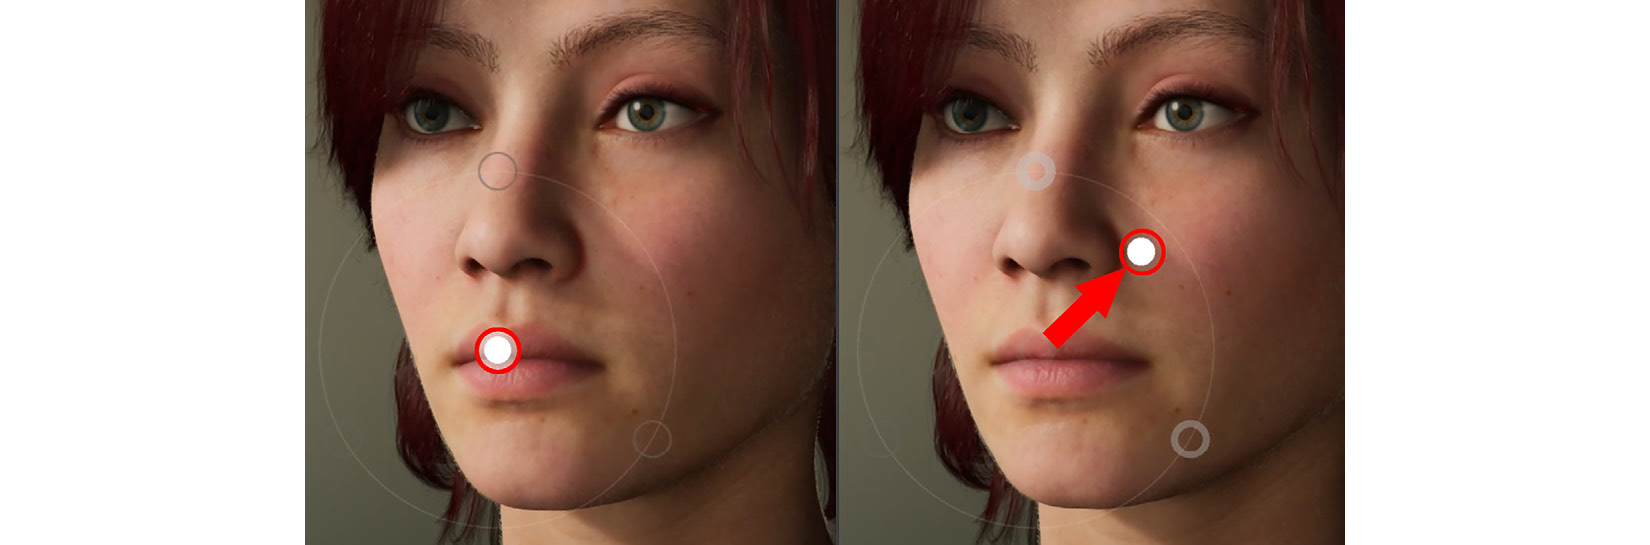
Figure 8.10 – Blending the lips to the geometric shape of the other character's lips
Great! You've made your first blend between two of the other character's facial features.
Now, let's make a similar modification to her cheekbones. The Zhen character that you have placed in the bottom-left slot has very pronounced cheekbones. We will use the Blend tool to add this cheekbone shape to your female sci-fi character.
- Left-click and hold your cursor on the white circle in the center of one of the cheekbones and drag the white circle to a position where Zhen's character slot is positioned (bottom-left slot).
This will tell the MetaHuman app that you want to blend your character's cheekbones to the shape of Zhen's cheekbones, as shown in the following screenshot:
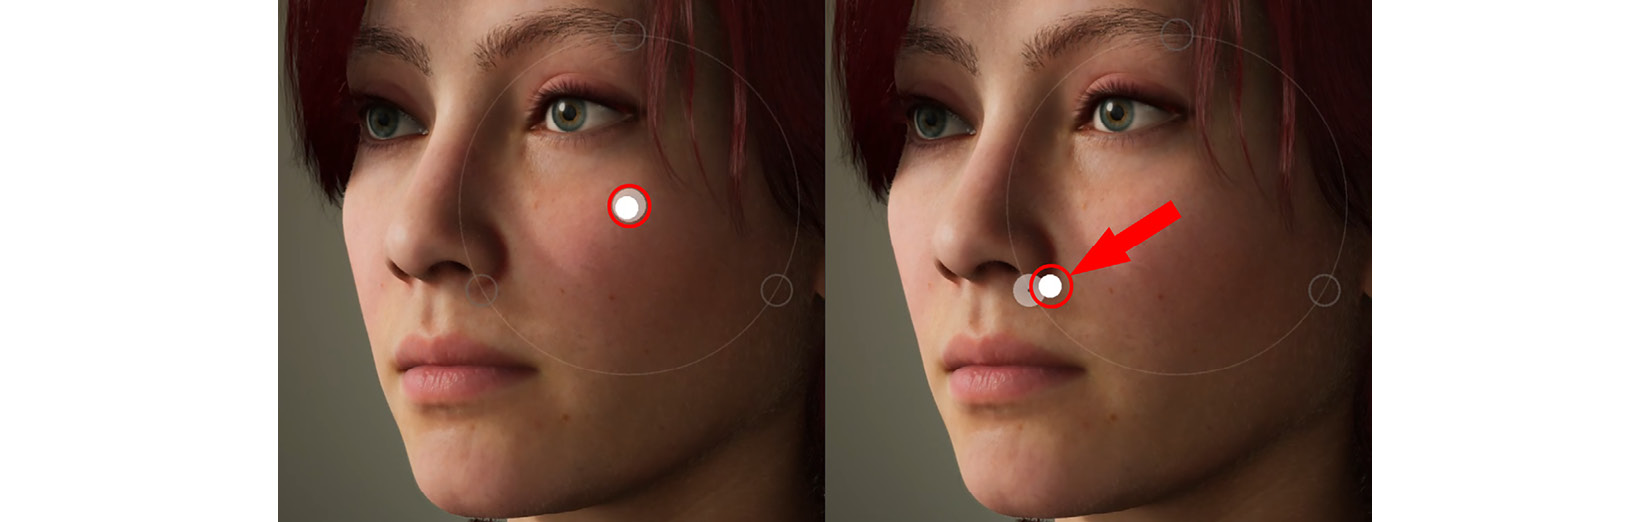
Figure 8.11 – Blending the cheekbones to the shape of another character's cheekbones
In this section, you learned how to use the Blend tool to blend between different characters' facial features that you would like to apply to your character.
The examples I have used here are quite subtle, but you can make bolder changes to facial features by selecting characters who have a greater difference in facial features than your character.
In the next section, we will learn how to use the Move tool to change the facial features of your female sci-fi character.
The Move tool
The Move tool has a very direct approach to changing your character's facial features. Let's have a look:
- Click on the Move button in the Viewport Sculpting and Animation toolbar (Region 6 of Figure 8.2). White guidelines will appear over different parts of your character's face. Let's see how we can use these white guidelines to modify the nose shape of the character's face.
- Rotate the character to a profile (side) view and left-click and hold the cursor on the guideline at the tip of the nose, as shown in Figure 8.12, part A. The guidelines will disappear when you click on a guideline. In the region where you've selected the guideline, white dots and dotted blue lines will appear to indicate parts of the geometry that can be modified, as shown in Figure 8.12, part B:
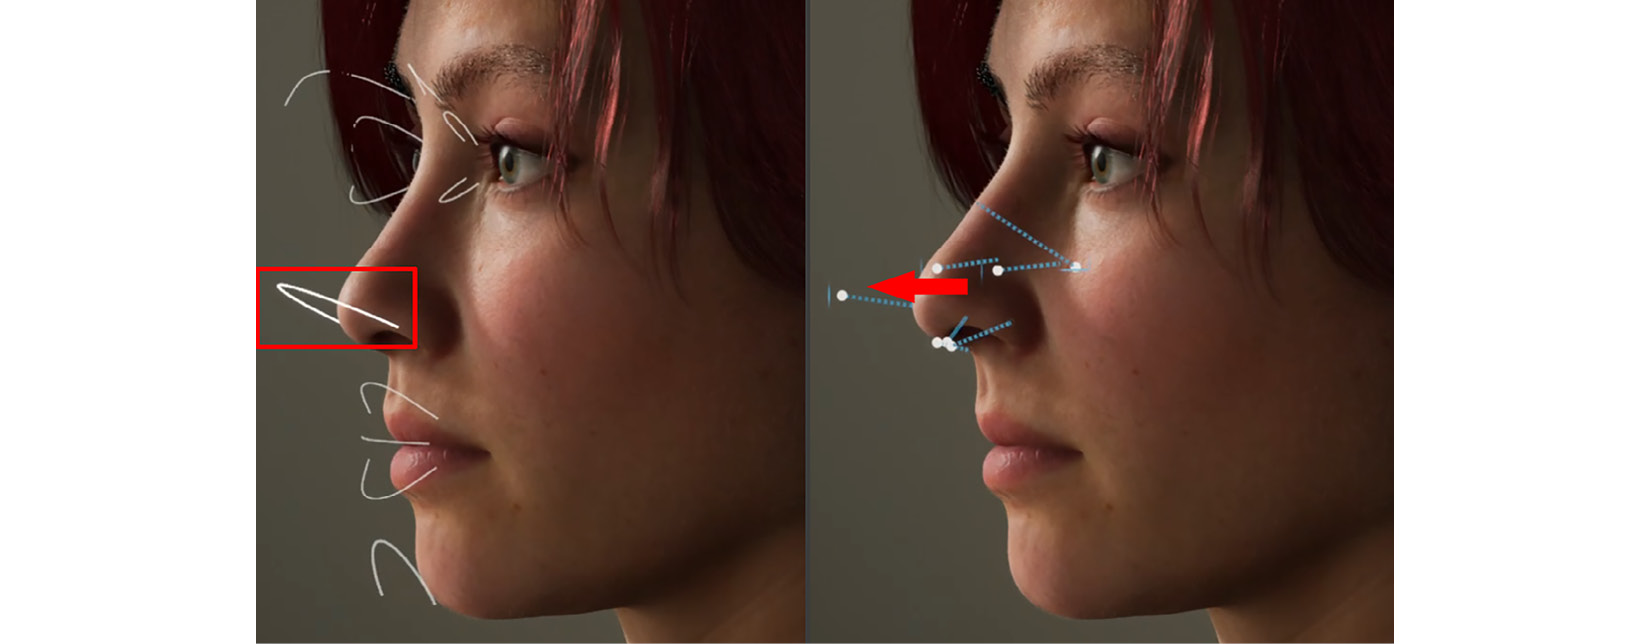
Figure 8.12 – (A) Clicking on the white guideline on the nose tip; (B) Dragging the mouse cursor forward to modify the shape of the nose
- With the left mouse button still pressed down, slowly drag your mouse cursor forward so that you increase the nose bridge size and the shape of the nose protrudes slightly forward.
You've just learned how to use the Move tool to directly edit the shape of your character's facial features. This is a very useful tool to make big facial feature changes very quickly.
In the next section, we will explore the last of the three Viewport Sculpting tools. We will use the Sculpt tool in a practical exercise to learn how to use it.
The Sculpt tool
The Sculpt tool has similarities to the Move tool, in the sense that they both allow you to directly manipulate the shape of the facial features.
Let's look at a practical example by using the Sculpt tool to change the shape of your character's jawline, chin line, and chin shape:
- We will start by rotating the face to the front view. Click on the Sculpt button in the Viewport Sculpting and Animation toolbar (Region 6 of Figure 8.2). You will see that small gray circles will appear all over your character's face, as shown in Figure 8.13, part A.
- Left-click and hold on to the small gray circle on one side of the jawline. When you click on a small gray circle, a gray dotted line with a white dot will appear to indicate that you can sculpt that facial feature area.
- With the left mouse button still pressed down, slowly drag your mouse cursor slightly to the top left-hand side, as shown in Figure 8.13, part B. This will interactively change the jawline's geometric shape as you drag your mouse. When you edit one side of the face, the other side of the face will automatically be modified at the same time. This is because Symmetry is enabled by default. Let's keep the Symmetry setting in its default state:
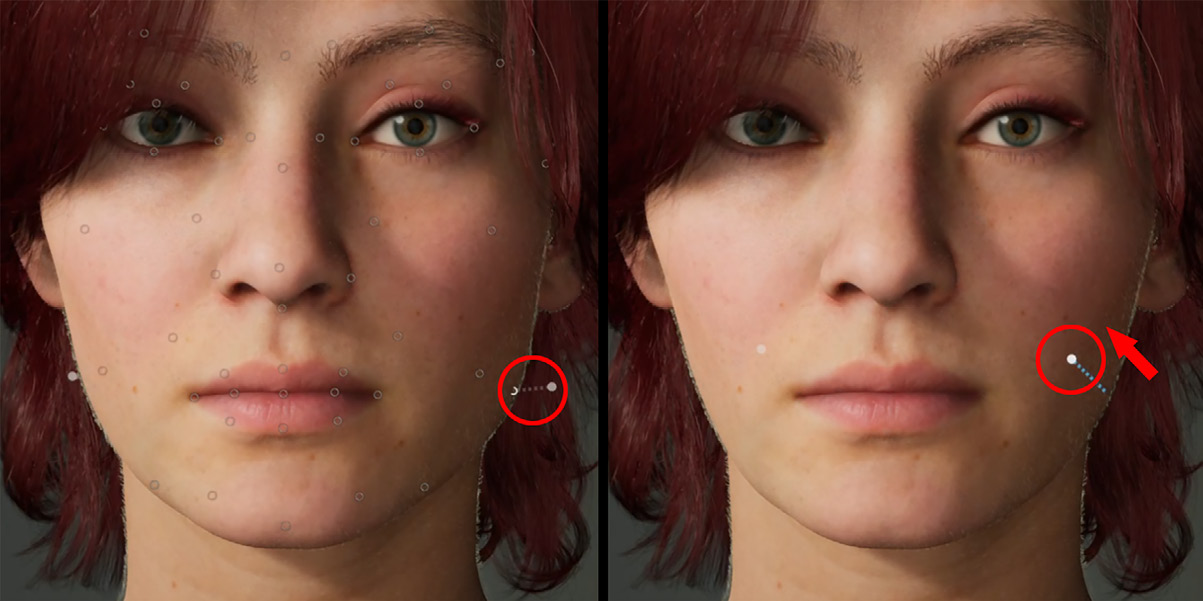
Figure 8.13 – (A) Clicking on the gray dot on the jawline; (B) Dragging your mouse cursor to modify the shape of the jawline
Let's do the same with the chin line area of the face:
- Left-click and hold on to the small gray circle on one side of the chin line, as shown in Figure 8.14, part A. When you've selected this gray circle, the rest of the gray circles will disappear, and you will see a gray dotted line with a white dot to indicate which sculpt area is currently active, as shown in Figure 8.14, part B.
- With the left mouse button still pressed down, slowly drag your mouse cursor slightly down and to the side. You have now modified the chin line shape so that it's a bit sharper, as shown in Figure 8.14, part C:
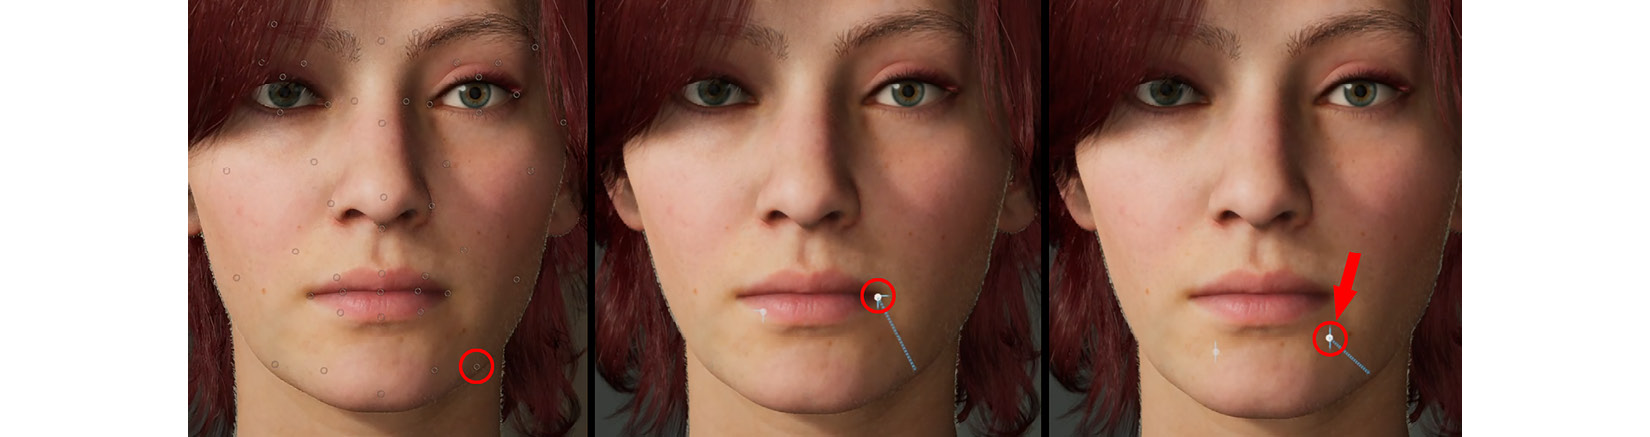
Figure 8.14 – (A) Selecting the small gray circle on the chin line; (B) The gray dotted line and white dot indicate which area is currently active; (C) Adjusting the shape of the chin line by dragging the mouse cursor
The last part of the character's face that we want to modify is her chin. Currently, her chin is quite weak, so we want to push it forward by using the Sculpt tool. Follow these steps:
- Rotate the face to the profile (side) view. Left-click and hold on to the small gray circle on the chin, as shown in Figure 8.15, part A.
- With the left mouse button still pressed down, slowly drag your mouse cursor slightly down and forward. You have now modified the chin's shape so that it protrudes more forward, as shown in Figure 8.15, part B:
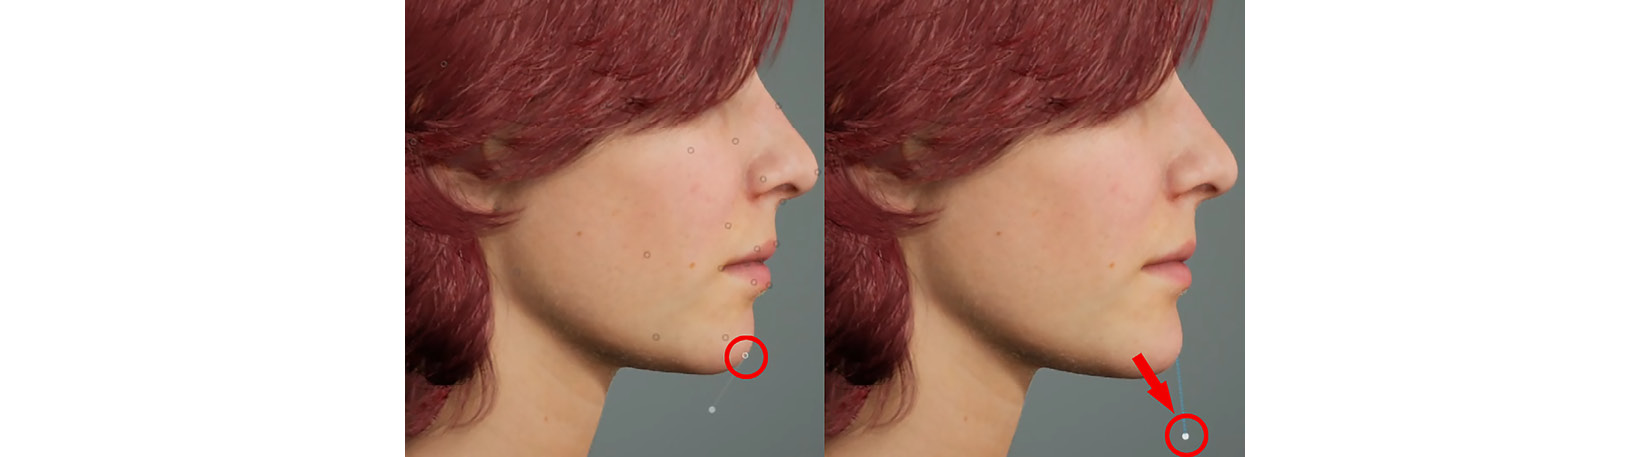
Figure 8.15 – (A) Selecting the small gray circle on the front of the chin; (B) Adjusting the shape of the chin by dragging the mouse cursor
You have just learned how to use the Sculpt tool to directly modify parts of your character's facial features.
The following is a close-up of the completed female sci-fi character's head:
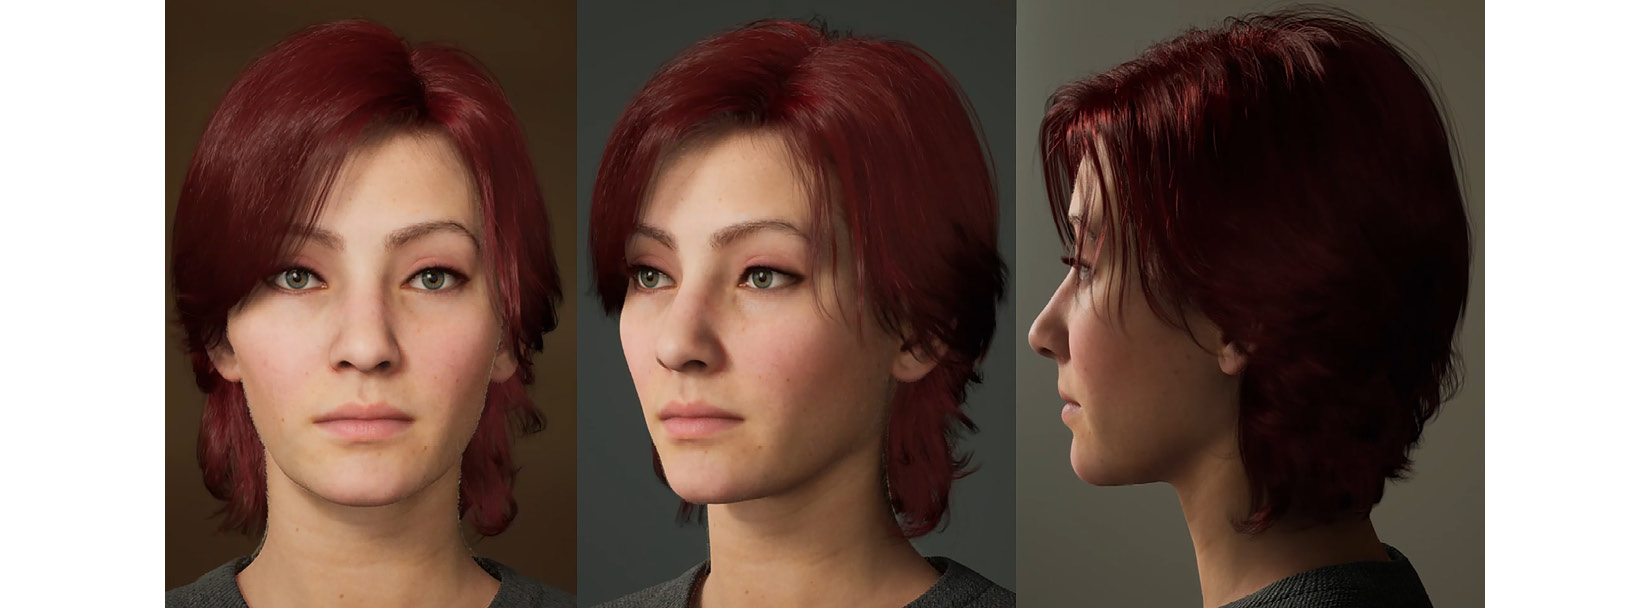
Figure 8.16 – Close-up of the completed female sci-fi character's head
This concludes the customization we can do in MetaHuman Creator to create a female sci-fi character. For the rest of the customization, we will use UE5.
The last step before we go back to UE5 is to preview the character with various animations. When you preview a character with animations, you can get a better idea of what the character will look like for your 3D movie than if you were just looking at the character in the default static pose (this static pose is known as the A-Pose):
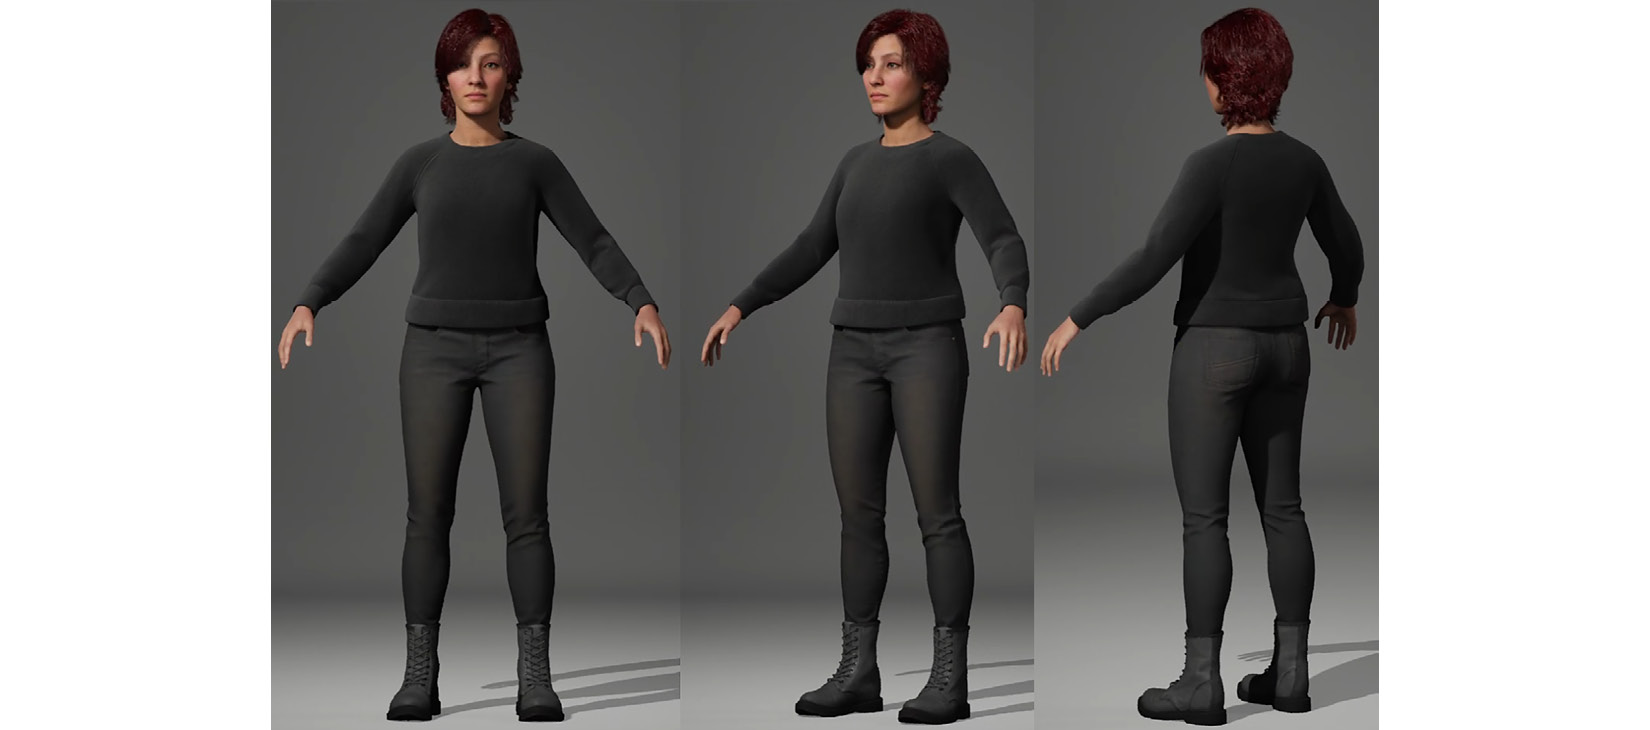
Figure 8.17 – The female sci-fi character's full-body preview in "A-Pose"
In the next section, we will explore the animation previews in MetaHuman Creator.
Previewing your character with animations
To preview your character with animations, you can use the Viewport Sculpting and Animation toolbar (Region 6 of Figure 8.2).
The Preview button is selected by default. When you click on the Blend, Move, or Sculpt tool in the Viewport Sculpting and Animation toolbar, the animation controls will be hidden automatically. To re-enable the animation controls, simply click on the Preview button again.
When the animation controls are visible, you can use standard video player controls to play, stop, or scrub through the animation timeline by using the Play icon, the Stop icon, and the Timeline area, respectively.
On the right-hand side end of the Viewport Sculpting and Animation toolbar is a Film Frame icon. When you click on this Film Frame icon, a pop-up menu with options for different kinds of animations will appear, as follows:
- Idle: This option will play through a typical idle animation. This is an animation in which the character stands, looks around, and moves slightly.
- FaceROM: This animation file will play through a range of facial animations. (ROM stands for Range of Motion).
The following screenshot shows the ROM animations that are currently active on your character's face:

Figure 8.18 – Testing the facial animations
- Body Technical ROM: This animation file will play through a range of body movement animations. This is used to preview the character with a greater range of poses and motions.
The following screenshot shows the range of body movement animations (Body Technical ROM) that are currently active on your character's body:
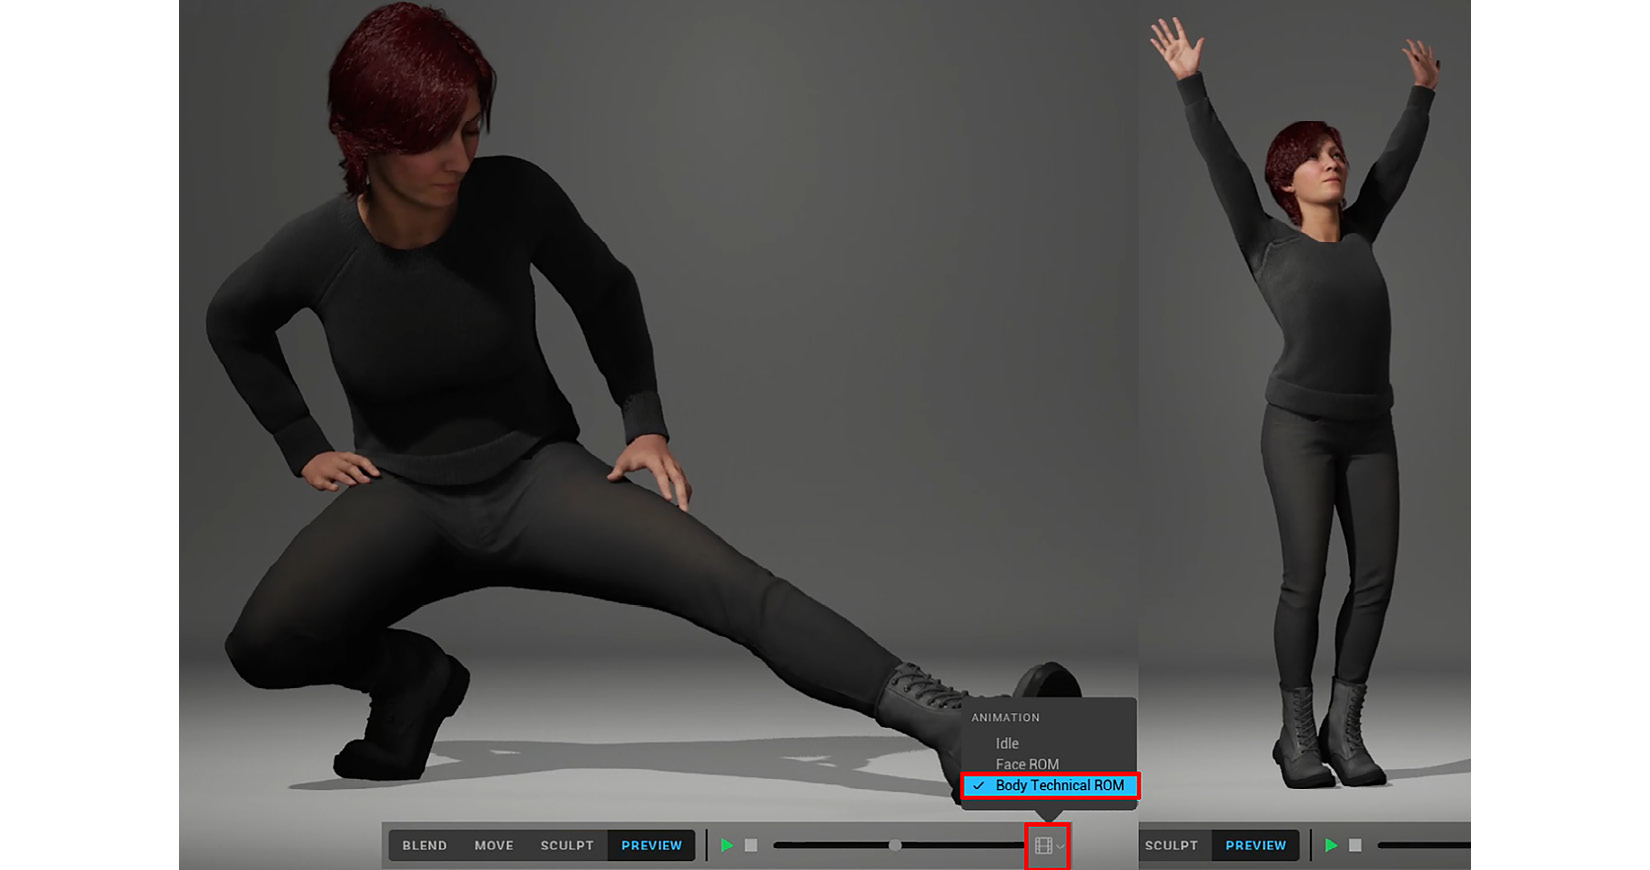
Figure 8.19 – Previewing the character with a range of body motions
With that, you've learned how to preview your MetaHuman character with animations for its body and face.
In the next section, we will return to UE5. We will go through the step-by-step process of adding your newly created MetaHuman to UE5.
Adding your MetaHuman to Unreal Engine 5
In this section, you will add your newly created MetaHuman female sci-fi character to UE5.
Before we start, make sure that you have the Quixel Bridge plugin enabled in UE5. The Quixel Bridge plugin is included in the default installation of UE5. To check if this plugin is enabled, follow these steps:
- Launch UE5. Navigate to the Menu bar and click on Edit | Plugins.
- Type bridge into the Search bar and tick the checkbox to enable it (if it is not already enabled). Then, close this menu and close UE5.
- Relaunch UE5. Use the project file that you created for Chapter 7, Setting Up Materials in UE 5..
- In the toolbar, click on the Create icon. This will open a drop-down menu. Select Quixel Bridge from that menu to open the Quixel Bridge app.
- The Quixel Bridge app window will open, as shown in the following screenshot. Maximize this window. On the top right-hand side of this window, there is a portrait icon. Click on this portrait icon and then, from the drop-down menu, click on Sign In. This will open another window containing a menu. Click on Sign in with Epic Games:
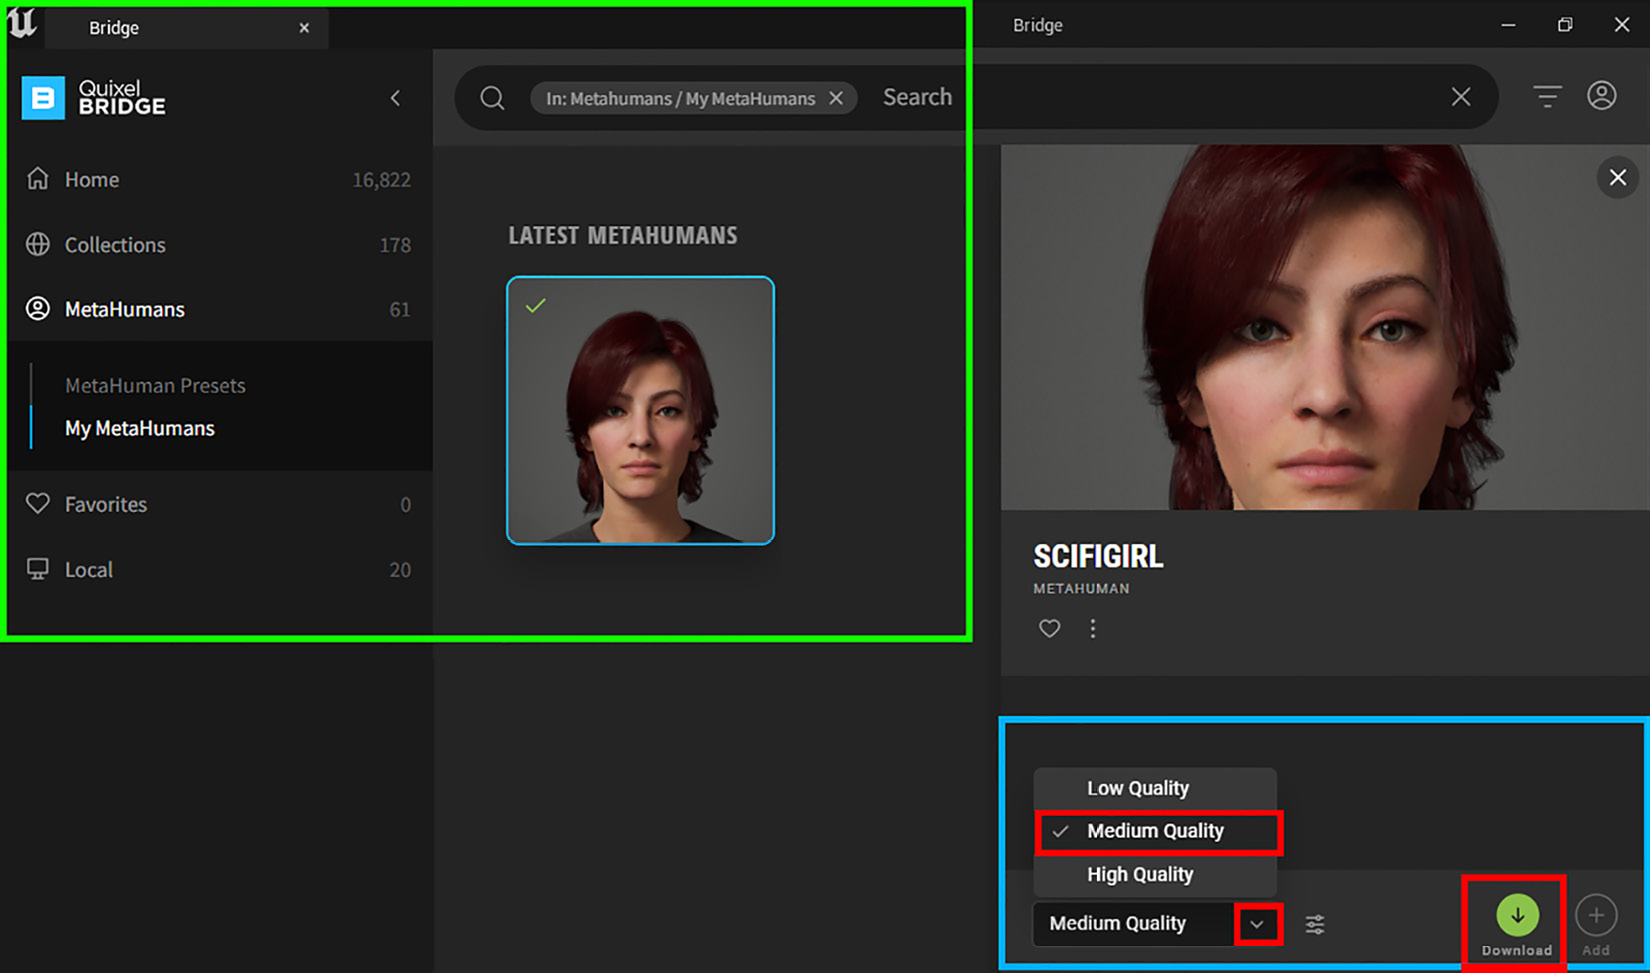
Figure 8.20 – The Quixel Bridge app window with "My MetaHumans" selected
- Once you've logged into your Quixel Bridge account, you will see MetaHumans in the menu on the left-hand side. Click on MetaHumans to open a drop-down menu. Inside this drop-down menu, select My MetaHumans, as shown in the preceding screenshot.
In the central area, you will find portraits of all the MetaHumans that you've created. If SciFiGirl is your first character, then you will see only one character.
- At the bottom right-hand side, you will see a menu with options to Download your MetaHuman at either Low Quality, Medium Quality, or High Quality. The quality setting refers to the texture size that you want to download for your character. Let's take a look at these texture sizes:
- Low Quality: 1024 x 1024 pixels
- Medium Quality: 2048 x 2048 pixels
- High Quality: 8192 x 8192 pixels
- The bigger the texture size that you want to download, the longer it will take to export your character. You will also need a more powerful computer when you want to use High Quality textures. For the purposes of this tutorial, I have selected Medium Quality.
- Once you've chosen the quality level (texture size) that you require, click on the Download button. Once you've done this, you will see a progress animation, as shown in the following screenshot:

Figure 8.21 – (A) The download progress bar animation; (B) When the download is complete, the "Add" button will be enabled
- In Figure 8.21, part A, you will see your download progression represented by the animated download circle. It will take a while time for the download to complete. Once it is completed, simply click on the blue Add button, as shown in Figure 8.21, part B. This will start the process of automatically exporting your selected character from Quixel Bridge and importing this character into UE5.
- Once you've clicked on the Add button, you will see various message windows appear, displaying a variety of import messages. Minimize Quixel Bridge and return to UE5. Wait for all the import messages to come through. Message windows will open in UE5 telling you about missing project settings. Click on the Enable Missing button for each of these message windows. Once all the plugins and project settings have been updated, restart UE5.
- When you restart UE5, you will get a message stating Changes to source content files have been detected. Would you like to import them?. Click on Import.
- In your Content Browser window, under Content, you will see a new directory named MetaHumans. Open this File directory and click on the folder named SciFiGirl. You will see some folders displayed in the asset view area of your Content Browser. There will also be a file with an icon named BP_SciFiGirl (I have highlighted this file icon in Figure 8.23).
- Left-click and drag BP_SciFiGirl (the blueprint file) onto the floor of your Viewport. This will add your MetaHuman to your UE5 Viewport.
- Select BP_SciFiGirl in the World Outliner panel. In the Details panel, change her Transform settings, as shown in the following screenshot. Here, we are moving her slightly upwards on the Z-axis because her boots are currently intersecting with the floor. Then, rotate her so that you have better lighting on her:

Figure 8.22 – Changing BP_SciFiGirl's Transform values
You have just learned how to import your custom MetaHuman into UE5 using the Quixel Bridge plugin (that's built into UE5).
In the next section, you will learn how to add modified clothing materials and some sci-fi armor to your project file.
Customizing your character's clothing
You have just added your custom MetaHuman, named SciFiGirl, to your project file and she looks amazing!
To make her fit better with the sci-fi theme of an Alien-Planet movie set, let's add some custom-made sci-fi armor to her and modify her clothing materials.
Download the Armor and Materials files (including all their content) from this book's GitHub repository: https://github.com/PacktPublishing/Unreal-Engine-5-Character-Creation-Animation-and-Cinematics/tree/main/Chapter08/SciFiGirl.
Important
When you download these files, keep their folder structure and the file's contents as-is.
The Armor folder contains 16 sci-fi armor pieces, their textures, and the materials that I have created for this chapter.
The Materials folder contains the updated clothing materials for the boots, jeans, and sweater of your character.
If you want to create some sci-fi armor of your own, then you can use the techniques that you have learned about earlier in this book. This will be a good learning exercise to put what you have learned so far to the test.
Follow these steps to update your project with the custom sci-fi armor and the modified clothing materials:
- Close UE5. Place the Armor and Materials folders (including all the sub-folders containing their files) inside your project's ContentMetaHumansSciFiGirl directory. I have highlighted this directory structure in the following screenshot.
- Launch UE5. Your Content Browser window will now look as follows:
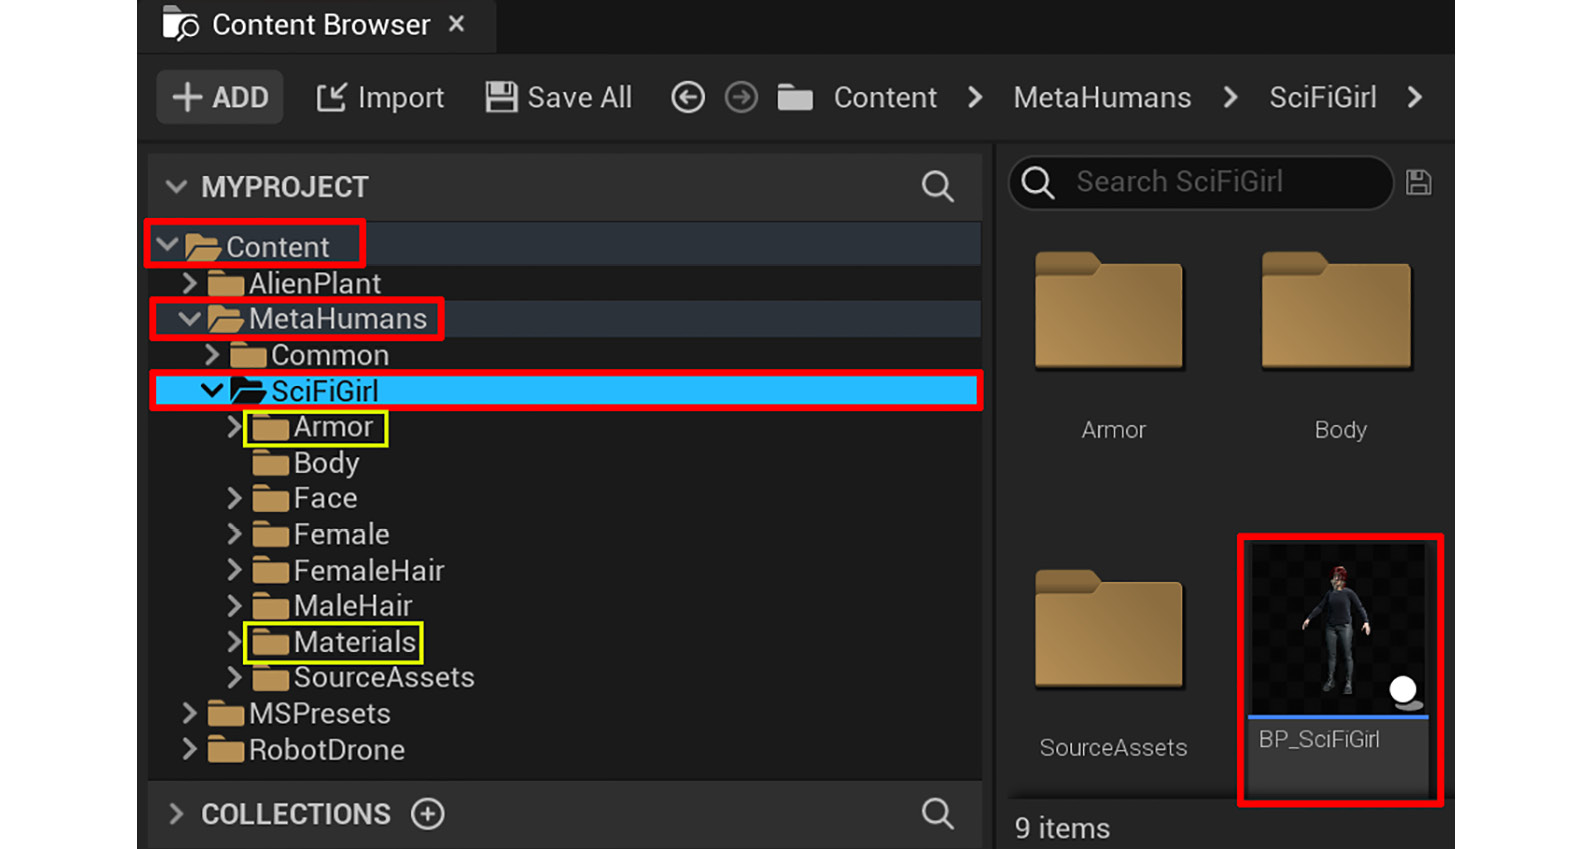
Figure 8.23 – The Content Browser window with the SciFiGirl folder added
- A message window will open, stating that the project and shaders are updating. After this update process is complete, you will notice that the SciFiGirl character's clothing materials have changed slightly.
- In the Content Browser window, open the Armor folder. Then, inside this directory, open the Armor_models folder. All 16 of the armor pieces will be displayed in the asset view area of the Content Browser window. Hold Shift and select all 16 armor pieces at the same time. Now, drag and drop all 16 armor pieces into the Viewport. You will see that all the armor pieces are now displayed in the World Outliner panel.
- While the armor pieces are still selected, click on the folder icon with a plus (+) sign on top of the World Outliner panel to automatically add all the armor pieces to a new folder. Rename this new folder Armor. Now, all the armor pieces are neatly organized in a folder inside the World Outliner panel.
- Open the Armor folder in the World Outliner panel. Press Shift and select all 16 armor pieces so that they are all selected at the same time. Go to the Details panel and set the Transform settings to the same ones that you used for BP_SciFiGirl, as shown in Figure 8.22. This will instantly move and rotate all the armor pieces together so that they match the character's position and rotation.
Great! She now has her sci-fi armor on!
Note
This is just temporary for us to see our progress since the sci-fi armor will be attached to the skeleton in Chapter 20, Using Sequencer to Construct Your Final Scene.
Your female sci-fi character should now look like the character shown in Figures 8.24 and 8.25:
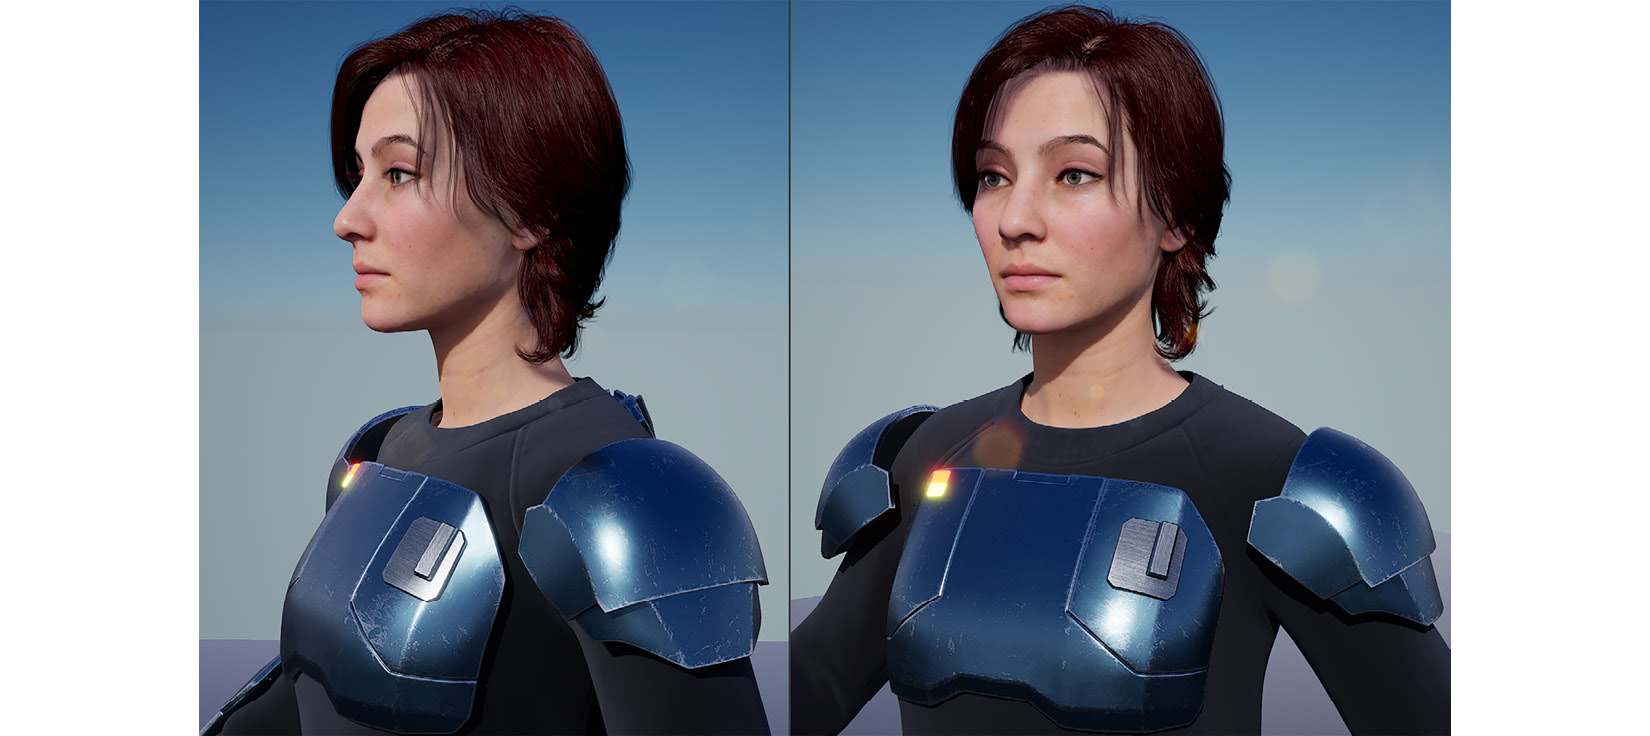
Figure 8.24 – Closeup of the sci-fi character with her sci-fi armor
The only difference is that your character's sci-fi armor won't have a glowing effect on its lights yet. You will learn how to add a glowing effect to the armor's lights in Chapter 10, Adding Lighting and Atmospheric Visual Effects in UE5:
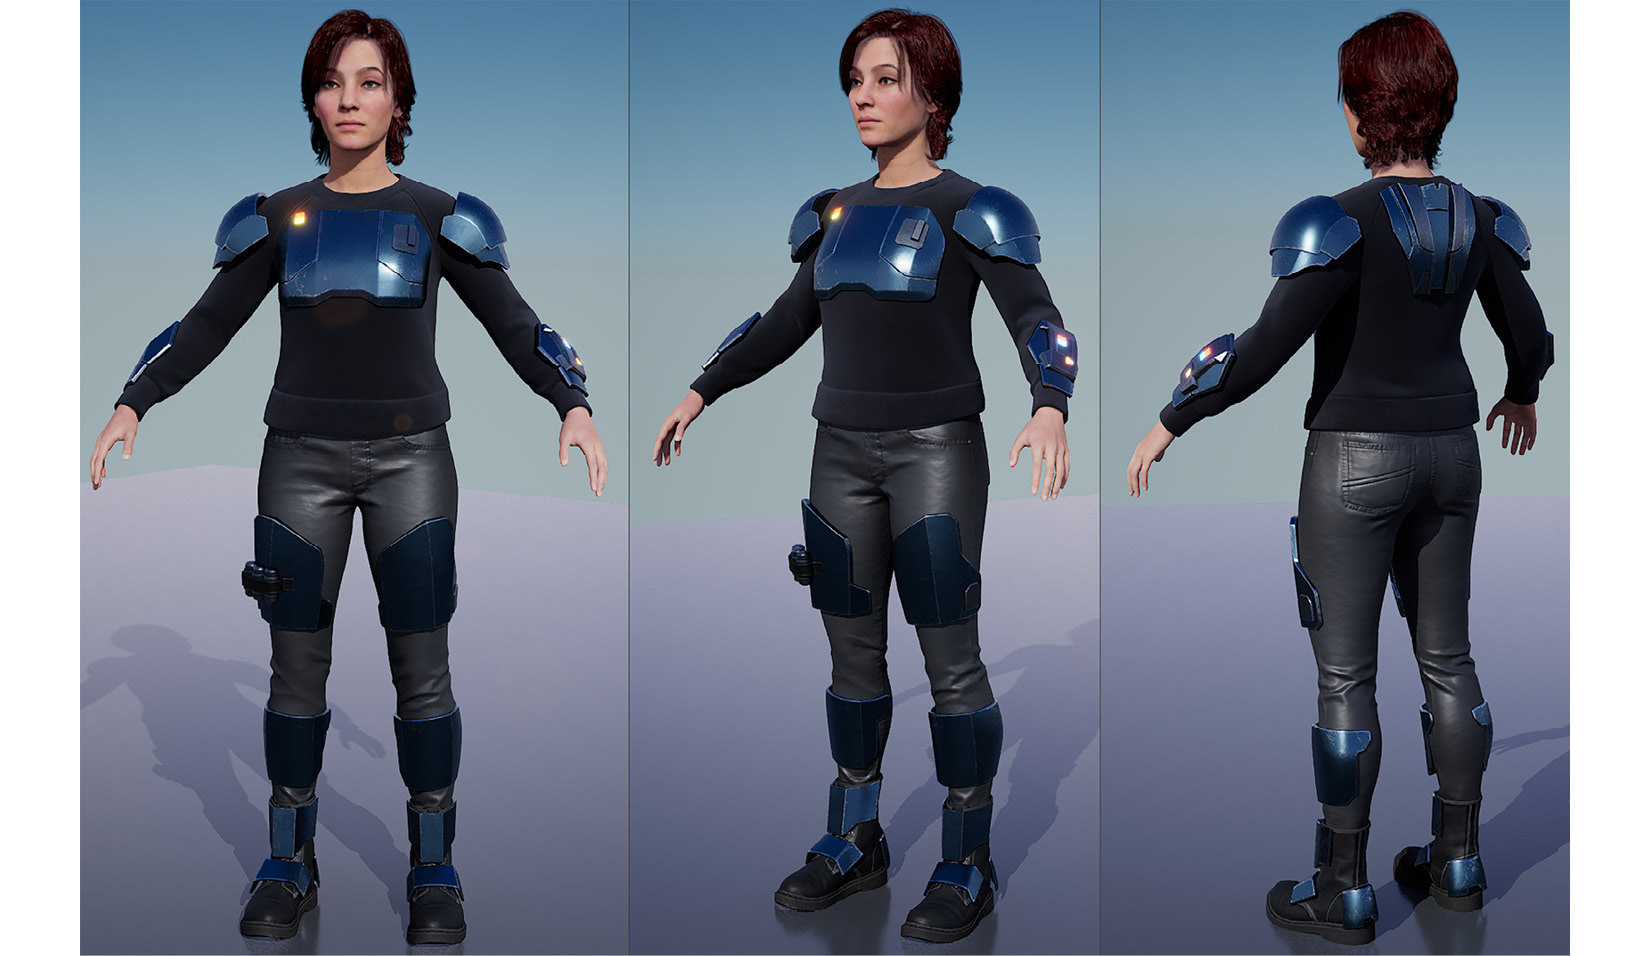
Figure 8.25 – Full figure view of the female sci-fi MetaHuman with her sci-fi armor
With that, you have learned how to add new assets to your UE5 project file. You also learned how to organize assets in the World Outliner panel by grouping them inside a folder.
Summary
In this chapter, you completed the MetaHuman character creation tutorial. You learned how to create a character, how to export them, and how to add them to UE5.
Finally, you learned how to add custom assets to your project that will help your character match the sci-fi theme of your 3D animated movie.
In the next chapter, you will learn how to bring all your assets together in UE5 and build a virtual 3D movie set.
You will learn how to import a landscape mesh and rock assets from Quixel Bridge to build an alien landscape. After this, you will populate your alien landscape with your alien plants.
See you in the next chapter!