In APEX it is possible to use many different item types. Some of these we've already seen in other recipes. In this recipe we're going to talk about some of the advanced item types like shuttles and HTML editors and how to interact with them.
To start with this recipe, create an empty page with ID 15 and put an HTML region with the name IT Employees on it.
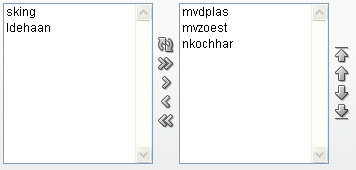
The first example of an advanced item type is the shuttle list. We will use this list to add employees to the IT department. The shuttle will show a list of available employees on the left side and a list of employees already in the IT department on the right side.
- Create a new item on your page by right-clicking on the IT Employees region and selecting Create Page Item.
- Select Shuttle and click Next.
- Name the item
P15_IT_SHUTTLEand click Next until you reach the List of Values page in the wizard. - Enter the following query to populate the left side of the shuttle:
select username display_value
, id return_value
from app_employees
where dept_id <> 3
[1346_01_07.txt]
- After clicking Next, you will be asked to enter the Source Value. This will populate the right side of the shuttle. For this, we will use a PL/SQL Function Body as the Source Type that will return a list of usernames delimited by colons.
declare
v_list apex_application_global.vc_arr2;
begin
select username return_value
bulk collect
into v_list
from app_employees
where dept_id = 3;
return(apex_util.table_to_string(v_list));
end;
[1346_01_08.txt]
- Click Create Item to finish the wizard.
Now the item will be populated with the employees.
The right side of the Shuttle Item can also be populated by the Default value that can be defined on the item's properties.
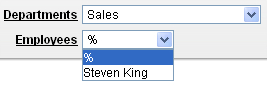
Another type of item we want to discuss here is the Cascading Select Item. Let's say we want to make a list of all employees. This is potentially a very long list, so before showing the employees, we first want to select the department we are working with.
First, we create the item that shows all departments for our company:
- Create a new page item.
- Use item type Select List.
- Name it P15_DEPARTMENTS.
- Give it a label and click Next until you reach the LOV query, and enter the following SQL:
select name display_value
, id return_value
from app_departments
[1346_01_09.txt]
- Now create the item.
The next part is to create the select list for the employees in the department. Again, we create a select list like before and name it P15_EMPLOYEES.
Now when we reach the LOV wizard screen, we enter the following SQL:
select firstname||' '||lastname display_value
, id return_value
from app_employees
where dept_id = :P15_DEPARTMENTS
[1346_01_10.txt]
Also on this screen change the value of Cascading LOV Parent Item(s) to P15_DEPARTMENTS. Click Next and Create Item.
When we now run the page and select a Department, we can see that the Employees list changes immediately.