
When you create a theme from scratch, you also have to link the templates to the theme. You can copy templates from another theme to your newly created theme. But you can also create new templates from scratch. We will create a new template in this recipe.
We can go on with theme 115 that we made in the first recipe, so make sure you already created this theme.
- In the application builder, go to the application you are working on. After that, go to the Shared components.
- In the shared components page, click Templates.
- Click the Create button to start the wizard.
- In the next step you see nine types of templates. Select the Region template.
- Click From scratch and click the Next button.
- Enter a name for this new template, that is, cust_rep_reg. You can also select the theme this new template should be part of. And finally, select the template class. In our case, we select the Reports region. Click the Create button to finish the wizard.

- The new template has now been created and you can see it in the list. Edit the new template by clicking on the template name (cust_rep_reg).
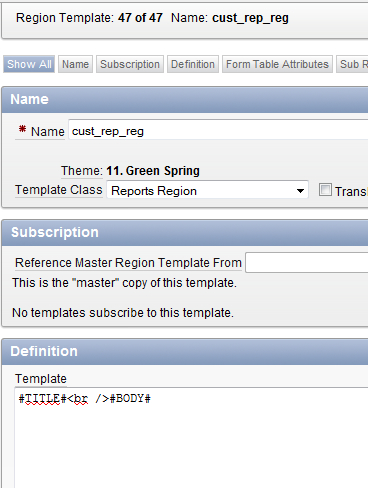
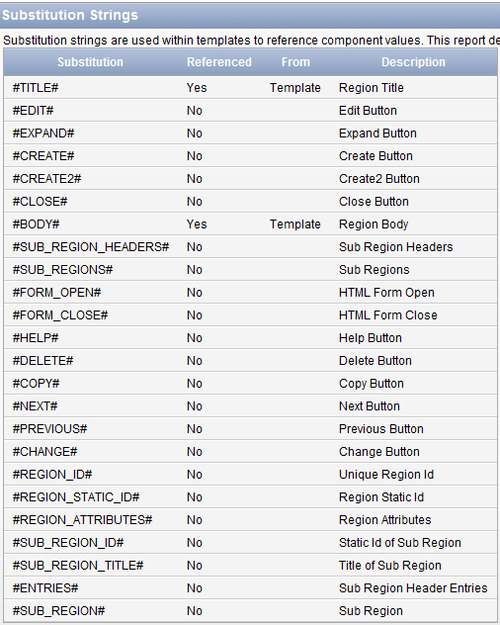
- You can use HTML in combination with the substitution strings to create a layout. Oracle replaces the substitution strings with the component values. You can find the substitution string at the bottom of the page:
- You can use the following example to enter in the definition section:
<table class="t115Region" id="#REGION_STATIC_ID#" #REGION_ATTRIBUTES# border="0" cellpadding="0" cellspacing="0" summary="" width="97%" style="border:none;"> <tbody class="ReportsRegion"> <tr> <th class="t115RegionHeader">#TITLE#</th> <th class="t115ButtonHolderHeader" width="100%">#CLOSE# #PREVIOUS##NEXT# #DELETE##EDIT##CHANGE##CREATE##CREATE2##EXPAND##COPY##HELP#</th> </tr> <tr> <td class="t115RegionBody" colspan="2" bgcolor="lightgrey">#BODY#</td> </tr> </tbody> </table> [T115region.txt]
- This template code is a copy of the original code from theme 18, but with the background color set to light grey.
Substitution strings should be written in uppercase and should begin and end with a #-sign. As from APEX 4.0, new templates use the <div> tag. The older templates from APEX 3.2 and before used the<table> - <tr> - <td> tags.
- Click the Apply changes button.
- If you want to use the new template, you have to change the pages/regions which will use this new template. Suppose you have a page with a tabular form. Click on the page you want to edit.
- Click on the region you want to edit.
- In the template list box, select the new template, cust_rep_reg. You can find the template list box in the user interface section.
- Click the Apply changes button. The region will now use this new template.
You can make your newly created template the default template for that specific component type. Just go to the Shared components page, go to the themes, and select the theme you want to edit. On the right side of the screen, under Tasks, click Edit theme. You will see the component defaults. In the region list box, select the new template. Click the Apply changes button. The new template is now the default for the region component type.