
Sending mail is an important feature in a web application. You can use it when you want to confirm something. Or when you want to send information to the user, or the user wants to send your company an e-mail with an inquiry. In this recipe, we will make a section on the homepage where users can request information via e-mail.
Your database should be able to send outbound e-mails. Therefore, check your database if it is configured for sending e-mails.
- In the application builder, go to page 1 of your application.
- In the Regions section, click the Add icon to create a new region.
- Select HTML.
- Select HTML again. This time it's for the type of HTML region.
- Enter a title for this region. For example, Contact. Click Next.
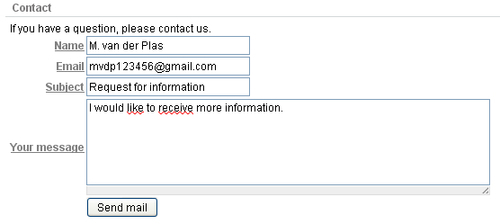
- In the text area, enter the following text: If you have any questions, please mail us.
- Click the Create region button.
- In the items section, click the add icon to create a new item.
- Select text field. Click Next.
- Enter a name for this item. In our case, this would be
P1_NAME. - In the region list box, select the region you just created. Click Next.
- Enter a name for the label. Click Next two times.
- Click the Create item button.
- The first item is now ready. You should also create the following items using the steps above:
P1_SUBJECT
P1_TEXT.
- But for this last item, select text area instead of text field as the item type.
- Next create a button. In the buttons section, click the Add icon.
- Select the region for this button. In our case, we select the region we just created. Click Next.
- Select Displayed among this region's items as the position.
- Enter a name for this button, for example P1_SENDMAIL.
- Check the Beginning on new line checkbox.
- In the label field, enter Send mail for this button.
- In the button style listbox, select HTML button.

- Click the Create button.
We now have a region with the necessary text items and a button to send the mail. Now we must create the process.
- In the processes section in the middle of the screen, click the Add icon.
- Select Send E-mail and click Next.
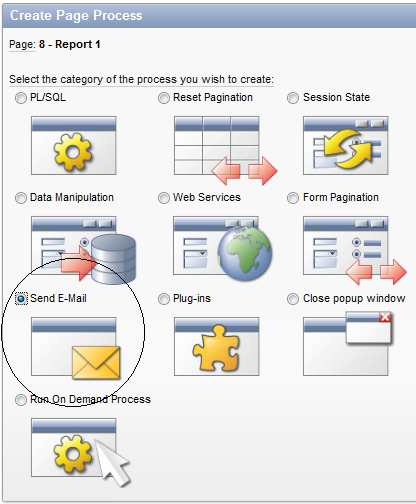
- Enter a name for this process. Click Next.
- In the From field, enter&P1_EMAIL. (with the dot at the end).
- In the To field, enter your company's e-mail address.
- In the Subject field, enter&P1_SUBJECT. (with the dot at the end).
- In the Body Plain Text field, enter&P1_TEXT. (with the dot at the end).
- Further, you can choose to have APEX send the mail immediately by selecting Yes in the Send immediately list box at the bottom.
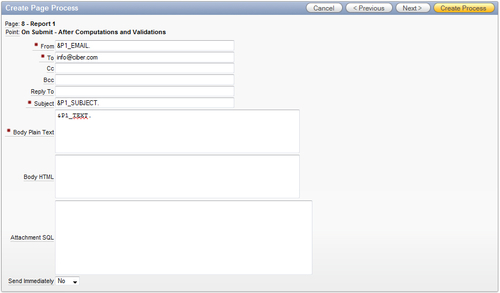
- Click Next.
- Enter a success message and a failure message. Click Next.
- In the "when button pressed" list box, select the button you just created.
- Click the Create process button.
The contact region with items and a send button is now ready. Run the form and try to send an e-mail.
The actual work is done by the apex_mail.send function and this function is called in the page process. This page process is of type Email and all you have to do is enter all details in the text fields. However, you can make it dynamic by using the substitution variables like&P1_NAME. Don't forget the dot at the end.