
The architecture of a single APEX application is simple. You create a workspace, then you create an application, and then you build pages inside this application.
But what if we anticipate more than one application in our workspace? It's possible that a company has a single corporate style for all its web applications. If we would have to create templates for this style in every single APEX application, we would lose a lot of time better spent on creating functionality in the application itself.
In this recipe, we will see how we can set up a development environment that can reuse as many elements as possible and still be flexible.
Application Express offers a feature called subscriptions. This allows developers to inherit a number of properties from one application to another. By using these subscriptions we don't have to build something like a template twice, but instead we create it once in a parent application and then use that same template in a child application by subscribing to it. Now whenever a change is made to the layout of the template in the parent application, all we have to do is update the subscriptions to rollout the changes to all child applications.
But this is not limited to templates. It can also be used for CSS files, authentication, or JavaScript and many more parts of the parent application.
In a very simple graph, the architecture would look a little like this:
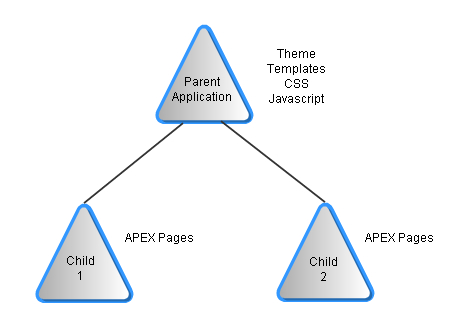
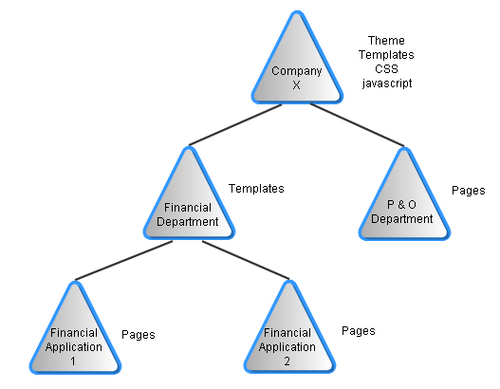
Developers can go as far with this architecture as they want. For example, if a company has a layout that is used for all web applications, but the financial department needs to add an extra region containing legal statements to some of it's pages for legal purposes, we can add another layer of child applications. So the company has a standard layout, the financial department subscribes to this standard to comply with company policy. They themselves create a standard layout for the required legal regions. The applications created by the financial department then subscribe to this new legal standard.
This would change the architecture to something like this:
And this can go as far and deep as the developers want. Keep in mind however that pushing a master subscription will only update the first level of subscriptions. So if you want to apply a change in the master more than one level down, you have to publish the change on every level.
First, we have to create an application to be used as the parent.
- Go to the Application Builder and press the Create > button.
- Select Database and press Next.
- Select From Scratch and press Next.
- Name the application Company Parent and press Next.
- Add a single Blank page and name it Main then press Next.
- Select One Level of Tabs and press Next until we reach the Theme selection screen.
- Select Theme 1 and press Next.
- Finally, press Create to finish.
We now have an almost empty application (except for the Main page), so let's adjust something in a template to see what happens.
- Navigate to Shared Components and then to Templates.
- In the list of templates, locate the one called One Level Tabs - Right Sidebar (optional / table-based) under the Page templates and open it.
- In the Definition section, find the Body section. In this section, change the first
<div>area with the id"header"to the following:<div id="header"> <div id="logo"><h2>Company X</h2><a href="#HOME_LINK#">#LOGO##REGION_POSITION_06#</a></div> #REGION_POSITION_07# <div id="navbar"> #NAVIGATION_BAR# <div class="app-user">#WELCOME_USER#</div> #REGION_POSITION_08# </div> </div>
[1346_10_1.txt]
- Press Apply Changes.
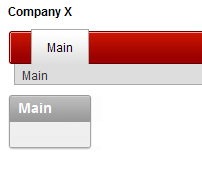
- Now Run the Company Parent application.
You will see that the header for the Main page has been changed. It now contains the text Company X.
Now let's create a Child application that will subscribe to this template.
- Go to the Application Builder and press the Create button.
- Select Database and press Next.
- Select From Scratch and press Next.
- Name the application Company Child and press Next.
- Add a single Blank page and name it Main then press Next.
- Select One Level of Tabs and press Next until we reach the Theme selection screen.
- To show the contrast with the Company Parent application, select Theme 2 and press Next and then Create.
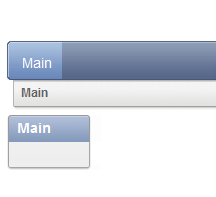
When we run this new application we can see that it's mainly blue and does not contain the name Company X in the header.
Now we are going to subscribe to the template we changed in the first part of this recipe, so we can see how this works.
- Go to the Shared Components of the Company Child application and go to Templates.
- Click on the One Level Tabs - Right Sidebar (optional / table-based) template to open it.
- In the Subscription section, press the List of Values button next to the field labelled Reference Master Template From.

- In the pop-up that opens, find the entry for One Level Tabs - Right Sidebar (optional / table-based) that corresponds to the Application ID of our Company Parent application.
- Press Apply Changes.
When we now return to the template, we can see that the Subscription section has changed.
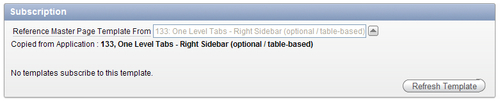
We can see that the template is now copied from our Company Parent application (in this screenshot the Application ID is 133), and a button called Refresh Template has been added. This button pulls in all changes made to the master copy of the template, in fact the opposite of the publish process we will see later on in the recipe.
If we run the Main page in the Company Child application, we can see that it looks exactly like the Main page of the Company Parent application. At least, the parts that belong to our One Level Tabs region template. This proves that the copy process for the template works.
Let's return to our Company Parent application to find out if the publishing works as well.
- Return to the Company Parent application and navigate to Shared Components | Template and click on the One Level Tabs - Right Sidebar (optional / table-based) template again.
Let's assume that the CEO of Company X has a new marketing strategy and wants to let the world know how good the company is.
- In the Body section change the "header" div to:
<div id="header">
<div id="logo"><h1>The best company in the world!</h1><a href="#HOME_LINK#">#LOGO##REGION_POSITION_06#</a></div>
#REGION_POSITION_07#
<div id="navbar">
#NAVIGATION_BAR#
<div class="app-user">#WELCOME_USER#</div>
#REGION_POSITION_08#
</div>
</div>
[1346_10_2.txt]
- Press Apply Changes.
- Run the Company Parent application as well as the Company Child application to see the difference.
- Return to the Company Parent application and navigate to Shared Components | Template and click on the One Level Tabs - Right Sidebar (optional / table-based) template again.
In the Subscription section, we can see that there is a list of templates that reference this one.
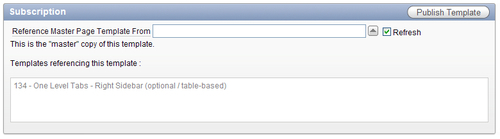
- In the screenshot there is the reference from our Company Child application with Application ID 134.
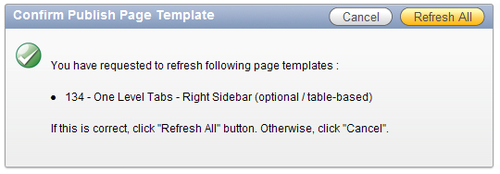
- Press the button Publish Template to apply the changes to the referencing templates.
- Press Refresh All to complete the publishing.
When we now run the Company Child application we can see the result. This application now automatically looks like its parent.