
Creating an Efficient Workflow
The first thing to do is to process and save all the images that will be needed for the job at high resolution (300dpi is great) and in CMYK mode. This should mean that they are all as large, or larger, than you will actually require. Once you begin the layout process you will not easily be able to make any further adjustments to them, so make sure all that work has already been done. Save them all into a single folder: I usually name it “hi-res CMYK.” Create an empty folder adjacent to it called “lo-res RGB.”
In Photoshop, open one of the images and then choose Window > Actions (fig. 8.1). Click on the Options button (at the top right of the window) and choose New Action. In the New Action window that opens, name it “300 CMYK to 72 RGB” and click Record (fig. 8.2). Now, everything you do to the open image will be recorded, so be careful!
Choose Image > Image Size and, in the window, make sure that the resolution is not linked to the width and height (see the Image Size window images in the previous chapter). If it is, check Resample Image in the lower left corner. Resolution should then be unlinked from the other two. Highlight the number in that field, 300, and change it to 72. Click OK, and your image will appear to change size. That is not a problem. As far as a page layout is concerned, it still has the same dimensions as before. Then, choose Image > Mode and choose RGB (fig. 8.3). The image is now low-res RGB, but is actually exactly the same physical size as the original in terms of inches wide and tall, and so it will occupy exactly the same area in InDesign as the original CMYK image.
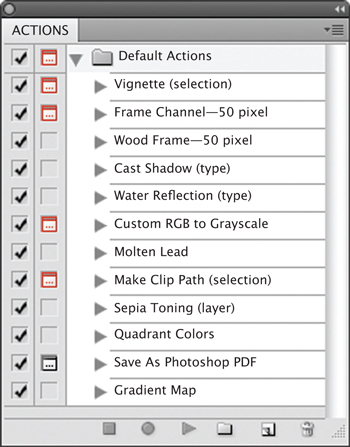
8.1 The Actions window.

8.2 The New Action window.

8.3 The Image > Mode list.
Finally, close the open image but do not save it, or you will have just overwritten one of your high-resolution CMYK originals.
Now, still in Photoshop, choose File > Automate > Batch (fig. 8.4). This enables you to automatically run the selected action on all the images in a defined “source” location, and save the results in a “destination” location—while you do something else.
The action you just created should appear at the top of the window; if not, choose it from the list.
The Source should be set to Folder. Then click on Choose and locate the high-res CMYK folder and select it. The “destination” should also be a folder. Again, click Choose, find the low-res RGB folder, and select it. Then, click OK. Photoshop will open each of the high-res CMYK images in turn, run the action on it, and save the low-res RGB result in the destination folder.
The low-res RGB images should now be used to build your design in InDesign. When it is completely finished, save the file and close it. Then, move the low-res RGB images folder, and reopen the InDesign file—which will warn you that the links to the source files are now broken, and suggest that you use the Links window to fix things. Click OK, and the file will open—apparently with all the images still in place. However, do not be misled: these are merely screen representations and are definitely not good enough to print.

8.4 The Batch window in Photoshop.
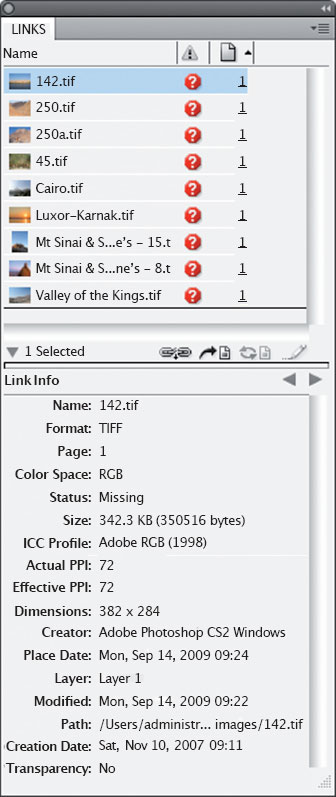
8.5 The Links window in InDesign showing the “missing” links.
Open the Links window, and you will see a red “missing link” icon opposite all the images in the list. To activate the window, click once on the top entry in the list (fig. 8.5), then click on the “relink” icon. This opens a file tree allowing you to identify the current location of—not the low-res RGB image, but the high-res CMYK image of the same name. Select the high-res image in the Source folder, click Open, and InDesign will find and update the links to all the other images in the layout.
Then save the file, and make the PDF. This method means that you never have to wait for the screen to redraw.