
Using InDesign
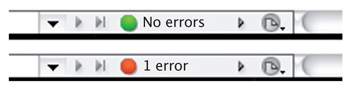
12.1 The Preflight button in InDesign, at the lower left corner of the screen. Click on it to show Preflight options.
InDesign has a Preflight option in the lower left corner of the document window which enables you to check various aspects of the document before making a final PDF. A green button means everything governed by the current profile is OK, whereas a red button means the document has a problem (fig. 12.1). However, the default preflight profile will not warn you about the inclusion of RGB images. As this is extremely useful, it is a good idea to create a new profile which will warn you.
To do this, click on the small gray arrow to the right of the green (or red) button and choose “define profiles” from the list. Give the new profile the name “color warning,” then click the arrow against “color.” Check the box next to “color spaces and modes not allowed,” and then on the arrow beside it to open that area. Now, check the boxes against RGB, Lab, and Spot Color. Click Save then OK to close the window.
To apply your new profile, double-click on the red/green button to open the Preflight window and choose it from the list. It will then become the profile associated with that document. To apply your new profile as the default setting, click on the “options” button in this window and choose “preflight options.”
To create a PDF from an open (and preferably saved) document, choose File > Export. You are prompted to create a file name and choose a destination. When you click Save, the Export Adobe PDF window appears (fig. 12.2).
At the top is a drop-down list of presets from which you should select the one most suited to the current purpose (fig. 12.3). In the bottom left corner is the Save Preset button. This can be used to save and name an edited version of any of the presets, which will then be added to the drop-down list.
The main area of the window, on the right, displays the options for the item currently selected in the list on the left side, which has General at the top (as shown in fig. 12.2).
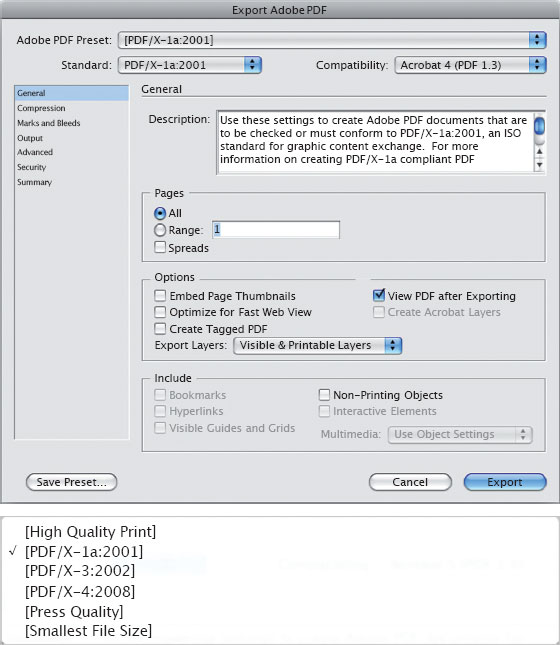
12.2 The Export Adobe PDF window.
12.3 The default list of PDF presets.
Making a low- or high-res PDF from InDesign
General
These settings cover options such as the range of pages to include, whether to do so as spreads or single pages, interactive options, and compatibility.
Low-res
If interactive materials are involved in your document, check Bookmarks, Hyperlinks, and Interactive Elements. The “Optimize for fast Web view” and “View PDF after exporting” boxes are checked as a default. If they remain checked, neither will be a problem regardless of the kind of file you are creating. Compatibility issues determine whether movie clips (which can be included as interactive material) will play in the result, or not. If compatibility is set to Acrobat 6, they will.
High-res
The only important setting is the page range to include. Otherwise, these settings will not affect the creation of a high-res PDF.
Compression
Compression settings are particularly important as they determine how the images will be handled.
At the foot of the settings area are two checkboxes: “Compress text and line art” and “Crop image data to frames.” Both are checked as a default, and should remain so as they help to reduce PDF file size without any loss of quality. Text and line art compression is non-lossy, and any part of an image outside the frame in which it has been placed will not display—so it might as well be cropped out.
The main area of this section holds the settings for grayscale, color, and monochrome images. There are two resolution fields for each of those three types. The default “Pixels per inch” numbers indicate that, for example, grayscale images will be allowed to remain unchanged if they are present at a dpi of 450 or less, but that anything with a greater resolution will be downsampled (i.e. the content of each pixel will be redefined) to the lower resolution of 300dpi. The method set for this downsampling is Bicubic, which creates a larger but a higher-quality result than the alternative Average Downsampling option.
Clearly, any image that has been placed in an InDesign document and then reduced in size will have a higher relative pixel count and will therefore create a larger PDF—and if the requirement is for a small file size, this is counter-productive right up to the downsampling threshold of 450dpi. So, why not just set both numbers to 300?
Downsampling Test
The images on the next page (fig. 12.4) are made up of eight duplicate images arranged in four pairs of two. The left-hand image in each pair was generated in test 1, and the right-hand image in test 2. The first pair were both 300dpi, the second 425dpi, the third 450dpi, and the fourth 475dpi.
The PDF/X1a:2001 preset was used for both tests. In test 1 the settings were left unchanged. As these will downsample an image only if it is above 450dpi, the left-hand image in pair 4 (at 475dpi) was the only one to be downsampled to 300dpi. As the dpi of the other three left-hand images was at or below 450 they were left unchanged.
In test 2, the “Downsample images below” setting was changed to 300. So, the only image not to undergo the downsampling process was the right-hand image in pair 1—which was already set to 300dpi.

12.4 To see if the downsampling presets made any difference in the resulting files, eight copies of the same image were made, each being subjected to different settings.
12.5 Four copies of the same image, each saved at a different dpi and then placed here at the same size to allow any differences to be seen. 300;

12.5 Four copies of the same image, each saved at a different dpi and then placed here at the same size to allow any differences to be seen. 425;

12.5 Four copies of the same image, each saved at a different dpi and then placed here at the same size to allow any differences to be seen. 450;

12.5 Four copies of the same image, each saved at a different dpi and then placed here at the same size to allow any differences to be seen. 475.
There was a considerable size difference between the two PDF documents: test 1 was 2.7MB, while test 2 was only 2.1MB.
While comparing the images, also bear in mind that each successive pair printed smaller than the original, as the relative dpi increased; they are all shown here, side by side, at the same size purely for ease of comparison. In fact their true printing sizes are described in fig. 12.5.
Low-res
As the consideration here is to produce a small file size at a reasonable quality, I usually change both fields in the color and grayscale areas to 96, and both to 300 for monochrome. As this creates a smaller file size than would otherwise be the case, I then turn the image quality from low to medium. If the file size is still smaller than necessary, I might re-run the PDF with the quality set to “high.”
High-res
When creating the side-by-side images for fig. 12.4 I was of course working (in Photoshop) with pixels rather than rasterized dots, and while there were some very slight differences between images that had been downsampled compared to those that had not, I doubt very much if they are the kind of differences that will ever be noticed. Therefore, I see no reason—especially when you also consider the difference in the resulting file sizes—to leave the pairs of numbers for grayscale, color, and monochrome images in any high-res PDF preset at their default settings. Instead, I change them to 300/300, 300/300, and 1200/1200 respectively (fig. 12.6).
Below this area for both color and grayscale images are two fields that deal with what, if any, method of compression will be used to further decrease the file size. I used to feel that the setting of Automatic (JPEG) could not possibly be as good as None, which does not compress the images at all. “Why,” I thought, “would I want to bring JPEG compression anywhere near my carefully saved TIFF files?” In fact, when Automatic (JPEG) is combined with Maximum in the Image Quality field directly below it, you will not be able to see any difference at all. Your images will look exactly the same as if you had chosen None. The real difference is in the resulting file size: instead of a whopping 6.9MB file, I ended up with 2.1MB.
The default CCITT Group 4 compression for monochrome images is non-lossy and safe to use for RGB and CMYK output.

12.6 The Compression settings.