
Using QuarkXPress
Quark is still slightly behind InDesign in that you cannot embed a CMS profile in your PDF. So, you need to have everything figured out beforehand.
Prior to exporting a file as a PDF, choose Utilities > Usage. Check that the fonts showing are the ones you actually used and that the images are all linked correctly. If not, the resulting PDF might be in trouble. If a picture is listed as “missing,” it means Quark cannot find it in the location from which it was originally linked. You will need to update the connection using the Update button. If a font appears that you did not expect, click on Show First to find out where it first appears.
It is not uncommon for Quark and InDesign files to include line spaces that are specified in a default font such as Arial. Since Arial is a resident font on both PC and Mac systems, there is no need to worry. However, if actual text appears in Arial, and it was supposed to be something else, change it to the correct font and resave the file before continuing.
To create a PDF you can now choose File > Export > Layout as PDF. This is much easier than the options available under File > Print, which required the adjustment of many different settings in many different windows.
Creating a low-resolution PDF
After checking that everything is linked correctly, and that there are no missing elements in your document (File > Flight Check), choose File > Export > Layout as PDF. In the Export PDFs window, assign a name and location for the saved file, then either choose an existing preset with no additional editing by making a selection from the Captured Settings list (probably not a great choice, as they all require some kind of adjustment), or click the Options button to open the PDF Export Options window (fig. 12.12).
Here, you can either choose from the PDF styles listed (fig. 12.13) under the PDF Style field—all of which can be edited to suit current output requirements—or build an entirely new style by clicking on “New PDF output style” at the foot of the list. In this case, having named the new style and saved it, it will appear as one of the choices on the drop-down list. You can customize the settings for a new style created in this way in exactly the same manner, and at any time, as you would any other style—see below.
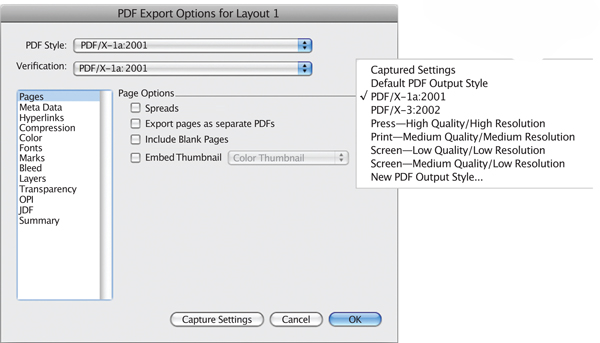
12.12 The Quark PDF Export Options window.
12.13 The default PDF presets.
If you are exporting a lower-resolution file either for Web use or for sending by e-mail, choose “Screen—low quality” or “Screen—medium quality.”
Clicking on the various items in the list on the left-hand side of the Export Options window allows you to change existing values or enter new information, such as in the Meta Data window.
Choose an option under Pages (usually it will be Spreads), then click on Hyperlinks. The default settings ensure that all interactive material—hyperlinks and bookmarks—built into the Quark document will function in the PDF result. You can also choose whether items such as hyperlinks will have a specific, additional visible appearance or appear just as they look on the page. A zoom setting at which the PDF will open can also be set, near the foot of the window.
Compression deals with the display and resolution of all the included images. There are three sections: Color, grayscale, and monochrome. The “Screen—low” settings put 72dpi in place (fig. 12.14), which is actually the resolution of older Mac screens. The quality of the output can be changed under the Compression settings for all three types of image (fig. 12.15). However, don’t change them for monochrome images, as CCITT Group 4 is a non-lossy form of compression that works very well. Also, make sure the “Compress text and line art” box is checked, for the same reason.
Color should generally indicate, regardless of the “plates” listed below, that the result will be a composite RGB file.
Fonts: if Select All is checked, every character in every font used will be embedded in the PDF result, in a way that does not contravene the licensing you agreed to when they were purchased —which does not usually include the right to send them to the printer.

12.14 Compressions settings for creating a low-resolution PDF.
12.15 Other Compression options.

12.16 The Layers options.

12.17 The color output option for a high-res PDF should usually be Composite CMYK.
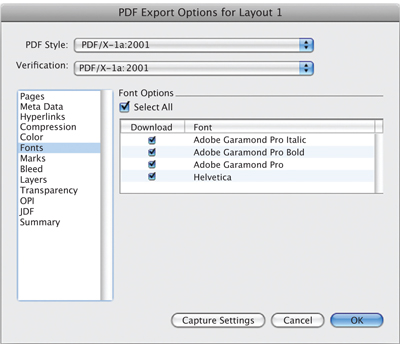
12.18 The Font options.

12.19 The Marks options.

12.20 Bleed options.
12.21 Leaving resolution values too low may result in some pixelation. To avoid this, increase them as shown.
Marks refers to registration and trims, and bleed marks can be added if required. The measurements refer to the size of trim marks, and the offset the distance between the end and the edge of the page.
Bleed: If your document contains bleeds, you should specify them here. If you choose Page Items, bleed marks will only be added on pages requiring them. The amount is usually 3mm.
 |
Neither marks nor bleeds are usually required in a file created solely for screen viewing. I do not include them in, for example, files sent to clients for their approval, as they usually confuse the client. |
Layers: If Select All is checked, all the layers in the file will be included in the PDF result (see fig. 12.16).
Transparency effects are rendered in various combinations of vector and bitmap. For effects made up of pixels, the resolution can be lower—72dpi. For vector objects, they require a higher resolution, as they do not mix colors in the same way. If we use a lower resolution for them, visible banding is the likely result.
The last few options are not relevant to the creation of a simple PDF.
High-resolution PDF
If you are making a high-res file for print output, choose “Press—high quality/high resolution.”
Pages and Meta Data are as mentioned. Hyperlinks will not be available, as they are not part of a print file. In Compression, the default resolution is 300dpi for color and grayscale images, and 1200dpi for monochrome. Monochrome images require higher resolution as there is no anti-aliasing present to soften them. However, the quality level should be set either to either JPEG High or None, and nothing lower. The same is true for PDF/X-1a, detailed below.
The Color window shows that in this case the result will be a composite CMYK file rather than RGB (fig. 12.17).
The Fonts window shows all the fonts used in the document and, as a default, will select and embed all of them (fig. 12.18).
Marks is as detailed above. However, in the case of a print-ready file, they are essential items to include (fig. 12.19). Choosing Centered will place registration marks at the center of each side of the page, just outside the live (i.e. the final, trimmed page size) area.
Bleed should be set to 3mm. You can choose whether to allow bleeds to be marked only on affected pages or throughout the document (fig. 12.20).
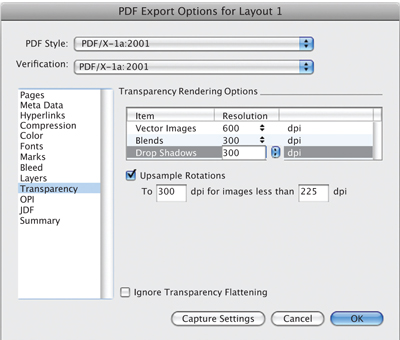
Under Transparency, increase the resolution for drop shadows to 300dpi, and for vector images to 600dpi. This rasterizes them at a higher resolution than the other images. Vectors tend to have sharp edges that may appear pixelated at a lower setting, hence the need to increase the dpi. The Upsample Rotations area is designed to deal with increasing the resolution of rotated images and should be set at 300dpi. If settings are left at 150dpi then it is possible that you will see some pixelation in the end result (fig. 12.21).
OPI and JDF are more advanced than usually required, and the Summary details everything done in these windows—which you already know, but which may be useful to review.
The settings for PDF/X-1a, another high-res-for-print format, differ in only a few significant ways. Under Color, only those colors actually used in the document will appear. Under Transparency, the drop shadows should still be increased to a resolution of 300dpi, but the correct resolution for vector rasterization (600dpi) is already in place.
Now that everything is ready to roll, there are some things you should know about printers.
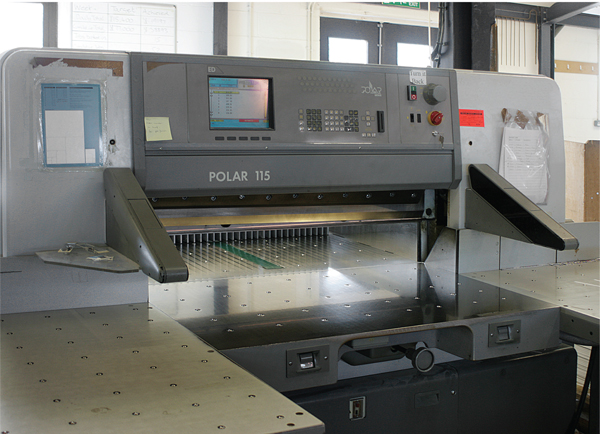
12.22 A guillotine for cutting paper. This machine is capable of cutting right through a stack more than 6in (15cm) thick… but doing so may not be a good idea.