
Chapter 9. Testing your application
- Roo test creation commands
- Stubbing tests
- Mocking entities and collaborators
- Web-based testing challenges
- Testing with Selenium
Spring Roo helps you build your applications rapidly, but that doesn’t mean you should skimp on your testing plans. Chances are, you’re building the applications so fast that it would help to slow down a bit and write some useful tests. The more you test up front, the fewer surprises you’ll find in production.
You’ve already learned that simple actions, such as using the --test-Automatically flag to create entities, help ensure you have a baseline of entity persistence tests for your application. But you can do more. As you saw in chapters 3 and 4, you can write your own tests, even reusing the DataOnDemand classes to create both persistent and transient versions of your entities. You can also write integration tests for your Spring beans and install Selenium for end-to-end testing.
In this chapter, you’ll see how Roo makes it easy to set up your test environments and how you can test using Roo’s integration and web testing technologies, such as the Spring test runner and Selenium.
9.1. Roo testing philosophy
A web-based application can be tested at several levels using isolated, method-level unit tests; more sophisticated, in-container integration tests; and live, externally executed website tests. Roo supports all three levels of testing, as shown in figure 9.1.
Figure 9.1. Testing levels in Roo, Spring, and most other frameworks. Note how complexity increases as the runtime environment is loaded or user interactions are posed, and how much faster tests run when isolated as unit tests.
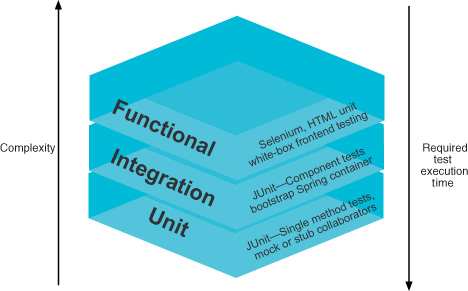
Think of these testing models as layers in a kind of testing cake. Without all of the layers, your tests are one-dimensional, and they look at your application from only a single viewpoint. You’ll find different bugs at each level, so implementing each of these types of tests is key to finding all of the bugs hiding in your application.
9.1.1. Layers of testing
The review of the testing levels in this chapter follows the same order as depicted in the previous figure—you’ll start with unit testing and finish with functional testing.
- Unit tests —Exercise single units of code, usually Java methods. Where necessary, other collaborating objects are either stubbed or mocked so that they can behave in predictable ways. For example, a Spring CourseManager bean may rely on a TaxCalculator bean. In a unit test, you’d test the calculateCost() method of CourseManager, but you’d want to generate a predictable result from the tax calculator bean reference, so you’d mock or stub it. JUnit is a popular testing API, and Roo uses it for all unit tests.
- Integration tests— Exercise methods in components such as Spring beans, but run the tests in a live container. You normally write integration tests to see how the component behaves in its own environment, such as when connected to a database. Entities are best tested in integration tests. These tests are also written in JUnit, but using a special test runner that mounts the application server before running tests.
- Functional tests —Exercise the application using an external testing tool, such as a web browser emulator. Selenium is an open source web testing tool that can be used to test your application’s web frontend.
Let’s see how Roo provides access to these test frameworks.
9.1.2. Test-specific shell commands
Roo provides these tests using several key shell commands:
- test stub andtest mock—Both of these commands create out-of-container unit tests.
- test integration—Creates in-container integration tests, which boot the Spring application context and execute all of the Roo entity API methods, such as persist(), merge(), flush(), and remove(). You can add your own tests to these as discussed in chapters 3 and 4.
- selenium test --controller—Installs and configures the Selenium web testing API if needed, and then generates a Selenium HTML test against a specific controller.
In this chapter, you’ll learn about each of these commands in detail as well as the APIs of which you need to be aware, and how to approach specific testing scenarios. Before you get started with the commands, though, you need to review a key Roo testing feature that makes working with entity data easier: the DataOnDemand test framework component.
9.1.3. The DataOnDemand component
The DataOnDemand component is a useful test class that helps you generate test fixtures, the data required to set up your test case. You’ll create these DataOnDemand classes in two ways: when you generate the automated entity integration tests
roo> test integration --entity ~.model.Course
or when you create one as a standalone test component using the dod command:
roo> dod --entity ~.model.Course
The generated component is shown in figure 9.2.
Figure 9.2. The integration test framework

The DataOnDemand component provides three key methods for test data generation: getNewTransientEntityName, getSpecificEntityName, and getRandomEntity-Name. Let’s look at each of these methods in detail.
Table 9.1 provides detail on the methods in the CourseDataOnDemand aspect.
Table 9.1. A sample of DataOnDemand methods, using the Course entity
|
Method |
Test type(s) |
Description |
|---|---|---|
| init() | Integration | Configures and persists ten instances of the Course entity, held in a member list variable, data. Entities created by this
mechanism are used by getSpecificCourse(), getRandomCourse(), and other methods that take an index parameter. This method doesn’t have to be called directly, because the other methods returning test entity instances will call it when necessary. If you call it after the elements are initialized, it returns without modifying the collection. |
| getNewTransientCourse (int index) | Unit, integration | Creates a new, legal instance of a course. This method doesn’t persist the course; hence the name includes the term transient. |
| setFieldName(value) | Unit, integration | Used by getNewTransientCourse(), these setters generate legal values of each field. If your validations are too complex for a simple static definition of a field, you may push one of these methods in to the DataOnDemand class, and modify the behavior. |
| getRandomCourse() | Integration | Returns a random persistent course in the range of courses created by the init() command. If the list of courses isn’t available, the init() command is executed automatically. |
| getSpecificCourse(int index) | Integration | Returns a persistent course at the specified index. If the course index specified is too high, the method returns the course with the highest available index. |
The DataOnDemand classes can be used for both unit entity tests and integration entity tests, as long as you use only methods such as getNewtransientCourse from the mock tests. Those methods create nonpersistent instances of the entity. All other methods work with a persistence context and must be called from within integration tests.
9.1.4. Key DataOnDemand methods
Let’s dive into some detail on three key methods of the DataOnDemand framework. You need to understand them fully to take full advantage of them and write tests quickly.
Fetching a Transient Entity
The getNewTransientEntity method returns an initialized, transient entity with sample data stored in each field. The entity is not persistent, so this method can be used by unit tests and integration tests.
A sample call:
CourseDataOnDemand dod = new CourseDataOnDemand();
Course course = dod.getNewTransientEntity(5);
The index helps to define the values for the data. The data returned holds to several predefined rules:
- All string-based fields hold the name of the field, an underscore, and the index value. For example, description_5.
- All numeric values return the value of the index.
- All date values return a randomized date, close to the value of the current date.
- All Boolean values return true.
- Relationships to single-sided entities, such as owners, may be initialized with values from other DataOnDemand components. For example, if the Training-ProgramDataOnDemand component exists, CourseDataOnDemand will call it to create an instance of the training program and set the value.
Referenced Entities and Dataondemand with Unit Tests
Currently, detection of referenced entities and their DataOnDemand instances can cause unit tests to fail. See https://jira.springsource.org/browse/ROO-2497 for more information. A quick workaround is to override the method that sets the entity, and create the referenced entity yourself using the referred to entity’s DataOnDemand class.
For this chapter’s sample course, the test data might look something like this:
name: name_5
price: 5
description: description_5
...
The getNewTransientEntity method is useful anywhere you want to generate a simple entity instance. It’s also used by the internal init() method to generate test entities for the other methods.
Use of this method to set up test fixtures saves you time and energy. Many of the tests in this book take advantage of this method.
Fetching a Persisted Entity
The getSpecificEntity method returns an entity from the internal list of persisted entities. If the list is empty, it will be initialized automatically. Roo will initialize and persist ten instances in this list. If the user requests an out-of-range index value, it will return either the lowest or the highest element.
This method can be used only in a JPA environment, so it’s useful only for integration tests. The entity has already been persisted and attached to the JPA entity manager, so you can modify and even delete the entity. Remember to define your integration test methods with @Transactional so the modifications are rolled back, or you may leave the DataOnDemand instances in an inconsistent state.
Fetching a Random Entity
If you don’t care which persistent entity instance you work with, ask for a random one with getRandomEntity(). Repeated calls won’t necessarily return unique instances because the sample range is only ten unique instances. If you truly need two different entities, use the getNewTransientEntity() method twice and persist each instance.
9.1.5. Working with the DataOnDemand framework
Let’s look at some techniques you can use when working with the DataOnDemand components.
For example, when you write a unit test you’ll use the transient getter, as in the following example, where you start with a generated entity, and set the list price to a value you prefer:
Course course = dod.getNewTransientCourse(0);
course.setListPrice(new BigDecimal(10.0d));
For working in an integration test, you can get a transient course and persist it, as in this code block that checks for a generated primary key after creating an instance of a course:
Course course = dod.getNewTransientCourse(0);
course.setListPrice(new BigDecimal(10.0d));
course.persist();
course.flush();
assertNotNull(course.getId());
Alternatively, you can grab a prepersisted instance and manipulate it, as you see in the next example, where this test asserts that an updated course has a different version number:
Course course = dod.getSpecificCourse(0);
Long oldVersion = course.getVersion();
course.setListPrice(new BigDecimal(103.0d));
course.update();
course.flush();
assertTrue(oldversion != course.getVersion());
In the previous example, you fetch the first generated course instance, capture the version of the course row when retrieved, and then modify the list price and update your entity. After a JPA flush, which guarantees that the data is written to the database, you can check the version, which should be incremented, allowing the assertion to pass.
Initializing the DOD Data
You may be wondering if you have to initialize the data backing a DataOnDemad class. The answer is, no; instead, you construct a new instance. It’ll initialize itself, provided a persistence context exists and you’re running a Spring Integration test.
Using the DataOnDemand framework can speed up your test writing, making the creation of simple entity instances a trivial operation. Feel free to refactor the code as you see fit, pushing in methods that perhaps won’t deal with your more complex validation rules or data persistence strategies. Remember to keep the core functionality in place for the three key methods mentioned previously in this chapter.
Now that you’ve seen how Roo approaches tests and how to generate test entity data, let’s start looking at the various types of entity tests you can write, and how you can allow Roo to help you during the creation and execution of those tests. You’ll review unit and integration tests with JUnit, and then perform some web testing with the Selenium API. Let’s begin by looking at the Roo unit testing framework.
9.2. Stubbed unit tests
The test stub command creates a JUnit test that constructs an instance of a class, and creates test stubs for each of the public methods. You create the test by using the test stub command.
Let’s look at a simple service that calculates a tax amount:
package org.rooina.coursemanager.service;

import java.math.BigDecimal;
import org.springframework.beans.factory.annotation.Autowired;

public class DefaultTaxCalcService implements TaxCalcService {

  private BigDecimal taxRate;

  @Autowired
  public DefaultTaxCalcService(BigDecimal taxRate) {
    this.taxRate = taxRate;
  }
  @Override
  public BigDecimal calculateTax(BigDecimal price) {
    return price.multiply(taxRate);
  }
}
This class is initialized with a BigDecimal tax amount and calculates a simple tax based on an injected tax rate. This is injected into the component via the Spring container, either by annotation, JavaConfig, or XML injection. Now, let’s create a unit test for this service:
roo> test stub --class ~.service.DefaultTaxService
This command creates DefaultTaxServiceTest.java in the src/test/java directory, stored within the same package as the DefaultTaxCalcService class. This assumes you’ll be writing tests against the methods of the class. The following code lists the sample test, with the stubbed test method for the calculateTax service method:
package org.rooina.coursemanager.service;

import org.junit.Test;

public class DefaultTaxCalcServiceTest {

  private DefaultTaxCalcService defaultTaxCalcService = new DefaultTaxCalcService();

  @Test
  public void calculateTax() {
      org.junit.Assert.assertTrue(true);
  }
}
This class doesn’t compile because the DefaultTaxService constructor requires a tax rate, injected as a BigDecimal. Let’s update the test to pass:
package org.rooina.coursemanager.service;

import java.math.BigDecimal;

import junit.framework.Assert;

import org.junit.Test;

public class DefaultTaxCalcServiceTest {

  private DefaultTaxCalcService defaultTaxCalcService =
    new DefaultTaxCalcService(new BigDecimal("0.02"));

  @Test
  public void calculateTax() {
    BigDecimal price = new BigDecimal("50");
    BigDecimal taxAmount = defaultTaxCalcService.calculateTax(price);
    Assert.assertEquals("Tax rate invalid",
                         new BigDecimal("1.00"), taxAmount);
  }
}
Fail them First
For a real treat, why not set the stubbed tests to assertTrue(false), so that they fail? The correct order is red to green.
You can use the test stub command to quickly generate empty tests against controllers, services, and other beans, and quickly write simple JUnit tests.
Let’s take a look at the next type of Roo test command, test mock, which is useful when you need to work with collaborating services and Roo entities.[1]
1 Refer to JUnit in Action, Second Edition for details on how to work with these APIs.
9.3. Unit tests using mock objects
Mock objects are objects that pretend to be instances of particular classes, but are completely controlled by the test developer. They appear to implement the specified interfaces, and you can configure them to return predictable values when their methods are called. You can use these mock objects instead of references to other Spring beans or collaborating classes.
There are a number of different mocking frameworks available for unit testing, including these:
- Mockito (http://mockito.org)—A popular unit test mocking library, well known for its easy-to-understand syntax and literate API, which uses method names such as when, then, answer, and other English language predicates. The Mockito API is great for mocking Spring bean and regular POJO collaborators with methods defined by an interface.
- EasyMock (http://easymock.org)—Mocks primarily based on interfaces. Uses a mock expectation recording and playback API, which can be a bit daunting to new users. In addition to Spring’s interface-driven applications, it’s a popular library.
- JMock (http://jmock.org)—Mocks based on interfaces as well. Developers define expected behavior and then execute their code.
- PowerMock (http://code.google.com/p/powermock)—An extension library that enhances the capabilities provided by EasyMock and Mockito. This mocking tool can mock static methods, interfaceless classes, constructors, final classes, and so on, which other APIs cannot.
Mock objects are often used when a layered application requires a particular Spring bean to collaborate with other beans, either in the same level or lower levels of the application. They take less time to create than a fully stubbed object, because you only have to create the mock object at runtime, define the specific behavior to mock, and ignore the rest of the methods in the class. Stubs require you to create a concrete class, and implement each of the methods of the object under test. That takes a lot of time, and unless you’re able to exercise the entire stub across all of your test methods, it may be a waste of your time.
What if you want to see whether the entity can be validated appropriately, or if you need to stub the entity itself behind a service? Spring provides a feature to mock the persistence layer enough to test your validations, without requiring a full JPA stack. This lets you perform basic unit tests against your entities, exercising logic you may have stashed away in assertTrue methods or methods that may contain business logic, and perform operations to generate derived data.
9.3.1. Mocking services with Mockito
Here’s how you can use mocks to emulate collaborating objects:
- Create your mock objects and define expectations.
- Create an instance of your object under test, manually setting or injecting your mock collaborators.
- Exercise the method under test.
- Verify your test results.
If you were working within a traditional, layered Spring application, you’d likely have Spring service beans that would work with Data Access Objects. You could easily make a mock version of a DAO that returns a predefined list of students if the getAllStudents() method is called. A fragment of a test may look something like this example:
...
StudentDAO studentDAO = Mockito.mock(StudentDAO.class);
studentService.setStudentDAO(studentDAO);

Mockito.when(studentDAO.getAllStudents())
              .thenReturn(preDefinedListOfStudents);

List<Student> students = studentService.getAllStudents();
Assert.assertTrue(students.size() == predefinedListOfStudents.size());
In the previous fragment, you’re testing a StudentService bean in isolation. It collaborates with a Student DAO, which you need to mock to provide that isolation. You’ll use the Mockito.mock(StudentDAO.class) statement to provide the mock object, and then set the mock as your collaborating Student DAO. You then use the Mockito.when method to tell the mock object to respond with a predefined list of students (not shown) when the DAO’s getAllStudents() method is called from the service.
As you can see, the Mockito framework makes it easy to define a mock object, such as studentDAO shown in the previous example. You can then manually inject the mock into studentService and tell the mock to return a prefabricated student list. After the service requests the getAllStudents() method on your mock, it automatically returns your predefined list of students.
Learning More
For more information about the excellent Mockito mocking framework, visit the project website at http://mockito.org. You might also be interested in an API that layers on top of Mockito and its cousin EasyMock. Named PowerMock, this API allows you to mock static methods and implements a number of other helpful features. See the website at http://code.google.com/p/powermock.
Mockito does a great job with typical, interface-driven Spring beans. But it can’t mock Roo entities, because Roo uses static methods within the entity to find entity instances from the database, and holds onto a private JPA entity manager to provide persistence logic.
All is not lost, though. Rod Johnson, the creator of Spring, contributed a testing framework element to help out: the static entity method mocking API.
9.3.2. The entity mocking framework
Spring provides a special mocking API to allow developers to write tests against static entity methods. To use it, you follow these steps:
1. Annotate your test class with @MockStaticEntityMethods.
2. Within a test method that requires collaboration with an entity, issue the method call that you’d like to mock. Because the annotation is in effect, the static method isn’t executed, but is added to the list of methods to expect.
3. Use the AnnotationDrivenStaticEntityMockingControl (for brevity, let’s abbreviate this as the acronym ADSEMC): call its .expectReturn method to define the result of the operation. You don’t need to do this if the method has no return value.
4. Put the mock in playback mode with the ADSEMC.playback() method.
5. Exercise the mock.
Because of the static methods used by the entity finders, testing a Spring bean involving an entity requires use of the Spring entity mocking framework.
9.3.3. Creating an entity mock test
To set up a mock test case, you use the test mock command:
roo> test mock --entity ~.model.Course
Roo will then create a test class that looks like the example shown in the following listing.
Listing 9.1. A mock course test
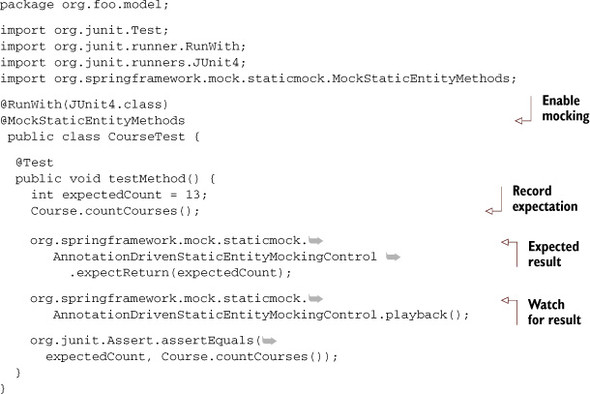
In the generated sample, the test is expected to call the Course.countCourses() method, returning the result of 13 rows. The @MockStaticEntityMethods annotation places the entity mock in expectation record mode. At this point, any calls to static methods, such as the Course.countCourses() method, won’t execute, but will be added to the recording queue.
Next, you use the AnnotationDrivenStaticEntityMockingControl object to record an expectation: a definition of the behavior to trigger when calling the last method recorded. In this case, you want the countCourses() method invocation to return the value 13 when executed.
Finally, you put the mock in playback mode, and then call your Course.count-Courses() method, which now returns the value 13, which you can check against your assertion.
This Seems Complex
While it’s true that the setup for this test is a bit unwieldy, you benefit because you’re able to test your validation assertions and plain business logic within a unit test, rather than booting the Spring container. Unit tests run in a fraction of the time.
You’ll need to decide whether to use integration tests for accuracy, or unit tests for speed, when testing validations and business logic attached to your entities.
You’ve examined the test mock command, and how to make use of it to write unit tests of Spring Roo entities. Now it’s time to use this in a more complex example and test what happens when you try to validate data.
9.3.4. Unit testing the completeRegistration() method
A typical JUnit unit test will test a single “unit” of code, such as a method on a Spring bean. Everything else is either stubbed or mocked, so that you can focus your energies on exercising your method under test and verifying the result.
Now let’s test an example Spring service method, RegistrationService.completeRegistration(long offeringId, List<Long> studentIds). The implementation looks like this:
public class RegistrationServiceDefaultImplBean
                implements RegistrationService {

  @Override
  @Transactional
  public void completeRegistration(
      Long offeringId, List<Long> studentIds) {
    Offering offering = Offering.findOffering(offeringId);
    for (Long studentId : studentIds) {
      Student student = Student.findStudent(studentId);
      Registration registration = new Registration();
      registration.setStudent(student);
      registration.setOffering(offering);
      registration.setAttended(false);
      registration.setPaymentMade(false);
      offering.addRegistration(registration);
      registration.persist();
    }
  }
}
The method creates a number of Registration entities and associates them with the appropriate student and course offering. Figure 9.3 shows the order of operations. The previous sequence diagram shows a fairly typical interaction with Roo’s Active Record–based entities. Rather than relying on repositories or DAOs to wrap access to your entities, you use the static finder methods to locate them, and methods such as persist() and merge() to manipulate them. You also define transactionality on this method, so that all operations against the entities are either committed or rolled back automatically.
Figure 9.3. The completeRegistration() method
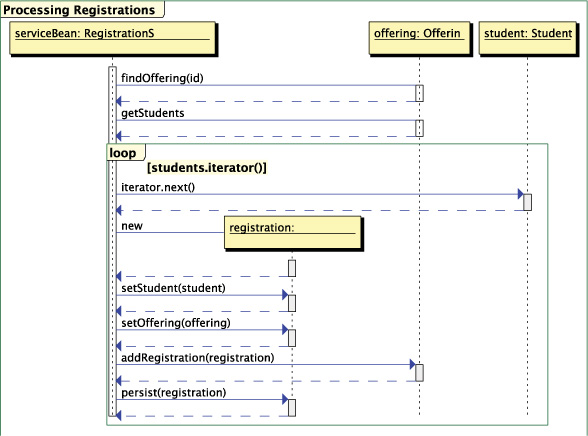
Testing this method in the Spring container, as you’ll see in section 9.4, is more involved and requires booting the application server. If you’re purely testing application logic, and can emulate the data access routines rather than take the integration testing overhead, you can run the test as a unit test, and improve the speed of your build process as a result.
Now, let’s implement the test using JUnit and Roo’s own entity mocking framework.
9.3.5. Mocking with the RegistrationServiceBean
Let’s write a test that exercises a bean that processes student registrations. The bean provides a registerStudents method that accepts a set of students and an offering, and then registers students for the provided course offering.
Setting up the Test
First, you’ll create the unit test class, using the Roo Shell test mock command:
roo> test mock --entity ~.service.RegistrationServiceBeanImpl
Note that the term --entity can be any class definition. Let’s open the bean definition for the newly created RegistrationServiceBeanImplTest and verify the class definition. Roo should define your test class with the @MockStaticEntityMethods annotation:
@MockStaticEntityMethods
public class RegistrationServiceDefaultImplBeanTest {
This annotation enables the entity mocking framework, as you’ll see in the next example.
Now, you’ll define three DataOnDemand class instances, one each for Student, Offering, and Course, which you’ll use to decrease the amount of code in your test. Define them in the Roo console with the dod command if they’re missing in your code:
private StudentDataOnDemand studentDod;
private OfferingDataOnDemand offeringDod;
private CourseDataOnDemand courseDod;
You’ll also create the Service bean yourself, so hold onto a reference to that, too:
private RegistrationServiceDefaultImplBean
                                    registrationServiceDefaultImplBean;
Setting up the Bean and Dataondemand Classes
Next, define a JUnit @Before method, setup(), which executes before each test. This method will create instances of all four of these objects:
@Before
public void setUp() {
  registrationServiceDefaultImplBean =
     new RegistrationServiceDefaultImplBean();
  studentDod = new StudentDataOnDemand();
  offeringDod = new OfferingDataOnDemand();
  courseDod = new CourseDataOnDemand();
}
Now, for each method under test, JUnit will create a new instance of the Registration-Service Bean, then reinitialize all three DataOnDemand instances.
Record Test Expectations
Define your test method, testRegisterStudents(). You’ll annotate it with @Test:
@Test
  public void testRegisterStudents() {
    ...
  }
Now, let’s write the code for the test. Referring back to the sequence diagram in figure 9.3, you’ll see that the first action of the method under test is to look up an Offering based on the value of the offering key passed to it.
You’ll use the OfferingDataOnDemand class to generate a test offering, and assign a fake primary key value of 1:
Offering offering = offeringDod.getNewTransientOffering(1);
offering.setId(1L);
Now, you’ll invoke the call you’d like to have your unit execute when it’s under test, and you’ll follow that up with what you expect it to return:
Offering.findOffering(1L);
AnnotationDrivenStaticEntityMockingControl.expectReturn(offering);
You’ll do this for every interaction you expect your unit to invoke.
For example, you can pass in ten Long primary key fields of students to register for this class. To set up the condition, do the following:
List<Long> ids = new ArrayList<Long>();
List<Student> testStudents = new ArrayList<Student>();

// record expectations
for (int id = 0; id < 10; id++) {
  Student.findStudent((long)id);
  Student student = studentDod.getNewTransientStudent(id);
  student.setId(Long.valueOf(id));
  ids.add(Long.valueOf(id));
  AnnotationDrivenStaticEntityMockingControl.expectReturn(student);
}
By now we hope you’re thinking that a straightforward integration test would be easier than this. You’re right, but it’ll run slowly and you’ll have to run it against a live database. If you’re trying to make sure the actions in your sequence diagram are called in the correct order, this test will do so at a fraction of the time.
Test and Verify
But you’re not done yet. You have to run the test—like EasyMock, Spring’s control doesn’t do anything until you call the playback() method:
AnnotationDrivenStaticEntityMockingControl.playback();
Now you can perform the call, using the generated offering’s primary key (1L) and the list of fake primary keys generated for each student mock call:
registrationServiceDefaultImplBean.
     completeRegistration(offering.getId(), ids);
If all is well, there’ll now be ten registrations, which you’ll fetch and assert, as shown in this next example:
Set<Registration> registrations = offering.getRegistrations();
Assert.assertEquals(10, registrations.size());
And that’s that. About 30 lines of code, with appropriate white spacing. The main benefit of testing in this way is that it forces you to review the coupling of your entities and services. If you find you’re mocking too many classes, you may have approached your design without thinking about the single responsibility principle (SRP).
9.4. Testing in-container with Roo
What if you need to spin up the Spring container to run your tests? Perhaps you want to verify that the database schema still operates against your entities and JPA code, or you want to make sure your Spring configuration is valid. Roo has two approaches for you—either you can use the Roo entity test framework and DataOnDemand classes, or build traditional Spring integration tests. Let’s take a look at both approaches, starting with the entity test framework.
9.4.1. Creating entity integration tests
As you saw in chapters 3 and 4, you can create entity integration tests automatically in two ways, either during creation of the entities themselves,
roo> entity jpa --class ~.model.Course --testAutomatically
or later, as a separate action:
roo> test integration --entity ~.model.Course
In either case, Roo creates a scaffolded integration test, named CourseIntegration-Test, and places it within the same package structure as the entity in the Maven src/ test/java directory. It also uses the DataOnDemand framework to scaffold the test data, and perform tests for all entity operations, as shown in figure 9.4.
Figure 9.4. The integration test and DataOnDemand frameworks
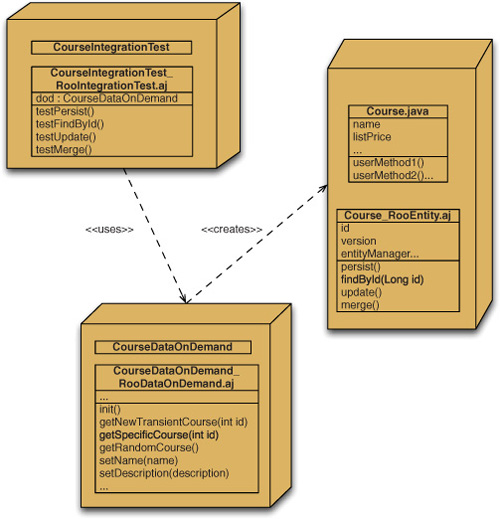
The testing framework shown in the figure automatically exercises all methods in the Roo entity. The difference between this test and the ones discussed earlier in this chapter is that it runs within the Spring container. The funny thing is how short the Java class is:
@RooIntegrationTest(entity = Course.class)
public class CourseIntegrationTest {

@Test
  public void testMarkerMethod() {
  }
}
You’ll do all of the work using the IntegrationTest aspect combined with the Data-OnDemand aspect. The following listing shows a portion of the CourseIntegrationTest_RooIntegrationTest.aj aspect.
Listing 9.2. The CourseIntegrationTest Roo aspect
privileged aspect CourseIntegrationTest_Roo_IntegrationTest {

  declare @type: CourseIntegrationTest:
    @RunWith(SpringJUnit4ClassRunner.class);

  declare @type: CourseIntegrationTest:
    @ContextConfiguration(
    locations = "classpath:/META-INF/spring/applicationContext.xml")
  declare @type: CourseIntegrationTest: @Transactional;

  @Autowired
  private CourseDataOnDemand CourseIntegrationTest.dod;

  ...

  @Test
  public void CourseIntegrationTest.testFindCourse() {
    org.rooina.coursemanager.model.Course obj = dod.getRandomCourse();
    org.junit.Assert.assertNotNull(
       "Data on demand for 'Course' failed to initialize correctly",
        obj);
    java.lang.Long id = obj.getId();
    org.junit.Assert.assertNotNull(
       "Data on demand for 'Course' failed to provide an identifier",
        id);
    obj = org.rooina.coursemanager.model.Course.findCourse(id);
    org.junit.Assert.assertNotNull(
       "Find method for 'Course' illegally returned null for id '"
       + id + "'", obj);
    org.junit.Assert.assertEquals(
        "Find method for 'Course' returned the incorrect identifier",
        id, obj.getId());
  }

  ...
}
As you saw in the previous listing, each method, such as findCourses(), is tested in a separate method, using some simple interactions with the DataOnDemand class and the entity’s API.
Obviously, these tests may require you to do some leg work, pushing in various methods so you can change them.
9.4.2. Testing other Spring beans
For Roo-built services and repositories, any entity integration tests you define with test integration will automatically adjust between testing the entity directly and using the repository or service layer, if you’ve generated one for your entity. This means that you already know how to test Roo-built services and repositories.
Roo doesn’t actually support the generation of freestyle tests from the shell. So, to build one, you can either create it using your IDE or use the class command to initializeit:
roo> class --class ~.web.BillingServiceSystemTest --path SRC_TEST_JAVA
Roo uses Spring’s annotation-driven JUnit 4 test runner in the automated integration tests. You configure this framework by hand as shown here:
import org.springframework.test.context.ContextConfiguration;
import org.springframework.test.context.junit4.SpringJUnit4ClassRunner;
import org.springframework.test.context.transaction.TransactionConfiguration;
import org.springframework.transaction.annotation.Transactional;

@ContextConfiguration(locations = "classpath:/META-INF/spring/applicationContext*.xml")
@RunWith(SpringJUnit4ClassRunner.class)
public class BillingServiceSystemTest {

  @Autowired
  private BillingService service;

  long studentId;

}
The @ContextConfiguration annotation defines the Spring context files to search for to load your test. Roo stores these in META-INF/spring, so pull in the primary context file, applicationContext.xml. That file contains your JPA configuration settings. Next, you tell JUnit that it has to run under the Spring Framework with your @Run-With annotation.
The test will exercise the BillingService, verifying that an invoice can be created based on student registrations that haven’t yet been paid. The JUnit initialization method initData() configures the test data for your service, so you can use it in multiple tests. It also captures the id of the student that you’ll use to generate the invoice:
@Before
public void initData() {
  StudentDataOnDemand studentDod = new StudentDataOnDemand();
  Student student = studentDod.getRandomStudent();
  studentId = student.getId();
  CourseDataOnDemand courseDod = new CourseDataOnDemand();
  Course course1 = courseDod.getRandomCourse();
  course1.setListPrice(new BigDecimal("250.0"));
  course course2 = courseDod.getRandomCourse();
  course2.setListPRice(new BigDecimal("250.0"));
  OfferingDataOnDemand offeringDod =   new OfferingDataOnDemand();
  Offering offering1 = offeringDod.getRandomOffering();
  offering1.setCourse(course1);
  Offering offering2 = offeringDod.getRandomOffering();
  offering2.setCourse(course2);

  Registration reg = new Registration();
  reg.setOffering(offering1);
  reg.setAttended(true);
  reg.setOffering(offerings.get(0));
  reg.setPaymentMade(false);
  reg.setStudent(student);
  reg.persist();

  Registration reg2 = new Registration();
  reg.setOffering(offering2);
  reg.setCourse(course2);
  reg2.setAttended(true);
  reg2.setOffering(offerings.get(1));
  reg2.setPaymentMade(false);
  reg2.setStudent(student);
  reg2.persist();

  reg2.flush();
}
The testGenerateInvoice() test below exercises the generation of an invoice for the two course offerings the student took. The student should owe $500; you’ve created two courses, each with a list price of $250:
@Transactional
@Test
public void testGenerateInvoice() {
  Integer invoiceId = service.generateInvoice(studentId, startDate, endDate);

  Invoice invoice = Invoice.findInvoice(invoiceId);

  Assert.assertNotNull(invoice);
  Assert.assertEquals(new BigDecimal("500.00"), invoice.getAmount());

}
Now you’ve seen how you can write tests against live Spring beans such as Roo services and repositories. You can use this technique to test any Spring bean in your container; just autowire the bean into the test and exercise it as you would in your application code, using asserts to verify behavior.
Now that we’ve discussed how to write integration tests, we should mention that all of the tests introduced so far are rather invasive, looking at the system from the inside. Testers call these white-box tests.
Equally valuable are tests that look at the system as a black box: tests external to the application that exercise the application as a user would. For those tests, we’ll look at Roo’s support for web testing, using the Selenium automated web testing tool.
9.5. Web testing with Selenium
Testing shouldn’t stop at the unit test or integration test level. These tests all exercise a particular component or set of components in compositions that you define yourself. But the best way to verify that the entire stack functions properly is to use some sort of external, black box test—meaning a test external to the application itself.
At a bare minimum, what you need is a mechanism to assert tests against the user interface, so that you can start testing at the level of a user interaction. Roo has support for this approach in the form of the Selenium web testing framework.
9.5.1. What is Selenium?
Selenium (http://seleniumhq.org) is a suite of web testing tools. It can exercise browser-based tests against an application, and has a Firefox-based IDE (Selenium IDE) for building tests interactively against a live application.
Selenium tests can be written in a number of languages, from HTML to the Java JUnit API to other languages such as Ruby or Python.
Selenium tests can be used in a number of ways, including
- Feature testing —Testing various use cases in your application, using a browser-based approach.
- Monitoring —Checking that a representative controller returns a valid result, which would indicate that the application is online.
- Load testing —Using Selenium’s distributed testing engines, a heavy load can be placed on the application from a number of machines.
Selenium is widely adopted and there are a number of resources, such as JUnit in Action, Second Edition, that document it in detail. We’ll focus on how to get Selenium up and running against a RESTful controller, and then we’ll look at how to add Junit based Selenium tests for more sophisticated testing scenarios.
9.5.2. Installing Selenium
As with everything else in Roo, the Selenium framework is installed with a simple Roo shell command. The selenium test command takes several options, including the mandatory controller class to test:
selenium test --controller ~.web.TagController
The class must be a Roo-scaffolded controller. In response to this, Roo performs the following actions:
- Installs the Selenium dependencies and the Codehaus Maven Selenium plug-in in the Maven pom.xml file.
- Creates a WEB-INF/selenium directory to hold HTML tests.
- Builds a test-suite.xhtml master test suite file, which Roo will maintain whenever a new test is installed.
- Builds a test case for the entity scaffolded by the controller, with the name of test-entity.xhtml.
You’ll see immediately that Roo’s support for Selenium mostly focuses on scaffolded controllers. This may be a bit limiting, but later in this chapter we’ll show you how to install support for any controller you want by using the JUnit API.
To run your tests, you first have to launch your web server. Open a new command prompt, switch to the project root directory and issue the following command to launch the Jetty web server:
mvn jetty:run
You’ll need a running instance of your application in order to run Selenium tests. To trigger the tests, issue the following command from another operating system prompt to run your tests:
mvn selenium:selenese
This command launches the Selenium test runner, which should launch an instance of the Firefox browser and run your tests. After the tests are finished, the Selenium Maven plug-in should declare the build a success. A test report will be generated in HTML format and placed in target/surefire-reports/selenium.html. The contents of this test are shown in figure 9.5.
Figure 9.5. Successful Selenium report showing test run of the test-tag.xhtml test
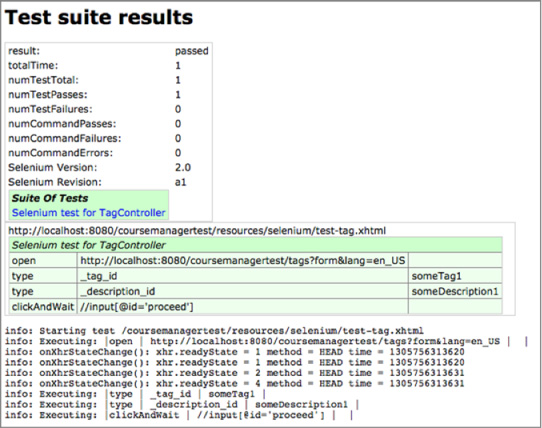
Looking at the test report, you’ll see that it contains counts of the number of tests, how many passes and failures, and the details for each test. Any failed test or test command is shown in red, successes are shown in green. You’ll also see a detailed log of each test step underneath the pass or fail data. This is a comprehensive test report.
So now that you know how to install Selenium and generate and execute your tests, let’s take a look at the test suite and the test that you initially generated on your Tag object.
9.5.3. Autogenerated Selenium tests
The generated tests are controlled by a master test suite file, test-suite.xhtml, located in src/main/webapp/. Let’s review the contents of that file after you’ve generated the Tag test, as shown in the following listing.
Listing 9.3. test-suite.xhtml
<?xml version="1.0" encoding="UTF-8" standalone="no"?>
<html xmlns="http://www.w3.org/1999/xhtml" lang="en" xml:lang="en">
  <head>
    <title>Test suite for coursemanagertestproject</title>
  </head>
  <body>
    <table>
      <tr>
        <td>
          <b>Suite Of Tests</b>
        </td>
      </tr>

      <tr>
        <td>
          <a href="http://localhost:8080/coursemanagertest/resources/selenium/test-tag.xhtml">
              Selenium test for TagController
          </a>
        </td>
     </tr>
   </table>
 </body>
</html>
The test suite is similar in concept to JUnit test suites—it contains a list of each Selenium test file you’ll execute.
Roo maintains the test suite, adding to it every time a new Selenium test is generated from the Roo shell. You can write your own test suites, place them in the same directory, and add them to this test suite file.
Roo also generated your test case, based on the fields of your entity. Let’s take a look at the test-tag.xhtml test file next.
Listing 9.4. test-tag.xhtml

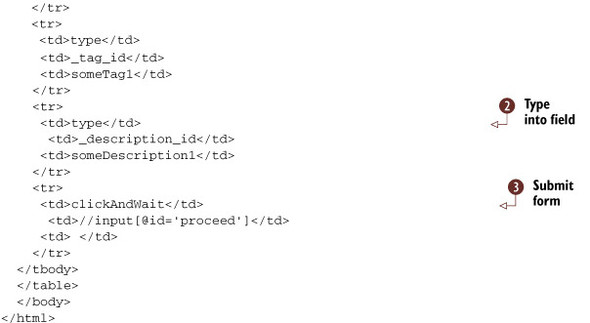
The HTML-based Selenium test language was designed so that power users and advanced business experts could read and interpret
it. You can see that the test starts by opening the URL to the tag controller ![]() . Then, using the HTML ID of the field elements, the type command enters a value into each field
. Then, using the HTML ID of the field elements, the type command enters a value into each field ![]() . Finally, the clickAndWait command
. Finally, the clickAndWait command ![]() tells Selenium to press the proceed button and wait for a valid response.
tells Selenium to press the proceed button and wait for a valid response.
What Can You Change?
This generated controller test file shouldn’t be edited, because it’s scaffolded like the controllers and entities themselves. Any change to the entity will also affect a change to the generated test file.
Roo will append only scaffolded tests to the test-suite.xhtml file, so you can add additional test files. Any additional entity will add an entry to the test suite. In this way, you can do some basic testing of the create method of the form.
But what if you’re not scaffolding, or you want to take it a step further? You have two options: either you can add the additional test to the suite and write it in HTML semantics, or you can use the JUnit framework to generate test cases. Let’s look at both approaches.
9.5.4. Writing your own Selenium test
The generated Selenium test submits form data based on legal values from the Bean Validation annotations, clicks the proceed button, and verifies that the next page is displayed. This isn’t an in-depth test. What if the controller fails?
Selenium tests can draw upon the full list of commands, collectively known as Selenese. These commands are documented at http://seleniumhq.org/docs/. Bear in mind, well-written tests attempt to perform a single activity and verify the result.
The test opens an entity creation page, types data on the page, and submits the form. You can go a step farther and assert that the data submitted by the test is reflected in the new page. Here’s a variation on the test that checks that the fields are shown in the show view, which is displayed after you submit. Copy your test-tag.jspx test to a test-tag-with-assertions.tagx, and add the lines in the following example to the end of the table:
<tr>
  <td>verifyText</td>
  <td>//div[@id='_s_org_rooina_coursemanager_model_Tag_tag_tag_id']</td>
  <td>someTag1</td>
</tr>
<tr>
  <td>verifyText</td>
  <td>//div[@id='_s_org_rooina_coursemanager_model_Tag    _description_description_id']</td>
  <td>someDescription1</td>
</tr>
These commands verify that the div with the id specified in @id hold the value in the third table element. You can use the assertText command to fail the test and stop running further commands, but the verifyText command you’re using marks the test as failed while it continues to run the rest of the commands in the test file.
If you want to know more about Selenium, we suggest you install the Selenium IDE, a Firefox plug-in that allows you to record, edit, and play back Selenium test cases. Figure 9.6 shows the IDE in action, reviewing a step in a test case.
Figure 9.6. The Selenium IDE editor—note the context-sensitive help in the Reference tab

The Selenium IDE has full support for editing the commands generated by the tests you created in this chapter. Fire it up and import your HTML test case into the editor. You can run the test interactively, debugging and modifying the commands until you have the test you want. You can also save this test. Note: Don’t save it with a preexisting generated test name, or it’ll get overwritten when Roo adds another field to the entity.
Key Selenese Commands
When you’re working in the Selenium IDE, you’ll see a drop-down list of commands. These commands are the language of Selenium, known as Selenese. There are a number of key commands that perform activities ranging from typing text into fields, to comparing values on forms, to verifying that text is, or is not, present, to submitting forms.
Table 9.2 shows a few common commands.
Table 9.2. Selenese commands
|
Selenium command |
Usage |
First parameter |
Second parameter |
|---|---|---|---|
| type | Types the value of an input field. You can also use this command to select from an option field, using the data value, not the visible option. | locator | value |
| click[AndWait] | Clicks on a clickable element such as a button. If used with the suffix AndWait, assumes a server call has been made, and waits up to the configured timeout time for a response from the server.[a] | locator | value |
| check | Selects a radio button or checkbox field. | locator | none |
| open | Opens a URL in the frame under test. This is the first action in your scaffolded tests. | url | none |
| waitForPageToLoad | Pauses the script until a new page is fully loaded. | timeout (optional) | none |
a Many commands in the HTML Selenese dialect can be suffixed with AndWait. Consult the reference documentation for details.
Many more Selenese commands are available. Consult the Selenium reference guide, experiment with the Selenium IDE, and write your own tests.
More Information on Selenium Commands
If you want to learn more about Selenese, you can refer to the excellent documentation online at http://seleniumhq.org, or review chapter 12 of JUnit in Action, Second Edition.
If you want to run an additional XHTML test, you’ll have to add it to the Selenium test suite.xhtml file. Assuming you named your new test test-tag-with-verify.xhtml in the same directory, you would add it to the test table, as shown in the following example:
<tr>
  <td>
    <a href="http://localhost:8080/coursemanagertest/resources/selenium/test-tag-with-verify.xhtml">
        Better Selenium test for TagController
    </a>
  </td>
</tr>
You may look at this and think, “Wow, this is handy.” If so, stop here and start collaborating with your subject matter experts on your tests, using this language as a kind of shared notation. But some of you may also think, “Ewwww. Writing code in HTML?” That’s fine as well. For you, Selenium has an answer. Several, in fact.
9.5.5. Adding JUnit semantics
If it seems wrong to you to write test code in an HTML or XML markup language because you think, as we do, that code is code, and XML is configuration, you can rest easy. Selenium has language bindings for a number of higher-level languages, such as Java (JUnit 3 and JUnit 4, TestNG), Groovy (JUnit), C#, Ruby, RSpec, Perl, Python, and PHP. This means that APIs are available to a wide variety of programmers, and as such makes Selenium a go-to technology for many web testing efforts.
So, let’s get started using Selenium with JUnit. You need to take several steps:
- Install the Selenium Java Client driver in your Maven pom.xml file.
- Write your JUnit tests, or convert them from HTML using the Selenium IDE.
- Optionally, configure Maven to run your tests in the integration test phase.
To install your Java Selenium API, add the following dependency to the pom.xml <dependency> section:
<dependency>
  <groupId>org.seleniumhq.selenium.client-drivers</groupId>
  <artifactId>selenium-java-client-driver</artifactId>
  <version>1.0.2</version>
  <scope>test</scope>
</dependency>
Now, to convert your test into JUnit, you’ll use the helpful language translation feature of the Selenium IDE.[2] After you install the IDE in your Firefox browser, launch it using the Tools > Selenium IDE menu option. The IDE will appear. Clear any test text from the code window, and use the Options > Format menu to select the HTML code format, as shown in figure 9.7.
2 The latest Selenium IDE has removed the Format menu option, and recommends cutting/pasting in a given language format. But you can bring the menu item back again. For more information, select Options > For mat > Want the Formats Back? Click to read more.
Figure 9.7. Selecting the code format
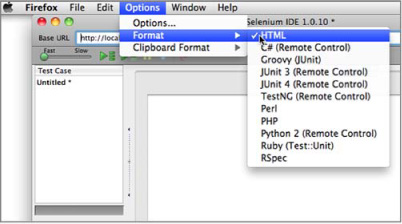
Note that all of the other formats also display in the drop-down menu in the previous figure. Paste your XHTML test code into the code editor on the right, and then switch the code to JUnit 4 by changing the format to JUnit 4 (Remote Control). Pretty nifty. The following listing shows the generated code for your sample test, modified so that you can make it consistent with the rest of your application framework.
Listing 9.5. The generated JUnit test
package org.rooina.coursemanager.web;

import com.thoughtworks.selenium.*;
import org.junit.After;
import org.junit.Before;
import org.junit.Test;
import java.util.regex.Pattern;

public class TagSeleniumTest extends SeleneseTestCase {
  @Before
  public void setUp() throws Exception {
      selenium = new DefaultSelenium("localhost", 4444,
                  "*chrome", "http://localhost:8080/");
      selenium.start();
  }

  @Test
  public void testAddTagAndVerify() throws Exception {
    selenium.open("http://localhost:8080/coursemanagertest/tags?form&lang=en_US");
    selenium.type("_tag_id", "someTag1");
    selenium.type("_description_id", "someDescription1");
    selenium.click("//input[@id='proceed']");
    selenium.waitForPageToLoad("30000");
    assertTrue(selenium.isTextPresent("Show Tag"));
    verifyEquals("someTag1", selenium.getText(   "//div[@id='_s_org_rooina_coursemanager_model_Tag_tag_tag_id']"));
    verifyEquals("someDescription1", selenium.getText(   "//div[@id='_s_org_rooina_coursemanager_model_Tag_description_description_id']"));
  }
  @After
  public void tearDown() throws Exception {
      selenium.stop();
  }
}
This is a preferable test for most Java developers to use—for one thing, you can debug the code. Instead of using the XTML syntax, you can use real, honest-to-goodness compiled Java code to write your tests. You can also use [CTRL-SPACE] for code assistance in your favorite IDE. Now, that feels more like it! Let’s inspect this code a little more.
In the setUp() method, the test creates a Selenium test runner client engine, which looks for a running Selenium server at port 4444. See the sidebar in this chapter on running a Selenium server to configure this. You’ll also need to be running your web application; otherwise, the tests won’t run, because they can’t connect to the server.
Your test method contains calls to the selenium object, which communicates with the Selenium server to execute your tests. Now you can script tests to execute calls to your test web browser, typing data in fields, and clicking various buttons. Key methods include the selenium.open() function, which browses to a page; selenium.isText-Present(), which verifies that text is present within the resulting web page; and the combination of selenium.click(), which presses a form button, and selenium.waitForPageToLoad(), which will pause for a period of time to make sure a page is loaded in response to that button click.
It may seem strange that the HTML-based Selenium tests don’t require you to fire up your own server process, but the JUnit ones do. There’s a simple reason: the mvnselenium:selenese goal does launch and stop the Selenium server, but when running normal JUnit tests, the Maven surfire test runner plug-in isn’t aware of your Selenium test requirements.
You can configure Selenium, and even Jetty, to run your Selenium JUnit tests during the integration test phase of Maven, rather than the unit test phase. You can even start the Selenium server and Jetty web server when running your integration tests and execute the entire test suite automatically.
9.5.6. The WebDriver API
If you think starting a Selenium server in order to run tests seems complicated, and you’d like to try something more advanced, you can use the WebDriver API to write and execute Java Selenium tests in Selenium 2. This eliminates the need to fire up a Selenium server, and the API is more direct and simplified.
To use the WebDriver API, replace your Maven dependency on the Selenium Java client driver with this:
<dependency>
  <groupId>org.seleniumhq.selenium</groupId>
  <artifactId>selenium-java</artifactId>
  <version>2.16.1</version>
  <scope>test</scope>
</dependency>
With this API, you only need to boot the web server, not the Selenium driver. Web-Driver doesn’t need a Selenium remote control server instance.
The sample coursemanager project in the chapter-09-testing folder uses the Web-Driver API for two tests: ITCourseSelenium.java and ItTagSelenium.java, located in the web test directory.
Let’s take a quick look at the ItTagSelenium.java test to compare the API to the previous example:
public class ITTagSelenium {

  private WebDriver webDriver;

  @Before
  public void setUp() throws Exception {
    webDriver = new FirefoxDriver();
  }

  @Test
  public void testCreateTag() throws Exception {
    webDriver.get(
       "http://localhost:8080/coursemanager/tags?form&lang=en_US");
    webDriver.manage().timeouts().implicitlyWait(10, TimeUnit.SECONDS);
    webDriver.findElement(By.id("_name_id")).sendKeys("someTag1");
    webDriver.findElement(By.id("_description_id"))
                                          .sendKeys("someDescription1");
    webDriver.findElement(By.id("proceed")).click();
    Assert.assertEquals(true, 0 < webDriver.getPageSource()
                                                  .indexOf("Show Tag"));
  }

  @After
  public void tearDown() throws Exception {
    webDriver.close();
  }
}
You can see some differences between the Selenium 1 API and the new WebDriver API used in Selenium 2. First, WebDriver has a more fluent, chained API, and second, the web drivers are created and used. No Selenium server needs to be configured to run WebDriver tests. To run this test, execute it in JUnit.
See it in Action
The sample coursemanager project in the chapter-09-testing folder has been written using the WebDriver API, and uses the Maven failsafe plug-in to fire off integration tests after the project is packaged. We’ve also configured the project so that the Jetty web server is booted before integration tests fire, and shut down after they’ve been run. To execute the tests, issue the mvn verify command.
You can find out more about the WebDriver at the Selenium project website, http://seleniumhq.org.
9.5.7. Final thoughts on web testing
There are a number of considerations we haven’t discussed, and testing via the web is an enormous topic. Keep in mind that the most difficult part of web testing is getting to the right level of detail. You can certainly write web tests that dig deeply into validation rules and test service logic.
Many of those tests would be less brittle if built at the appropriate layer—for example, logic tests should be written as unit tests where possible because they won’t change if somebody makes adjustments to the user interface.
9.6. Improving your testing
Here are other things you can do to improve your testing and overall code quality:
- Install the Maven Reporting plug-in, configuring the Cobertura code coverage report as well as the Surefire Testing report. These reports, when run with mvnsite, can tell you the health of your unit and integration tests, and show you the code coverage of your application. More information about Maven-based tests can be found in chapter 10 of JUnit in Action, Second Edition, or at the Maven website, http://maven.apache.org.
- Configure a continuous integration tool, such as Jenkins (http://jenkins-ci.org), to run your build each time somebody checks in your code. Have it alert your users when activities fail.
- Look into other code-quality inspection tools that are compatible with Roo and Maven, such as Sonar (http://sonarsource.org).
Above all, your comfort level with changes to your application can only improve as your code coverage increases, because any change that breaks your software will instantly show up when you perform your unit testing and Spring container tests using mvn test and functional tests with Selenium, the Maven Surefire plug-in, and mvn verify.
9.7. Summary
In this chapter, you’ve learned how to test from a Roo perspective. You’ve reviewed all of the major testing approaches, from unit tests with stubs, mocks, and Roo’s entity mocking support, to Spring container integration tests, to web testing with Selenium.
Testing is a key part of the development lifecycle, and you’re encouraged to write tests against any of your coded logic. This chapter has only scratched the surface. Let’s look at some other topics you may want to consider.
If you want to emulate more advanced features of your web tier, you can review Spring’s built-in mock objects, included in the spring-test.jar and springaspects.jar artifacts, which include the mock web elements MockHttpServlet, MockHttpServletRequest, and MockHttpServletResponse.
You should also pay close attention to mock object frameworks. They’re the best way to isolate your objects under test from other objects. Mockito is popular, but a lot of existing code is tested using EasyMock and JMock. Pick one mocking framework, as doing so makes it easy to read your tests without having to switch gears constantly.
Most real-world applications also have requirements for other functionality like sending emails to customers, or asynchronous offline data processing to lower the impact on the real-time application access. In the next chapter, you’ll learn how to integrate enterprise application concerns into Roo applications, such as sending emails, asynchronous messaging (using the Java Messaging Service API), and enterprise application integration (EAI) requirements using the Spring Integration frame work.
9.8. Resources
One chapter can’t convey all of the nuances and issues you’ll face when writing tests against your applications. You have a number of big topics yet to learn on testing in general.
Here are a few resources for further research.
Books
- Tachiev, Petar, et al. JUnit in Action, Second Edition (Manning Publications, 2010) is a great guide to unit and integration testing from the ground up, and includes a section on web testing with Selenium and other APIs.
- Walls, Craig. Spring in Action, Third Edition (Manning Publications, 2011) covers Spring 3 and many topics, including how to configure tests in-container.
Web
- http://seleniumhq.org, the home of the Selenium web testing framework.
- http://mockito.org, the Mockito mocking framework.
- http://easymock.org, the EasyMock mocking framework.
- http://www.springsource.org/spring-framework#documentation covers Spring’s testing approach in chapter 9 of the Spring Framework documentation.