
Chapter 12. Advanced add-ons and deployment
Now that you’ve learned how to install add-ons to customize your projects, you may be thinking, “So what? Normally I update my Maven POM and install these frameworks myself.” True, but add-ons can be much more powerful than a codegeneration mechanism. Mastering the Roo add-on system is key to providing a wealth of productivity enhancements for your development team.
In this chapter, we’ll take a look at how to build advanced Roo add-ons. We’ll delve into Roo’s key infrastructure beans such as the fileManager and project-Operations components, how to accept parameters, and how to register for and react to changes in class definitions. We’ll wrap up by showing you how to deploy your add-on to the Roo add-on repository, also known as the RooBot.
Let’s begin by learning how to create an advanced add-on.
12.1. Advanced add-ons
Advanced add-ons are generated from a template that provides an extra level of customization. You still have the ability to create and expose commands to the shell, but in addition you can now create annotations that generate ITDs, watch for and act on changes in classes in the Roo package path (such as adding a @RooToString annotation to a bean), and manipulate the Maven configuration.
The advanced add-on template generates a few other key files:
- src/assembly/assembly.xml —This is a Maven assembly file, which can be used to deliver the final add-on as a ZIP or JAR file. The assembly file will include Java-doc and source JARs. You create the assembly by issuing the mvn assembly:assemble command.
- configuration.xml (in src/main/resources, under the add-on’s top-level package) —This file is a template that allows you to use XML to load configuration elements, such as Maven dependencies and plug-ins.
- A Rooannotation class —Used to install features such as ITDs.
- Metadata andMetadataProvider implementations (in src/main/java, under the add on’s top-level package)—These files are used to define and deliver the metadata to the Roo shell. This metadata can add and remove methods and properties from classes and generate ITDs.
With the advanced add-on, you can manipulate your entire project. Let’s dive in and create an advanced add-on right now—one that will enable a feature to simplify your JavaScript programming.
12.2. To create an advanced add-on, you need Coffee(Script)
CoffeeScript, a language created by Jeremy Ashkenas, was designed to make JavaScript code using a simple Ruby- or Python-like syntax. Billed as a cross-compiler, CoffeeScript takes this simple language and turns it into a more complex JavaScript equivalent.
Don’t let the name fool you; building an advanced add-on isn’t as hard as it seems, especially if what you’re looking to do is configure additional Maven artifacts and plug-ins. That’s all you have to do to install CoffeeScript, so let’s go.
12.2.1. What is CoffeeScript?
CoffeeScript is a JavaScript simplification language. It can make your scripts more readable and concise. For example, a data grid loading function in the Dojo JavaScript Toolkit API, which Roo uses to decorate standard HTML controls with client-side validation and rich internet features, may look something like this:
function loadGrid(dataGrid) {
   dojo.xhrGet({
      url: "${mydatasource}",
      load: function(data, ioArgs) {
             dataGrid.setStore(
                new dojo.data.ItemFileReadStore(
                          {data: {items : data}})
                );
             },
   error: function(error) {
       console.log("Grid data loading failed.", error);
}
});
}
Using the CoffeeScript language, you can reduce the syntax and make it more readable. The same function looks like this:
loadGrid = (datagrid) -> dojo.xhrGet
  url: -> "${mydatasource}"
  load: (data, ioArgs) ->
    dataGrid.setStore(new dojo.data.ItemFileReadStore {
      data: { items: data }
    })
error: (error) ->
    console.log("Grid data loading failed.", error)
The syntax is more concise: functions can be defined anonymously with (params) ->body, rather than the wordy function() {... } syntax. Semicolons are optional, and passing JavaScript object literals to functions requires a set of indented parameters, such as the url:, load:, and error: parameters to the xhrGet function in the previous example.
There are CoffeeScript compilers and interpreters available for a wide variety of languages, including a Maven plug-in. Getting interested? Then let’s set up an add-on that installs a Maven CoffeeScript compiler plug-in into your application.
12.2.2. Creating a CoffeeScript add-on
To create your add-on, you’ll use the advanced add-on creation command. Create a directory named coffeescript-addon, switch to it, and fire up the Roo shell. Then create your add-on application:
roo> add-on create advanced --topLevelPackage org.rooina.addons.coffeescript --projectName coffeescript-addon --description "Adds the coffeescript maven compiler"
You’ll define two add-on shell commands: coffeescript setup and coffeescriptremove, which will add and remove the Maven CoffeeScript compiler to your project.
First, you’ll define the add-on capabilities. Open the project in the SpringSource Tool Suite, and replace the contents of CoffeeScriptOperations with the following four method signatures:
package org.rooina.addons.coffeescript;

public interface CoffeescriptOperations {
  boolean isSetupCommandAvailable();
  boolean isRemoveCommandAvailable();
  void setup();
  void remove();
}
The CoffeescriptOperations interface is self-documenting—it provides both a setup and a tear-down command, as well as availability indicator methods for each. Next, let’s define the Maven configuration setting changes so you can tell the add-on how to install the Maven CoffeeScript compiler.
12.2.3. Configuring the Maven plug-in
Roo defines a configuration.xml file in org/rooinaction/addons/coffeescript that you can use to define the Maven artifacts you’ll be adding. The format is arbitrary; you fetch what you want using an XML parser. Replace the contents of this file with the Maven plug-in definition, as shown in the next listing.
Listing 12.1. The CoffeeScript plug-in settings in configuration.xml
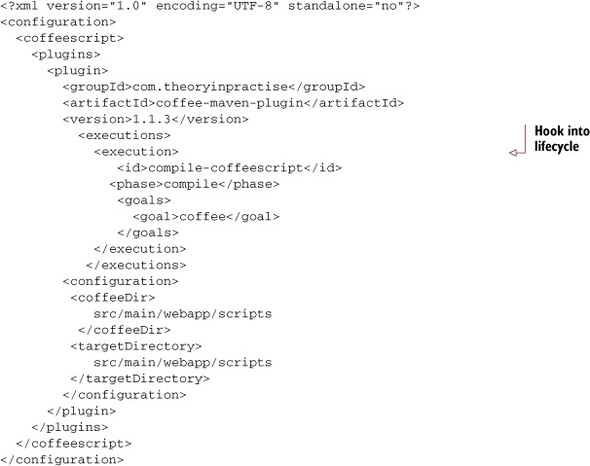
Maven users will immediately recognize the plugin instruction, which is how Maven installs additional build features.
The Maven CoffeeScript plug-in installs a Java-based CoffeeScript compiler and will automatically compile any file ending in.coffee in the src/main/webapp/scripts directory, placing the JavaScript version of the file in the final /webapp/scripts directory as a JavaScript file. Now you’re ready to define some of your command methods.
12.2.4. Creating the setup command
To set up your CoffeescriptOperationsImpl class, which will install your Maven plug-in, open up the CoffeeScriptOperationsImpl class and remove the existing methods. Next, create and stub out the isSetupCommandAvailable(), isRemoveCommand-Available(), and remove() methods, returning true from the Booleans and, for now, doing absolutely nothing inside of the remove() method:
@Component
@Service
public class CoffeescriptOperationsImpl
  implements CoffeescriptOperations {

  public void remove() { }
  public boolean isSetupCommandAvailable() { return true; }
  public boolean isRemoveCommandAvailable() { return true; }
}
Next, create the setup() method. This method will parse your XML configuration file and feed the defined plug-ins to your Roo add-on for addition to your pom.xml file. The following listing shows your approach.
Listing 12.2. Setting up the CoffeeScript plug-in
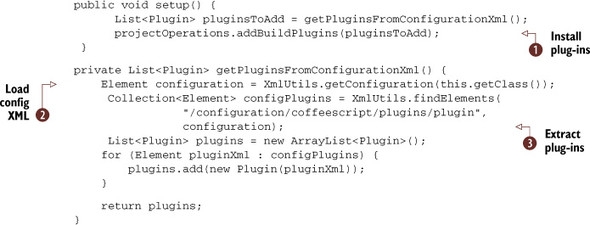
You’ve placed the code for pulling the plug-ins in the getPluginsFromConfigurationXml() method. In this method, you’re using the XmlUtils class again, this time to read your new configuration.xml descriptor ![]() . You’ll use this file to install the plug-ins, located in the XPath of /configuration/coffeescript/plugins/plugin.
. You’ll use this file to install the plug-ins, located in the XPath of /configuration/coffeescript/plugins/plugin.
Construct a list of the plug-ins you find ![]() , adding each one to the list using the Roo Plugin class, which takes an XML DOM Element from the XmlUtils.findElements method. This automatically turns the XML DOM Element into a form that the project-Operations instance can accept. Although you’re adding only one plug-in this time, you can go back and add others by adding them to
the configuration.xml file. This makes managing the plug-in more flexible for more work in the future.
, adding each one to the list using the Roo Plugin class, which takes an XML DOM Element from the XmlUtils.findElements method. This automatically turns the XML DOM Element into a form that the project-Operations instance can accept. Although you’re adding only one plug-in this time, you can go back and add others by adding them to
the configuration.xml file. This makes managing the plug-in more flexible for more work in the future.
Finally, in the setup() method, call the projectOperations.addBuildPlugins method ![]() , which will install the new plugin node(s) in the pom.xml file.
, which will install the new plugin node(s) in the pom.xml file.
You’re almost ready to test this add-on. One final step remains before you can make the add-on run—defining your commands to the Roo shell.
12.2.5. Setting up the CoffeescriptCommands
Open up the CoffeescriptCommands.java file, which will define and delegate the available commands for your add-on. Replace the body of the class with the implementation defined in the following listing.
Listing 12.3. CoffeescriptCommands.java
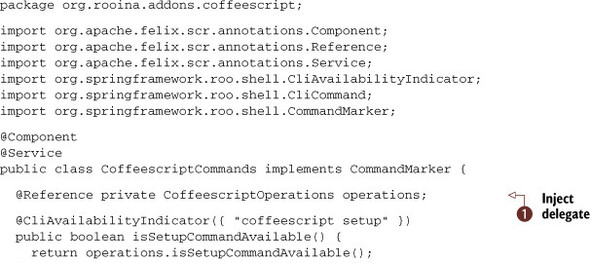
By now the CommandMarker class in the previous code should be more familiar. Just as Spring injects beans into other beans using @Autowired, an OSGi SCR service such as this class injects the CoffeescriptOperations instance, operations, into this object using the SCR @Reference annotation ![]() . You then delegate all calls for checking command availability and performing commands to the operations delegate.
. You then delegate all calls for checking command availability and performing commands to the operations delegate.
12.2.6. Accessing parameters
You may pass parameters to your Roo add-on commands. For example, adding a compileIndividualFiles option to the coffeescript setup command:
@CliCommand(value = "coffeescript setup",
    help = "Install the CoffeeScript compiler")
public void setup(
  @CliOption(key="compileIndividualFiles", mandatory=false,
     unspecifiedDefaultValue = "false",
     optionContext = "true, false",
     help = "Compile individual files into separate JS files.")
     boolean compileIndividualFiles) {
operations.setup(compileIndividualFiles);
This option is then sent to the operation method for use by your add-on code. Note that you can specify a default value if the option isn’t passed, and hints for correct options such as true and false.
Although you could finish out the add-on implementation, let’s first take it for a spin. You’ll build your add-on, install it in the Roo shell, and test it with a sample project.
12.2.7. Building and installing the CoffeeScript add-on
To build your add-on, you drop to the command line and issue a Maven command:
$ mvn package
Your target OSGi bundle is located in target as the JAR artifact. If it was built successfully, copy the full path, including the root of the file path.
To install the add-on, use the same osgi start command you used with the simple add-on (the ellipsis [...] represents the full path to the JAR file):
osgi start --url file:///...org.rooina.addons.coffeescript-0.1.0.BUILD-SNAPSHOT.jar
You’re Not Installing the Add-On for a Single Project
Unlike a lot of other frameworks, Roo holds the add-ons within the shell itself, rather than at the project level. Because your add-on adds commands to the Roo shell itself, the installation needs to occur at that level. Once you use an add-on, you benefit from the operations it performs, regardless of the project you’re working on.
If an add-on misbehaves, you’ll need to remove it from the entire Roo shell using osgi uninstall.
If the start command worked, hit [TAB] and you should see both the coffeescript setup and coffeescript remove commands in your tab completion list.
12.2.8. Using the CoffeeScript add-on
Now, create an empty project directory, such as test-coffeescript, and fire up the Roo shell. When inside the shell, create a simple project with a web application. You can use this short script:
project --topLevelPackage org.rooina.projects.test.coffeescript --projectName test-coffeescript
jpa setup --database HYPERSONIC_PERSISTENT --provider HIBERNATE
web mvc setup
controller class --class ~.web.FooController
Try the add-on by issuing the coffeescript setup command:
roo> coffeescript setup
Updated ROOT/pom.xml [added plugin com.theoryinpractise:coffee-maven-plugin:1.1.3]
...
Open the project’s pom.xml file in your editor. If you search for the coffee-mavenplugin entry, you’ll find your plugin definition, complete from the configuration.xml file.
12.2.9. Testing the CoffeeScript add-on
You can test the plug-in with a simple CoffeeScript script. Create src/main/webapp/hello.coffee with the following contents:
alert message for message in ['Coffeescript', 'Is', 'Fantastic']
CoffeeScript compiles into native JavaScript. To test it, add a reference to the script in your home page, src/main/webapp/WEB-INF/views/index.jspx, near the end of the file, just before </util:panel/>:
<spring:url value="/scripts/hello.js" var="hello_js" />
<script type="text/javascript" src="${hello_js}"> <!-- comment required --></script>
You’re ready to test. To build and test your application from the operating system prompt, execute
mvn coffee:coffee
The coffee:coffee command executes the CoffeeScript compiler. Next, start your Jetty web server to test the script:
mvn jetty:run
The jetty:run command, which depends on the Maven package command, will build the rest of the project and launch the Jetty plug-in.
Browse to your project’s home page. You’ll see three alert boxes displayed in succession. This proves that you’re running the compiled CoffeeScript file, hello.coffee, which was transformed into the following JavaScript code in /scripts/hello.js:
(function() {
  var message, _i, _len, _ref;
  _ref = ['Coffeescript', 'Is', 'Fantastic'];
  for (_i = 0, _len = _ref.length; _i < _len; _i++) {
    message = _ref[_i];
    alert(message);
  }
}).call(this);
Use your browser’s View Source command to view the script. Pretty nifty. The more advanced Mavenites among this book’s readers will quickly begin to customize the plug-in, including adding steps to attach the coffee goal to a Maven lifecycle step, such as prepare-resources.
Now, let’s wrap up this section by adding implementations of the script detection methods and the removal command.
12.2.10. Removing CoffeeScript from a project
The first step is the easy one—remove the add-on. This is the inverse of the add command, so you’ll refactor, extracting the common code, and adding or removing the plug-ins based on the operation. You can review the refactored code in the following listing.
Listing 12.4. Removing the CoffeeScript plug-in from Maven
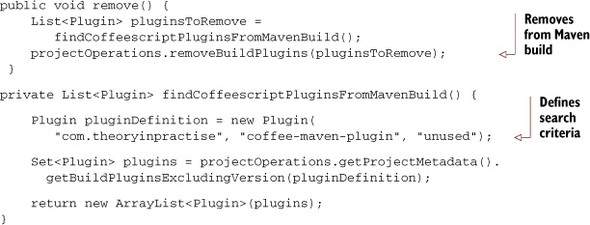
The remove() method delegates to a private method, findCoffeescriptPluginsFromMavenBuild(), which uses a method on the projectMetaData object, getBuildPluginsExcludingVersion, to search for any add-ons in the project’s Maven pom.xml file. The projectOperations object method, removeBuildPlugins, takes this list and uses it to remove any plug-ins defined in the file. This removes the CoffeeScript compiler feature from the project.
Let’s test the remove feature. Build the add-on using mvn package and then run the Roo shell osgi update command to replace the currently installed CoffeeScript add-on:
$ mvn package
...
$ roo
roo> osgi update
         --bundleSymbolicName org.rooina.addons.coffeescript --url:///...target/
               org.rooina.addons.coffeescript-0.1.0.BUILD-SNAPSHOT.jar
The command takes a bundleSymbolicName to reference the installed add-on, which is defined from the Maven artifactId of the CoffeeScript add-on’s pom.xml file.
Finally, try to issue the CoffeeScript remove method. If it works, you’ll see that the pom.xml file no longer contains the CoffeeScript plug-in.
A better implementation would also allow for an optional parameter, such as -removeScripts or --convertAndRemoveScripts, which would remove the Coffee-Script files. This should be an optional method. Experiment with your own add-on and see what additional features you might provide.
12.2.11. Detecting setup and remove command availability
You need to provide commands that manipulate the visibility of your commands. You’ll start with detecting the setup command feature. Expose the coffeescriptsetup command only if
- You haven’t installed the CoffeeScript Maven plug-in
- Your project is defined as a web application
That seems to be a straightforward pair of instructions. You’ll start by defining two private helper methods in the class, isCoffeeScriptAddOnInstalled() and isProjectWar(), to help figure this out. The following listing shows your approach.
Listing 12.5. Detecting project features
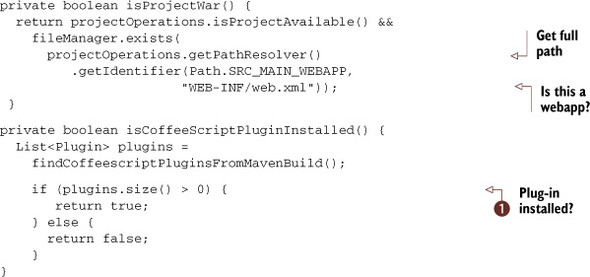
To find out what project type is attempting to access the coffeescript setup command, the isProjectWar() method fetches the web.xml file path for your project. You then check whether this file exists, which would confirm that the project is a WAR.
You’ll express the next operation (checking that the CoffeeScript Maven plug-in is not installed) as a positive-logic check.
The check isCoffeeScriptPluginInstalled lets you use it in both a positive and negative manner. You need to ask the project-Operations object for all installed Maven plug-ins and iterate through them, looking for a hit ![]() .
.
You also need to inject another support class, the FileManager, which you can do via another class-level member variable:
@Reference private FileManager fileManager;
Now, you’ll define the isSetupCommandAvailable() method, which is almost identical, making sure that the project is a valid WAR but does not have the CoffeeScript addon installed:
public boolean isSetupCommandAvailable() {
  if (!projectOperations.isProjectAvailable() ||
      !isProjectWar()) {
    return false;
  }
return !isCoffeeScriptPluginInstalled();
}
This step will only allow access to the command if the project is a WAR, and if the addon isn’t installed. You also protect the command from appearing if the Roo shell hasn’t created a project yet.
The isRemoveCommandAvailable() method is the inverse of this method:
public boolean isRemoveCommandAvailable() {
   if (!projectOperations.isProjectAvailable() ||
       !isProjectWar()) {
       return false;
  }
  return isCoffeeScriptPluginInstalled();
}
Again, you don’t allow access to the command unless you’re working within a defined Roo project, and the project has to be set up as a WAR. In addition, the project must contain an installed Maven CoffeeScript plug-in, so that you can then remove it. Your removal method looks like this:
public void remove() {
  List<Plugin> pluginsToRemove =
    findCoffeescriptPluginsFromMavenBuild();
  projectOperations.removeBuildPlugins(pluginsToRemove);
}
Update your add-on, and remember the command to update it is osgi update:
roo> osgi update
--bundleSymbolicName org.rooina.addons.coffeescript --url:///...target/org.rooina.addons.coffeescript-0.1.0.BUILD-SNAPSHOT.jar
Experiment with tab completion in your test project—if the add-on is already installed, you’ll see only the coffeescript remove command. Conversely, if it’s not yet installed, you’ll see only the coffeescript setup command. Run each command and check your pom.xml file. You’ll see the plug-in added and removed each time you run the relevant command.
Now we’ll review some of the services and beans made available to add-on developers.
12.3. Key add-on beans and services
To get the most from your add-on system, you have to learn each of the OSGi services that Roo provides. The following section details some of the major services and some snippets that you can experiment with in your own add-ons.
12.3.1. ProjectOperations
You can use the ProjectOperations service to manipulate your project in a number of ways. It’s injected via
@Reference private ProjectOperations projectOperations;
There are a number of features in this service. Let’s start by reviewing the ones that affect your Maven build.
Configuring Your Maven Build
Here are a few methods that let you manipulate your pom.xml file. As with the rest of these examples, they’ll be written after the add-on command completes using a transactional file manager, so your projects won’t get damaged by incomplete configuration changes in the case of a bug. You can adjust these features:
- Maven build plug-ins: addBuildPlugin(Plugin), addBuildPlugins(List<Plugin>) updateBuildPlugin(Plugin) removeBuildPlugin(Plugin) removeBuildPlugins(List<Plugin>)
- Maven dependencies: addDependency(Dependency) addDependencies(List<Dependency>) removeDependency(Dependency) removeDependencies(List<Dependency>)
- Maven properties: addProperty(Property) removeProperty(Property)
- Maven filters: addFilter(Filter) removeFilter(Filter)
- Maven resources (properties files, XML descriptors, and the like): addResource(String moduleName, Resource resource) removeResource(String moduleName, Resource resource)
There are more commands you can issues as well, although you need to cast to a more specific type of ProjectOperations to do so.
Additional Maven Operations
Your reference to ProjectOperations also implements the MavenOperations interface, which gives you the ability to create a project yourself using the create-Project() method.
You also expose whether you’re able to create a project with the isCreateProjectAvailable() method:
if (((MavenOperations)projectOperations).isCreateProjectAvailable()) {
...
}
You could also create a project on your own within your add-on, potentially using a separate configuration:
((MavenOperations)projectOperations).createProject(
    new JavaPackage("com.foo.bar.project"),
      "FooBarBaz", 6));
The snippet above creates a new project named “FooBarBaz” with the top-level package of com.foo.bar.project, and using Java version 6.0.
You can also execute any valid Maven command with executeMvnCommand (String). For example:
try {
  ((MavenOperations)projectOperations).executeMvnCommand("jetty:run");
} catch (IOException e) {
  //handle error
  ...
}
12.3.2. The PathResolver
The PathResolver is a service that properly accesses your project files for you. It provides complete file paths for your root project and any modules associated with it. It can be injected as well:
@Reference private PathResolver pathResolver;
You can use the resolver to fetch various file path roots:
String warRoot = pathResolver.getFocusedRoot(Path.SRC_MAIN_WEBAPP);
String javaRoot = pathResolver.getFocusedRoot(Path.SRC_MAIN_JAVA);
This would equate to the file path on your file system for the src/main/webapp and src/main/java directories of your currently focused module. You can also concatenate a subpath, such as
String indexFilePath = pathResolver.
getFocusedPath(Path.SRC_MAIN_WEBAPP, "index.jspx");
This points to the index file at the root of your web application.
12.3.3. The file manager
You used the file manager to copy files in chapter 11, so it’s not completely foreign to you. All writes go through an implementation of this service. You can gain access to it from your ProjectOperations instance using injection as well:
@Reference private FileManager fileManager;
The file manager is a transactional engine that writes files after an add-on task has been committed. If any RuntimeException is thrown, such as one thrown by the Apache commons-lang3 project’s Validate annotation, the writes for all files manipulated via this manager won’t be performed.
As in chapter 11, you can also use it indirectly. The AbstractOperations base class contains a handy copyDirectoryContents method that you used to copy the jQuery JavaScript files in chapter 11:
copyDirectoryContents("js/jqueryui/*.js",
pathResolver.getFocusedIdentifier(Path.SRC_MAIN_WEBAPP, "/js"), true);
The copyDirectoryContents method uses the FileManager, as well.
You’ll also notice the use of the pathResolver in this fragment. The PathResolver is frequently used along with the FileManager to pull together the proper source or destination paths for a given operation.
12.3.4. Manipulating files transactionally
Let’s put this together with a simple file writing example. Let’s say you want to create a new JavaScript file in the project’s src/main/webapp/js directory:
String jsLocation = pathResolver.getFocusedIdentifier(
  Path.SRC_MAIN_WEBAPP, "/js/myscript.js");

MutableFile file = fileManager.createFile(jsLocation);

try {
  PrintWriter writer = new PrintWriter(file.getOutputStream());
  writer.println("var myvar = 10; alert (myvar);");
catch (IOException e) {
  throw new IllegalStateException("file cannot be written to");
} finally {
  IOUtils.closeQuietly(writer);
}
You’ll use the pathResolver to look up the proper path for the /js/myscript.js file within the webapp directory. Then, instead of creating a standard Java file structure and writing to it directly, you ask the fileManager to create a reference to a mutable file, which is a virtual buffer for the file you wish to write.
You then write your information to the file and use the Apache Commons IOUtils class’s closeQuietly() method to properly close the file. Because the PrintWriter can throw an IOException during the write process, you have to catch it and rethrow as a runtime exception, here the IllegalStateException, to handle it properly.
Roo doesn’t write this file right away. It waits until the Roo shell command that issued the changes completes, and then tells the file manager to write all of the file create, update, and delete operations at once. While not 100% fail-safe, it will generally stop an add-on from half-modifying a given file. For the curious, browse the Roo source code for DefaultFileManager.commit() to see the operations performed.
12.3.5. Services wrap-up
You’re only scratching the surface of the key services and beans provided by Roo. We haven’t even discussed the ITD services and type system, and unfortunately, space doesn’t allow it here. We could write an entire book on Roo add-ons, so stay tuned for that. Because the framework is under heavy refactoring for version 1.2, we decided that documenting the internal Roo services wouldn’t be useful at this time.
This API Undergoes Constant Tweaking
The code we’re showing you is valid as of Roo 1.2.1. One significant (albeit small) change is that the Roo team removed their own IOUtils class, and are now using the Apache Commons IO library’s IOUtils methods instead.
The team also removed their own Assert class in 1.2.1, replacing it with the Apache Commons Lang project’s Verify method.
In the future, more tweaks should be expected. The general add-on development process should remain the same; however, expect to need to adjust your add-ons once deployed every time Roo is updated.
We encourage you to read the Roo source code, which is easily digestible, and review the various built-in add-ons. The project is available at http://github.com/springsource/spring-roo.
12.4. Publishing your add-ons
When you’ve finished writing your add-on, and you’ve tested it with your team, it’s time to publish it. Roo gives you several options: the manual installation via a URL, deployment to a Maven repository as part of an OBR repository, and indexing with the SpringSource RooBot as part of the public Roo add-on repository. Table 12.1 shows the approaches and their respective pros and cons.
Table 12.1. Roo add-on publication options
|
Option |
Approach |
Pros |
Cons |
|---|---|---|---|
| Manual distribution | Distribute the binary JAR file through a web download or other means. Developers can use the osgi install command to install it. |
|
|
| Using an OSGi Bundle Repository (OBR) | Host your own bundle repository and expose your add-on through that service. |
|
|
| Host on Roo’s add-on service | Contribute your add-on to the Roo add-on repository list as a publicly available add-on. |
|
|
Let’s take a look at each of these approaches in detail.
12.4.1. Manual distribution
You’ve used this approach with the osgi start command. There are few requirements placed on you for this deployment option, so it’s the logical place to start. You need to package your artifact and publish the JAR file in a publicly available location, such as a web server or a network share.
Because you don’t use a key signing process to authenticate these add-ons, they should only be installed this way for development purposes, or inside your own organization.
Table 12.2 summarizes the commands used to publish and consume the add-on.
Table 12.2. Manual add-on distribution command summary
|
Roo command (single-line) |
Notes |
|---|---|
| perform maven package | Executes the Maven ‘package’ command, which will build and deliver the artifact in the target directory. |
| osgi start --url url | Loads and starts the Roo add-on. |
| osgi update --bundleSymbolicName name | Updates an existing add-on, using the name defined in the MANIFEST.MF file header Bundle-SymbolicName:. Roo defines this variable using the ${project.groupId} and the ${project.artifactId} values. |
| osgi uninstall --bundleSymbolicName name | Stops and removes the add-on. |
| osgi ps [--format format ] | Similar to a Unix ‘ps’ command, shows the running OSGi bundles and add-ons. You can use the --format parameter with the values of BUNDLE_NAME, LOCATION_PATH, SYMBOLIC_NAME, and UPDATE_PATH to show different information by bundle. |
| osgi headers [--bundleSymbolicName name ] | Shows the headers for all bundles, or a selected bundle. |
| osgi log [--maximumEntries max--level [INFO|WARNING|DEBUG|ERROR| ] | Displays the Felix OSGi container log. Useful when deployment has failed due to an unexpected problem, such as a missing dependency or Java package. |
You learned about using the OSGi commands osgi start and osgi uninstall during your jQueryUI add-on installation in chapter 11, so we can skip that technique and move on to deploying artifacts to an OBR Repository. Remember, all Roo add-ons are OSGi bundles, so these commands will come in handy on a regular basis.
12.5. Deploying to an OBR
You’re probably thinking, “What’s an OBR?” It stands for OSGi Bundle Repository, which is a standard format for defining a collection of OSGi artifacts on a central server. OBR provides commands for clients to search and download artifacts from a repository via a special, publicly available file, repository.xml. This file contains entries for all resources provided by the repository.
Let’s deploy your CoffeeScript Roo add-on to an OBR on the Google Code project hosting service. The first step involves digitally signing your artifacts.
12.5.1. Generating and using your PGP keys
To sign your OBR bundle, you’ll first need to set up a secure key, known as a PGP key pair. An open source tool exists to do this: GPG, which stands for GnuPG. GPG is an open source implementation of the PGP key signing standard, and can be downloaded at http://gnupg.org. When configured, you create a new public/private keypair using the gpg command:
gpg --gen-key
We won’t cover the process here, because it’s documented in a number of places, including the informative Roo manual reference instructions available at https://help.ubuntu.com/community/GnuPrivacyGuardHowto.
Pretty Good Privacy
PGP stands for pretty good privacy, and is based on the open source Open PGP standard RFC-4880, documented at http://tools.ietf.org/html/rfc4880.
After you’ve generated your keypair, write down your passphrase; you’ll need it every time you configure another machine.
You’ll also need to set the default passphrase when running the Maven build, and possibly your default GPG key. To do this, you’ll create or edit a file named ~/.m2/ settings.xml. (The ‘~’ symbol refers to your home directory, which you’re referencing in Unix format.) This file provides settings for your Maven builds. You’ll add a profiles section, which injects Maven properties into one or more builds, based on an activation strategy:
<settings>
     ...
      <profiles>
           <profile>
                <id>gpg</id>
                <properties>
                     <gpg.passphrase>thegpgpassphrase</gpg.passphrase>
      </properties>
     </profile>
   </profiles>
 <activeProfiles>
      <activeProfile>gpg</activeProfile>
</activeProfiles>
...
</settings>
The profile you installed, with the id of gpg, adds a property named gpg.passphrase. You activate it using the activeProfiles tag, which turns the profile on by default. This injects the property into your Maven build.
To list your keys, you can use the gpg --list-keys command. The results we saw on Ken’s system were as follows:
$ gpg --list-keys

/Users/krimple/.gnupg/pubring.gpg
---------------------------------
pub   2048R/E96FE35F 2010-06-11
uid                  Ken Rimple <[email protected]>
sub   2048R/68520BEB 2010-06-11

pub   2048R/9EC1BFA3 2010-12-07
uid                  Ken Rimple (Geek.) <[email protected]>
sub   2048R/F986D076 2010-12-07

pub   2048R/B6F65A34 2011-06-01
uid                  Ken Rimple (Silly Weasel) <[email protected]>
sub   2048R/5C1EF315 2011-06-01

pub   2048R/CA57AD7C 2004-12-06
uid                  PGP Global Directory Verification Key
uid                  [jpeg image of size 3400]
uid                  DNR KS1 <[email protected]>
uid                  DNR-KS2 <[email protected]>
Because our system has a number of keys, to make one the default, such as the SillyWeasel key, we edited the GPG configuration file, also located off of the home directory in the path ~/.gnupg/gpg.conf. We set up the default key using the value of 9EC1BFA3 as the default-key property in that file:
default-key 9EC1BFA3
The next step for you is to configure the settings that define your version control system in the Maven pom.xml file.
12.5.2. Using a version control system
Each time you release an update to your add-on, you’ll need to upload a build to a source code repository. We use Google Code, a cloud-based project hosting system, to host a Subversion repository at http://code.google.com/p/sillyweasel-coffeescriptaddon. You can choose any cloud-based hosting provider as long as pubic viewing of files is available.
How do I Create a Google Code Project?
To create a free, open source project on Google Code, sign up for an account through your Google Mail or Google Apps account. The URL for Google Code is http://code.google.com. You’ll need to follow the sign-up instructions, and you can choose between SVN and GIT hosting models. As an alternative to this process, you can create a public repository on GitHub.
Next, you have to supply the proper SVN URL settings in the Maven pom.xml file.
First, we edited the <scm> section to set the Maven connection and URL variables:
<scm>
      <connection>
scm:svn:https://sillyweasel-coffeescript-addon.googlecode.com/svn/trunk
   </connection>

   <developerConnection>
scm:svn:https://sillyweasel-coffeescript-addon.googlecode.com/svn/trunk
   </developerConnection>

<url>
    http://code.google.com/p/sillyweasel-roo-addons/source/browse
   </url>
</scm>
Next, we modified the distributionManagement section to tell Maven where to deliver our add-on:
<distributionManagement>
     <repository>
          <id>Google Code</id>
          <url>
              dav:https://sillyweasel-roo-addons.googlecode.com/svn/repo
          </url>
    </repository>
</distributionManagement>
Finally, we edited the Maven settings.xml file again (in ~/.m2) to add our credentials for the Google Code server:
<settings>
...
  <servers>
       <server>
           <id>Google Code</id>
           <username>MYUSERNAME</username>
           <password>MYPASSWORD</password>
        </server>
    </servers>
...
</settings>
After making these changes, you’re ready to develop and release your add-on. During development, point your add-on developer team to the source tree and let them work with it using standard Subversion (or Git if you choose) commands. At some point in the cycle, you’ll be ready to release your add-on.
12.5.3. Releasing the add-on
The release of an add-on is generally performed by a designated member of the team. This member will coordinate all check-ins, ensure that all unit and integration tests run properly, perform tests by installing and using the add-on, and ensure that none of the artifacts used by the Maven POM of the add-on are using unreleased (snapshot) versions of the libraries referenced.
Don’t Use Snapshot Versions of Dependencies
Because Maven releases are meant to be 100% reproducible, all dependencies to your project need to be released versions. For example, if the dependent library version is 1.0.2-SNAPSHOT, it’s considered unstable, and under development. Versions such as 1.0.2-RELEASE, 1.0.2, or 1.0.2-BETA are releases, and therefore can be checked out and built as of the time that release was marked in the source control system. If you’re testing your add-on and want to run through the release process without having to check for snapshots, you can temporarily issue your mvn release:prepare command using the flag -DignoreSnapshots=true. Do not use this for typical releases.
Deployment in Maven uses the somewhat complex but useful maven-release-plugin. You should read the Maven documentation on the plug-in for the most up-to-date details, but the general process involves two steps:
- Prepare your release —Check to make sure you haven’t left uncommitted code in your local repository copy, and that you haven’t used any snapshot dependencies (which means they can change and are not released versions). You do this via the mvn release:prepare command.
- Release the artifact —Perform the release. You use the mvn release:release command.
The release prepare process asks for three pieces of information: the name of the release version, the SCM tag for the release, and the new development version of the project (including the version of the release to deploy, the label to use for the release in the version control tag, and the next development version):
$ mvn release:prepare

What is the release version for
   "sillyweasel-coffeescript-addon"?
org.rooinaction.addons.coffeescript:
 org.rooinaction.addons.coffeescript) 0.1.2: : 0.1.2
What is SCM release tag or label for
   "sillyweasel-coffeescript-addon"?
   (org.rooina.addons.coffeescript:
   org.rooina.addons.coffeescript)
org.rooina.addons.coffeescript-0.1.2-SNAPSHOT: : 0.1.2-SNAPSHOT
   org.rooina.addons.coffeescript-0.1.2
What is the new development version for
  "sillyweasel-coffeescript-addon"? (
  org.rooina.addons.coffeescript:
  org.rooina.addons.coffeescript)
  0.1.3-SNAPSHOT: : 0.1.3-SNAPSHOT
After answering these questions, Maven will build the code, tag the release with the release tag, and commit the tag to the version control system. This marks the time of the release so that you can then perform the release itself:
$ mvn release:perform
Maven checks out the code tagged by the release:prepare step, which was tagged at the time the development coordinator felt the team was ready to release the code:
[INFO] --- maven-release-plugin:2.2:perform (default-cli) @ org.rooina.addons.coffeescript ---
[INFO] Checking out the project to perform the release ...
Maven then executes the deploy goal, which does a full build, deploying the final target artifact to your defined target repository, which is defined in this case as dav: https://sillyweasel-roo-addons.googlecode.com/svn/repo. This artifact includes the source, Javadoc, and release JARs. It also writes a pom.xml file in the release directory:
...
[INFO] Executing goals 'deploy'...
...
[INFO] Loading source files for package org.rooina.addons.coffeescript
    Constructing Javadoc information...
[INFO] Building jar: /.../sillyweasel-coffeescript-addon/target/checkout/target/org.rooina.addons.coffeescript-0.1.2-javadoc.jar
[INFO] Installing org/rooina/addons/coffeescript/org.rooina.addons.coffeescript /0.1.2/org.rooina.addons.coffeescript-0.1.2.jar
[INFO] Writing OBR metadata
[INFO] Uploading: dav:https://sillyweasel-coffeescript-addon.googlecode.com /svn/.../addons/coffeescript/org.rooina.addons.coffeescript /0.1.2/org.rooina.addons.coffeescript-0.1.2.jar
[INFO] Uploading: dav:https://sillyweasel-coffeescript-addon.googlecode.com /svn/.../addons/coffeescript/org.rooina.addons.coffeescript /0.1.2/org.rooina.addons.coffeescript-0.1.2-sources.jar
[INFO]Uploading: dav:https://sillyweasel-coffeescript-addon.googlecode.com /svn/.../addons/coffeescript/org.rooina.addons.coffeescript /0.1.2/org.rooina.addons.coffeescript-0.1.2-javadoc.jar
...
The repository has both signatures as well as copies of the artifacts, as shown in figure 12.1.
Figure 12.1. Artifacts deployed in a release
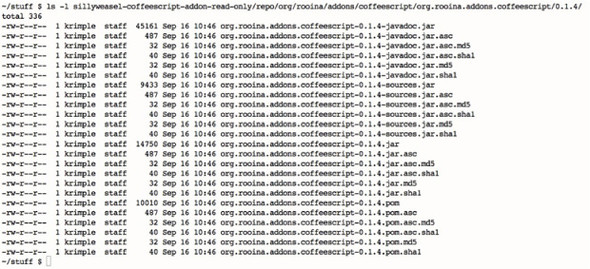
Because add-on projects include the maven-bundle-plugin, Maven sets up the OBR entry and adds your new release properly to the right location as part of the release process. In our project, that file is located at https://sillyweasel-coffeescriptaddon.googlecode.com under the directory /svn/repo/repository.xml.
Now you’ve got an official release, deployed on a Maven repository, which is OBR-enabled. Time to use it.
12.5.4. Using the OBR to fetch your add-on
To use this repository, you can use the osgi obr commands to attach to the OBR and install an add-on from it. You will install the add-on for the Roo shell, not for a specific project. Here’s an example, using our sillyweasel-coffeescript-addon (please type on one line):
roo> osgi obr url add --url https://sillyweasel-coffeescript-addon.googlecode.com/svn/repo/repository.xml
And to start the add-on, we have the bonus feature of [TAB] completion:
roo> osgi obr start --bundleSymbolicName org.rooina.addons.coffeescript
The fun part is having to trust your own Roo encryption key before you install the add-on. Now is a good time to refer back to the trust section in chapter 11 and install your key.
The key OSGi OBR commands are shown in table 12.3.
Table 12.3. OSGi OBR commands
|
Command |
Notes |
|---|---|
| osgi obr info--bundle Symbo1icName name[;version] | Shows the Roo add-on information about this add-on bundle. Without specifying the version of the bundle, it displays all versions found. Appending a version, such as ;0.1.1, displays information about an individual version. |
| osgi obr list [--keywords 'keywords'] | Shows all add-ons, optionally matching the text in the keywords option. |
| osgi obr add --url url | Adds an OSGi OBR to your repository list. The URL must point to the location of a repository.xml file stored in your repository, and that file must be visible to the developers accessing the repository. |
| osgi obr refresh --url url | Updates your copy of the OBR by again fetching and parsing the OBR file. Use this when checking for updated versions of your add-on. |
| osgi obr remove --url url | Removes this OBR directory from the list of managed OBRs in your Roo shell. |
Now that you’ve seen how to build, sign, upload, and release your OBR-based Roo add-on, it’s time to consider ‘going public’ and publishing it to the Roo central repository.
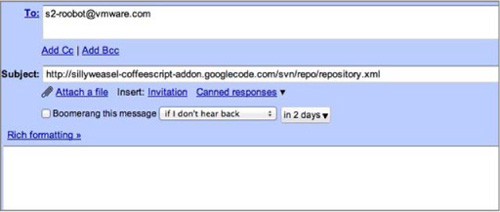
12.6. Submitting your add-on
It’s easy to upload an artifact to the Roo add-on repository, as of the time of this publication. In the future this may change, but provided your artifact exists in a proper OBR, you only need to send an email to [email protected], with the full URL to the OBR’s repository.xml file. In the case of the Silly Weasel Roo add-on, the URL is
http://sillyweasel.coffeescript-addon.googlecode.com/svn/repo/repository.xml
Using a GMail client, the email you send would look something like figure 12.2.
Figure 12.2. Email to the RooBot, which contains the OBR repository URL
After you send this email, the RooBot will wake up and process the request. Any errors will be shown on the RooBot monitoring page, which at the time of publication resides at http://spring-roo-repository.springsource.org/roobot/roobot-log.txt. This URL may change in the future if the add-on submission procedure is adjusted. The gist of this process, however, is to submit your repository URL so that your add-ons get incorporated into the Roo add-on central repository.
The following code is an example of what you can get from the RooBot when submitting an erroneous add-on request. In this example, we used the httppgp:// URL syntax in our email request, which is incorrect procedure. The source control repository needs to support PGP signed keys and URLs, but the repository itself must be a clear http: or https: URL:
2011-09-16 02:46:50.889 -
   org.springframework.integration.MessageHandlingException:
   java.net.MalformedURLException: unknown protocol: httppgp
   org.springframework.integration.transformer.
   MessageTransformationException:
     org.springframework.integration.MessageHandlingException:
       java.net.MalformedURLException: unknown protocol: httppgp
      ...
      lengthy Java stack trace ensues...
If you get no messages in this URL, don’t worry. It’s possible that your add-on is already accepted. Try restarting the Roo shell, and use the add-on search command:
roo> addon search coffee
1 found, sorted by rank; T = trusted developer; R = Roo 1.2 compatible
ID T R DESCRIPTION ---------------------------------------------------
01 - Y 0.1.4 Adds the coffeescript maven compiler
----------------------------------------------------------------------
Yep, it’s there. Now you can install it, provided you’ve removed the prior version with osgi uninstall. You’ll use the search ID from the last search:
roo> addon install id 01
That’s it. This process may change as Roo finds wider adoption, and if an approval process is put in place. The basic concept of exposing a Roo repository and downloading it is a nifty way to use an OSGi framework extension. This exposes a large number of developers to software automatically. This is a use case for OSGi we can certainly get behind.
12.7. Summary
As you’ve seen in this chapter, Roo has a powerful add-on API, capable of completely transforming the stock Roo platform into any type of development environment you can imagine. With Roo, you can create add-ons to support different persistence models, frontend APIs, and integration tools, and even to customize your team’s development platform.
Add-ons are a complex topic, worthy of their own book. We suggest that add-on developers learn the basics of OSGi bundle development, get cozy with the stock Felix shell, understand as much as they can about the OBR and SCR technologies, and above all, read other add-on code, particularly the built-in Roo add-ons from the Roo source tree. As the add-on framework continues to evolve and becomes more useful with each release, developers should download and keep up to date with the Roo source code. It’s located on GitHub at https://github.com/SpringSource/spring-roo.
12.7.1. Resources
The following books and articles may be useful to you as you continue your journey.
Books
- Castro Alves, Alexandre. OSGi in Depth (Manning Publications, 2011)
- Hall, Richard S. et al. OSGi in Action (Manning Publications, 2011)
Web
- “Introducing Spring Roo, Part 3: Developing Spring Roo add-ons” by Shekhar Gulati. On IBM developerWorks: http://www.ibm.com/developerworks/opensource/library/osspringroo3/index.html
- “Developing Spring Roo Addons” on Marc Schweiterman’s Weblog: http://marcschwieterman.com/blog/developing-spring-roo-addons/
- Details on the Apache Felix Maven bundler plug-in, which is used to assemble Roo add-ons in to OSGi bundles: http://felix.apache.org/site/apache-felix-maven-bundle-pluginbnd.html