
Chapter 11. Roo add-ons
In the previous chapter, you learned how to process email notifications to the customers of your sample Course Manager application. You also took steps to implement an asynchronous processing solution based on Java Message Service technology using two different JMS destinations (topic and queue).
In this and the next chapter, we explain how to install existing Roo add-ons from the central Roo add-on repository. Then we show you how to write and install your own add-ons, beginning with the somewhat confusingly named simple add-on. Finally, we discuss the advanced add-on and related infrastructure features woven into Roo.
When you write Spring Roo applications you use a modular add-on architecture. Many of the core Roo components were written as add-ons, including the entity and field management commands, interactions with Maven, Java toString() and Java-Bean method constructions, Spring MVC configurations, email, JMS, and more.
All of these add-ons are OSGi components, so if you’re confused by the terminology, you may wish to do a little extra research. Manning’s OSGi in Action (Hall et al., 2011) contains a thorough overview of all things OSGi, and we used it as a reference when we wrote these chapters. Expect some of the material in this chapter to be complex, because the Roo add-on API hasn’t had the rigorous refinement from hundreds of developers as have the APIs from Grails, Rails, or Maven. Our goal in these chapters is to demystify Roo’s complexity, so we can encourage more developers to contribute to the current pool of Roo add-ons.
Without further ado, let’s roll up our sleeves and dig into Roo add-ons.
11.1. Extending Roo with add-ons
Roo was designed from the ground up to be extremely extensible. All of the Roo features we discuss in this book are interrelated modules known as add-ons. Each add-on can define a set of Roo commands, manipulate project configurations, and listen for changes in the file system, such as the addition or removal of a @RooTo-String annotation.
Roo developers can define their own add-ons and even publish them to the main Roo add-on repository. There are add-ons in place to support web frameworks such as JSF, Vaadin, and Wicket (a recently introduced service-and-repository data mapping technology from SpringSource); automatic JAXB and JSON data conversion; building executable WARs; and so on.
Roo’s extensibility allows you to easily add to the set of commands and features by installing additional add-ons. If you don’t see Roo support for your favorite feature or framework, you can write an add-on, install it, and have those capabilities in your projects. Much like other agile development tools, Roo is only as powerful and rich as the features the community puts into it, so open source developers have the power to shape the future direction of this tool.
11.2. How add-ons work
Roo add-ons are “tool-time” features—they’re wired into the shell as OSGi bundles, which are special JAR files that can be loaded and unloaded at will from an OSGi compliant application. You already use OSGi bundles in many different software products, including tools such as ServiceMix, Mule, and the Eclipse IDE. All Eclipse plug-ins are implemented as OSGi bundles, and you can even expose an OSGi command line by appending the -console flag to the eclipse binary.
The Roo shell environment runs atop an OSGi implementation from Apache, the Felix container. Roo has distributed more than 37 add-on bundles that make up the base of the Roo platform. You’ve already used a few. The following list of add-ons comprises the base Roo install. These add-ons may change as the Roo team continues to update the project and add new features:
addon-backup                    addon-cloud-foundry
addon-configurable              addon-creator
addon-dbre                      addon-dod
addon-email                     addon-equals
addon-finder                    addon-git
addon-gwt                       addon-javabean
addon-jdbc                      addon-jms
addon-jpa                       addon-jsf
addon-json                      addon-layers-repository-jpa
addon-layers-repository-mongo   addon-layers-service
addon-logging                   addon-op4j
addon-oscommands                addon-plural
addon-property-editor           addon-propfiles
addon-roobot-client             addon-security
addon-serializable              addon-solr
addon-test                      addon-tostring
addon-web-flow                  addon-web-mvc-controller
addon-web-mvc-embedded          addon-web-mvc-jsp
addon-web-selenium              classpath
Add-ons provide features in the form of specific shell commands. For example:
- addon-jpa —Provides the entity jpa command to create Roo entities, which we detailed in chapters 3 and 4.
- classpath —Although not prefixed with addon-, the commands provided in this project include class, interface, enum, and field because they create Java classes, interfaces, and enums.
- addon-web-mvc-controller —Provides the web mvc all and web mvc controller commands, as well as the web mvc setup and web mvc scaffold commands to set up and optionally generate scaffolded web pages, as discussed in chapter 5.
- addon-web-selenium —Installs the Selenium web testing engine and allows for scaffolding of HTML-based web tests.
You can also install other add-ons to provide support for new features and frameworks. Let’s review the add-on management system and some third-party add-ons.
11.3. Working with published Roo add-ons
Like other rapid development platforms, Roo has a number of add-ons available for installation over the internet, because its development team hosts a live directory of components that automatically downloads on startup. You may see the download process occurring on the top right of your console window, finishing with
Downloaded 100% of roobot.xml.zip
The downloaded file contains a list of all Roo add-ons registered with Roo-bot, a service available to Roo developers that exposes published add-ons to all Roo users. We’ll experiment with this directory, and we’ll start by learning how to search for add-ons; then we’ll install and test an add-on; and, finally, we’ll remove an add-on.
The key thing to remember is that, unlike Grails or Rails, where the add-on is used at runtime, our add-ons are merely Roo shell extensions. After we compile the project code, all effects of the add-on will result in standard Java EE code and web artifacts.
11.3.1. Finding the Roo repository add-ons
Let’s get started. Use the addon list command to show a list of add-ons in the repository, which we have excerpted in the following example:
roo> addon list

65 found, sorted by rank; T = trusted developer; R = Roo 1.2 compatible
ID T R DESCRIPTION ----------------------------------------------------
01 Y Y 3.0.5.RELEASE
02 - Y 1.0.0.0001 This bundle wraps the standard Maven artifact:
       google-collections-1.0.0.
...
08 - Y 0.7.0 JasperReport support for Spring MVC based projects. With
       JasperReport support you give to the project the feature of
       create...
...
42 Y Y 1.2.0.M1 Offers GIT integration in the project. Each
       successfully executed command will be automatically committed to
       a local GIT...
...
57 - - 1.0.0 The Executable WAR Addon configures the Maven project
       to makes it possible to create web applications that can be
       run from the command
...
You’ll get a full list of the add-ons in the repository, whether or not they are compatible with your version of Roo. The fields returned are
- ID—The search result # of the add-on.
- (T)rusted—Whether the team member deploying the add-on is a trusted or approved Roo developer. These add-ons must be approved by the Roo team to gain the T code.
- (R)oo 1.2 Compatible—These add-ons are compatible with the add-on system as of version 1.2 or later.
- Description—The description of each add-on. It starts with the version of the add-on.
The addon list command has several options, including
- --compatibleOnly—Show only compatible add-ons.
- --trustedOnly—Show only add-ons by trusted developers.
- --communityOnly—Show only add-ons contributed to the system by the outside community. Some of the add-ons available include upgrades of key Roo components and optional JARs, so this option weeds out internal JARs from the list.
- --linesPerResult—By default, Roo shows only two comment lines. If an addon has more documentation, you can expand the number of rows to read the result.
- --refresh—The list of add-ons are loaded on startup. Use this option to force a reload of the list.
You can also use the search command to locate a specific add-on. The --requires-Description option searches text within the description:
roo> addon search --requiresDescription git

1 found, sorted by rank; T = trusted developer; R = Roo 1.2 compatible
ID T R DESCRIPTION ---------------------------------------------------
01 Y Y 1.2.0.M1 Offers GIT integration in the project. Each
       successfully executed command will be automatically committed to
       a local GIT...
The --requiresCommand option searches for the commands provided by the add-on:
roo> addon search --requiresCommand git

1 found, sorted by rank; T = trusted developer; R = Roo 1.2 compatible
ID T R DESCRIPTION ---------------------------------------------------
01 Y Y 1.2.0.M1 Offers GIT integration in the project. Each
       successfully executed command will be automatically committed to
       a local GIT...
For all of the add-on commands, you can type two dashes (--) and use the [TAB] completion key to see additional options.
There are four ways to install an add-on to your Roo configuration:
- Use the addon install command to install it from the central Roo add-on repository.
- Use the osgi start command to install add-ons from a URL or a file. You’ll use this technique later in this chapter when you write your own add-ons.
- Use the osgi obr repository commands to mount an OSGi repository and install the add-on from that repository. Useful in a corporate environment where your team needs to share company-wide add-ons.
- Copy the add-on JAR file to the Roo installation’s bundles directory.
We discuss the osgi start and osgi obr commands in the next chapter.
The report format is a bit basic, but we hope to soon see an add-on portal website that displays this information in a more useful way.
The addon info command shows details about your add-on. The following example assumes roo-equals-roo-addon was search result 01:
Name.........: Spring Roo - Addon - GIT
BSN..........: org.springframework.roo.addon.git
Version......: 1.2.0.M1 [available versions: 1.1.1.RELEASE,
               1.1.2.RELEASE, 1.1.3.RELEASE, 1.1.4.RELEASE,
               1.1.5.RELEASE, 1.2.0.M1]
Roo Version..: 1.2
Ranking......: 0.0
JAR Size.....: 14278 bytes
PGP Signature: 0xEC67B395 signed by Alan Stewart ([email protected])
OBR URL......: http://spring-roo-repository.springsource.org/repository
                .xml.zip
JAR URL......: httppgp://spring-roo-repository.springsource.org/release
               /org/springframework/roo/org.springframework.roo.addon.g
               it/1.2.0.M1/org.springframework.roo.addon.git-1.2.0.M1.j
               ar
Commands.....: 'git revert commit' [Roll project back to a specific com
               mit]
Commands.....: 'git revert last' [Revert last commit]
Commands.....: 'git log' [Commit log]
Commands.....: 'git push' [Roll project back to a specific commit]
Commands.....: 'git setup' [Setup Git revision control]
Commands.....: 'git commit all' [Trigger a commit manually for the proj
               ect]
Commands.....: 'git config' [Git revision control configuration (.git/c
               onfig)]
Commands.....: 'git reset' [Reset (hard) last (x) commit(s)]
Description..: Offers GIT integration in the project. Each successfully
               executed command will be automatically committed to a lo
               cal GIT repository. Tags: #git, #scm, #wrappedCoreDepend
               ency
The Roo add-on system is a great way to find and experiment with published and contributed add-ons. You can also install your own add-on to this repository, further contributing to the Roo platform. We’ll show you how in chapter 12.
11.3.2. Installing with add-on install
Now that you’ve learned how to search for add-ons, it’s time to install one and experiment. Let’s install the Roo Git add-on. There are two ways to do this.
The first is to use the search ID of a previously executed search:
roo> addon search --requiresCommand git

1 found, sorted by rank; T = trusted developer; R = Roo 1.2 compatible
ID T R DESCRIPTION ---------------------------------------------------
01 Y Y 1.2.0.M1 Offers GIT integration in the project. Each
       successfully executed command will be automatically committed to
       a local GIT...

roo> addon install id --searchResultId 01
The second is to use the bundle symbolic name, abbreviated as BSN in the previous addon info command:
roo> addon install bundle --bundleSymbolicName org.springframework.roo.addon.git
This method works well when you’re putting together Roo script files for your developers to use in the future, and don’t want to rely on a search result ID.
Watch those Search IDs
Each time you perform an addon search or addon list command, the search result IDs change. They aren’t permanent numbers.
It’s time to use your add-on to set up a git repository.
11.3.3. Using the Git add-on
You can check your shell to see the new command by hitting [TAB]:
roo> [TAB]
*/            /*            //            ;             addon
backup        class         controller    date          dependency
development   download      email         enum          equals
exit          field         flash         focus         git
 gwt           help           hint         interface     jms
json          logging       metadata      osgi          perform
persistence   pgp           poll          process       properties
proxy         quit          reference     script        system
test          version       web
Now the git command appears alongside the rest of the Roo shell commands.
You can set up a Git repository from a Roo project. This add-on provides a series of shell commands that configure and automatically manage changes to the repository with each shell command. To set up the Git repository, you can issue this one-line command:
roo> git setup
Git commit 4c655f6c43eb4e76e1cfa13919f213ca3466a5a7 [git setup]
This command will issue a git init command in your project directory, if needed, and otherwise use your existing Git configuration. It will then issue a git commit to record the change you’ve made.
Now, any change you make to your project configuration in the Roo shell will be followed by a commit to the Git repository:
roo> entity jpa --class ~.model.StudentSurvey --testAutomatically
Created SRC_MAIN_JAVA/.../model/StudentSurvey.java
Created SRC_TEST_JAVA/.../model/StudentSurveyDataOnDemand.java
Created SRC_TEST_JAVA/.../model/StudentSurveyIntegrationTest.java
Created SRC_MAIN_JAVA/.../model/StudentSurvey_Roo_Configurable.aj
Created SRC_MAIN_JAVA/.../model/StudentSurvey_Roo_ToString.aj
Created SRC_MAIN_JAVA/.../model/StudentSurvey_Roo_Jpa_Entity.aj
Created SRC_MAIN_JAVA/.../model/StudentSurvey_Roo_Jpa_ActiveRecord.aj
Created SRC_TEST_JAVA/.../model/StudentSurveyIntegrationTest_Roo_Config
        urable.aj
Created SRC_TEST_JAVA/.../model/StudentSurveyDataOnDemand_Roo_DataOnDem
        and.aj
Created SRC_TEST_JAVA/.../model/StudentSurveyIntegrationTest_Roo_Integr
        ationTest.aj
Created SRC_TEST_JAVA/.../model/StudentSurveyDataOnDemand_Roo_Configura
        ble.aj
Git commit 87f7126c44029e99ed9345d8884cde47d43d545c

  [entity jpa --class ~.model.StudentSurvey --testAutomatically]
Pretty handy. You can also force a commit right from the shell:
roo> git commit all --message "configured the big one"
And you can also revert to your last commit:
git revert last --message "undid the entity create - not needed."
Revert of commit HEAD~0 successful.
Finally, you can also review your Git log:
~.model.StudentSurvey roo> git log
---------- Start Git log ----------
commit id: dc95fbfcb94c528ec7846e95fe4b34b0157f66ca
message:  Revert "entity jpa --class ~.model.StudentSurvey
  --testAutomatically"

This reverts commit 87f7126c44029e99ed9345d8884cde47d43d545c

commit id: 87f7126c44029e99ed9345d8884cde47d43d545c
message:  entity jpa --class ~.model.StudentSurvey
  --testAutomatically

commit id: 4c655f6c43eb4e76e1cfa13919f213ca3466a5a7
message:  git setup
There are more features of this add-on, so consult your addon info output and experiment.
11.3.4. Upgrading Roo add-ons
You can use the addon upgrade command to search for and automatically install upgrades to Roo add-ons:
roo> addon upgrade available
The following add-ons / components are available for upgrade for level: ANY
-----------------------------------------------------------------------
[level: ANY] ...roo.addon.property.editor;1.1.4.RELEASE > 1.2.0.BUILD-SNAPSHOT
[level: ANY] ..roo.addon.gwt;1.1.4.RELEASE > 1.2.0.BUILD-SNAPSHOT
[level: ANY] ..roo.addon.propfiles;1.1.4.RELEASE > 1.2.0.BUILD-SN..
[level: ANY] ..roo.addon.web.selenium;1.1.4.RELEASE > 1.2.0.BUILD-SNAPSHOT
[level: ANY] ..roo.addon.solr;1.1.4.RELEASE > 1.2.0.BUILD-SNAPSHOT
[level: ANY] ..roo.addon.json;1.1.4.RELEASE > 1.2.0.BUILD-SNAPSHOT
[level: ANY] ..roo.addon.backup;1.1.4.RELEASE > 1.2.0.BUILD-SNAPSHOT
...
Beware of Updating the Internal Roo Add-Ons
In the previous example, the add-ons from Roo 1.1.4 are upgradable to a build snapshot version of Roo 1.2.0. Due to a missing add-on, however, when we upgraded to 1.2.0, the Roo shell detected a problem and was no longer functional. If you accidentally upgrade your Roo artifacts and the shell won’t start properly, you can go back to the original installed version by deleting the contents of the cache directory in your Roo installation directory.
You’ll also lose any additional add-ons you’ve installed previously, so it’s a good idea to store your third-party add-on installation scripts in your version control system and update them whenever you add a new approved add-on.
By default, the upgrade engine searches for any version, including releases, release candidates, and milestone releases. You can customize this, for example, by limiting to only release-level add-ons:
roo> addon upgrade settings --addonStabilityLevel RELEASE
Add-on Stability Level: RELEASE stored
Or you can list only available add-ons for your Roo shell release level:
roo> addon upgrade available
No add-ons / components are available for upgrade for level: RELEASE
This setting is stored between restarts, so if you want to experiment, make sure to reset it before searching for upgrades.
11.3.5. Trusting PGP keys
When a user installs add-ons using the addon command, Roo verifies whether or not the user trusts the add-on developer by checking whether they have trusted the developer’s PGP key.
You can see the following list of trusted keys that are installed into your Roo environment by issuing the pgp key command:
roo> pgp list trusted keys

>>>> KEY ID: 0xBB0371CE <<<<
     More Info: http://keyserver.ubuntu.com/pks/lookup?fingerprint=on&op=index&search=0xBB0371CE
     Created: 2010-Jul-11 17:29:06 +0000
     Fingerprint: eb25ea09869e3be5def83c43a9cb702ebb0371ce
     Algorithm: RSA_GENERAL
     User ID: Spring Roo <[email protected]>
       Signed By: Key 0x00B5050F (Ben Alex <[email protected]>)
       Signed By: Key 0xBB0371CE (Spring Roo <[email protected]>)
     Subkey ID: 0x90BDE537 [RSA_GENERAL]
>>>> KEY ID: 0x6163CB9E <<<<
     More Info: http://keyserver.ubuntu.com/pks/lookup?fingerprint=on&op=index&search=0x6163CB9E
     Created: 2010-Jun-09 06:07:56 +0000
     Fingerprint: 868df24600c3c8e4d999ea3584f200286163cb9e
     Algorithm: RSA_GENERAL
     User ID: Stefan Schmidt <[email protected]>
       Signed By: Key 0x00B5050F (Ben Alex <[email protected]>)
       Signed By: Key 0xEC67B395 (Alan Stewart <[email protected]>
               )
       Signed By: Key 0x6163CB9E (Stefan Schmidt <[email protected]
                  m>)
     Subkey ID: 0x411B8828 [RSA_GENERAL]
...
You can permanently trust the keyholder of this key by issuing the pgp trust command:
roo> pgp trust --keyId 0x0E5BA660

Added trust for key:
>>>> KEY ID: 0x0E5BA660 <<<<
     More Info: http://keyserver.ubuntu.com/pks/lookup? fingerprint=on&op=index&search=0x0E5BA660
     Created: 2010-Aug-05 14:43:59 +0000
     Fingerprint: f2b858c56bcbada85df77995c74ccbff0e5ba660
     Algorithm: DSA
     User ID: Stefan Bley <[email protected]>
        Signed By: Key 0x0E5BA660 (Stefan Bley <[email protected]
                  e>)
     Subkey ID: 0xB14BD4B7 [ELGAMAL_ENCRYPT]
This command, unlike pgp automatic trust, is a permanent decision and is kept within Roo’s configuration. If you upgrade to a new version of Roo, you may have to redo your trust relationships. You can also untrust a PGP key:
roo> pgp untrust --keyId 0xACB27429
Revoked trust from key:
>>>> KEY ID: 0xACB27429 <<<<
     More Info: http://keyserver.ubuntu.com/pks/lookup?fingerprint=on&op=index&search=0xACB27429
     Created: 2010-Jun-13 15:14:48 +0000
     Fingerprint: 8f19905b317143e44bd28ba83fec2947acb27429
     Algorithm: RSA_GENERAL
     User ID: Christian Tzolov <[email protected]>
           Signed By: Key 0xACB27429 - not locally trusted
     Subkey ID: 0xD9D8D1C2 [RSA_GENERAL]
11.3.6. Removing add-ons
To remove an add-on, use the addon remove command. This command is tab-completion aware, so if you aren’t sure which add-on you want to remove, keep hitting [TAB] to autocomplete the bundleSymbolicName command-line property:
roo> addon remove --bundleSymbolicNameorg.springframework.roo.addons.git
Successfully removed add-on:
org.springframework.roo.addons.git
Add-On Removal Doesn’t Always Remove Code
Code contributed by the add-on generally stays put. But nothing will keep it up to date, so you may want to use push-in refactoring to put the code under developer control again. As the add-on developer, you may wish to provide a remove command so that you can clean up after yourself before developers uninstall your add-on.
This command removes the artifact from the Roo installation’s bundle cache directory.
11.4. Enough OSGi to be dangerous
Because all add-ons are written as OSGi bundles, it may help you to learn enough OSGi to be dangerous. For the bold, a trip into the OSGi specification, or Manning’s OSGi in Action, is a good diversion, but you can also get started with merely a basic understanding of OSGi.
OSGi is a dynamic module system for Java. It allows Java applications to load, start, stop, update, and unload artifacts such as JARs and WARs on the fly, without stopping and restarting. Think of it as a dynamic, class-loading system that’s smart enough to resolve complex dependencies. You use OSGi in many applications today, including Eclipse, which the SpringSource Tool Suite is based on, and which runs with a small application core under the Equinox OSGi container. The ServiceMix and Mule integration platforms have OSGi at their core so they can configure new integration services at runtime. The platform has been around for years and was originally developed to manage the modularity of applications on mobile devices.
We’ll begin this investigation of OSGi with a little terminology.
11.4.1. OSGi bundles and manifests
OSGi bundles are JAR, WAR, or EAR files that contain a special file, META-INF/MANIFEST.MF, with some well-defined headers. To see these headers, open a Roo shell and type in
roo> osgi headers
You’ll see a ton of output, broken up into sections by information about each bundle. Here’s an excerpt of the contents of Roo’s entity OSGi bundle:
Spring Roo - Addon - Entity (15)
--------------------------------
Bnd-LastModified = 1314712639731
Build-Jdk = 1.6.0_23
Built-By = roobuild
Bundle-Copyright = Copyright VMware, Inc. All Rights Reserved.
...
Bundle-Description = Support for the creation and management of domain entities.
Bundle-ManifestVersion = 2
Bundle-Name = Spring Roo - Addon - Entity
Bundle-SymbolicName = org.springframework.roo.addon.entity
Bundle-Vendor = VMware, Inc
Bundle-Version = 1.2.0.BUILD-SNAPSHOT
Created-By = Apache Maven Bundle Plugin
Export-Package = org.springframework.roo.addon.entity...
...
Import-Package = org.osgi.service.component;version="[1.1,2)",..
Manifest-Version = 1
Service-Component = OSGI-INF/serviceComponents.xml
Tool = Bnd-1.43.0
...
OSGi components export certain Java packages, using the Export-Package header. They also require other packages to function, as detailed by the Import-Package header. Every Roo add-on contains a manifest that describes the exposed packages, and is identified by both a human-readable Bundle-Name, and an identifier known as a Bundle-SymbolicName. You’ll refer to the symbolic name wherever Roo asks you for a bundle’s ID.
Accessing the Felix OSGi Console
For those OSGi experts among you, try to access the underlying Felix shell directly using the Roo shell command osgi framework command felix-command. All valid Felix command activities are valid here as well. Keep in mind that you’re using OSGi only to expose and use components, so the utility of this command is limited.
11.4.2. Bundle lifecycle
OSGi bundles go through several lifecycle phases, including resolved, installed, started, and stopped. You start a bundle with the osgi start command. You stop one with osgi stop. You’ll learn how to use these commands when you create an OSGi bundle.
Roo activates a bundle when you start it. At the time of activation, OSGi loads the component into memory. The Apache SCR feature exposes OSGi components marked with the @Component annotation, and injects any components into other OSGi components with the @Reference annotation. In this way, SCR-based OSGi components behave like the dependency injection model in Spring beans. However, OSGi components are stateful, whereas Spring’s beans are stateless by default.
11.4.3. Viewing bundles in the OSGi container
You can use the osgi ps shell command to show the status of the bundles and add-ons installed in the container. For example, type in
roo> osgi ps
to bring back a list of all OSGi “processes” or active bundles. The following shows some example output:
roo> osgi ps
START LEVEL 99
 ID   State     Level  Name
[ 0] [Active ] [   0] System Bundle (3.0.7)
[ 1] [Active ] [   1] jansi (1.5)
[ 2] [Active ] [   1] Apache Felix Bundle Repository (1.6.4)
[ 3] [Active ] [   1] Apache Felix iPOJO (1.6.8)
[ 4] [Active ] [   1] Apache Felix Log Service (1.0.0)
[ 5] [Active ] [   1] Apache Felix Declarative Services (1.6.0)
[ 6] [Active ] [   1] Apache Felix Shell Service (1.4.2)
[ 7] [Active ] [   1] Spring Roo - Addon - Backup (1.1.4.RELEASE)
[ 8] [Active ] [   1] Spring Roo - Addon - @Configurable Support
                      (1.1.4.RELEASE)
[ 9] [Active ] [   1] Spring Roo - Addon - Creator (1.1.4.RELEASE)
[10] [Active ] [   1] Spring Roo - Addon - Database Reverse
                      Engineering (1.1.4.RELEASE)
...
Each OSGi bundle is listed in the previous output, along with an ID, state, starting level, and name. You can install any OSGi JAR file, and you may need to if your Roo shell commands have to interact with a Java library that’s not already installed in your Roo shell, such as a JDBC driver.
11.4.4. Starting and uninstalling a bundle
To start an OSGi module, use the osgi start command, passing it the URL of an OSGi-ified JAR file. If you’ve developed an add-on and have access to the JAR file, you may mount it in this way:
roo> osgi start --url file:///Users/kenrimple/[...]/org.sillyweasel.maven.reports.addon-0.1.0.BUILD-SNAPSHOT.jar
If your OSGi bundle happens to be configured as a Roo add-on, the shell will initialize it when started and add any configured commands. The add-on’s JAR file and configuration settings will be installed in the cache directory of the Roo installation, and will be available until removed from the system.
You can use the osgi uninstall command to unload the same Roo add-on bundle. You’ll need to type in the bundle’s symbolic name:
roo> osgi uninstall --bundleSymbolicNameorg.sillyweasel.maven.reports.addon
This will remove the bundle from your Roo shell. If you’d rather update it from the latest source file, use osgi update, and tell it which bundle and what location to reload it from:
roo> osgi update --bundle org.sillyweasel.maven.reports.addon --url file:///path..to../org.sillyweasel.maven.reports....jar
Why Not Use the OSGi Install Command?
This command loads only an OSGi bundle into your shell—it doesn’t start it. You’ll have to issue the osgistart command afterward. It’s easier to load and start in one step with osgistart. If you accidentally installed a bundle using the install variant, you can start it by issuing the osgi start command. Roo doesn’t currently provide an osgi stop command—see Issue ROO-2734 in https://jira.springsource.org for details on a potential fix.
That’s enough OSGi to be dangerous now. You’re ready to write your own add-ons with Roo.
11.5. Types of Roo add-ons
Roo lets you create your own add-ons, using projects built using the Roo shell addoncreate command. There are four variants. Table 11.1 outlines the differences between them, and their pros and cons.
Table 11.1. Roo add-ons: using the addon create command
|
Add on type |
Features |
Pros and cons |
|---|---|---|
| simple | Installs commands. Performs operations such as file manipulation and installation of tag libraries and other files. |
Pros: Easy to understand; contains simple example code to get a minimal example working quickly. Cons: Limited features, and managing dependencies requires use of more services and features. |
| advanced | Installs commands. Performs operations. Manipulates build configuration. Installs annotations and ITDs. Watches code for changes and reacts when annotations are added or deleted. |
Pros: Extremely powerful; the sky is the limit. Cons: Complicated, and uses a number of non-integrated APIs and services. Developer needs to understand OSGi, Felix, and Aspect-J ITDs to get the most out of the add-on. |
| wrapper | Installs a Maven artifact as an OSGi module. Installs features needed by other plugins, such as a database driver for the reverse engineering add-on. |
Pros: Simple to configure. Command can also pull in transitory dependencies with some adjustments to the Maven POM file. Cons: None. If you’re installing a Roo shell command that needs a feature in a Java library, such as a JDBC driver or an email service provider, this is the one option for installing the library. |
| i18n | Defines an installable language for your applications. This artifact defines a language name, flag, locale, and a message source properties file to install a language into your Roo shell. |
Pros: Allows for bundling of additional languages into your application, which then can be assumed into your user interface, if
working with the Roo scaffolded web template design. Cons: Useful when paired with the scaffolded user interface, but may have less utility than adding the locale to your current message source. |
All four add-on types will be covered in this two-chapter series. The wrapper add-on type creates JARs such as those used in chapter 4, section 4, “Reverse engineering your database,” for installing a database driver into the Roo shell.
It’s time to start experimenting with your own add-ons. In this chapter, we’ll get you started by covering how to wrap a standard JAR and provide it to the Roo shell using the OSGi wrapper add-on. We’ll create an i18n add-on to provide a Norwegian translation of the Roo scaffold labels. Then we’ll build a simple add-on that installs jQuery, jQuery UI, and some replacement tags in the Roo tag library. Finally, in the next chapter, we’ll branch out and create an add-on to provide access to the Coffee-Script language, which we’ll use to simplify some of the JavaScript files.
11.6. Roo wrapper add-ons
A wrapper add-on takes a given Maven artifact and wraps it with the proper OSGi MANIFEST.MF entries, delivering it as a new JAR to be used by the Roo shell. The JAR may then be started as an OSGi bundle with osgi start and accessed by other Roo add-ons. For example, to wrap the Apache math library, you can search for the proper Maven artifact information on http://search.maven.org, as shown in figure 11.1.
Figure 11.1. You can use https://search.maven.org to search for any public artifact. In our search, we found version 2.2 of Apache’s commons-math and will use it to construct our wrapper class.
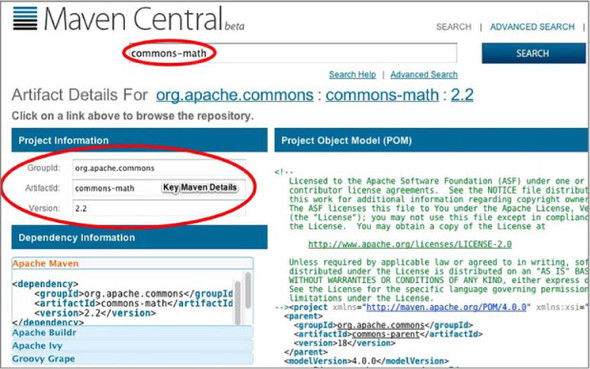
Now, let’s use the groupId, artifactId, and version from the Maven repository search to create a wrapper add-on. Create an empty directory named commons-mathwrapper, navigate to it, and open a Roo shell. Issue the following add-on project creation command:
roo> addon create wrapper --groupId org.apache.commons --artifactId commons-math --version 2.2 --topLevelPackage org.rooinaction.bundles --vendorName "Apache Software Foundation" --licenseUrl "http://www.apache.org/licenses/LICENSE-2.0" --projectName commons-math-wrapper
Roo creates a new project that you can use to build your add-on. The final artifact name will be the provided topLevelPackage parameter, coupled with the artifactId and version parameters, plus “.0001.” Now, you’ll create the wrapper artifact. To do this, issue this Roo shell command:
roo> perform command --mavenCommand bundle:bundle
Once Roo completes the bundling process, the wrapper will be built in target, and the previous example becomes org.rooinaction.bundles.commons-math-2.2.0001.jar. You can now install this bundle into the Roo shell:
roo> osgi start --url file:///path-to-project/target/org.rooinaction.bundles.commons-math-2.2.0001.jar
The commons-math API is available to all Roo add-ons that need it. You can use this technique to expose new JDBC drivers to the Roo shell, which you can use to run the database reverse engineering command discussed in chapter 4.[1]
1 Supporting Oracle’s JDBC drivers requires you to create a wrapped OSGi library, because Oracle currently restricts downloads of its drivers from anywhere other than Oracle itself. Review the issue at http://mng.bz/26am.
11.7. Adding a language to Roo with i18n
You can define a special project, known as a Roo localization add-on, that contains the standard Roo web framework localization file, messages.properties, which you can translate for your required language. You’ll need to supply a fully translated properties file, an icon for the language, and the details[2] for the locale to support, such as the language name.
2 For this section, we used http://translatify.appspot.com/ to translate the properties file into Norwegian. We had to manually extract the HTML table of translated code because the zip file returned was incomplete. This application no longer functions in the way it was used, so you’ll need to find your own translation service.
For this application, you’ll create a language localization add-on to support Norwegian, which isn’t provided out of the box. You can create a new localization project by localizing your language file, providing your icon PNG, creating a new directory, and issuing the following Roo command in the empty directory:
roo> addon create i18n --topLevelPackage org.rooinaction.addons.i18n.norwegian --locale no --messageBundle messages_no.properties --language norwegian --projectName rooinaction-norwegian-language-addon --flaggraphic norway.png
In this example, Roo was able to look up the flag for Norway using a web service and download the norway.png file itself. For unknown flags, you’ll have to find a legally distributable flag image, convert it to PNG format with a size of 16-by-11 pixels, and place it in the project root directory.
From this point on, the project files will be contained in the src/main/resources directory of this project, under the package specified by the topLevelPackage parameter. You can then build the application with mvn package. If the add-on builds properly, you can install it into your Roo shell with this command:
roo> osgi start --url file:///path-to-target-dir/ org.rooinaction.addons.i18n.norwegian-0.1.0.BUILD-SNAPSHOT.jar
To use your add-on, switch back to your web project and issue this Roo command:
roo> web mvc language --code no
Before you create your own language add-on, use the public add-on searching feature to see if someone else has already provided one.
11.8. A simple add-on: jQuery UI
Roo uses the Dojo form library for all client-side form validation and widgets, as we discussed in chapter 7. Many developers have embraced the more widely adopted jQuery library and a wide variety of components contained within it. The Dojo form library poses a challenge for these developers, because it chooses both a JavaScript library and a widget library for them.
Roo allows add-on developers to modify files in the installation, so it’s easy to modify the platform to suit your needs. Let’s build an add-on to set up a jQuery-based fron-tend. You’ll focus on several major tasks:
- Installing the jQuery JavaScript library
- Installing the jQuery UI component library, styles, and images
- Adjusting the load-scripts.tagx tag to load each of the libraries and the stylesheet
All of these tasks can be accomplished easily using a Roo add-on. You can create an add-on project to hold your customizations and test them with a simple MVC project. Let’s start by creating the add-on project.
11.8.1. Creating the jQuery UI add-on
You develop add-ons using the add-on create command, which generates a new project. First you’ll create the directory to hold your project:
$ mkdir jquery-addon
$ cd jquery-addon
Next, create the add-on project. You’ll use the simple add-on command:
$ roo
roo> addon create simple

      --topLevelPackage org.rooinaction.addons.jqueryui --projectName jqueryui --description "An add-on to install jQuery UI"
The output will indicate that the simple add-on has been generated as a Maven project, and organized by the usual directories, src/main/java, src/main/resources, src/ test/java, and others. The generated add-on contains a sample component, named Jqueryaddon, which will need to be replaced. It includes
- An interface-driven Operations class, JqueryuiOperationsImpl, and its base interface JqueryuiOperations. This component defines methods that are executed in response to Roo shell commands.
- A commands class, JqueryuiCommands, which implements the CommandMarker interface and defines the commands exposed by the add-on. This class contains methods annotated with two annotations, @CliAvailabilityIndicator and @CliCommand, which define whether your add-on commands are available, and which methods to call in your add-on operations class.
- An enum, JqueryuiPropertyName, which is an example of an enumerated property that can be sent to a command. Commands such as persistencesetup use this component for the --database options, such as HYPERSONIC_PERSISTENT and ORACLE.
- A set of tags, located in the src/main/resources directory, for potential inclusion into the consuming project.
- A legal license agreement file, which you can replace with the license your project will use.
- An assembly.xml file, which provides the ability to package the entire project, including dependencies, into a zip file.
You’ll need to customize these files for your purposes, so that you install the proper commands to set up the add-on.
But before you do this, you have to do some cleanup, because Roo delivers more code than you need. You’ll need to remove some files you aren’t using to clean up the library. Delete the tag files in the org/rooinaction/jqueryaddon directory of src/ main/resources, leaving the directory there for use by your new tags. Also, delete the JqueryaddonPropertyName.java enum class; you won’t be using that one either:
$ rm src/main/resources/org/rooinaction/addons/jqueryui/*.tagx
$ rm src/main/java/org/rooinaction/addons/jqueryui/JqueryuiPropertyName.java
Now, take a moment to define your goals for the add-on.
11.8.2. The jQuery UI add-on goals
You’ll want your Roo add-on to provide two commands:
- jquery api install—Installs the jQuery JavaScript library in a JavaScript library directory, /js, within the web application, and adds a reference to it to the JSPX tag, load-script.tagx, which adds the library to the Roo page layout.
- jquery ui install—Installs the jQuery UI library, graphics, and stylesheet, and edits the load-script.tagx library to add the framework to the Roo page layout.
After executing these commands, developers can use the jQuery and jQuery UI JavaScript libraries in their applications.
To develop this add-on, you’ll need to create the proper components in your addon project, and copy the appropriate file resources to the src/main/resources directory, under the project package directory, org/rooina/jqueryaddon. Let’s start by defining the operations that the add-on will perform.
11.8.3. Defining the jQuery install operations
First, you’ll set up your operations interface. You’ll start by editing the existing JqueryaddonOperations.java interface. Replace the contents with the following:
package org.rooinaction.jqueryaddon;

public interface JqueryaddonOperations {

  boolean isInstalljQueryCommandAvailable();
  boolean isInstalljQueryUICommandAvailable();
  void installjQueryApi();
  void installjQueryUIApi();
}
You’ve defined two command methods, one for each of the Roo shell commands: installjQueryApi(), which installs the jQuery API, and installjQueryUIApi(), which installs the jQuery UI API. You also defined two Boolean methods, installjQueryApi() and installjQueryUIApi(), which are executed by the Roo shell when it checks whether to make each of the commands available.
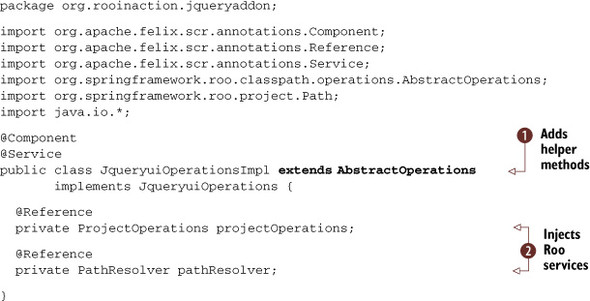
Next, edit the JqueryaddonOperationsImpl.java implementation class. As you’ll see in the following listing, you’ll gut everything but the first two lines of the class, and change them to extend the Roo support class AbstractOperations, which provides a few helper methods you’ll take advantage of during implementation.
Listing 11.1. Setting up your operations implementation
When building this class, let your IDE find the imports for you to save time.
You added two annotations, @Component and @Service. But these aren’t the Spring annotations; they’re from the Service Component Registry (SCR) API, which is part of the Apache Felix OSGi container, on which Roo is based. Your add-on operations class is an OSGi service, which makes it visible to Roo for inclusion into the system.
The class now extends AbstractOperations ![]() , a helpful abstract class that provides some project management facilities. You also injected references to two Roo OSGi
services: instances of ProjectOperations and PathResolver, which you’ll use to access components that change your project configuration
, a helpful abstract class that provides some project management facilities. You also injected references to two Roo OSGi
services: instances of ProjectOperations and PathResolver, which you’ll use to access components that change your project configuration ![]() .
.
Roo and OSGi: Configuring Roo at Runtime
Remember, Roo add-ons are OSGi bundles—they can be added and removed from running Roo shell environments at will, and these annotations identify this class as an OSGi component that exports OSGi services, which can be consumed by other OSGi components, such as the Roo shell.
Unless you have to add a class or a library to the Roo runtime path, such as a JDBC driver, you won’t need to restart after installing new Roo add-ons. Consult your add-on’s home page for details.
Let’s build the first Roo add-on command method—the one that installs jQuery itself.
11.8.4. Copying jQuery to the web application
It’s time to write the installjQueryApi() method, which copies jQuery to your project. Add the following method to the JqueryuiOperations class. The following listing shows your implementation.
Listing 11.2. The installjQueryApi() method
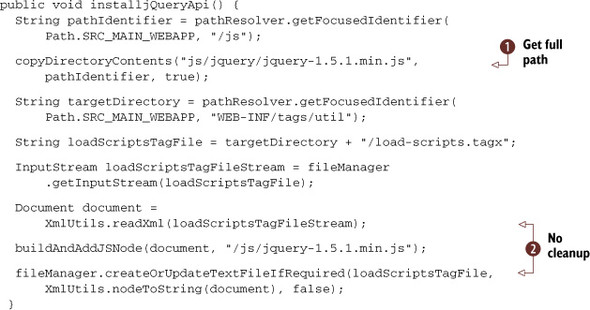
This method first copies the jquery-1.5.1.min.js file from the org/rooina/ jqueryaddon/js/jquery directory of src/main/resources. You’ll use the pathResolver you set up at the top of your class to find the absolute path to the web application’s / js directory. This will be created
if it doesn’t already exist.[3] You then use the copy-DirectoryContents method ![]() , which comes from the AbstractOperations Roo add-on class. It uses Roo’s FileManager component to perform the copy operation.
, which comes from the AbstractOperations Roo add-on class. It uses Roo’s FileManager component to perform the copy operation.
3 You’ll need to download the jQuery library from http://jquery.org and place it in the previously mentioned directory for this to work.
Note that the method XmlUtils.readXml(InputStream) will automatically close the stream, so you don’t need to do any cleanup. The same holds for the fileManager method createOrUpdateTextFileIfRequired ![]() , as it performs bulk operations to stream the file and is responsible for its own cleanup.
, as it performs bulk operations to stream the file and is responsible for its own cleanup.
Use the FileManager for File Access
Because the FileManager can automatically undo operations if your command throws an exception, it makes it easier to roll back your changes to the file system. Use it whenever you have to manipulate files.
To properly refer to the destination path, which must be absolute, you use the Path-Resolver ![]() , a helper object from the Roo projectOperations helper, injected into your class as a @Reference earlier in section 11.8.3. This component has visibility into the currently running Roo shell, which gives you the proper OS path to the file.
, a helper object from the Roo projectOperations helper, injected into your class as a @Reference earlier in section 11.8.3. This component has visibility into the currently running Roo shell, which gives you the proper OS path to the file.
This class will not compile yet; you must define a helper method next, buildAndAddJSNode, to install your JavaScript tags.
11.8.5. Installing jQuery in JavaScript
Next, you need to edit the load-script.tagx JSPX tag file, and use the HTML <script> tag to install the command. You loaded the XML source for this file into a DOM Document instance in the previous installjQueryApi() method.
You’ll add a new <script> tag to the end of the document, which you access via the document’s DOM method getFirstChild(). The buildAndAddJSNode(document,path, var) method does the work for you:
private void buildAndAddJSNode(Document doc, String var) {
  XmlElementBuilder builder = new XmlElementBuilder("script", doc);
  builder.addAttribute("type", "text/javascript");
  builder.addAttribute("src", var);
  addComment(doc, builder);
  Element springJSTag = builder.build();
  doc.getDocumentElement().appendChild(springJSTag);
}
Some HTML browsers can’t deal with bodiless script tags, so you have to add a comment to the tag using the helper addComment (document, builder) method:
private void addComment(Document document, XmlElementBuilder builder) {
  Comment comment = document.createComment("required for FF3, Opera");
  builder.addChild(comment);
}
This method emits the following tags to the end of the script tag file:
<script src="/js/jquery-1.5.1.min.js" type="text/javascript">
  <!--required for FF3 and Opera-->
</script>
You’re almost finished. But there’s one more task for this command—defining whether it’s available or not at the time the user hits [TAB].
11.8.6. Defining the availability of the jquery setup
Each time someone uses tab completion, or the Roo shell changes the configuration in some way, all Roo components are asked whether their commands are available. The add-on can conditionally expose their commands and hide them when they don’t make sense, such as when trying to add a web feature before the web framework is installed.
You need to determine when to show your jquery commands. To do so you’ll implement the isInstalljQueryCommandAvailable() method, which returns a Boolean result:
public boolean isInstalljQueryCommandAvailable() {
  String jsLocation = pathResolver.getFocusedIdentifier(
      Path.SRC_MAIN_WEBAPP, "/js");

  return fileManager.findMatchingAntPath(
      jsLocation + "**/jquery-1.*.min.js").isEmpty();
}
You use the injected Roo pathResolver to determine the proper path to a file starting with jquery-1, and ending with.min.js. You could have searched for your exact version, but then you wouldn’t be able to detect a user-upgraded jQuery library. Obviously, this issue will come up when someone mounts a future 2.x jQuery library, or names it differently.
What is the Focused Identifier?
You may wonder what the focused fragment in the pathResolver method refers to. Back in chapter 2, we discussed how you can create multimodule Roo projects. Asking for the focused project or identifier scopes your request for the module you’re working on, or the top-level module if you either don’t have modules or aren’t focused on one. There are also methods to ask for the top-level project so you can affect changes at that level.
Now, if the shell user has installed jQuery before, the script file will be available in the ‘js’ directory of the web application, so it should return false. Otherwise, it should return true, which will allow the command to become visible in the shell.
That’s How they Hide Commands
Add-ons can provide visibility (or invisibility) of shell commands. For example, the Spring MVC add-on is always present, but doesn’t make itself active until you have a valid Roo project. The entity add-on doesn’t allow you to create an entity until you have a persistence context configured in your application. Take a good look at the existing Roo add-ons from the Roo project itself to learn how you can take advantage of this.
Now let’s look at the second level of JavaScript enhancements: installing the jQuery UI.
11.8.7. Installing the jquery UI setup command
Some developers are happy working with Dojo for their user interface widgets, but they want jQuery for other purposes. Others may want it all and will choose to install both. Your add-on gives developers a choice. You’ll configure another command, jquery UI setup, to install the UI library as well as assets such as stylesheets and graphics.
First, you’ll detect whether you’re able to install the command itself. You have to check whether the application is a web application and then verify that you’ve installed the jQuery library itself. This is a variant of the check for jQuery in section 11.8.6 earlier in this chapter:
public boolean isInstalljQueryUICommandAvailable() {

String jsLocation = pathResolver.getFocusedIdentifier(
Path.SRC_MAIN_WEBAPP, "/js");
if (projectOperations.isFocusedProjectAvailable()) {
boolean hasJqueryUI = !fileManager.findMatchingAntPath(
jsLocation + "/jquery-ui-*.min.js").isEmpty();

return !isInstalljQueryCommandAvailable() && !hasJqueryUI;
} else {
return false;
}
}
Check whether the /js directory in your src/main/webapp project folder contains a jQuery UI main JavaScript file. If it does, and you can’t install the jQuery library (referring back to the jQuery detection method), you can install the jQuery UI.
Installing the jQuery UI is a little tricky. It comes with multiple JavaScript files, a number of images, and a stylesheet. So your installjQueryUIApi method in the following listing is a bit longer, but not more complex.
Listing 11.3. Installing the jQuery UI
public void installjQueryUIApi() {
copyDirectoryContents("js/jqueryui/*.js",
pathResolver.getFocusedIdentifier(Path.SRC_MAIN_WEBAPP, "/js"),
true);
copyDirectoryContents("images/*.png",
pathResolver.getFocusedIdentifier(Path.SRC_MAIN_WEBAPP,
"/images"), true);
copyDirectoryContents("styles/*.css",
pathResolver.getFocusedIdentifier(Path.SRC_MAIN_WEBAPP,
"/styles"), true);

String targetDirectory = pathResolver.getFocusedIdentifier(
Path.SRC_MAIN_WEBAPP, "/WEB-INF/tags/util");

String loadScriptsTagFile = targetDirectory + "/load-scripts.tagx";

InputStream loadScriptsTagFileStream = fileManager
.getInputStream(loadScriptsTagFile);
 Document document = XmlUtils.readXml(loadScriptsTagFileStream);

buildAndAddJSNode(document,
"/js/jqueryui/jquery-ui-1.8.14.custom.min.js");
buildAndAddJSNode(document,
"/js/jqueryui/jquery.validate.min.js");
buildAndAddJSNode(document,
"/js/jqueryui/additional-methods.min.js");
buildAndAddCSSNode(document,
"/styles/jquery-ui-1.8.14.custom.css");

IOUtils.closeQuietly(loadScriptsTagFileStream);

fileManager.createOrUpdateTextFileIfRequired(loadScriptsTagFile,
XmlUtils.nodeToString(document), false);
}
You also need to add another helper method to this class—one that adds a CSS node to the load-script.tagx file:
private void buildAndAddCSSNode(Document document, String fileName) {
XmlElementBuilder builder = new XmlElementBuilder("link", document);
builder.addAttribute("href", fileName);
builder.addAttribute("rel", "stylesheet");
builder.addAttribute("type", "text/css");
addComment(document, builder);
Element springCSSTag = builder.build();
document.getDocumentElement().appendChild(springCSSTag);
}
You need to take one more step: you have to tell the Roo shell that these commands exist. That’s where the JqueryuiCommands.java class comes in.
11.8.8. Installing your commands
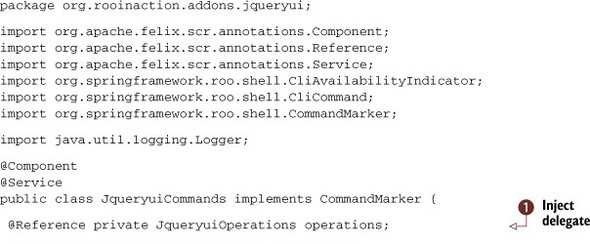
To make your commands visible to the shell, you need to define your add-on to the Roo shell system. The JqueryuiCommands.java class does this for you. This class must
- Implement the CommandMarker interface.
- Inject an instance of the JqueryuiOperations class via the OSGi @Reference annotation. This is similar to the Spring @Autowired annotation, but works in an OSGi container. Because you have an implementation of this class, Felix will find it and inject the instance, which in this case is JqueryuiOperationsImpl.java.
- Provide at least one Boolean method annotated with @CliAvailability-Indicator, which will return whether a method, or a set of methods, is available to the Roo shell.
- Provide at least one method annotated with @CliCommand, which defines the method to execute in your command component for a given Roo shell command. This ties the two components together.
The following listing defines your commands class, JqueryuiCommands.
Listing 11.4. The commands definition: JqueryuiCommands
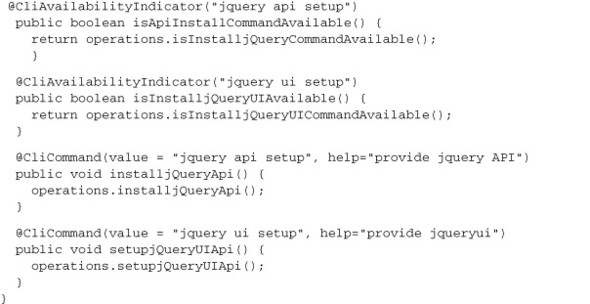
This class is used by the Roo shell every time a user attempts the tab completion mechanism, or types in the name of a command directly. Roo calls any @CliAvailbility-Indicator methods exposed in running add-ons to see whether they respond to the provided command. If a user executes a command, and the indicator method returns true, Roo executes the method annotated with @CliCommand with the same text.
This CommandMarker class forwards the command request to the Operations class, which OSGi injects for you using the @Reference annotated operations variable. For the setupjQueryApi() method, you delegate to the same method name in the JqueryuiOperationsImpl implementation. You’ll see that you refer to the injected class ![]() via the interface, JqueryuiOperations, as you would using Spring’s dependency injection features.
via the interface, JqueryuiOperations, as you would using Spring’s dependency injection features.
Do You Need a Commandmarker and an Operations Class?
No, you don’t. But your class will be bloated with methods for both types of operations, so unless the add-on is small, we recommend you separate the implementation of the add-on from exposure to commands by the add-on.
You’ll install your add-on and put it through its paces next.
11.8.9. Building and installing the add-on
You can build your add-on the usual way, using mvn package to compile and turn it into a JAR file. Any JUnit tests you write will be executed, as usual. Please note that, at this time, Spring Roo doesn’t have explicit support for writing any sort of Roo integration tests in the Felix OSGi container. The way you test add-ons is to install them in a test project.
You’re ready to build your add-on:
roo> perform package
Roo has attached additional steps to your Maven packaging stage, including the generation and installation of OSGi entries in the META-INF/MANIFEST.MF file contained within the JAR, as shown in the next listing.
Listing 11.5. The META-INF/MANIFEST.MF file
Manifest-Version: 1.0
Export-Package: org.rooinaction.addons.jqueryui;uses:="org.springframew
ork.roo.shell,org.springframework.roo.classpath.operations,org.springf
ramework.roo.project,org.springframework.roo.support.util,org.springfr
amework.roo.process.manager,org.w3c.dom"
Built-By: krimple
Tool: Bnd-1.15.0
Bundle-Name: jqueryui
Created-By: Apache Maven Bundle Plugin
Bundle-Copyright: Copyright Your project/company name goes here (used
in copyright and vendor information in the manifest). All Rights Rese
rved.
Bundle-Vendor: Your project/company name goes here (used in copyright
and vendor information in the manifest)
Build-Jdk: 1.6.0_26
Bundle-Version: 0.0.1.BUILD-SNAPSHOT
Bnd-LastModified: 1311435382474
Bundle-ManifestVersion: 2
Bundle-License: http://www.gnu.org/copyleft/gpl.html
Bundle-Description: Installs jQuery UI
Bundle-DocURL: http://www.rimple.com/sillyweasel
Bundle-SymbolicName: org.rooinaction.addons.jqueryui
Import-Package: org.springframework.roo.classpath.operations;version="
[1.2,2)",org.springframework.roo.process.manager;version="[1.2,2)",or
g.springframework.roo.project;version="[1.2,2)",org.springframework.r
oo.shell;version="[1.2,2)",org.springframework.roo.support.util;versi
on="[1.2,2)",org.w3c.dom
How did Roo know to build an OSGi bundle here? Because add-ons aren’t standard JAR or WAR projects; rather, they’re defined in the pom.xml file with the packaging type of bundle, and are configured using a Maven plug-in, maven-bundle-plugin, which sets up the appropriate entries in the manifest. Let’s take a look at the relevant sections in the pom.xml file:
<?xml version="1.0" encoding="UTF-8" standalone="no"?>
<project ...>
...
<artifactId>org.rooinaction.addons.jqueryui</artifactId>
...
<packaging>bundle</packaging>
...
<build>
<plugins>
<plugin>
<groupId>org.apache.felix</groupId>
<artifactId>maven-bundle-plugin</artifactId>
<version>2.3.4</version>
<extensions>true</extensions>
<configuration>
<instructions>
<Bundle-SymbolicName>
${project.artifactId}
</Bundle-SymbolicName>
<Bundle-Copyright>
Copyright ${project.organization.name}.
All Rights Reserved.</Bundle-Copyright>
<Bundle-DocURL>${project.url}</Bundle-DocURL>
</instructions>
...
</configuration>
</plugin>
</plugins>
</build>
...
</project>
Anyone who’s experimented with OSGi modules in the past will welcome Roo’s use of BND tool (see http://mng.bz/D593). Although you didn’t write the OSGi manifest file yourself, Roo used BND to put it together for you. OSGi expects you to explain which libraries you’re making available to consumers of the add-on (Export-Package:); which ones you’ll need to mount the add-on (Import-Package:); and other information, such as the Bundle-Name, a human-readable name, and the Bundle-SymbolicName, the name used to uniquely identify the bundle in the Roo shell.
You’ll note that the packages from libraries used in the source code, such as org.w3c.dom and org.springframework.roo.support.util, are listed in both the import and export entries. If you’d like to customize these settings, you can adjust them in the pom.xml file, in the build/plugins/plugin section.
For example, to exclude the export of org.w3c.dom from your add-on so that it doesn’t get installed in the container automatically, change the bundle to use the Export-Package tag:
<Export-Package>!org.w3c.dom</Export-Package>
This becomes important in more complex add-ons, because the Roo shell will take BND’s defaults and export all packages found in the source code.
To install your add-on, you’ll use the osgi start command:
roo> osgi start --url path-to-target-dir/org.rooinaction.addons.jqueryui-0.0.1.BUILD-SNAPSHOT.jar
You can verify the installation by using the osgi ps command; your add-on will appear at the bottom of the list:
roo> osgi ps
...
[ 72] [Active ] [ 1] jqueryui (0.0.1.BUILD-SNAPSHOT)
You’ll also see your add-on in the [TAB] completion in the Roo shell, because it exposes the jquery commands.
11.8.10. Installing jQuery in your project
Now for the piece de resistance: you’ll need to define a new application and install the add-on in the Roo shell for your jquery commands to appear. You’ll start by creating a jqueryui-test Roo application:
$ mkdir jqueryui-test
$ cd jqueryui-test
$ roo
...
roo> project
--topLevelPackage org.rooinaction.addons.demo.jqueryuitest --projectName jqueryui-test
Now you’ll add persistence and web support:
jpa setup --database HYPERSONIC_PERSISTENT --provider HIBERNATE
web mvc setup
Finally, tell the shell to set up your jQuery API and jQuery UI library:
roo> jquery api setup
Created SRC_MAIN_WEBAPP/js
Created SRC_MAIN_WEBAPP/js/jquery-1.5.1.min.js
Updated SRC_MAIN_WEBAPP/WEB-INF/tags/util/load-scripts.tagx
roo> jquery ui setup
Created SRC_MAIN_WEBAPP/js/additional-methods.min.js
Created SRC_MAIN_WEBAPP/js/jquery-ui-1.8.14.custom.min.js
... [images, css files]
Updated SRC_MAIN_WEBAPP/WEB-INF/tags/util/load-scripts.tagx
roo>
To verify, take a look at the load-scripts.tagx script in src/main/webapp/WEB-INF/ tags. You’ll see that jQuery and jQuery UI JavaScript entries have been added, and that the jQuery UI theme stylesheet has been mounted. Your add-on worked, and it not only installed jQuery support, it also reconfigured the application to support it.
Finally, review the contents of src/main/webapp/js, src/main/webapp/images, and src/main/webapp/styles to see the new artifacts.
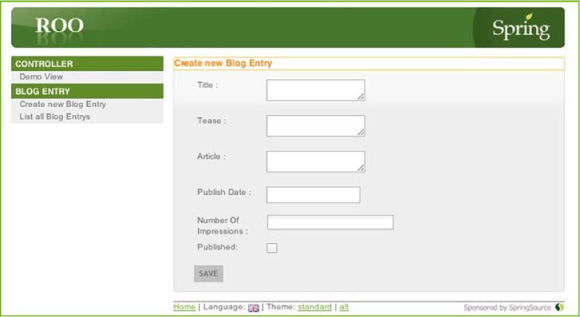
11.8.11. Using the jQuery UI in your application
Let’s modify a tag in the generated Roo tag libraries to use a jQuery UI widget, instead of a Dojo one. You’ll edit the tag library file tags/util/panel.tagx, replacing the Dojo TitlePane widget with a jQuery UI Accordion. Replace the DIV section and the Dojo install script with the following code:
<div id="_title_${sec_id}_id">
<h3>${sec_title}</h3>
<div>
<jsp:doBody />
</div>
</div>
<script type="text/javascript">
$(document).ready(function() {
$("#_title_${sec_id}_id").accordion();
});
</script>
The jQuery $(document).ready() method executes the script after the page loads, in a manner similar to Dojo’s initializing method, dojo.addOnLoad(). The elegance of jQuery is evident here: the $ method on the next line selects the DIV in the previous example by its id, and then applies the jQuery UI accordion function to it, which styles the component with a border. Figure 11.2 shows the effect.
Figure 11.2. A jQuery UI–styled page
Updating Your Add-On
To update your add-on, follow the parameters in the osgi update command:
osgi update --bundleSymbolicName org.rooinaction.addons.jqueryui --url path..to..jar../
You can take this add-on further. For example, using the previous technique, you could replace all of the Roo standard tags with jQuery UI widgets, or even install other commands to provide and use other jQuery plug-ins. You could then install those tags with a separate Roo shell command, such as the jquery tags setup. The possibilities are endless.
11.9. Summary
In this chapter, we’ve looked at how to find and install Roo add-ons, and we’ve discussed how they are built on top of OSGi. We used the pgp trust command to allow installation of signed add-ons, which let us verify their source and identity. You then built your own add-on to install jQuery and the jQuery UI, from which you could manipulate configuration files, generate supporting tag library and JavaScript library files, and expose the commands to the shell. You also learned how to install, update, and remove your add-ons using the various osgi Roo commands, such as osgi start.
In the next chapter, we’ll show you how to write advanced add-ons. We’ll build an add-on to install the CoffeeScript language into your Maven build, and show you how to install it using an OSGi Bundle Repository and the Roo add-on service.
11.10. Resources
Here are some helpful links for the tools and technologies we discussed in this chapter:
For information about jQuery and jQuery UI, visit http://jquery.org.
Apache Felix, the OSGi container for Roo, is documented at http://felix.apache.org.
Though you probably won’t need it, for background information the OSGi specification (Roo uses 4.2) can be downloaded at http://www.osgi.org/Release4/Download.