
In PDE, every plug-in has its own individual project. A plug-in project is typically created with the new project wizard, although it is also possible to upgrade an existing Java project to a plug-in project by adding the PDE nature and the required files by navigating to Configure | Convert to plug-in project.
- To create a Hello World plug-in, navigate to File | New | Project…

- The project types shown may be different from this list but should include Plug-in Project with Eclipse IDE for Eclipse Committers or Eclipse SDK. If nothing is shown when you navigate to File | New, then navigate to Window | Open Perspective | Other | Plug-in Development first; the entries should then be seen under the New menu.
- Choose Plug-in Project and click on Next. Fill in the dialog as follows:
- Project name should be
com.packtpub.e4.hello.ui. - Ensure that Use default location is selected.
- Ensure that Create a Java project is selected. The Eclipse version should be targeted to 3.5 or greater:
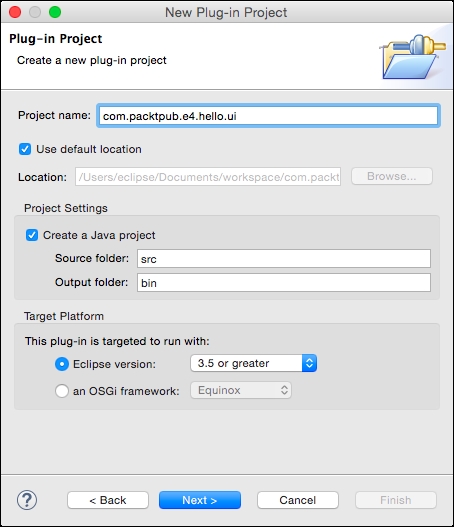
- Project name should be
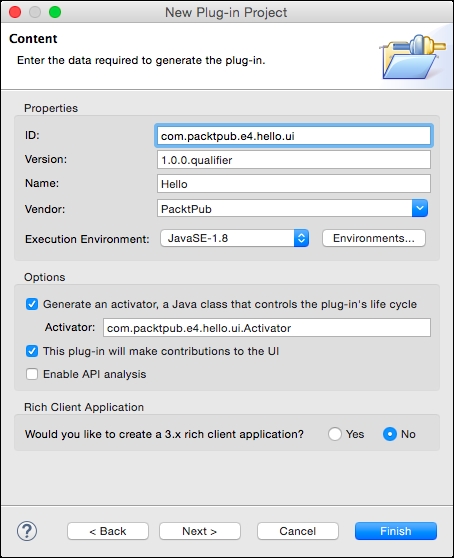
- Click on Next again, and fill in the plug-in properties:
- ID is set to
com.packtpub.e4.hello.ui. - Version is set to
1.0.0.qualifier. - Name is set to
Hello. - Vendor is set to
PacktPub. - For Execution Environment, use the default (for example, JavaSE-1.8).
- Ensure that Generate an Activator is selected.
- Set Activator to
com.packtpub.e4.hello.ui.Activator. - Ensure that This plug-in will make contributions to the UI is selected.
- Rich client application should be No:
- ID is set to
- Click on Next and a set of templates will be provided:

- Click on Next to customize the sample, including:
- Java Package Name, which defaults to the project's name followed by
.handlers - Handler Class Name, which is the code that gets invoked for the action
- Message Box Text, which is the message to be displayed:
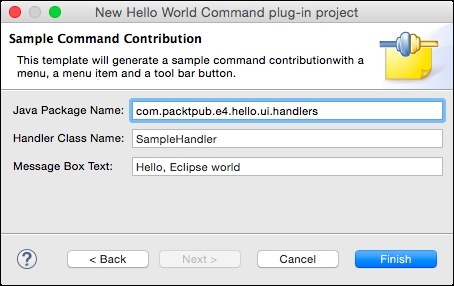
- Java Package Name, which defaults to the project's name followed by
- Finally, click on Finish and the project will be generated.
- If an Open Associated Perspective? dialog asks, click on Yes to show the Plug-in Development perspective.
Creating a plug-in project is the first step towards creating a plug-in for Eclipse. The new plug-in project wizard was used with one of the sample templates to create a project.
Plug-ins are typically named in reverse domain name format, so these examples will be prefixed with com.packtpub.e4. This helps to distinguish between many plug-ins; the stock Eclipse IDE for Eclipse Committers comes with more than 450 individual plug-ins; the Eclipse-developed ones start with org.eclipse.
Note
Conventionally, plug-ins that create additions to (or require) the use of the UI have .ui. in their name. This helps to distinguish those that don't, which can often be used headlessly. Of the more than 450 plug-ins that make up the Eclipse IDE for Eclipse Committers, approximately 120 are UI-related and the rest are headless.
The project contains a number of files that are automatically generated based on the content filled in the wizard. The key files in an Eclipse plug-in are:
META-INF/MANIFEST.MF: TheMANIFEST.MFfile, also known as the OSGi manifest, describes the plug-in's name, version, and dependencies. Double-clicking on it will open a custom editor, which shows the information entered in the wizards; or it can be opened in a standard text editor. The manifest follows standard Java conventions; line continuations are represented by a newline followed by a single space character, and the file must end with a newline.plugin.xml: Theplugin.xmlfile declares what extensions the plug-in provides to the Eclipse runtime. Not all plug-ins need aplugin.xmlfile; headless (non-UI) plug-ins often don't need to have one. Extension points will be covered in more detail later; but the sample project creates an extension for the commands, handlers, bindings, and menus' extension points. Text labels for the commands/actions/menus are represented declaratively in theplugin.xmlfile, rather than programmatically; this allows Eclipse to show the menu before needing to load or execute any code.Note
This is one of the reasons Eclipse starts so quickly; by not needing to load or execute classes, it can scale by showing what's needed at the time, and then load the class on demand when the user invokes the action. Java Swing's
Actionclass provides labels and tooltips programmatically, which can result in slower initialization of Swing-based user interfaces.build.properties: Thebuild.propertiesfile is used by PDE at development time and at build time. Generally it can be ignored, but if resources are added that need to be made available to the plug-in (such as images, properties files, HTML content and more), then an entry must be added here as otherwise it won't be found. Generally the easiest way to do this is by going to the Build tab of thebuild.propertiesfile, which will gives a tree-like view of the project's contents. This file is an archaic hangover from the days of Ant builds, and is generally useless when using more up-to-date builds such as Maven Tycho, which will be covered in Chapter 12, Automated Builds with Tycho.
Q1. What is an Eclipse workspace?
Q2. What is the naming convention for Eclipse plug-in projects?
Q3. What are the names of the three key files in an Eclipse plug-in?