
It's useful to be able to add contributions to pop-up menus so that they can be used by different places. Fortunately this can be done fairly easily with the menuContribution fragment and a combination of enablement tests. However, to implement this in E4, the view must be moved into the fragment.e4xmi file in order to attach a PopupMenu.
- Add the
org.eclipse.ui.servicespackage as a dependency to theplugin.xmlin the Dependencies tab, if it's not already added. - Open the
TimeZoneTableViewclass and add the following to the end of thecreatePartControlmethod:private void createPartControl(Composite parent, EMenuService menuService) { menuService.registerContextMenu(tableViewer.getControl(), "com.packtpub.e4.clock.ui.popup"); tableViewer.addSelectionChangedListener(event -> { // forward selection Object selection = ((IStructuredSelection) event.getSelection()).getFirstElement(); if (selection != null && selectionService != null) { selectionService.setSelection(selection); } }); - Running the Eclipse instance and showing the menu results in nothing being displayed, because no menu items have been added to it yet.
- Create a command and a handler fragment called Show the Time by adding them to the
fragment.e4xmifile as before. - Create a class called
ShowTheTimein thecom.packtpub.e4.clock.ui.handlerspackage to show the time in a specific time zone:public class ShowTheTime { @Execute public void execute(ESelectionService selectionService) { Object selection = selectionService.getSelection(); if (selection instanceof ZoneId) { DateTimeFormatter formatter = DateTimeFormatter.ISO_DATE_TIME; String theTime = ZonedDateTime.now((ZoneId) selection).format(formatter); MessageDialog.openInformation(null, "The time is", theTime); } }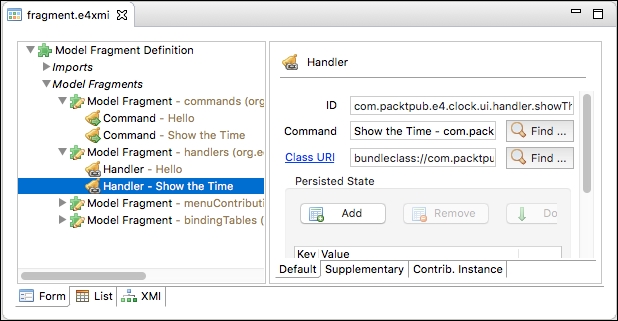
- To add a popup menu, the Time Zone Table View first needs to be converted into an E4 PartDescriptor. Comment out the
e4viewin theplugin.xml, and in thefragment.e4xmifile, add a new Model Fragment with the following information:- Extended Element ID:
org.eclipse.e4.legacy.ide.application - Feature Name:
descriptors
- Extended Element ID:
- Select the PartDescriptor from the drop-down list and click on Add. Fill in the fields as follows:
- ID:
com.packtpub.e4.clock.ui.partdescriptor.timeZoneTableView - Label:
Time Zone Table View - Icon URI:
platform:/plugin/com.packtpub.e4.clock.ui/icons/sample.gif - Class URI:
bundleclass://com.packtpub.e4.clock.ui/com.packtpub.e4.clock.ui.views.TimeZoneTableView - Category:
Timekeeping
- ID:
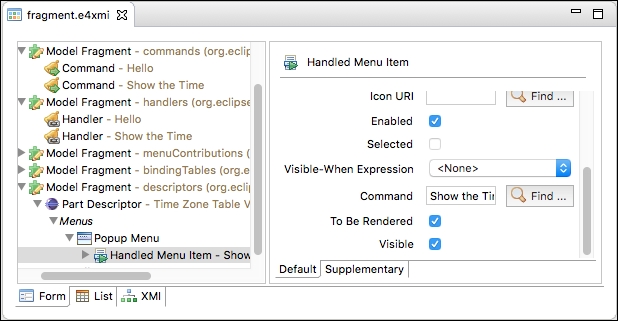
- Under the Menus node, select Popup Menu from the drop-down list and click on Add. Give it the ID
com.packtpub.e4.clock.ui.popup, which corresponds to the argument used in themenuService.registerContextMenucall previously. - Under the Popup Menu node, select Handled Menu Item from the drop-down list and click on Add. Fill in the fields as follows:
- ID:
com.packtpub.e4.clock.ui.handledmenuitem.showTheTime - Label:
Show the Time - Command:
Show the Time - com.packtpub.e4.clock.ui.command.show
- ID:
- Run the target Eclipse instance, and open the
TimeZoneTableView. Right-click on a time zone in the table, and the command Show the Time will be displayed in a pop-up menu. Select the menu item and a dialog should show the time.
The E4 fragment can be used to add views, commands, and handlers, and wire them together. This approach to registering commands is powerful, because any time a time zone is exposed as a selection in the future will now have a Show the Time menu added to it automatically.
The commands define a generic operation, and handlers bind those commands to implementations. The context-sensitive menu is provided by the pop-up menu extension point using the LocationURI popup:org.eclipse.ui.popup.any. This allows the menu to be added to any pop-up menu that uses the EMenuService and when the selection contains a ZoneId. The EMenuService is responsible for listening to the mouse gestures to show a menu, and filling it with details when it is shown.
In the example, the command was enabled when the object was an instance of a ZoneId, and also if it could be adapted to a ZoneId. This would allow another object type (say, a contact card) to have an adapter to convert it to a ZoneId, and thus show the time in that contact's location. This could be used to provide compatibility with older Java runtimes, using a TimeZone for example.
The way to add a view menu is similar to adding a pop-up menu; the location URI used is the view's ID rather than the menu item itself. Add a Show the Time menu to the Time Zone View as a view menu.
Another way of adding the menu is to add it as a toolbar, which is an icon in the main Eclipse window. Add the Show the Time icon by adding it to the global toolbar instead.