
To submit patches to Gerrit, the change must first be committed locally, and the remote repository pointed to Gerrit. Then the change can be pushed and the builds triggered.
- When committing for the first time, Git will ask for a user name and an e-mail address. That's because changes in Git are associated with a name and e-mail address and nothing else. In Eclipse, triggering a commit will bring up a dialog asking for these details; alternatively they can be specified in the Preferences | Team | Git | Configuration panel under the
user.nameanduser.emailvalues. Alternatively the git command line can be used to set them, using:$ git config --global user.name "My Name" $ git config --global user.email "[email protected]"
- The change can be committed in Eclipse by right-clicking on the project (or folder) and choosing Team | Commit. This will show a dialog or view of information where the details can be entered. The general Eclipse practice is to put the bug on the first line, along with a short subject, and then more detailed information underneath. Gerrit also requires a
Change-Idline in the commit, which can be automatically added by clicking on the Gerrit icon on the top right of the commit dialog; aSigned-off-byline is generated by clicking on the pen icon next to the Gerrit icon:
- Once the change has been committed, it can be pushed to the remote server using
ssh://git.eclipse.org:29418/platform/eclipse.platform.swt.gitwith a pushrefspecofHEAD:refs/for/master. This can be performed on the command line as follows:$ git push ssh://git.eclipse.org:29418/platform/eclipse.platform.swt.git HEAD:refs/for/master
- To save time, these defaults can be configured for the project directly:
$ git remote set-url --push origin ssh://git.eclipse.org:29418/platform/eclipse.platform.swt.git
$ git config remote.origin.push HEAD:refs/for/master
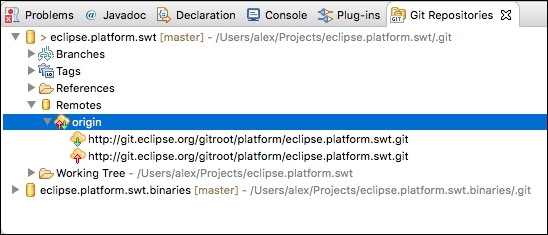
- It is also possible to set this with Eclipse's Git Repositories view from repositories that have been cloned in Eclipse. Expanding the repository shows the remotes, including what the repository pushes to or pulls from:
- Right-clicking on the origin provides a menu which can be used to Configure Push…, but an easier way is to choose Gerrit Configuration…, which shows a dialog that can be used to select
sshorhttp, and have the configuration generated automatically: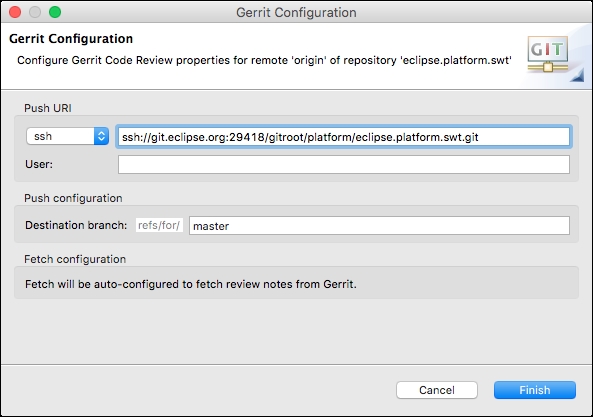
- It is now possible to push the changes to trigger a Gerrit patch by running
git pushfrom the command line, or by right-clicking on the project and choosing Team | Repository | Push to Upstream.Note
If the push is rejected, check that you have signed the Eclipse Contributor License Agreement at https://dev.eclipse.org/site_login/myaccount.php#open_tab_cla (sometimes there is a delay between signing this and Gerrit recognizing the new information), In addition, verify that your committer e-mail address is the same one associated with your profile, and that the
Signed-off-byfield is present in the commit. You may need togit commit --amendorgit commit --amend --reset-authorin order to fix these problems.
When committing patches for Eclipse, there are several things that need to be followed. The git commit message must be sensible; typically the first line will contain the bug identifier and a short description, followed by a blank line, and then multiple paragraphs of text. The footer must include a Signed-off-by, and most projects also require a Gerrit Change-Id at the bottom.
Eclipse can be used to generate these automatically, but if working on the command line, these can be set by installing a commit message hook. This will add the Change-Id based on the content of the message, and the Signed-off-by can be added by supplying a -s argument to git commit. To install the hook, the remote Gerrit instance can supply a template via HTTP or SSH, which can then be used to place it in the right location, .git/hooks/commit-msg:
$ scp -P 29418 git.eclipse.org:/hooks/commit-msg .git/hooks/
$ curl -o .git/hooks/commit-msg http://git.eclipse.org/r/tools/hooks/commit-msg
It's possible to fetch review commentary by adding a fetch refspec for refs/notes/*, which can then be shown with git log --notes=review or git show --notes=review:
$ git config --add remote.origin.fetch +refs/notes/*:refs/notes/*
$ git fetch
$ git log --notes=review
$ git show --notes=review
Setting the project up for Gerrit access involves changing the remote push URL and ensuring that the changes go through the review. This can also be done by manually editing the .git/config file instead:
[remote "origin"]
  url = http://git.eclipse.org/gitroot/platform/eclipse.platform.swt.git
  fetch = +refs/heads/*:refs/remotes/origin/*
  fetch = +refs/notes/*:refs/notes/*
  pushurl = ssh://git.eclipse.org:29418/gitroot/platform/eclipse.platform.swt.git
  push = HEAD:refs/for/master
[branch "master"]
  remote = origin
  merge = refs/heads/master
[gerrit]
  createchangeid = true
Gerrit reviews and review comments can also be seen with Mylyn, by installing the Mylyn Reviews Connector for Gerrit and using the Task Repositories view to create a task repository for the Eclipse Gerrit server. Create the repository using the URL https://git.eclipse.org/r/ and verify the connectivity using the Validate Settings button.
Queries are possible using the Gerrit textual syntax for displaying information. This is described in Gerrit's help page on the search terms at https://git.eclipse.org/r/Documentation/user-search.html. These include is:open (for showing all open changes) and owner:self (for the authenticated users' changes). It's also possible to find all the open changes for a particular project; for example, to see all open changes against the SWT project, a filter project:platform/eclipse.platform.swt is:open can be used.