First, you need to understand what accounts can be added to Azure AD. Basically, there are two types of account:
- Cloud accounts: Accounts that are created through Azure AD or other Microsoft cloud services, such as Office 365.
- Hybrid accounts: Accounts that are created and located in on-premises Microsoft AD DS. Those accounts are deployed through a the Azure AD Connect and synchronization tool.
To create cloud accounts, you have several options. Most Azure AD users start with Office 365 and do not natively add users through Azure. If you've used Office 365 before, that would be the simplest for you.
The example shown in the following screenshot guides you through how to add a user from the Office 365 preview portal through https://portal.office.com:

Alternatively, to create new users in Azure AD through the Azure portal, you need to follow these steps:
- Browse to https://portal.azure.com.
- Click on the More services option on the sidebar:

- The new Azure AD interface does not yet have all features enabled. Currently, it is not possible to create new Azure active directories, but you can perform most user and application operations.
- In addition to the new portal, Microsoft also extended user management to the Azure AD management portal. At the time of writing this book, the new user and group management is still in preview, so changes are still possible. To add or change user accounts, you now have different options. The first one would be to open user and group management through the Azure AD interface:

- The next step is look for Users and groups with Microsoft resources:

- Both ways will bring you to the same blade, with options to create users and groups as shown in the following screenshot:

- To add a user in the new UI, you click on the All users section, as shown in the following screenshot:

- There, you click on the +Add button and follow the instructions shown in the following screenshot:

- The blade will ask you to provide a username, as shown here:

- While creating the user, you have different options for pre-staging information about the user, including the First name, Last name, Job title, or Department fields as shown in the following screenshot:

- With a synced AD DS and other joined services, you can change the Source of Authority option:

- You can also join the account directly to Azure AD groups during creation:

- The new UI for Azure AD includes a new option to join users as account admins (formerly known as co-administrators). To do this, change the administrator rights of the user by clicking on the relevant user to open the user blade:

- Then, click on the Directory role section to open the role options:
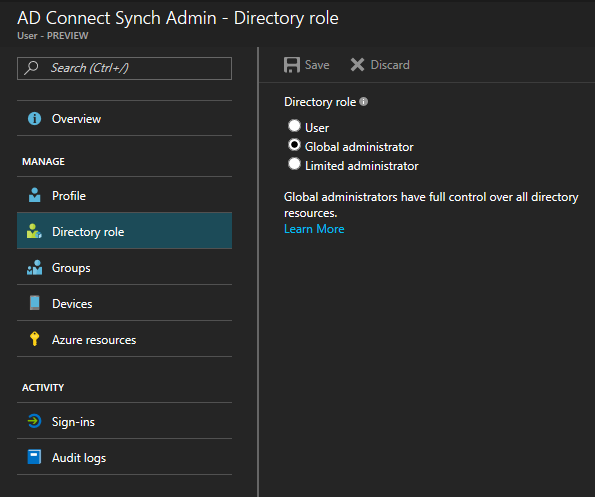
- Not every user needs to be global administrator to be able to fulfill their job. Mostly, one or more of the options of a limited administrator should be enough:

- After you add the user to their admin role, you need to go to the Subscriptions section in the Azure resources:

- There, you select subscriptions for which the user should be the co-administrator:

- In the following blade, click on the Access control (IAM) section and then on the +Add button:

- Now, select a role for the user. To make them a co-administrator, we need to give them Owner rights:

- The user is now able to manage the subscription. Next, select the user or group that should have the permissions. This user can now manage the subscription.
The other option to create new users and groups is to sync them through AD DS from your connected on-premises Windows Server AD DS. To do this, you'll need an additional tool named Azure AD Connect.
Azure AD Connect will integrate your on-premises directories with Azure AD. This allows you to provide a common identity for your users for Office 365, Azure, and SaaS applications integrated with Azure AD:
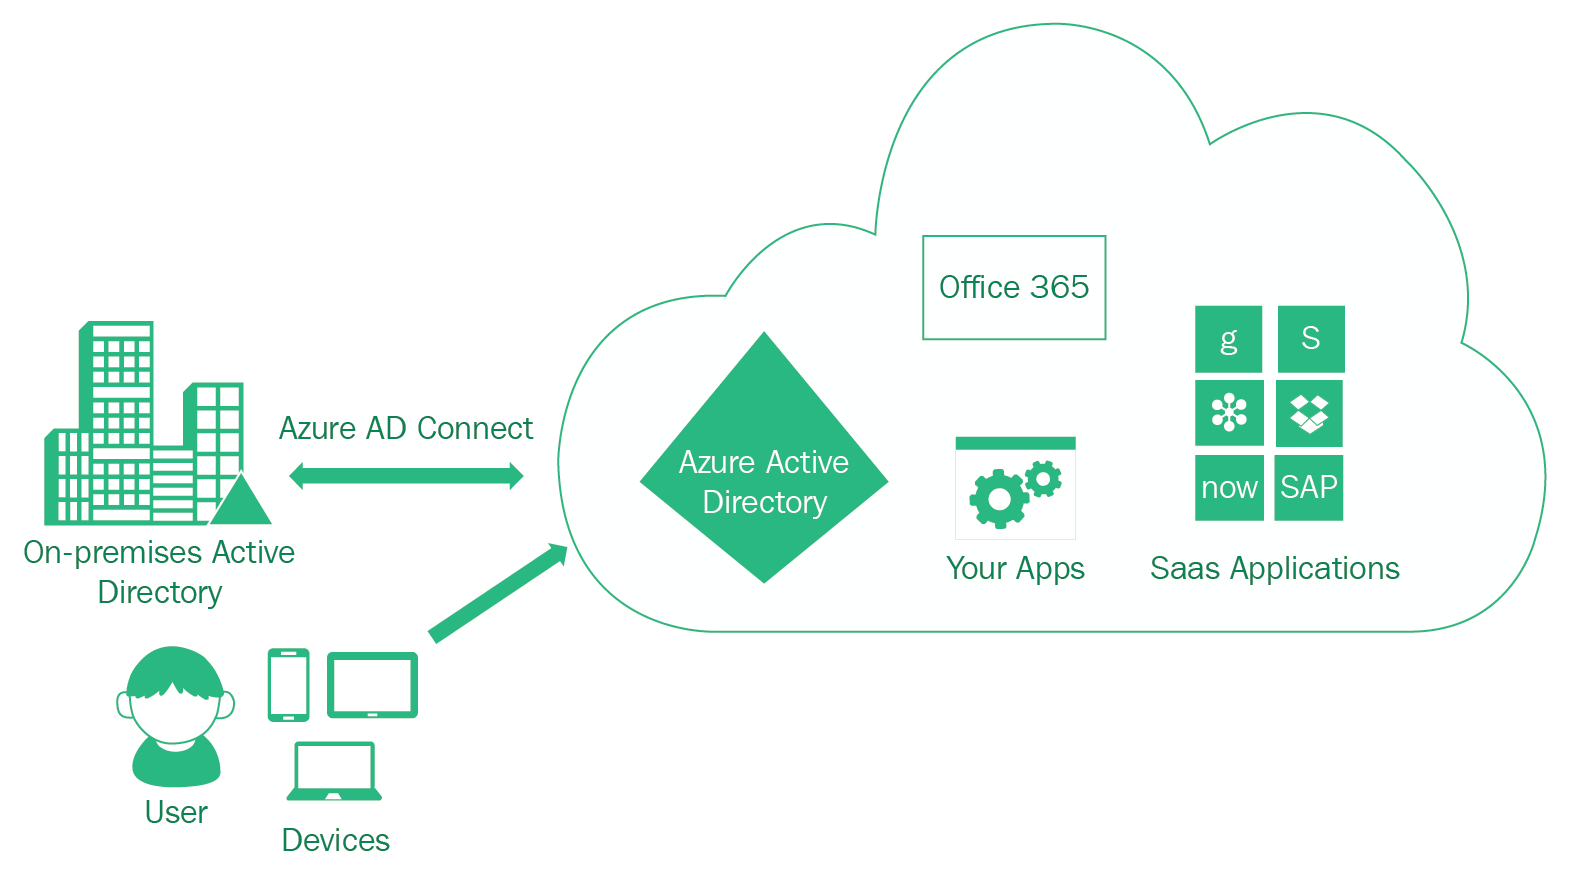
Azure AD Connect is the central tool with which to implement hybrid identities in Azure, and enables you to license your software or implement identity and access management tools such as SSO, MFS, or Active Directory Rights Management Services (AD RMS).
Azure AD Connect brings five programs with different purposes:
- Azure AD Connect: This is a configuration tool with an integrated and detailed wizard to configure Azure AD and on-premises AD DS synchronization.
- Synchronization rules editor: This is a basic tool to configure and customize synchronizations between Azure AD and on-premises AD DS:

- Synchronization service: The synchronization service is a tool to basically monitor and log synchronization between Azure AD and on-premises AD DS. You can supervise the synchronization process:

- Synchronization service key manager: Helps you manage security keys to encrypt data transferred between Azure AD and on-premises AD DS:

- Synchronization Service Web Service Configuration Manager: This came with version 1.1.189.0 of Azure AD Connect in June 2016. It is used to configure Microsoft Account Entity Management (MIM) endpoints with Azure AD Connect:

https://www.microsoft.com/en-us/download/details.aspx?id=47594.
You can deploy Azure AD Connect in three different ways for users. Each method provides different integration levels and is more or less dependent on your Azure AD subscription level:

The first solution is to use the Password Synchronization option. This option transfers user passwords as hashed values to the cloud. This option is also the one that enables a basic SSO option for your users to Azure AD-based applications in your organization. This password synchronization is only based on user account and password replication. So, changes within Azure AD will take some time or be manual. This option is also only practical for small environments with fewer than 300 users. For larger environments, you would have too much replication traffic and too many changes within Azure AD, which would take too long. As an example, a replication of around 4,000 users could take up to 12 hours before it is visible in the Azure AD:
- The following screenshot shows you the tooltip you get when you hover over the question mark for the Password Synchronization option:

- The second option is to select the new Pass-through authentication option. With this option, your AD Connect and Azure AD will not store any identity data, and they will send all requests directly to your environment. The following screenshot shows you the tooltip you get when you hover over the question mark for Pass-through authentication:

- The third and most complex solution is to implement Active Directory Federation Services (AD FS) with Azure AD, in the interface named federation with AD FS. That will enable full SSO and add MFA. The organizations and implementations. If you want to implement AD FS, you need also to have public and private key infrastructure (PKI) and certificates from a trusted agency in place. For AD FS, you need good response times so you might need to upgrade your internet access and/or Wide Area Network connectivity. The following screenshot shows you the tooltip you get when you hover over the question mark for Federation with AD FS:

- The fourth and easiest way is to not configure user sign-in. This option enables only license and user replication from local to cloud and vice versa. There is no option to replicate passwords, and your users will not be able to sign in or use Azure AD resources. Users would be able to use, for example, Office 365 or the Azure remote app. The following screenshot shows you the tooltip you get when you hover over the question mark for Do not configure:

- With the new enhancements in Windows 10 and with Azure AD, you can now also configure SSO directly from your on-premises Windows systems. To enable this feature, you need to check the Enable single sign on checkbox:
