
A simple way to detect motion is using a PIR sensor. This sensor measures infrared light radiation emitted by the objects in its range. By detecting changes in the amount of radiation, it can detect motion.
Using the relay circuit from the previous step and having the AC plug disconnected from the socket, add the following connections:
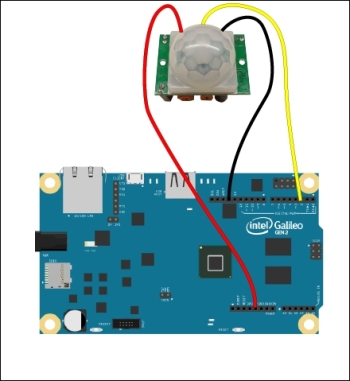
Wiring a PIR motion detection sensor to Galileo
Your PIR sensor should have three pins. Be sure to connect its VCC pin to the Galileo's 5 V pin, the GND pin to the Galileo's ground, and the OUT pin to the Galileo's pin 2. Whenever the sensor detects motion, we'll be able to read the value HIGH on the Galileo's pin 2. When the sensor stops detecting, we'll be able to read LOW.
Open the Arduino IDE, power on your Galileo (just the Galileo, not the lightbulb plug), and upload the following code:
// Pin where we will read the sensor data
int pir_data_pin = 2;
// Pin which we will use to control the relay
int relay_pin = 13;   // Initializing PIR status as low
int last_pir_status = LOW;

void setup() {
  pinMode(relay_pin, OUTPUT);
  // Set pin as input so we can read it
  pinMode(pir_data_pin, INPUT);    digitalWrite(pir_data_pin, LOW);
  Serial.begin(9600);
  Serial.print("Calibrating sensor ");

  //Give the sensor 20 seconds to warm up and calibrate
  for(int i = 0; i < 20; i++){
    Serial.print(".");
    delay(1000);
  }

  Serial.println("Sensor ready!");
 }

// Set relay status
void setLightbulbStatus(int status) {
  digitalWrite(relay_pin, status);
}

void loop(){
  if(digitalRead(pir_data_pin) == HIGH){

    // If transition is from LOW to HIGH
    //motion was detected, activate the relay
    if (last_pir_status == LOW) {
      Serial.println("Motion detected");

     // Activate the relay
      setLightbulbStatus(HIGH);

      // Set status to the current one
      last_pir_status = HIGH;
    }

  } else {

    // If transition is from HIGH to LOW
    //motion stopped being detected, deactivate the relay
    if (last_pir_status == HIGH){
      Serial.println("Motion stopped");

      // Deactivate the relay
      setLightbulbStatus(LOW);

      // Set status to the current one
      last_pir_status = LOW;
    }
  }
  delay(50);
}
Because of the way this kind of sensor works (heat), when the Galileo is powered, we first need to let the sensor calibrate with its surroundings for at least 20 seconds. After this, the PIR should be ready. Open the serial monitor, and every time you move you should see the triggered event printed and the on-board LED turning on when motion is detected and turning off when motion stops being sensed.
If you are struggling to trigger the sensor, you will find two potentiometers in it. One tagged as Sx and another as Tx. The Sx potentiometer allows you to adjust the sensor's sensibility, while the Tx allows you to adjust the output time. Use a Philips screwdriver to adjust them until you start obtaining more responsiveness. Having a look at the code, in the loop method, we are filtering the transitions from HIGH to LOW, and vice versa.
This way, we will be able to manipulate the relay properly, turning the lightbulb on/off when there is the correspondent transition. Plug in the lightbulb plug to the wall socket and with the Galileo powered on, upload the sketch. Wait for the sensor calibration to finish, and then give it a try by waving at the sensor. Combining the PIR logic with the preceding relay control code, the lightbulb will be turned on when motion is detected.