
Muzzley is an Internet of Things ecosystem that is composed of connected devices, mobile apps, and cloud-based services. Devices can be integrated with Muzzley through the device cloud or the device itself:

It offers device control, a rules system, and a machine learning system that predicts and suggests actions, based on the device usage.
The mobile app is available for Android, iOS, and Windows phone. It can pack all your Internet-connected devices in to a single common app, allowing them to be controlled together, and to work with other devices that are available in real-world stores or even other homemade connected devices, like the one we will create in this chapter.
Muzzley is known for being one of the first generation platforms with the ability to predict a users' actions by learning from the user's interaction with their own devices.
Human behavior is mostly unpredictable, but for convenience, people end up creating routines in their daily lives. The interaction with home devices is an example where human behavior can be observed and learned by an automated system.
Muzzley tries to take advantage of these behaviors by identifying the user's recurrent routines and making suggestions that could accelerate and simplify the interaction with the mobile app and devices. Devices that don't know of each others' existence get connected through the user behavior and may create synergies among themselves.
When the user starts using the Muzzley app, the interaction is observed by a profiler agent that tries to acquire a behavioral network of the linked cause-effect events. When the frequency of these network associations becomes important enough, the profiler agent emits a suggestion for the user to act upon. For instance, if every time a user arrives home, he switches on the house lights, check the thermostat, and adjust the air conditioner accordingly, the profiler agent will emit a set of suggestions based on this. The cause of the suggestion is identified and shortcuts are offered for the effect-associated action. For instance, the user could receive in the Muzzley app the following suggestions: "You are arriving at a known location. Every time you arrive here, you switch on the «Entrance bulb». Would you like to do it now?"; or "You are arriving at a known location. The thermostat «Living room» says that the temperature is at 15 degrees Celsius. Would you like to set your «Living room» air conditioner to 21 degrees Celsius?"
When it comes to security and privacy, Muzzley takes it seriously and all the collected data is used exclusively to analyze behaviors to help make your life easier.
This is the system where we will be integrating our door unlocker. In this chapter, we will integrate our device with the Muzzley cloud using Galileo as a bridge (gateway) to communicate between the lock and this ecosystem. Galileo will answer Muzzley requests and will act on the unlocking system, unlocking the entrance door.
The first step is to own a Muzzley developer account.
Note
If you don't have one yet, you can obtain one by visiting https://muzzley.com/developers, clicking on the Sign up button, and submitting the displayed form.
To create an app, click on the top menu option Apps and then Create app. Name your App Galileo Lock and if you want to, add a description to your project.
As soon as you click on Submit, you'll see two buttons displayed, allowing you to select the integration type:
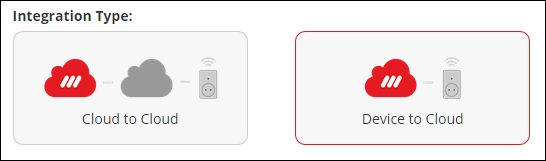
Muzzley allows you to integrate through the product manufacturer cloud or directly with a device. In this example, we will be integrating directly with the device. To do so, click on Device to Cloud integration.
Fill in the provider name as you wish and pick two image URLs to be used as the profile (for example, http://www.bestsquarefeet.com/wp-content/uploads/2013/01/Commercial1.jpg) and channel (for example, http://png-2.findicons.com/files/icons/949/token/256/lock.png) images.
We can select one of two available ways to add our device: it can be done using UPnP discovery or by inserting a custom serial number. Pick the device discovery option Serial number and ignore the fields Interface UUID and Email Access List; we will come back for them later. Save your changes by pressing the Save changes button.
To be able to communicate under a common language, we'll need to define the hierarchical structure of our device components and the respective properties. In this integration, we will only have a door lock, which will be our only type of component. The only information we need to exchange about this type of component will be the door status, and this will be our only property.
On the app details web page, in the top-left corner, you'll find the Profile Spec option. Click on it, and let's create our integration profile.
On this page, you'll find a section named Component #1. This is where we'll define our first and only component. Click on the arrow to expand the component section and insert the key door-lock in the ID field. This ID should be a suggestive key name since it will identify the lock component type. Fill in the label with the name of the component, and pick any name that will help you remember the type of component that you are creating.
Now let's define the properties. Expand the Property #1 section and set lock-status as the property ID, also giving this property a Label. Scrolling down, you'll find two more fields: IO and Components. The field IO represents the type of actions you will allow to be performed on this property. This property can be readable (r), writable (w), or subscribable (s). Allow all by typing rws. The property components is a components array referring to the components that you want to have on this property. Insert ["door-lock"] to associate this property with our door-lock component.
If you click on the JSON button in front of the Profile Spec section, you should see the following profile object:
{
  "components": [
    {
      "id": "door-lock",
      "label": "Building Lock",
      "classes": ""
    }
  ],
  "properties": [
    {
      "id": "lock-status",
      "label": "Lock Status",
      "classes": "",
      "schema": "",
      "schemaExtension": "",
      "isTriggerable": false,
      "isActionable": false,
      "controlInterfaces": [],
      "triggers": [],
      "actions": [],
      "io": "rws",
      "onChange": false,
      "rateLimit": 0,
      "components": "["door-lock"]"
    }
  ]
}
Save the profile, and let's start building the Galileo bridge.
Open the Intel XDK IoT Edition. Navigate to Projects | Start a new project and then select Templates | Blank template under the INTERNET OF THINGS EMBEDDED APPLICATION tab to create a new blank project.
To help you connect to Muzzley, let's use the muzzley-bridge-node library (https://github.com/v0od0oChild/muzzley-bridge-node). Although not an official library, it packs most of the Muzzley device-to-cloud features together and will help you with connecting and exchanging messages. Open the package.json file and add the line "muzzley-bridge-node": "latest" inside the dependencies key to allow this library to be installed in Galileo when you press the editor build button.
Create a new file and name it config.js. In this file, we will add all the keys and IDs we'll need to use. Copy and paste the following structure into the new config file:
var config = {};
config.account = {
  profileId: '',
  serialNumber: 'galileo-bridge-12345',
  appToken: ''
}

config.bridgeComponents = [
  {
    id: 'lock-1',
    type: 'door-lock',
    label: 'Building door lock1'
  }
];
module.exports = config;
Open the App Details lock in the Muzzley website, and there you'll find the profileId and appToken displayed. Use them to fill in the config.account data with your own keys. The serialNumber field is a unique ID that you'll need to set in order to identify this Galileo bridge.
To help us with the Galileo pin operations, we're creating the lock.js file, where we'll have all the pin manipulation logic. Create the file and copy the following code:
var mraa = require('mraa'),

exports = module.exports = {};
var processingRequest = false;
var processTimer;

var pin = new mraa.Gpio(13);
pin.dir(mraa.DIR_OUT);

// Unlock the door
exports.unlockDoor = function () {
  if (processingRequest === true) return;
  processingRequest = true;
  pin.write(1);
  processTimer = setTimeout(stopUnlockingDoor, 4000);
};

// Stop unlocking the door
exports.stopUnlockingDoor = function () {
  clearTimeout(processTimer);
  pin.write(0);
  var processingRequest = false;
};
Since the relay will keep opening the door when active, here we'll have two main methods: unlockDoor and stopUnlockingDoor. The first method will order Galileo to set pin 13 to HIGH, which will activate the relay, close the door-unlocking circuit, and unlock the door. For security reasons, we are adding two control variables—proccessingRequest and processTimer. The processingRequest variable will ensure that only one user at a time will be able unlock the door and the processTimer will ensure that after 4 seconds, the door-unlocking system will stop whether there is Internet access or not. When a user unlocks the door, other unlocking requests for the same lock will be discarded. If the stopUnlockingDoor method is called, the timer will be cleared and the Galileo will be available for more unlock door requests.
Now, let's create our integration skeleton by pasting the following code into the main.js file:
// Dependencies
var muzzleyBridge = require('muzzley-bridge-node'),
var lock = require('./lock'),
var config = require('./config'),

// Connect and subscribe to the configured Muzzley channel
muzzleyBridge.connect(config.account, config.bridgeComponents, function (err, channel) {
  console.log('Device connected to Muzzley'),

  // When a request to read the lock status arrives
  channel.on('readRequest', function (user, message, callback) {
    console.log(message);
  });

  // When a request to change the lock status arrives
  channel.on('writeRequest', function (user, message) {
    console.log(message);

    if (message.property === 'status' && message.value === true) {
    }
    if (message.property === 'status' && message.value === false) {
  lock.stopUnlockingDoor();
    }
  });
});
On connecting to Muzzley, we will receive a communication channel. We can publish and read from the subscribed component properties. We are able to publish the lock changes or perform some local actions when we receive a request.
Requests can be of two types: read or write. A read request indicates that a person allowed to be subscribed to this channel, most likely a mobile device, is requiring to obtain the value of a specific component property. In this situation, it would refer to the lock-status of the door-lock.
When receiving a write request, we will receive a command that is trying to change the value of a specific property and, in this scenario, the value of the lock-status property. This write requests will be responsible for changing the door lock status by manipulating the Galileo pins.
Build your project, upload it to Galileo, and run it using the Intel XDK. Uploading the project using this IDE will make the app to run persistently. Even when the board is rebooted, the app will restart automatically.
Heading back to the Muzzley web page, we'll now create the interface that will control the door unlocking system. In the top menu, you'll find the option Widgets; click on it and select Create Widget. Name your interface and click on Submit. From the widget selection menu, select the one you just created, tick the Is interface checkbox, and save it. Select the same widget once again, and in the left menu, you'll find the option Editor. Click on it to be able to edit and develop your custom interface. You'll find three text inputs, one for HTML, one for CSS, and the other one for JavaScript.
Starting with the HTML, let's create a main container with a button on it by copying the following lines into the HTML editor:
<div class="container">
  <div id="open-button"><span>UnLock</span></div>
</div>
Now let's take care of the styling. We'll make the displayed text not selectable using the option user-select. We'll add a background-color property to the main container and add some styling for the button press and release custom classes, making the button change color on press and on release. Copy and paste the stylesheet below into the CSS editor:
body {
  height: 100%; width: 100%; margin: 0; padding: 0;
  font-family: 'Open Sans', sans-serif;
  background-color: #fff;
}

* {
  box-sizing: border-box;
  -webkit-box-sizing: border-box;
  -moz-box-sizing: border-box;
  -webkit-tap-highlight-color: rgba(0, 0, 0, 0);
  -webkit-touch-callout: none;
  -webkit-user-select: none;
  -khtml-user-select: none;
  -moz-user-select: none;
  -ms-user-select: none;
  -ms-touch-action: none;
  user-select: none;
  -webkit-tap-hightlight-color: transparent;
}

.container{
  width: 100%;
  height: 100%;
  background-color: #efefef;
  display: table;
}

#open-button {
  width: 100px;
  height: 100px;
  border: 2px solid black;
  margin-top: 50%;
  border-radius: 100%;
  display:table;
  margin: 0 auto 0 auto;
  background-color: #27ae60;
}

#open-button span{
    display: table-cell;
    vertical-align:middle;
    margin: 0 auto;
    width: 100%;
    text-align: center;
}

#open-button.down{
  background-color: #fec504;
  -moz-transition: all .5s ease-out;
  -webkit-transition: all .5s ease-in;
  -o-transition: all .5s ease-in;
  transition: all .5s ease-in;
}
#open-button.up{
  background-color: #27ae60;
  -moz-transition: all .5s ease-out;
  -webkit-transition: all .5s ease-in;
  -o-transition: all .5s ease-in;
  transition: all .5s ease-in;
}
To add all the actions to our interface, we'll need to use a bit of JavaScript. We'll be using it to identify and process the browser touch events, communicate with Muzzley, set the interface size to full screen, and set the button classes to make it change its colors. To identify the press and release events, we'll need to test the events against our browser since each browser has its own event.
The Muzzley client will be running in the interface. When the event muzzley.ready fires, we'll subscribe the interface to the Muzzley channel. As soon as we are subscribed, we can start sending and receiving messages.
Note
If you want to read more about the Muzzley JS library, visit https://github.com/muzzley/muzzley-client.
Copy the code below to the JavaScript editor:
var channel, EVENT_START, EVENT_RELEASE;

// Find the touch events for this browser
if('ontouchstart' in window) {
  EVENT_START = 'touchstart';
  EVENT_RELEASE = 'touchend';
} else if (window.navigator.pointerEnabled) {
  EVENT_START = 'pointerdown';
  EVENT_RELEASE = 'pointerup';
} else if (window.navigator.msPointerEnabled) {
  EVENT_START = 'MSPointerDown';
  EVENT_RELEASE = 'MSPointerUp';
} else {
  EVENT_START = 'mousedown';
  EVENT_RELEASE = 'mouseup';
}

// When Muzzley loads
muzzley.ready(function (options) {
  if(!options || !options.channels) {
    return alert('There is no channels data'),
  }

  // Obtain the channel information
  // Indexing to 0 since there's only one channel (One Galileo running this profile)
  channel = options.channels[0];

  // Subscribe to the channel
  var subscription = muzzley.subscribe( {
      namespace: 'iot',
      payload: {
        profile: channel.profileId,
        channel: channel.remoteId
      }
    });
});

// When document finishes loading, set interface to full height
$(document).ready(function() {
  $('body').css('height', window.innerHeight+'px'),
  var margin = (window.innerHeight*.5) –
                      ($('#open-button').height()*.5);
  $('#open-button').css('margin-top', margin+'px'),
});

// Publish a Muzzley write request to set the lock-status property
function writeLockStatus(lockStatus) {
  var data = {
        namespace: 'iot',
        payload: {
            io: 'w',
            profile: channel.profileId,
            channel: channel.remoteId,
            property: channel.id,
            component: channel.components[0],
            data: {value: lockStatus}
        }
    };
    muzzley.publish(data);
}

   // On touch, add the button class responsible to change the button color
   // and publish Muzzley request
   $('#open-button').on(EVENT_START, function(){
    $('#open-button').removeClass();
    $('#open-button').addClass('down'),
    writeLockStatus(true);
});

// On touch stop change color back and publish Muzzley request
$('#open-button').on(EVENT_RELEASE, function() {
    $('#open-button').removeClass();
    $('#open-button').addClass('up'),
    writeLockStatus(false);
});
Save the interface changes and click on the Apps option in the site's top menu. Edit the app you created before, and in the Interface UUID option, select the interface you just created. This app is private and in order to use it, you'll need to add the user e-mails you want in the app's Email Access list option, separating multiple entries with commas.
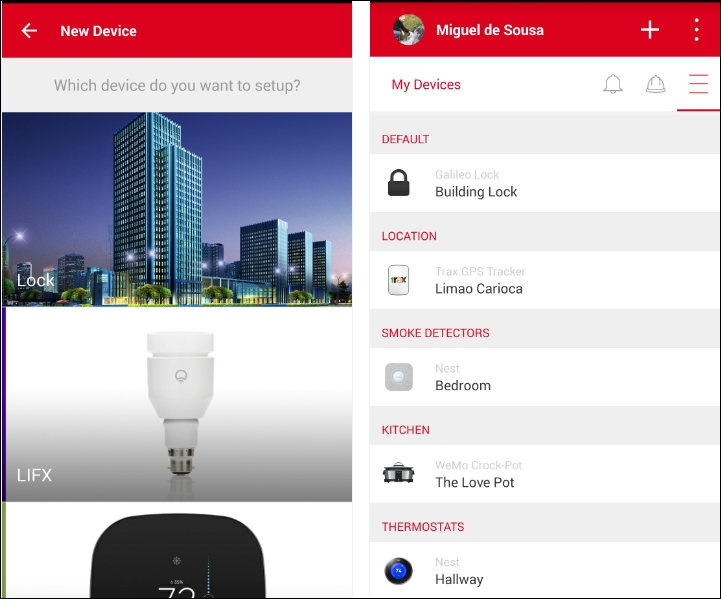
Now you'll be able to give the app a test drive. Install the Muzzley app in your mobile device and log in. Clicking on the app's + button will list all the public profiles and your private ones. Locate the profile you created in the beginning of this chapter and click on it. You'll be asked for the device's serial number. Insert the serialNumber you defined before in the device config file.
After adding the channel, you'll find it listed under the default category. Click on it and then try pressing the interface button to unlock the door. To do this, you must have Internet access (you can use mobile Internet, such as 3G).
Check the onboard LED while you unlock the door from the app. The onboard LED should light up every time you unlock the door from the Muzzley app.
Now that we can unlock our door from anywhere using the mobile phone with an Internet connection, a nice thing to have is the entrance lights turn on when you open the building door using your Muzzley app.
To do this, you can use the Muzzley workers to define rules to perform an action when the door is unlocked using the mobile app. To do this, you'll need to own one of the Muzzley-enabled smart bulbs such as Philips Hue, WeMo LED Lighting, Milight, Easybulb, or LIFX. You can find all the enabled devices in the app profiles selection list:
If you don't have those specific lighting devices but have another type of connected device, search the available list to see whether it is supported. If it is, you can use that instead.
Add your bulb channel to your account. You should now find it listed in your channels under the category Lighting. If you click on it, you'll be able to control the lights.
To activate the trigger option in the lock profile we created previously, go to the Muzzley website and head back to the Profile Spec app, located inside App Details. Expand the property lock status by clicking on the arrow sign in the property #1 - Lock Status section and then expand the controlInterfaces section. Create a new control interface by clicking on the +controlInterface button. In the new controlInterface #1 section, we'll need to define the possible choices of label-values for this property when setting a rule. Feel free to insert an id, and in the control interface option, select the text-picker option. In the config field, we'll need to specify each of the available options, setting the display label and the real value that will be published. Insert the following JSON object:
{"options":[{"value":"true","label":"Lock"},{"value":"false","label":"Unlock"}]}.Now we need to create a trigger. In the profile spec, expand the trigger section. Create a new trigger by clicking on the +trigger button. Inside the newly created section, select the equals condition. Create an input by clicking on +input, insert the ID value, insert the ID of the control interface you have just created in the controlInterfaceId text field. Finally, add the [{"source":"selection.value","target":"data.value"}].path to map the data.
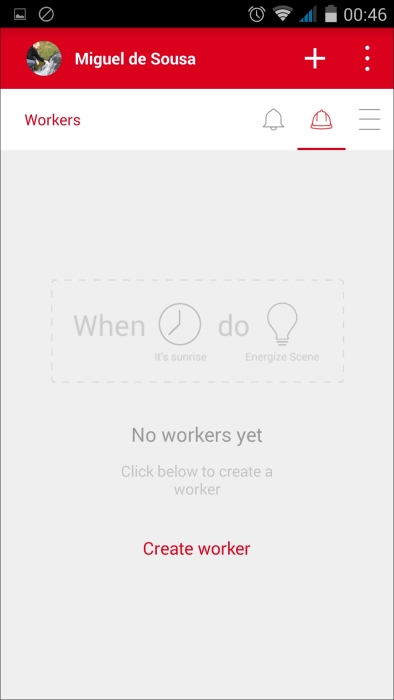
Open your mobile app and click on the workers icon. Clicking on Create Worker will display the worker creation menu to you. Here, you'll be able to select a channel component property as a trigger to some other channel component property:
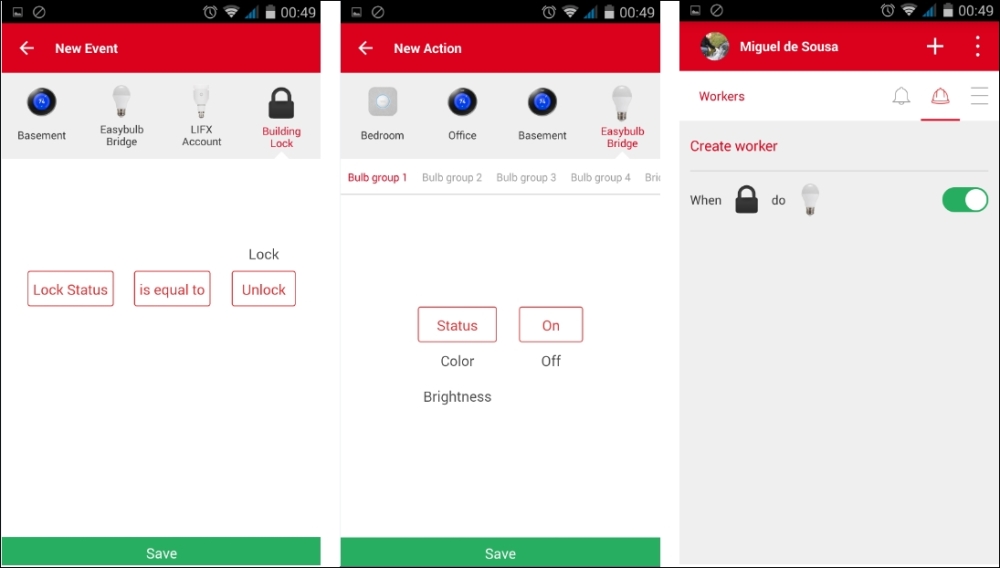
Select the lock and select the Lock Status is equal to Unlock trigger. Save it and select the action button. In here, select the smart bulb you own and select the Status On option:
After saving this rule, give it a try and use your mobile phone to unlock the door. The smart bulb should then turn on. With this, you can configure many things in your home even before you arrive there. In this specific scenario, we used our door locker as a trigger to accomplish an action on a lightbulb. If you want, you can do the opposite and open the door when a lightbulb lights up a specific color for instance. To do it, similar to how you configured your device trigger, you just have to set up the action options in your device profile page.