
The LPD8806 LED strip is a digitally-addressable RGB LED strip that can receive instructions using the SPI protocol. This type of strip is one of the most customizable available as you can control the colors of each of the available LEDs individually using 21 bit colors per LED.
Galileo is great for this task since it has a native SPI controller (only actuates as master) available. This way, you don't need to bit-bang the GPIO pins, simulating the hardware behavior through software, which consumes more CPU usage when compared to the hardware option.
Common serial ports communicate asynchronously since there is no control over data transmission as the same transfer rates are being used. The SPI controller works differently. Being a synchronous data bus, it uses two different lines—one for data and the other for a clock signal. The clock signal will tell the receiver when it should start looking at the transmitted data. This is an interesting protocol since it can be used with simple shift registers, just like our LED strip.
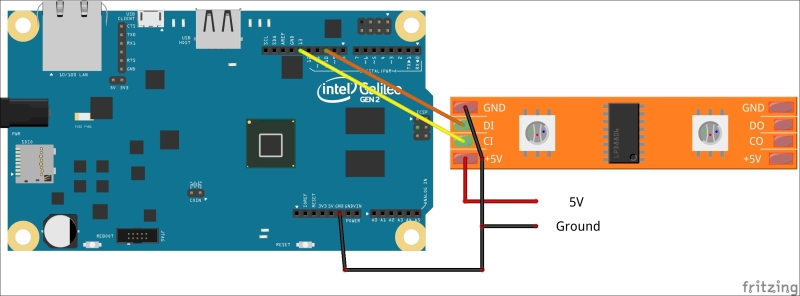
Taking a look at the LED strip, you'll find four wire connectors: 5V, GND, CI, and DI. Each of these (input) connectors require to have a wire attached to it and you may have to solder them. Visit https://learn.adafruit.com/digital-led-strip/wiring if you need help for doing this.
On the opposite side of the strip, you'll find four other connectors, but those ones are used for output and won't be necessary unless you want to add more LEDs to your strip.
Having in mind your strip length, you may need to consider powering it from an external 5V power source. If you are using a strip containing only a couple of LEDs, you should be able to power it straight from the Galileo's 5V pin, as displayed in the following figure:

Powering a small LED strip from Galileo
The DI connector refers to the data line input and should be connected to Galileo's pin 10, while the CI (clock input) connector should be connected to Galileo's pin 13.
If you are using a short strip, connect the 5V and GND strip connectors to the Galileo's 5V and GND pins, respectively. If you are using a longer strip, you should power it from an external 5V power supply, sharing Ground with the Galileo, as displayed in the following figure:
Powering the LED strip from an external power source