
In this project, we will be using the aforementioned components to improve the game experience. We'll use the LCD screen to display game information such as the Galileo IP address, which will be used to pair the mobile devices with the game or the current questions round. The buzzer will be used to notify the users that the game or a new question round has just started.
You should connect them to your board by referring to the following image:

First, attach the base shield to your board. Connect the LCD screen to the I2C connector, just like in the preceding image, and the buzzer to the digital connector D4.
Connect your Galileo to the Internet using an Ethernet cable connection or you may use a wireless connection.
With the basic setup finished, download the game source files from the Packt Publishing website (http://www.packtpub.com/support). Open the Intel XDK and then open the IoT-quiz project by navigating to PROJECTS | Open an Intel XDK project and selecting the file IoT-quiz.xdk inside the project folder.
This app will run in Galileo and handle the players' connections, cache their results, and coordinate the LCD and buzzer according to the game stage. Let's take a deeper look at the concepts behind this game.
The player's coordination will be done using the Socket.IO real-time engine. The first thing we should do is define the messages we will be exchanging between the server (Galileo) and clients (mobile devices). Here, we'll create four main stages after a client connects. In the following image, we can find four different colored stages. The first stage (green) is registering new players in the game, the second stage (blue) is the questions being presented and answered, the third stage (orange) is displaying the correct answer, and the fourth stage (red) is displaying the high scores.
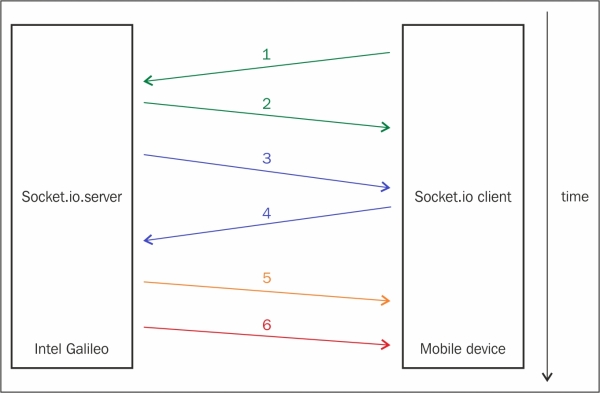
From the preceding diagram, you can observe the flow in the following manner:
- Player requests to join the game.
- Server replies with a success true/false.
- Server sends the question and answer options to the mobile devices (clients).
- Client selects the answer and informs the server.
- Server sends the right answer to the clients.
- Server sends the game results to the clients.
Keeping this in mind, in the main.js file, you'll find the Socket.IO server being set up and listening for new connections:
var app = http.createServer(function (req, res) {
  'use strict';
  res.writeHead(200, {'Content-Type': 'text/plain'});
  res.end('<h1>Hello world from Intel IoT platform!</h1>'),
}).listen(1337);

var io = require('socket.io')(app);

//Attach a 'connection' event handler to the server
io.on('connection', function (socket) {
    …

  socket.on('error', function (error) {
    …
  });

  //Attach a 'disconnect' event handler to the socket
  socket.on('disconnect', function () {
    …
  });
});
Every time a connection is successfully established, Galileo will be waiting for a client to send the registration message to join the game. If the game hasn't started yet, the new player will be added to a player list, and the server will confirm the client through a callback that he/she was successfully registered:
socket.on('register_player', function (player, callback) {
    if (game.isGameRunning()) return callback(null, {success: false, message: 'Game already started. Try again later'});

    // Add the player to the game
    game.registerPlayer(player.name, socket);

    // Replying to mobile device, game registration request
    callback(null, {success: true});

    // If is the first player to join, launch a timer to start the game
    if (game.players.length === 1) {
      console.log('Game will start in Xs'),
      startGameTimer = setTimeout(game.start, 3000);
    }
  });
The returned message will be using the following parameters:
- Error: If an error is present, it should be sent using the callback's first parameter
- Message: The message structure should be
{success: true/false, message: 'optional'}
To help us keep track of players' data and easily exchange data messages, we are using a custom object that we have named Player. This object has a name, a connection socket, and a unique ID, referring to the socket ID. It can emit events to a specific client, such as the questions, correct answer, and game scores:
function Player (options) {
  this.name = options.name;
  this.socket = options.socket;
  this.id = options.socket.id;
}

// Send scores to player
Player.prototype.displayScores = function (scores) {
  this.socket.emit('scores', {gameScore: scores});
};

// Display the question answer
Player.prototype.showCorrectAnswer = function (correctAnswer) {
  this.socket.emit('display_right_answer', {correctAnswer: correctAnswer});
};

// Send question to player and return the answer
Player.prototype.sendQuestion = function (question, timeout, roundNumber, callback) {
  this.socket.emit('question', {question: question, timeout: timeout, round: roundNumber}, callback);
};

module.exports = Player;
The game engine can be found in the game.js file located inside the lib folder. Game and players' data will be handled here:
var players = [];
var questions, roundNumber = null;
var gameRunning = false;
All the players joining and leaving the game will be added or removed from the players' array. The var gameRunning value will indicate whether the game is already running or not. The vars questions and roundNumber values will store the game questions and the current question round number, respectively.
Game questions will be stored in a static JSON file, containing an array of questions. This file is named questions.json. You can add or change questions as long as the question structure is kept:
[
   {
     "id": 1,
     "question": "Which one is an Internet of Things major concern?",
     "answers": {
       "A": "Security",
       "B": "Too many devices connected to the Internet",
       "C": "Sedentarism",
       "D": "Not enought storage available in the world"
     },
     "correctAnswer": "A"
   },
   {
     "id": 2,
     "question": "What can you sense when using this Grove sensor?",
     "url": "http://www.seeedstudio.com/depot/bmz_cache/9/9b57087d562b65bcd9d77059b16061eb.image.530x397.jpg",
     "answers": {
       "A": "Light",
       "B": "Temperature",
       "C": "Moisture",
       "D": "Sound"
     },
     "correctAnswer": "D"
   }
]
The first one is a text only question and the second one a question with an image.
Whenever there's a single player connected, a countdown timer will start. Other players who want to join the current game will need to do it during this countdown. When the time limit is reached, the game starts by calling the following method, which can be found in the game.js file:
exports.start = function () {
  gameRunning = true;
  roundNumber = 1;

    // Load questions from a JSON file
    fs.readFile(''/home/root/.node_app_slot/questions.json'', ''utf8'', function (err, data) {
      if (err) throw err;
      questions = JSON.parse(data);


      async.whilst(
        function () {
          // While round number is not the last one and there are connected players, keep playing
          return (roundNumber <= questions.length && players.length > 0);
        },

        // Start next question round
        nextQuestionRound,

        // When all rounds end
        function () {

            for (var i = 0; i != players.length; ++i) {
              players[i].displayScores(scores);
            }
            gameRunning = false;
        }
      );
    });
};
In game.js, we can also find the preceding method, which is responsible to start the game. The game status control variable will be checked as true and the round number will be set to the first one. The game starts by loading all the questions from the JSON file. Galileo will then asynchronously keep on processing the question rounds until it cycles all the questions or all the players leave the game.
Note
To accomplish this, we used the async library (https://github.com/caolan/async).
The async.whilst method will lock every nextQuestionRound(callback) function until its callback is called:
function nextQuestionRound(callback) {
  // Send the round question to all players
  async.each(players, function (player, playerDone) {

    // Set a maximum time to wait for the question answer
    var questionTimer = setTimeout(function () {
      console.log(''ANSWER was not answered''),
      return playerDone();
    }, 15000);

    // Question and options to send to the mobile device
    var roundQuestion = {
      question: questions[roundNumber-1].question,
      answers: questions[roundNumber-1].answers,
      url: questions[roundNumber-1].url
    }

    player.sendQuestion(roundQuestion, 15000, roundNumber, function (err, answer) {

      // Cancel the timer since the question was answered
      clearTimeout(questionTimer);

      // Evaluate question
      if (answer !== questions[roundNumber-1].correctAnswer) {
        // If answer is wrong, return and release
        return playerDone();
      }
      // If answer is correct, increase score and return and release
      scores.increaseScore(player.name, playerDone);
    });
  },

  // When all players are done in current round
  function () {
    for (var i = 0; i != players.length; ++i) {
      players[i].showCorrectAnswer(questions[roundNumber-1].correctAnswer);
  }

  setTimeout(function () {
      ++roundNumber;
      callback();
    }, 3000);
  });
}
This method is our game core. Here, we'll be using the async.each method to asynchronously loop the game participants in parallel. Each participant will be sent the game round question. Each player's answer is expected to be returned in 15 seconds or it will be considered unanswered. The playerDone callback will be called every time a player finishes "his move" in the current round. It will be called when a player answers the question correctly or incorrectly, or it will be called if the player doesn't answer the question at all.
When all the playerDone callbacks are called for all the players, the correct answer will be displayed to all the players for 3 seconds. Then the round number will increase by one unit and, on returning the round callback, a new round will be processed in the previous async.whilst loop.
Every time a player answers a displayed question correctly, his score will increase by one unit. We'll keep this data structurally cached using Redis. The Intel IoT Dev Kit image already comes with it installed, so you'll be ready to use it. Redis is a key-value cache and storage system, where you can store your data by type (http://redis.io/).
Inside lib/storage.js, you can find the methods for our small storage system that use the Redis Node.js client (https://github.com/mranney/node_redis). We'll use sorted sets to store our data (http://redis.io/commands#sorted_set). Having a set key, we can add multiple members with an associated score. Here, we will use the players' IDs as members and their current scores as member scores:
var redis = require('redis'),
var storage = redis.createClient();

// Key where we'll be storing our game score data
var storageKey = 'iot-quiz:scores';

exports = module.exports = {};

exports.increaseScore = function (playerKey, callback) {
  storage.zincrby(storageKey, 1, playerKey, callback);
};

// Get total correct answers
exports.getScores = function (callback) {
  storage.zrevrange(storageKey, 0, -1, 'WITHSCORES', function (err, score) {
    return callback(err, score);
  });
}

exports.clear = function (callback) {
  storage.del(storageKey, callback);
};
The clear method will be used every time a new game starts to clear the last game's scores, if they exist. Whenever a player answers a question correctly, we'll increase its score using the zincrby method (http://redis.io/commands/ZINCRBY).
To retrieve stored data, we can list it by score. Using the zrevrange method (http://redis.io/commands/zrevrange) will return us an array of members in descending order, starting with the player IDs that have the best scores. The WITHSCORES option will also include the player scores in the results, returning the score value in the array. This will be used to display the game scores at the end of the game.
Pretty much like in the previous chapter's example, we will use a buzzer to help improve the game experience. Using the MRAA library, we'll export and use GPIO 4, where the buzzer should be connected:
var mraa = require("mraa");
var buzzer_pin = new mraa.Gpio(4);
buzzer_pin.dir(mraa.DIR_OUT);
buzzer_pin.write(0);

exports = module.exports = {};

exports.playBuzzer = function (time) {
  buzzer_pin.write(1);
  setTimeout(function () {
    buzzer_pin.write(0);
  }, time);
}
When a game starts or whenever a new question is displayed, the buzzer will make some noise for some short time interval. Although we are just using the buzzer to alert the players, if you prefer, you can use fancy sounds and create melodies using the buzzer UPM module (http://iotdk.intel.com/docs/master/upm/node/classes/buzzer.html).
The Grove LCD will be controlled using the UPM library. It will be useful to display the Galileo IP address and the rounds status:
var LCD  = require(''jsupm_i2clcd''),
var os = require( ''os'' );
var myLCD = new LCD.Jhd1313m1(0, 0x3E, 0x62);

exports = module.exports = {};


exports.printRound = function (roundNumber, total) {
  myLCD.clear();
  myLCD.setCursor(0,0);
  myLCD.write("Current round:");
  myLCD.setCursor(1,0);
  var roundInfo = roundNumber + "/" + total;
  myLCD.write(roundInfo);
};Some Node.js libraries dependencies are already installed in the Developer Kit image, but the ones that aren't have to be included in the package.json file:
{
  "name": "IoT-Quiz",
  "description": "A quiz served by Galileo and played with mobile devices",
  "author": "Miguel Sousa <[email protected]>",
  "version": "0.0.1",
  "main": "main.js",
  "engines": {
    "node": "">=0.10.0""
  },
  "dependencies": {
    "async": "0.9.x",
  "redis": "0.12.x"
  }
}
The preceding JSON file contains our project description and libraries dependencies with version. When you press the XDK build project button, this file will be read and the dependencies written on it will be installed.