
In this chapter, we will start understanding how to write a rich application using RichFaces.
In order to do this, we've chosen to start with a simple example that implements an Ajax contact list. The user will be able to list, add, and delete contacts without the need of reloading the browser page.
We'll see how some important Ajax components work and how to ajaxize a JSF application by using the RichFaces framework concepts.
The features developed in this example will be seen in depth in the coming chapters.
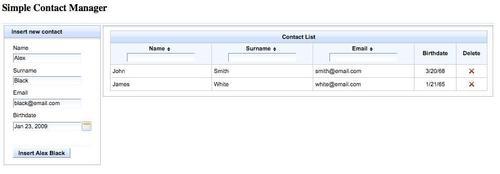
The example application is a simple contact manager it has a list of contacts and a form to add new contacts. Also, you can delete a specific contact from the list.
The example shows how the Ajax framework works and how you can use the RichFaces Ajax components. It also uses some graphic RichFaces components such as rich:panel, rich:spacer, and rich:separator. It uses the rich:calendar component for date input, and the RichFaces version of dataTable (rich:dataTable and rich:column) with automatic filtering and ordering capabilities.
We also use the Ajax validation component (rich:beanValidator) to ajaxize and enhance the standard JSF validation.
The skin we have chosen can be changed by editing the skin name in the web.xml file (we'll see how to do that in the following chapters).
As we've seen in Chapter 2, Getting Ready, in order to use seam-gen, just open a terminal window and navigate to the JBoss Seam distribution directory.
From that point, you can execute seam-gen commands. Before giving seam-gen the command that creates a new project, we have to configure it using the following commands.
If you are using Microsoft Windows, use the following command:
seam setup
If you are using a Unix-like system such as GNU/Linux or Mac OS X, use the following command:
./seam setup
After the welcome text, seam-gen will ask us some questions regarding the project configuration we would like to have; for every question, there is a default answer (in square brackets) that you can choose by pressing the Enter key.
The questions are not difficult to understand; let's go through them and create our project for the example:
|
Question |
Description |
Answer |
|---|---|---|
|
|
This is the directory in which we want to save our new project (it depends on our environment and preferences) |
(The new project directory path) |
|
|
It is the directory where the JBoss Application Server is installed |
(The JBoss directory path) |
|
|
The name of the application |
|
|
|
Seam-gen also supports ICEFaces (another component framework), but we want to use RichFaces, so just press Enter |
No |
|
|
We can select one of the provided skins for our project; we can change it later, for now |
(Let's press Enter) |
|
|
We can generate a WAR package or an EAR package for our application. We would like a complete EAR application with EJB support |
(Let's press Enter) |
|
|
The package name containing our session beans (generated by Seam-gen) |
|
|
|
The package name containing our entity beans (generated by Seam-gen) |
|
|
|
The package name containing our test cases' beans |
|
|
|
For this simple example, we don't use the database at all |
(Let's press Enter for default (hsql)) |
|
|
Not used for our project |
(Let's press Enter) |
|
|
Not used for our project |
(Let's press Enter) |
|
|
Not used for our project |
(Let's press Enter) |
|
|
Not used for our project |
(Let's press Enter) |
|
|
Not used for our project |
(Let's press Enter) |
|
|
Not used for our project |
(Let's press Enter) |
|
|
Not used for our project |
(Let's press Enter) |
|
|
Not used for our project |
(Let's press Enter) |
|
|
Not used for our project |
(Let's press Enter) |
|
|
Not used for our project |
(Let's press Enter) |
Okay, we've completed the configuration of the project. We will see how to configure a project for a MySQL DBMS connection in Chapter 4, The Application (when we will start making the real application); for now it's okay to use the default answers.
We are ready to create the project using the following commands. If you are using Microsoft Windows, use the following command:
seam create-project
If you are using a Unix-like system such as GNU/Linux or Mac OS X, use the following command:
./seam create-project
If you are using the Eclipse IDE, you have to import the project into the workspace (we described how to do that in Chapter 2). With other IDEs ( such as IntelliJ IDEA or NetBeans), you can open the project from the location specified while executing seam-gen.
Our new project not only has the Facelets support included, but also a first template file, which we can edit in order to add our features. You can find it at the path /view/layout/template.xhtml.
It is the structure we use in other pages to avoid repeatedly writing the same components across pages.
This is how it looks:
<!DOCTYPE html PUBLIC "-//W3C//DTD XHTML 1.0 Transitional//EN"
http://www.w3.org/TR/xhtml1/DTD/xhtml1-transitional.dtd">
<f:view contentType="text/html"
xmlns="http://www.w3.org/1999/xhtml"
xmlns:ui="http://java.sun.com/jsf/facelets"
xmlns:h="http://java.sun.com/jsf/html"
xmlns:f="http://java.sun.com/jsf/core"
xmlns:a="http://richfaces.org/a4j"
xmlns:s="http://jboss.com/products/seam/taglib">
<html>
<head>
<meta http-equiv="Content-Type" content="text/html;charset=UTF-8"/>
<title>AdvContactManager</title>
<link rel="shortcut icon" href="#{request.contextPath}/favicon.ico"/>
<a:loadStyle src="resource:///stylesheet/theme.xcss"/>
<a:loadStyle src="/stylesheet/theme.css"/>
<ui:insert name="head"/>
</head>
<body>
<ui:include src="menu.xhtml">
<ui:param name="projectName" value="AdvContactManager"/>
</ui:include>
<div class="body">
<h:messages id="messages" globalOnly="true" styleClass="message" errorClass="errormsg" infoClass="infomsg" warnClass="warnmsg" rendered="#{showGlobalMessages != 'false'}"/>
<ui:insert name="body"/>
</div>
<div class="footer">
Powered by <a href="http://jboss.com/products/seam">Seam</a>.
Generated by seam-gen.
</div>
</body>
</html>
</f:view>
Let's discuss the page.
We can see the DOCTYPE declaration, which tells us the kind of document it is, and then the<f:view> tag with Facelets XML namespace declarations of the component libraries we are going to use. Note that in this page, we don't use RichFaces component (yet) and only the namespace for Ajax4Jsf components (xmlns:a="http://richfaces.org/a4j") is written. This is because the<a:loadStyle> tag is used. If you want to use the other RichFaces components, you have to include the corresponding xmlns (the namespace required to be able to use every RichFaces component with the rich prefix) as follows:
xmlns:rich=http://richfaces.org/rich
We are going to insert it as we want to use RichFaces components in the template.xhtml page too.
Let's continue to analyze the page. Our document starts (we can see the<html>, <head>, <meta>, <title>, and<link> tags) after the<f:view> tag.
After those standard tags, we can see<a:loadStyle>, which is a very useful Ajax4Jsf component to render links to the head section of the page.
There is a Facelets component called<ui:insert>. We are not going to explain the Facelets framework in depth, all you have to know is that the component makes insertion points in order to insert code from other pages, which use this template. Therefore, it is very useful to put code into the head section from other pages.
We find the Facelets<ui:include> tag used to include another page called menu.xhtml in the body section. It is the top menu that we want to reuse for the entire application. We also pass ui:param inside the tag, which the included page can use (the parameter is the project name in this case).
Now we find a div element that contains the standard<h:messages> component, which we are going to replace with the corresponding RichFaces component.
Below the h:messages tag, we find the body Facelets insertion point that is used by other pages in order to insert specific content (we will see how it works in the following paragraphs).
At the end of the code, there is another div section, including some text with the JBoss Seam web site link.
For this example, we will just use one page and no menu, so let's edit the template.xhtml page and delete the section that includes the menu into every page:
<ui:include src="menu.xhtml">
<ui:param name="projectName" value="AdvContactManager"/> </ui:include>
If we want to, we can also personalize the footer by changing the text or deleting it.
We have to change the title of the page in the template to Simple Contact Manager.
Now open the home.xhtml file for editing, it comes with standard text presenting seam-gen. Let's delete the h1 section and the rich:panel component to have an empty page.
Moreover, we can add the support for Ajx4JSF components by inserting the XML namespace at the top of the page. Now, the page looks like this:
<!DOCTYPE html PUBLIC "-//W3C//DTD XHTML 1.0 Transitional//EN"
http://www.w3.org/TR/xhtml1/DTD/xhtml1-transitional.dtd">
<ui:composition xmlns="http://www.w3.org/1999/xhtml"
xmlns:s="http://jboss.com/products/seam/taglib"
xmlns:ui="http://java.sun.com/jsf/facelets"
xmlns:f="http://java.sun.com/jsf/core"
xmlns:h="http://java.sun.com/jsf/html"
xmlns:a4j="https://ajax4jsf.dev.java.net/ajax"
xmlns:rich="http://richfaces.org/rich"
template="layout/template.xhtml">
<ui:define name="body">
<!-- my code -->
</ui:define>
</ui:composition>
We still have to add the structure in order to render the form and the contact list. We will use a standard h:panelGrid with two columns for this purpose, so let's put the following code inside the body definition (replacing the<!-- my code --> comment):
<h3>Simple Contact Manager</h3>
<rich:separator height="1" lineType="solid" width="100%"/>
<h:panelGrid columns="2" width="100%" columnClasses="form-column, table-column">
<!-- Insert new contact form -->
<!-- Contact list -->
</h:panelGrid>
As you can see, we also added a header (h3s) and a spacer between the header and h:panelGrid. We also used two CSS classes for the panel grid, but we have not defined them yet.
So, let's open the theme.css file inside the stylesheet folder. You can see some classes added by seam-gen, ignore them and add the following CSS code at the end of the file:
form-column {
vertical-align: top;
width: 20%;
}
table-column {
vertical-align: top;
width: 80%;
}
Those simple CSS classes define the width of the two columns and align the content on top.
We have to store our contact information in a Java class. In this case, we don't have the database support and our data stays in memory. In the real application that we are going to develop in the next chapters we will have MySQL support.
Therefore, we will be using a simple Plain Old Java Object (POJO) to store the information we need. Let's create a new Java class called ContactBean in the book.richfaces.scm package (the one in the src/main folder) and insert the following code:
package book.richfaces.scm;
import java.util.Date;
public class ContactBean {
private String name;
private String surname;
private String email;
private Date birthdate;
public ContactBean() {
}
public String getName() {
return name;
}
public void setName(String name) {
this.name = name;
}
public String getSurname() {
return surname;
}
public void setSurname(String surname) {
this.surname = surname;
}
public String getEmail() {
return email;
}
public void setEmail(String email) {
this.email = email;
}
public Date getBirthdate() {
return birthdate;
}
public void setBirthdate(Date birthdate) {
this.birthdate = birthdate;
}
}
As you can see, this is a simple Java class with private properties and public accessors and mutators.
In order to manage the actions of this simple example (such as inserting a new contact, deleting a contact, listing all contacts), we need a managed bean. We can use a standard JSF managed bean (so we have to configure the faces-config.xml file) or a Seam component, and we've chosen the second option because we don't have to configure anything while using a Seam component. We will just add an annotation to the class we are going to use (Seam simplifies JSF development a lot). Anyway, the code is simple and can be used as is for a standard JSF managed bean.
So, let's create a new Java class called ContactsManager in the book.richfaces.scm package (the one in src/hot folder). At first, the class is empty:
package book.richfaces.scm;
public class ContactsManager {
}
First of all, we need a place to save our contact list a standard list of ContactBean instances. So, let's add the code to manage it:
package book.richfaces.scm;
import java.util.ArrayList;
import java.util.List;
public class ContactsManager {
private List<ContactBean> contactsList;
public List<ContactBean> getContactsList() {
if (contactsList==null) {
contactsList=new ArrayList<ContactBean>();
}
return contactsList;
}
public void setContactsList(List<ContactBean> contactsList) {
this.contactsList = contactsList;
}
}
It's a simple private property with a getter and a setter. The getter lazily initializes the contactsList property.
For inserting contacts, we create a new ContactBean instance to connect with the Insert new contact form and an action for inserting it into the list. Let's add the code we need inside the ContactsManager class:
private ContactBean newContact;
public ContactBean getNewContact() {
if (newContact==null) {
newContact=new ContactBean();
}
return newContact;
}
public void setNewContact(ContactBean newContact) {
this.newContact = newContact;
}
public void insertContact() {
getContactsList().add(0, getNewContact());
setNewContact(null);
}
Again, we have the newContact property with the getter and the setter, and an insertContact action.
As we have said, in order to make the class a managed bean, we can use the standard JSF way or the Seam way.
We'll show both of them now, so you can understand why using Seam is more simple.
Using the normal JSF way, we have to edit the faces-config.xml file to tell JSF that the ContactsManager class is a managed bean. We have to add the following code inside the faces-config element:
<managed-bean>
<managed-bean-name>contactsManager</managed-bean-name>
<managed-bean-class>
com.test.manager.ContactsManager
</managed-bean-class>
<managed-bean-scope>session</managed-bean-scope>
</managed-bean>
Not a difficult code at all, but very verbose as we have to describe the class, its properties, and declare the scope (that is session in this case) of the class. Even if tools help us in doing this task, maintaining the faces-config.xml file remains difficult.
Using JBoss Seam, the only thing you have to do is to annotate the ContactsManager class, which becomes like this:
package book.richfaces.scm;
import java.util.ArrayList;
import java.util.List;
import org.jboss.seam.ScopeType;
import org.jboss.seam.annotations.Name;
import org.jboss.seam.annotations.Scope;
@Name("contactsManager")
@Scope(ScopeType.SESSION)
public class ContactsManager {
// code...
}
In this case, we just added two annotations one (the @Name) of them tells Seam that it is a Seam component (and also a managed bean) named contactsManager, and the other one (@Scope) tells it that the class has SESSION scope (so it will be kept in memory across the requests).
We don't need to modify the faces-config.xml file and describe every field of the class. Simple, isn't it? We are now ready to write the XHTML and connect it with the managed bean (we can refer to it in XHTML using its name, that is contactsManager).
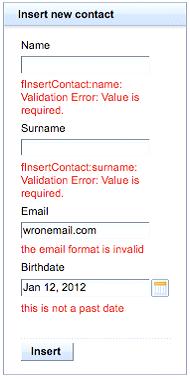
This is a form that asks the user for some data and inserts it into the contact list when the user clicks on the Insert button. All of this is done using Ajax calls!
All of the data validation is done in Ajax while entering the values for the Name and Surname fields, and after the button has been clicked for the other fields. But it's just our choice. Also, we can take advantage of Hibernate Validator annotations to set validators on fields, by using the RichFaces Ajax Validator support instead of the f:validation (we'll see how it's done in this section).
In order to show other Ajax functionalities, we also want the Insert button to change the caption while the user is typing their name and surname.
The next screenshot shows the final look that we want for the form:

In order to describe the box of the form, we use a rich:panel component with a header. Inside it, we put an h:panelGrid with one column to insert fields one below the other. Therefore, we have the form layout ready, just insert this code into the home.xhtml file (replace the<!-- Insert new contact form --> comment):
<rich:panel>
<f:facet name="header">Insert new contact</f:facet>
<h:form id="fInsertContact">
<h:panelGrid columns="1">
<!-- fields -->
</h:panelGrid>
</h:form>
</rich:panel>
We declared a simple panel with a header using the "header" facet to declare it. If the header is just text, we can also use the header attribute in this way:
<rich:panel header="Header text">
...
</rich:panel>
As you can see, a panel is simple to use and you can put whatever you want inside it. Also, it is fully customizable using the skinnability feature.
After declaring the panel, we have to put the fields inside, in order to connect them to the managed beans.
We have declared one managed bean called contactsManager, which contains an instance of ContactBean (the bean that represents a contact), other than all the methods to list, insert, and delete contacts. This is used for inserting a new contact called newContact, we are going to connect fields to this instance (that is inside the contactsManager bean).
Here is the code for describing the form fields, insert it in the place of the<!-- fields --> comment:
<h:outputLabel for="name" value="Name"/>
<h:inputText id="name"
value="#{contactsManager.newContact.name}" required="true">
<rich:beanValidator/>
a4j:support event="onkeyup" timeout="200" ajaxSingle="true" reRender="insertButton"/>
</h:inputText>
<rich:message for="name" style="color: red;"/>
<h:outputLabel for="surname" value="Surname"/>
<h:inputText id="surname"
value="#{contactsManager.newContact.surname}"
required="true">
<rich:beanValidator/>
<a4j:support event="onkeyup" timeout="200"
ajaxSingle="true" reRender="insertButton"/>
</h:inputText>
<rich:message for="surname" style="color: red;"/>
<h:outputLabel for="email" value="Email"/>
<h:inputText id="email" value="#{contactsManager.newContact.email}"
required="true">
<rich:beanValidator/>
</h:inputText>
<rich:message for="email" style="color: red;"/>
<h:outputLabel for="birthdate" value="Birthdate"/>
<rich:calendar id="birthdate" value="#{contactsManager.newContact.birthdate}" required="true">
<rich:beanValidator/>
</rich:calendar>
<rich:message for="birthdate" style="color: red;"/>
<rich:spacer height="15"/>
<rich:separator height="1" lineType="dotted" width="100%"/>
<a4j:commandButton id="insertButton"
action="#{contactsManager.insertContact}"
value="Insert #{contactsManager.newContact.name} #{contactsManager.newContact.surname}"
reRender="fInsertContact"/>
As we can see, in the first block of code (in the name field) we have a standard JSF h:outputLabel for inserting the label of the input and a standard h:inputText connected to the ContactBean field using the value attribute.
After that, we used rich:message instead of the standard h:message component because it supports Ajax out of the box (and it offers more personalization too). See the next section for a better explanation.
Coming back to h:inputText, we can see two new tags rich:beanValidator for Ajax field validation and a4j:support to update the Insert button caption while typing.
By using a standard h:message or h:messages component, you don't get the Ajax JSF messaging support for JSF Ajax events and the messages are not shown after an Ajax event.
With the rich:message and rich:messages components, we don't have to care about that as they work with both Ajax and traditional JSF requests.
The basic usage is very simple and quite the same as the standard one:
<rich:message for="myComponentId" />
Making an Ajax version of the standard component is only a part of the work the RichFaces team has done on this component. In fact, they added a set of interesting features you can use to customize your application.
In fact, they provide a highly-customizable look and feel with CSS-based support. Also, you can customize every single part of the components by adding a facet for different kinds of messages (WARN, INFO, FATAL, ERROR), and customize the "marker" (for example, an icon) accordingly:
<rich:message for="myComponentId">
<f:facet name="warnMarker">
<h:graphicImage url="/images/warning.png"/>
</f:facet>
<f:facet name="errorMarker">
<h:graphicImage url="/images/error.png"/>
</f:facet>
<f:facet name="passedMarker">
<h:graphicImage url="/images/passed.png"/>
</f:facet>
</rich:message>
Moreover, you can add a passedLabel text string that is shown when no error message appears.
There are three JSF components that you can use for validation purposes. We will see them in more detail in Chapter 4, The Application. We've used rich:beanValidator here, because it uses the Hibernate Validator framework to read validation rules directly from the ContactBean field.
In this way, we don't have to write (and maintain!) the same validators in different input fields, which refer to the same input.
In our case, we can add Hibernate Validator annotations to the model class (ContactBean).
rich:beanValidator reads them and uses them to decide the validation strategy; the ContactBean class is now defined as follows:
public class ContactBean {
private String name;
private String surname;
private String email;
private Date birthdate;
public ContactBean() {
}
@NotNull
@Length(min = 3, max = 20)

public String getName() {
return name;
}
simple contact manager, example applicationsimple contact manager, example applicationfield, validatingpublic void setName(String name) {
this.name = name;
}
@NotNull
@Length(min = 3, max = 20)
public String getSurname() {
return surname;
}
public void setSurname(String surname) {
this.surname = surname;
}
@NotNull
@Email

public String getEmail() {
return email;
}
public void setEmail(String email) {
this.email = email;
}
@NotNull
@Past

public Date getBirthdate() {
return birthdate;
}
public void setBirthdate(Date birthdate) {
this.birthdate = birthdate;
}
}
It is not the purpose of this book to explain how the Hibernate Validator framework works, but it is simple to understand from the example. If we look at the getName method, we can see the @NotNull and @Length annotations (the latter with two parameters). They tell rich:beanValidator that the field must not be null, and that it has a minimum length of two characters and a maximum length of 20 characters. In 99% of the applications, we just have to annotate validators for every field and we are done. Anyway, it is always possible to add another f:validator tag with rich:beanValidator in order to add specific validation rules.
If we look at the other fields of the ContactBean class, we can find other validators such as @Email and @Past. There are others that you can use and you can even create your own validators for a specific purpose.
Coming back to the form code, after the validator tag, we can see another tag a4j:support.
This is the most important Ajax component of the library and attaching it as a child adds Ajax capabilities to standard JSF components. The event attribute is used to define the JavaScript event that the Ajax request will be attached to (in this case, onkeyup that fires an event for every key the user types).
The timeout attribute describes the number of milliseconds (ms) to wait before firing the Ajax request. In this case, it is useful to avoid a lot of Ajax requests while the user is writing.
The ajaxSingle attribute tells the framework to just send the value of the field and not to submit the whole form (we just need the date to be inserted in the field, and the form data will be submitted by clicking on the Insert button).
Finally, the reRender attribute contains the id(s) of the JSF component to "reRender" after the Ajax request. In this case, we want to update the caption of the insertButton component, which contains the value of the field (contactsManager.newContact.name) updated by the Ajax request.
Another example is shown as follows:
<h:form>
<h:inputText value="#{aBean.myText}">
<a4j:support event="onblur" reRender="out1" />
</h:inputText>
</h:form>
<h:outputText
id="out1"
value="#{aBean.myText}" />
After the user puts some text inside inputText and presses the Tab key or clicks outside the input field (JavaScript event onblur), a4j:support will update the myText property of the aBean bean with the typed text. Then it will update the outputText with id="out1".
The Surname field works like the Name field, unlike the Email field that doesn't contain the a4j:support tag and is validated (always using an Ajax request) when the user clicks on the Insert button (a4j:commandButton).
In the fourth field, we use the rich:calendar component to get the birth date of the contact. It is very simple to use, but it has a lot of optional fields and can become very powerful. It can be used to set the time too. It is fully customizable, shows a pop-up window, and it also works with manual input.
In the following screenshot, you can see how it appears when the user clicks on the icon on the right in order to select the date.
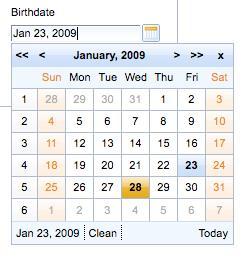
We will look at the use of this component in more depth in the following chapters.
Those are two simple, but very useful layout components. They can show a customizable line (such as solid, dotted, double, and so on) and a personalized (in size) empty block rendered as a transparent image, respectively.
The HTML result of inserting a rich:separator component with the height attribute set to 1, the width attribute set to 100%, and the lineType attribute set to dotted is as follows:
<div class="rich-separator " style="height: 1px; width: 100%; background-image: url(/SimpleContactManager/a4j/g/3_2_2.SR1org.richfaces.renderkit.html.images.SimpleSeparatorImage/DATB/eAFjYNxa6sUIAATTAXc_); null;"></div>
Instead of using the rich:separator component, if you use a rich:spacer component with the height attribute set to 15, you get this XHTML code:
The last component we can see in the form's field code is a4j:commandButton. It is the Ajax version of the standard JSF h:commandButton and it produces Ajax requests instead of standard ones, as well as having attributes to manage the Ajax options.
The most important one is the reRender attribute that tells the JavaScript Engine which area(s) of the page or component must be updated after an Ajax response.
It can re-render one or more components after an Ajax request. It accepts a String object (a component id or a comma-separated id list), Set, Collection, or Array (passed via the JSF EL).
In our code, it is used to call the action method (contactsManager.insertContact) that inserts the newContact bean into the contact list array, and then to re-render the form itself and the contact list rich:dataTable. The form might be re-rendered to clean fields (in fact, after insertion, the contactsManager.insertContact method clears the fields so we can insert another contact in a clean instance of ContactBean).
Also, as you can see, the value contains the inserted name and surname. Therefore, if the user writes John as the name and Wilson as the surname, the caption of the a4j:commandButton becomes "Insert John Wilson", and thanks to a4j:support (as we've seen in the previous paragraphs), it changes while the user is typing.
Here is another example:
<h:form>
<a4j:commandButton value="update" action="#{myBean.anOptionalAction}"
reRender="block1,text1"
</h:form>
<h:panelGroup id="block1">
...
</h:panelGroup>
<h:outputText id="text1" ... />
When the user clicks on the update button rendered by the a4j:commandButton tag, the RichFaces JavaScript Engine will make an Ajax request to the server and wait for the response. After that, it will update the block1 and text1 elements.
It has a lot of other useful attributes, which we'll see in the following chapters.
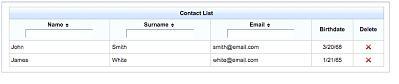
In order to show (and let the user delete) the contact list, we are going to use the RichFaces version of the classical h:dataTable. It works the same way, but it has very useful and simple-to-use enhanced features. It is enclosed in a rich:panel tag (this time without a header, because we are going to use the header facet of rich:dataTable).
We also will use rich:datascoller in order to add Ajax pagination to the rich:dataTable records and a4j:commandLink to add a button for every contact in the list.
You can see the final look in the next screenshot (the delete button is shown as an X icon in the last column of the table.)
Here is the code that you have to add to your home.xhtml page (replacing the<!-- Contact list --> comment) in order to render the contact list:
<rich:panel>
<h:form id="fContactsList">
<rich:dataTable id="edtContactsList" value="#{contactsManager.contactsList}"
var="contact" rows="5" width="100%">
<f:facet name="header">Contact List</f:facet>
<rich:column sortBy="#{contact.name}" filterBy="#{contact.name}">
<f:facet name="header">Name</f:facet>
<h:outputText value="#{contact.name}"/>
</rich:column>
<rich:column sortBy="#{contact.surname}" filterBy="#{contact.surname}">
<f:facet name="header">Surname</f:facet>
<h:outputText value="#{contact.surname}"/>
</rich:column>
<rich:column sortBy="#{contact.email}" filterBy="#{contact.email}">
<f:facet name="header">Email</f:facet>
<h:outputText value="#{contact.email}"/>
</rich:column>
<rich:column align="center">
<f:facet name="header">Birthdate</f:facet>
<h:outputText value="#{contact.birthdate}">
<f:convertDateTime type="date" dateStyle="short"/>
</h:outputText>
</rich:column>
</rich:dataTable>
<h:outputText value="No contacts found"
rendered="#{empty contactsManager.contactsList}"/>
<rich:datascroller id="dsContactsList" for="edtContactsList"
renderIfSinglePage="false" />
</h:form>
</rich:panel>
As we can see, we've used a rich:dataTable tag as a normal h:dataTable tag (In fact, we've used the var value and the rows parameter respectively for setting the contact list array. The rows parameter is the request-scope variable to manage the current row object and the number of rows per page.).
We have also used the "rich" version of h:column, that is rich:column, in order to set up the filtering and sorting features for the Name, Surname, and Email fields. Enabling the column for basic sorting and filtering is very simple just connect the sortBy and filterBy attributes of rich:column to the field that you want to sort (or filter).
There is nothing new in the other code of the table.
We'll talk about the "No contacts found" value of h:outputText in the next chapter (talking about Ajax placeholders). After it, we inserted rich:datascroller and connected to the rich:dataTable using the for attribute. The renderIfSinglePage attribute does not render the datascroller until the table contains at least six records (one more than the rows attribute of rich:dataTable), which means two pages of data.
At this point, if we try to add a new contact, the contact list would not be updated. Why?
This is because we have to tell insertButton to update not only the form, but also the contact list after executing the action.
In order to do that, just modify the reRender property of insertButton by adding the id of the contact list form (fContactList), so the component now appears like this:
<a4j:commandButton
id="insertButton" action="#{contactsManager.insertContact}"
value="Insert #{contactsManager.newContact.name}
#{contactsManager.newContact.surname}"
reRender="fContactsList,fInsertContact" />
Now it will also update the contact list that will show the just inserted contact.
We would like to add a delete button as the last column of the table. In order to do so, just insert this code after the birthdate column:
<rich:column width="50" align="center">
<f:facet name="header">Delete</f:facet>
<a4j:commandLink reRender="fContactsList"
action="#{contactsManager.deleteContact}">
<h:graphicImage style="border-width: 0px;"
value="images/buttons/delete.gif" />
<f:setPropertyActionListener value="#{contact}"
target="#{contactsManager.contactToDelete}"/>
</a4j:commandLink>
</rich:column>
We used a4j:commandLink and an image (but we should have used the a4j:commandButton with the image attribute set) to add the support to delete contacts.
This code is simple to understand. When the user clicks on the delete icon (it's a red-colored X), the contact variable (that points to the ContactBean instance for the selected table row) will be set into the contactToDelete property of the contactsManager bean. After that, the contactsManager.deleteContact action will be called and the instance will be removed from the contact list. Following the execution of the action, the RichFaces framework will re-render the contact list form (according to what is set into the reRender property of a4j:commandLink) showing the new list (without the deleted row).