
The vSphere Certificate Manager Utility is a command-line utility that allows for most certificate management tasks to be performed interactively by the administrator. The utility prompts for which task to perform, for any additional information, and then automatically stops and starts services, ultimately replacing the certificates.
Regenerating a new VMCA root certificate and replacing all certificates is useful in the event that the certificates have expired or compromised and new certificates need to be issued to the different vSphere components.
To begin:
- Console to the PSC virtual machine (in this case, it is an embedded deployment, meaning that the vCenter Server virtual machine is also the PSC virtual machine).
- Enable and launch BASH. To launch the Certificate Manager Utility enter
/usr/lib/vmware-vmca/bin/certificate-manager(for a Windows vCenter Server, this is located atC:Program FilesVMwarevCenter Servervmcadcertificate-manager) and press Enter. - Now that the Certificate Manager Utility has launched, select
4. Regenerate a new VMCA Root Certificate and replace all certificatesby pressing 4 and then Enter. (Optionally, option8. Reset all Certificatesmay also be chosen.)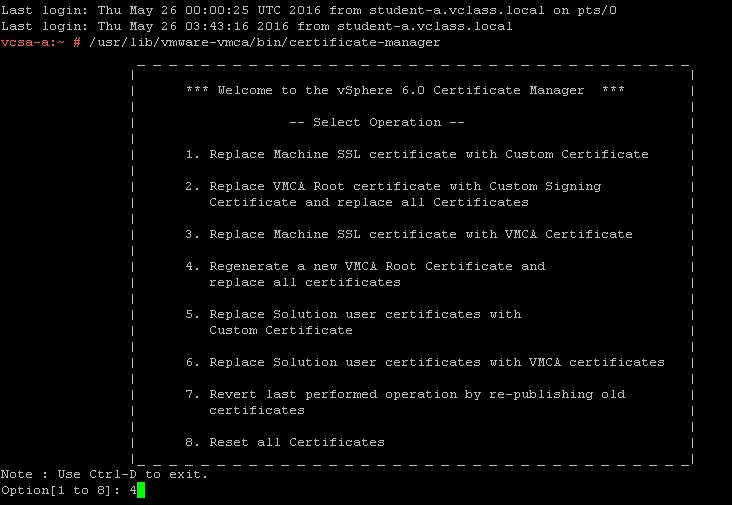
- Enter the SSO administrator (
[email protected]) password (this is defined during installation). - Press Y to reconfigure the
certool.cfgfile. - Enter the values as prompted:
Enter proper value for 'Country' [Previous value: US]:Enter proper value for 'Name' [Previous value: Acme]:Enter proper value for 'Organization' [Previous value: AcmeOrg]:Enter proper value for 'OrgUnit' [Previous value: AcmeOrg Engineering]:Enter proper value for 'State' [Previous value: California]:Enter proper value for 'Locality' [Previous value: Palo Alto]:Enter proper value for 'IPAddress' [optional]:Enter proper value for 'Email' [Previous value: [email protected]]:Enter proper value for 'Hostname' [Enter valid Fully Qualified Domain Name (FQDN), For Example : example.domain.com]: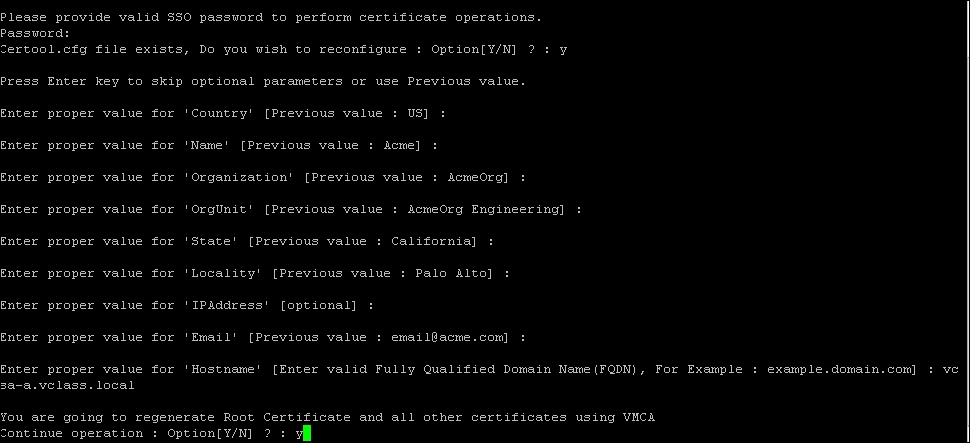
- As shown in the following screeenshot, type
Yto confirm the request in order to proceed.
- This will take several minutes to complete.
The completion of this task will result in a replacement of the VMCA root certificate with a new certificate and newly issued replacement certificates for each of the solution users.
This section will cover configuring the VMCA as a subordinate certificate authority. The procedure entails the VMCA importing a root signing certificate from a trusted enterprise root CA, therefore making the VMCA a subordinate CA to the enterprise root CA.
To begin this process:
- Console to the PSC virtual machine (in this case, it is an embedded deployment, meaning that the vCenter Server virtual machine is also the PSC virtual machine).
- Enable and launch BASH. To launch the Certificate Manager Utility enter
/usr/lib/vmware-vmca/bin/certificate-manager(for a Windows vCenter Server, this is located at C:Program FilesVMwarevCenter Servervmcadcertificate-manager) and press Enter.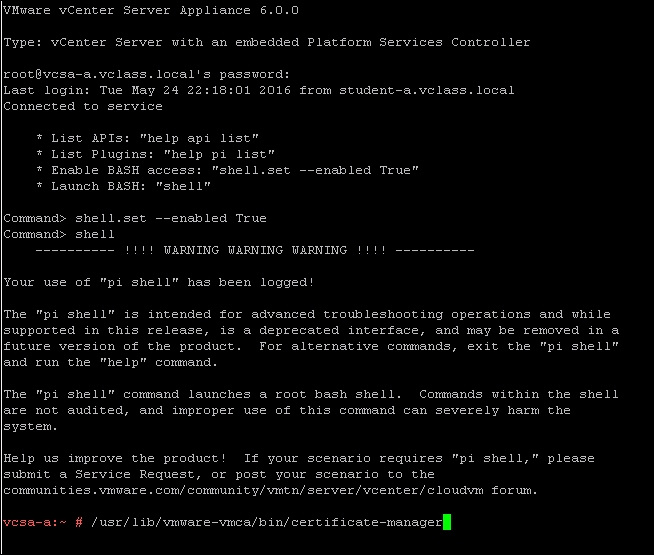
- Now that the Certificate Manager Utility has launched, select
2. Replace VMCA Root certificate with Custom Signing Certificate and replace all Certificatesby pressing 2 and then Enter.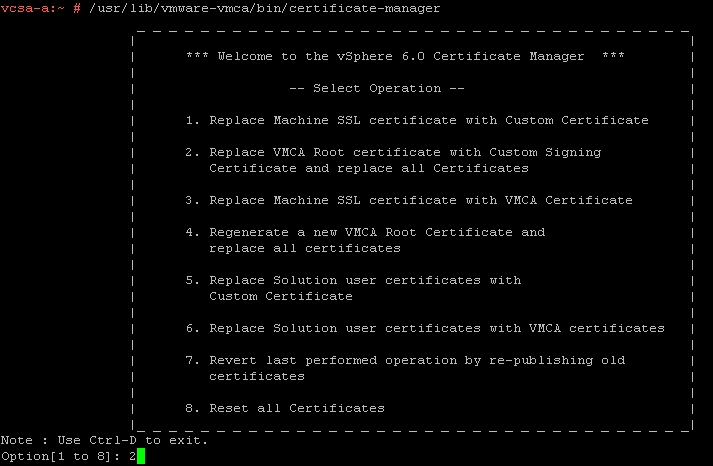
- Enter the password for the SSO account (
[email protected]).
- Press 1 to select
1. Generate Certificate Signing Request(s) and Key(s) for VMCA Root Signing certificate. This will generate the private key (the.keyfile) and the certificate signing request ( the.csrfile). The.csrfile is needed for the certificate authority to grant a certificate.
- You will be prompted to enter an Output directory path. The example uses
/cert/(a custom-made directory for this specific purpose).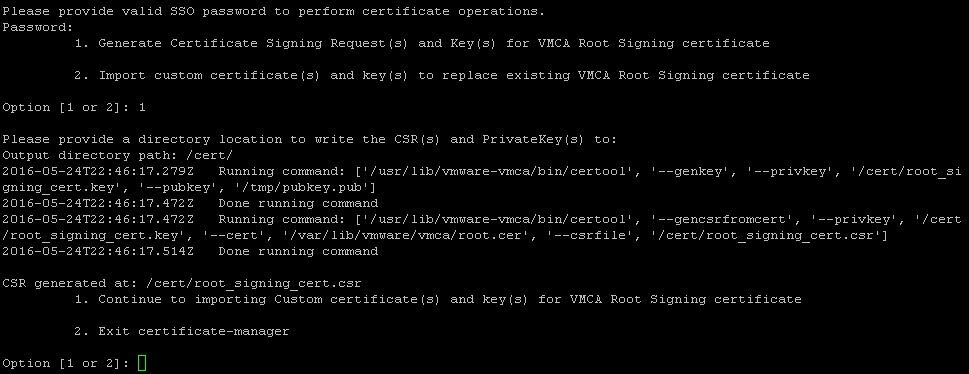
- Once finished, it will say
Done running command, as demonstrated in the previous screenshot. Minimize, but do not close, this session as it will be used again later. - Open a similar tool, WinSCP, connect to the PSC (in this case, the embedded vCenter Server appliance), and navigate to the directory that was used for the output of the
.csrand.keyfiles. Copy the.csrfile to a directory on your desktop. Leave the.keyfile as it will be needed later on.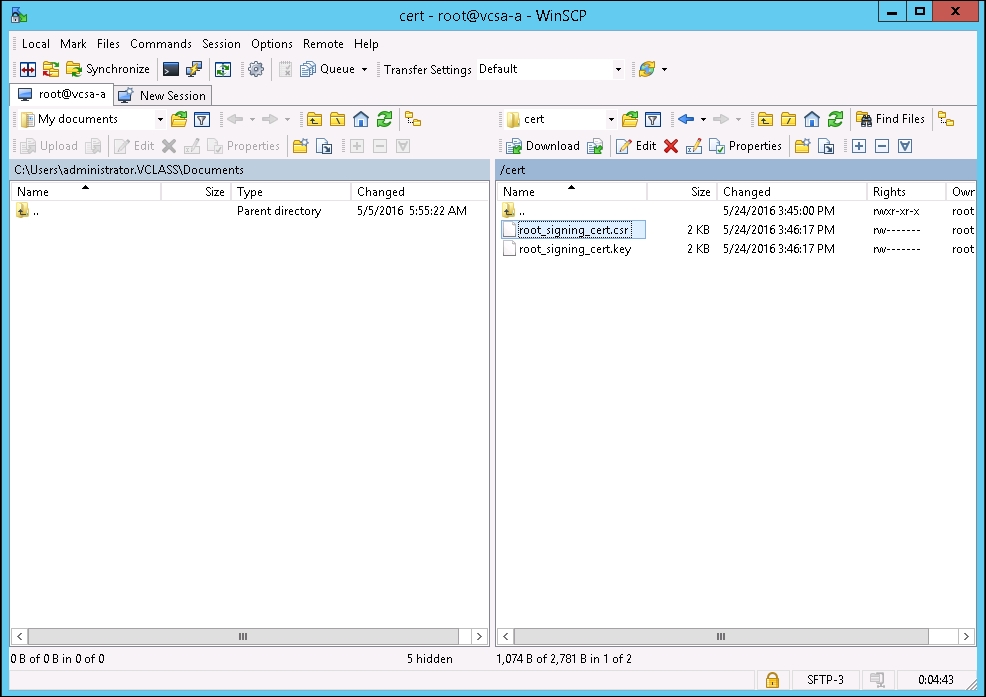
- Next, open up a web browser. Go to
https://<CA FQDN>/certsrvand click on the Request a certificate link.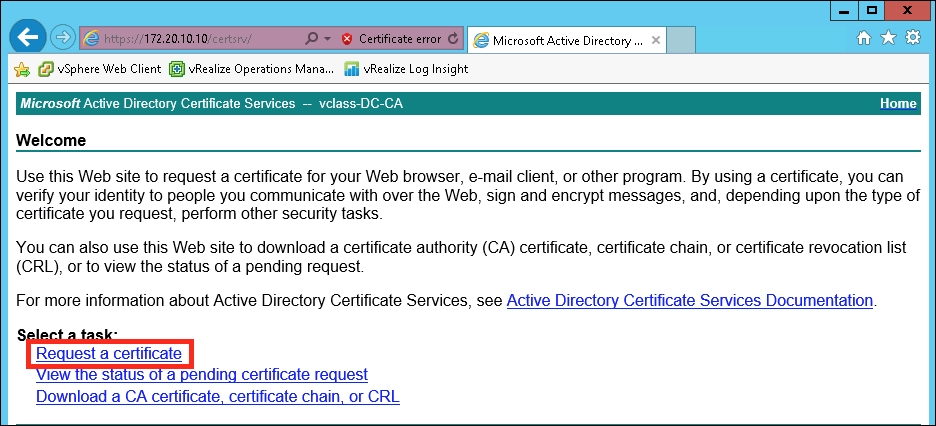
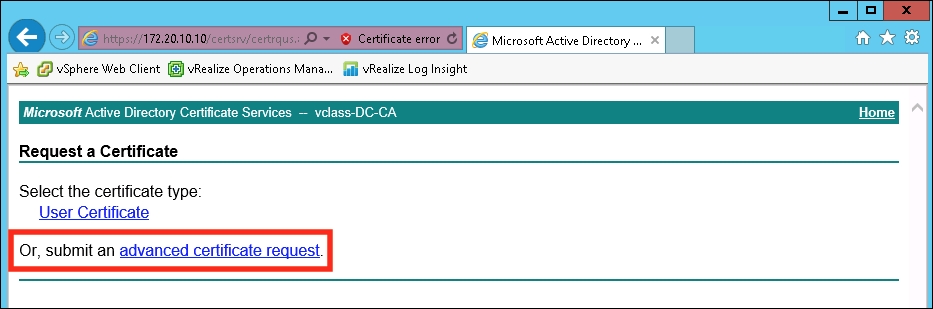
- Select Or, submit an advanced certificate request.
- This brings up the Submit a Certificate Request or Renewal Request form. The next few steps will describe filling this form out.
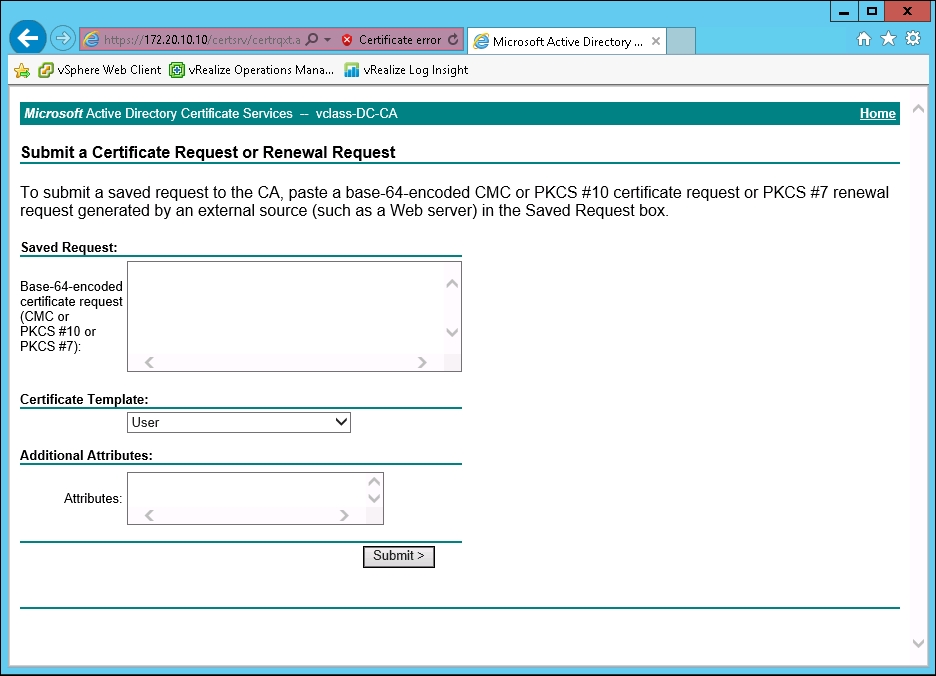
- To start, open up the
.csrfile using Notepad or a similar application. Copy the contents of the.csrfile. The contents of a.csrfile are demonstrated in the following screenshot:
- Paste the contents of the
.csrfile into the Base-64-encoded certificate request (CMC or PKCS #10 or PKCS #7) section. Under the Certificate Template section, select the dropdown and choose the Subordinate Certification Authority option. No attributes should be added. Click on the Submit button when finished.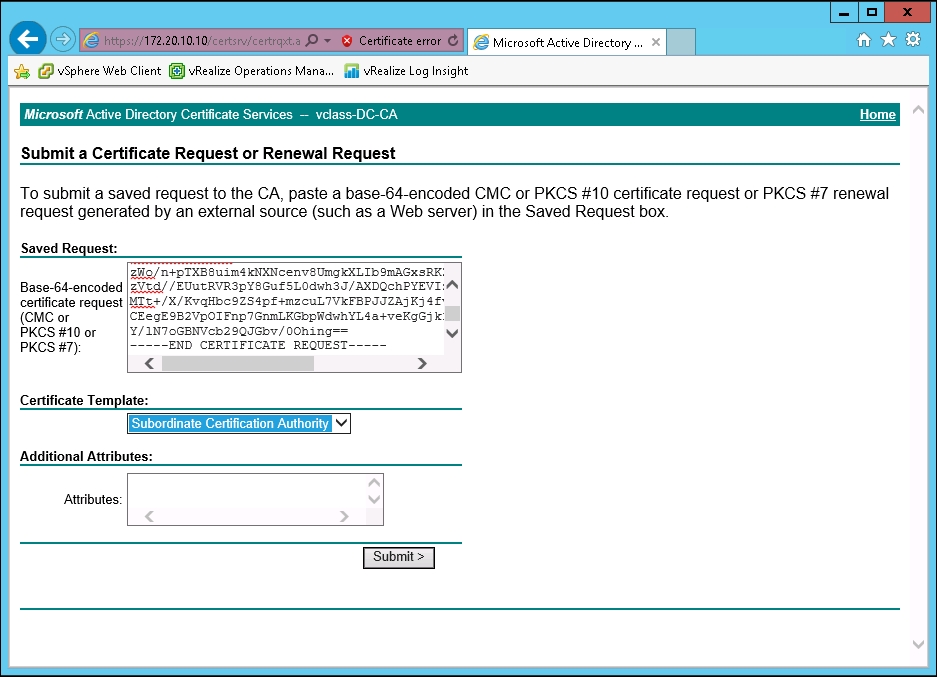
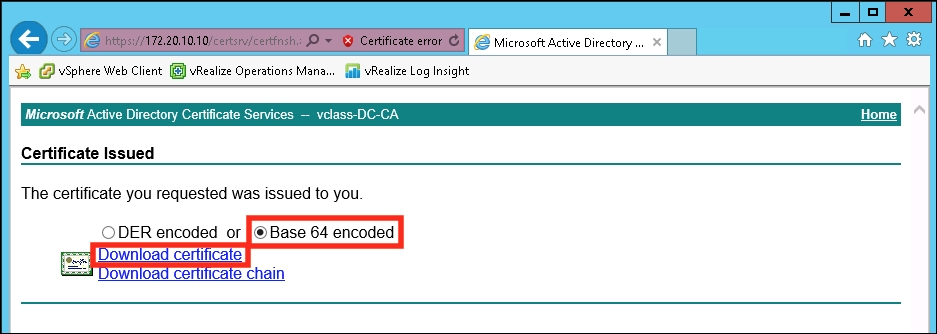
- The certificate authority will issue a certificate that is available for download. Ensure that you select Base 64 encoded and click on Download certificate.
- The next part is a little bit tricky; you need to concatenate the certificate that was just generated and downloaded with the certificate authority's root CA into a single
.cerfile. First, copy the contents of the certificate that was just downloaded and then follow it with the root CA certificate contents. Save this file asroot_signing_chain.ceror something similar, just ensure that.ceris the file extension. An example of this is demonstrated in the following screenshot: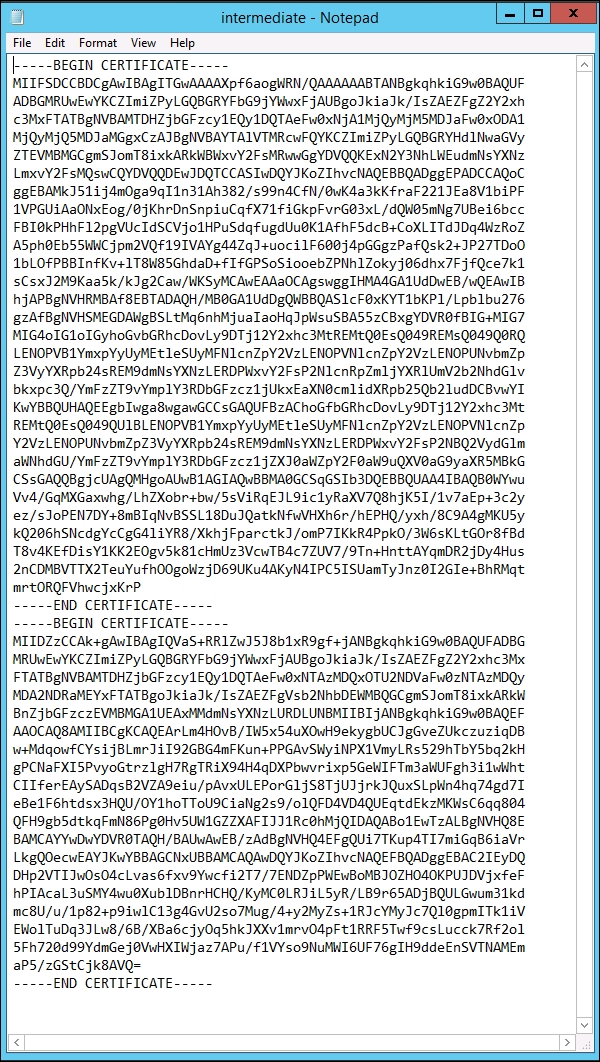
- Switch back to the Certificate Manager Utility window where we left off in step 7. Press 1 to choose the
1. Continue to importing Custom certification(s) and key(s) for VMCA Root Signing certificateoption and hit Enter.
- Enter the path for the
.cerand.keyfiles. Enter Y to replace the certificates.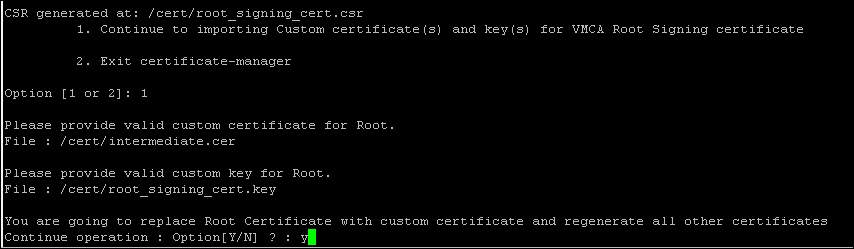
- The following screenshot demonstrates the required values for the
certool.cfgfile: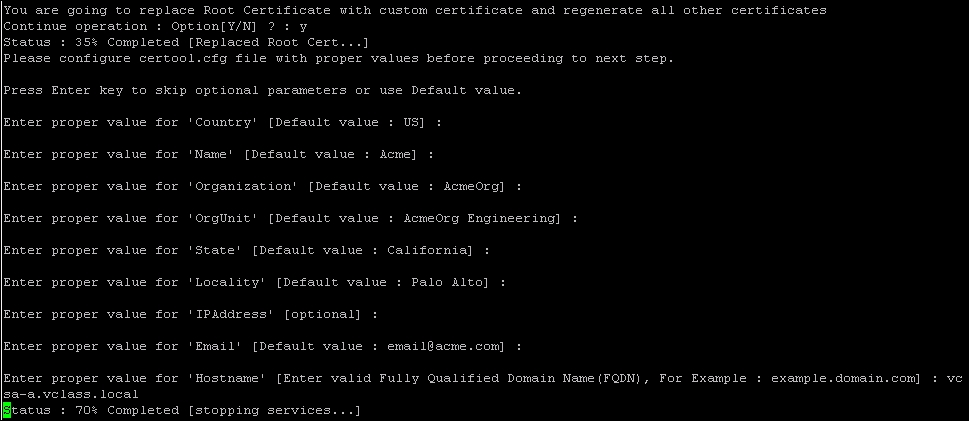
- It will take several minutes for the services to restart.
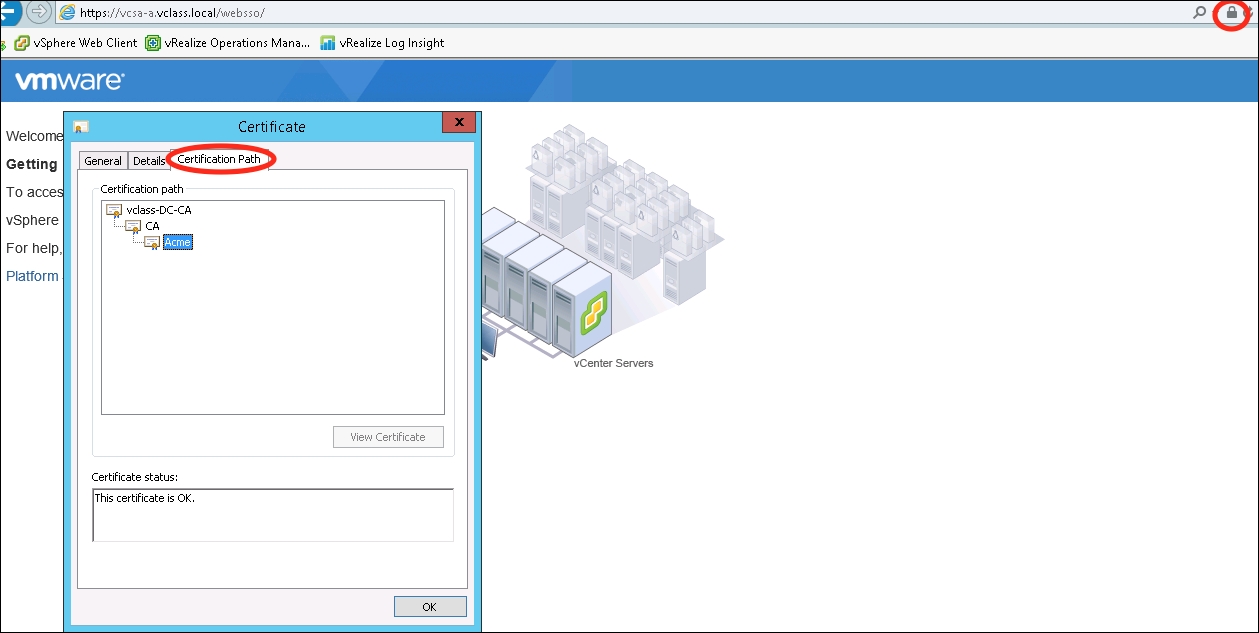
- To validate that the SSL certificate installation has completed, open a web browser and go to
https://<PSC FQDN>/websso/. From here, open the certificate properties for the site by clicking on the lock icon at the top of the navigation bar. - Once the Certificate dialog pops up, select the Certificate Path tab. Verify that all enterprise CAs are listed. If only a single entry is on the list, this means that the VMCA subordinate CA is not trusted. The following screenshot shows the certificate chain:
It may be required by security policy to use CA (other than VMCA) signed certificates for the vSphere components. The Certificate Manager Utility can be used to replace the solution user certificates.
To get started:
- Console to the PSC virtual machine (in this case, it is an embedded deployment, meaning that the vCenter Server virtual machine is also the PSC virtual machine).
- Enable and launch BASH. To launch the Certificate Manager Utility enter
/usr/lib/vmware-vmca/bin/certificate-manager(for a Windows vCenter Server, this is located atC:Program FilesVMwarevCenter Servervmcadcertificate-manager) and press Enter. - Now that the Certificate Manager Utility has launched, select
5. Replace Solution user certificates Custom Certificateby pressing 5 and then Enter.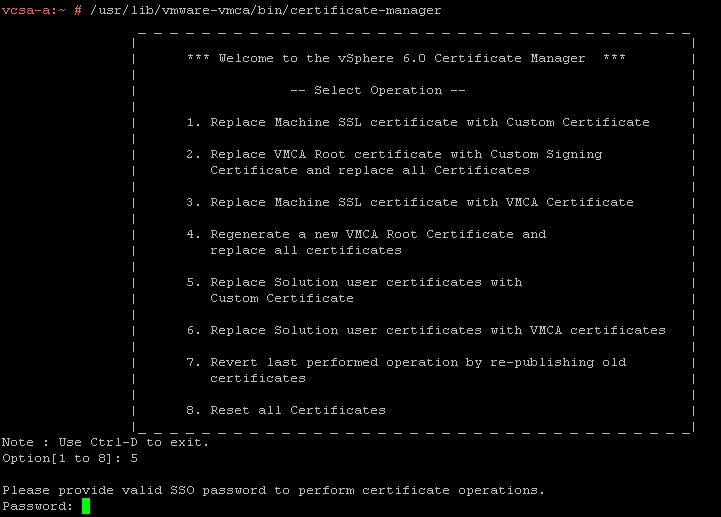
- Enter the SSO administrator (
[email protected]) password. Select1. Generate Certificate Signing Request(s) and Key(s) for Solution User Certificatesby pressing 1 and pressing Enter.
- Provide an output directory to place the certificate signing requests and keys. The example uses a custom-made directory
/cert/. - Once the certificate signing requests and keys have been copied to the output directory, the tool should specify
Done running command.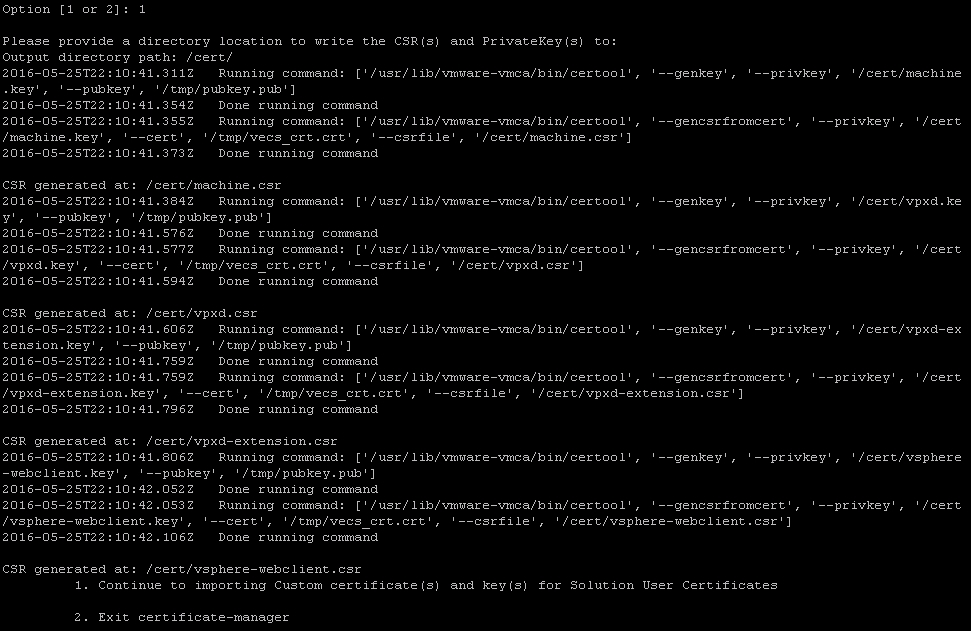
- Once the keys are exported, minimize (but don't close) the Certificate Manager Utility as it will be used again later.
- Use a utility similar to WinSCP to copy the certificate signing requests and keys to a desktop that can access the certificate authority.
- The certificate signing requests should be used to request a certificate. In this example, Microsoft Active Directory Certificate Services is used to generate certificates (open up a web browser and go to
https://<CA FQDN>/certsrv). To begin, selectOr, submit an advanced certificate request.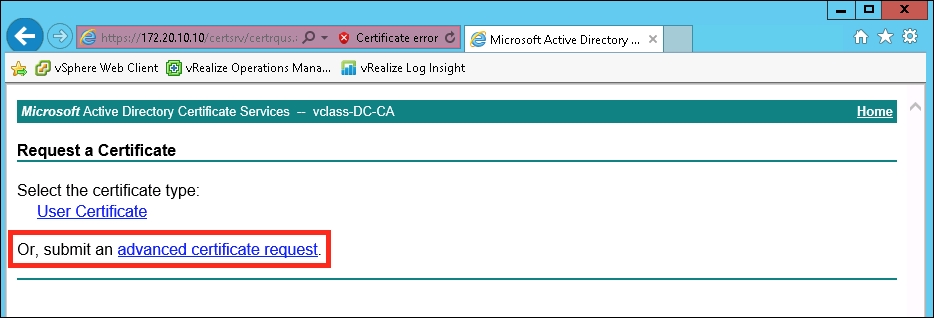
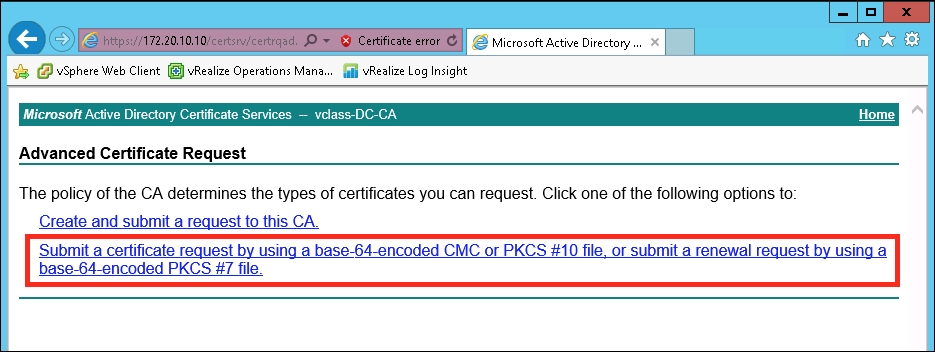
- Next, select Submit a certificate request by using a base-64-encoded CMC or PKCS #10 file, or submit a renewal request by using a base-64-encoded PKCS #7 file.
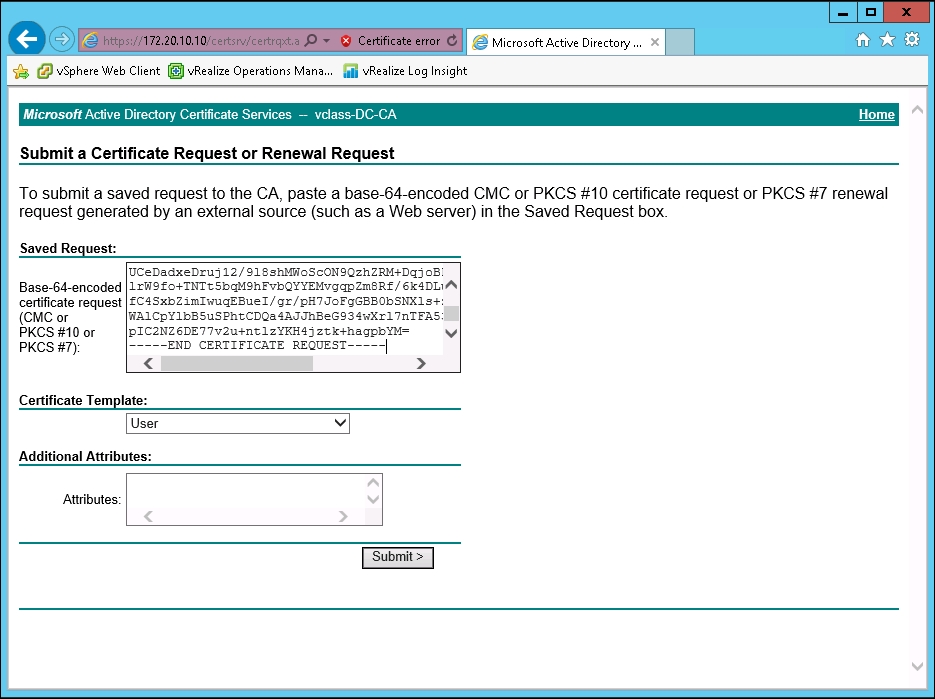
- At this point, open the first
.csrfile. In the following example,machine.csrwas opened in Notepad. Select all and copy the contents of this file as it will be used in the certificate request.
- Paste the contents of the
.csrfile into the section labeled Base-64-encoded certificate request (CMC or PKCS #10 or PKCS #7). Leave all attributes as default. - Click on the Submit button.
- Select Base 64 encoded and then the Download certificate hyperlink. You will be prompted to save the certificate; save it as the solution username using the
.cerextension.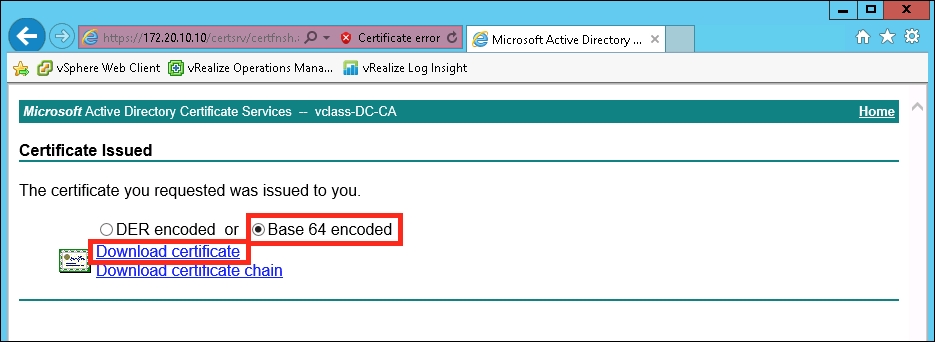
- Repeat steps 9-14 for all solution users (machine, vpxd, vpxd-extension, and vsphere-webclient).
- Once this process is completely finished, use a tool similar to WinSCP to copy these
.cerfiles into a directory accessible by the PSC. - Return to the minimized Certificate Manager Utility.
- Picking up, select
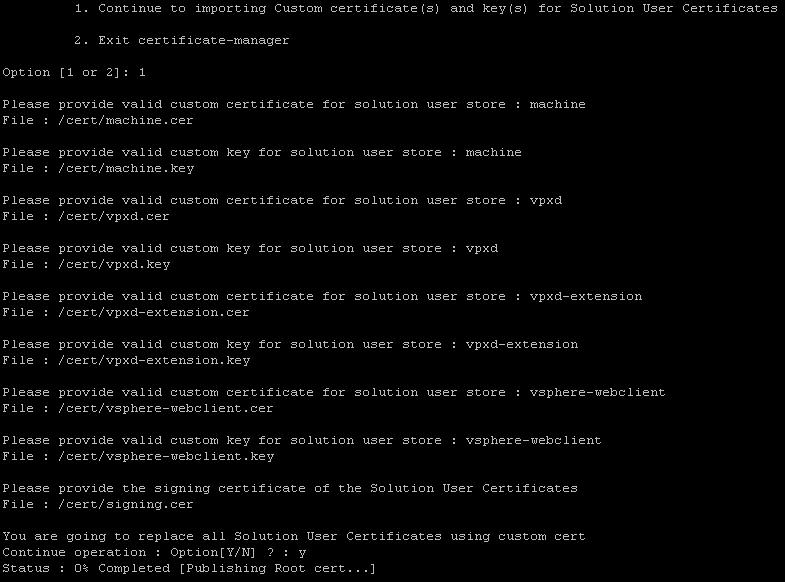
1. Continue to importing Custom certificate(s) and key(s) for Solution User Certificatesby pressing 1 and then Enter.
- Provide the path to each solution user certificate and key. The utility will prompt for:
Please provide valid custom certificate for solution user store: machineFile: /tmp/ssl/machine.cerPlease provide valid custom key for solution user store: machineFile: /tmp/ssl/machine.keyPlease provide valid custom certificate for solution user store: vpxdFile: /tmp/ssl/vpxd.cerPlease provide valid custom key for solution user store: vpxdFile: /tmp/ssl/vpxd.keyPlease provide valid custom certificate for solution user store: vpxd-extensionFile: /tmp/ssl/vpxd-extension.cerPlease provide valid custom key for solution user store: vpxd-extensionFile: /tmp/ssl/vpxd-extension.keyPlease provide valid custom certificate for solution user store: vsphere-webclientFile: /tmp/ssl/vsphere-webclient.cerPlease provide valid custom key for solution user store: vsphere-webclientFile: /tmp/ssl/vsphere-webclient.keyPlease provide the signing certificate of the Solution User CertificatesFile: /tmp/ssl/Root64.cer
- This process will take several minutes to finish once all of the directories have been input.
Once this has finished, the ESX agent manager must be updated.
Note
For more information see VMware KB 2112577 at http://bit.ly/2cN8SXS.