Remember, everything in Cocos2d is, at its base, a CCNode object. Nodes can have other nodes as children. For example, if you wish to create a character with a jetpack attached, the character can be a CCSprite object (a node object with an image) and the jetpack can be a CCSprite object as a child of the character.
Anyway, this is a chapter about prototypes, and we've yet to create any real gameplay. Let's get that going with a few images, some touch controls, and much more.
Add the background image to the sprite sheet (or SpriteBuilder), save, publish, and then in the MainScene.m file's init method, add the image to the screen as a CCSprite object below the CCLayoutBox code:
CCSprite *board = [CCSprite spriteWithImageNamed:@"imgBoard.png"];
board.position = ccp(winSize.width * 0.625, winSize.height/2);
[self addChild:board];
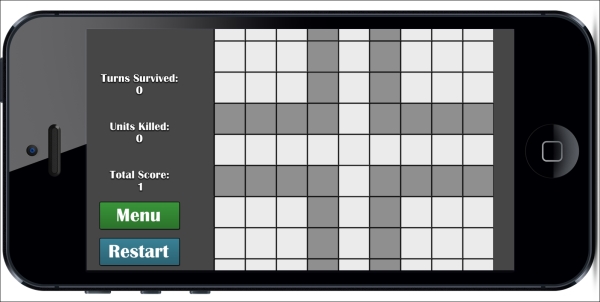
Let's run the game, and uh oh! We seem to have run into the first issue with our prototype. Although it's not entirely necessary to get all the bugs and kinks out during this phase, this one is important for the gameplay. Plus, it's a great opportunity to learn about device-specific scaling. If you'll take a look at the following screenshots, one of which was taken on an iPhone 5 and the other on an iPad Retina, you'll notice an issue with the game board being a bit too big on the phone. Here is a screenshot of the game from an iPhone 5:
An iPad Retina screenshot of the game appears as follows:
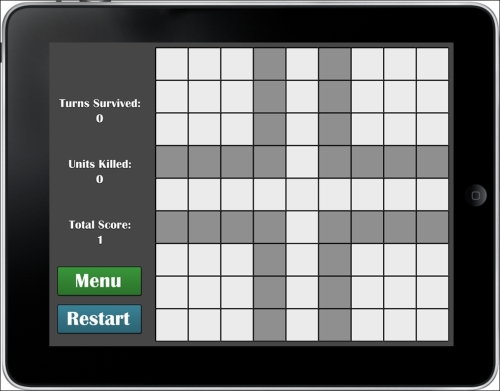
Luckily, it's not too far off, as the auto-scaling from either TexturePacker or SpriteBuilder has given us a relatively accurate scale for the game board. The only thing we need to do is modify the scale of the board very slightly on only the phone, and not the tablet. This can be done by adding these lines of code after you've declared the board variable:
if (UI_USER_INTERFACE_IDIOM() == UIUserInterfaceIdiomPhone)
  board.scale = 0.8;
Conversely, if you wish to detect an iPad, just use UIUserInterfaceIdiomPad instead.
Now, if you run it on a phone (whether it's your own or the simulator), you'll see that the grid is nicely within the screen's bounds.
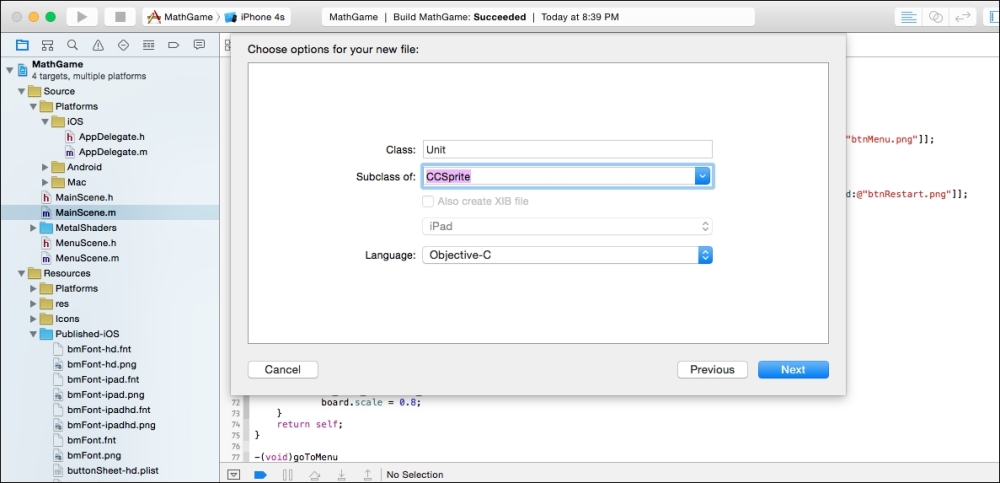
Since each unit is basically the same, except with a different color and number, we should define ourselves a class. To do that, we follow the same instructions regarding a new scene, except that this time, we're going to call the Unit class and set the subclass as a CCSprite type.
Open Unit.h, and make it look like the following:
#import "CCSprite.h"

NS_ENUM(NSInteger, UnitDirection)
{
  DirUp,
  DirDown,
  DirLeft,
  DirRight,
  DirStanding //for when a new one spawns at the center
};

@interface Unit : CCSprite

@property (nonatomic, assign) NSInteger unitValue;
@property (nonatomic, assign) BOOL isFriendly;
@property (nonatomic, assign) enum UnitDirection direction;
//9x9 grid, 1,1 is top left, 9,9 is bottom right
@property (nonatomic, assign) CGPoint gridPos;
@property (nonatomic, strong) CCColor *color;
@property (nonatomic, strong) CCLabelBMFont *lblValue;

+(Unit*)friendlyUnit;
+(Unit*)enemyUnitWithNumber:(NSInteger)value atGridPosition:(CGPoint)pos;
@end
This will basically allow us to give our units a move direction. We also get a value associated with them, a Boolean to determine whether it's a friendly unit or not (needed for both movement as well as collisions), and various other stuff.
Now open Unit.m and add the following code between @implementation and @end:
+(Unit*)friendlyUnit
{
  return [[self alloc] initWithFriendlyUnit];
}

+(Unit*)enemyUnitWithNumber:(NSInteger)num atGridPosition:(CGPoint)pos
{
  return [[self alloc] initWithEnemyWithNumber:num atPos:pos];
}

-(id)initCommon
{
  if ((self=[super initWithImageNamed:@"imgUnit.png"]))
  {
    if (UI_USER_INTERFACE_IDIOM() == UIUserInterfaceIdiomPhone)
      self.scale = 0.8;

    self.lblValue = [CCLabelBMFont labelWithString:@"1" fntFile:@"bmFont.fnt"];
    self.lblValue.scale = 1.5;
    self.lblValue.position = ccp(self.contentSize.width/2, self.contentSize.height/1.75);
    [self addChild:self.lblValue];
  }
  return self;
}

-(id)initWithFriendlyUnit
{
  if ((self=[self initCommon]))
  {
    self.isFriendly = YES;
    self.unitValue = 1;
    self.direction = DirStanding;
    self.color = [CCColor colorWithRed:0 green:0.8f blue:0]; //green for friendly
    self.gridPos = ccp(5,5);
  }
  return self;
}

-(id)initWithEnemyWithNumber:(NSInteger)num atPos:(CGPoint)p
{
  if ((self=[self initCommon]))
  {
    self.isFriendly = NO;
    self.unitValue = num;
    self.lblValue.string = [NSString stringWithFormat:@"%ld", (long)num];
    self.direction = DirLeft;
    self.color = [CCColor colorWithRed:0.8f green:0 blue:0]; //red for enemy
    self.gridPos = p;
  }
  return self;
}
The init methods set up some important stuff: position on the grid, color, whether it's a friendly unit or not, the value of the unit when it first spawns, the label in which to show the value, and the direction it intends to move on the next turn.
Let's open MainScene.m and spawn a friendly unit and an enemy unit on the screen. Because we defined the class so well, it's very simple to spawn two units with only a few lines of code. Make sure you include the Unit.h at the top too:
Unit *friendly = [Unit friendlyUnit];
friendly.position = ccp(winSize.width/2, winSize.height/2);
[self addChild:friendly];

Unit *enemy = [Unit enemyUnitWithNumber:1 atGridPosition:ccp(1,1)];
enemy.position = ccp(winSize.width - 50, winSize.height/2);
[self addChild:enemy];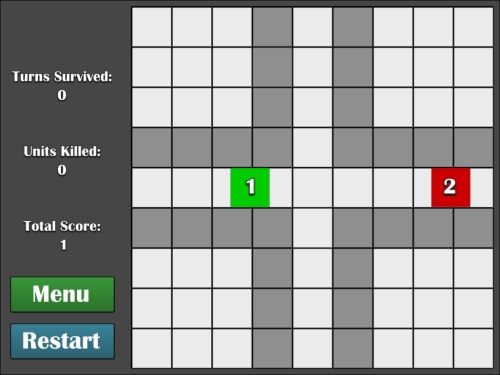
However, the positions still need to be calculated, and the fact that we assigned a grid coordinate doesn't mean anything to the game. We need to determine the actual positions on the screen. That is, if we say the position is (5, 5), it better know that means smack dab in the middle of the grid. However, the only place that knows the screen coordinates is the main scene, so open MainScene.m and add the following method to get the screen position based on a grid coordinate:
-(CGPoint)getPositionForGridCoord:(CGPoint)pos
{
  CGPoint screenPos;
  Unit *u = [Unit friendlyUnit];

  CGFloat borderValue = 1.f;
  if (UI_USER_INTERFACE_IDIOM() == UIUserInterfaceIdiomPhone)
    borderValue = 0.6f;

  screenPos.x = winSize.width * 0.625 + (u.boundingBox.size.width + borderValue) * (pos.x-5);
  screenPos.y = winSize.height/2 - (u.boundingBox.size.width + borderValue) * (pos.y-5);

  return screenPos;
}

Now change the positioning of the units to reflect this change:
Unit *friendly = [Unit friendlyUnit];
friendly.position = [self getPositionForGridCoord:friendly.gridPos];
[self addChild:friendly];

Unit *enemy = [Unit enemyUnitWithNumber:2 atGridPosition:ccp(4,7)];
enemy.position = [self getPositionForGridCoord:enemy.gridPos];
[self addChild:enemy];
Have a look at the following screenshot; this is how your game will now look like:

Running the game should get you something like what is shown in the preceding screenshot. And yes, even though this screenshot is from an iPad, the code works equally well on an iPhone of any resolution, as the formula for determining the position works on the assumption that (5, 5) is the center of the grid.
Now let's get these units moving around the screen with some touch mechanics. First, place the red unit to the right of the green in the rightmost section of the grid—(9, 5), for those who are lazy and don't want to calculate it.
Touch detection is extremely easy in Cocos2d. From version 3.3 onwards, all you need to do is add one line of code and a few methods, and you're good.
That being said, add this line of code to the initWithFriendlyUnit method of the Unit class (we want to enable touch only on the friendly units, not the enemies):
[self setUserInteractionEnabled:YES];

Then add the following methods in Unit.m that will intercept all touches made on each unit:
-(void)touchBegan:(CCTouch *)touch withEvent:(CCTouchEvent *)event
{

}

-(void)touchMoved:(CCTouch *)touch withEvent:(CCTouchEvent *)event
{

}

-(void)touchEnded:(CCTouch *)touch withEvent:(CCTouchEvent *)event
{

}
These methods are fairly self-descriptive in terms of what they do. The touchBegan method registers a touch every time a finger touches the screen, the touchMoved method registers a touch every time the finger is dragged along the screen, and the touchEnded method registers when the finger is lifted off the screen.
In order to determine which unit is being dragged and in which direction, add these three variables to the Unit.h file:
@property (nonatomic, assign) BOOL isBeingDragged;
@property (nonatomic, assign) CGPoint touchDownPos;
@property (nonatomic, assign) enum UnitDirection dragDirection;
Also add this method declaration:
-(void)updateLabel;
Once that's done, open Unit.m and add code to the following methods.
First you must create this method, which will set the displayed string of the Unit's label to the Unit's actual value:
-(void)updateLabel
{
  self.lblValue.string = [NSString stringWithFormat:@"%ld", (long)self.unitValue];
}
Then we need to handle our touches in order to update the label, so the following code needs to be added to the touchBegan method, which will grab the CCTouch method's location relative to where it is inside a given node. For now, we want to know where the touch is occurring relative to the Unit itself, and we'll set that in our touchDownPos variable:
self.touchDownPos = [touch locationInNode:self];
self.dragDirection = DirStanding;
Then you have to add the following code to the touchMoved method. This will determine what direction the finger is being dragged, based on the x and y difference from touchDownPos and the current touchPos variables:
CGPoint touchPos = [touch locationInNode:self];
//if it's not already being dragged and the touch is dragged far enough away...
if (!self.isBeingDragged && ccpDistance(touchPos, self.touchDownPos) > 6)
{
  self.isBeingDragged = YES;

  CGPoint difference = ccp(touchPos.x - self.touchDownPos.x, touchPos.y - self.touchDownPos.y);
  //determine direction
  if (difference.x > 0)
  {
      if (difference.x > fabsf(difference.y))
        self.dragDirection = DirRight;
      else if (difference.y > 0)
        self.dragDirection = DirUp;
      else
        self.dragDirection = DirDown;
  }
  else
  {
      if (difference.x < -1* fabsf(difference.y))
        self.dragDirection = DirLeft;
      else if (difference.y > 0)
        self.dragDirection = DirUp;
      else
        self.dragDirection = DirDown;
  }
}
Finally, add this section of code to the touchEnded method. This will actually update the grid position of the unit based on what direction it was being dragged in:
//if it was being dragged in the first place
if (self.isBeingDragged)
{
  CGPoint touchPos = [touch locationInNode:self];
  //stop the dragging
  self.isBeingDragged = NO;

  if (ccpDistance(touchPos, self.touchDownPos) > self.boundingBox.size.width/2)
  {
      NSInteger gridX, gridY;
      gridX = self.gridPos.x;
      gridY = self.gridPos.y;

      //move unit that direction
      if (self.dragDirection == DirUp)
        --gridY;
      else if (self.dragDirection == DirDown)
        ++gridY;
      else if (self.dragDirection == DirLeft)
        --gridX;
      else if (self.dragDirection == DirRight)
        ++gridX;

      //keep within the grid bounds
      if (gridX < 1) gridX = 1;
      if (gridY > 9) gridX = 9;

      if (gridY < 1) gridY = 1;
      if (gridY > 9) gridY = 9;

      //if it's not in the same place... aka, a valid move taken
      if (!(gridX == self.gridPos.x && gridY == self.gridPos.y))
      {
        self.gridPos = ccp(gridX, gridY);
        self.unitValue++;
        self.direction = self.dragDirection;
        [self updateLabel];
      }
  }
}
Now, if you run the game, you'll see that when you tap (or click, if running on the simulator) and drag that unit… oh my! Why isn't the unit moving? We set the grid coordinate and everything! Even the unit's value is being increased properly.
But aye! We didn't tell the main scene that the unit needed to be moved, since that's where the unit positioning happens. That being said, we want a way to let our main scene know that a unit was moved so that we can update its position.
A very common way to do this is by making use of NSNotificationCenter. It's broken down into two parts: a sender and a receiver. The sender is called a notification and the receiver is called an observer. What we need to do is send a notification through NSNotificationCenter so that any observer set up can receive the notification.
First, we need to declare a constant to reduce human errors when coding. We want to do this because the notifications need to be exact, or else they won't work.
So, open Unit.h and add this line below #import but above NS_ENUM:
FOUNDATION_EXPORT NSString *const kTurnCompletedNotification;
Then, at the top of Unit.m, below the #import statement but above @implementation, insert this line of code:
NSString *const kTurnCompletedNotification = @"unitDragComplete";
It doesn't entirely matter what the string is; it's just that it has to be something unique from any other notification you end up creating later on.
Then go ahead and add this little line of code right below the [self updateLabel] line in the touchEnded method of Unit.m:
//pass the unit through to the MainScene
[[NSNotificationCenter defaultCenter] postNotificationName:kTurnCompletedNotification object:nil userInfo:@{@"unit" : self}];
This will send a notification to the observer that something has happened. In this case, we want to notify the main scene that the current unit has been moved via dragging and needs its position updated. That's why we pass self (the current Unit)—so that we can update the position of the specific unit that was moved.
Finally, let's hop over to MainScene.m and add the following code at the bottom of (or top of; it's your preference) the init method:
[[NSNotificationCenter defaultCenter] addObserver:self selector:@selector(moveUnit:) name:kTurnCompletedNotification object:nil];
Then add the following methods: moveUnit and dealloc. The moveUnit method is what we want called when the notification gets pushed. We have an NSNotification parameter that grabs the NSDictionary parameter passed from the Unit class. We also need the dealloc to remove the observer, or else it could catch future notifications by accident, and that can cause the game to crash:
-(void)moveUnit:(NSNotification*)notif
{
  NSDictionary *userInfo = [notif userInfo];
  Unit *u = (Unit*)userInfo[@"unit"];
  u.position = [self getPositionForGridCoord:u.gridPos];
}

-(void)dealloc
{
  [[NSNotificationCenter defaultCenter] removeObserver:self];
}
Hurray! Now when you run the code, you should get the unit shifting from grid spot to grid spot with each swipe, in any direction. Now it's starting to feel like a game. However, it still lacks interaction with the enemies, and none of the scores are being increased. Let's add that next.
First, we need some variables to keep track of the numbers. So in MainScene.h, add this under the BMFont label variables:
NSInteger numTurnSurvived, numUnitsKilled, numTotalScore;
In MainScene.m, add the following method to update the label for each counter:
-(void)updateLabels
{
  lblTotalScore.string = [NSString stringWithFormat:@"%ld", (long)numTotalScore];
  lblTurnsSurvived.string = [NSString stringWithFormat:@"%ld", (long)numTurnSurvived];
  lblUnitsKilled.string = [NSString stringWithFormat:@"%ld", (long)numUnitsKilled];
}
Add these lines to the moveUnit method to increment the respective numbers:
++numTurnSurvived;
++numTotalScore;
[self updateLabels];
Then initialize the variables somewhere in the init method:
numTotalScore = 1;
numTurnSurvived = 0;
numUnitsKilled = 0;
Now you'll notice that each time your unit moves around, the score and the turns survived labels increases by 1. But the unit can still go straight through the enemy unit. Let's fix that.
First, we need to compare the grid locations after a move with all possible enemies on the screen to see whether there was a collision. However, if we're going to cycle through all the enemies, it means we'll need an array to hold them all, so we declare an NSMutableArray parameter in the MainScene.h file:
NSMutableArray *arrEnemies;
At the bottom of the init method in the MainScene.m file, after you spawn the enemy, add the following lines of code:
arrEnemies = [[NSMutableArray alloc] init];
[arrEnemies addObject:enemy];
At the end of the moveUnit method, we need to cycle through all the enemies and check whether the grid location is the same (that is, whether we're about to run into an enemy):
//for each Unit in the arrEnemies array...
for (Unit *enemy in arrEnemies)
{
  if (enemy.gridPos.x == u.gridPos.x &&
     enemy.gridPos.y == u.gridPos.y)
  {
     //collision!

  }
}
Under the collision comment, we now want to compare the unit values. Whichever unit has the higher value will win, and the unit with the lower value will be removed from the board (and the array). In the case of a tie, both will be removed. It's also important to update the unitsKilled counter here:
{
      //collision!
      NSInteger enemyVal = enemy.unitValue;
      NSInteger friendVal = u.unitValue;

      //tie, both dead
      if (enemyVal == friendVal)
      {
        [self removeChild:u];
        [arrEnemies removeObject:enemy];
        [self removeChild:enemy];
        ++numUnitsKilled;
      }
      //enemy higher
      else if (enemy.unitValue > u.unitValue)
      {
        enemy.unitValue -= friendVal;
        [enemy updateLabel];
        [self removeChild:u];
      }
      //friendly higher
      else
      {
        u.unitValue -= enemyVal;
        [u updateLabel];
        [arrEnemies removeObject:enemy];
        [self removeChild:enemy];
        ++numUnitsKilled;
      }

      //exit the for loop so no "bad things" happen
      break;
  }
Finally, move the [self updateLabels] method call in the moveUnit method to the end of the method (that is, after the loop ends), or else the unitsKilled label won't be updated until the next turn, which might confuse your players.
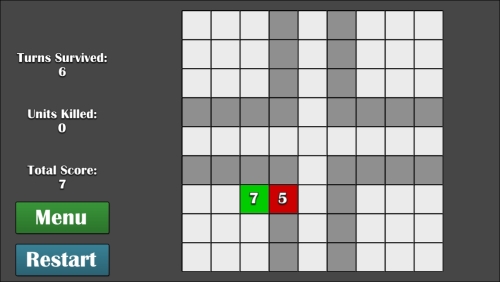
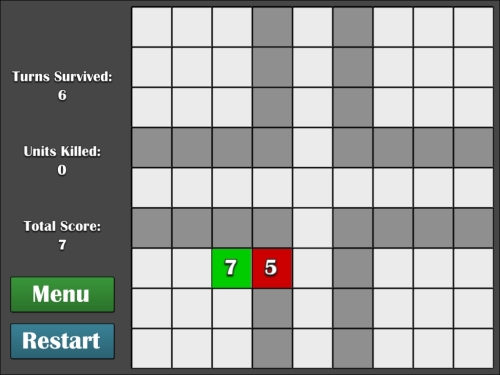
That's it! You can move around, run into enemies, combine your score, have the labels updated, and even restart the game if you lose (by going to Menu and tapping the Play button). Here's what the game more or less looks like so far.
On an iPad, the game scene appears as follows:
On an iPhone 5, the game scene appears like this: