
The idea behind using Cocos2d-Swift is to switch over to the new programming language, right? Even though the Swift version of Cocos2d is still relatively new, and everything might not be implemented by the time you read this book, it can still be used as the core language when creating a game. So let's make a very simple game here, building upon the core concepts you just learned and combining them with the knowledge you already have of how the Cocos2d engine works in general.
Why use Swift instead of Objective-C? Because, you should be staying up to date with the latest technologies in the field, and Swift is just the next step in that direction. Also, as the years pass by, Apple may slowly deprecate and stop supporting Objective-C (but that's just a theory).
In general, it helps to know more languages if the opportunity calls for it. And if you're interested in web development, Swift feels very similar to JavaScript, so it's like learning two languages at once.
So why Cocos2d-Swift specifically? For the same reasons you just read. Also, typing code in Swift is generally faster than in Objective-C, and so, if you can create code faster, you can, in theory, create games faster, which is awesome!
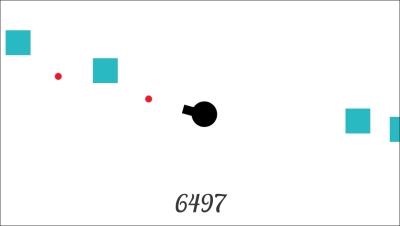
The game we're going to make consists of a turret in the center that can shoot bullets, a score counter, and square-shaped enemies that come in from the left and the right. If the enemies make it to the center, it's game over! As the score increases, so will the spawn rate of enemies, eventually overwhelming the turret's fire rate.
Here are a few screenshots of the game we'll be making:

Remember, the way to start Cocos2d projects now is by going through SpriteBuilder. Even though we won't be using SpriteBuilder for any code, we still have to go through the process of creating a project there.
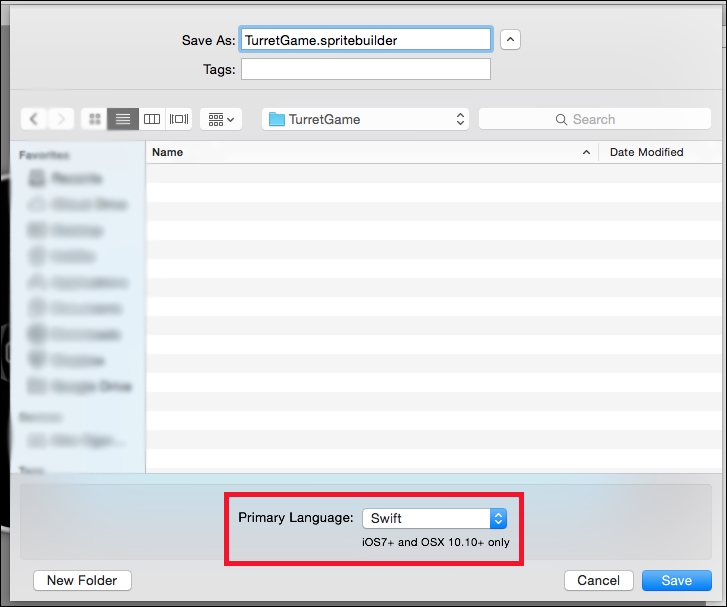
So, in SpriteBuilder, go to File | New | Project. Select the location where you want to create the project, name it something like TurretGame, and make sure you select Swift as the language. This is also shown in the following screenshot for your reference:
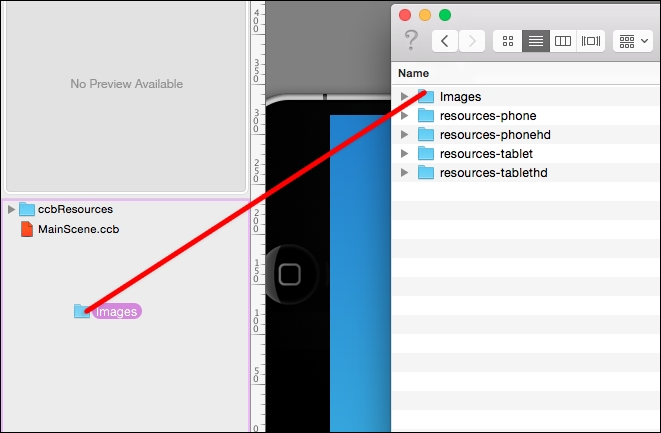
Then, in Turret Game, go to the Assets folder of this book's content, and drag the Images folder into the resources list on the left side of SpriteBuilder as shown in the following screenshot:
After it has been imported to SpriteBuilder, right-click (or press Ctrl and click) on the Images folder in SpriteBuilder, and select Make Smart Sprite Sheet. This is what TexturePacker normally does for us. However, we can speed up the process using SpriteBuilder's auto sheet maker, since this is only going to be an example project.
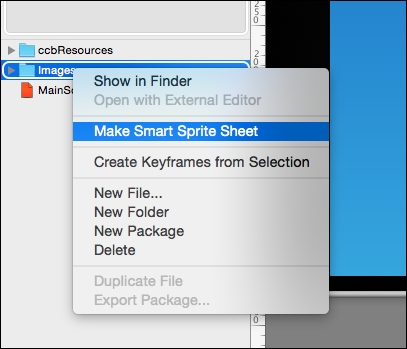
Once it has turned into a sprite sheet, the folder icon should be of a pinkish color with a smiley on it. Now, go to File | Publish so that SpriteBuilder can generate the necessary files for our project and we can be on our way.
Unfortunately, SpriteBuilder is lame at the time of writing this book and doesn't handle BMFonts very well. So, what we're going to do instead of having SpriteBuilder handle the sizing/exporting is create our own BMFont and manually add it to our list of files. This might not be the most efficient way, but it works, so we're going with it.
In this book's project folder, you should see a list of folders such as resources-hd and so on next to the Images folder you dragged into SpriteBuilder. Copy all four of these folders and paste them in the iOS Resources folder of your project files. When it asks you, make sure you click on Merge (as well as Apply to All).
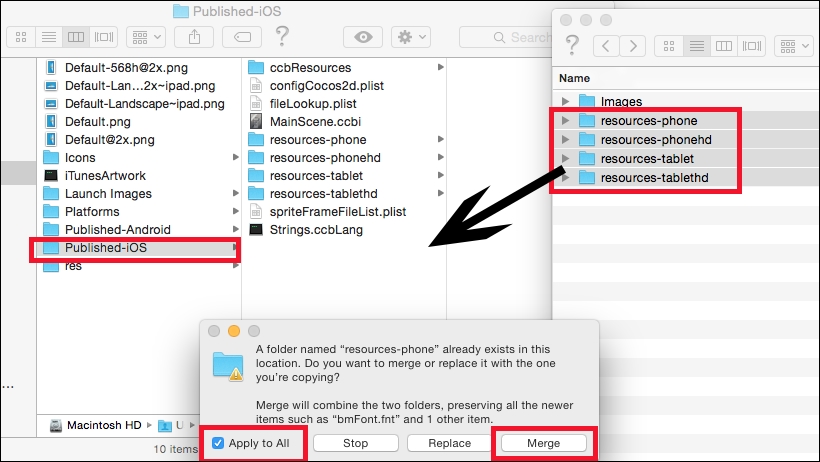
This will add the font files for each size type to the respective folder so that Cocos2d's directory search mode can find the correct size based on the device.
Objective-C, when working with Swift files, needs something called a Bridging-Header file. It's automatically created, so all we have to do is import the file. The format of the file is ProjectName-Swift.h, where ProjectName is the name of your project (for example, if the project is called TurretGame, we'll use TurretGame-Swift.h).
Now, feel free to open the Xcode project. Open AppDelegate.m and, at the top of the file, add the import statement to add the Bridging-Header file:
#import "TurretGame-Swift.h"
Then, in the StartScene method, we need to change the line of code that will transition to the main scene (as well as add a line that will read in our images sheet):
- (CCScene*) startScene
{
  // Capital "I"
  [[CCSpriteFrameCache sharedSpriteFrameCache] addSpriteFramesWithFile:@"Images.plist"];
//[CCBReader loadAsScene:@"MainScene"];
  return [MainScene node];
}
We're using node here instead of Scene because we're calling a Swift class. In the previous examples in this book, the Scene method was a method we created, whereas node is a predefined function that does the same thing.
Because Swift is intended to be short and to the point when it comes to readability, the following code is all that is required in the MainScene.swift file in order to get a white background, an image to display, and a label at the bottom of the screen (note the CCScene inheritance; the default is CCNode):
class MainScene: CCScene {

  let winSize = CCDirector.sharedDirector().viewSize()
  var background = CCNodeColor(color: CCColor.whiteColor())

  //a value of "527" to make sure it's working. It'll get auto-set later, don't worry.
  var lblScore = CCLabelBMFont(string: "527", fntFile: "bmFont.fnt")

  //"Images/turret.png" because the turret image was located inside the Images folder
  //also making sure to Downcast to a CCSprite from AnyObject!
//We want to downcast because the variable we're setting should be a sprite, so because the spriteFrameByName() method returns AnyObject (as an explicitly unwrapped optional), we must downcast the ambiguous type to CCSprite for better use of the variable later on.
  var turret = CCSprite.spriteWithSpriteFrame(CCSpriteFrameCache.sharedSpriteFrameCache().spriteFrameByName("Images/turret.png")) as CCSprite


  override init() {
    super.init()

    //simply add the background color
    self.addChild(background)

    //position and add the score label
    self.lblScore.position = ccp(self.winSize.width/2, self.winSize.height * 0.1)
    self.addChild(self.lblScore)

    //position and add the turret (z:1 so the bullets can spawn underneath it)
    self.turret.position = ccp(self.winSize.width/2, self.winSize.height/2)
    self.addChild(self.turret, z: 1)

  }
}
Run the project at this point, and you'll see exactly what we described as our result. If you're starting to appreciate how little code it takes to make stuff happen, then Swift just might be your language to learn.
Now let's move on to getting the turret to rotate.
Notice so far how just about all the classes and methods are named exactly the same, with minor syntax differences between Objective-C and Swift. It's going to be the same for our touchBegan, touchMoved, and touchEnded methods.
First, we need to add a variable to store the player's touch position. So, at the top of MainScene, add the following variable:
class MainScene: CCScene {
  ...
    var touchPos = ccp(0, 0)
  ...
}
Then, in the init() method, set the user interaction Boolean to true:
//records touches
self.userInteractionEnabled = true
Next, add the following methods to MainScene:
// a method that will be called when a touch is registered on the device

override func touchBegan(touch: CCTouch!, withEvent event: CCTouchEvent!) {
    // grab the touch's location within the scene, and set it to our variable
    self.touchPos = touch.locationInNode(self)
    // calculate the angle of the touch relative to the turret's current position
    var angle = ccpToAngle( ccpSub( self.touchPos, self.turret.position ) )
// set the rotation of the turret based on the calculated angle (converted to degrees because Cocos2D doesn't use radians)
    self.turret.rotation = CC_RADIANS_TO_DEGREES(Float(angle)) * -1
}

// a method called when a touch is dragged across the screen
override func touchMoved(touch: CCTouch!, withEvent event: CCTouchEvent!) {
// grab the location of the touch and set it again
    self.touchPos = touch.locationInNode(self)
    // calculate the angle again based on the new touch position
    var angle = ccpToAngle( ccpSub( self.touchPos, self.turret.position ) )
    // set the rotation of the turret again based on the new angle
    self.turret.rotation = CC_RADIANS_TO_DEGREES(Float(angle)) * -1
}

override func touchEnded(touch: CCTouch!, withEvent event: CCTouchEvent!) {
    // do nothing at the moment
}
If you run the game, you'll be able to drag your finger around and rotate the turret in the direction of your finger.
Ours is not a very useful turret unless it's shooting bullets, so let's write that code.
First, we want a method we can call (or schedule). We want to make it spawn a bullet and then launch it in the direction of our finger (where the turret is pointing). So go ahead and add the following method:
func shootBullet() {

  //create the bullet. Again, "Images/bullet.png" because of the Images folder
    var bullet = CCSprite.spriteWithSpriteFrame(CCSpriteFrameCache.sharedSpriteFrameCache().spriteFrameByName("Images/bullet.png")) as CCSprite

    //position the bullet underneath the turret
    bullet.position = ccp(self.winSize.width/2, self.winSize.height/2)

    //calculate the distance to move based on similar triangles
    let xDist = self.touchPos.x - self.turret.position.x;
    let yDist = self.touchPos.y - self.turret.position.y;
    let zDist = ccpDistance(self.touchPos, self.turret.position)

    let newX = (xDist * winSize.width) / zDist;
    let newY = (yDist * winSize.width) / zDist;

    //assign that distance to a CGPoint variable
    let moveDistance = ccp(newX, newY)

    //create an action that will move the bullet, then after 0.5 seconds, it will remove it from the screen
    var moveAndRemoveAction = CCActionSequence.actionOne(CCActionMoveBy.actionWithDuration(0.5, position: moveDistance) as CCActionFiniteTime, two: CCActionCallBlock.actionWithBlock({

      self.removeChild(bullet)
    }) as CCActionFiniteTime) as CCAction

    //add the bullet
    self.addChild(bullet)

    //run the move action
    bullet.runAction(moveAndRemoveAction)
}
Although we now have this function that will create a bullet and launch it along a path, we have no way of testing it yet. So, in our touchBegan method, we add a call to schedule the selector:
override func touchBegan(touch: CCTouch!, withEvent event: CCTouchEvent!) {
  ...
    //call it once, then schedule it
    shootBullet()
    self.schedule(Selector("shootBullet"), interval: 0.125)
}
Also, in our touchEnded method, we add a call to unschedule the selector (as we don't want the turret to shoot constantly):
override func touchEnded(touch: CCTouch!, withEvent event: CCTouchEvent!) {
    self.unschedule(Selector("shootBullet"))
}
If you're wondering why the selector is in quotes, let me tell you that that's just the syntax of Swift. Instead of explicitly stating the function, you have to pass the function name as a string, and Swift handles the rest.
If you run the game at this point, you'll watch those bullets go rocketing out of the turret when you drag your finger across the screen.
We want some enemies to shoot at, so let's create a method that will spawn an enemy along either the left or right wall, and send it to the center of the screen (where the turret is), over a period of 3 seconds:
func spawnEnemy() {
    //create the enemy. Again, "Images/enemy.png" because of the Images folder
    var enemy = CCSprite.spriteWithSpriteFrame(CCSpriteFrameCache.sharedSpriteFrameCache().spriteFrameByName("Images/enemy.png")) as CCSprite

    //position the enemy randomly along the left or right wall
    let yPos = arc4random() % UInt32(winSize.height)
    let xPos = arc4random() % 2 == 0 ? -50 : winSize.width + 50
    enemy.position = ccp(CGFloat(xPos),CGFloat(yPos))

    //add the enemy to the screen
    self.addChild(enemy)

    //move to exactly 1 enemy-length away from the center (calculated with triangle ratios)
    let distanceToCenter = ccpDistance(self.turret.position, enemy.position)
    let xDistance = self.turret.position.x - xPos
    let yDistance = self.turret.position.y - CGFloat(yPos)

    let newDistanceToCenter = distanceToCenter - enemy.boundingBox().size.width
    let newX = (newDistanceToCenter * xDistance) / distanceToCenter
    let newY = (newDistanceToCenter * yDistance) / distanceToCenter

    let centerPosDistance = ccp(newX,newY)

    //create a move action that, after 3 seconds, will do something (nothing at the moment)
    let moveAndEndGameAction = CCActionSequence.actionOne(CCActionMoveBy.actionWithDuration(3, position: centerPosDistance) as CCActionFiniteTime, two: CCActionCallBlock.actionWithBlock({
      //do nothing at the moment
    }) as CCActionFiniteTime) as CCAction

    //run the move action
    enemy.runAction(moveAndEndGameAction)
}
It's great that we have a method to spawn enemies, but there are none currently spawning. So, just like the shootBullet function we scheduled, we must schedule the spawnEnemy function.
In the init() method, add the following line of code to spawn the enemies:
override init() {
    super.init()

    ...

    self.schedule(Selector("spawnEnemy"), interval: 0.35)
}
There we go! Now we have our enemies spawning. But even if they make it to their final position, nothing happens. Let's fix that.
When an enemy gets near the center (after the action completes), we want our game to be over, so let's create a GameOverScene class, and transition to it when an enemy reaches their end position.
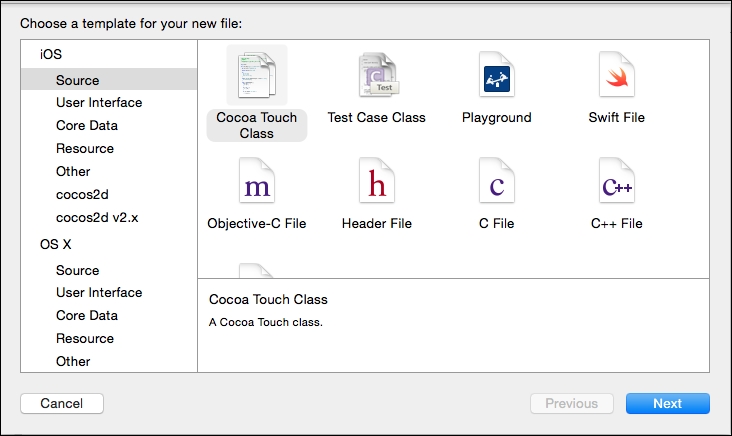
First, create a new file by hitting Command + N (or File | New | File). Select Cocoa Touch Class by navigating to iOS | Source.
Then name it GameOverScene, and make sure you choose Swift as the language.
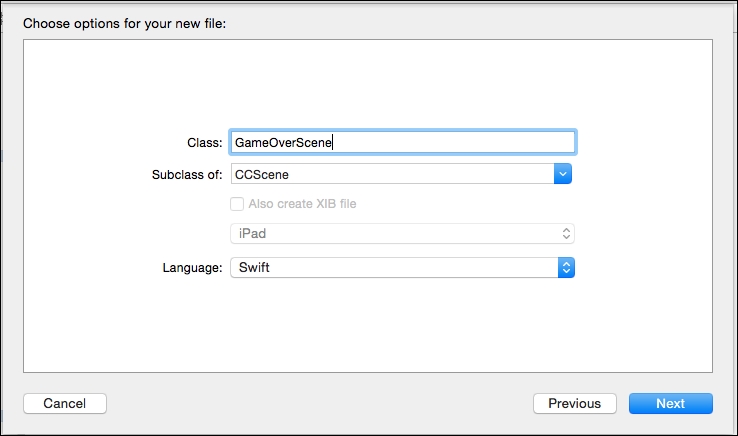
Save it in the Source folder of your project, and it will automatically open up.
Replace your GameOverScene class with the following, which will set the background to white, create a label in the center of the screen, enable touches, and transition back to MainScene when the screen is tapped:
class GameOverScene: CCScene {

  override init() {

    super.init()

    let winSize = CCDirector.sharedDirector().viewSize()

    var background = CCNodeColor(color: CCColor.whiteColor())
    self.addChild(background)

    var label = CCLabelBMFont(string: "Tap anywhere to restart", fntFile: "bmFont.fnt")
    label.position = ccp(winSize.width/2, winSize.height/2)
    self.addChild(label)

    self.userInteractionEnabled = true
  }

  override func touchBegan(touch: CCTouch!, withEvent event: CCTouchEvent!) {

    CCDirector.sharedDirector().replaceScene(MainScene.node() as CCScene)
  }
}
Then, to test this scene, add the following replaceScene call to the closure (or code block) of the enemy's move action in MainScene.swift:
func spawnEnemy() {
...
    //create a move action that, after 3 seconds, will do something (nothing at the moment)
    let moveAndEndGameAction = CCActionSequence.actionOne(CCActionMoveBy.actionWithDuration(3, position: centerPosDistance) as CCActionFiniteTime, two: CCActionCallBlock.actionWithBlock({

  //add this line – it will transition to the GameOverScene (in other words, the enemy was not killed)
    CCDirector.sharedDirector().replaceScene(GameOverScene.node() as CCScene)

}) as CCActionFiniteTime) as CCAction

    //run the move action
    enemy.runAction(moveAndEndGameAction)
}
Hmmm! Except now that it transitions properly, it's not much of a game, since we can't stop the enemies with the bullets we're shooting. Let's fix that!
There's a ton of different ways to handle collisions, but the way we're going to handle them is by using the bounding box of our bullets and the enemies. To do that, we're going to set up two arrays (one for enemies and one for bullets) and a function to loop through the arrays and check for bounding box intersections.
First, we add two variables for the arrays. We're going to use NSMutableArray instead of Swift's arrays because Swift's array allows us to remove an item only via its index, and not by passing the item itself. So, it will be easier with NSMutableArray:
class MainScene: CCScene {

  ...

  //arrays to hold our bullets and enemies
  var bullets : NSMutableArray = []
  var enemies : NSMutableArray = []

  override init() {
    ...
Now we need to add our bullets and enemies to their respective array (as well as handle their removal from the array). So, in our shootBullet and spawnEnemy functions, we add the objects to the array, as well as remove the bullet from the array right before we remove it from the scene:
func shootBullet() {

...

    var moveAndRemoveAction = CCActionSequence.actionOne(CCActionMoveBy.actionWithDuration(0.5, position: moveDistance) as CCActionFiniteTime, two: CCActionCallBlock.actionWithBlock({

      //remove the bullet from the array
      //before removing it from the screen
      self.bullets.removeObject(bullet)
      self.removeChild(bullet)
    }) as CCActionFiniteTime) as CCAction

    //add the bullet
    self.bullets.addObject(bullet)
    self.addChild(bullet)

...
}

func spawnEnemy() {
...


//add the enemy to the enemies array before adding it to the screen
    self.enemies.addObject(enemy)
//add the enemy to the screen
    self.addChild(enemy)

...
}
Next, we need to create a function that will loop through our arrays and check for collisions. If a collision is found, we will remove both objects from the arrays (and the screen) and break out of the loop so that we don't accidentally go out of bounds.
Create the following function in the MainScene.swift file:
func checkForCollisions() {

    //check for collisions
    for bullet in self.bullets {
      for enemy in self.enemies {

        //if the two bounding boxes are overlapping/intersecting/colliding
        if CGRectIntersectsRect(bullet.boundingBox(),
        enemy.boundingBox()) {
          self.bullets.removeObject(bullet)
          self.enemies.removeObject(enemy)

          self.removeChild(bullet as CCSprite)
          self.removeChild(enemy as CCSprite)

          break;
        }
      }
    }
}
Finally, we need to schedule this function so that it will be called frequently enough when our bullets interact with the enemies, and the collision will get detected at the right time. To do that, simply schedule it in the init() function:
override init() {
    ...
    self.schedule(Selector("checkForCollisions"), interval: 1.0/60.0)
}
Run the game at this point, and you'll see the bullets colliding properly. But no! It's not much of a game without a score counter. So let's add that to this example game in Swift.
All we need is a variable that tracks our score and a label to display it. Arguably, you can also have this on the game over scene, but we're not going to worry about that in this example.
So, at the top of our MainScene class, we create two variables as described, and then add the label to the screen in the init() method:
class MainScene: CCScene {

  ...
//a variable to hold the score. The value of 0.0 sets it to a Float type by default, not Int
  var score = 0.0
  override init() {
    ...
  }
}
Then we implement the update function, which gets automatically called by Cocos2d:
override func update(delta: CCTime) {
    //some obscure score increment over time...
    self.score += 0.47

    //set the label using String Interpolation
  self.lblScore.setString("(Int(self.score))")
}
We also want to increase the score by 100 for every enemy that dies, so in the checkForCollisions function, we simply add 100 to the score variable:
func checkForCollisions() {
...
  if CGRectIntersectsRect(bullet.boundingBox(), enemy.boundingBox()) {
     ...
     self.score += 100
     break;
  }
}
If you run the game at this point, you'll see the score increasing as time goes on, as well as when any enemy gets hit by a bullet. The only thing left to do is make the game harder over time (because it's rather boring at the moment).
Finally (although it doesn't entirely matter for the purpose of making the example work), we want our difficulty to increase over time so that only the best players can make it far. We're going to do this by increasing the rate at which units spawn (every 2,000 points, to be exact). First, we want some variables to hold the current spawn rate as well as the amount of points accrued since the last increase in difficulty:
class MainScene: CCScene {
  ...
  //variables for enemy spawn rate (aka, difficulty)
  var spawnRate = 0.35
  var scoreSinceLastIncrease = 0.0

  override init() {
Then, we must replace the hardcoded value of 0.35 with the spawnRate variable:
override init() {
  ...
  self.schedule(Selector("spawnEnemy"), interval: self.spawnRate)
}
Now, every time we increase our score variable, we must also increase the scoreSinceLastIncrease variable. So in update as well as checkForCollisions, we need to add the same amount to both the variables:
func checkForCollisions() {
  ...
  if CGRectIntersectsRect(bullet.boundingBox(), enemy.boundingBox()) {
    ...
    self.score += 100
    self.scoreSinceLastIncrease += 100

    break;
  }
}

override func update(delta: CCTime) {
    //some random score increment over time...
    self.score += 0.47
    self.scoreSinceLastIncrease += 0.47

    //set the label using String Interpolation
    self.lblScore.setString("(Int(self.score))")

}
Finally, we need to check inside our update: method whether the score since the last difficulty increase has crossed our limit (in this case, we're going to increase it after every 2,000 points earned). To do this, we'll just unschedule the spawnEnemy function, reduce spawnRate (only to a certain amount), and re-schedule the spawnEnemy function:
override func update(delta: CCTime) {
    ...
    if self.scoreSinceLastIncrease > 2000 {

      //unschedule and re-schedule the spawnEnemy method
      //using the new spawn rate
      self.unschedule(Selector("spawnEnemy"))

      spawnRate -= 0.025
      if (spawnRate < 0.005) {
        spawnRate = 0.005
      }

      self.schedule(Selector("spawnEnemy"), interval: self.spawnRate)

      //subtract 2000, the amount of the difficulty
      self.scoreSinceLastIncrease -= 2000
    }
}
Run the game at this point and watch as more and more units come flooding into the view, eventually overwhelming you.
And that's it! We've just made a very simple game in Cocos2d but with the help of Swift this time. It's not the best or most fun game in the world but it counts. Plus, this example was more of a way to show you how to go ahead and make games using Swift as your core language instead of Objective-C.