
We're at the point where we need to teach our players how to play our game. Although you might have been able to explain the game to your testers when you were standing over their shoulders, you won't be able to do that for those who download the app from the App Store. Thus, we're in need of a tutorial, and a quick one because we want our players playing the game, not the tutorial.
For this project, we're going to have a simple tutorial that basically explains the main concepts of the game through only a few words and some images:
- Players sliding units with their fingers
- Combining their own units
- Defeating enemy units
- Protecting the central square
Obviously, we are able to go a lot more in depth by explaining a few more of the subtle concepts, but instead, we're giving the player room to learn, experiment, and test things for themselves. We just want the tutorial to set them up so that they don't get frustrated when they either don't know what to do when the game starts, or lose and don't know why they lost.
We want to know at what point in the tutorial our user is. So, we need to know what set of text and options to display. For example, if we create a tutorial that uses multiple scenes, we wouldn't have needed a variable, as the scene would have indicated which tutorial we were on. However, because we're doing everything within the MainScene (and because we want to smoothly transition into a regular game after the tutorial is over), it's best to use a variable to track how far we've gone.
So (since we'll want to access the variable in a later portion), let's create an @property variable in MainScene.h, like this:
}
+(CCScene*)scene;

...

//here:
@property (nonatomic, assign) NSInteger tutorialPhase;
@end
If it's a good tutorial, the user learns the first time they're going through it, so it's a good assumption to set a "did they finish it?" variable to true after they've gone through all the steps. This means that we want to record in a variable whether or not they've finished the tutorial before, so we're going to use NSUserDefaults again. Let's define another key so that we can eliminate human errors as well as increase code readability. In MainScene.h, declare the following key with the rest at the top of the file:
FOUNDATION_EXPORT NSString *const KeyFinishedTutorial;
In MainScene.m, define the key at the top, with something like the following:
NSString *const KeyFinishedTutorial = @"keyFinishedTutorial";
Finally, we want to determine whether or not to show the tutorial. Since we have this key storing the determining factor, we can simply read that from NSUserDefaults and either run the game as normal or begin the tutorial in phase 1.
So in MainScene.m, at the bottom of your init method, modify the spawnNewEnemy call to the following:
if ([[NSUserDefaults standardUserDefaults] boolForKey:KeyFinishedTutorial])
{
  [self spawnNewEnemy:[self getRandomEnemy]];
  self.tutorialPhase = 0;
}
else
{
  //spawn enemy on far right with value of 1
  Unit *newEnemy = [Unit enemyUnitWithNumber:1 atGridPosition:ccp(9, 5)];
  newEnemy.position = [MainScene getPositionForGridCoord: newEnemy.gridPos];
  [newEnemy setDirection:DirLeft];
  [self spawnNewEnemy:newEnemy];
  self.tutorialPhase = 1;

  [self showTutorialInstructions];
}
Also, to eliminate errors and set ourselves up for easier coding later, we define the showTutorialInstructions object (the empty body is okay for now; we'll cover that next):
-(void)showTutorialInstructions
{
}
In the preceding if-else statement, you see the tutorialPhase being set to either 0 (not going through the tutorial this time) or 1 (begin the tutorial at phase 1), based on whether they've finished the tutorial or not. If they haven't, it will also spawn a new enemy at the far right with a value of 1.
That's the beginning of our tutorial—setting up the necessary structure. Next, we're going to tackle actually displaying some text, depending on what phase of the tutorial we're in.
Each tutorial phase needs to have its own text. To do that, we'll just reference the tutorial phase variable and assign the text to a label based on what phase we're in. That said, in the showTutorialInstructions method that we just created, we add the following lines to display our initial phase 1 text:
NSString *tutString = @"";
if (self.tutorialPhase == 1)
{
tutString = @"Drag Friendly Units";
}

CCLabelBMFont *lblTutorialText = [CCLabelBMFont labelWithString:tutString fntFile:@"bmScoreFont.fnt"];
lblTutorialText.color = [CCColor colorWithRed:52/255.f green:73/255.f blue:94/255.f];
lblTutorialText.position = [MainScene getPositionForGridCoord:ccp(5,2)];
lblTutorialText.name = @"tutorialText";
[self addChild:lblTutorialText z:2];
CCSprite9Slice *background = [CCSprite9Slice spriteWithSpriteFrame:[[CCSpriteFrameCache sharedSpriteFrameCache] spriteFrameByName:@"imgUnit.png"]];
background.margin = 0.2;
background.position = ccp(0.5,0.4);
background.positionType = CCPositionTypeNormalized;
background.contentSize = CGSizeMake(1.05f, 1.2f);
background.contentSizeType = CCSizeTypeNormalized;
[lblTutorialText addChild:background z:-1];
Run the project. You'll see the text spanning across the top center of the grid. But code-wise, there's a lot going on in the block we just added, so let's quickly go over the new stuff.
First, we're naming (a tag property in previous versions, but it's now a string) the label so that we can access the CCNode by searching for it later using the getChildByName function. Next, we're positioning the label at z:2, so we're ensuring that it's above everything else (the default is z:0, and at most, we have our units at z:1, so z:2, should be good).
There's also the CCSprite9Slice object, which is most likely new to you. If you've never heard of a 9-slice (or 9-patch) sprite before, refer to the following diagram to learn about it:
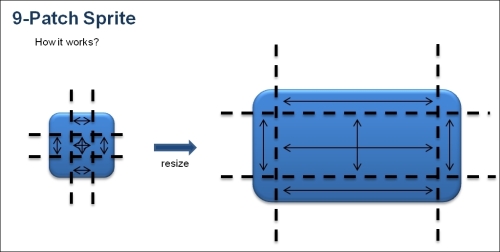
In short, the central section can scale in any direction, the corners do not scale, the top and bottom margins scale horizontally, and the left and right margins scale vertically.
You'll require the 9-slice sprite only when you want the margins to scale. In any other situation, it's better to use a regular CCSprite.
Since we want to keep our art style consistent, we can use Unit.png as our 9-slice sprite, along with a 20 percent margin (the rest is whitespace anyways, so this is a good number to go with). Then we'll position it behind the label (using z:-1) and set the content size to slightly larger than the width and height of the label.
Now we're actually going to take the tutorial to the next phase.
Just the fact that we have text displayed doesn't mean we have something impressive, as it's not really a tutorial up to this point. We need to implement the advanced portion. So, create a function called advanceTutorial as well as removePreviousTutorialPhase (which will be used to get rid of the previous phases' text) and edit them like this:
-(void)advanceTutorial
{
  ++self.tutorialPhase;
  [self removePreviousTutorialPhase];

  if (self.tutorialPhase<7)
  {
    [self showTutorialInstructions];
  }
  else
  {
    //the tutorial should be marked as "visible"
    [[NSUserDefaults standardUserDefaults] setBool:YES forKey:KeyFinishedTutorial];
    [[NSUserDefaults standardUserDefaults] synchronize];
  }
}
-(void)removePreviousTutorialPhase
{
}
Essentially, we're saying that if we advance to the next tutorial phase, and the phase is less than 7, we just show the next tutorial's instructions. Otherwise, we simply set the didFinishTutorial Boolean to true.
Finally, we should include the proper text for each phase so that when we start advancing the tutorial phase, we can actually see the progress. So, in the showTutorialInstructions function, modify the if statement to look like the following (which also creates and displays a How to Play label for the first phase):
if (self.tutorialPhase == 1)
{
  tutString = @"Drag Friendly Units";

  CCLabelBMFont *lblHowToPlay = [CCLabelBMFont labelWithString:@"How to Play:" fntFile:@"bmScoreFont.fnt"];
  lblHowToPlay.color = [CCColor colorWithRed:52/255.f green:73/255.f blue:94/255.f];
  lblHowToPlay.position = [MainScene getPositionForGridCoord:ccp(5,1)];
  lblHowToPlay.name = @"lblHowToPlay";
  lblHowToPlay.scale = 0.8;
  [self addChild:lblHowToPlay z:2];

  CCSprite9Slice *bgHowTo = [CCSprite9Slice spriteWithSpriteFrame:[[CCSpriteFrameCache sharedSpriteFrameCache] spriteFrameByName:@"imgUnit.png"]];
  bgHowTo.margin = 0.2;
  bgHowTo.position = ccp(0.5,0.4);
  bgHowTo.positionType = CCPositionTypeNormalized;
  bgHowTo.contentSize = CGSizeMake(1.05f, 1.2f);
  bgHowTo.contentSizeType = CCSizeTypeNormalized;
  [lblHowToPlay addChild:bgHowTo z:-1];
}
else if (self.tutorialPhase == 2)
{
  tutString = @"Combine Friendly Units";

  id fadeRemoveHowToPlay = [CCActionSequence actions:[CCActionEaseInOut actionWithAction:[CCActionFadeOut actionWithDuration:0.5f] rate:2], [CCActionCallBlock actionWithBlock:^{
    [self removeChildByName:@"lblHowToPlay"];
  }], nil];

  [[self getChildByName:@"lblHowToPlay" recursively:NO] runAction:fadeRemoveHowToPlay];

}
else if (self.tutorialPhase == 3)
{
  tutString = @"Defeat Enemies";
}
else if (self.tutorialPhase == 4)
{
  tutString = @"Protect Center";
}
else if (self.tutorialPhase == 5)
{
  tutString = @"Survive";
}
else if (self.tutorialPhase == 6)
{
  tutString = @"Enjoy! :)";
}So that's it! Let's actually take our tutorial ahead so that we can see our progress in action as we walk through each phase.
Since we have all the functions laid out, all we need to do is call the advanceTutorial function when we want the next phase to begin.
The first phase will advance once we've moved the unit for the first time, so in the moveUnit function, add the following to the bottom:
if (self.tutorialPhase == 1 || self.tutorialPhase == 2)
  [self advanceTutorial];
And hey! While we're at it, we might as well include phase 2, right? After all, we're just sliding once in both phases.
Phase 3 will end when the enemy coming in from the right is destroyed, so in the handleCollisionWithFriendly function, you need to add the following method call within the if statement shown here. Phase 4 will also end when a unit gets destroyed, so we'll go ahead and include it as well:
if (enemy.unitValue<= 0)
{
  [arrEnemies removeObject:enemy];
  [selfremoveChild:enemy];
  ++numUnitsKilled;

  if (self.tutorialPhase == 3 || self.tutorialPhase == 4)
[selfadvanceTutorial];
}
Next is going to be when tutorial phase 5 ends, which is after the user wants to make their move but before any unit movements have been calculated. The same applies to phase 6, so add the following call to the advanceTutorial function at the top of the moveUnit function. This is because we don't want to accidentally advance the tutorial twice (which is what would happen if we add it at the bottom):
if (self.tutorialPhase == 5 || self.tutorialPhase == 6)
  [self advanceTutorial];
But hold on for a second! We want to ensure the same experience for every person in the tutorial. So, just like the way we created a custom unit at the beginning of the scene in the init method, we're going to create a custom unit in the moveUnit function. In your moveUnit function, modify this if statement to create a custom unit when you're in the corresponding tutorial phase:
if (numTurnSurvived % 3 == 0 || [arrEnemiescount] == 0)
{
  if (self.tutorialPhase == 4)
  {
    Unit *newEnemy = [Unit enemyUnitWithNumber:4 atGridPosition:ccp(5,9)];
    [newEnemy setDirection:DirUp];
    newEnemy.position = [MainScene getPositionForGridCoord:ccp(5,9)];
    [self spawnNewEnemy:newEnemy];
  }
  else
  {
    [self spawnNewEnemy:[self getRandomEnemy]];
  }
}
Alright! With this in place, we should have a pretty solid tutorial, but it's still kind of clunky, and we can definitely use some polish (coincidentally, that's the chapter we're in). So, let's continue to make it the best tutorial that it can be.
Right now, the old text is just piling up, so let's clear that up. In the removePreviousTutorialPhase function, add the following block. It will grab the text, rename it (so that there are no naming conflicts by accident), quickly fade out the text, and remove it:
-(void)removePreviousTutorialPhase
{
  CCLabelBMFont *lblInstructions = (CCLabelBMFont*)[self getChildByName:@"tutorialText" recursively:NO];
  lblInstructions.name = @"old_instructions";

  id fadeRemoveInstructions = [CCActionSequence actions:[CCActionEaseInOut actionWithAction:[CCActionFadeTo actionWithDuration:0.5f opacity:0] rate:2], [CCActionCallBlock actionWithBlock:^{
    [self removeChild:lblInstructions];
  }], nil];

  [lblInstructions runAction:fadeRemoveInstructions];
}
There we go! But it still needs more polish. Let's add some graphical elements to our tutorial to better explain what we want the user to do.
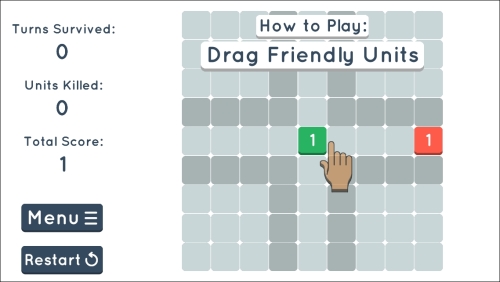
Text is great, but what about those who can't read English? Or what about those who don't understand what we mean by Drag Friendly Units? It's best to have an image to show what we mean. In this case, we're going to use a small hand with the index finger pointing to show a drag motion in the intended direction.
Here's what we're going to add. Notice the finger (which is being moved to the right and fading at the same time), as well as the text above it, which we added in the previous section, as shown in this screenshot:
In our showTutorialInstructions method, we want to create a finger that will guide the user in the right direction. So, at the bottom of your showTutorialInstructions method, add the following block of code to create a finger and position it so that it points to the center of the middle square:
CCSprite *finger = [CCSprite spriteWithSpriteFrame:[[CCSpriteFrameCache sharedSpriteFrameCache] spriteFrameByName:@"imgFinger.png"]];
finger.anchorPoint = ccp(0.4,1);
finger.position = [MainScene getPositionForGridCoord:ccp(5,5)];
finger.name = @"finger";
finger.opacity = 0;
[self addChild:finger z:2];
Notice how we've named the finger and positioned it at z:2 (for consistency with the rest of our tutorial).
The next step is to animate our finger in the direction in which we want our users to slide their units. So, right after you've added the finger to the scene, make a call to the following function:
...
  [self addChild:finger z:2];

  [self runFingerArrowActionsWithFinger:finger];
}

-(void)runFingerArrowActionsWithFinger:(CCSprite*)finger
{
}
Here, we just passed the finger variable directly to the function (as searching for a child with a matching name takes up more processing time). Now, all we need to do with our finger image is the following:
- Fade the finger in
- Slide it to the right
- Fade it out while it is sliding to the right
- Wait a bit
- Reposition the finger
- Repeat
This seems fairly simple, right? It is, except when we want to sequence all of these events. In that case, the code looks fairly convoluted. This is what we want the function to look like:
-(void)runFingerArrowActionsWithFinger:(CCSprite*)finger
{
  Unit *u = [Unit friendlyUnit];
  if (self.tutorialPhase == 1 || self.tutorialPhase == 3)
  {
    id slideRight = [CCActionSequence actions:[CCActionEaseIn actionWithAction:[CCActionFadeIn actionWithDuration:0.25f] rate:2], [CCActionEaseInOut actionWithAction:[CCActionMoveBy actionWithDuration:1.0f position:ccp(u.gridWidth*2, 0)] rate:2],[CCActionDelay actionWithDuration:0.5f], nil];

    id fadeOutAndReposition = [CCActionSequence actions:[CCActionDelay actionWithDuration:0.25f], [CCActionEaseInOut actionWithAction:[CCActionFadeOut actionWithDuration:1.0f] rate:2], [CCActionDelay actionWithDuration:0.5f], [CCActionCallBlock actionWithBlock:^{
      finger.position = [MainScene getPositionForGridCoord:ccp(5,5)];
    }], nil];

    [finger runAction:[CCActionRepeatForever actionWithAction:slideRight]];
    [finger runAction:[CCActionRepeatForever actionWithAction:fadeOutAndReposition]];


  }
  else if (self.tutorialPhase == 2)
  {

    finger.position = [MainScene getPositionForGridCoord:ccp(6,5)];
    id slideLeft = [CCActionSequence actions:[CCActionEaseIn actionWithAction:[CCActionFadeIn actionWithDuration:0.25f] rate:2], [CCActionEaseInOut actionWithAction:[CCActionMoveBy actionWithDuration:1.0f position:ccp(-u.gridWidth*2, 0)] rate:2],[CCActionDelay actionWithDuration:0.5f], nil];

    id fadeOutAndReposition = [CCActionSequence actions:[CCActionDelay actionWithDuration:0.25f], [CCActionEaseInOut actionWithAction:[CCActionFadeOut actionWithDuration:1.0f] rate:2], [CCActionDelay actionWithDuration:0.5f], [CCActionCallBlock actionWithBlock:^{
      finger.position = [MainScene getPositionForGridCoord:ccp(6,5)];
    }], nil];

    [finger runAction:[CCActionRepeatForever actionWithAction:slideLeft]];
    [finger runAction:[CCActionRepeatForever actionWithAction:fadeOutAndReposition]];

  }
}
Essentially, the finger is going to fade in, slide to the right (while it's fading out), then get repositioned, and repeat these actions indefinitely in phase 1 and phase 3 of the tutorial (the opposite direction for phase 2).
Sadly, we're not done with coding for the entirety of the finger. We must still remove it once we wish to advance to the next phase, remember?
Therefore, in removePreviousTutorialPhase, we're just going to add a very similar removal style to the label, the only difference being that we'll apply it to the finger (and this time, we need to use the search function of getChildByName, as this function gets called at an undetermined time):
CCSprite *finger = (CCSprite*)[self getChildByName:@"finger" recursively:NO];
finger.name = @"old_finger";
id fadeRemoveFinger = [CCActionSequence actions:[CCActionEaseInOut actionWithAction:[CCActionFadeTo actionWithDuration:0.5f opacity:0] rate:2], [CCActionCallBlock actionWithBlock:^{
  [self removeChild:finger];
}], nil];
[finger runAction:fadeRemoveFinger];
And that's it for the finger! We've got ourselves a finger sliding in the direction we want, including a nice fade in/out. We also have the text displaying and getting removed, advancing text, and so on. The only thing left to do is to make sure our users are allowed to move their units only in the direction we want them to.
Our tutorial works as intended only when they move in a specific order. So, we need to restrict their initial movements when going through the tutorial.
In Unit.m, in the touchMoved function, we want to make sure that the unit can only begin to be dragged when they're going in the correct direction in the first three phases. So add the following if statement to the touchMoved function (when the distance is less than 20):
if (!self.isBeingDragged && ccpDistance(touchPos, self.touchDownPos) >20)
{
  ...

    if (
  (((MainScene*)self.parent).tutorialPhase == 1 && self.dragDirection != DirRight) ||
  (((MainScene*)self.parent).tutorialPhase == 2 && (self.dragDirection != DirLeft || self.unitValue == 1)) ||
  (((MainScene*)self.parent).tutorialPhase == 3 && self.dragDirection != DirRight))
    {
      self.isBeingDragged = NO;
      self.dragDirection = DirStanding;
    }
}
This is why we created the tutorialPhase object as a property—so that we can access the phase from within another class. But what's going on here is essentially a check of the tutorial phase, and if it's any one of phase 1, 2, or 3, it does another check to see whether dragDirection is indicating the correct way. There's a second check that's done for phase 2, as it's not allowed to be the unit with a value of 1.
If any of this comes out to true, we set isBeingDragged to NO and the drag direction to standing (so that no unexpected behavior happens in phase 2).
That's it for the tutorial! It took a while, but it's not only simple and quick; it's also fairly comprehensive, while not affecting the experience of the game.
Then, once our tutorial ends, it seamlessly flows into a regular game from that point. The other advantage is as follows: suppose players lose, don't finish, or hit menu or restart; or the phone dies at some point during the tutorial. When they come back, the tutorial will simply start from the beginning, which is good and intentional.