
Creating Custom Content Types and Site Columns
Consultants work on projects and each project has a Statement of Work, or SOW, that defines what the goals, scope, duration, and cost of the project are. In this exercise you will create a Project Management team site. This site could be the location for all of your organization’s project templates and project management best practices, and where all new Statements of Work are created and stored. You will then create a document library in which to store your SOWs, columns to track information about the projects, and a template to create new SOWs from, and all of this will be associated to a content type called Statement of Work.
Cross-Ref
For detailed steps on how to create a new site, refer to Chapter 3.
Step 1: Create site columns
Organize your site columns and content types at the top of the Portal hierarchy so that they have the ability to be associated with any team site or document library. When you create a top-level Statement of Work content type and design your Site Columns at the top level, you ensure that required information such as project number will be available to all downstream child sites.
You can begin this step at your portal home page.
1. | |
2. | Under the Galleries section, click Site columns. The Site Column Gallery lists all of the Site Columns available on the portal, the type of column, and their source site. |
3. | Click Create. |
4. | Enter these values:
|
5. | Leave the default values for the remaining items and click OK. |

In a production scenario you would probably create additional project management-related columns such as Project Name, Customer Name, and so on. For this example you will move on to creating your content type and associate your new column with it.
Step 2: Create site content type
1. | |
2. | Under Galleries click Site content types. |
3. | Click Create. |
4. | Enter these values:
|
5. | Click OK. |
6. | At the bottom of the Site Content Type: Statement of Work page, click Add from existing site columns to add the columns you created earlier in step 1. |
7. | From the Select columns from drop-down menu, choose Project Management. |
8. | |
9. | Click OK. |


Step 3: Configure template to use for column type
1. | On the Site Content Type: Statement of Work page, under Settings, click Advanced settings. |
2. | If you have a sample document to use as the SOW template, you can just browse to it at this time. If you don’t have a sample document, open Word and create a document to use as your sample SOW. Click the radio button next to Upload a new document template and then click Browse. Your screen should be similar to Figure 18.4. |
3. | Click OK to make this document an associated template for your new content type. |

Step 4: Create a new team site and document library
1. | Click Site Actions in the upper right-hand corner of the screen. |
2. | Choose Create Site. |
3. | Enter the following values:
|
4. | Leave the other default values and click Create. |
5. | Click Site Actions in the upper right-hand corner of the new team site. |
6. | Click Create from the pull-down menu. |
7. | Under Libraries click Document Library. |
8. | Enter Statement of Work for the name and click Create. |
Step 5: Associate the content type with a document library
1. | From the top menu in your document library, click Settings
Notice that there are no options available for working with content types under the current options. You must first enable content types. |
2. | Under General Settings, click Advanced settings. |
3. | Select Yes under Allow the management of content types. |
4. | Leave the default options for remaining items and click OK. |
5. | To remove the default content type, Document, and add your new one, under Content Types click the default content type Document. |
6. | Under Settings, click Delete this content type and click OK to confirm. |
7. | Under Content Types, click Add from existing site content types. |
8. | In the Select site content types from pulldown menu, choose Project Management. |
9. | Click Add to add the Statement of Work content type and click OK. |
10. | Click Statement of Work in the breadcrumb link at the top to return to the document library. |
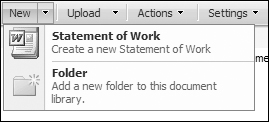
11. | Click the arrow next to New and you will see the Statement of Work template in the New pulldown, as shown in Figure 18.6. Figure 18.6. The New drop-down menu
|
12. | Choose the Statement of Work template to open a new document. |
13. | Click Save to save your new SOW. |
14. | Click OK to save it with a new document name. |
15. |


Using the object model to update content types
Depending on your application of content types, it may be more useful to you to update content types using the object model. The object model allows you greater granularity in “pushing down” the child content type changes. Changes you make to a site content type in code are applied to the memory representation of that content type. Calling the Update method applies those changes to the database.
This code snippet updates a content type description, adds a field, then updates the content type and its children:
// open your site and get the SPWeb
SPSite site = new SPSite("http://mysite.com");
SPWeb web = site.OpenWeb();
// get the solution content type
SPContentType type = web.ContentTypes["Solution"];
// set the updated description
type.Description = "Updated description";
// add the new field names contact which is a user and not
   required.
type.Fields.Add("Contact", SPFieldType.User, false);
// update the content type.
// adding true in the arguments updates the children as
   well.
type.Update(true);
Extending content types
SharePoint content types are extensible. You can add custom information in content type definitions using the XmlDocuments property of the SPContentType object. These XmlElements can be accessed programmatically through the object model, and you can add as many XmlDocument objects to the content type as you require. The only rule with the XmlDocument object is that it must be valid XML.
As an example, you’ll add an RSS item definition to a SPContentType object.
// open your site and get the SPWeb
SPSite site = new SPSite("http://mysite.com");
SPWeb web = site.OpenWeb();
// get the solution content type
SPContentType type = web.ContentTypes["Solution"];

// create an xml document based on a simple rss schema
string ItemXml = @"<item><title /><link /><subject
   /><description /><pubDate /></item>";
XmlDocument RssItem = new XmlDocument();
RssItem.LoadXml(ItemXml);
// add that XmlDocument to the XmlDocuments collection
type.XmlDocuments.Add(RssItem);
//adding true in the arguments updates the children as
   well.
type.Update(true);
Note
By performing a “push down” operation (updating the children of the content type) the XmlDocument object of the child is completely overwritten. It is important to take note of this because changes made to the child and not to the parent, by you or someone else, could be lost. It is also important to note that if a push down change fails on a certain content type—if that content type is sealed, for example—the operation will continue and those changes will be attempted on any child content types. Any errors encountered will be returned.