
Customizing Lists and Libraries
By customizing lists and libraries, you are able to tailor your lists, whether they are created from a template or as custom lists, to match your needs. You can add columns to track the information that is important to you, create custom lookup lists as centralized references to other lists and set item-level security to secure each item appropriately.
Implementing custom columns
Custom columns allow you to track the information that is important for you. With list items, the additional columns are customized so that you are tracking the information that is important to the task, announcement, event, or other list type. With documents, columns provide the additional metadata about the document so that it is easy to find, categorize, and track.
With every column, you have the opportunity to suggest default values. Default values provide a suggested entry for a field but can be replaced by whatever the user types. For some column types like choice columns, the first choice option is automatically populated in the default value field so if you would like a different default value or none at all either enter that default value or clear the field. You can also suggest a default value that is a calculated value like [Me] for a single line of text field which will automatically enter the user name of the creator of the item in the field.
For each column, you also have the option of making it a required column. This setting ensures that the user cannot save the item without entering a value. However, this can make bulk updating of data somewhat dicey because if you have a value that you want to fill down in datasheet view (similar to the Excel capability to fill a column), it will not let you do that for the column if another column for that item is required and empty (you are not allowed to leave the row until that column is populated). So, you may want to deselect requiring a value for columns before doing bulk updates.
The following column types are available for use in customizing your SharePoint lists and libraries whether they are custom lists or additional columns added to list created to from a list template.
Single line of text: This column type accepts up to 255 characters of text. This is the column type for the title column of every list and cannot be changed for that title column. The default value (if configured) can be a text value or a calculated value.
Multiple lines of text: A large text box for text longer than 255 characters. This column type can be configured to allow plain text, rich text, or enhanced rich text which supports pictures, tables, and hyperlinks. If you choose either of the rich text options, the text gets stored in SharePoint as raw HTML. If viewed by the display page or edit page, this text is displayed properly. If it is exposed via another method such as the data view Web Part, you will get the HTML markups and it will not render correctly. If you will be exposing the content of a multiple lines of text field in this fashion, it is recommended that you limit uses to plain text.
In addition, you can configure this column to append edits of the text in this field to previous content stored in the field. This is great for notes columns that contain a running log of notes so that each entry is preserved.
The ability to set the number of lines for editing allows you to determine how big a text box you will give users to edit. If you enter a large number such as 40 lines of text, you will be using a large portion of the edit item real estate (for a 1024×768 screen).
Choice (menu to choose from): This list column allows you to enter the choices that you enter as options. Each choice is entered on a separate line in the “Type each choice on a separate line” field and you can allow whether or not users can enter their own “fill-in” choices.
Choices can be either offered from a drop-down menu or radio buttons, both of which allow users to select only one option. Alternatively, you can allow multi-select choices by presenting the choices using check boxes. If you allow multi-select, you limit the ability to group by this field because there is an array of choices for multi-select that grows exponentially with each choice option. For example, a list with multi-select of options A, B, or C allows seven options:
A
B
C
A, B
A, C
B, C
A, B, C
Because of the unpredictable number combination of options, SharePoint will not group by a multi-select choice field nor allow them to be used as lookup columns.
Number (1, 1.0, 100): The number column is used for columns that contain numbers and provides some value checking to confirm that correct numbers are being entered. Number columns allow you to set a minimum and maximum allowed value and to limit number of decimal places from 0-5. You can also configure the column to display number entries as percentages, however, keep in mind that the value will still be the stored value. For example, a value that shows 50% will be stored as .5.
Currency($, ¥, ): The currency column is used for columns that contain currency numbers and provides some value checking to confirm that correct numbers are being entered. Currency columns allow you to set a minimum and maximum allowed value and to limit number of decimal places from 0-5. You also configure the column to display the correct currency format from a wide list of currencies ranging from Albanian to Zimbabwe currency. If the user attempts to enter the currency symbol with the number, the list will reject the entry.
Date and Time: The date and time column supports date entries. You can configure the column to provide a date field only or a date and time field for specific time entries. The default value can be set to be today’s date, a specified date or a calculated value (such as [today]+2) for date values that you will like to suggest.
Lookup (information already on this site): The lookup column allows you to select a column from other lists on the site to use as references for your current list. This allows you to create relationships between lists. The lookup must be to a column of single line of text format or to a supported built-in columns which are: ID (automatically generated unique ID for each item), content type, copy source (available for form, picture, document, and wiki libraries), and version.
SharePoint will only show the lookup field that you select and not other related values from the list. For example, if you choose Last Name from the Contact list as a lookup field for your list, SharePoint will just show the last name selected and cannot be configured to show the related First Name for the item as well.
Yes/No (check box): The yes/no column presents a check box for a user to select to indicate “Yes” or deselect to indicate “No.”
Person or Group: This column provides functionality so that users can select one or more people or groups from the directory service that supports SharePoint. You can configure this column to allow users to select only people or people and groups.
Hyperlink or Picture: The hyperlink or picture column allows users to enter any linkable entry. When editing the hyperlink field using the edit form, the user will be prompted for two fields for the column—a Web address and a description. The description is presented as the friendly name for the column to the viewer but they are delivered to the configured web address.
Calculated (calculation based on other columns): The calculated column type allows you to calculate a value based on other columns in the list. The user is not allowed to edit the calculated value for an item. The calculated column is not allowed as an input for a lookup column. Standard math, comparison and logical operators are allowed in equations including +, -, /, *, %, ^, >, <, >=, <=, <>, &, OR, NOR, and XOR.
Examples of types of calculations that are valuable for SharePoint lists are
Text calculation for full name: Calculation of full name given a first name column and last name column using this formula: [First Name]+’ ‘+[Last Name].
Text calculation of first 15 characters of string: Calculation of the leftmost 15 characters of a text field using this formula: =LEFT([Single line of text],15) will result in a calculated field as shown in Figure 4.6.
Figure 4.6. Results of a calculated text column that returns the 15 leftmost characters

Date calculation of due date: Calculation of due date for seven days after the create date for an item using this formula: [Created]+7.
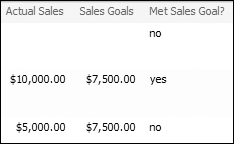
Logical calculation of Yes/No: Calculation that shows yes if a value of the actual sales column has exceeded the value of the sales goal column using this formula: =IF([Actual Sales]>[Sales Goal],”yes”,”no”).
The resulting column would show values as shown in Figure 4.7.
Figure 4.7. Results of logically calculated column for Met Sales Goal?
Statistical calculation of an average: Calculation of the average of two columns (Q1 Sales and Q2 Sales) if they do not add to 0 (which would result in an error for the average using the formula: =IF(([Q1 Sales]+[Q2 Sales])<>0,AVERAGE([Q1 Sales],[Q2 Sales],0).
Because you select the type of data that the calculated value returns such as single line of text, number, currency, date, and time or yes/no, SharePoint can accurately display the calculated value.
Business data: This column allows users to select a value from a business data object. You can configure this column to also return other fields from the business data list when viewed although these other columns do not display when the user is editing the column.
Cross-Ref
Please see Chapter 17 for more information on using business data in lists and defining business data applications.
Creating lookup lists
One custom list that is very useful is to create a list of values that are used as lookups for other lists. This list is very helpful if you want to standardize choices to be consistent across multiple lists and only have to update one location. For example, you may create a list of the regions that your company is divided into. You can then use that list as a lookup for the contact list so that your contacts are divided by region and for your document library so that documents are targeted to the correct region and so on. If your company adds a region, you can then update the custom region list with the new value which then becomes available to all lists using the region list as a lookup.
To create a lookup list, follow these steps:
1. | Select Create from the Site Actions menu in the top right corner of any page on the site that you would like to create lookup list. |
2. | Select Custom List from the Custom Lists section. |
3. | Enter the Name and Description (optional) for your lookup list and do not select to have the list displayed on the Quick Launch bar. |
4. | Click Create. |
5. | Enter each lookup value in the Title field of the list. |
To use your lookup list as a reference in an existing list or library:
1. | Select Create Column from the Settings menu in the top navigation bar of the list or library that you want to use the lookup list. |
2. | Enter the name of the column that will use the lookup values. |
3. | Select lookup in the The type of information in this column is field. |
4. | Select your lookup list in the Get information from: field. |
5. | Select the Title in the In this column: field as shown in Figure 4.8. Figure 4.8. Creating a column based on a lookup list
|
6. | Click OK. |

Configuring list and library item security
With SharePoint 2007, you can also set item-level security on the contents of your lists and libraries. This allows you to combine items in libraries that make sense for navigation and views while still preserving the security of your items.

To configure security for a list or library item, follow these steps:
1. | Left-click on the item that you want to manage permissions and select Manage Permissions from the edit menu, as shown in Figure 4.9. Figure 4.9. Managing Permissions for a List Item
|
2. | Select Edit Permissions from the Actions menu to copy permissions from the parent list or library and to discontinue inheritance of permissions. Items inherit permissions from the parent list until this action has been taken. |
3. | Select Add Users from the New menu to add users with permissions to the item. If you want to remove users, select the users in the permissions list that you want to remove and select Remove User Permissions from the Actions menu as shown in Figure 4.10. Figure 4-10. Removing permissions for users on a document
If you want to edit permissions for existing users, select the users in the permissions list that you want to remove and select Edit User Permissions from the Actions menu. |

