
Creating Basic Workflows
Basic workflows can be created directly from an authoring application or a browser. One template is available out of the box in WSS and more are available in MOSS. More sophisticated workflows can easily be designed using Office SharePoint Designer without writing code. This section discusses the creation of the most basic workflows as well as how the power user can take advantage of Office SharePoint Designer.
WSS out-of-the-box workflows
The only workflow template available from the browser out of the box in WSS is the Issue Tracking Workflow. This workflow can be used to manage business processes that require organizations to track a high volume of issues or items, such as customer support issues, sales leads, or project tasks. Other custom templates can be added and associated with document libraries, lists, and content types.
Workflows that are available on a list or site are called templates. Workflows that are running on a SharePoint item are called workflow instances. It is possible to have several instances of the same workflow template running against a singe list, each on a separate SharePoint item. It is also possible to have more than one workflow running against a particular SharePoint item at a time.
Configuring an Issue Tracking workflow
Configuration of the Issue Tracking workflow begins at a basic Windows SharePoint Services Team Site as shown in Figure 8.2. It is curious that Microsoft decided not to provide the Issue Tracking template in MOSS 2007 because the typical scenario is to provide all of the WSS functionality with the MOSS features added as extra items. If you do not have access to a WSS-only server, you may want to skip this section or install a copy of WSS to follow along.
1. | From your WSS site home page, click View All Site Content in the top of the left navigation pane. |
2. | Click Create. |
3. | Under Tracking click the Issue Tracking link. Although it is possible to configure an Issue Tracking workflow on another type of list, this list maps nicely to the features available in the workflow template. |
4. | Enter a name and description for your tracking list as shown in Figure 8.2. Selecting Yes for displaying on the Quick Launch bar makes the list show up in your left-hand navigation under Lists, and you have the option of sending e-mail when ownership of an item is assigned or when a change occurs to the item. This feature can be configured later, and users can configure alerts on the list, too. Figure 8.2. Issue Tracking List
|
5. | From your main Issue Tracking list view, click Settings, as shown in Figure 8.3, and then click List Settings. Figure 8.3. List Settings
|
6. | Under Permissions and Management (as it appears in MOSS) click Workflow settings. Your screen should look similar to Figure 8.4. Note If you receive an error when you click Workflow settings, click Site Actions |
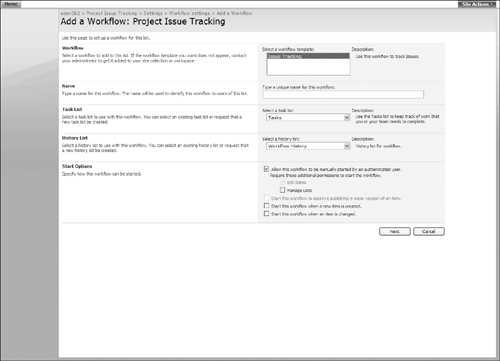
7. | Give your workflow a unique name. |
8. | Select the Task List you want to use to monitor the workflow tasks. You can use an existing list or have WSS create a new one for this workflow. Do the same for the History List. |
9. | Under Start Options you can choose to allow the workflow to be started manually, when a new item is created, or when an item is changed. The manual start is selected by default and places the option to start the workflow on the drop-down menu for list items. You can limit the ability of users to start workflows by requiring the Manage Lists right. The Start this workflow to approve publishing a major version of an item option will be grayed out unless Major and Minor versions have been enabled on this list. |
10. | Click Next to continue configuring the workflow options. |


Customize the Item Resolution workflow—settings and options
To customize workflow settings and options we configure the field whose state we will set at outset of the workflow called the Choice field. The options are
Issue Status
Active
Resolved
Closed
Priority
(1) High
(2) Normal
(3) Low
Category
(1) Category1
(2) Category2
(3) Category3
Each of the choices has three states that can be configured. The item updates automatically as it moves through the stages of the workflow. Follow these steps:
1.Specify what you want to happen when a workflow is initiated. Depending on your earlier choices, you will have a new task created in an existing task list or a new list that was created by the workflow. Under the Task Details section the first option is to configure Task Title with a custom message. This text will be the first part of the subject text of your new task. You can select any field from the Issue Tracking list items as the text to append to your custom message.2.Customize the task description. The custom message can be the first part of the description with a field from the Issue Tracking list appended to it, as in the task view in Figure 8.5.
3.Check the Insert link to List item check box to include a link.
Note
If your links don’t work in the e-mails that are sent from the server, you may need to configure Alternate Access Mappings. See Chapter 2 for detailed information on configuring additional access mappings.
4.For Task Due Date, you can select from one of the following Issue Tracking list fields:
Due Date
Modified
Created
5.Select the field that drives who the task will be assigned to. The most common option would be who was “Assigned To” or a custom assignee, but in some cases you may want to assign the task to whoever modified or created the item, and “Modified by” and “Created by” are available field options.6.Configure the E-mail Message Details if you want by selecting the Send e-mail message check box. The e-mail can be sent to people that are defined as field variables, such as “Assigned To” or to some custom e-mail address. The same is true for the Subject and Body fields as well.7.Specify what happens when a workflow changes to its middle state. Again, this state was defined earlier in the process. If you accepted the default, the middle state would be Resolved and the final state would be Closed. For example, a user enters an issue because SharePoint search is not working on a particular site. Once that issue is entered, an e-mail is sent to a first-level SharePoint technician. If the technician sets the issue to “Resolved” (the middle state) a workflow item can be created for someone in documentation to ensure that the issue is written up as a knowledge base article for future issues of a similar nature.
Again, the task title, description, due date, who it is assigned to, and the e-mail message sent out can all be customized using text and fields from the Issue Tracking list item.

MOSS out-of-the-box workflows
The following workflow templates are available directly from the browser interface after install:
Approval: This workflow routes a document or item to a group of people for approval. By default, the Approval workflow is associated with the Document content type, and it is thus automatically available in document libraries. A version of the Approval workflow is also associated by default with Pages libraries in a Publishing site, and it can be used to manage the approval process for the publication of Web pages.
Collect Feedback: This workflow routes a document or item to a group of people for feedback. Reviewers can provide feedback, which is then compiled and sent to the person who initiated the workflow when the workflow has completed. By default, the Collect Feedback workflow is associated with the Document content type and it is thus automatically available to document libraries.
Collect Signatures: This workflow routes a Microsoft Office document to a group of people to collect their digital signatures. This workflow must be started from within the relevant 2007 Office release client program. Participants must also complete their signature tasks by adding their digital signature to the document in the relevant 2007 Office release client program. By default, the Collect Signatures workflow is associated with the Document content type and it is thus automatically available to document libraries. However, the Collect Signatures workflow will appear for a document in the library only if that document contains one or more Microsoft Office Signature Lines.
Disposition Approval: This workflow, which supports records management processes, manages document expiration and retention by allowing participants to decide whether to retain or delete expired documents.
Group Approval: This workflow is similar to the Approval workflow, but it uses a designated document library and offers a personalized view of the approval process(es) in which a user is participating. This workflow provides a hierarchical organization chart from which to select the approvers and allows the approvers to use a stamp control instead of a signature. This solution was designed specifically for East Asian markets.
Translation Management: This workflow manages the manual document translation process by creating copies of the document to be translated and assigning translation tasks to translators. This workflow is available only for Translation Management Libraries.