Importing and Displaying Data
The Data View Web Part allows you to flexibly display data from several data sources on your SharePoint site. Using SharePoint Designer, you can connect to, select fields from, or display and format data from these sources:
SharePoint Lists and Libraries: Lists and libraries on the site on which you are using the Data View Web Part are automatically populated in the SharePoint Designer Data Source Library. You can define connections to SharePoint Lists and Libraries from other sites in the site collection.
Databases: The Data View Web Part can consume a database connection to any SQL Server database, through the SQL Server database connection provider or an OLE DB through the corresponding OLE DB data provider. Additionally, you can use a custom connection string to configure a connection to any Oracle, ODBC, OLE DB, or SQL Server.
You can configure the database connections with a specific account or use SSO authentication. If you configure the connection with a specific account, the password is stored in clear text, so this method is not recommended if the password needs to be secured.
XML files: Any XML files can be added to the Data Source Library for use in the Data View Web Part.
Server-side scripts or RSS feeds: You can define server-side scripts or RSS feeds as data sources for the Data View Web Part.
XML Web Services: XML Web services allow you to define connections to Web services to get data. This includes, of course, connecting to SharePoint Web services to get data—for example, list data from another site collection.
Business Data Catalog: The data source catalog allows you to define views of applications and entities from your Business Data Catalog. These views can be filtered so that you can hone in on just the business data that you need.
Linked sources: Linked sources are combinations of other data sources that can be sorted together or joined. For example, if you have multiple sources that have similar fields (like two contact lists or a contact list and a contact database), you can create a linked source that identifies each source and defines a sorted relationship. If you have multiple sources that have related data like a customer list and contacts for those customers, you can create a linked source that identifies each source and defines a joined relationship.
Defining data sources
The Data Source Library in SharePoint designer stores all of your defined data sources that are available to be used in a Data View Web Part. While some sources are populated automatically, like the lists and libraries on the current site, you will need to define the other connections, like database connections, before using the sources in the Data View Web Part.
Adding SharePoint lists and libraries data sources
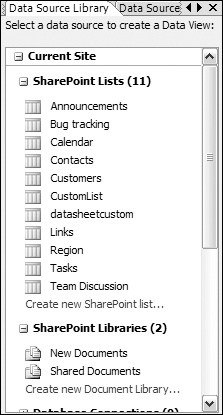
SharePoint lists and libraries that have already been created are listed automatically as sources in the Data Source Library, as shown in Figure 20.1. You can also create new lists and libraries in the current site from SharePoint Designer and connect to list and libraries on other sites.
Figure 20.1. SharePoint lists and libraries in the SharePoint Designer Data Source Library
To create a new list or library in the current site from SharePoint Designer, follow these steps:
1. | Open SharePoint Designer and choose Open Site from the File menu. |
2. | Enter the URL in the Site Name field and click Open. |
3. | The Data Source Library should open in the tool pane section on the right, but if you do not see that, choose Data Source Library from the Task Panes menu. |
4. | To create a new list, click the Create new SharePoint list link under the SharePoint Lists section of the Data Source Library. To create a new library, expand the SharePoint library section of the Data Source Library and click Create new Document Library. |
5. | Select the list or library type for your new list or library and enter the name in the Specify the name for the new list field and click OK. |
To connect to a list or library in another site, follow these steps:
1. | Open SharePoint Designer and choose Open Site from the File menu. |
2. | Enter the URL in the Site Name field and click Open. |
3. | The Data Source Library should open in the tool pane section on the right, but if you do not see that, choose Data Source Library from the Task Panes menu. |
4. | Select Connect to another library from the bottom of the Data Source Library task pane. |
5. | Click Add in the Manage Library dialog box. |
6. | Enter the display name for the new source in the Display name field and the URL in the Location field, as shown in Figure 20.2. Figure 20.2. Defining a connection to a SharePoint site for additional lists and libraries
|
7. | Click OK in the Collection Properties dialog box and OK in the Manage Library dialog box (or Add to add another library location). |

The new location will populate as another node (after current site) in the Data Source Library.
Defining database connection data sources
To define a database connection, you need to know the server name, type of connection provider (SQL Server or OLE DB) and authentication information, or be able to define a custom connection string to your database source.
To define a database connection, follow these steps:
1. | Open SharePoint Designer and choose Open Site from the File menu. |
2. | Enter the URL in the Site Name field and click Open. |
3. | The Data Source Library should open in the tool pane section on the right, but if you do not see that, choose Data Source Library from the Task Pane menu. |
4. | Expand the Database Connections section of the Data Source Library and click Connect to a database. |
5. | Click Configure Database Connection. |
6. | Enter the server name in the Server Name field, select the connection provider and enter the username and password or select User Single Sign-On authentication in the Authentication section, as shown in Figure 20.3. If you choose to store a username and password in the data connection, other authors can see this information in clear text. If you choose to use SSO, you need to provide the application name, the field to use for the username, and the field to use for the password. Figure 20.3. Entering the database connection information
Alternatively, you can choose to enter a custom connection string. You will need to provide that string as well as select whether you want to use an ODBC, OLE DB, SQL Server, or Oracle provider type. |
7. | Click Next. |
8. | Choose your database from the Database drop-down menu and select the table or view. Alternatively, you can select that you will use custom SQL commands or stored procedures in the data view. |
9. | Click Finish. |
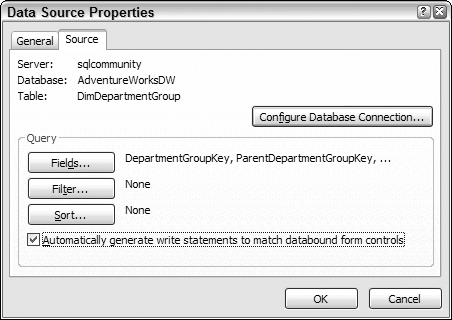
10. | Once the source table is selected, you can enter filter and sort criteria for the data in the Source tab of the database connection, as shown in Figure 20.4. Figure 20.4. Using the sort and filter options for the database connection
|
11. | Click the General tab. |
12. | Enter the name for your database connection in the Name field and the description in the Description field. Make sure that you provide enough information about the connection (database, table, and authentication method, as appropriate) so that anyone designing a data view can make use of the data source. |
13. | Click OK. |

Adding XML files
You can upload XML files with data that you want to use in a Data View Web Part. This allows you to add data that is structured exactly to your specifications.
To add an XML file to the Data Source Library, follow these steps:
1. | Open SharePoint Designer and choose Open Site from the File menu. |
2. | Enter the URL in the Site Name field and click Open. |
3. | The Data Source Library should open in the tool pane section on the right, but if you do not see that, choose Data Source Library from the Task Pane menu. |
4. | Expand the XML Files section and click Add an XML file. |
5. | Enter the location in the Location field or browse to your XML source file. |
6. | Click the Login tab and enter appropriate authentication info as necessary for your XML file. If you choose to store a username and password in the data connection, other authors can see this information in clear text. If you use SSO, you must provide the application name, the field to use for the username, and the field to use for the password. |
7. | Click the General tab and enter the name for your XML data in the Name field and the description in the Description field. Make sure that you provide enough information about the connection data so that anyone designing a data view can make use of the data source. |
Connecting to server-side scripts or RSS feeds
Server-side scripts allow you to connect to data that is selected by the script and processed on the server on which it lives. The capability to connect to RSS feeds allows you to present the data made available via RSS in your Data View Web Part. To create a connection to a server-side script or RSS feed, follow these steps:
1. | Open SharePoint Designer and choose Open Site from the File menu. |
2. | Enter the URL in the Site Name field and click Open. |
3. | The Data Source Library should open in the tool pane section on the right, but if you do not see that, choose Data Source Library from the Task Pane menu. |
4. | Expand the Server-side Scripts section and click Connect to a script or RSS feed. |
5. | Choose whether you will use HTTP Get or HTTP Post in the HTTP Method field. |
6. | Select which command you are configuring in this dialog box. The default value is Select (as it appears in the dropdown) which is the most common method of returning data. However, you have the option of configuring the Insert, Update, and Delete commands as well in the server-side script configuration. |
7. | Enter the URL to the script or RSS feed in the Enter the URL to a server-side script field, as shown in Figure 20.5. Figure 20.5. Configuring the URL for a server-side script or RSS feed connection
|
8. | Enter the parameters that you would like to pass to the script. In this example shown in Figure 20.5, the URL is to an RSS feed for a list, and the list parameter is automatically populated as a parameter for the connection. |
9. | Click the Login tab and enter the appropriate authentication information or select Don’t attempt to authenticate if authentication is not necessary. If you provide username and password credentials, they are stored in clear text. If you use SSO, you must provide the application name, the field to use for the username, and the field to use for the password. |
10. | Click the General tab and enter the name for your server-side script or RSS feed in the Name field and the description in the Description field. Make sure that you provide enough information about the connection data so that anyone designing a data view can make use of the data source. |
11. | Click OK. |

Connecting to a Web service data source
Connecting to data via a Web service is a very flexible option that can leverage the full power of the Web service. For example, using the SharePoint Web service to connect to (or update) SharePoint information (list data and so on) allows you to configure the data source to perform operations and authenticate exactly per your specification, even if the list is not on your local site collection or server.
1. | Open SharePoint Designer and choose Open Site from the File menu. |
2. | Enter the URL in the Site Name field and click Open. |
3. | The Data Source Library should open in the tool pane section on the right, but if you do not see that, choose Data Source Library from the Task Pane menu. |
4. | Expand the XML Web Services section and click Connect to a web service. |
5. | Enter the Web service address in the Service description location field. If you are connecting to a Web service for a SharePoint site, the address will be http://<servername>/<sitename>/_vti_bin/lists.asmx. |
6. | Click Connect Now. |
7. | Select which command you are configuring in this dialog box. The default value is Select, which is the most common method of returning data. However, you have the option of configuring the Insert, Update, and Delete (as it appears in SharePoint Designer command dropdown) commands as well in the Web services configuration. |
8. | Configure the port and operation for your Web service. If you are using a SharePoint 2007 Web service, choose ListsSoap12 as the port as shown in Figure 20.6. If you want to return list items for a SharePoint list, choose GetListItems as the operation. Figure 20.6. Connecting to a SharePoint web service
|
9. | Enter the parameters that you would like to pass to the service. In the example shown in Figure 20.6, the Web service is provided by SharePoint to get items, and the appropriate parameters are automatically populated as a parameter for the connection. If you are using the data view to get items as shown in the Figure 20.6 example, double-click the listName parameter and enter the name of the list for which you want to return, as shown in Figure 20.7. Figure 20.7. Configuring the list name parameter for which you want the web service to return items
|
10. | Click the Login tab and enter the appropriate authentication information, or select Don’t attempt to authenticate if authentication is not necessary. If you provide username and password credentials, they will be stored in clear text. If you use SSO, you must provide the application name, the field to use for the username, and the field to use for the password. |
11. | Click the General tab and enter the name for your Web services connection in the Name field and the description in the Description field. Make sure that you provide enough information about the connection data so that anyone designing a data view can make use of the data source. |
12. | Click OK. |


Note
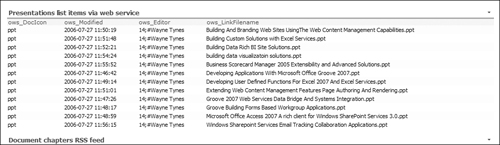
Although using the Web service to access SharePoint data is very flexible, it loses some of the automatic formatting of the list or library provided by inserting SharePoint list Web Parts. In Figure 20.8, you see a Data View Web Part of a document library that is accessed via a Web service. You will need to format the columns to make the document title link to the document and the document creator link to the user profile, both of which are provided by a native document library Web Part.
Figure 20.8. A Data View Web Part displaying a document library that was accessed via Web services
Creating Business Data Catalog views
By creating Business Data Catalog views, you can provide read-only access to the business data provided by your Shared Services. To create a Business Data Catalog view, follow these steps:
1. | Open SharePoint Designer and choose Open Site from the File menu. |
2. | Enter the URL in the Site Name field and click Open. |
3. | The Data Source Library should open in the tool pane section on the right, but if you do not see that, choose Data Source Library from the Task Pane menu. |
4. | Expand the Business Data Catalog section and click Create a new view. |
5. | In the Source tab, select the application and entity for which you want to create a view. |
6. | Select the Filter button and enter filter criteria if you want to limit the data available in the view in the Data Source Library. |
7. | Click the General tab and enter the name for your business data in the Name field and the description in the Description field. Make sure that you provide enough information about the connection data so that anyone designing a data view can make use of the data source. |
8. | Click OK. |
Creating linked sources
Linked sources are sources in your data catalog that you want to link together so that the data can be either joined based on a common field or combined so that it is sorted together. You want to create your linked sources in your Data Source Library before inserting the data in a Data View Web Part because you want to show and select the fields for insertion from the linked data source instead of the individual data sources.
1. | Open SharePoint Designer and choose Open Site from the File menu. |
2. | Enter the URL in the Site Name field and click Open. |
3. | The Data Source Library should open in the tool pane section on the right, but if you do not see that, choose Data Source Library from the Task Pane menu. |
4. | Expand the Linked Sources section and click Create a new Linked Source. |
5. | Click Configure Linked Source and add two or more data sources from your Data Source Library. |
6. | Click Next. |
7. | Select whether you want to merge or join the data sources as shown in Figure 20.9. Figure 20.9. Choosing the method for linking data sources
If the sources are two RSS feeds that you want to show in one feed, merge the sources. For the case where you will join the data so that you can show all orders for a particular customer and those are two data sources, choose to join the data. |
8. | Click Finish. You will enter the criteria for the join when you insert the subview, so that is not managed when you create the linked sources. |
9. | Click the General tab and enter the name for your linked source in the Name field and the description in the Description field. Make sure that you provide enough information about the connection data so that anyone designing a data view can make use of the data source. |
10. | Click OK. |

Implementing the Data View Web Part
After your Data Source Library has been populated with the data sources that you need for your site, you implement the Data View Web Part on Web Part pages to display that data. You will want to configure your linked data sources before implementing the Web Part. This allows you to insert the data from the linked data source instead of from the separate data sources.
There are two ways that you can display data in your Data View Web Part: as a view (read-only) or as a form (read-write). The data source must allow updates for you to insert data as a form, so you cannot insert a form of the Business Data Catalog sources or RSS feeds, for example. Also, SharePoint does not allow updates to linked sources, even though if the lists were implemented as separate SharePoint lists, the dataview would support updates.
Whether you are inserting a view or a form, SharePoint also lets you choose whether to insert the data as a single item or multiple items. For form items, you can also create a view with a new form that presents your selected fields so that users can add new items. These options allow you to design the page so that the data is presented to the user in a readable format and optimized for your page width.
The single item view provides a control so that users can scroll through the record, as shown in Figure 20.10.
Figure 20.10. A single item with scroll control data view

If you have a form view, inserting a multiple item form can make the page long very quickly, and therefore hard to use, because the save or cancel control is at the bottom of all the values.
Tip
To make a multiple item form more usable on a page, you can connect it to another Web Part that filters the values so that only a few are shown at a time. For example, you can connect a multiple item form for a contact list to a Company list so that multiple item form only shows contacts for the selected company.
For linked sources that are joined, you have the option to insert a joined subview for the joined data. In this scenario, you insert the fields from the linked source that are the primary fields and then insert the joined subview for your related list fields. For example, in Figure 20.11 the primary data view fields are the customer fields, and a joined subview for contacts has been inserted that shows all the contacts for each customer.
Figure 20.11. A joined linked data source that is inserted as a data view and a joined subview

Inserting a data view
To insert a data view on a Web Part page, follow these steps:
1. | Open the page on which you want to add the Data View Web Part using SharePoint Designer. |
2. | Click the zone in which you want to insert the data view. |
3. | Choose Insert Data View from the Data View menu. |
4. | Select the data source from the data source library tool pane in the right-hand column and select Show Data. |
5. | Select the fields that you want to insert in the data view. If you are selecting more than one field, you can hold down the Ctrl key while selecting the fields you want with your mouse. |
6. | Click Insert Selected Fields as. Select Single Item View if you want to show just one item from the list. Select Multiple Item View if you want to show multiple items from the list. If your data source allows updates, you have three options for inserting data in a form view that will present the fields for adding records or updating records. If you want to insert forms for writing data, select one of these options:
|
7. | Choose Save from the File menu to save your Web Part page. |
Inserting a linked source joined data view
To insert a data view on a Web Part page, follow these steps:
1. | Open the page on which you want to add the Data View Web Part using SharePoint Designer. |
2. | Click the zone in which you want to insert the data view. |
3. | Choose Insert Data View from the Data View menu. |
4. | Select the linked data source from the Data Source Library tool pane in the right-hand column and select Show Data. |
5. | Select the fields from your primary list fields that you want to insert in the data view. If you are selecting more than one field, you can hold down the Ctrl key while selecting the fields you want with your mouse. |
6. | Click Insert Selected Fields as. Select Single Item View if you want to show just one item from the list. Select Multiple Item View if you want to show multiple items from the list. |
7. | Click the column to the left of where you want to insert the joined menu and select Column to the Right from the Table
|
8. | Place the cursor in the first row that contains a value (not the header row). |
9. | Select the fields from your secondary list fields that you want to insert in the data view. |
10. | Click Insert Selected Fields as and select Join Subview. |
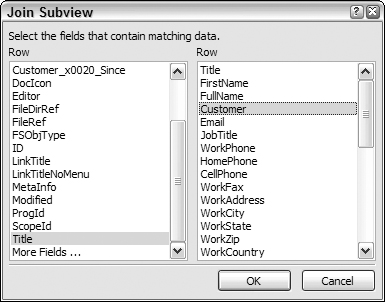
11. | From the Join Subview dialog box, select the field from your primary list on the left and the field from your secondary list on the right that should be joined, as shown in Figure 20.12. If you don’t see your field, click More Fields at the bottom of the dialog box. Figure 20.12. Selecting a joined field for your join subview
|
12. | Click OK. |
13. | Choose Save from the File menu to save your Web Part page. |