
Optimizing Excel Services
Excel Services allows you to reuse your existing corporate spreadsheet assets in SharePoint without having to convert the file format. It also allows you to use and connect your spreadsheet data while protecting and securing the business logic and data contained in your spreadsheets. You must be running MOSS to use Excel Services.
Excel worksheet functionality can extend to external data sources, user-defined functions, and programmatic access to services, so it’s important to secure the file locations and data sources that you will be using to support your Excel Services. Doing this enables you to take advantage of the Excel Services functionality without exposing your SharePoint infrastructure to malicious or bad behavior.
This section covers how to configure Excel Services to be secure and usable, and have high performance.
Configuring Excel Services settings
To configure your Excel Services settings and optimize its security and performance, follow these steps:
1. | Open the administration page for your Shared Service provider. |
2. | Select Edit Excel Services settings in the Excel Services Settings section. |
3. | In the Security section, select whether you would like to use Impersonation or the Process account to access workbooks that are not stored on SharePoint. If you select impersonation, Excel Services will use the credentials of the service account. |
4. | In the Security section, select whether encryption is required between the Excel Services front end and the client computer. |
5. | Select whether you would like to use the Workbook URL, Round Robin, or Local for the load balancing scheme, and in the Load Balancing section enter the Retry Interval, which defines how long to wait between attempts to communicate with unresponsive Excel Calculation Services servers. Acceptable responses for the retry interval range from 5 seconds to 24 days (2073600 seconds). The load-balancing choices allow you to pick the right method for distributing the load if you have multiple application servers providing Excel Services. The Workbook URL load-balancing option will pass requests for the same workbook URL to the same application server to try to take advantage of caching on the application server. The Round Robin load balancing option distributes requests to application servers in turn. The Local option is for the scenario when your application server is also your Web front end. |
6. | Enter the maximum number of sessions allowed for each user in the Session Management section. You can configure Excel Services to not have a session limit by specifying a -1 value or any positive integer for the limit. |
7. | Configure the memory utilization behavior by entering the Maximum Private Bytes, Memory Cache Threshold, and the Maximum Unused Object Age settings in the Memory Utilization section. The Maximum Private Bytes (in MB) sets the maximum amount of memory that the Excel Calculation Services process can command. If you configure this setting to a -1 value, it will use up to 50% of the server memory. You can also specify any positive integer as a valid value. The Memory Cache Threshold is a percentage (1–95%) that determines how much of the maximum private bytes can be used for caching inactive objects to improve performance. Excel Calculation Services releases cached objects if the Memory Cache Threshold is exceeded. If you configure this setting to 0, it does not cache inactive objects. For the Maximum Unused Object Age set the maximum time in minutes that you want inactive objects to be cached. This setting can be disabled by configuring a -1 value if you do not want to set a maximum time. Otherwise, you can enter a value between 1 minute and 24 days (34560 minutes). |
8. | Configure the disk space usage settings in the Workbook Cache section by defining an alternative Workbook Cache Location and Maximum Size of Workbook Cache, and by enabling or disabling the caching of unused files. The Workbook Cache Location is a local server file directory to use for caching if you do not want to use the system temporary directory setting. Leave blank if you are fine with using the system temporary directory. The Maximum Size of Workbook Cache setting allows you to limit (in MB) the disk space Excel Calculation Services uses, including space used for files that are not active but were recently used. You can decide whether to use the Caching of Unused Files. Disabling this feature slows Excel Services performance but also reduces the disk space used. |
9. | In the External Data section, configure the timeout for connections to external data sources and service account credentials to be used for accessing external data. The Connection Lifetime setting configures the number of sections that a connection to an external data source is kept open. If you disable this feature by configuring the setting as -1, the external data connections close at the end of each query. Other valid settings are 0 seconds to 24 days (2073600 seconds). The Unattended Service Account settings determine what credentials are used for connecting to external data locations that require authentication. |
10. | Click OK. |
Adding trusted file locations
Trusted file locations are locations that you designate as secure sources for workbooks for Excel Services. They can be SharePoint libraries, file shares, or non-SharePoint Web sites, and you can designate as many trusted file locations as you need to support your structure and the different level of trust. For example, you may allow user-defined functions from one trusted location but not another, and the ability to use external data and user-defined functions in a different trusted location. To add trusted file locations for Excel Services, follow these steps:
1. | Open the administration page for your Shared Service provider. |
2. | Select Trusted file locations in the Excel Services Settings section. |
3. | Click Add Trusted File Location in the top navigation bar. |
4. | Enter the address for your document library, file share, or Web site address in the Address field, as shown in Figure 9.8. Figure 9.8. Entering the address for your trusted file location
|
5. | Select whether the location is a SharePoint site, file share, or Web site address using the Location type radio buttons. |
6. | Select whether you would like to trust child libraries or directories by checking the Children trusted box. This setting can be very helpful if you don’t want to granularly manage libraries; however, you need to be confident that the users with the site creation permissions will not create subsites that should not be considered trusted locations. |
7. | Enter the appropriate session management settings in the Session Management section:
|
8. | Enter the appropriate workbook values in the Workbook Properties section:
|
9. | Enter the calculation behavior in the Calculation Behavior section.
|
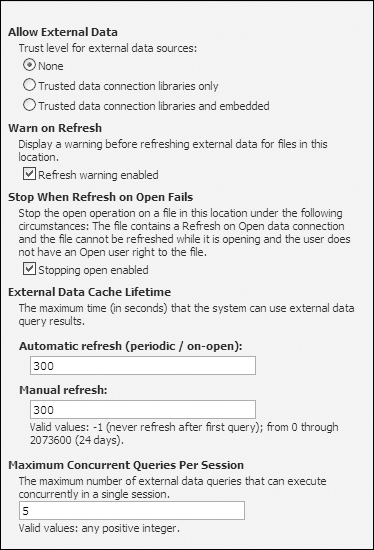
10. | Enter the external data settings in the External Data section, as shown in Figure 9.9. You will want to configure these settings according to the needs and trust levels of workbook authors. External data allows Excel to process data from a variety of sources, such as databases and ODBC sources, and therefore surfaces sources that many users wouldn’t otherwise see. By limiting the ability to use external data defined in trusted data connection libraries and limiting the publishing of DCLs to trusted authors, you can manage external data risk while still allowing a wide range of functionality. Figure 9.9. Configuring the external data settings for your trusted data location
|
11. | Select whether you would like to allow user-defined functions in the User-Defined Functions section. |
12. | Click OK. |

Defining trusted data connection libraries
Data connection files that are stored in data connection libraries provide central access to data sources for users and applications that may not even realize that they are using the data connections. You can configure your Excel Services to use data connections that are stored in data connection libraries instead of data connections embedded in the file. If Excel Services will be opening files that rely on data connection files, you will need to add the location(s) of the data connection library to the trusted data connection library list so that Excel Services can use the data connection.
If you limit the access to external data to only connections in DCLs in workbooks in trusted locations, you need to define the trusted locations that are viable and trusted for your workbook authors to Use.
To add a trusted data connection library, follow these steps:
1. | Open The Administration Page For Your Shared Service Provider. |
2. | Select Trusted Data Connection Libraries In The Excel Services Settings Section. |
3. | Select Add Trusted Data Connection Library In The Top Navigation Bar. |
4. | |
5. | Click OK. |

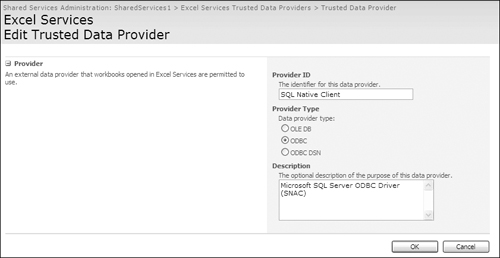
Configuring trusted data providers
External databases that are explicitly trusted can be configured as trusted data provided for Excel Services. Excel Services processes data from a data connection if the data is from a trusted provider. This allows you to further control the external data sources that can be used in your Excel Services environment.
1. | Open the administration page for your Shared Service provider. |
2. | Select Trusted data providers in the Excel Services Settings section. |
3. | Click Add Trusted Data Provider in the top navigation bar. |
3. | |
4. | Select whether you provider is OLE DB, ODBC, or ODBC DSN in the Provider Type section. |
5. | Enter a description for your provider. |
6. | Click OK. |
Adding user-defined function assemblies
User-Defined Functions (UDFs) are a way to extend the Excel capabilities to support calculations or data access that is not built into Excel. With UDFs, you can:
Create custom mathematical functions
Access data from data sources that do not have Excel data connection support
Make Web services calls
Because of the flexibility the UDF framework provides, the security ramifications of allowing UDFs must be considered. You should upload only UDF assemblies that have been created by a trusted source.
In addition to uploading the assemblies as outlined in this section, you need to enable workbooks stored in a trusted file location to call user-defined functions. This setting can be enabled for each trusted file location, so for further control of the security opening, you can have just one file location and not allow user-defined functions.
The UDF assembly is a DLL file that needs to be added to your Excel Services UDF library. To add a UDF file to Excel Services, follow these steps.
1. | Open the administration page for your Shared Service provider. |
2. | Select User-defined function assemblies in the Excel Services Settings section. |
3. | Click Add User-Defined Function Assembly in the top navigation bar. |
4. | Enter the path to the UDF in the Assembly field, as shown in Figure 9.12. This can be a file in the Global Assembly Catalog, on a network server, or local to the SharePoint server. |
5. | In the Assembly Location section, select whether the assembly is stored in a file location or in the Global Assembly Catalog. |
6. | Select Assembly enabled if you want the assembly to be available for use. If you want to add a disabled assembly or disable a current assembly without deleting it, you can deselect the Assembly enabled check box and the assembly remains but is not available for use. |
7. | Enter an assembly description so that administrators can identify the purpose of your assembly. |
8. | Click OK. |

After you have added your UDF, confirm that workbooks that will call the UDF are stored in a trusted file location that allows user-defined functions.