
Using Office SharePoint Designer
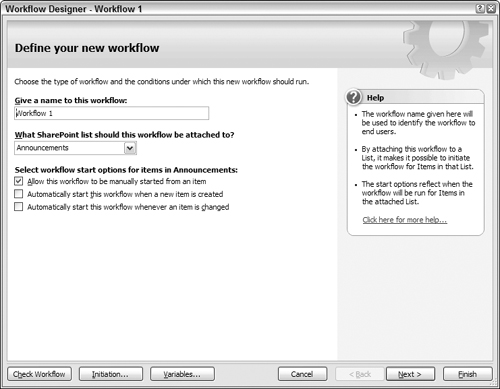
Although Microsoft Office SharePoint Designer does much more than provide a way to add additional workflow functionality to applications, this section focuses on workflows. The Office SharePoint Designer includes a Workflow Designer, as shown in Figure 8.6, to assist with the creation of workflows. It includes the basic workflow building blocks such as Document workflows, send mail, and update list item, as well as providing an interface to deploy custom developed workflows.
For the nondevelopers, SharePoint Designer provides the tools to create and deploy reasonably sophisticated workflows without writing code. This may become a very heavily used capability in organizations that want to manage human workflow activities.
Workflows developed in SharePoint Designer are authored directly against a specific list or document library in WSS. The activities available are predefined and the workflow is not compiled as an assembly. The workflow is stored as source files and then compiled the first time it runs. On each site, the workflows are stored in a separate document library that has a folder for each work-flow authored. The folder contains:
The markup file
The rules file
Any ASPX forms
Table 8.1 compares and contrasts the feature sets when developing workflows in SharePoint Designer and Visual Studio.
| Visual Studio 2005 | SharePoint Designer 2007 | |
|---|---|---|
| Authoring | Code is authored in the Visual Studio Designer and saved as a template that can be associated with multiple lists, sites, and content types | Easy to use wizard-type of interface for authoring workflows—a workflow must be bound to a specific list when created and is not associated with other lists |
| Custom activity and condition creation | Yes | No—limited to predefined set of activities and conditions |
| Generation of workflow markup file | Yes | Yes |
| Types | State Machine, Sequential | Sequential |
| Code-behind | Yes | No |
| Completed workflow | The workflow markup file and code-behind files are compiled into the workflow assembly and deployed to the server | The workflow markup, rules, and files are stored uncompiled in a document library on the site and are compiled on demand |
| Deployment | The workflow assembly and definition are packaged as a SharePoint Feature and deployed on the site | Deployment is handed automatically to the appropriate list |
| Dynamic data gathering and workflow modification | Workflow applications can use almost any forms technology including InfoPath and ASP.NET forms—it is possible to modify an active/running workflow | ASP.NET forms are automatically generated and can then be customized—it is not possible to modify an active/running workflow |
| Debugging | Yes | No |
The basic steps you will follow when designing workflows using SharePoint Designer are
- Collect and assemble the actions and conditions that will become the workflow sequence
- Generate any required ASP.NET forms for the initiation of the workflows
- Customize the forms
As you can see from the Workflow Designer UI, all SharePoint Designer workflows must be attached to a particular list, and it is an event in that list that starts the workflow.
Using Workflow Designer
To see the options available in the Workflow Designer, follow these steps:
1. | Go to any team site in MOSS or WSS. If you have installed SharePoint Designer, you may see an icon on your browser tool bar to Edit with Microsoft Office SharePoint Designer. If so, click that icon and SharePoint Designer loads, opened to the default.aspx of your site. You can also click File Note Running SharePoint Designer on a client requires the installation of Windows Workflow Foundation client side code which is included in the .NET Framework. SharePoint Designer checks the client the first time you load it and point to a SharePoint site. It then prompts with a link for the installation of the correct version of the .NET Framework. |
2. | Click File
|
3. | Give your workflow a name. This name identifies your workflow to the people who use it. We’ll go through these steps with an example in mind and you can replace these entries with your own scenario. Assume you have an HR team site and you want to send candidates that apply to developer positions to a development manager for review, and you want to send candidates for a sales position to the sales department manager. We will call this new workflow New Candidate. For this example, we have already created a document library called New Candidates on my HR site as well as a Candidate Type column that includes Developer and Sales Manager as selection options. If you want to follow this example, create these items prior to beginning this section. You can also just follow along with your own example relevant to your business. |
4. | Select the Shared Documents list as the list to which you will attach the workflow. All of the lists on the site are displayed. |
5. | Leave the default selected for Allow this workflow to be manually started from an item. This allows a workflow to be launched from the document drop-down menu. We’ll also check Automatically start this workflow when a new item is created so that new resumes saved will always kick off a new review process. We’ll leave Automatically start this workflow whenever an item is changed unchecked because we don’t need to start a review for simple edits or metadata changes. |
6. | Click Next. The next screen allows you to design steps in our workflow. Steps are simply a way to group a set of related conditions and actions. The conditions and actions in the step are evaluated and processed at one time. For this simple example, we will have one step to evaluate. Is this a Developer or Sales Manager’s resume? If it is a Developer’s resume, send to the designated reviewer; likewise if it is a Sales Managers resume, it should be sent to the designated reviewer for those candidates. For more complicated multi-step workflows, you simply want to create a design that logically follows the actions in the previous step. |
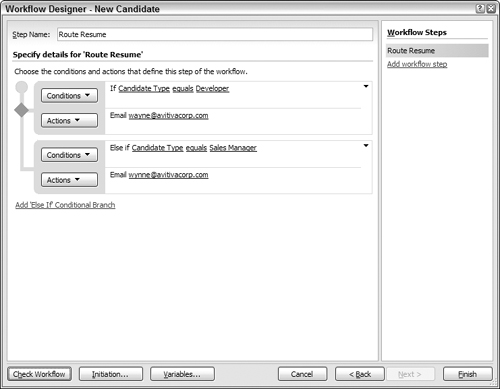
7. | We’ll name the step Route Resume because that is the primary function of this single-step workflow. |
8. | Add a condition. Click the Conditions button and select Compare New Candidates field (to be consistent with the list mentioned in step 3). This option changes based on the name of the list you selected in step 5 and will always show the columns that have been created in that list. A line is added to the conditions row with underlined values that indicate these can be configured. |
9. | Click field and select Candidate Type. Click value and select Developer. |
10. | Click the Actions button and select “Send an Email.” |
11. | Click the underlined “this message” link to configure the e-mail message. |
12. | Add an e-mail user to the To: field, a subject line for the e-mail, and the body. Any text that has been captured in a list item field can be added as a variable to the message body by clicking the Add lookup to Body button. |
13. | To add the logic for a Sales Manager candidate, click Add ‘Else If’ Conditional Branch. Your step screen should look similar to Figure 8.7. |
14. | Click Finish. You should see a Processing New Candidate dialog box, and then you are returned to the SharePoint designer workspace. A Workflows folder now appears on the left side of the workspace. You can expand the folder to see the workflows you have created on this site. |
Other Workflow ActionsAdd Time to Date: Provides the ability to add a time increment in minutes, hours, days, months, or years and then output that new amount to a variable that could be used in an e-mail, field, and so on. Assign a Form to a Group: Adding this action provides the ability to assign a custom form to a group of users. Clicking “a custom form” in the action loads the Custom Task Wizard. Values that are submitted using the form are stored in the Tasks list. The workflow remains paused until all of the survey forms are completed. A practical example for this action would be collecting feedback on potential new hires at a company. To complete the task a user would review a resume, click Edit this task, and answer several survey questions about the candidate. The task list could have a custom view that counts the number of Hire and No Hires and displays those totals in a view. Assign a To-do Item: This action adds a to-do item to the Tasks list for each user that is specified. Until all items are completed, the workflow remains paused. Build Dynamic String: Provides an interface to build a string. In the String Builder UI, lookups to lists and their specific fields can be added to the string, and then the string can be stored in a variable. Check In Item: This action allows any item in a list to be checked in with a custom comment. Check Out Item: With this action any list item can be checked out based on conditions being satisfied in the workflow. Filling in the field and value tells the code which item to check out. Collect Data from a User: The action definition launches a Custom Task Wizard to help define the data to be collected from a user and includes custom form fields. Values submitted by the user are stored in the Tasks list and can be referenced later in the workflow. The workflow remains paused until the task is completed. Copy List Item: Allows the user to specify a list item to copy to another list by defining the list, field, and value in the source. Create List Item: Creates a new list item by defining which list and the values of the fields in the list. The Create New List Item UI also allows you to append a unique identifier to the end of the file name to deal with list items of the same name; otherwise, the item can be overwritten. Delete Item: Provides for the selection of a list and item for deletion when the condition is met. Discard Check Out Item: This option is used to terminate a Check Out on an item without initiating a Check In. Do Calculation: This action is useful when you want to take the values of two list items and perform a calculation that outputs to a variable. Log to History List: A custom message related to a workflow action can be logged to the workflow history list using this action. Pause For Duration: This action pauses the workflow for a period of days, hours, and minutes specified. Pause Until Date: An action that pauses the workflow until the date specified. Send an Email: Send an e-mail with defined To, CC, Subject, Body, and variables. Set Content Approval Status: This action sets the content approval status to Approved, Rejected, or Pending, and adds comments to go with the approval. Set Field in Current Item: Changes the value of the field to the setting in the action. Set Time Portion of Date/Time Field: This action configures the time portion of the specified Date/Time Field. Set Workflow Variable: Allows the configuration of a workflow variable. Stop Workflow: This action stops the workflow and posts a custom message to the workflow history log. Update List Item: An action that updates any of the fields in a list item to the values specified. Wait For Field Change in Current Item: Pauses a workflow until a specified field equals the value entered. |
Testing the New Candidate workflow
These steps test the new workflow you created.
1. | Go to the HR site and click the New Candidates document library. |
2. | Click Upload and upload a sample document. |
3. | Select the Candidate Type to be Developer. |
4. | An e-mail should be sent to the contact you configured. |
5. | Run a similar test for Sales Manager to confirm that your conditional branch is working properly. |