
Understanding Web Part Galleries
A Web Part Gallery is an organized central library of Web Parts that you can use to locate a specific Web Part to add to your Web Part page. You can access Web Part galleries when you are in Edit mode in your Web Part page by selecting Browse from the Add Web Parts menu of the Web Parts tool pane. See the “Adding a Web Part to a Web Part page” section earlier in this chapter.
Web Part galleries are actually lists of installed Web Part Definition (.dwp file extension) and Web Part (.Web Part file extension) files. Depending on how your site administrator has configured your site, there are typically three or four Web Part galleries:
Closed Web Parts: Contains Web Parts assigned to the page but not visible.
Site Gallery: Contains Web Parts that a server administrator has decided are safe and are therefore available to all sites in a collection. The name of this gallery is the name of the collection’s top-level Windows SharePoint Services Web site.
Server Gallery: Contains Web Parts that a server administrator has made available to all site collections (sites and sub-sites) on a single virtual server.
Online Gallery: Contains Web Parts available from Microsoft or other third-party software vendors. By default, the Online Gallery contains an additional set of Web Parts available from Microsoft. However, a site administrator can redirect the online library to a different site.
Web Parts in common with WSS v3
The following Web Parts are available in both WSS and MOSS. The Web Parts that require MOSS follow this section. Both sections give descriptions of the Web Parts and some examples of how many of these Web Parts can be used.
Content Editor Web Part
The Content Editor Web Part (as it appears in MOSS) is a very versatile and useful Web Part that renders Hypertext Markup Language (HTML) content. We often use this Web Part to present text in an attractive manner. There are three ways to enter content into the Content Editor Web Part once you have put the Web Part into Edit mode:
Rich-Text Editor: The rich-text editor is an easy way for non-HTML users to input content. Using the rich-text editor, you can insert and format text, links, and tables, and insert pictures. The editor controls, though lacking the full breadth of Microsoft Word tools, should be familiar to Word users.
Source Editor: The source editor provides an edit window where you can input or edit the HTML for the Web Part.
Content Link Field: If you have HTML in a file, you can point the content editor Web Part at that file. This is useful if you want to present the same text on multiple pages so you can upload an HTML file to a location available to all the pages and link the content editor Web Part to those files.
Although it is easy to enter and edit content in the rich-text editor, there are times that it is not possible to format the content as neatly as is possible by editing the HTML code. In this case, you can input the content via the rich-text editor and then open the source editor and modify the HTML.
Another approach is to paste into the Content Editor Web Part some standard HTML that you use to encapsulate content so your end users can edit the text once it is there. As an example, here is some HTML that we use to present text in a text box with rounded corners (small graphic files provide the rounded corners and gradient).
<TABLE id=table27 style="BORDER-COLLAPSE: collapse" cellPadding=0 width="100%" border=0> <TBODY> <TR> <TD vAlign=top width="100%"> <TABLE id=table28 style="BORDER-COLLAPSE: collapse" cellPadding=0 width="100%" border=0> <TBODY> <TR> <TD width=6><IMG height=19 src="image%20library/tplft-crnr.jpg" width=6 border=0></TD> <TD style="BACKGROUND-POSITION: left top; BACKGROUND-IMAGE: url(image%20library/part-grad.jpg); BACKGROUND-REPEAT: repeat-x" bgColor=#f7941d> <FONT color=#000000 size=2><B>Content Header (Corresponding text from the image)</B></FONT></TD> <TD width=6><IMG height=19 src="image%20library/tprt-crnr.jpg" width=6 border=0></TD></TR> <TR> <TD style="BACKGROUND-POSITION: left top; BACKGROUND-IMAGE: url(image%20library/side-lft.jpg); BACKGROUND-REPEAT: repeat- y"> <P> </P></TD> <TD vAlign=top align=middle> <TABLE height=100 width="100%" border=0> <TBODY> <TR> <TD vAlign=top><SPAN>Content </SPAN></TD></TR> </TBODY></TABLE></TD> <TD style="BACKGROUND-POSITION: right top; BACKGROUND-IMAGE: url(image%20library/side-rt.jpg); BACKGROUND-REPEAT: repeat- y"> </TD></TR> <TR> <TD vAlign=top align=left><IMG height=6 src="image%20library/btmlft-crnr.jpg" width=6 border=0></TD> <TD style="BACKGROUND-POSITION: center top; BACKGROUND-IMAGE: url(image%20library/btm.jpg); BACKGROUND-REPEAT: repeat- x"> </TD> <TD vAlign=top align=right><IMG height=6 src="image%20library/btmrt-crnr.jpg" width=6 border=0></TD></TR></TBODY></TABLE></TD> </TR></TBODY></TABLE>
The resulting Content Editor Web Part is shown in Figure 5.9, and end users can easily modify the text while leaving the structure in place.

Form Web Part
The Form Web Part (in MOSS 2007 Web Part names are capitalized) is very similar to the Content Editor Web Part in function because it renders HTML code. However, the Form Web Part is designed so that it can be connected to provide data to other Web Parts, whereas the Content Editor Web Part is not connectable.
Image Web Part
This Web Part makes it easy to display image files. In the Image section of the tool pane, you set:
The path to the image in the image link field
The alternative text that appears if users cannot see the image in the alternative text field
The image vertical alignment (top, middle, bottom) and the image horizontal alignment (left, center, right)
Web Part background color (transparent, pick from palette or enter RGB in hex)
The Content Editor Web Part can also be used to display images on a page, but the image Web Part is preferable if you are displaying an image only because it does a better job with centering and placement.
Site Users
The Site Users Web Part shows all users that have rights to this site and their online status.
Page Viewer Web Part
The Page Viewer Web Part is a useful Web Part to connect to data that is external to the site. You can select whether you want to connect to a Web Page folder or a specific file.
The linked content is isolated from other content on the Web page. It may seem logical to use the Page Viewer Web Part to show content from other SharePoint sites—for example, to show a view of a document library. Unfortunately this results in a poor display because there are two sets of navigation rendered: the navigation of the page where the Page Viewer Web Part is installed and the navigation of the Document Library view. A better solution is to use a Data View or Content Query Web Part to surface data located in other sites.
Displaying a folder with the Page Viewer Web Part is a good way to show content that is located on a file share. The view of the share differs based on the user’s Windows Explorer settings. Users will have the task pane of Windows Explorer if they have chosen to Show common tasks in folders in the Folder Options of Windows Explorer, as shown in Figure 5.10; the resulting view of file share looks like Figures 5.11 and 5.12.
Figure 5.10. Folder Options settings in Windows Explorer

Figure 5.11. Page Viewer Web Part showing a file share with Windows Explorer set to show common tasks in folders

Figure 5.12. Page Viewer Web Part showing a file share with Windows Explorer set to use Windows classic folders

Relevant documents
This Web Part displays documents that are relevant to the current user. The options for configuring this Web Part are in the Data section of the task pane. The settings allow you to select whether to include or display:
Documents last modified by me
Documents created by me
Documents checked out to me
A link to the containing folder or list
Maximum number of items shown (between 1 and 10,000)
This can be an effective Web Part to aggregate content for each user, especially if the site collection is small enough so that this Web Part can display documents from multiple sites.
User tasks
This Web Part aggregates and shows tasks that are assigned to the current user. The options for configuring this Web Part are in the data section of the task pane. The settings allow you to decide whether to:
Display Item Link column
Set Maximum number of items shown (between 1 and 10,000).
This can be an effective Web Part to aggregate content for each user especially if the site collection is small enough so that this Web Part can display tasks from multiple sites.
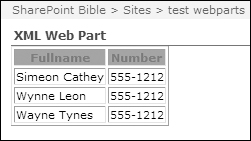
XML Web Part
This Web Part renders Extensible Markup Language (XML) just as the Content Editor Web Part renders HTML. You can enter XML via the XML Editor, link to an XML file, and enter Extensible Stylesheet Language (XSL) via the XSL Editor, or link to an XSL file. The XSL file is used to style, handle, and manipulate your XML data.
As an example of how the XML Web Part renders, here is some sample XML data.
<?xml version="1.0" encoding="ISO-8859-1"?>
<catalog>
<name>
<firstname>Simeon</firstname>
<lastname>Cathey</lastname>
<gender>male</gender>
<fullname>Simeon Cathey</fullname>
<telephone>555-1212</telephone>
<pet>cats</pet>
</name>
<name>
<firstname>Wynne</firstname>
<lastname>Leon</lastname>
<gender>female</gender>
<fullname>Wynne Leon</fullname>
<telephone>555-1212</telephone>
<pet>dog</pet>
</name>
<name>
<firstname>Wayne</firstname>
<lastname>Tynes</lastname>
<gender>male</gender>
<fullname>Wayne Tynes</fullname>
<telephone>555-1212</telephone>
<pet>dog</pet>
</name>
</catalog>
The code below shows the associated XSL for the XML data. The XSL formats the table, the table headings, and the table heading color, and selects which columns of the XML data to show.
<?xml version="1.0" encoding="ISO-8859-1"?>
<xsl:stylesheet version="1.0"
xmlns:xsl="http://www.w3.org/1999/XSL/Transform">
<xsl:template match="/">
 <html>
 <body>
  <table border="1">
   <tr bgcolor="#9acd32">
    <th>Fullname</th>
    <th>Number</th>
   </tr>
   <xsl:for-each select="catalog/name">
   <tr>
    <td><xsl:value-of select="fullname"/></td>
    <td><xsl:value-of select="telephone"/></td>
   </tr>
   </xsl:for-each>
  </table>
 </body>
 </html>
</xsl:template>
</xsl:stylesheet>
The XML Web Part renders the XML and XSL as shown in Figure 5.13.
Figure 5.13. XML Web Part rendering of XML data with the applied XSL stylesheet
List View Web Part
The List View Web Part is generated every time you create a list or library on your site, so that you can add a Web Part view of that list or library on any of your site pages. The list view varies the columns that are displayed based on the type of list that is added, but all list views have the following edit options:
Selected View: The Selected View option lets you pick from any of your existing list views or lets you edit the current view. By editing the view you can change which columns are displayed, and filter the list and also the number of items that are returned. For more information about list views, see Chapter 4.
Toolbar Type: The Toolbar Type gives you the option to choose from a full toolbar, a summary toolbar, and no toolbar. The full toolbar gives you the toolbar for the list so you can perform any action on the list on the Web Part page that you could while in the list. The summary toolbar is a small link at the bottom of the list that allows users to add a new item from the view, and the no toolbar option just shows the list items.
The edit options for the List View Web Part are shown in Figure 5.14.
Figure 5.14. Edit options for the List View Web Part

Data View Web Part
The Data View Web Part allows you to create custom views of data contained in lists, libraries, or databases. This Web Part works for all data within the site collection so you can use it to display content that is not on your site. The Data View Web Part can be connected to other Web Parts on the page.
The Data View Web Part should be edited using SharePoint Designer. See Chapter 20 for more information on how to use SharePoint Designer to create and customize Data View Web Parts.
Web Parts specific to MOSS 2007
The Web Parts described in this section are available only on MOSS 2007 installations.
Business Data
The Business Data Web Parts are intended to connect a user to business applications.
Excel Web Access
Use the Excel Web Access Web Part to interact with an Excel 2007 workbook as a Web page. This Web Part requires the portal to be running Excel Web Services. To configure this Web Part:
1. | From the Site Actions menu in the top-right corner, select Edit Page. |
2. | From the Edit menu on the Excel Web Access Web Part, select Modify Shared Web Part. |
3. | In the Workbook Display section, enter the path to the workbook in the Workbook field. |
4. | Enter the range of cells that you want to show in the Named Item field. |
5. | Enter the number of rows to display and columns to display in their associated fields. |
6. | Click OK. |
Business Data Actions
Displays a list of actions from the Business Data Catalog. Displays a list of actions associated with an entity as defined in the Business Data Catalog. For example, you can use a Business Data Actions Web Part to display all the actions that portal users can perform on the Customer entity. Some examples of these actions are sending e-mail to a customer or editing the address of a customer.
IView Web Part
Displays iViews from SAP portal servers.
Business Data Item
Displays the details of an item from the data source of a business application that has been registered in the Business Data Catalog. For example, you can use a Business Data Items Web Part to display the details of a particular customer from a CRM database.
Business Data Item Builder
Creates a Business Data item from parameters in the query string and provides it to other Web Parts. This Web Part is used on Business Data profile pages only.
Business Data List
Displays a list of items from a business application. For example, you can use a Business Data List Web Part to display all of the customers from a CRM database.
Business Data Related List
Displays a list of items related to one or more parent items from a business application. For example, you can use a Business Data Related List Web Part to display all the orders for a particular customer from an order management database.
Content Rollup
The Content Rollup Web Parts are intended to consolidate SharePoint information from numerous sites for ease of use.
Content Query Web Part
The Content Query Web Part is used to roll up lists and libraries of similar content from one or more sites in a site collection. You can think of this Web Part as a content aggregator. A simple example would be to use this Web Part to display all documents in your site collection. In this case, you can keep documents located in their own document library in the context of a particular topic and have a rollup view in a single location to aggregate your documents. This can quickly provide another way to navigate your document structure.
To modify the Content Query Web Part, follow these steps:
1. | From the Site Actions menu in the top right corner, select Edit Page. |
2. | Next, click one of the Add a Web Part buttons in a Web Part zone. The Add Web Parts Webpage dialog appears. |
3. | Scroll down to the Web Part category labeled Default and select the Content Query Web Part check box, as shown in Figure 5.15. |
4. | Click the Add button at the bottom of the page. |

The page will refresh and show a new Web Part labeled Content Query Web Part. When first added to a page, it shows the structure of your site collection, as shown in Figure 5.16.
1. | To view all of your site collection documents, edit the query being used to show this data. Select Modify Shared Web Part from the Web Part edit menu. The Content Query Web Part has two configurable sections, Query and Presentation, in addition to the default Web Part properties. Expanding the Query section gives you access to the settings needed to customize the location to query as well as the types of content. |
2. | In the Source section, choose Show items from all sites in this site collection. If you know a specific site that you would like to show in the Content Query Web Part, you can limit the query to a specific site or even as granular as a single list. |
3. | In the List Type section, choose Document library from the drop-down combo box. To give you an idea of the many uses for this Web Part, some of the available choices are Announcements, Calendar, Contacts, Converted Forms, and Custom List. |
4. | From the Content Type section, select Document Content Types from the Show items of this content type group combo box. |
5. | Select Document from the Show items of this content type combo box. |
6. | If you have audiences defined in your deployment, you can enable audience targeting for this Web Part as a way to show or hide data. You can also use the Additional Filters section to refine what data is displayed. |
7. | Use the presentation section to customize the appearance of the data on the page. You will likely want to experiment with these settings to familiarize yourself with the different options. |
8. | Click OK at the bottom of the Web Part tool pane. This refreshes the page and applies all of the settings you chose. |
Figure 5.16. The Content Query Web Part when first added to a page

Note
In the Additional Filters section, you can filter only on system site or server column properties. You can select from out-of-the-box default list columns, or plan ahead and set up site or server list columns before you will be able to select them from the Additional Filters section. For information about site and server columns, see Chapter 3.
Colleague Tracker
In this version of SharePoint you can have a list of people (colleagues) in your organization who are associated to you in an easy-to-navigate tree structure view. This view also allows you to see their online status and links you to the public view of their MOSS My Site. There are two ways to associate colleagues to you in order to have them show up in your colleague tracker:
Manually search for users and then add them.
Let MOSS 2007 automatically suggest colleagues that it determines are associated to you and should be shown in the Colleague Tracker. MOSS makes these suggestions based on relationship to you in the organizational structure found in your Active Directory—looking at other members of sites and workspaces you are a member of, people who have worked on the same documents as you, people who have e-mailed you—and by comparing your user profile to others and finding similarities.
After placing the Colleague Tracker Web Part on a page, you need to configure it. There are three links to choose from:
The first link shows you a list of suggested colleagues. You can then choose which colleagues will be actively tracked.
You can also select whether or not to show all of your colleagues or only ones with recent changes.
The settings link opens the tool pane and allows you to switch the following on or off:
Show colleagues without changes
Only show colleagues in my workgroup
Anniversaries
Profile Property Changes
Membership Changes
New Documents
Out Of Office
Blog Changes
With the Colleague Tracker Web Part, it becomes easy to see at-a-glance events and activities that may affect you and the people you work with.
Memberships
The membership Web Part displays a list of Exchange Distribution lists and SharePoint sites that you are a member of.
The list of Distribution Lists that you belong to is displayed as Mailto links. Clicking one of the links opens your default e-mail program and populates the To field with the e-mail address of the distribution list.
The list of SharePoint sites you are a member of appears as links to each of those sites. Clicking any of the links redirects you to that site.
This list helps you keep track of the projects and distribution lists you are interacting with at a glance.
My Links
As you navigate around your SharePoint sites, a My Links link appears at the top of each page. Clicking it allows you to add a link to the current page to your global My Links list. Adding the My Links Web Part to a page allows you to view the list of links you have associated to you in the context of a particular topic or area of a SharePoint site. This can be particularly useful on a page you designate as an aggregator of information you use on a daily basis. Your My Site is a good candidate for this Web Part.
Opening the tool pane for this Web Part shows only the typical default properties.
My SharePoint Sites
Use to display documents you have authored on sites where you are a member and sites of your choice. This Web Part works only on personalized sites (My Sites).
My Workspaces
Displays sites created under your My Site. This Web Part works only on personalized sites (My Sites).
Site Aggregator
Use to display sites of your choice. The Site Aggregator creates a tab for each site that you enter and then encapsulates that site in the Web Part. This doesn’t look very good for high-content sites but otherwise provides an embedded view of sites. To configure this Web Part to show your sites:
1. | From the New Site Tab menu drop-down list of the Web Part, select New Site Tab. |
2. | Enter the Site URL and Site Name in the corresponding fields. |
3. | Click Create. |
When added to a page, the Site Aggregator Web Part is configured to append _layouts/MyInfo.aspx to any URL that you create a tab for. To change this behavior, modify the URL section of the Web Part properties.
Dashboard
The Dashboard Web Parts are intended to give users metrics and status about how the organization or group is performing. The Key Performance Indicators lists are configured with the metrics site template. See Chapter 3 for information on the Metrics site template.
Key Performance Indicators (KPIs)
Shows a list of status indicators. Status indicators display important measures for your organization, and show how your organization is performing with respect to your goals.
KPI Details
Displays the details of a single status indicator. Status indicators display an important measure for an organization and may be obtained from other data sources including SharePoint lists, Excel workbooks, and SQL Server 2005 Analysis Services KPIs.
Default
The Default Web Parts are a collection of Web Parts that allow you to connect to other news and content sources typically outside of SharePoint.
I need to . . .
Displays tasks and tools from a list.
RSS Viewer
Renders RSS Feed. To configure this Web Part, you much have the URL of the feed to which it is subscribed and configure the number of items that you want to display. You can also choose to show the feed title and description.
This Week in Pictures
Use to display the Images Library of a News site. The images must be stored in an Image Library and be on the same site as the page in which you are trying to add the Web Part.
WSRP Consumer Web Part (Displayed under Business Data category in MOSS 2007 RTM version)
Displays portlets from Web sites using WSRP 1.1. For this Web Part to function, WSRP providers must be configured for your site.
Filters
The Filter Web Parts help you filter the contents of the page to a user’s exact needs. They help users refine larger amounts of data down to items only relevant to a specific topic or other set of criteria.
Business Data Catalog Filter: Filter the contents of Web Parts using a list of values from the Business Data Catalog.
Choice List Filter: Filter the contents of Web Parts using a list of values from the Business Data Catalog.
Current User Filter: Filter the contents of Web Parts by using the logged on user properties of the current page.
Date Filter: Filter the contents of Web Parts by allowing users to enter or pick a date.
Filter Actions: Filter Actions will execute any filters set within the page.
Page Field Filter: Filter the contents of Web Parts using information about the current page.
Query String(URL) Filter: Filter the contents of Web Parts using values passed via the query string.
SharePoint List Filter: Filter the contents of Web Parts by using a list of values from an Office SharePoint Server list.
SQL Server 2005 Analysis Services Filter: Filter the contents of Web Parts using a list of values from SQL Server 2005 Analysis Services cubes.
Text Filter: Filter the contents of Web Parts by allowing users to enter a text value.
Outlook Web Access
The Outlook Web Access Web Parts allow users to integrate e-mail and calendaring capabilities with the portal. These Web Parts are most often used on personalized sites (such as MySites) so that users can get a single window into all their most used business information.
My Calendar
Use to display your calendar. This Web Part works with Microsoft Exchange Server 2003 and above. To configure this Web Part to view your calendar, follow these steps:
1. | From the Site Actions menu in the top-right corner, select Edit Page. |
2. | From the Edit menu on the My Calendar Web Part, select Modify Shared Web Part. |
3. | In the Mail Configuration section in the Web Part tool pane, enter the OWA address of your mail server in the Mail server address field and your username in the Mailbox field. |
4. | Select whether you would like the Web Part to show a daily or weekly view of your calendar in the View drop-down menu. |
5. | Click OK. |
My Contacts
Displays your contacts using Outlook Web Access for Microsoft Exchange Server 2007. To configure this Web Part to view your contacts, follow these steps:
1. | From the Site Actions menu in the top-right corner, select Edit Page. |
2. | From the Edit menu on the My Contacts Web Part, select Modify Shared Web Part. |
3. | In the Mail Configuration section in the Web Part tool pane, enter the OWA address of your mail server in the Mail server address field and your username in the Mailbox field. |
4. | Select whether you would like the Web Part to show a phone list or two-line view of your contacts in the View drop-down menu. |
5. | Click OK. |
My Inbox
Displays your inbox using Outlook Web Access for Microsoft Exchange Server 2003 or later. To configure this Web Part to view your Inbox, do the following:
1. | From the Site Actions menu in the top-right corner, select Edit Page. |
2. | From the Edit menu on the My Inbox Web Part, select Modify Shared Web Part. |
3. | In the Mail Configuration section in the Web Part tool pane, enter the OWA address of your mail server in the Mail server address field and your username in the Mailbox field. |
4. | Select whether you would like the Web Part to show a two-line message by sender, by subject, or by conversation view of your Inbox in the View drop-down menu. |
5. | Click OK. |
My Mail Folder
Displays your calendar using Outlook Web Access for Microsoft Exchange Server 2000 or later. Use this Web Part if you cannot use the My Inbox Web Part because of the server version.
My Tasks
Displays your tasks using Outlook Web Access for Microsoft Exchange Server 2003 or later. To configure this Web Part to view your tasks, follow these steps:
1. | From the Site Actions menu in the top-right corner, select Edit Page. |
2. | From the Edit menu on the My Tasks Web Part, select Modify Shared Web Part. |
3. | In the Mail Configuration section in the Web Part tool pane, enter the OWA address of your mail server in the Mail server address field and your username in the Mailbox field. |
4. | Select whether you would like the Web Part to show a by-due-date or by-subject view of your tasks in the View drop-down menu. |
5. | Click OK. |
Search
The Search Web Parts provide all the simple and advanced search components for MOSS. These Web Parts are delivered in this gallery so that users can drag search components on their custom pages.
Advanced Search Box
This Web Part enables users to find documents using various search criteria including words, phrases, scope, language, and document type, as shown in Figure 5.17 You can further restrict your search by specifying the search scope and document properties, such as author, document size, and create date.

Cross-Ref
SharePoint Search capabilities are explored in detail in Chapter 7.
People Search Box
This Web Part provides the same capability that is provided when users click the People tab in Advanced Search. It enables users to search for a person by name. Additional search options include Department, Title, Responsibilities, Skills, and Memberships.
People Search Core Results
Displays the people search results, and would typically be on the same page as the People search box. To use the People Search Box and People Search Core Results Web Parts together, follow these steps:
1. | From the Site Actions menu in the top-right corner, select Edit Page. |
2. | In the zone that you want to add the People Search capabilities, select Add a Web Part. |
3. | Select the People Search Box and People Search Core Results check boxes. |
4. | Click Add. |
5. | Select Modify Shared Web Part from the edit menu on the People Search Box Web Part. |
6. | Expand the Miscellaneous section. |
7. | Enter the name of the aspx page that you have added the Web Parts to in the Target Search Results Page URL. |
8. | Click OK. |
To test your Web Parts, exit Edit Mode and search for a person, as shown in Figure 5.18.

Search Box
This Web Part contains the search box found on all portal pages by default. Use this Web Part to enable search on custom portal pages and to place search anywhere you want on the page.
Search Core Results
This Web Part displays the search results generated from the Search Box search. Configuring the Search Box and Results Web Parts are accomplished the same way as configuring the People Search and Results Web Parts—by configuring the Miscellaneous property to point at the page the part is on.
Search High Confidence Results
This Web Part is used to display the special term and high confidence result sets.
Search Paging
This Web Part displays the search paging capability, so a user can scroll through multiple pages of search results.
Search Statistics
Displays search statistics, including number of results and duration of search time.
Search Summary
Displays search summary.
Site Directory
The Site Directory Web Parts are focused on consolidating sites and information within your site collection. These Web Parts augment site navigation and the ability to find information across the site collection.
Categories
This Web Part shows the categories for your site directory. If you put this Web Part on a page that is not located on the same site as your site directory, you must configure the Web Part to find your site directory site. To do this:
1. | From the Site Actions menu in the top-right corner, select Edit Page. |
2. | From the Edit menu on the Categories Web Part, select Modify Shared Web Part. |
3. | Expand the Miscellaneous section in the Web Part tool pane. |
4. | Enter the URL in the Web URL field. |
5. | Click OK. |
After this Web Part is configured, the results will show in the Sites in Category Web Part if it is added to the page.
Sites in Category
Displays the results of the Categories Web Part. When a category in selected in the Categories Web Part, the sites in that category appear in the Sites in Category Web Part.
Top Sites
The Top Sites Web Part returns the sites in the site collection or site directory that are marked as top site. It is a Content Query Web Part that needs to be configured to point to the location of your site directory list, list items from all sites in a particular site collection, or show items from a specific site and its sub sites. To configure this Web Part to list top sites from one of your site directories:
1. | From the Site Actions menu in the top-right corner, select Edit Page. |
2. | From the Edit menu on the Top Sites Web Part, select Modify Shared Web Part. |
3. | Expand the Query section in the Web Part tool pane. |
4. | Select the Show items from the following list button and use the Browse button to select your Site Directory list. |
5. | Click OK. |