
One of the most important accounting tools for a business is the budget, which is generally created on an annual basis to outline the expected needs of each department or business area.
A major benefit of budgets is the ability to control spending on certain operations by restricting the funds available for spending, which can require managers and buyers to find new vendors or suppliers to meet budget limits.
Budgets also allow companies to plan for future growth and expansion, and allow the creation of a financial roadmap.
Dynamics GP provides a flexible and easy-to-use budget creation and maintenance utility, which allows for comparison to the previous year's actual and budget figures during the budget creation process.
Budgets can be created in Dynamics GP directly, but the most efficient way of creating a budget for use in Microsoft Dynamics GP is to create it using Microsoft Excel.
There are four steps to create a budget in Dynamics GP. They are as follows:
- Create the budget.
- Export the budget to Microsoft Excel from Dynamics GP.
- Edit the budget in Microsoft Excel.
- Import the budget back into Dynamics GP.
It is strongly recommended that the budget be created in Dynamics GP and exported to Microsoft Excel for editing, as the import process requires the structure of the file to be exactly the same as the one being exported. The attempts to create the budget template manually can be very problematic.
To create a budget in Microsoft Excel, follow the given steps:
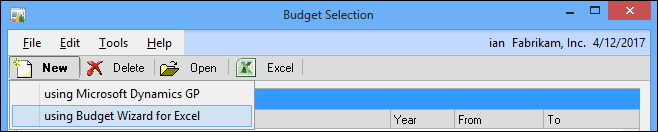
- Open the Budget Selection window in Dynamics GP by clicking on Financial from the Navigation Pane on the left, and then clicking on Budgets in the area page under Cards | Financial.
- Click on the New button and then navigate to using Budget Wizard for Excel.
- On the Welcome to the Budget Wizard for the Excel window, click on Next.
- Many of the organizations I have dealt with have used multiple budgets throughout the year. For example, they'll create an initial budget, a half-year forecast, and a master budget for reporting. As such, I always recommend that the year be placed at the start of the Budget ID, to group them together in the list of budgets. Following this recommendation, enter
2017 MASTERin the Enter an ID for this budget field. - Enter
Master Budget for 2017in Enter a description for this budget. - Leave Select how to base this budget set to
Fiscal Yearand change Select the date range for this budget to2017. - Click on Next to progress to the next step.
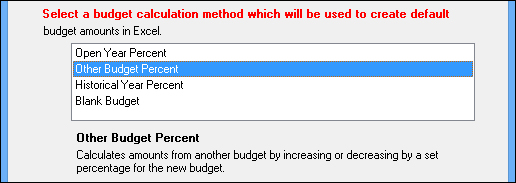
- Budgets can be based on one of the four calculation methods. In this example, click on Other Budget Percent.
- Click on Next.
- Set the Select a source budget ID field to
BUDGET 2008. - Set Increase by to
2.50%and click on Next. - If a worksheet for actual figures is to be output to the Excel budget, check the relevant checkbox, otherwise click on Next.
- The Account Verification step allows the selected accounts to be reviewed and unwanted ones to be removed. In this case, click on Next to proceed.
- Accept A new workbook as the Excel workbook to use, and click on Next.
- Before clicking on Finish to complete the budget creation, minimize all open windows other than the Budget Wizard for Excel window to prevent the Excel Save As dialog popping behind a window, and being inaccessible. Once the windows have been minimized, click on Finish.
- Click on Save to save the
2017 MASTER.xlsxfile to your Documents folder.
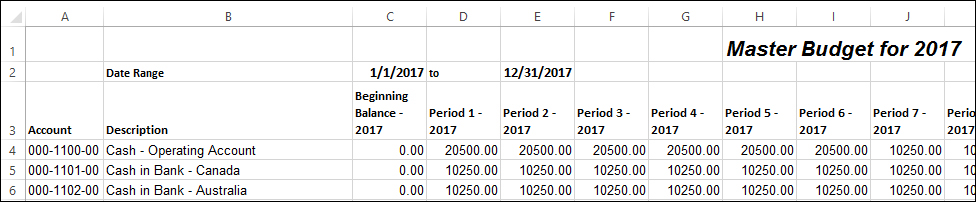
Now that the 2017 MASTER budget has been created in Microsoft Excel by copying the MASTER 2008 budget, and adding 2.5 percent, the budget can be edited in Excel before being imported into Dynamics GP.
It is very important that the column structure and the header rows of the spreadsheet are not altered; if they are, the budget will not import back into Dynamics GP.
To edit the budget, perform the following steps:
As many changes as required can be made to the Excel spreadsheet, and additional account codes can be inserted if required. The changes are only within the Excel spreadsheet; to apply the changes, the spreadsheet needs to be imported into Dynamics GP.
Now that the 2017 MASTER budget has been edited in Microsoft Excel, we now need to import it back to Dynamics GP.
To import the budget into Dynamics GP, perform the following steps:
- Open the Budget Selection window in Dynamics GP by clicking on Financial from the Navigation Pane on the left, and clicking on Budgets in the area page under Cards | Financial.
- Click on the Excel button and then click on Import from Excel which will launch Budget Wizard from Excel.
- On the Welcome page, click on Next.
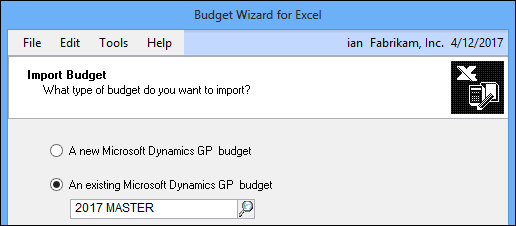
- Click on An Existing Microsoft Dynamics GP budget and enter
2017 MASTER. - Click on Next.
- Click on Browse… and then click on the Excel spreadsheet
2017 MASTER.xlsxfrom your Documents folder.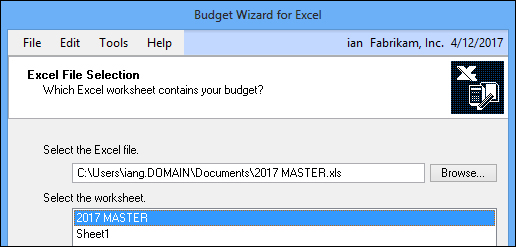
- Click on the 2017 MASTER worksheet and click on Next.
- Click on Finish to complete the import.