
23
Other modulation tools
Modulated delay lines are at the heart of a few other effects. Although neither phasers nor tremolos are based on delay lines, their operation is based on modulation. This chapter covers these tools.
Vibrato
Vibrato is the effect caused by rapid and subtle alteration of pitch. Such an effect can be part of a vocal performance, is an extremely common playing technique with string instruments, a known technique on guitars, and can also be the byproduct of the Doppler effect as produced by a Leslie cabinet (which was originally called a “Vibratone”). Vibrato can be achieved by modulating a delay line—without mixing the source signal. Subtle settings create similar effects to those that occur in nature. The evident pitch shifting caused by more aggressive settings will make the effect very obvious and unnatural (although this can still be used to creative effect in certain circumstances). The actual settings involve:
- Dry/wet—fully wet, dry signal not mixed.
- Delay time—between 3 and 8 ms.
- Modulation depth—around 25% (2 ms). This control is used for more or less effect.
- Modulation rate—around 3 Hz.
- Feedback—none.
Note that some delay time is still needed. If the delay time is set to 0, it is like having the record and playback heads at the same position. Although mechanically impossible, no matter how much the tape speed was modulated with such an arrangement, the pitch would never alter.
![]()
Track 23.1: Original Vocal
Track 23.2: Vibrato (Vocal, Light)
Settings: 100 percent wet, 8 ms delay time, 50 percent modulation depth, 1.5 Hz modulation rate, no feedback.
Track 23.3: Vibrato (Vocal, Deep)
Settings: 100 percent wet, 8 ms delay time, 75 percent modulation depth, 2.2 Hz modulation rate, no feedback.
Track 23.4: Original Guitar
Settings: 100 percent wet, 8 ms delay time, 40 percent modulation depth, 1 Hz modulation rate, no feedback.
Track 23.6: Original Snare
Track 23.7: Vibrato (Snare)
Settings: 100 percent wet, 8 ms delay time, 65 percent modulation depth, 1 Hz modulation rate, no feedback. In this track, the slow vibrato applied on the snare results in subtle pitch changes. This can be used to make snare samples more realistic.
Plugin: PSP 84
Drums: Toontrack EZdrummer
ADT
Not all singers are fans of the effort involved with real double-tracking. John Lennon was one of them. In search of an artificial alternative, Ken Townshend, then an engineer for The Beatles at Abbey Road Studios in London, came up with a solution. He connected two tape machines, so the delayed vocals from the second were rerecorded onto the first. The modulation on the second machine was achieved using a purpose-installed voltage-controlled oscillator. Having the original voice mixed with its own delayed-modulated version created an effect similar to double-tracking. The technique was termed artificial double-tracking (or automatic double-tracking) and was used liberally on Revolver and subsequent Beatles albums. Townshend’s actual arrangement also helped to give birth to chorus and flanging effects.
Although the general consensus is that properly performed double-tracking is better than ADT, having the ability to create this effect artificially during mixdown is a handy one—it gives an impression of fullness, whether by enriching vocals or other instruments. A few artists are associated with the double-tracking effect because they made generous use of it (the late Elliott Smith was one such exponent). But mostly, double-tracking is introduced during specific sections of a song to add some interest and breadth.
The execution of the ADT effect is similar to that of vibrato, except that we mix the dry signal as well:
- Dry/wet—possibly at the same level or with dry slightly louder than wet.
- Delay time—between 20 and 50 ms.
- Modulation depth—40% as a starting point.
- Modulation rate—less than 1 Hz.
- Feedback—none.
![]()
Track 23.8: ADT (Vocal)
Settings: 50 percent wet, 20 ms delay time, 21 percent modulation depth, 0.775 Hz modulation rate, no feedback.
Plugin: PSP 84
Chorus
The actual idea of multiple singers singing in unison was established well before harmony was introduced into Western compositions. Mostly, this was done solely for the purposes of loudness—even today, the size of an orchestra is dependent on the size of the venue and the audience within it. But multiple unison performance is also known to produce an extremely appealing effect called chorus. When 20 cellos play the same note, as each player produces a slightly different frequency (within the cents range), and as each cello is either slightly closer to or farther from the listener, the combined effect is mesmerizing. Synthesizers offer a similar feature called unison, where the same patch is layered with identical patches slightly detuned.
Perhaps of all the effects mentioned in this chapter, chorus is the most useful for mixing purposes. We might use it in the traditional sense of creating the impression of multiple performance with slightly different pitch and timing. It can, for example, enrich backing vocals and strings. It might also be used to add some richness and polish to plain sounds, or to liven tame organ presets or synthesized strings. Also, it is used to simply make other instruments, such as an acoustic guitar, slightly bigger and wider, and, using more subtle settings, to improve fluidity, on a bass guitar for example. It can even mask slight pitch detunes in a vocal performance. The denser the mix, the heavier the chorus would need to be to have an effect, but once the settings result in clear pitch alteration, the effect can lose its practical impact and sound gimmicky. In sparse mixes, a touch of chorus will often suffice. One of the qualities of chorus (which can also be regarded as a disadvantage) is that it tends to soften sounds and send them slightly farther away in the mix.
Chorus can be considered a form of ADT with slightly different settings. Chorus tends to sound richer with stereo delays, where slightly different delay times are set on each channel:
- Dry/wet—wet set between 20 and 70%; the more wet signal, the clearer the effect.
- Delay time—between 20 and 80 ms.
- Modulation depth—around 10%.
- Modulation rate—can be anywhere between 0.1 and 10 Hz.
- Feedback—none or very little.
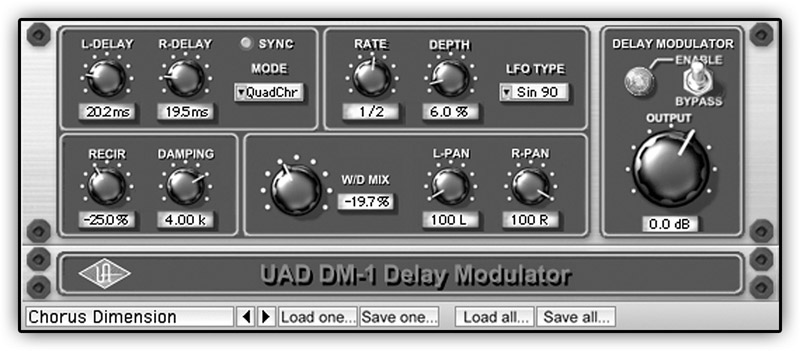
Figure 23.1 The Universal Audio DM-1 in chorus mode. This screenshot shows the settings of the “Chorus Dimension” preset. Essentially, very short delay on both channels, negative feedback of 25%, and feedback filter set to 4 kHz; slow rate, little depth, and only 19.7% of wet signal, which is phase-inverted.
![]()
Settings: 30 percent wet, 21 ms (L), 26 ms (R), 10 percent modulation depth, 0.5 Hz modulation rate, 20 percent feedback. The effect return is panned fully to the extremes.
Track 23.10: Chorus 2 (Vocal)
Settings: 50 percent wet, 40 ms (L), 35 ms (R), 11 percent modulation depth, 1 Hz modulation rate, –25 percent feedback. The effect return is panned fully to the extremes. This track has more noticeable chorus than the subtle chorus in Track 23.9. Note how compared to the original vocal (Track 23.1), the chorused version appears both deeper and wider.
Track 23.11: Chorus 1 (Guitar)
Settings: Same as Chorus 1 (Vocal).
Track 23.12: Chorus 2 (Guitar)
Settings: Same as Chorus 2 (Vocal).
Track 23.13: Original Distorted Guitar
Track 23.14: Chorus 1 (Distorted Guitar)
Settings: Same as Chorus 1 (Vocal).
Track 23.15: Original Bass
Track 23.16: Chorus 3 (Bass)
Settings: Same as Chorus 1 (Vocal), with two exceptions: wet is set to 10 percent, and the effect is panned 50 percent to each extreme.
Plugin: UAD DM-1
Flanging
Just like with guitars, flanging is mostly used as a distinct effect in the mix. Flanging is based on comb filtering created as a result of very short delay times. It yields a series of peaks and dips along the frequency spectrum, which are organized in harmonic series (see Figure 23.2). The actual character of the comb filter is determined by the delay time, the feedback phase switch, and the amount of feedback. The modulation sweeps the comb up and down in frequencies, producing a whooshing sound. Modulation rates are usually kept low and might be synced to a half-note or a one-bar duration. If any waveform option is given, either a sine or a triangle would normally be used.
By way of analogy, the flanging effect is like a siren where the depth determines how low and high the siren goes, and the rate determines how quickly it goes. The feedback can be thought of as a resonance controller: the higher the feedback, the more the resonance. Phase-inverting the feedback will normally produce a bolder effect:
- Dry/wet—50/50.
- Delay time—between 1 and 20 ms.
- Modulation depth—often higher than 25%.
- Modulation rate—slow, often tempo-synced to a half note or a bar.
- Feedback—the more feedback, the more resonance.
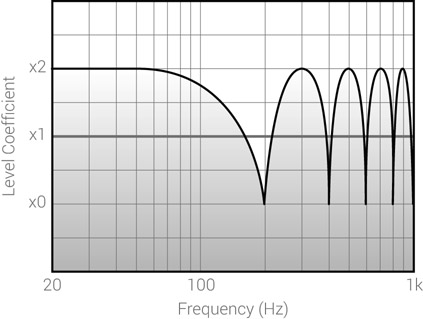
Figure 23.2 The comb-filter response caused by a flanger. The frequencies of the peaks and dips are harmonically related. As the effect is modulated, this response pattern expands and contracts, but the harmonic relationship remains.
![]()
The following tracks were produced using both the light and deep flanger presets of the PSP 42. The deep flanger preset can be seen in Figure 23.3. The light flanger preset is only different from the deep one in that its feedback is set to 0 percent.
- Track 23.17: Flanger (Vocal, Light)
- Track 23.18: Flanger (Distorted Guitar, Light)
- Track 23.19: Flanger (Distorted Guitar, Deep)
- Track 23.20: Original Drums
- Track 23.21: Flanger (Drums, Light)
- Track 23.22: Flanger (Drums, Deep)
- Track 23.23: Original Shaker
- Track 23.24: Flanger (Shaker, Light)
Plugin: PSP Lexicon 42
Drums: Toontrack EZdrummer

Figure 23.3 The PSP Lexicon 42 in deep flanger mode. This screenshot shows the setting of the deep flanger preset—high feedback, 1 ms of delay, high depth, slow rate, and both the feedback signal and the wet signal are phase-inverted.
Phasing
Flanging and phasing are twin effects, sounding very similar, yet different. A true phasing effect cannot be achieved using a delay. Instead, phasers employ a series of all-pass filters. These filters, instead of altering the amplitude of specific frequencies, change their phase. When the original and treated signals are combined, the result is a series of peaks and dips along the frequency spectrum. But, unlike flanging, the peaks and dips are not organized in harmonic series (Figure 23.4).

Figure 23.4 The response caused by a sixth-order phaser. The peaks and dips are not harmonically related. As the effect is modulated, this pattern would not expand or contract; it would simply shift lower and higher in frequencies.
Generally, two all-pass filters are required to create one dip. Often phasers use an even number of filters, where fourth order would create two dips, the sixth order would create three, and so forth. The higher the order, the stronger the effect. A feedback loop might also be included, which, like a flanger, would produce a more resonant, bolder effect.
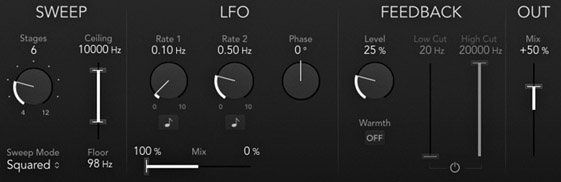
Figure 23.5 The Logic Phaser plugin.
Like flanging, phasing is an easily recognizable effect, although generally subtler. In addition to electric guitars, it can be applied on various instruments just to create some cyclic movement or be introduced on specific sections of the song just to add interest.
![]()
The settings for all these tracks are identical: fourth order, 0.5 Hz modulation, sweep floor 40 Hz, sweep ceiling 10 kHz. It is interesting to compare these tracks to the flanger tracks and learn to recognize the differences between the two effects.
- Track 23.25: Phaser (Vocal)
- Track 23.26: Phaser (Distorted Guitar)
- Track 23.27: Phaser (Drums)
- Track 23.28: Phaser (Shaker)
Plugin: Logic Phaser
Tremolo
A tremolo produces cyclic modulation of amplitude, which makes instruments passing through it periodically fall and rise in level. This effect can be traced back to the Leslie cabinet (mentioned earlier), which also produces a vibrato. While vibrato is a modulation of pitch, tremolo is a modulation of amplitude. The Leslie cabinet (and similar products) is famous for its use with the Hammond organ. Tremolos were later introduced into many guitar amplifiers, and there are endless examples of songs with guitar tremolos. To this day, tremolo is frequently applied on organs and electric guitars, but apart from its legacy there is nothing to prevent it from being applied on any other instrument. Being a distinctive effect in its own right, tremolo can be used either subtly or more evidently to add a sense of motion to sounds.
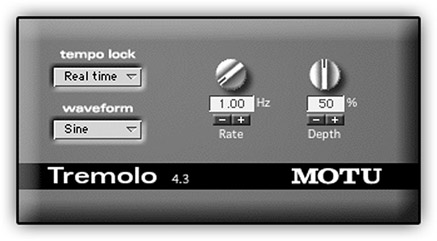
Figure 23.6 The MOTU Tremolo plugin.
Tremolo controls are mostly modulation-related. We often get:
- Rate—the modulation rate. Can be expressed in Hz, or if it can be tempo-synced it might be given as note value.
- Depth—the intensity of attenuation. Expressed in percentages. Whereas 0% means no effect, 100% means the signal level will fall down to complete attenuation.
Some tremolos provide a choice of modulation waveform (sine, sawtooth, square). Also, some stereo tremolos employ a separate tremolo for each channel, where the modulation phase between the two can be altered. For example, 180° on a sine modulator would mean that as one channel is at the highest amplitude, the other is at the lowest. This can be used to create interesting panning effects.
![]()
Track 23.29: Tremolo 1 (Distorted Guitar)
For the most obvious effect, the tremolo depth in this track is set to 100 percent; the rate is set to 2 Hz.
Track 23.30: Tremolo 1 (Distorted Guitar)
The more musical settings in this track are the outcome of 30 percent depth and 5 Hz rate.
Track 23.31: Tremolo (Vocal)x
40 percent of depth, 5 Hz rate, applied on vocal.
Plugin: UAD Tremolo