21
Duckers
We are all familiar with duckers from their common broadcast application—when the DJ speaks, the music is turned down. Most hardware gates provide a switch that turns the gate into a ducker. Even the small dynamics sections on large-format consoles sometimes offer such a feature. For no apparent reason, duckers are hard to find in the software domain. At the time of writing, the SV-719 in Figure 21.1 is one of the very few plugins that offers ducker functionality. However, ducking as an application is a common part of mixing that is arguably slightly underused.
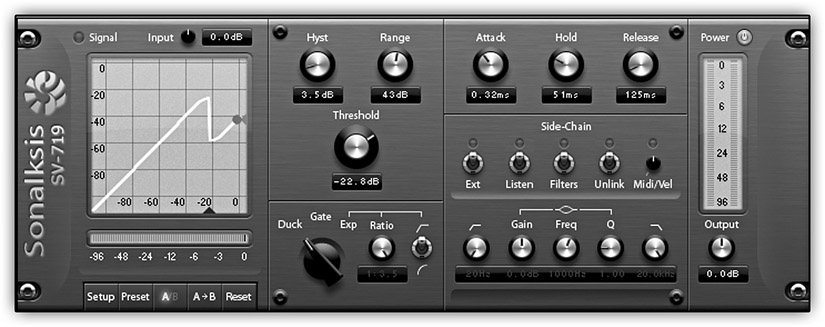
Figure 21.1 The Sonalksis SV-719. This gate/expander plugin also offers a ducker mode.
Operation and controls
Looking back at the internal architecture of a gate in Figure 19.2, all that needs to be done to turn a gate into a ducker is to swap the threshold outputs (above and below). Indeed, duckers offer exactly the same controls as gates and work in a similar way. The sole difference between the two is that while a gate attenuates signals below the threshold, a ducker attenuates signals above the threshold. Put another way, once the signal overshoots the threshold, it is attenuated (ducked). The amount of attenuation is fixed and determined by the range. Figure 21.2 illustrates the transfer function of a ducker.
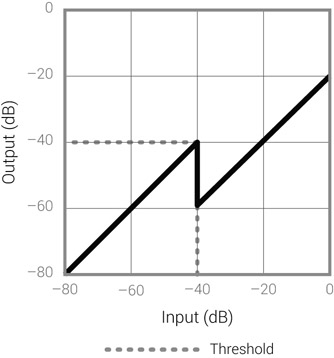
Figure 21.2 The transfer function of a ducker. Signals above the threshold are attenuated by a fixed amount determined by the range (20 dB in this illustration).
The rationale for attenuating a signal by a fixed amount once it exceeds a certain threshold is yet to be discovered. But there are many reasons for attenuating a signal once a different signal exceeds a certain threshold, like in the radio example above, where we want the music attenuated when the DJ speaks. To achieve this, we use the key input—the ducked signal (e.g., the music) is fed into the ducker’s input, and the ducking signal (e.g., the voice) is fed into the key input. Whenever the voice exceeds the ducker’s threshold, the music will be attenuated. Figure 21.3 illustrates this arrangement, and Figure 21.4 shows it in action. Ducking applications always make use of the key input in a ducked/ducking arrangement.
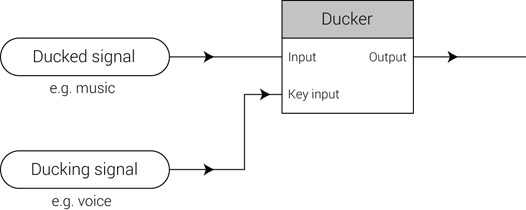
Figure 21.3 The ducked/ducking arrangement. The signal to be ducked is fed into the ducker’s input, while the signal to trigger the ducking is fed into the key input. If the music is the ducked signal and the voice is the ducking signal, every time the voice exceeds the ducker’s threshold, the music will be attenuated.
As can be seen in Figure 21.4, gain reduction on the ducked music was applied gradually. This is due to the attack and release times, which ensure that no clicks occur. In the case of a ducker, the attack determines how quickly the ducked signal is attenuated, while the release determines how quickly the signal returns to its normal level. Also, in Figure 21.4, inspecting the music levels during the attack descent suggests that some music could still interfere with the voice. In addition, there is a hint that once the voice had faded away, the music rise during the release stage was audible. Shortening the attack and release might cause clicks and might not be musical. This is where look-ahead can be extremely useful—ducking starts and ends slightly beforehand, letting us dial more-musical time constants. The hold parameter gives us added control over the ducker behavior once the side-chain signal drops below the threshold.
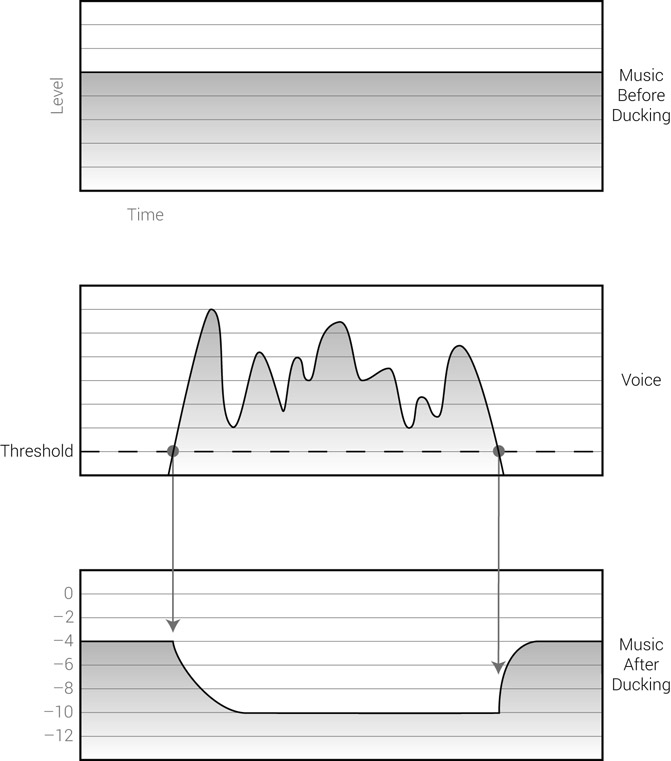
Figure 21.4 Ducking music with respect to voice. The top graph shows the music before ducking, which for simplicity shows no level variations. The middle graph shows the voice that triggers the ducking. The bottom graph shows the music after ducking with –6 dB range. The arrowed lines denote the points where the voice crosses the threshold, which is where the ducker’s gain reduction starts to rise and fall.
As already mentioned, often compressors are utilized as duckers. It is worth demonstrating the difference between a real ducker and a compressor used as a ducker. Both processors attenuate the treated signal once the side-chain signal overshoots the threshold. While on a ducker the amount of attenuation is fixed, on a compressor it varies in relation to the overshoot amount. This means that as the side-chain signal fluctuates in level, the amount of gain reduction fluctuates and so does the compressed signal. These differences are illustrated in Figure 21.5.
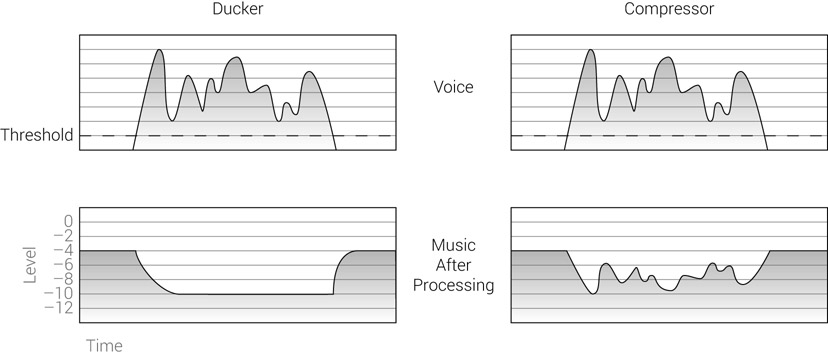
Figure 21.5 A compressor vs. a ducker in the ducking challenge. The amount of gain reduction on a ducker is fixed; on a compressor, it is dependent on the overshoot amount. As the side-chain signal fluctuates in level above the threshold, the ducked signal also fluctuates in level. This is not the case with a ducker.
![]()
The following tracks demonstrate the difference between a ducker and a compressor-ducker. In both tracks, the uncompressed vocal ducks the guitars. With the ducker, the gain reduction is constant, whereas with the compressor-ducker the gain reduction varies in relation to the level of the voice.
Track 21.1: Ducker
Track 21.2: Compressor Ducker
Plugins: Logic Ducker, Logic Compressor
Applications
In a mixing context, duckers make one instrument quieter when another gets louder—an incredibly useful way to combat masking. Say, for example, we want the full slap of the kick but the distorted guitars mask much of it. We can reduce this masking interaction by ducking the distorted guitars whenever the kick hits. It can be surprising how much attenuation can be applied before it becomes noticeable, especially when it comes to normal listeners. Whether done for a very brief moment or for longer periods, ducking is an extremely effective way to clear some space for the really important instruments. Indeed, it is mostly the important instruments that serve as ducking triggers and the least important instruments that are the ducking prey. While the options are endless, here are a few common places where this can be done:
- Vocals ducking their own reverb—one of the oldest tricks in mixing involves attenuating the vocal reverb whenever the vocalist sings. Vocal reverbs are typically added as an effect rather than for any spatial purposes. In fact, the spatial nature of reverbs can be a great threat to vocals, since it tends to send the vocals back in the depth field (which is normally not desired). In addition to the ability to mask the vocals, reverbs might blur the intelligibility of the sung words. Ducking the reverb while the vocals are sung makes the vocals more focused and prominent, but we still get the reverb effect during vocal pauses. There are endless accounts of such ducking application in commercial releases.
- Snares ducking their own reverb—for the very same reasons as vocals.
- Kicks and snares ducking their opponents—it is a typical aim in many contemporary mixes to give an added emphasis to the kick and snare. In dance genres, a potent kick can be one of the prime objectives in the mix. In busy mixes in particular, many instruments can mask the kick and snare, reducing their brunt. By way of analogy, ducking lets the kick and snare push aside any instrument that stands in their way. Both the kick and snare are impulse sounds, so the brief drop they cause on the ducked instruments does not normally result in a great loss of musical information. On some mixes, it is even appropriate to duck the bass with respect to the kick. In addition to kicks and snares, toms can also benefit from the same technique, and, if the majority of the tom sound derives from the close-mics, it is not unthinkable to have them ducking the overheads.
- A phrasal power guitar ducking a steady power guitar—some of the heavier rock and metal arrangements involve a power guitar that plays continuously and another guitar that bursts every bar or so. Ducking the steady guitar with the phrasal guitar would cause the steady guitar to drop back (on some mixes even disappear) every time the phrasal guitar has something to say.
- Ducked effects—time-based effects occupy some space in the mix over time. Reverbs can cloud the mix, and delays can cause some confusion or draw unnecessary attention. Ducking interfering effects can result in increased clarity and tidiness. What instrument triggers the ducking is dependent on the arrangement.
Remember ducking when you fight masking or clouding, or you are after prominence.
![]()
Track 21.3: Vocal Reverb Normal
A normal arrangement where a vocal is sent to a reverb, but the reverb is not ducked. The dense reverb sends the vocal backward, clouds it, and reduces its intelligibility.
Track 21.4: Vocal Reverb Ducked
The vocal in this track ducks its own reverb. Notice how, during vocal pauses, the reverb gets louder. Compared to the previous track, the vocal here is more focused and forward.
Plugin s: Sonnox Oxford Reverb, Sonnox Oxford Dynamics
There is a way to make ducking less intrusive yet more effective, but it involves giving the ducker a rest and using a compressor instead, more specifically a multiband compressor. Back to the earlier example of distorted guitars masking the kick, instead of ducking the entire guitar tracks with the kick, we can feed them into a multiband compressor that is side-chained to the kick. On the multiband compressor, we utilize the high-mids band, so the kick’s attack will compress the guitars every time the kick hits. Since no other frequency range will be affected, we can set a deeper ducking to the high-mids of the guitars.
An important goal in mixing is controlled dynamics. Compressors are often employed to contain the level fluctuation of various instruments. However, once levels are contained, the result can be rather vapid—all the instruments play at the same level throughout the song. Duckers can be utilized to insert some dynamic motion. Since we have full control over how this is done, we are kept in the zone of controlled dynamics. The idea is to add sensible level variations that reflect the action in the mix. Drums are often a good source of ducking triggers; vocals as well. We can, for example, duck the hi-hats in relation to the snare and we can even set a long release on the ducker so the hi-hats rise gradually after each snare hit. Or, we can duck the organ in relation to the vocals or the pad with respect to the lead. This is not done to resolve masking or add prominence; it is simply done to break a static impression and add some dynamism.
Ducking can infuse motion into a dynamically insipid mix.
Then there is always ducking for creative purposes and sheer effect. We can make drum loops and drumbeats far more interesting by incorporating ducking into them. We can feed a delay line into a ducker to create rhythmical level pulses. We can also duck the left channel of a stereo track in relation to the right, and vice versa, to create intentional image shifting.
![]()
Track 21.5: Drums No Ducking
This is the source track used in the following track. No ducking is applied on this track.
Track 21.6: Drums with Ducking
The hats and tambourine are ducked by the kick, with relatively long release. Notice how this track has added dynamic motion compared to the previous one.
Plugin: Digidesign DigiRack Compressor/Limiter Dyn 3
Drums: Toontrack EZdrummer