
12
Phase
What is phase?
Phase, in sound theory at least, describes the time relationship between two or more sine waves of the same frequency. Phase is measured in degrees. A sine wave starts when its cycle starts—denoted by 0°. One complete cycle signifies 360° (which is also 0°), half a cycle 180°, a quarter of a cycle 90°, and so forth. If one sine wave reaches a quarter of its cycle when a cycle begins on another sine wave of the same frequency, the two are said to be 90° out of phase (Figure 12.1).

Figure 12.1 Two identical sine waves 90° out of phase with each other.
The degree of phase shift is dependent on the time gap between the two sine waves, but also on their frequency. For the same time gap, different frequencies will have different phase shifts. Complex waveforms, like all recorded and synthesized waveforms (apart from sine waves), contain many frequencies. If two complex waveforms are delayed with respect to one another, each frequency within them will have its own degree of phase shift.
In mixing, we aren’t quite interested in sine waves, but rather in complex waveforms. When two similar waveforms are mixed, their phase interaction is of interest. We have to define similar first:
- Identical waveforms—as the name suggests, these are similar in every way and usually the outcome of duplication. For example, by duplicating a vocal track in an audio sequencer, we get two identical waveforms. By sending a snare to two different groups, we also create two duplicate signals.
- Waveforms of the same event—two microphones capturing the same musical event. For example, two microphones fronting an acoustic guitar, or a kick-mic and the overheads—although the kick-mic captures mostly the kick, and the overheads capture the whole drum kit, both recordings will have the same kick performance in them.
It is also important to define what is dissimilar: two takes of any instrument, no matter how similar in performance, do not count as similar waveforms. Based on this, double-tracking is not subject to phase consideration.
![]()
There is one exception to the above. A kick’s sound is largely determined by its first cycle, which can be similar enough between two kicks—even if these were recorded using a different drum and microphone. In practice, phase mostly becomes a factor when we layer two kick samples.
There are three types of phase relationships between similar waveforms:
- In phase or phase-coherent—when the waveforms start at exactly the same time.
- Out of phase or phase-shifted—when the waveforms start at different times. For example, if we delay or nudge the duplicate of a vocal track, but not the original. Also, if two microphones are placed at different distances from an instrument, they will capture the same waveform, but the farthest microphone will do so slightly later.
- Phase-inverted—when both waveforms start at exactly the same time, but their amplitude is inverted (i.e., mirrored across the zero line). Many people confuse phaseinversion with 180° phase shift, but the two are not the same. When two waveforms other than sine waves are 180° out of phase, they do not start at the same time and rarely does their amplitude appear inverted (Figure 12.2).
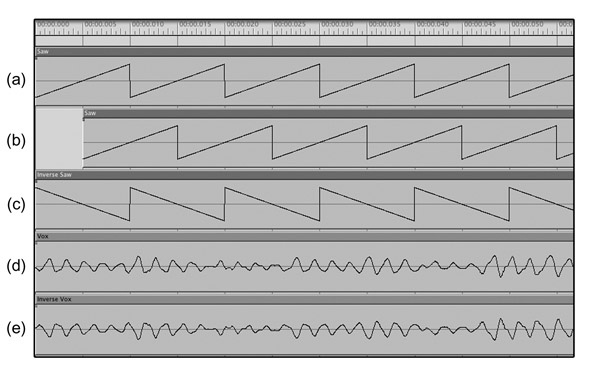
Figure 12.2 Five mono tracks in Digital Performer. (a) The original rising saw tooth. (b) The same sawtooth only 180° out of phase with the original. (c) The original sawtooth phase-inverted. (d) A vocal track. (e) The same vocal track phase-inverted.
One thing that the Haas effect tells us is that an audible delay will only be perceived if the time gap between two similar waveforms is bigger than 30–40 ms. In this text, 35 ms will be used, and we will regard the Haas window as any time gap between 1 and 35 ms. We normally consider phase when time gaps fall into the Haas window. In mixing terms, a time gap longer than 35 ms is an audible delay and phase is no longer of interest.
Problems
Phase problems occur when we sum similar waveforms that are either phase-shifted or phase-inverted. If the time gap involved is smaller than 35 ms, one should expect comb filtering and its subsequent tonal alterations and timbre coloration. If two waveforms are phase-inverted with one another, they will cancel each other and cause level attenuation; if both are of equal amplitude, they will cancel each other completely and result in complete silence.
It should be said that all this holds true when the two waveforms are summed internally— either electronically or mathematically within the mixer. If each of the waveforms is played through a different speaker, the result is different, as we shall soon see. However, if the stereo output is folded to mono, the same phase problems will arise.
Phase problems on recorded material
Raw tracks, to our great misfortune, often involve some phase issues—especially those of recorded productions. One example is a guitar amplifier recording made with a microphone a few feet from the grill. With both the amplifier and the microphone close to a reflective floor, the direct and the later reflected sound are likely to produce noticeable comb filtering when they hit the microphone. In cases such as this, comb filtering is imprinted into a single track, and usually there is little the mixing engineer can do. However, when two or more tracks represent the same take of the same instrument, some enhancements can be made. Here are a few usual suspects for tracks that might benefit from phase correction:
- Top/bottom or front/back tracks—snares are often recorded with two microphones in a top and bottom arrangement, while kicks and guitar cabinets might be recorded with two, front and back, microphones. Since the two microphones are positioned on opposite sides of the sound source, they are likely to capture opposite sound pressures (contrary to belief, this is not always the case, especially if the microphones are at different distances from the instrument). Recording engineers are aware of this and usually inverse the phase of one microphone before it is recorded. This way, the two tracks arrive ready for mixing in phase.
- Close-mic and overheads—it is possible to have the kick, snare, or any other close-mic either phase-inverted or phase-shifted with the overheads. Again, a good recording engineer will take the overheads as a reference and make sure all drum tracks are phase-coherent with the overheads.
- Mic and direct—in addition to the conventional microphone recording, guitars (bass, in particular) might also be recorded using a DI box, or direct output from the amplifier. Being kept in the electronic domain, direct signals travel at almost the speed of light. Sound takes some extra time to travel through the air between the amplifier and the

These tracks demonstrate the effect of phase shift on the timbre of a bass guitar. Such phase shifts can be the outcome of mixing direct and mic tracks, or two microphones that were positioned at different distances from the source:
Track 12.1: Bass In Phase
The two bass tracks perfectly in phase.
Track 12.2: Bass 1 ms Shift
1 ms time gap between the two tracks results in loss of high frequencies, definition, and attack. (It is worth mentioning that this is the most primitive form of a digital low-pass filter—by summing a sound with a very short delayed version of itself, high frequencies are softened while low frequencies are hardly affected.)
Track 12.3: Bass 2 ms Shift
With 2 ms time gap, the loss of low frequencies becomes evident. The track sounds hollow and powerless.
Track 12.4: Bass 5 ms Shift
5 ms time gap produces a severe coloration of timbre, and a distant, weak sound. These two tracks show the effect of phase inverting one of two snare tracks:
Track 12.5: Snare Top and Bot
Both the snare top and bottom are mixed as recorded.
Track 12.6: Snare Top with Bottom Inverted
With the snare bottom track inverted, some snare body is lost. The effect is not always similar to the one heard here, or as profound.
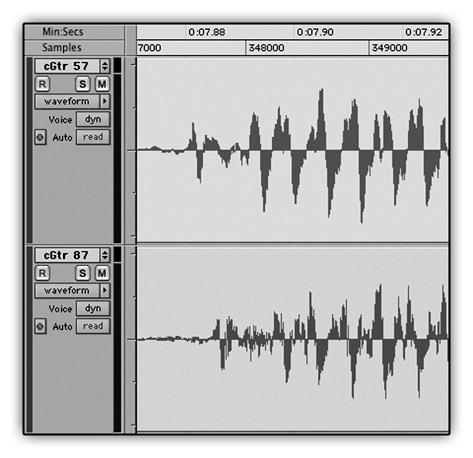
Figure 12.3 Phase shift on guitar recordings. This screenshot shows two guitar recordings that were captured simultaneously using microphones at different distances from the amplifier. The time gap, approximately 5 ms, is evident here.
microphone, resulting in a slightly delayed instance of the mic track compared with the direct track. This is one example of phase-shifting that, once corrected, can result in dramatic timbre improvements.
Phase problems are not always audibly obvious. In the case of phase inversions, we go through the usual suspects and see what happens when we engage the phase-invert switch. Sometimes the difference is noticeable, whether for good or bad; sometimes it is not. We can also zoom into associated tracks to look for phase inversions. Zooming can also be useful when hunting for phase shifts. To correct phase shifts, we nudge the late audio region backward in time until it is aligned with its associated track. We can also delay the early track until it is aligned with the late track, but this less straightforward solution is mostly used when nudging is not available, as with a tape multitrack. When aligning two phase-shifted tracks, it is not always possible to determine the exact nudging amount by eye, and different values result in different timbres. Fine phase corrections are mostly done by ear.
Phase checks and corrections are better carried out before mixing onset. Associated tracks are checked for phase inversions and phase shifts.
Phase problems during mixdown
Although rare, phase problems can also be created during mixdown; here are a few examples how:
- Lack of plugin delay compensation—uncompensated plugin delay is an open invitation for phase problems. For example, if a compressor plugin delays the snare by 500 samples, chances are that when mixed with the overheads comb filtering will occur.
- Digital-to-analog conversions on outboard gear—digital units convert the audio from analog to digital and back, which takes some time. This introduces a short delay, but one long enough to cause comb filtering if the signal is then summed with an identical track.
- Very short delays—short delays that fall into the Haas window might cause comb filtering if the original and the delayed sounds are summed internally.
- Equalizers—as part of their design, equalizers cause group delay for a specific range of frequencies. Phase problems are especially noticeable with large gain boosts.
Tricks
We’ve mentioned that when two identical waveforms are not in phase, but each is played through a different speaker, the result is quite different from comb filtering. Two mixing tricks are based on such a stereo setup. With both, two identical mono signals are sent to a different extreme, and one of the signals is either delayed or phase-inverted. To distinguish the two, we will call the unaltered signal the original signal and the copy, which is either delayed or phase-inverted, the ghost copy.
The Haas trick
The Haas trick was not invented by Helmut Haas, but it is essentially a demonstration of the Haas effect. Haas was interested in what happens when an initial sound is quickly succeeded by similar sounds from various directions. His findings teach us that the directivity of the sound is determined solely by the initial sound provided that (a) the successive sounds arrive within 1–35 ms of the initial sound; and (b) the successive sounds are less than 10 dB louder than the initial sound. Although the successive sounds do not give any directivity cues, they still play a spatial role. The Haas trick simply involves an original signal panned to one extreme, and a ghost copy, which is delayed by 1–35 ms, sent to the other (Figure 12.4).

Figure 12.4 The Haas trick. A mono track is sent to both left and right, but one channel is delayed by 1–35 ms.
The Haas trick is usually achieved in one of two ways. The first involves panning a mono track hard to one channel, duplicating it, and then panning the duplicate hard to the opposite channel and nudging the duplicate by a few milliseconds (Figure 12.5). The second involves loading a stereo delay on a mono track, and setting one channel to have no delay and the other to have a short delay between 1 and 35 ms.
The Haas trick results in a wide, open, spacious sound; although the sound can be localized to the non-delayed channel, there is some sense of unfocused stereo image. It can be applied during mixdown for three main purposes:
- To fatten sounds panned to the extremes—using the Haas trick on instruments already panned to the extremes can make them sound bigger, especially in a crossed arrangement. For example, it is common to double-track distorted guitars and pan each mono track to an opposite channel. Applying the Haas trick on each guitar track (sending the delayed duplicate to the opposite channel as in Figure 12.6) results in a fatter, more powerful effect.
- As a panning alternative—sometimes when panning a mono track, all the panning options seem less than ideal. For example, in a sparse arrangement of three mono tracks—vocal, bass, and guitar—chances are that both the bass and the vocal will be panned center. Panning the guitar to the center will place it in the busiest, high-masking area of the mix (and will also create a monophonic mix). Panning the mono guitar to one side or the other will cause stereo imbalance. By applying the Haas trick, we can
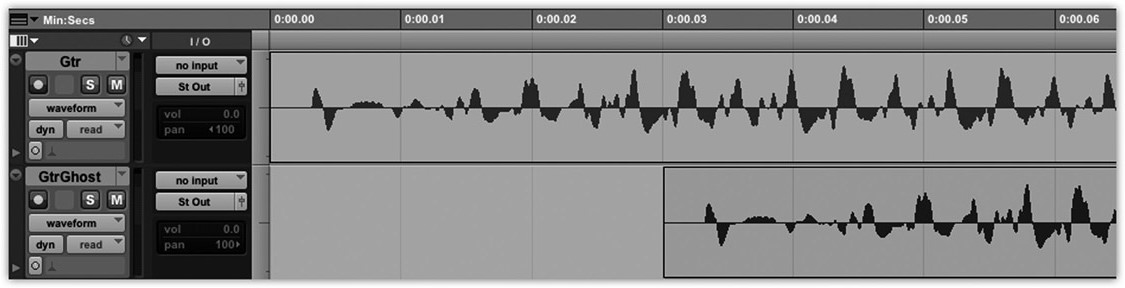
Figure 12.5 The Haas trick using duplicates. One way to achieve the Haas trick is by duplicating a mono track, nudging the duplicate a few milliseconds in time (30 ms in the screenshot above), then panning each track to an opposite extreme.

Figure 12.6 The Haas trick in crossed setup. Guitar 1 is sent to the left and its delayed copy to the right. Guitar 2 is sent to the right and its delayed copy to the left.
open up the monophonic guitar sound, give it some stereo width, and place the guitar in a low-masking area.
- More realistic panning—the ear uses amplitude, time, and frequency differences for the localization of sounds. A pan pot works by only altering amplitude; therefore, the results are less natural. The Haas trick adds to the standard panning method time differences, and with a filter on the delayed channel we can also tuck on some frequency differences. However, this application is limited to instruments already panned to one extreme—we cannot pan the original signal anywhere else.
![]()
Track 12.7: dGuitars Stereo
Two distorted guitars, each panned hard to a different extreme, before applying the Haas trick.
Track 12.8: dGuitars Haas Crossed
The same two guitars after applying the Haas trick in crossed arrangement, as shown in Figure 12.6. The delay times are set to around 28 ms.
Plugin: Digidesign DigiRack Mod Delay II.
One of the settings we can control with the Haas trick is the amount of delay applied on the ghost copy. Different delay times give slightly different effects, so it is up to the ear to decide which is the best effect. One thing to consider is what happens when the mix is folded to mono. To be sure, the resultant comb filtering will have its impact (often loss of high frequencies), but some delay times, mostly longer ones, sum to mono more gracefully than others, so while checking in mono we look for the least-destructive delay time.
Another setting we can control is the level of the ghost copy. The Haas effect only applies if the ghost copy is less than 10 dB louder than the original signal. Depending on the delay time, it might not apply with figures even smaller than 10 dB. Assuming that both the original and the ghost copy are initially at the same level, boosting the level of the ghost copy will appear at first to balance the stereo image. With slightly more boost, a rather confusing, unnatural, yet interesting effect is achieved—it can be described as an audible delay where it is impossible to say which extreme is the delayed one.
Track 12.9: dGtr Original
The original distortion guitar in mono.
Track 12.10: dGtr Haas 5 ms
The Haas trick applied on this track with the right channel delayed by 5 ms.
Track 12.11: dGtr Haas 30 ms
The Haas trick applied on this track with the right channel delayed by 30 ms. Compared to the previous track, the effect here appears wider and fuller.
Track 12.12: dGtr Haas 5 ms Mono
Summing Track 12.10 (5 ms delay) to mono results in very evident comb-filtering effect.
Track 12.13: dGtr Haas 30 ms Mono
There is still coloration of the sound when Track 12.11 (30 ms delay) is summed to mono, but this coloration is neither as evident nor as obstructive as the effect with 5 ms delay.
Plugin: Digidesign DigiRack Mod Delay II.
Attenuating the ghost copy below the level of the original signal makes the effect less noticeable and the stereo image of the original signal somewhat less vague. Altogether, it is worth experimenting with different levels, and making the final decision based on taste and feel.
![]()
The following tracks demonstrate how the relative level of the ghost copy affects our perception of the Haas trick. When applied, the delay time of the ghost copy was set to 23 ms.
Track 12.14: Guitar Src
The source track used in the following samples. This is the mono recording with no delay involved.
Track 12.15: Guitar Panned
In the following tracks, the source guitar is panned hard-left and the ghost copy hard-right. This track, which is given for reference purposes, only involves the source track panned hard-left, without the ghost copy.
Track 12.16: Guitar Haas 9 dB Down
The Haas effect is applied on this track with the ghost copy 9 dB below the original. The ghost copy on the right channel is not easily discerned. But comparing this track to the previous one would reveal the effect. In the previous track, the guitar is distinctly isolated on the left channel. In this track, the image still clearly appears to come from the left channel, but in a slightly more natural way. This is an example of how the Haas trick can yield more realistic panning and subtly richer sound. Yet, even in a sparse mix, the ghost copy on the right channel could be masked to an extent that would conceal the effect; therefore, it might need to be louder.
Track 12.17: Guitar Haas 6 dB Down
In this track, the ghost copy is 6 dB below the original. It is only slightly more noticeable. The guitar image still clearly appears to come from the left channel.
Track 12.18: Guitar Haas 3 dB Down
With the ghost copy 3 dB below the original, it becomes more noticeable, and the resultant effect is richer. The guitar image still appears to come from the left channel.
Track 12.19: Guitar Haas 0
Both the original and the ghost copy are at the same level in this track. As Haas suggested, the sound image still appears to come from the left channel.
Track 12.20: Guitar Haas 3 dB Up
The ghost copy is 3 dB above the original. The effect is becoming confusing, although the image still appears to come from the left channel. It is interesting that the image should still come from the left channel if you move your head toward the right speaker.
Track 12.21: Guitar Haas 6 dB Up
With the ghost copy 6 dB above the original, the effect is becoming very confusing indeed. Most listeners would still perceive the image as if coming from the left, but there is some sense of balance between the left and right speakers. One way or another, the overall effect is wide and it creates an unfocused image (which can be appealing if used in the right context).
Plugin: Digidesign DigiRack Mod Delay II.
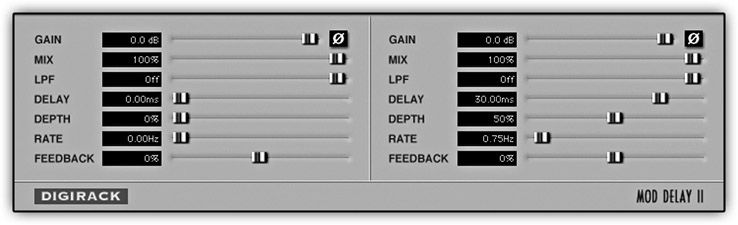
Figure 12.7 The modulated Haas trick using a delay plugin (Digidesign DigiRack Mod Delay II). This mono-to-stereo instance of the plugin involves a left channel that is neutralized with 0 ms delay time. The right channel is delayed by 30 ms and modulated using 50% depth and 0.75 Hz rate.
The Haas trick can be enhanced in two ways. First, applying a filter on the ghost channel— usually a low-pass filter—can bring about more natural results, and might even reduce comb filtering when the mix is folded to mono. This is especially useful when the Haas trick is used to achieve more realistic panning. When the Haas effect is applied to fatten sounds, another enhancement is possible. While using a delay on the ghost channel, we modulate the delay time with low rate and low depth (Figure 12.7). This gives a richer impact and bigger size to the effect. While the results are not always suitable, it is worth experimenting.
The Haas trick is often only expedient if used on one, maybe two instruments in the mix. When used on more, it can clutter the extremes and result in an overall unfocused stereo image—doing more harm than good to the mix. Like with many other mixing tricks, overdoing means loss of impact.
![]()
Track 12.22: dGtr Haas 30 ms Modulated
The same setup as in Track 12.11, only in this track the delay time is modulated using 50 percent depth and 0.75 Hz rate. The exact setup can be seen in Figure 12.7. Compared to Track 12.11, the effect here is richer and provides a slight sensation of movement.
Plugin: Digidesign DigiRack Mod Delay II.
The out-of-speakers trick
With the Haas trick, we delay the ghost copy. With the out-of-speakers trick, we keep it time-aligned to the original signal, but we invert its phase (Figure 12.8). This means that the sound arriving at one ear is phase-inverted with the sound arriving at the other. In nature, this happens (for specific frequencies only) when the sound source is located to one side of the head. The two phase-inverted signals emitted from each speaker first travel to the near ear, but shortly after both arrive at the far ear (Figure 12.9). The outcome of this is sound that seems to arrive at both sides of the head at the same time. Since different frequencies are localized slightly more forward or backward, the final effect is of sound coming from around you, rather than simply from your left and right.
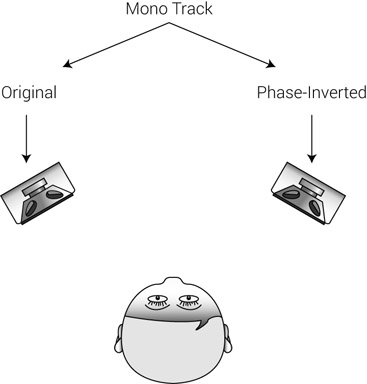
Figure 12.8 The out-of-speakers trick. A mono track is sent to both left and right, but one channel is phase-inverted.
When heard for the first time, the out-of-speakers trick can make some people over-whelmingly excited—not only does sound appear to arrive from outside the speakers, it also seems to surround you in a hallucinatory fashion. To add to the excitement, an instrument on which the out-of-speakers trick is applied will disappear completely when the mix is folded to mono (provided that the original and the ghost copy are at exactly the same level, as they usually are with this trick).

Figure 12.9 With the out-of-speakers trick, the original and inverted signals will first reach the ear closer to the speaker from which each signal is emitted, and shortly after the other ear. This creates the impression that the sound is arriving from wide side angles.
![]()
Both the drums and electric piano are monophonic and panned center.
Track 12.24: 8Bars ePiano OOS
The out-of-speakers trick is only applied to the electric piano. When listening in mono, the piano should disappear.
Track 12.25: 8Bars Drums OOS
The out-of-speakers trick is only applied to the drums. When listening in mono, the drums should disappear.
Track 12.26: 8Bars both OOS
The out-of-speakers trick is applied to both instruments. Listening to this track in mono should yield silence.
Plugin: Logic Gain.
Drums: Toontrack EZdrummer.
The trick, however, is only in full effect when the listener’s head is on the central plane between the two speakers. Also, our ears only localize sounds coming from the sides based on low-frequency content. The wavelength of high frequencies is too short compared with the distance between our ears. High frequencies can easily change their phase a few times while traveling the distance between our ears. Scientifically speaking, 1 kHz is roughly the frequency below which side localization is experienced. Consequently, it is mostly frequencies below 1 kHz that give the impression of surrounding the head. The out-of-speakers trick is therefore mostly effective with low-frequency sounds.
The out-of-speakers trick causes low-frequency material to appear as if coming from all around us. Instruments to which the trick is applied disappear in mono.
![]()
These tracks demonstrate the varying effect of the out-of-speakers trick in relation to frequencies. An arpeggiated synth line involves a band-pass filter that is swept up, then down. The kick and hi-hats provide a center-image reference, on which the trick is not applied.
Track 12.27: Arp Mono
The arpeggiated line in mono, panned center.
Track 12.28: Arp Out of Speakers
The arpeggiated line with the out-of-speakers trick applied. It is possible to hear that the higher the band-pass filter is swept, the narrower the synth image becomes.
Track 12.29: Arp Toggle
The out-of-speakers effect is toggled every two beats. The greater effect at lower frequencies should be easier to discern here.
Plugin: Logic Gain.
A sound that appears to surround your head in a hallucinatory fashion is clearly the definition of anti-focus. We can apply the out-of-speakers trick on an instrument, but we should not expect the instrument to relate well to the sound stage we are building. What’s more, the instrument will disappear in mono, so it would not be wise to apply this trick on important instruments, say the beat of a hip-hop track. The out-of-speakers trick is used as a special effect, a sonic gimmick, and is usually applied on the least-important instruments, or ones that appear for a very short time in the mix.
The out-of-speaker trick is used as a special effect, occasionally, and mostly on the least-important tracks.
To conclude this section, it should be noted that the out-of-speakers trick is not strictly vinyl-proof. In fact, the worst-case scenario for vinyl cutting is phase-inverted low-frequency content on the left and right channels. For this reason, mastering engineers sum the low-end of the mix to mono, which cancels out, to some degree, any instruments to which this trick has been applied. If the mix is to be cut on vinyl, mixing engineers may be required to submit a vinyl edit from which this trick is omitted.