
20
Supporting Multi-Tenancy
This chapter discusses different approaches to designing and implementing multi-tenancy in Moodle. If any of the following scenarios are of interest, then this chapter is for you:
- An authority representing multiple schools or colleges in a region or country wishes to provide each school or college with a separate Moodle system but needs to manage the systems centrally
- A private training organization with multiple customers, each needing its own walled area
- A company that has regional offices, each requiring its own learning space
First, we will provide an overview of what multi-tenancy is and why there isn’t a one-size-fits-all solution before we present three different types of implementations.
The first approach, multi-tenancy via categories, uses a single Moodle instance with specifically tailored course categories and permissions.
The second implementation, multi-tenancy via a centralized code base, provides separate standalone Moodle instances and delegates all responsibilities to local administrators.
Lastly, we will describe how multi-tenancy has been implemented in Moodle Workplace.
We will cover the following topics in this chapter:
- Understanding Moodle multi-tenancy
- Supporting multi-tenancy via categories
- Supporting multi-tenancy via a centralized code base
- Supporting multi-tenancy in Moodle Workplace
Understanding Moodle multi-tenancy
What exactly is multi-tenancy? In a Moodle context, multi-tenancy can be defined as follows.
Important note
In a Moodle multi-tenancy setup, separate entities or instances (tenants) are administered centrally, where specific features are devolved and managed locally.
The following radial diagram shows a simplistic high-level view of Moodle multi-tenancy:
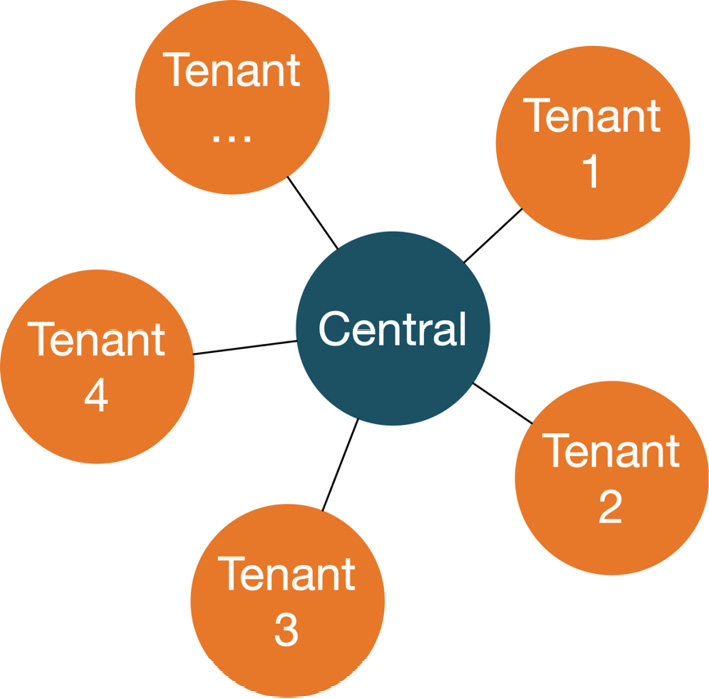
Figure 20.1 – Moodle multi-tenancy: a high-level view
Two critical high-level questions need answering when it comes to multi-tenancy:
- Which features are handled centrally, and which are delegated – that is, dealt with at the tenant level?
- Which elements can be shared across tenants (if any)?
These questions are critical because the answers determine what type of multi-tenancy is suitable for your organization.
Let’s drill down further to the two dimensions – features and sharing – in a Moodle context, as illustrated in the following diagram:

Figure 20.2 – Moodle multi-tenancy: features and sharing
More questions arise when looking at specific Moodle functionality that is potentially impacted by multi-tenancy:
- Users: Are user accounts managed centrally and assigned to tenants or can a tenant admin manage users locally? How about authentication? Does each tenant have a separate authentication mechanism or are logins managed site-wide? Do user names have to be unique across tenants? Can users be in multiple tenants? Does every tenant have its own guest account? How about tenant-aware user profile fields? Should there be a user quota per tenant? And what about tenant cohorts and tenant roles?
- Courses: Will courses (and categories) be managed centrally, locally, or both? Can courses be sharable across tenants? Should users from multiple tenants be able to enrol in the same course and, vice versa, can users enrol in courses in multiple tenants?
- Plugins: Do all tenants have the same plugins or can they be activated and deactivated at the tenant level? Can the configuration of each plugin differ for each tenant or is it identical for all?
- Admin settings: Which site-wide settings can be configured individually (if any)? Should the master administrator be able to lock down specific configuration settings to prevent individual tenant admins from changing those values?
- Admin features: Which admin tools, such as reporting and backups, can be configured and operated by tenant admins? How about security and privacy setups? Will reporting across tenants be allowed?
- Themes: Does the main theme apply to all tenants or can each tenant have its own design? How about one white-labeled theme that can be branded for each tenant?
- Moodle code: Is the code base identical for all tenants or can individual tenants have their own code (as in, make modifications)?
The list goes on and on. You can see from the questions that there cannot be a one-size-fits-all approach to multi-tenancy. When you ask three Moodle consultants to come up with a multi-tenancy checklist, you will likely receive four different versions.
Now that we have asked several questions, let us look at three (very) different multi-tenancy approaches to hopefully answer some of them.
Supporting multi-tenancy via categories
The simplest form of multi-tenancy is configuring your Moodle system so that a category represents a tenant. The following diagram illustrates this approach:
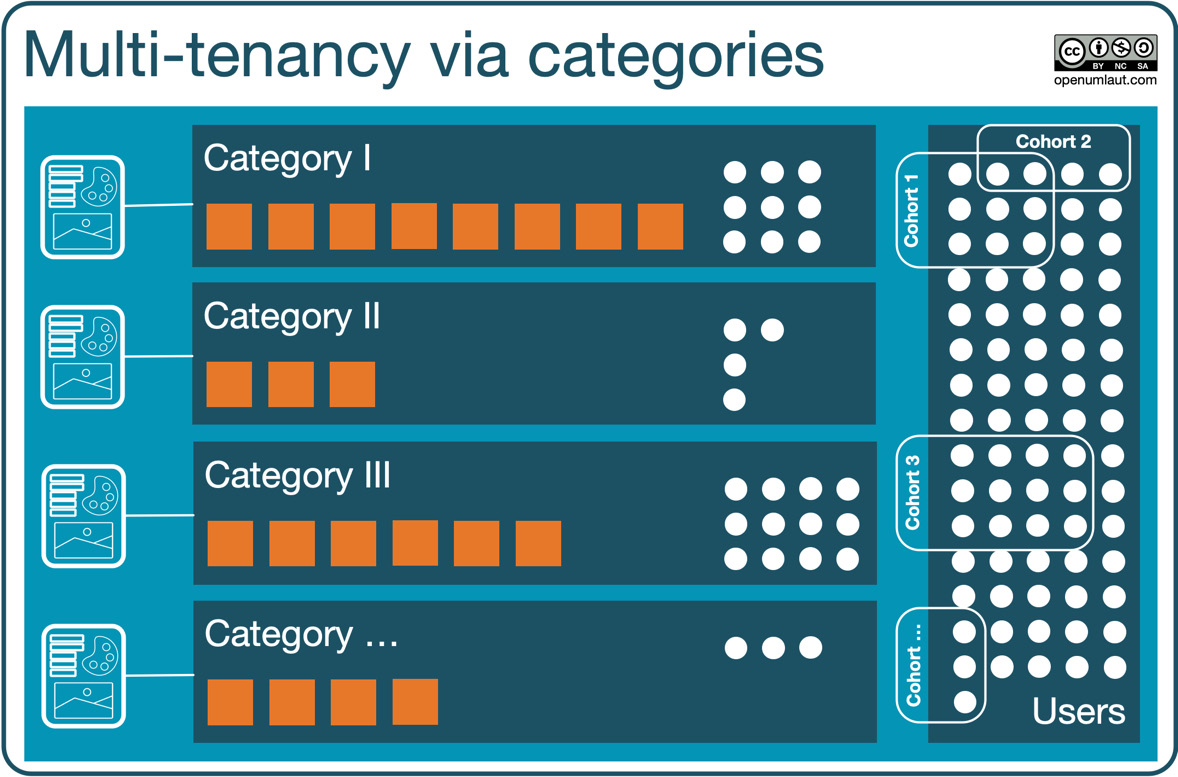
Figure 20.3 – Multi-tenancy via categories
A category represents a ring-fenced area (tenant) where courses are managed locally. Users can be assigned via category cohorts; that is, users can be members of multiple tenants.
You can assign a dedicated theme for each category, as we saw in Chapter 7, Enhancing Moodle’s Look and Feel. However, users won’t see that branding until they have logged in. A new category admin role should be created and the appropriate permissions granted accordingly – for instance, the ability to add subcategories and courses.
One main drawback of the category-based approach is that plugins can only be configured site-wide and not at the tenant (that is, category) level. You can bypass this limitation by using the addinstance capability for each module, which allows you to control which activities can be added to which courses. However, this capability only caters to activities, not other plugins, such as authentication, enrolment, or plagiarism. addinstance can also only be applied at the course level and not at the category level.
The following checklist summarizes this poor man’s approach to multi-tenancy:

Figure 20.4 – Checklist: multi-tenancy via categories
Multi-tenancy by categories is mainly suitable for sites where users are managed centrally and departments, faculties, or other entities only have control over course content. The approach is unsuitable for sites where a higher degree of autonomy is required at the tenant level. Multi-tenancy via a centralized code base overcomes that restriction, as shown in the following section.
Supporting multi-tenancy via a centralized code base
The principal idea of this multi-tenancy approach is to have a single code base but multiple separate and standalone Moodle instances.
An example where this kind of model is suitable is where each tenant represents a school or college in the region, and each school or college has its own Moodle admin, theme, and administration settings for managing users, courses, privacy, and grades.
The following diagram illustrates this federated approach:
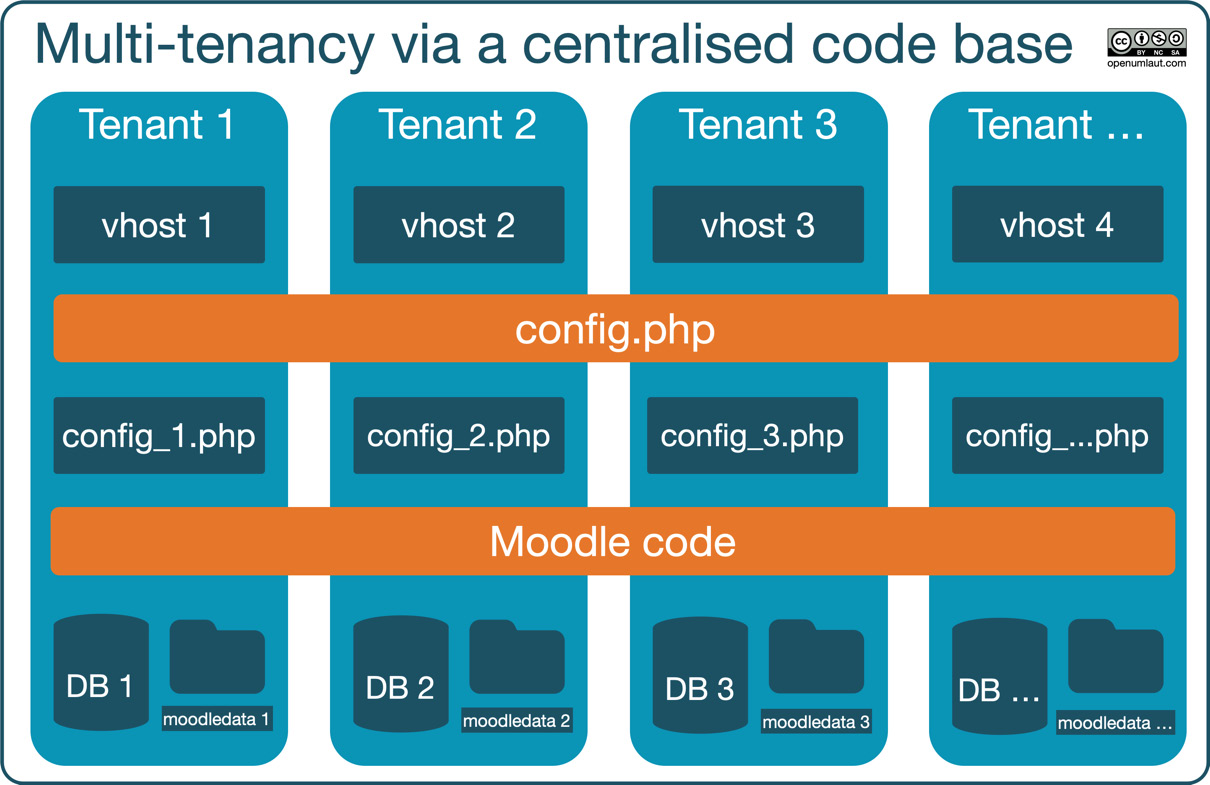
Figure 20.5 – Multi-tenancy via a centralised code base
This solution requires two main configuration steps:
- Web server configuration:
For each Moodle instance, a separate virtual host is required where the ServerName, ErrorLog, and CustomLog parameters point to the individual instances (tenants), but the DocumentRoot variable must be identical in all virtual hosts, ensuring that the same code base (CFG->dirroot) is used. A virtual host can either be a separate vhost file or a <VirtualHost> entry in httpd.conf.
- Moodle setup:
There is one main config.php file that acts as the launch pad for all other instances that are represented by individual config.php files. These local config.php files must be stored in separate locations and have to follow a strict naming convention (in our example, <domain name>_config.php). The installation of these config files and their maintenance is usually implemented via scripts to ensure consistency.
To make this work, the main config.php file has to be modified as follows, assuming your local config.php files are stored in a dedicated /tenants folder:
<?php // Moodle configuration file
$moodle_host = $_SERVER['HTTP_HOST'];
require_once('/tenants/'.$moodle_host.'_config.php');
In each local config.php file, $CFG->dirroot must be set to the same value specified in DocumentRoot in vhost here.
Local config files can be customized further to cater to any idiosyncrasies in a particular tenant. For instance, you might want to freeze specific administration parameters that the tenant administrator must not modify.
Using this setup, you only have to maintain a single code base and provide each tenant with a separate, standalone Moodle instance. The implementation is also suitable for environments where you have to provision Moodle instances on an ad hoc basis – for instance, in a training or development environment.
The following checklist summarizes this centralised approach to multi-tenancy:
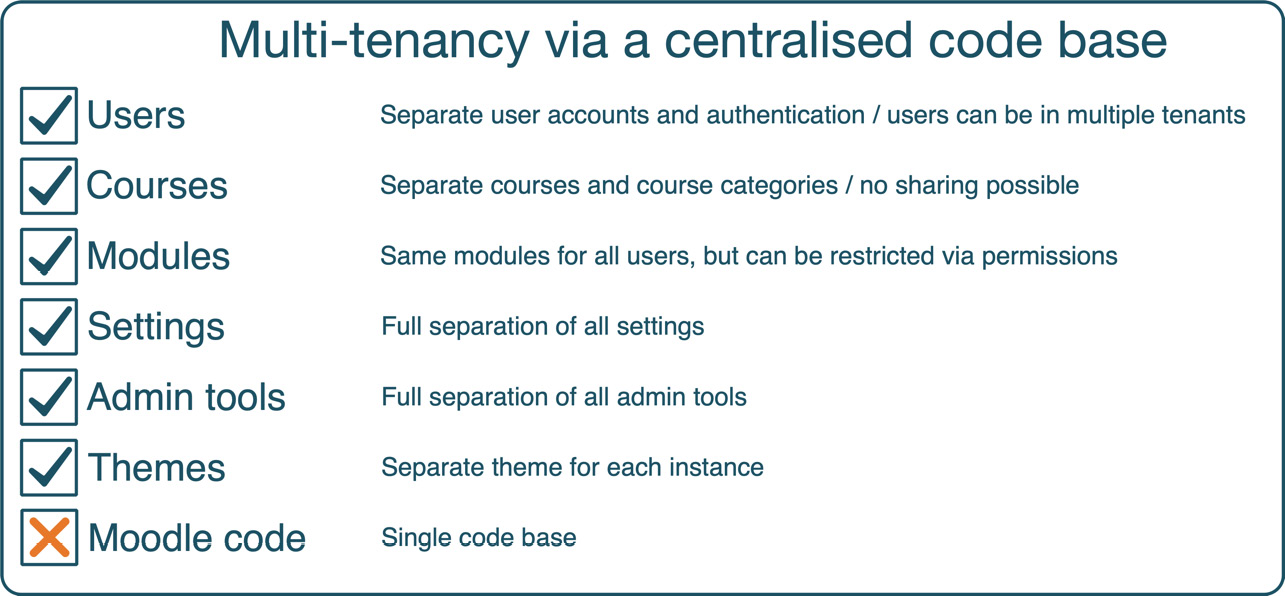
Figure 20.6 – Summary: multi-tenancy via a centralized code base
The approaches presented so far offer very different solutions to multi-tenancy: one uses a single Moodle instance with configured course categories and permissions, while the other provides separate standalone instances and delegates all responsibility to local administrators. The implementation presented in the following section is positioned somewhere between these two: a single Moodle instance with a built-in tenant functionality.
Supporting multi-tenancy in Moodle Workplace
This book is about Moodle administration and all its content applies to Moodle Workplace, too. Since Moodle Workplace provides a unique feature to cater to multi-tenancy, we will make an exception and cover a Moodle Workplace-only feature here. Parts of the section have been borrowed from the Tenants, Organizations, and Teams chapter in (advertisement alert!) my book Corporate Learning with Moodle Workplace by Packt Publishing.
There are two critical parts to multi-tenancy in Moodle Workplace:
- Tenants: Tenants are entirely isolated entities with their own look and feel, structure, users, and learning entities
- Sharing entities: Sharing courses and certificates across tenants is supported, as is sharing data such as programs, reports, or organization structures
We will cover both aspects of Moodle Workplace multi-tenancy in the following two subsections by describing how they work in general. For implementation details about Moodle Workplace’s powerful yet versatile multi-tenancy feature, check out docs.moodle.org/en/Multi-tenancy, also written and maintained by the author.
Understanding Moodle Workplace tenants
In Moodle Workplace, tenants are isolated entities with their own users, hierarchies, roles, dynamic rules, theme settings, reports, custom pages, and learning entities (courses, programs, and certifications).
All Moodle Workplace tools are multi-tenant-aware – depending on the feature, different levels of multi-tenancy are supported. The following diagram shows a high-level view of a tenant and multi-tenant-aware elements:
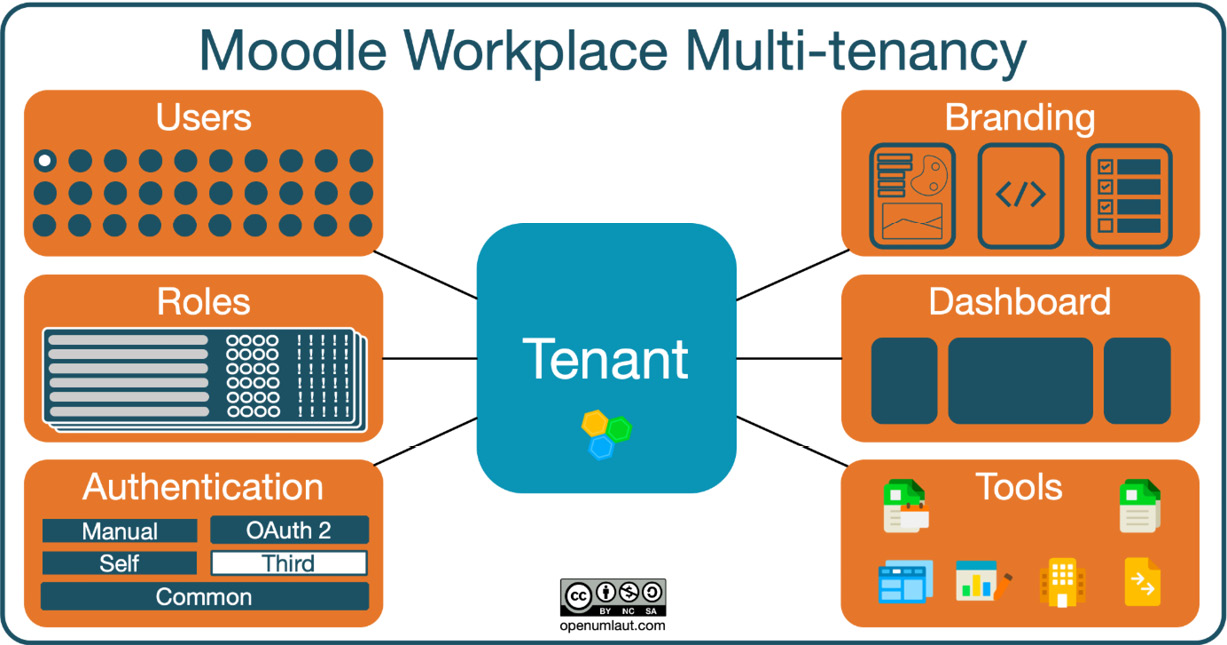
Figure 20.7 – Moodle Workplace multi-tenancy
A single default tenant is created during installation or after upgrading from Moodle LMS to Moodle Workplace. Each tenant has the following properties:
- Tenant name and ID number: Name of the tenant and unique tenant identifier.
- Site name and Site short name: These two tenant settings override the Full site name and the Short name for the site settings respectively in Site administration | General | Site home settings.
- Login URL: Two selections are available to access the login directly: one containing the ID number and the other an internal numeric tenant ID – for example, workplace.openumlaut.com?tenant=packt.
- Course category: Courses belonging to a particular tenant must be located in a tenant category. We will elaborate more on that feature later when we deal with sharing content across tenants.
There are two critical rules – some may call them restrictions – when dealing with tenant users in Workplace:
Important note
A user is always assigned to a tenant; an account cannot be tenantless.
A user cannot be assigned to more than one tenant; an account always belongs to just one single tenant.
When a new user account is created, whether by self-registration, manual entry, batch upload, or via web services, it is always attached to the default tenant unless specified otherwise. The following diagram illustrates how users are assigned to tenants:

Figure 20.8 – Moodle Workplace: users and tenants
Each user belongs to precisely one tenant, although this is likely to change in the future. Moodle Workplace supports tenant user quotas and lets you specify the maximum number of tenants allowed.
Moodle’s user profile fields have been extended to allow the definition of different user profile fields per tenant. When profile fields belong to tenant-specific categories, they will only appear in the profile for users in those tenants; this also includes sign-up and edit forms.
Each tenant can have zero, one, or many tenant admins who have devolved administration functions that allow you to fine-tune their level of responsibility. In addition to handling tenant users, a tenant admin has permission to manage tenant roles, configure tenant authentication settings, adjust the tenant branding, and create tenant dashboards by default:
- Tenant roles:
Role assignments to users can be managed separately for each tenant – thus, handling a tenant is almost like context.
- Tenant authentication:
Moodle Workplace supports multi-tenancy for authentication; you can configure different authentication options for different tenants. At the time of writing, supported authentication methods are manual, email-based self-registration, and OAuth 2. SAML is an explicitly supported, third-party authentication method. For more details, check out docs.moodle.org/en/Multi-tenancy_authentication.
- Tenant branding:
You can customize the look and feel of the tenant by configuring the multi-tenancy-aware Workplace theme. The branding elements, images, colors, custom SCSS, and footer are described in detail in the Moodle Docs at docs.moodle.org/en/Workplace_theme.
- Tenant dashboards
By default, all tenant dashboards are linked to the content defined in the default site dashboard, and any modifications to this page will appear for the new users in any tenant. Any user with appropriate permissions (site and tenant admins by default) can define a tenant-specific dashboard with the same editing capabilities as the main dashboard. Tenant admins can manage the dashboards of their tenants and reset the configuration for tenant users.
All Moodle Workplace tools, such as programs, certifications, custom pages, dynamic rules, and organization structures (departments, positions, and jobs), are fully multi-tenancy-aware. In addition to defining and managing these features per tenant, Moodle Workplace also supports sharing content and data across tenants, as described in the following subsection.
Understanding Moodle Workplace sharing entities
Moodle Workplace supports two ways that sharing across tenants can be facilitated:
- Shared content: Sharing courses and certificates
- Shared space: Sharing Moodle Workplace data, such as programs or organization structures
Let’s have a brief look at both options.
Sharing content in Moodle Workplace
Typically, each tenant has its own course category, and hence, its own courses. The manual enrolment method has been modified, so the user picker only displays users from the current tenant. However, there are scenarios where you might want to share specific courses among tenants, which is achieved by placing courses in the shared courses category.
Multi-tenancy does not apply to course content, which means that if learners or trainers are enrolled in a course, they will see users from other tenants while browsing the course. This behavior is intentional: suppose your organization has some shared courses. It can be assumed that you want the learners to study together and the trainer from one tenant to be a trainer for all learners regardless of their tenant.
If you share courses between different tenants and want users from each tenant to learn independently, they must belong to separate groups. Allocation to separate groups is done automatically when a shared course is part of a program.
The certificates tool we covered in the Skills and incentives section in Chapter 9, Configuring Educational Features, uses the shared course category feature just described. If a certificate template is placed in a tenant course category, it is limited to this particular tenant; otherwise, it is shared across all tenants.
Custom pages enable site and tenant administrators to create personalized experiences for different audiences by easily adding new pages to the navigation. The content on these pages can be customized using standard Moodle Workplace blocks. While tenant custom pages are specific to a single tenant, global custom pages are shared across all tenants.
Sharing data in Moodle Workplace using Shared space
The Shared space feature enables the sharing of entities across all tenants. It works like a special tenant where users can create supported entities available in other tenants.
Important note
Shared space is a special tenant to share Moodle Workplace entities among all tenants.
Currently, the following Workplace tools are supported in Shared space:
- Programs and certifications
- Organization structure (departments, positions, and jobs)
- Dynamic rules
- Reports
In the following screenshot, you can see a list of custom reports to demonstrate the Shared space feature. Moodle Workplace’s report generator is the same as the one described in Chapter 12, Gaining Insights through Moodle Reporting and Analytics, only with more report sources and the support of Shared space:

Figure 20.9 – Moodle Workplace: users and tenants
Two reports (Issued certificates and New users (all)) have a little mark beside them to indicate that they are shared across tenants, while the other two reports are only available in the local tenant.
This concludes the overview on multi-tenancy in Moodle Workplace, which also applies to the Moodle Workplace app. To summarize, we have created a familiar checklist as shown in the following figure:
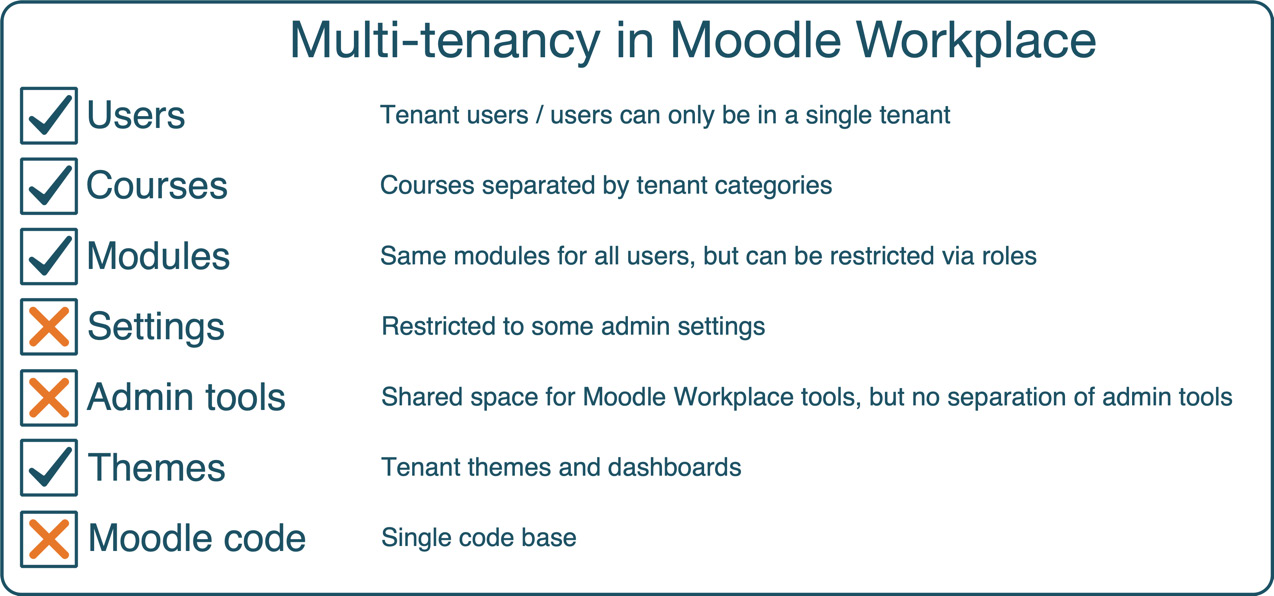
Figure 20.10 – Summary of multi-tenancy in Moodle Workplace
For more interesting reading on multi-tenancy in Moodle Workplace, check out the article at moodle.com/news/lms-multi-tenancy.
Summary
This chapter discussed different ways to support Moodle multi-tenancy. We first defined what multi-tenancy is and showed why there is a need for different types of multi-tenancy implementations. We presented three different approaches, one of which hopefully matches your requirements.
The first model, multi-tenancy via categories, used a single Moodle instance with configured course categories and permissions.
The second approach, multi-tenancy via a centralized code base, provided separate standalone instances and delegated all responsibilities to local administrators.
Lastly, we presented multi-tenancy in Moodle Workplace, the most versatile out-of-the-box implementation currently available.
We covered three representative implementations to facilitate multi-tenancy in Moodle. These solutions can, of course, be extended or further modified to cater to your individual requirements. While some aspects of implementing multi-tenancy might look technical, daunting, and labor-intensive, it will be a relatively pain-free exercise if a solid strategy is followed, possibly assisted by a professional and experienced Moodle Partner.