
8
Understanding Moodle Plugins
Your system is fully operational and has a look and feel that reflects your organization’s branding. As with all complex web-based applications, a significant number of configuration activities can be carried out to bring Moodle in line with your organization’s needs and requirements.
In this chapter, we will first provide an overview of plugins. Then, we will explore some third-party plugins and learn about their powers. We will then understand how to install, update, and delete plugins before we conclude with plugin evaluation criteria, popular plugins, and organizational decisions.
One of the many strengths of Moodle is its pluggable architecture. Moodle supports a wide range of plugins, which we are going to shed light on by covering the following topics:
- Moodle plugins – an overview
- The power of third-party plugins
- Managing third-party plugins (install, update, and delete)
- Good plugins and bad plugins (plugin evaluation criteria, popular plugins, and organizational decisions)
A word on terminology: we will use plugin, module, and add-on interchangeably in this chapter.
Let’s start with an overview of plugins and integrations.
Moodle plugins – an overview
Moodle is a (very) modular system – that’s what the M in Moodle stands for, after all – and most of Moodle’s functionality has been implemented as modules, called plugins.
Important note
Moodle plugins are modules that provide some specific, usually ring-fenced, functionality.
Navigate to the Plugins tab in the Site administration area. You will find two menu items dealing with installing and managing plugins before all plugin types are shown underneath.
Let’s get started with Plugins overview, which displays a list of all the installed plugins. The information shown for each plugin includes the following:
- Plugin name: The official name of the plugin.
- Component name: A unique internal identifier, shown underneath the plugin name.
- Version: The plugin version number, in date format. Some third-party plugins also show the supported Moodle version.
- Availability: Enabled or disabled.
- Actions: A link to the plugin settings, if available.
- Uninstall: An option to delete the plugin; unavailable for some core plugins.
- Notes: Additional information, usually in the form of dependencies or errors.
The Plugins overview window shown in Figure 8.1 is helpful to get a quick overview of what has been installed on your system and what functionality is available. You can also perform a check for available updates via the button at the top of the screen.
Select the Additional plugins link to see which third-party plugins have been installed. There are 16 additional plugins on my Moodle system. We utilized some in Chapter 7, Enhancing Moodle’s Look and Feel; we will install the other plugins later in this chapter.
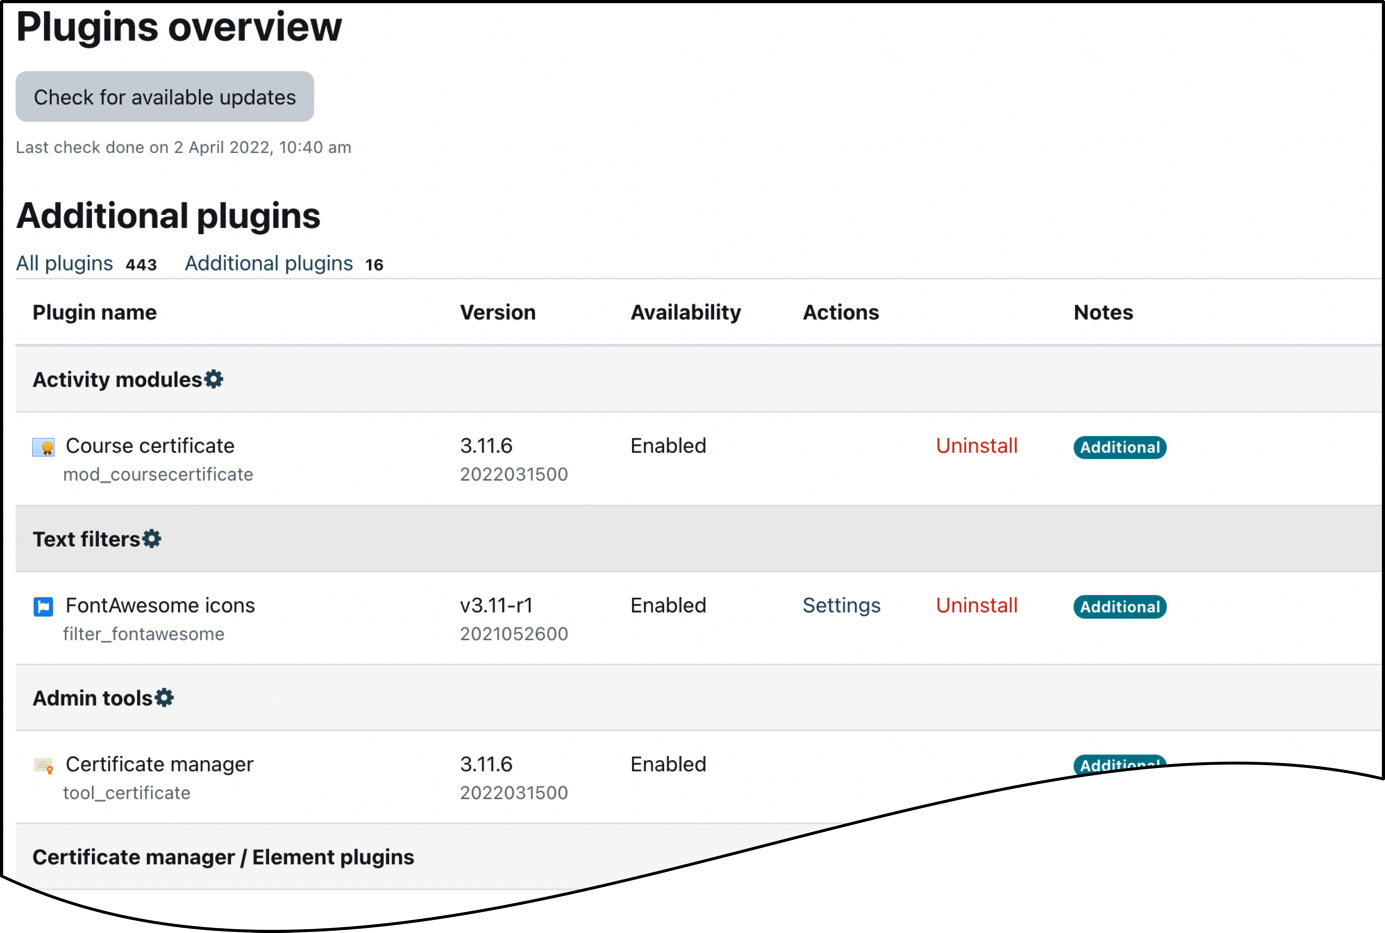
Figure 8.1 – Installed plugins
You can also see that each plugin has been placed in a category, a so-called plugin type, which is a good filter criterion when searching for third-party plugins, as we will see later.
Tip
Plugins are grouped into plugin types and plugin subtypes. For more technical information, check out docs.moodle.org/dev/Plugin_types.
As you can see from your instance’s long list of entries, Moodle already ships with over 400 plugins. Most plugins work within the realm of Moodle itself; that is, they do not need to communicate with any other systems. However, some plugins – integration plugins – require some sort of data exchange with other systems or services. We have system plugins at the other end of the spectrum, which need some internal configuration to function correctly.
Our plugins overview diagram follows the same structure and order as Moodle’s list of plugin types:

Figure 8.2 – Moodle plugins overview
Some plugin types have not been listed in this diagram. They either represent a niche type, for example, document converters and development tools, such as web service protocols, or are treated differently, such as themes.
The tiny bubbles attached to each plugin in Figure 8.2 indicate in which chapter the plugin is covered. The E-bubbles will be dealt with in Chapter 9, Configuring Educational Features, and the T-bubbles in Chapter 10, Configuring Technical Features.
Important note
Be careful when modifying settings in any of the plugins. Inappropriate values can cause problems throughout the system.
We haven’t mentioned one type of plugin called local plugins yet. The directory is the recommended place for customizations that do not fit the plugin types we already mentioned. These customizations can be changed according to the existing functionalities or the introduction of new features. For more information on local plugins, check out the readme.txt file in the local directory located in dirroot.
A plugin stores data in up to three locations:
- It always stores code in dirroot. This is the plugin itself.
- It might store data in the database, such as configuration settings or user data.
- It can store files in dataroot, for example, images or videos.
The following diagram visualizes these dependencies:
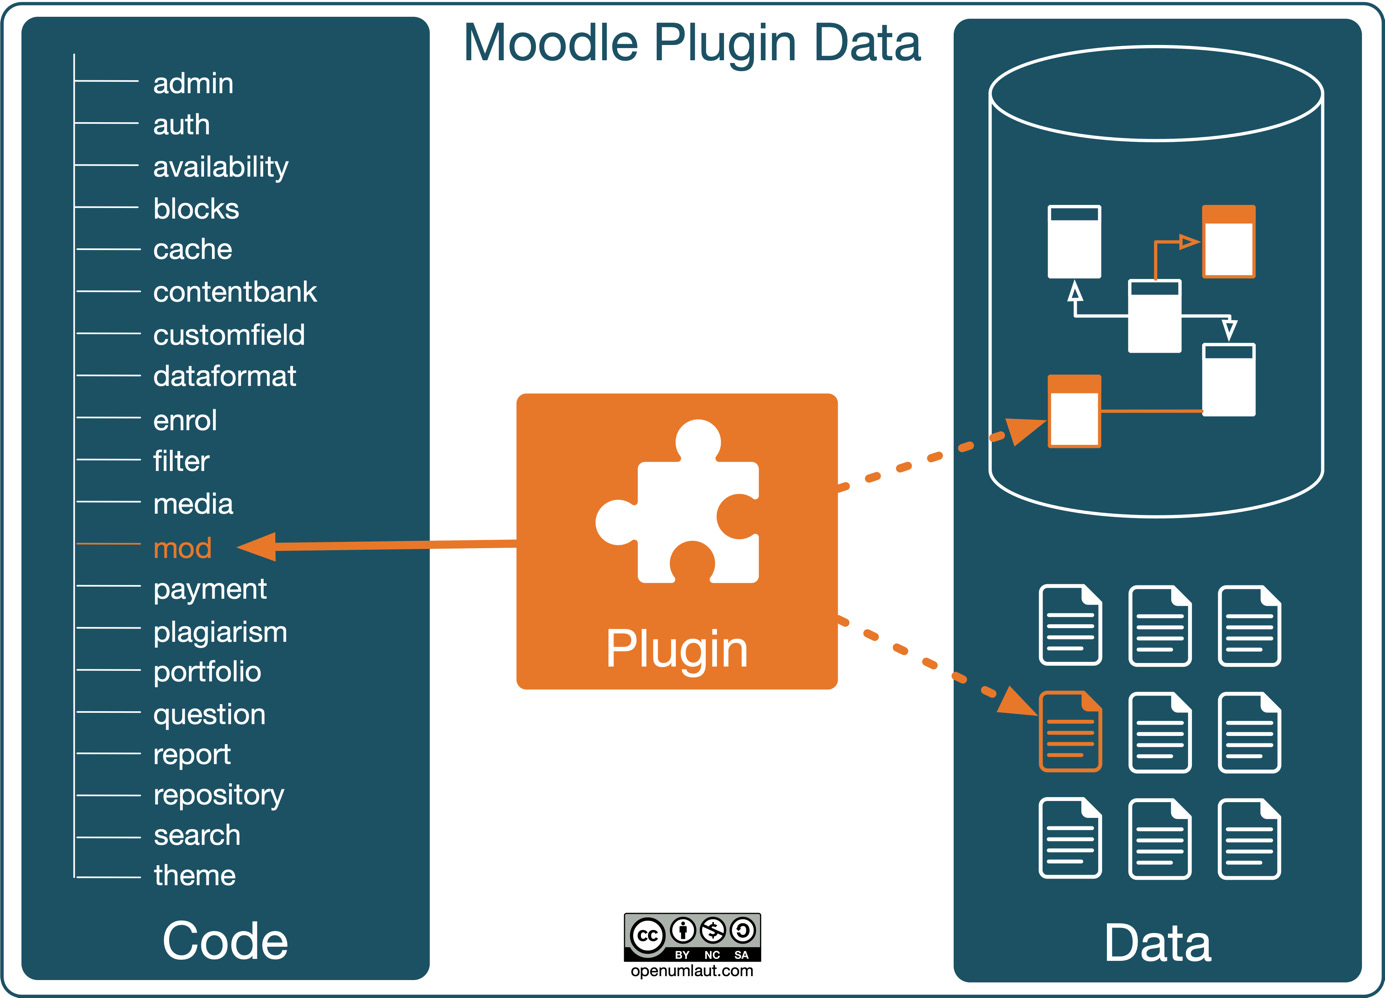
Figure 8.3 – Plugin data
If you delete any plugin – core or custom – used anywhere in Moodle, all of its already-created instances will be deleted, including any associated user data! Deleting a plugin cannot be undone; it has to be installed from scratch.
Important note
Do not delete any core plugins unless you are 100% sure you will never need them again. If you wish to prevent the usage of a core plugin, it is better to hide it instead of remove it.
With that stark warning, let’s extend your Moodle system with third-party plugins.
The power of third-party plugins
A plethora of third-party Moodle software exists that adds new functionality, fixes shortcomings, or integrates Moodle with external systems and cloud services. Let’s start with an overview of third-party software.
Moodle ships with a comprehensive set of core plugins. While the provided functionalities sufficiently satisfy a majority of use cases, there is a growing demand for additional software. Also, requirements change over time, and new functionalities are needed in your Moodle system.
Due to Moodle’s open source nature and modularity, it is relatively straightforward for developers to add new functionality or modify existing features. These can range from minor modifications (patches) or hacks to full-blown modules. You can access the plugin directory by visiting moodle.org/plugins, which contains all the approved non-core plugins (and themes).
You have three options to navigate through the plugin directory:
- Using Search with the help of a keyword
- Using Plugin types combined with other criteria, such as version or purpose
- Using Navigation in the side block where you can also contribute new plugins
Either way, you should always end up with a list of add-ons. Once you click on the plugin’s name, you will see details such as a description, installation instructions, statistics, and translations.
At the time of writing, there are over 2,000 third-party Moodle plugins, and the number is growing continuously. You will find all kinds of add-ons, from the weird and wonderful to the very powerful.
Now that we know where to locate plugins, let’s see how to install, update, and delete them in the next section.
Managing third-party plugins
The management of third-party plugins comprises the basic standard operations of add, change, and delete. There are four different ways to install, update, and uninstall plugins, which we will cover in this section:
- Installation via the web interface
- Manual installation
- Installation via Git
- Installation via the command line
Once you have added, modified, or removed a plugin via any of the four methods, you need to trigger the Moodle updater from Site administration | General | Notifications, which will manage the data stored in the database and moodledata. These processes are shown in the following diagram:
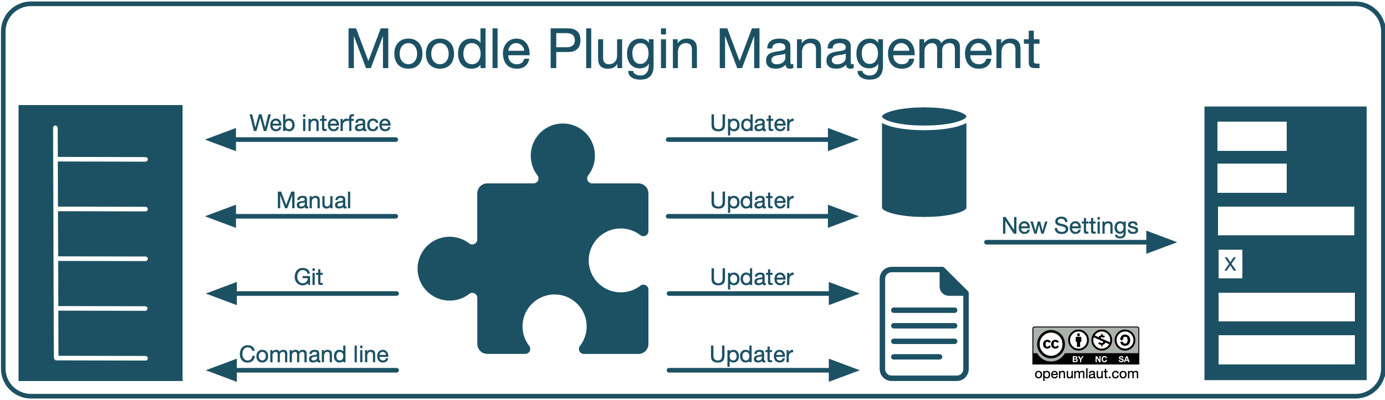
Figure 8.4 – Plugin management
If the updater has added any configurable settings, they will be displayed on a separate New settings page. This screen will be skipped if the plugin doesn’t contain any new parameters.
Important note
Installing, updating, and removing plugins should always be done in maintenance mode, which is activated from Site administration | Server | Maintenance mode. While it is possible to add most plugins while Moodle is in use, it is not recommended as this can lead to unforeseen problems.
In the following subsections, we will deal with the three standard management operations to install, update, and delete plugins by installing some popular third-party add-ons.
Installing third-party add-ons
Installing plugins to your Moodle system can greatly enhance the set of features and, consequently, your users’ experience. However, we recommend avoiding experimenting with new add-ons on your production site(s). Most organizations set up a shadow site of their live server to be used as a sandbox. Once the installation has been successful, the procedure is reapplied on the production site.
Important note
Try out new plugins on a staging or test site first. Back up your production site before installing new plugins.
Additionally, it is recommended that you make a complete site backup before installing any third-party software. This way, you can roll it back in case of a disaster. We will deal with backups in Chapter 16, Avoiding Sleepless Nights – Moodle Backup and Restore.
Important note
Ensure the plugin version is compatible with the version of Moodle you are running.
Most add-ons are structured in a very similar way. However, some modules either don’t follow this standardized approach or require other steps, particularly when the module communicates with other software systems. Each plugin should contain a file (usually) called README, and it is important to read the instructions inside it before starting the installation process.
We will demonstrate each installation type (web interface, manual, Git, and command line) by adding a popular plugin, starting with Video Time, which we already mentioned in the previous chapter.
Installing the Video Time plugin via the web interface
The easiest way to install a plugin is by going to Site administration | Plugins | Install Plugins. However, you must ensure that the target directory on your server is writable, which is not recommended in production sites for security reasons but is usually acceptable on test sites. There are two options for using the web-based plugin installer:
- Install plugin from Moodle plugins
This option will direct you to the familiar plugins section at moodle.org/plugins, where you must log in, to perform installations. Also, bear in mind that your site’s full name, URL, and Moodle version will be transferred to ensure a smooth installation process. Once you have located the plugin you wish to install (here, Video Time), you will see an additional Install now button appear:

Figure 8.5 – Installing plugins from Moodle plugins I
Once selected, a list of your sites will be shown, and you need to select Install now again. You will be redirected back to your Moodle site, where a message will indicate whether the plugin can be installed or a problem has arisen; for instance, the target directory is not writable. Once this has been confirmed, the plugin validation will be carried out, and the already-familiar Plugins check screen has to be confirmed before the installation is carried out.
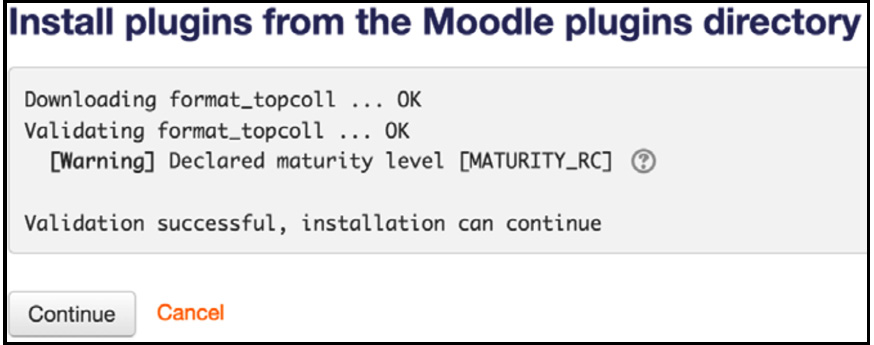
Figure 8.6 – Installing plugins from Moodle plugins II
Once Upgrade Moodle database now has been clicked, the updater will be started, and the standard installation process will kick off.
- Install plugins from a ZIP file
Alternatively, you can download and upload the plugin by navigating to the Site administration | Plugins | Install Plugins interface. You will have to confirm the validation screen before the installation is performed.
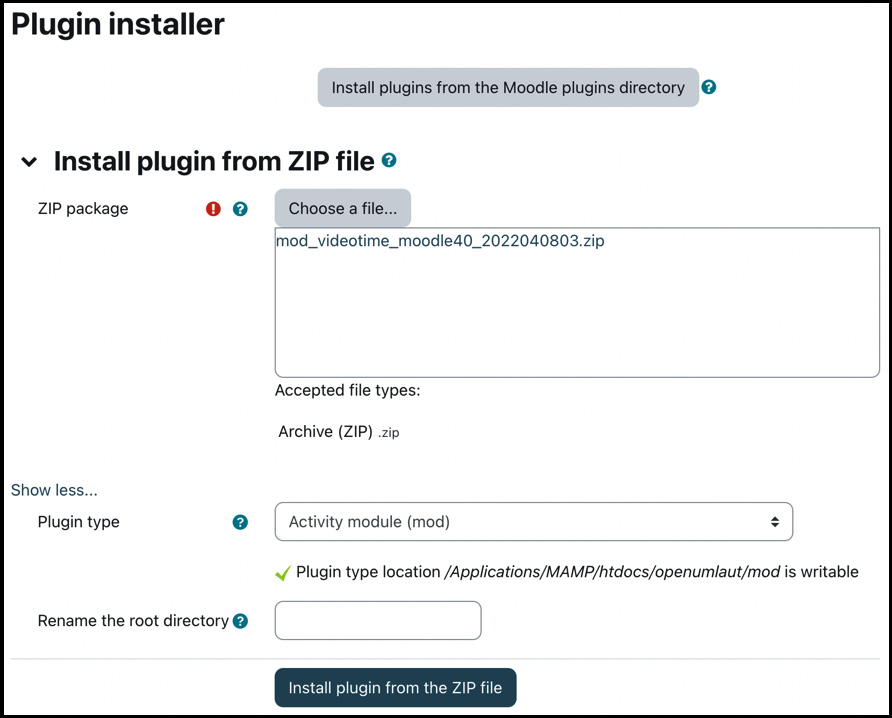
Figure 8.7 – Installing plugins from a ZIP file
The installer automatically detects the type of plugins that correctly declare their component’s name. If auto-detection fails, choose the correct plugin type manually. The installation procedure can fail if an incorrect plugin type is specified! If you need to change the root directory for the plugin installation, change the Rename the root directory setting.
The installation via ZIP files lets you add plugins not only from the public plugin repository on moodle.org but also from other sources, such as trusted developers or (Premium) Moodle Partners.
The advantage of the two covered web-based installation methods is their simplicity; the price to pay is compromised site security. The following plugin installation method overcomes this restriction.
Installing the Zoom meeting plugin manually
You can perform these installation tasks manually as an alternative to installing plugins via the admin interface. To demonstrate these steps, we have chosen the Zoom meeting plugin, which became very popular during the pandemic when working from a home office was the norm for many and the demand for video conference calls increased significantly.
After locating the add-on in the plugins repository (moodle.org/plugins/mod_zoom), download the version of the software that fits the version of your Moodle system (here, 4.0). Next, put Moodle in maintenance mode (Site administration | Server | Maintenance mode).
The module follows the standardized structure of add-ons; it uses Moodle’s predefined directory hierarchy and naming convention. It is best to copy the ZIP file to the $CFG->dirroot/mod directory and unpack the file via the unzip command. You might have to change the user and group attributes of the folder. Depending on their type, other plugins must be placed in other directories in $CFG->dirroot.
Now, go to Site administration | General | Notifications, where the module behind this page will recognize that a new module has to be installed and kick off the updater.
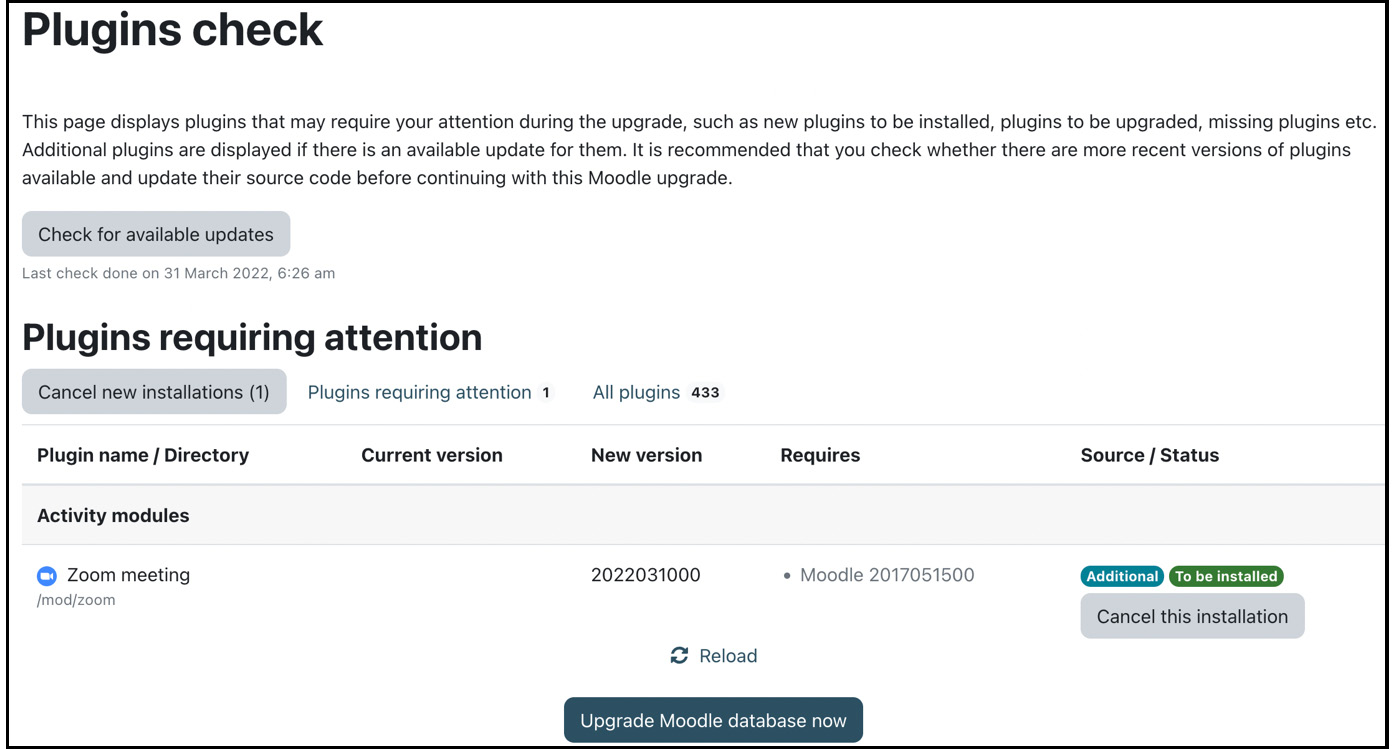
Figure 8.8 – Installing plugins manually
You will see a new entry in the Activity modules plugin types called /mod/zoom with the To be installed status. Once you confirm this via the Upgrade Moodle database now button, database tables with fields are created and populated with values. The overall success of the installation will be displayed.
If a new plugin contains settings that can be configured via the admin interface, they will be displayed on a separate New settings page. The Zoom meeting plugin has over 40 new parameters, which can be entered straight away (or left at their defaults), or later via the Plugin tab. In the case of our Zoom plugin, you must provide apikey, apisecret, and zoomurl for the module to function.
That’s it! All you have to do now is ensure the module works as expected. In the case of Zoom meeting, go to Site administration | Plugins | Activity modules | Zoom meeting, and you will see an entry for the newly installed add-on. You can find detailed information at github.com/ncstate-delta/moodle-mod_zoom/wiki.
Finally, don’t forget to disable Moodle’s maintenance mode and let your users know the new functionality is available!
An alternative to manually installing third-party plugins is to install and update them via Git, which we will cover in the following subsection.
Installing the Workplace certificate manager via Git
Developers are encouraged to maintain their personal Git repositories, which might contain multiple Moodle extensions. We will use the popular Workplace certificate manager to demonstrate how to install a contributed extension from its Git repository. As the name suggests, the plugin is part of Moodle Workplace and has been made available to work in Moodle LMS. Check out the Moodle Docs page at docs.moodle.org/en/Certificates and the Managing certificates section in Chapter 9, Configuring Educational Features, for details about the tool.
When you browse the plugin page, you will see a link to Source control URL, which will direct you to the GitHub entry of the plugin. GitHub (now owned by Microsoft) is the de facto standard site for managing Git repositories.
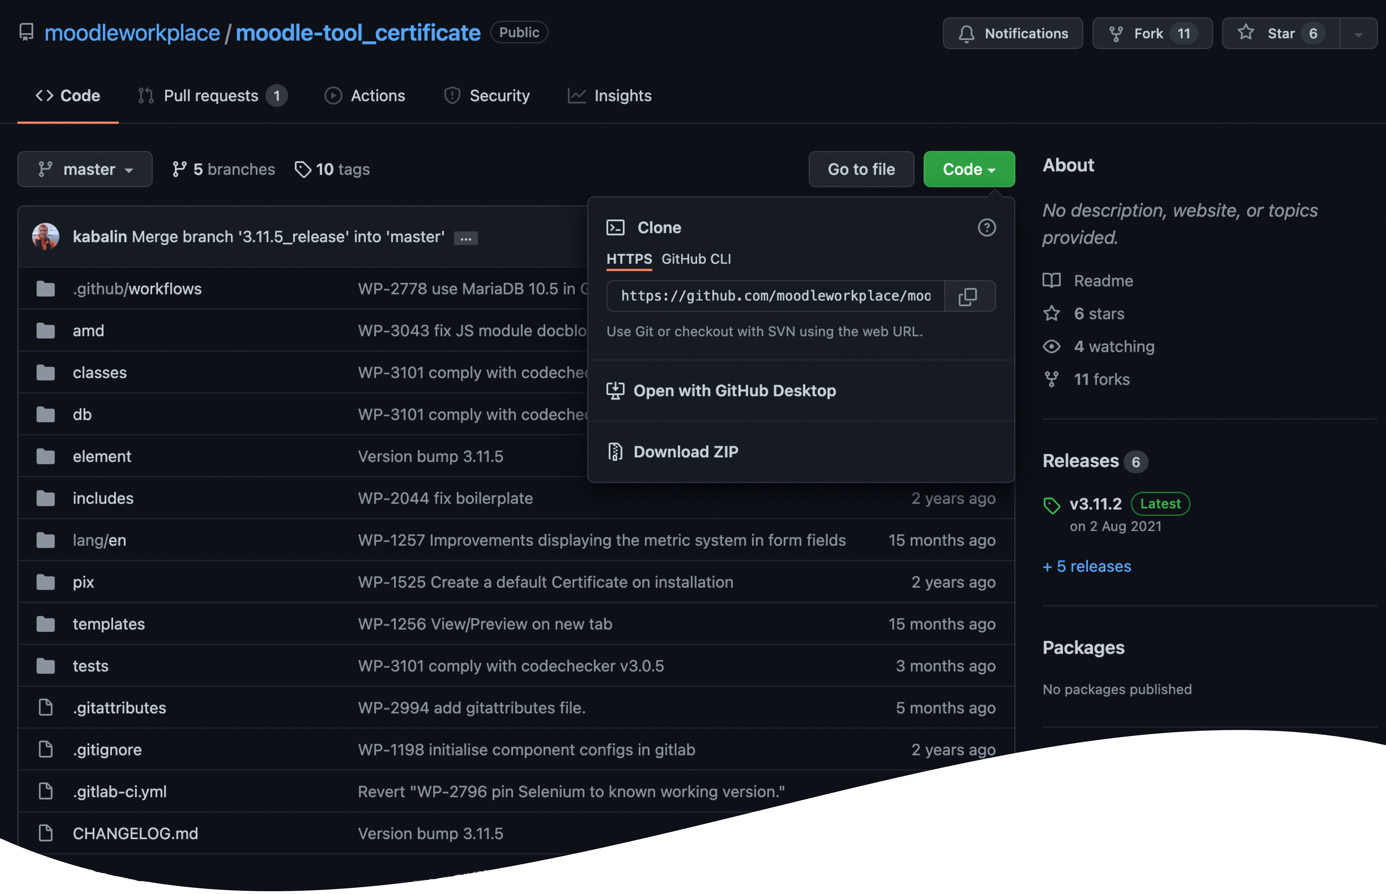
Figure 8.9 – Installing plugins via Git I
Workplace certificate manager is an admin tool. To install the plugin, you have to execute the following steps:
- Change to the $CFG->dirroot/admin/tool directory (this is where admin tools are stored).
- Execute the following git command, which adds a new subdirectory called certificate and creates a local copy of the plugin code repository:
git clone https://github.com/moodleworkplace/moodle-tool_certificate.git certificate
When executing the git command, progress is displayed as shown in the following screenshot:

Figure 8.10 – Installing plugins via Git II
- Go to the Site administration | General | Notifications page and run through the upgrade screens for the plugin to be added to your Moodle system. Once this last step has been successfully executed, the plugin will be available by navigating to Site administration | General | Certificates | Manage certificate templates.
A second plugin works in tandem with Workplace certificate manager. The Workplace course certificate activity (moodle.org/plugins/mod_coursecertificate) automatically issues digital certificates to course participants. Feel free to install the plugin yourself and check its documentation at docs.moodle.org/en/Course_certificate_activity.
The installation via Git has the advantage that you have a version history and can potentially roll back in case of any problems. A further benefit is that Git commands can be placed in shell scripts to automate plugin maintenance. However, some may find the Git syntax a bit cryptic or the usage of Git overkill. An intuitive alternative to Git is the MOOSH command-line tool, which might work better in some environments.
Installing plugins via the command line
Moodle itself does not support the installation of plugins via its CLI, but there is a utility called MOOSH that does exactly that. You will find the tool in the Moodle plugins database (moodle.org/plugins/view.php?id=522). To install MOOSH, extract the downloaded package and set a symbolic link to your programs folder:
sudo ln -s $PWD/moosh.php /usr/local/bin/mooshYou should now be able to execute MOOSH from the command line. For further installation options, have a look at moosh-online.com.
MOOSH is a bit different; that is, it is not a plugin as such but a command-line tool supporting over 150 commands, two of which are relevant in the context of installing plugins:
- moosh plugin-list: This command lists all the plugins (full name, short name, available Moodle versions, and a short description) available at moodle.org/plugins; it makes sense to apply some filters, such as the module name, since the list is enormous.
- moosh plugin-install mod_coursecertificate 1: This command downloads and installs the current version of the Workplace course certificate activity we mentioned in the previous subsection. It doesn’t get any easier than this! To obtain the version number, use the aforementioned plugin-list command (moosh plugin-list | grep "Course certificate").
You can use the config_plugins command to configure the settings of the plugin. To get an overview of all the plugins installed on your Moodle instance, use the info-plugins command.
You will come across MOOSH at various places in this book, and an entire section has been dedicated to the tool in Chapter 17, Working with Moodle Admin Tools.
So far, we have worked our way through alternative plugin installation procedures. Regular updates are published for most plugins, and the topic of the following subsection is how to keep your add-ons up to date.
Keeping plugins up to date
One main challenge that Moodle administrators face is to keep plugins up to date. The preceding steps are sufficient for a one-off installation but do not cater to plugin maintenance.
How do you know that new plugins are available? You can either be notified automatically by email (go to Site administration | Server | Update notifications, as covered in Chapter 1, Installing Moodle), you can check manually for updates at Site administration | Plugins | Plugins overview (see Figure 8.1), or you can go to Site administration | General | Notifications, where you might see the following notification:
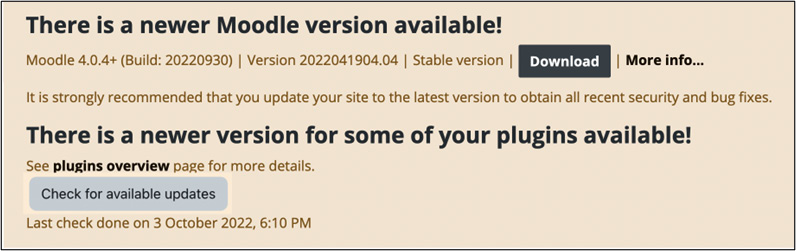
Figure 8.11 – Plugin upgrade required?
Keeping plugins up to date depends on the installation method you chose initially:
- Web interface: Go to Site administration | Plugins | Plugins overview, where the Install available updates button will initiate the update process of any available plugins (download and installation).
- Manually: You will have to download the latest version at moodle.org/plugins and re-install, as described previously.
- Git: To keep the plugin up to date over time, you will have to create a local module branch of the module that is synchronized with the remote branch on GitHub. You will find detailed instructions on how to do this at docs.moodle.org/en/Git_for_Administrators.
- Command line: All you need to do is rerun the same command you used during installation: moosh plugin-install <plugin> <moodle_version>.
Plugins might become obsolete, or a better alternative might get published. Removing plugins from your Moodle system will be dealt with in the following subsection.
Uninstalling third-party add-ons
Moodle plugins usually comprise two parts: the plugin code, located in a subdirectory of $CFG->dirroot, and data associated with the plugin, located in the database and/or Moodledata. When deleting a plugin, you must ensure that both parts have been removed. If the code is removed, but there is still some data in the database or filesystem, inconsistencies might occur; if the data is gone, but the plugin is still present, it will be re-installed the next time the updater is initiated.
The removal of a plugin depends again on the installation method you chose initially:
- Web interface: Go to the Site administration | Plugins | Plugins overview, where you must follow the Uninstall link. Once the deletion has been confirmed, all data associated with the plugin will be removed. To prevent the plugin from re-installing itself, its code must be removed from your server, which can be done by confirming the second screen.
- Manually: The procedure is the same as the uninstallation via the web interface. The only step unlikely to work is deleting the plugin code from Moodledata due to a lack of permissions. If that is the case, you must remove the folder(s) at the shell level.
- Git: To remove the plugin code, you have to run the following command:
git rm <plugin>
- While this command keeps your local git repository up to date, it doesn’t remove the data associated with the plugin. As before, you need to do this manually via the Uninstall option at Site administration | Plugins | Plugins overview.
- Command line: All you need to do is run the MOOSH plugin_uninstall command: moosh plugin-uninstall <plugin>. This command removes both the plugin code and the plugin data.
You are not tied to a single method for maintaining plugins; you can install an add-on via the command line and remove it manually. The only method that requires consistency is Git, as the repository has to be kept in sync with the code base of your Moodle instance to avoid inconsistencies.
Important note
Deleting an add-on will also irreversibly remove all the user data associated with the module!
This concludes the section on managing third-party plugins. The following table provides a summary of the four described plugin management types, highlighting key features and restrictions:
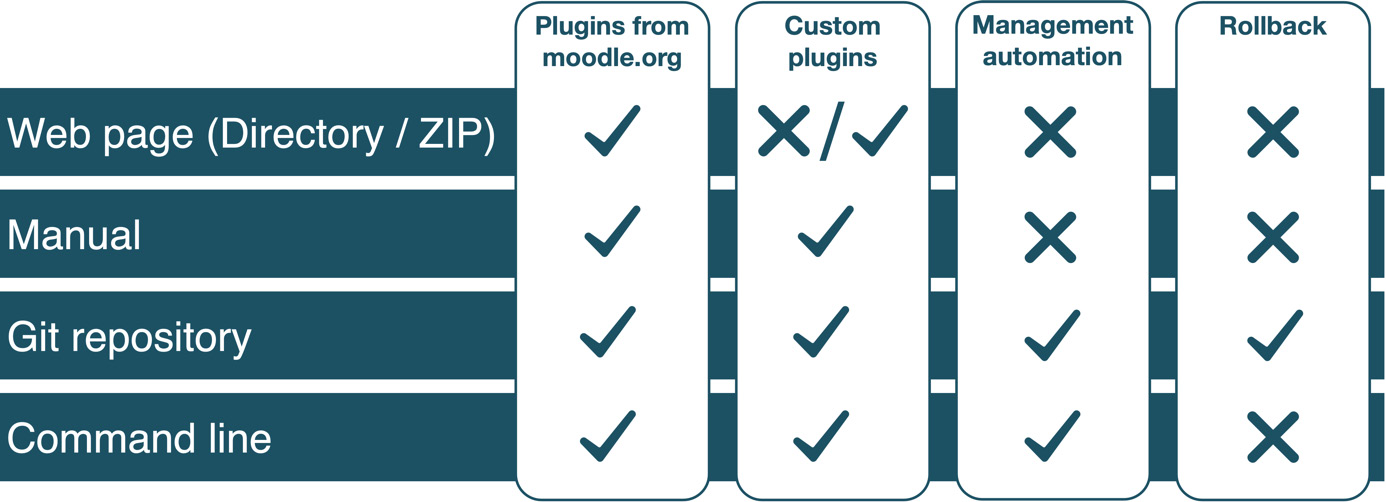
Figure 8.12 – Plugin management options
So far, we have not distinguished between good and not-so-good plugins, which is the topic of the following section.
Good plugins and bad plugins
Every module that is part of the core of Moodle has gone through a thorough quality assurance procedure. Moodle has implemented a tight process of accepting third-party plugins to its database. While this practice does not guarantee the add-on’s functionality, security, or integrity, it evaluates the code at a high level. Once this stage has been passed, it will be accepted in the plugin database. The potential problem with third-party add-ons is that you don’t know anything about the quality of the software.
While it is possible to uninstall modules if they don’t fit your purpose, you will have to ensure that you don’t put barriers in place for future updates. If an add-on is not maintained correctly, it is unlikely that it’ll be able to support any upcoming versions of Moodle. You will have to delete the module that’s already in use, or you won’t be able to upgrade your system. Also, a module might cater to some required functionality but can compromise your system’s security.
Plugin evaluation criteria
Several criteria indicate whether a plugin is trustworthy or not. They are as follows:
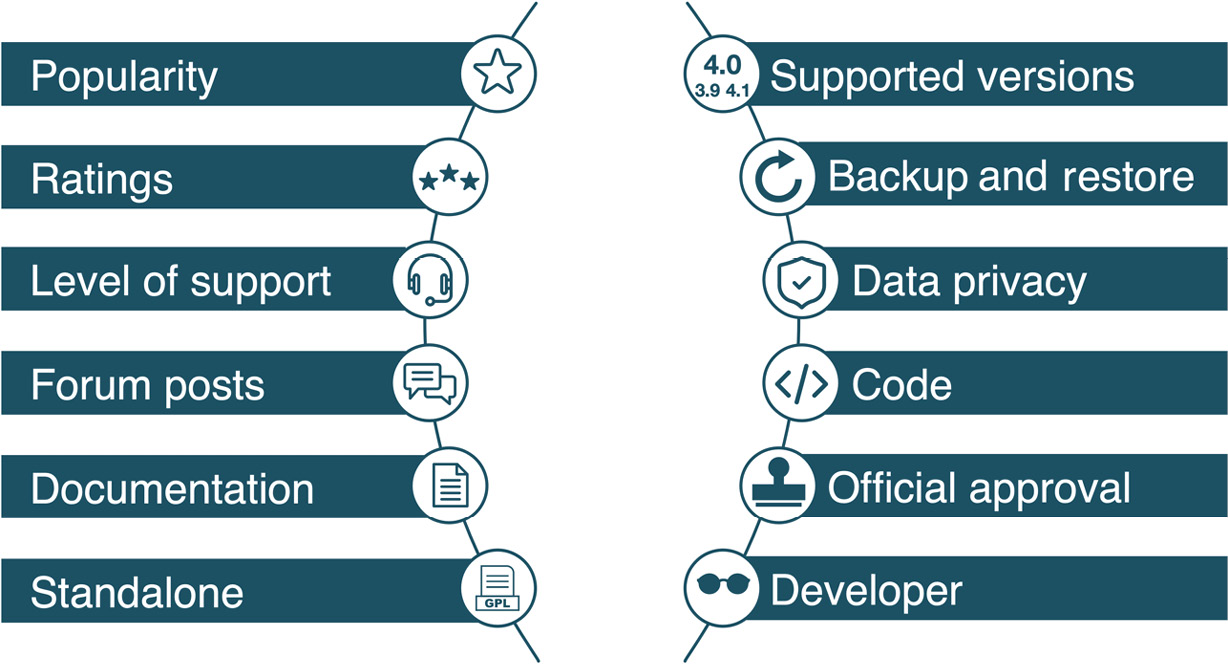
Figure 8.13 – Plugin evaluation criteria
The following enumeration provides a brief explanation for each item in the diagram:
- Popularity: Moodle maintains statistics on usage and downloads, which can be found in the Stats tab of each plugin. While there is no guarantee, the more popular a module, the more likely it is to be of a high standard.
- Ratings: Each plugin page allows users to mark a plugin as their favorite. Again, there’s no guarantee here, but the more admins who are fans of a plugin, the more likely that this is a good plugin.
- Level of support: Some of the most valuable third-party add-ons have vanished because they are unsupported. Your best bet is if a major stakeholder supports the add-on in Moodle, that is, a (Premium) Moodle Partner. The maintainer should have been active in the community during the past 60 days.
- Forum posts: Users are encouraged to post comments, problems, and praise about each module. Read through the posts to get an idea about what other users have experienced. Be suspicious about modules that are not talked about at all. Also, check whether there are any bad reviews in the Reviews section.
- Documentation: Each add-on should have a dedicated page in Moodle Docs. It is usually not a good sign if the page does not exist or is only a wiki stub. Also, it is a good practice if a changelog is kept for the developed software.
- Standalone: Third-party add-ons mustn’t modify any core code (known as patches supplied in the form of patch files). This restriction is essential as the changes will be overridden with every Moodle update, and the modifications must be reapplied.
- Supported versions: Support for current and all supported versions of Moodle shows that the software is being actively maintained. You can look at any of the existing versions in the Versions tab.
- Backup and restore support: If applicable, the add-on should be supported by the course backup and restore facility. Otherwise, what good is an activity if it is not included in your archives?
- Data privacy: If the plugin stores any data, Moodle’s data privacy features (data requests, data registry, and data deletion) must be fully supported. More details can be found in Chapter 14, Complying with Data Protection Regulations.
- Code: If you can read PHP code, look at the actual source code of the add-on. Try to find answers to the following questions: Is the code well structured, and can it be easily followed? Is the source code well commented? Does the module follow the Moodle coding guidelines (docs.moodle.org/dev/Coding)? Beware if the answer to any of these questions is no.
- Official approval: Add-ons stored outside the official Moodle plugin repository, for example, on a developer’s home page, should only be trusted if they come from a well-known source.
- Developer: Some developers are known to produce very well-written Moodle add-ons. Programmers affiliated with a (Premium) Moodle Partner are usually a good bet, as are core developers, Moodle documenters, and particularly helpful Moodlers.
Sound quality is a non-negotiable criterion, but many good third-party plugins are still available. We have put together a list of popular plugins to get you started, which you will see in the following subsection.
Popular plugins
The following is a list of some popular third-party Moodle add-ons, available through the plugin directory at moodle.org/plugins, alongside brief descriptions (excluding themes and course formats, which we already covered in Chapter 7, Enhancing Moodle’s Look and Feel):
- Adminer: This is a repackaged version of Adminer. Once installed, you will see a new Moodle Adminer item in the Server menu. This tool can handle all database-related operations, including creating database backup dumps.
- Attendance: The plugin allows an attendance log to be kept in blended-learning environments and includes a block for easy access to relevant functions.
- Checklist: This plugin, containing an activity module and a block, allows teachers to create a checklist to benefit their students. The teacher can monitor all their students’ progress as they tick off each item on the list, and items can be indented and marked as optional. Students are presented with a progress bar, and they can add their private items to the list.
- Completion progress: This block is a time management tool for students that visually shows what activities and resources a student should interact with within a course.
- Dash: Dash is an interface and report builder that lets you create flexible course catalogs, team dashboards, and progress reports, among others.
- Level Up: This provides a great way to add various gamification elements to your Moodle system, supporting (experience) points, (configurable) levels, leaderboards, targets, rewards, and many more.
- Microsoft Office 365: Microsoft has developed a suite of plugins to allow Microsoft Office 365 usage within Moodle. The set includes logging in via OpenID, access to OneDrive, integration with Office resources, and Outlook calendar synchronization.
- Zoom: To strengthen our love-hate relationship with Zoom, we can add the plugin to our Moodle instance, as described earlier in this chapter. We will discuss the built-in web conferencing system BigBlueButton in detail in Chapter 10, Configuring Technical Features.
Keep monitoring the list of Recently added plugins at moodle.org/plugins or via the Twitter handle @moodleplugins. There are always great new plugins that might be useful for your site. However, before adding every plugin to your site that could be useful to some users sometime in the future, please consider some organizational criteria, which we will discuss next.
Organizational decisions around plugins
Before you go wild and bombard your Moodle system with dozens of plugins, sit back and reflect on the following questions:
- Who is the plugin for?
Does the plugin cater to the needs of a wide range of users or only a handful of trainers with very specific needs? Is it a nice-to-have gimmick or a must-have feature? Neither is a problem; just be aware of this.
- What are the requirements of your users?
It has proven very useful to gather your staff’s requirements from a representative group of users. Math teachers have needs that are different from language coaches, novices need tools separate from experts, and course authors request features dissimilar to those required by course coordinators. Gather all the requirements first, and then decide which plugins are needed to cater to the majority.
- What is the impact on your users?
Adding new activities, question types, and course formats is a great way to equip your teachers with new tools to build engaging learning content. However, take into account the skills of your staff and the time they would have to invest in mastering these add-ons.
- What is the impact on your infrastructure?
Some plugins require access to other systems, for instance, authentication plugins or cloud services. Other plugins rely on a commercial service, for example, video conference tools or plagiarism detection systems. Ensure that the plugin suits your infrastructure and that there is a sustained budget in case regular fees must be paid.
- Is there an alternative?
Ensure that onboard tools cannot cater to the requirements. If this is not the case, trawl Moodle’s plugin directory for alternative options.
Be very selective with the plugins you add to your system – the fewer add-ons you have to maintain, the less work and potential hassle you face in the long term.
Summary
In this chapter, we learned the basics about Moodle plugins. We first provided an overview of plugins, before covering the essentials of managing third-party Moodle add-ons. Plugin management comprised installation, update, and removal; for each operation, we offered four methods: web interface, manual, Git, and command line.
After that, we offered some advice on good plugins and not-so-good plugins. We provided some plugin evaluation criteria you might want to apply, presented some popular plugins, and gave you a list of organizational decisions you should take into account.
You’ve hopefully experienced a flavor of the breadth and depth of additional functionalities available for Moodle. It demonstrates the extensibility and significant benefit of open source software, that is, programmatically enhancing a system to a user’s requirements. The consistent manner in which plugins have been implemented demonstrates the modular architecture of Moodle and flattens the learning curve when additional modules are added in the future and must be administered.
Now, let’s move on to configuring Moodle plugins. Due to the high volume of available plugins, we divided the topic into two chapters: educational configuration and technical configuration.