
9
Configuring Educational Features
Moodle supports a wide range of tools and features that require administrative attention, some only once, others regularly. Due to the volume of configuration areas, we have divided the topic into educational and technical configurations, each represented by a dedicated chapter:
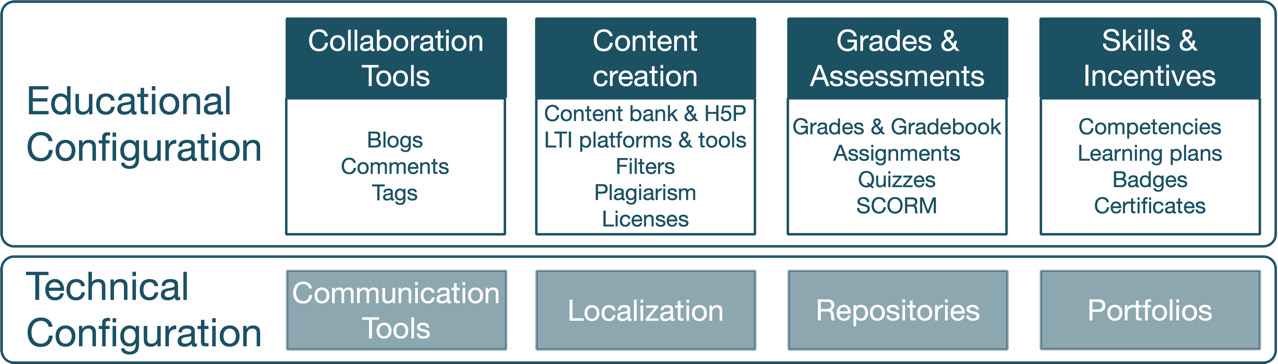
Figure 9.1 – Educational configuration topics
This chapter deals with configuring educational settings. Therefore, we will cover the following topics:
- Configuring collaboration tools
- Configuring content creation features
- Configuring grades and assessments
- Managing skills and incentives
Configuring educational settings usually requires input from domain experts, such as curriculum planners, content creators, or assessors. It has proven beneficial to liaise with these specialists to ensure the optimal setup for your Moodle system.
By the end of this chapter, you should be in a good position to approach your colleagues, ask the right educational questions, and implement their requirements.
Configuring collaboration tools
One of Moodle’s many advantages is its built-in support for collaboration among learners and instructors. This ranges from several collaborative course activities, such as Forum, Wiki, Glossary, and Database, the ability to run activities in group mode, and support for groupings. Additionally, there are three social tools in Moodle that have to be configured by the administrator: blogs, comments, and tags. We will discuss these in the following subsections.
Configuring blogs
The blogging mechanism provided to users in Moodle allows them to create personal and public entries and posts relating to courses.
Important note
Blogs are a means for users to express themselves either in the form of a learning journal or as a personal account of events.
As an administrator, you must ensure that Enable blogs is turned on in Site administration | General | Advanced features. Next, you should navigate to Site administration | Appearance | Blog to configure the following settings, which apply to all blog users:
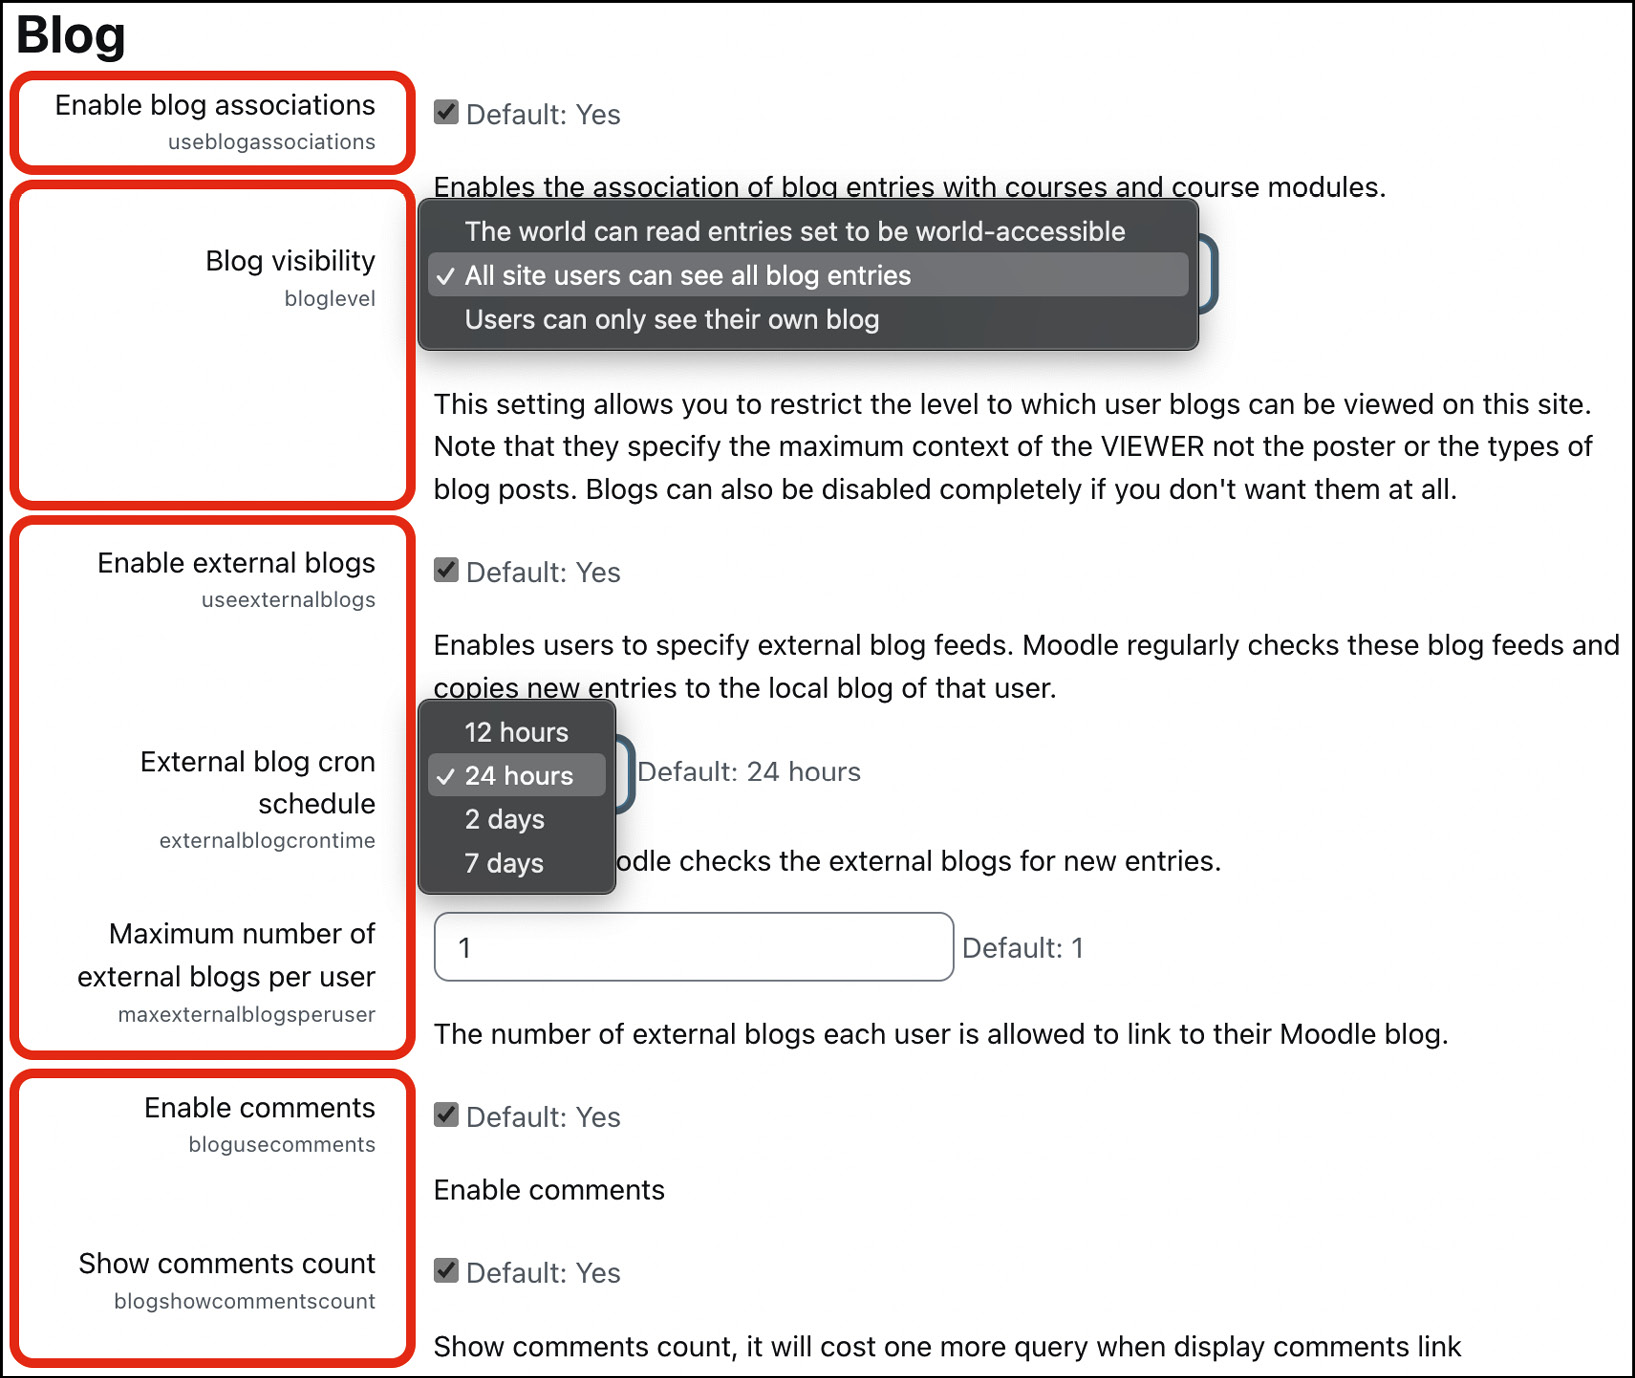
Figure 9.2 – Configuring blogs
There are four types of settings that you should double-check:
- Enable blog associations: If checked, course and activity blogs become available, which allow learners to choose link entries to a course or course module. If unchecked, all blog posts will be converted into user blog posts. This setting can be overridden locally via the moodle/blog:associatecourse and moodle/blog:associatemodule capabilities.
- Blog visibility: What you choose here depends on your organization’s policy and how blogs are used as part of the learning process.
- External blogs: Moodle supports external blogs, such as those from WordPress. If enabled, users can link external blogs via the Register an external blog link in the Preferences menu. The entries will be shown as if they had been entered in the Moodle blog but cannot be modified.
- Blog comments: If enabled, others can provide comments on blog posts; for instance, a teacher can leave private or public feedback on a journal entry. You can further specify whether the comments count should be shown.
We have just come across comments in blogs, which are the second collaboration tool to be configured.
Configuring comments
Moodle comes with a generic comments functionality independent of the one in the blogging tools. It allows you to place the Comments block in any context of the system, such as in a course or an individual activity.
Important note
Comments are remarks that can be attached to various Moodle artifacts.
This feature is enabled by default but can be disabled via the Enable comments parameter under Site administration | General | Advanced features.
There are several areas where additional comment-related settings can be set; for instance, when they are included in backups or supported by certain activities. You can also look at a report by going to Reports | Comments, where you will see all the comments throughout the system. You might want to check this frequently in case anything offensive or inappropriate has been entered.
You can search for comments using the Search box to see these settings. As always, these options can be overridden locally via the respective role capabilities.
The third and last collaboration activity in Moodle is tagging, which we deal with in the following subsection.
Configuring tags
Tagging is the process of describing artifacts or users using keywords. These tags are then harnessed to search for, share, and perform various collaborative activities to match interests.
Important note
Tagging is the process of describing artifacts or users using keywords.
Users create their own tags that represent their personal or educational interests. However, as an educational institution, you might want to create site-wide tags that can be used in addition to the user-defined tags or even limit tagging to a set of standard tags. Examples of global tags include organization-related keywords, topics your entity specializes in, campaigns your company runs, and newsworthy topics relevant to your institution.
As with blogs and comments, tags can be enabled (default) and disabled for the entire site via the Enable tags functionality parameter under Site administration | General | Advanced features. The following diagram illustrates how tags are organized in Moodle:
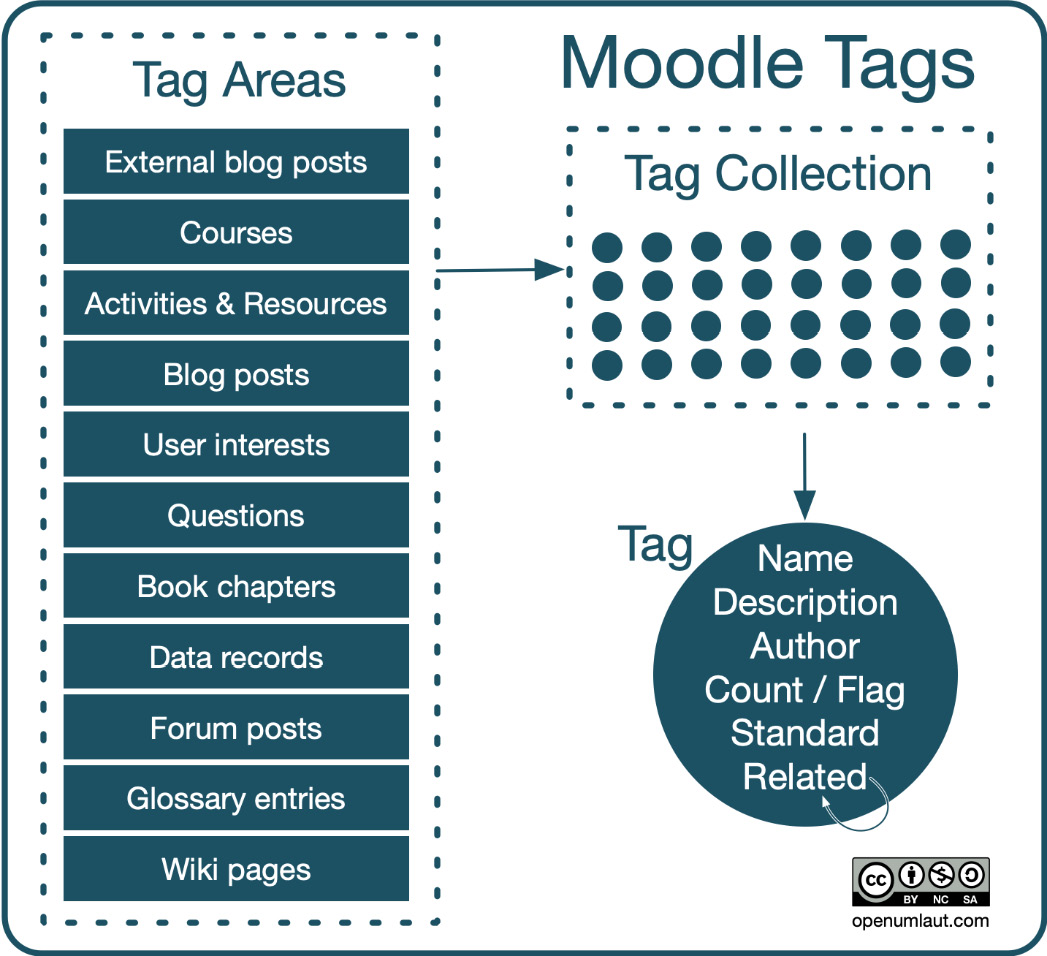
Figure 9.3 – Moodle tags
Tags are organized in tag collections. A tag belongs to one collection; a tag cannot belong to more than one collection. There are several predefined tag areas, each representing Moodle features that support tags. Each tag area has an associated tag collection; one tag collection can be associated with multiple tag areas. To see the tags, tag areas, and tag collections in action, navigate to Site administration | Appearance | Manage tags, where you will see the following:
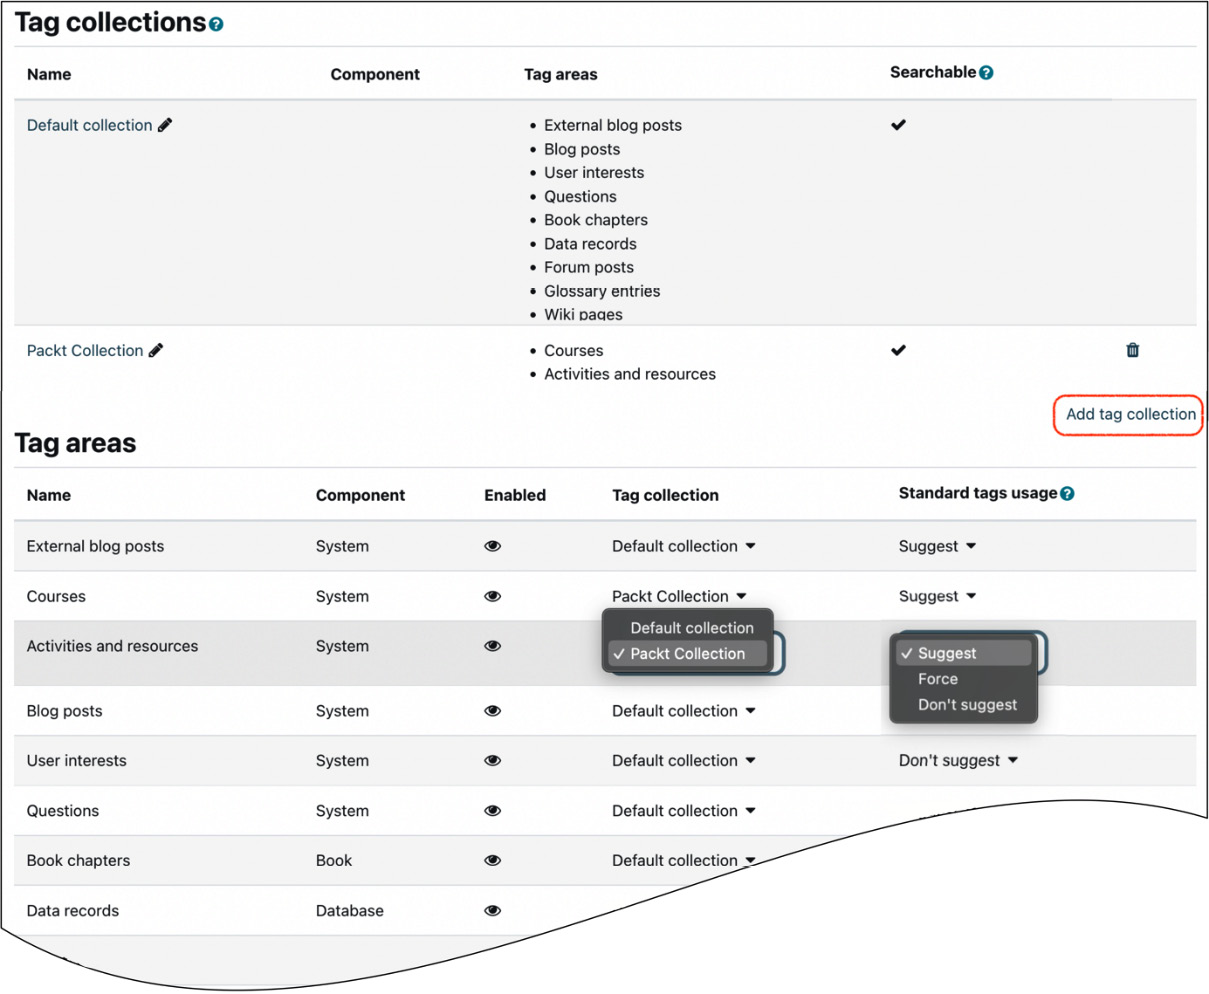
Figure 9.4 – Managing tags I
There are two tag collections at the top of the screen, one of which has been added via the Add tag collection link. To associate a tag collection with a tag area, you need to select it in the respective column in the tag areas table. The Standard tags usage setting indicates how tags are being dealt with when entered in the tag area: they can be proposed once you start typing (Suggest), only standard tags can be selected (Force), or no tags are shown (Don’t suggest).
Disabling a tag area (via the standard eye symbol) completely hides the tagging functionality from this component. For example, when turning off tagging in User interests, the respective entry in the user profile won’t be available anymore.
When you select the name of a tag collection, you will see all tags of that collection:
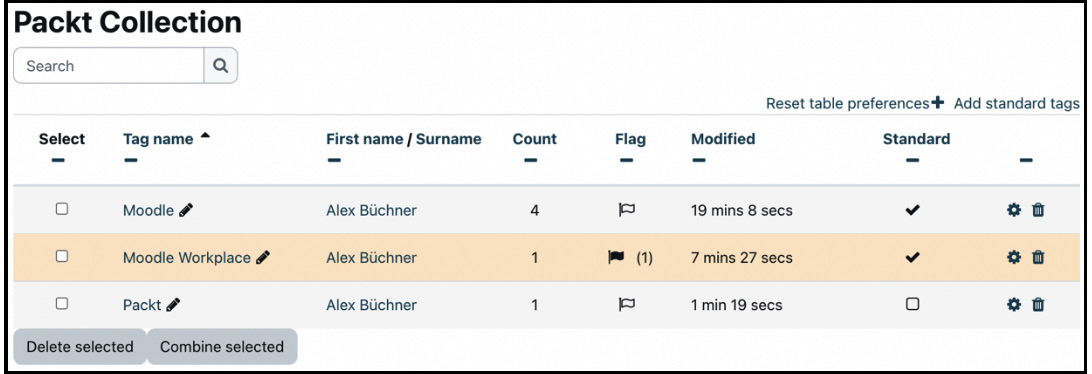
Figure 9.5 – Managing tags II
For each tag, the following settings/actions are available:
- Tag name: When selected, you see which users have been tagged with this tag.
- First name / Surname: Tag creator.
- Count: This is the number of times the tag has been used throughout the site. This will be used as a basis for tag cloud sizes in the Tag block.
- Flag: This shows whether the tag has been flagged as inappropriate and the number of times in brackets.
- Modified: This shows the last time the tag was edited.
- Standard: Standard tags are available to all users.
- Edit: You can alter the tag’s name, change its description, and select any related tags.
- Delete: This removes the tag from the system.
You can add standard tags via the Add standard tags link. If you identify any tags that should be combined, such as when a tag name has been misspelled, use the Combine selected button and select the tag that should be kept.
If you need to block users from tagging, you will need to create a separate role and adjust the two relevant capabilities, moodle/tag:create and moodle/tag:edit. If you want tag names to keep the original casing as entered by the users who created them, ensure that the Keep tag name casing setting is ticked under Site administration | General | Security | Site security settings.
This concludes this subsection on configuring tags and, thus, the section on administering collaborative Moodle tools. Next up is configuring the features required by your content creators.
Configuring content creation features
Course authors heavily rely on the content creation tools made available to them. Moodle allows you to create content with built-in tools, incorporate content from external applications, and add structure and conditions among content items.
In this section, you will learn how to configure different content creation features, namely the content bank and H5P, LTI platforms and tools, filters, plagiarism prevention, and licenses. First, let’s configure some generic content creation settings.
Configuring content creation settings
Several site-wide settings impact content creation, which are as follows:
- Require activity description: Activities and resources do not require a description by default. To enforce a descriptive explanation, you must enable the parameter in Site administration | Plugins | Activity modules | Common activity settings.
- Completion tracking: Course and activity completion allows authors to set completion criteria for activities and courses. It is recommended to leave the feature enabled in Site administration | General | Advanced features, where you can also find the Default completion tracking option.
- Restricting access: Inside Moodle courses, a course author can restrict access to individual activities or resources. The types of available restrictions can be configured by navigating to Site administration | Plugins | Availability restrictions | Manage restrictions:
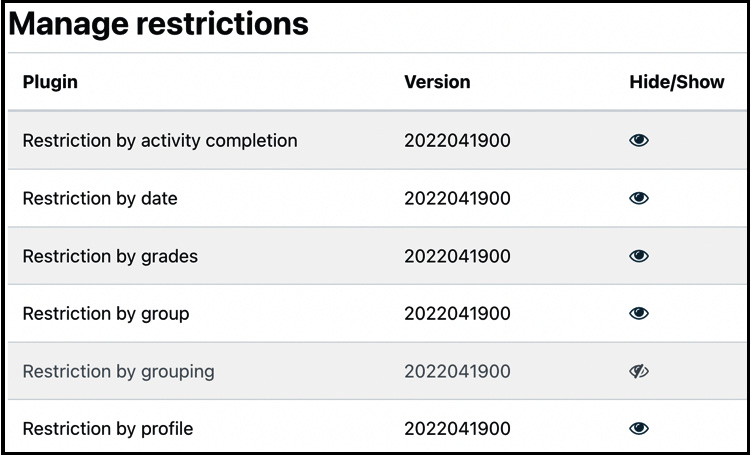
Figure 9.6 – Managing availability restrictions
You only have the option to show and hide each restriction; by default, all the plugins are enabled. Some restrictions require other elements to be present or configured, respectively. For example, groups and groupings only appear in a course’s Access restriction when they exist in a particular course. Ensure Enable restricted access is turned on in Site administration | General | Advanced features.
A popular third-party availability restriction is Restriction by language (moodle.org/plugins/availability_language), which will be described in more detail in the Managing localization section of Chapter 10, Configuring Technical Features.
- Stealth activities: These are available but invisible activities, previously known as orphans. These are useful if course creators wish to hide activities and provide links from elsewhere, such as a page resource or a text block.
Each activity or resource has a settings page in Site administration | Plugins | Activity modules. The majority of settings are default values that are often accompanied by the following additional value states, if applicable:
- Enabled: If set, the standard setting will be ticked; otherwise, it will be unticked
- Advanced: If set, the teacher has to select the Show more… link to see them, which is recommended for settings used infrequently
- Locked: If set, the teacher cannot alter the setting; for example, if you wish to enforce a description for all activities across the system
The following is an example from the Assignment activity where all three states are shown on the right-hand side:
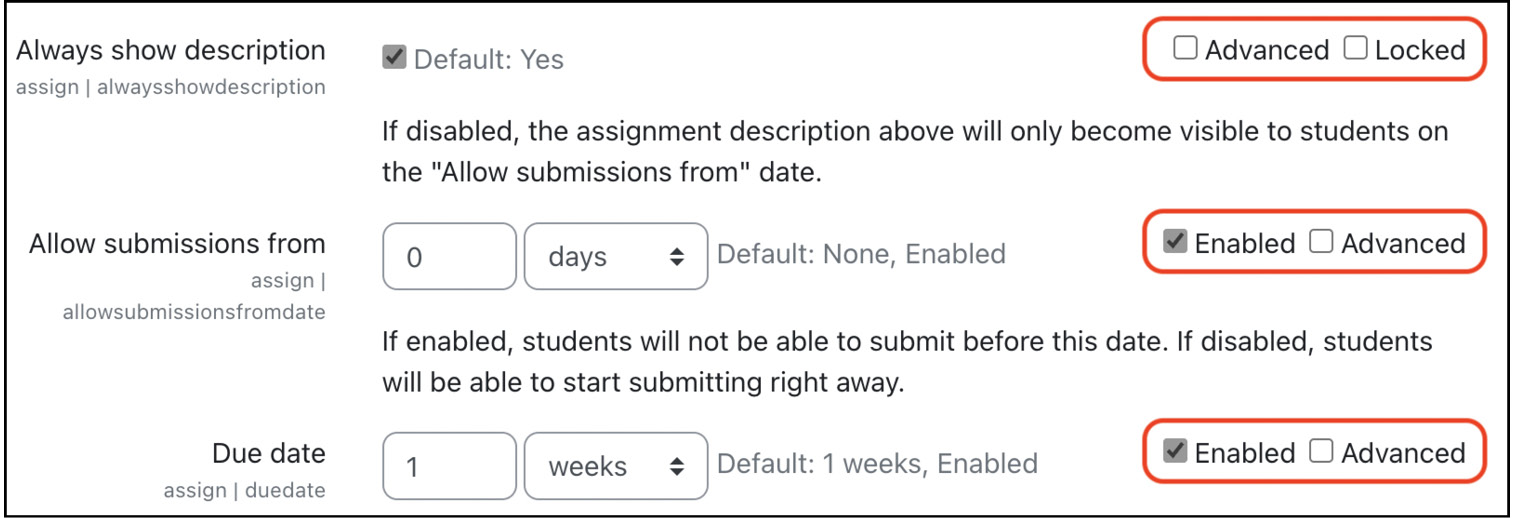
Figure 9.7 – The Enabled, Advanced, and Locked states
Once you have checked and configured these general course and activity settings, we can configure the content bank in general and H5P in particular.
Configuring the content bank and H5P
H5P lets your course authors create, share, and reuse rich, interactive, and mobile-friendly HTML5 content. In Moodle, a content bank has been implemented to incorporate H5P content, as illustrated in the following diagram:
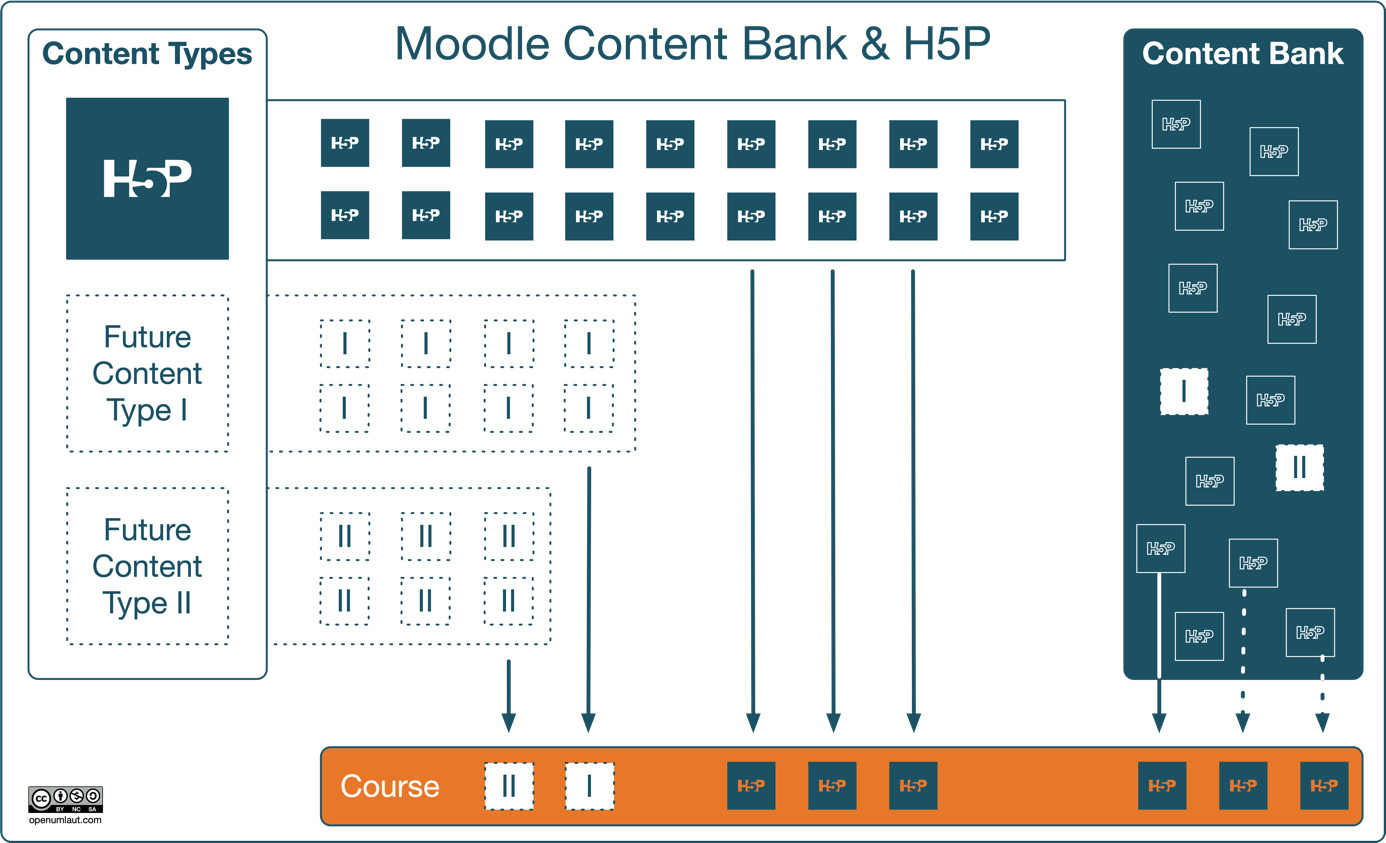
Figure 9.8 – Content bank and H5P
Moodle supports the concept of content integrations, where each integration is represented as a separate entity. Only a single content integration – H5P – has been implemented at the time of writing. Go to Site administration | Plugins | Content bank | Manage content types to manage content integrations. Expect additional types to be published in the future at moodle.org/plugins/?q=type:contenttype.
Each content integration comprises one or many content types, where each type represents a feature. In the case of H5P, you can view all available content types by going to Site administration | General | H5P | Manage H5P content types:
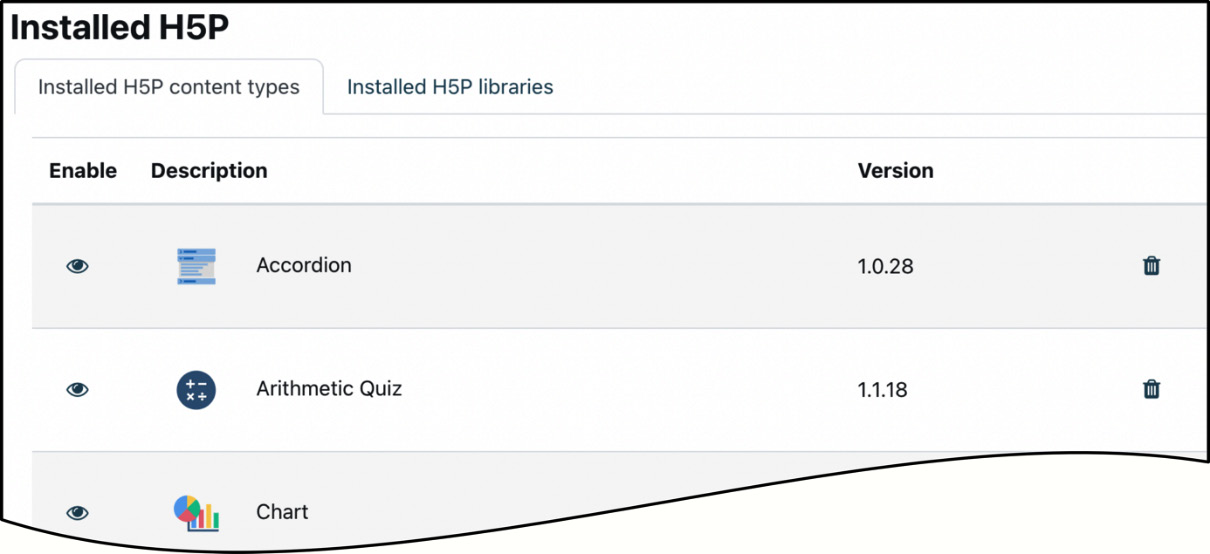
Figure 9.9 – H5P content types
H5P content can be embedded in courses in different ways:
- Directly via the H5P activity: Ensure the activity is enabled at Site administration | Plugins | Activity modules | Manage activities.
- Inside text authored via the Atto editor: Ensure the Insert H5P plugin is installed at Site administration | Plugins | Text editors | Atto HTML editor | Atto toolbar settings.
- Using a URL representing H5P content (by default, from h5p.com): The Display H5P filter must be enabled at Site administration | Plugins | Filters | Manage filters.
- Linked from the content bank: Content to be reused can be stored in the content bank and linked to activities or courses. Any changes in the content bank are automatically updated inside courses since no copies are stored but linked entries. Other users can share content placed in the content bank if they have access to the folder where .h5p is stored.
- From a repository: H5P content is copied or linked from a repository. For more details, see the Managing repositories section in Chapter 10, Configuring Technical Features.
A short checklist is available at Site administration | General | H5P | H5P overview with links to the respective configuration pages, as shown in the following screenshot:

Figure 9.10 – H5P overview
We have already mentioned the first two entries; the last entry – H5P scheduled task – is important as it automatically downloads any new content types from h5p.org. Since the task only runs once a month, check that it has been executed after installing or updating your Moodle system. If not, temporarily change all time values of the task to *, trigger cron.php, and reverse any changes back to their defaults. More on tasks will be covered in the Scheduled tasks section in Chapter 15, Optimizing Moodle Performance. If it is not possible to use this scheduled task, then Site administration | General | H5P | Manage H5P content types allows you to upload the necessary files manually.
H5P represents interactive content that’s been stored, edited, and created in Moodle. Another type of content integration is LTI, which will be dealt with in the following subsection.
Configuring LTI platforms and tools
According to IMS, Learning Tools Interoperability (LTI) is a standard for learning tool interoperability to allow remote tools and content to be integrated into a Learning Management System. Moodle supports depreciated versions of LTI and the latest LTI Advantage (core LTI 1.3 packaged with some essential services). Moodle can act as an LTI platform (external content can be used in Moodle) and LTI tool (Moodle content can be used in other LTI platforms).
Important note
Legacy LTI uses the terms Consumer and Provider, whereas LTI Advantage uses Platform and Tool.
We will use these new terms going forward, starting with Moodle operating as an LTI platform.
Moodle as an LTI platform
For Moodle to act as an LTI platform, course authors must use the External tool activity. The simplified data flow between Moodle (LTI platform) and an external system (LTI tool) is depicted in the following diagram:
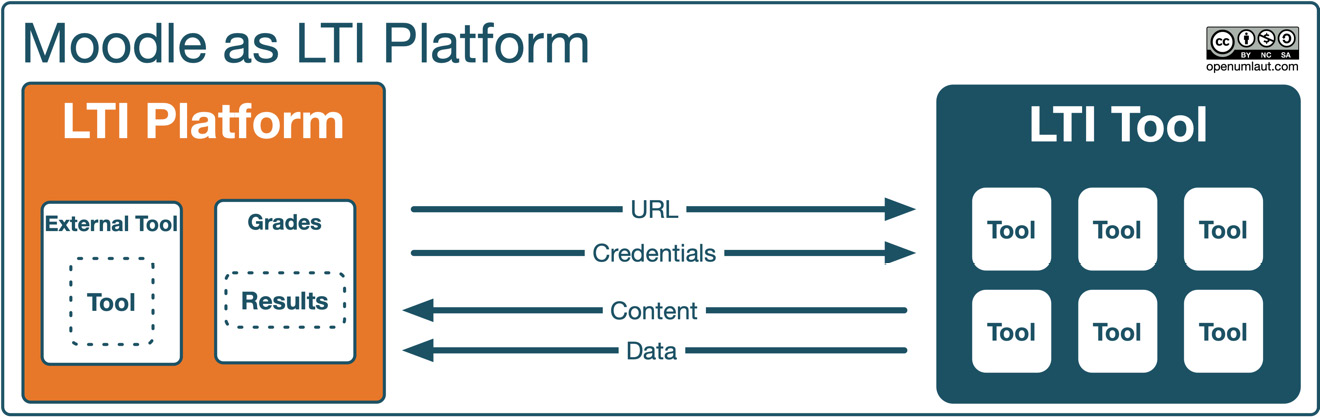
Figure 9.11 – Moodle as an LTI platform I
The tool has to be connected to Moodle via a URL and some credentials; the latter can be a consumer key/shared secret pair, an RSA key, or a keyset URL. Once the connection has been established, learning content is embedded via the aforementioned external tool activity. Additional data might be transferred, which are usually results to be stored locally in the gradebook.
As an administrator, you have to configure external content providers, which will then appear in the Preconfigured tool dropdown in the activity inside a course. Go to Site administration | Plugins | Activity modules | External tool | Manage tools, where you have multiple options to add new providers:
- Add LTI Advantage: If the provider supports this workflow, enter a Tool URL; you will be directed to the tool registration page, where you will be guided through the registration steps.
- Add Legacy LTI: Moodle supports deprecated LTI versions; depending on the current version, either a key/secret pair has to be provided (version 1.1), or a registration process similar to LTI Advantage will be kicked off (version 2.0).
- Configure tool manually: If neither of the preceding two options works, you must provide the tool parameters manually. The external tool settings are well documented at docs.moodle.org/en/External_tool_settings.
Added tools will first be given a pending state, which allows you to review the tool configuration and the privacy and services granted, and apply possible modifications before activating the tool via the Manage preconfigured tools link.
Important note
For a tool to appear as a separate item in the activity chooser, change the Tool configuration usage setting to Show in activity chooser and as a preconfigured tool.
In our demo system, two LTI tools have already been registered successfully:
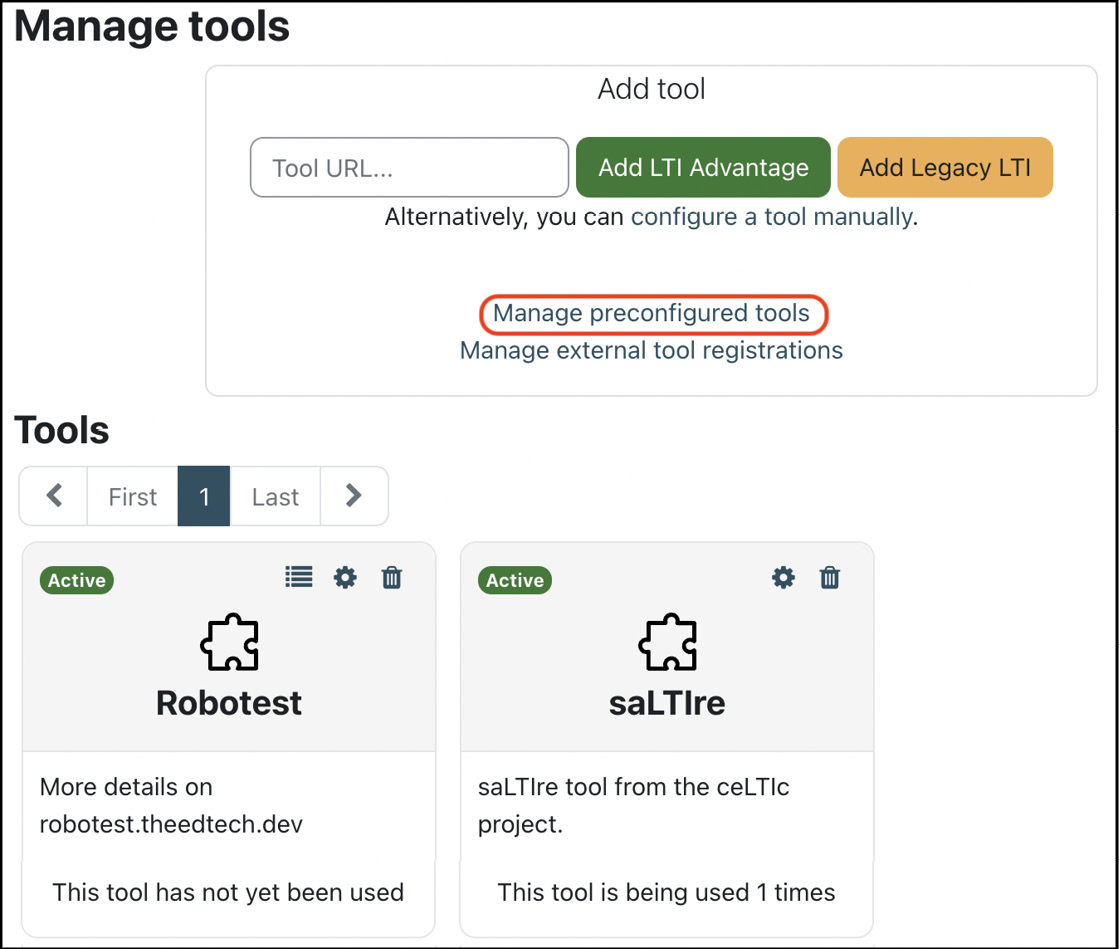
Figure 9.12 – Moodle as an LTI platform II
Now that we have configured Moodle to act as an LTI platform, let’s look at the opposite, where Moodle is the LTI tool, provisioning content for other systems.
Moodle as an LTI tool
For Moodle to operate as an LTI tool, it is essential to understand the simplified data flow between an external platform (LTI consumer) and Moodle (LTI producer), as shown in the following diagram:
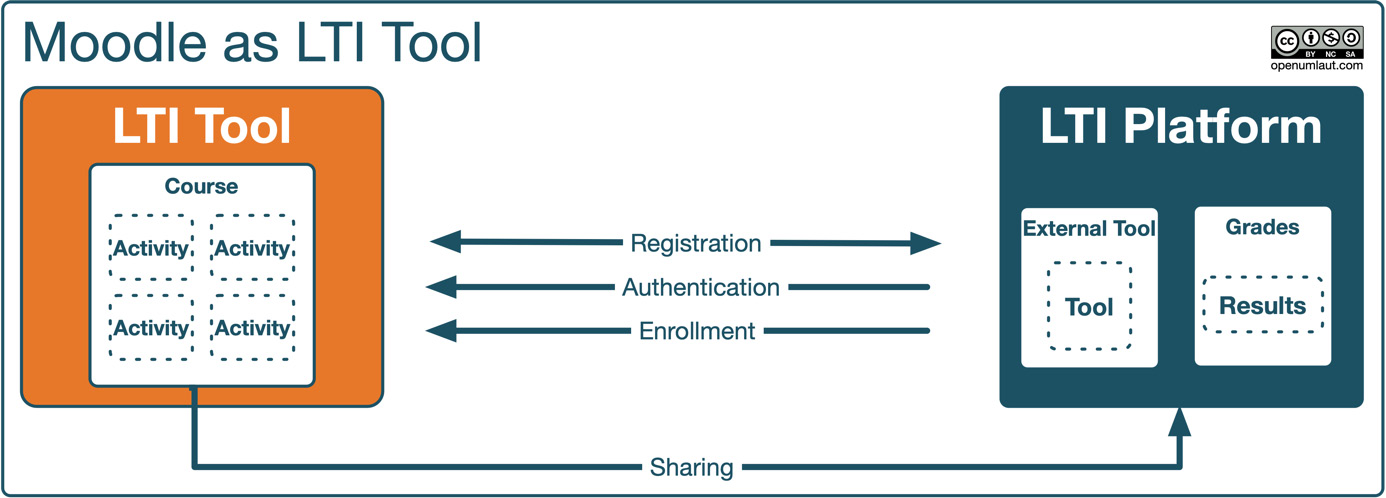
Figure 9.13 – Moodle as an LTI tool I
The LTI tool and the LTI platform must register with one another; they effectively sign a security contract that allows communication and data exchange between the two systems. Content (an entire course or a single activity) and, optionally, grades are shared by the LTI tool and utilized in the LTI platform. When both LTI sites are Moodle systems, this process is identical to the Moodle as LTI platform workflow. For users of the LTI platform to access published content in the LTI tool, an authentication and enrolment mechanism have to be activated. These two steps and further configurations to enable Moodle as an LTI tool are outlined here:
- Go to Site administration | Plugins | Authentication | Manage authentication and enable the LTI plugin.
- Go to Site administration | Plugins | Enrolments | Manage enroll plugins and enable Publish as LTI tool. Configure the user default values in the plugin settings with your details.
- Go to Site administration | Plugins | Enrolments | Publish as LTI tool | Tool registration and select Register a platform.
After providing a name, Moodle will automatically generate tool details, which must be entered into the LTI platform. Once the tool has been set up in the platform, details must be recorded on the Platform details tab to complete the registration. For dynamic registrations, this information is entered automatically; for manual registrations, it must be copied and entered manually.
We have registered two platforms on the right-hand side of the following screenshot (one active and one pending). You can see the tool details for dynamic and manual registration on the left:
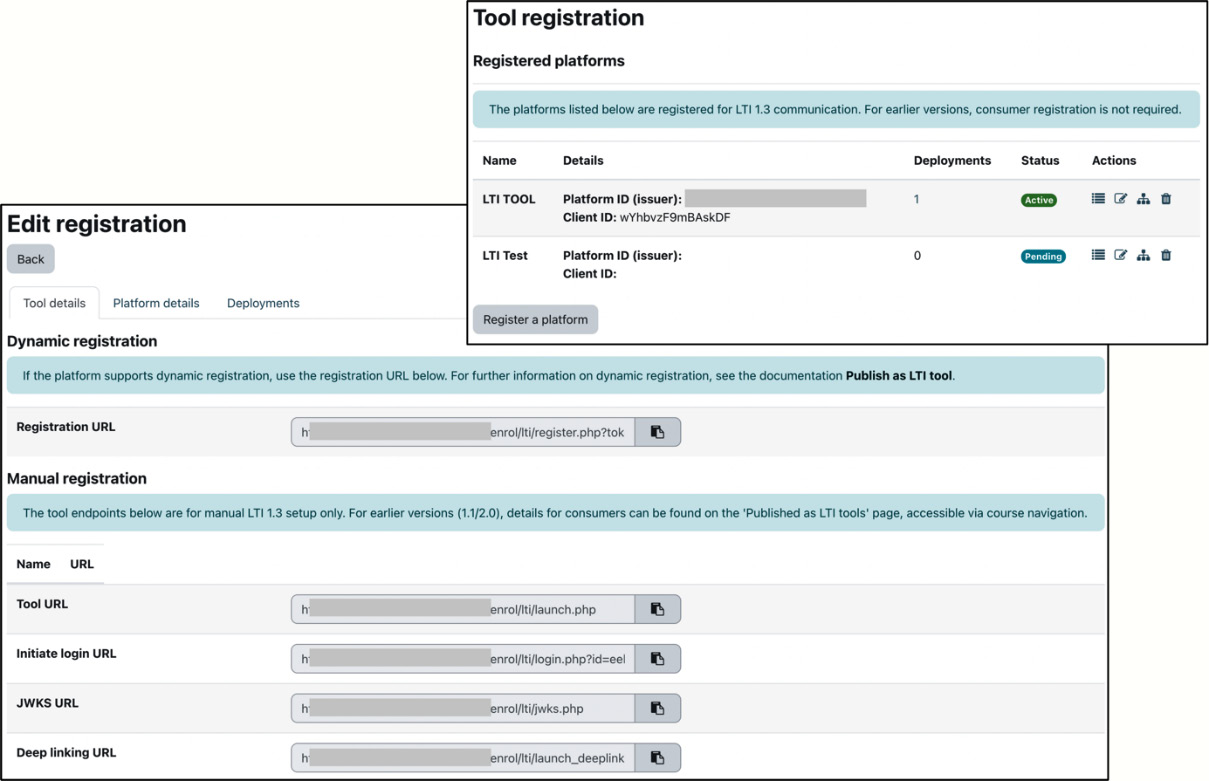
Figure 9.14 – Moodle as an LTI tool II
- Inside a course, teachers can publish content (the entire course or an individual activity) via Published as LTI tools. Here, grade and user synchronization must be configured. User synchronization mode determines how the enrollment of remote users has to be handled.
- When remote users access a shared activity or course for the first time, Moodle will either use an existing account or create a new one. How this user account provisioning is carried out (automatic or user-prompted) is determined by the settings in Teacher first launch provisioning mode and Student first launch provisioning mode.
While teachers carry out steps 4 and 5, they usually require assistance with this partly technical procedure. The preceding list only crudely outlines the setup steps of the LTI tool when using dynamic registration. At docs.moodle.org/en/Publish_as_LTI_tool, you can find very well-written documentation on other LTI setups, such as manual registration, sharing access, and user provisioning, as well as information on legacy LTI.
Tip
It is recommended that the Allow frame embedding setting is enabled by going to Site administration | General | Security | HTTP security so that tools are displayed within a frame rather than in a new window.
LTI is a powerful standard that opens up your Moodle system to grant access to and from external content. Filters, which we will cover next, transform content inside your Moodle instance.
Configuring filters
Filters scan any text entered via the Atto editor and automatically transform it into different and often more complex forms. For example, entries or concepts in glossaries are automatically hyperlinked in text, URLs pointing to MP3 files become an embedded audio player, mathematical equations are represented as visual formulae, uploaded videos are given play controls, and so on.
Moodle ships several filters, which can be accessed by navigating to Site administration | Plugins | Filters | Manage filters:
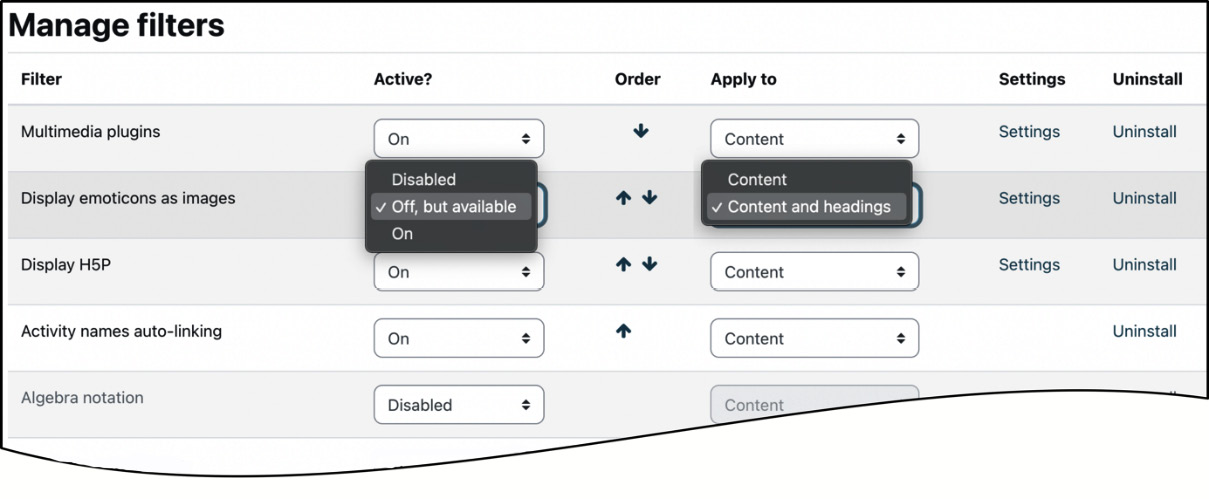
Figure 9.15 – Filter configuration
By default, all the filters are disabled. You can enable them by changing the Active? status from Disabled to On or Off, but available. If the status is set to On, the filter is activated throughout the system but can be deactivated locally. If the status is set to Off, but available, the filter is not activated but can be enabled locally. Managing local filter settings requires the moodle/filter:manage capability, which is allowed by default for the Manager and Teacher roles.
Filters used throughout the LMS and by most of your users should be turned on. Typical candidates are Multimedia plugins, Display H5P, Display emoticons as images, and Multi-language content. Filters that are only used by some users should not be activated but made available locally, such as TeX notation, to deal with mathematical or scientific notation. Enabled filters might also be switched off temporarily at the activity level, for instance, Glossary auto-linking in an online exam. Activating some filters might trigger the appearance of an editor button, such as Display emoticons as images (emoji selection) or TeX notation (equation editor).
You can change the order in which the filters are applied to text using the up and down arrows in the Order column. If a particular filter isn’t working, try moving it higher up the list.
Important note
The filtering mechanism operates on a first-come, first-served basis; if a filter detects a text element that has to be transformed, it will do this before the next filter is applied.
Each filter can be configured to be applied to Content and headings or Content only; that is, filters will be ignored in the names of activity modules.
Important note
Applying filters to headings as well as content can significantly increase the load on your server, so use them sparingly.
Some filters provide settings that either indicate to which text format the filter should apply or are specific to the filter; the latter is described in detail in the respective Moodle Docs. In addition to filter-specific settings, Moodle provides several settings that are shared among all filters. These can be accessed via Site administration | Filters | Common filter settings and are as follows:
- Filter uploaded files: By default, only text entered via the Moodle editor is filtered. If you wish to include uploaded files, you can choose any of them from the HTML files only and All files options.
- Filter match once per page: Enable this setting if the filter should stop analyzing text after it finds a match; that is, only the first occurrence will be transformed.
- Filter match once per text: Enable this setting if the filter should only generate a single link for the first matching text instance found in each text item on a page. This setting is ignored if the Filter match once per page parameter is enabled.
- Filter navigation within system context: Filters are context-sensitive, which might cause performance issues when filtering is enabled for headings. Selecting this option should reduce the number of filter operations to pages.
The following diagram provides a summary of how filters are applied, considering the order of filters, filter matching, and what text the filter is applied to (content and heading or content only):
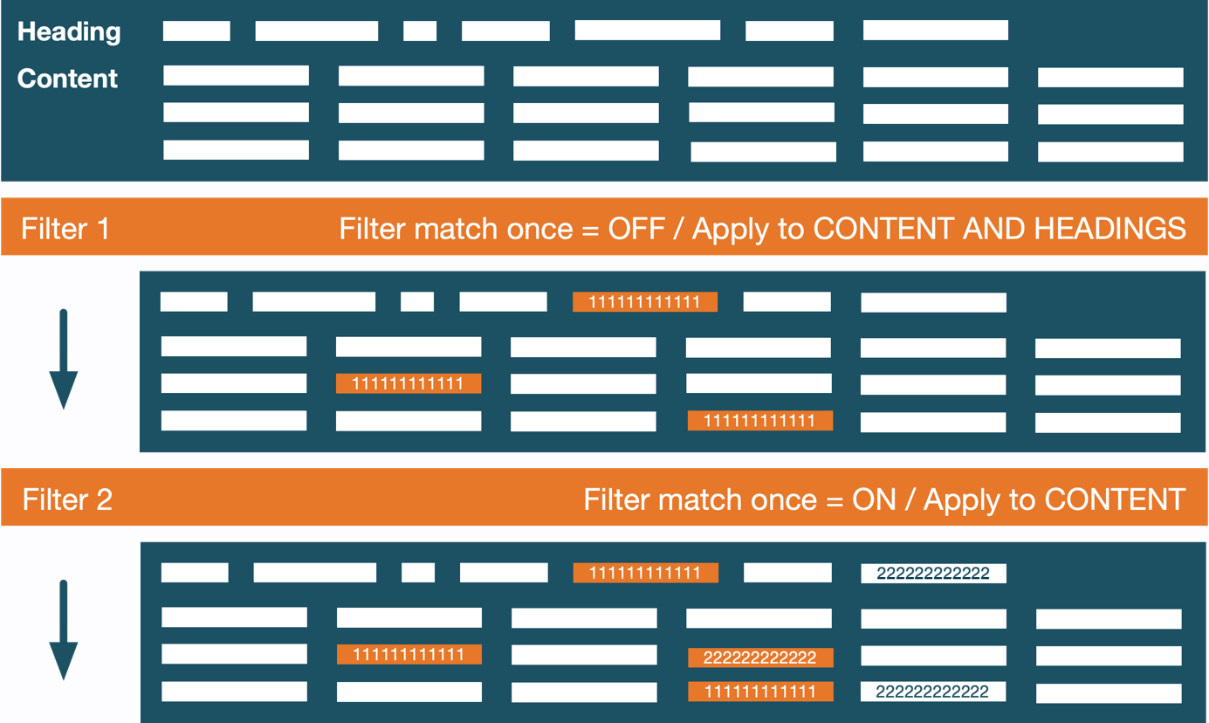
Figure 9.16 – Applying filters
Filter 1 has matching turned off (all matches are transformed) and is applied to both content and headings. Filter 2 has matching turned on (only the first match is transformed) and is only applied to content; that is, the matching text in the heading is ignored.
Plagiarism prevention is next on the (long) list of content creation topics that require admin attention.
Configuring plagiarism prevention
The idea behind plagiarism prevention is to check students’ submitted content against others’ work – the higher the overlap, the more likely the content has been plagiarized. This detection can either be for users’ content in Moodle or through public resources.
Plagiarism prevention must be enabled by selecting the Enable plagiarism plugins parameter at Site administration | General | Advanced features. Once this occurs, you can access any installed plagiarism prevention plugins when navigating to Site administration | Plugins | Plagiarism | Manage plagiarism plugins.
At the time of writing, about a dozen plugins are available at moodle.org/plugins/?q=type:plagiarism that cater to plagiarism prevention. The two most popular are Turnitin and Ouriginal (previously Urkund). Both systems are commercial tools and require a paid subscription. Once installed and configured, the plagiarism prevention functionality will be available as part of the Assignment and Forum modules inside courses.
Another topic that requires agreement across the site and organization is which licenses are available in your Moodle system; this is the topic of the following subsection.
Managing licenses
A license can be selected when adding a file via File picker. This information will then be attached to the metadata of the file. To configure the licenses that are available to your users, go to Site administration | General | License | License manager, where all available licenses are listed:
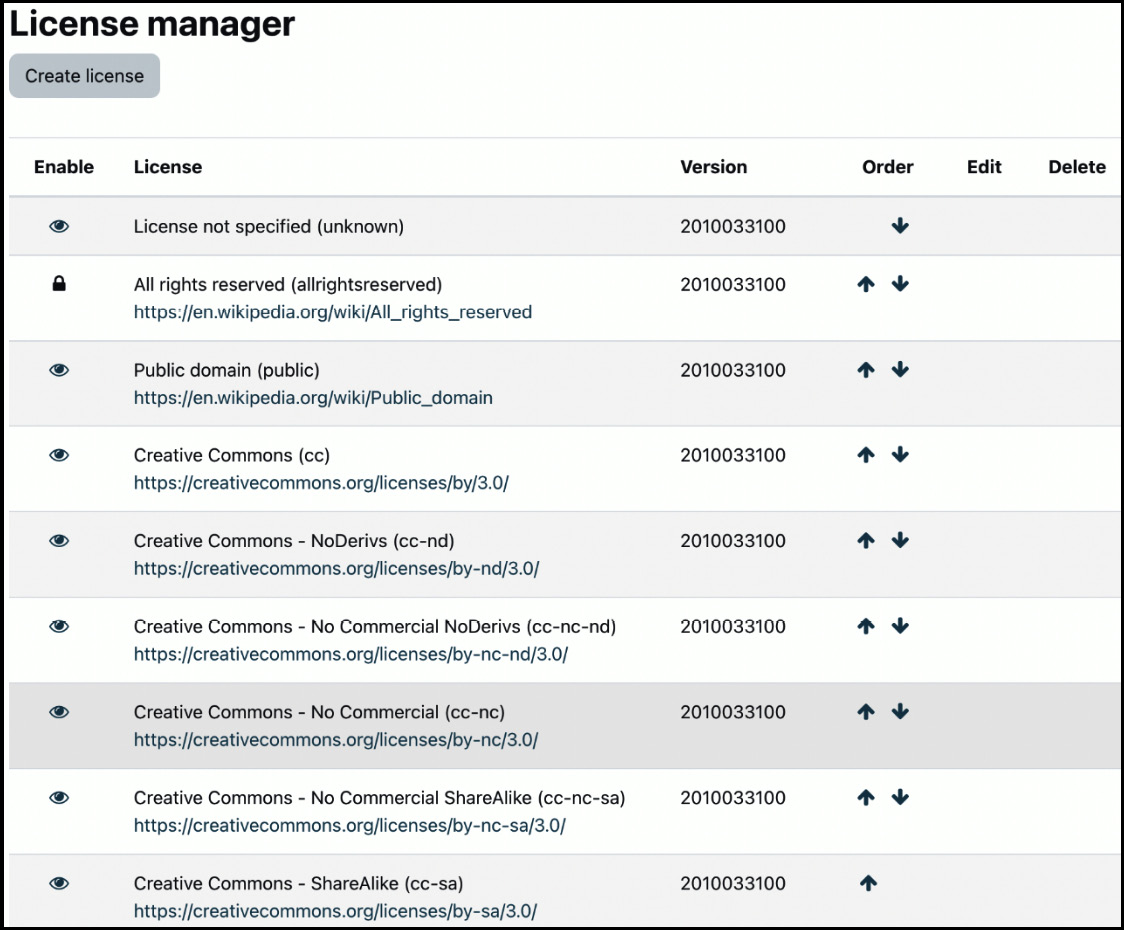
Figure 9.17 – Managing licenses
You can create new licenses via the Create license button, where you have to provide the following information:
- License short name: Internal license name
- License full name: Display license name
- License source: The URL where the license’s terms and conditions can be found
- License version: Publication date of the license version being utilized
The license manager can edit and delete manually added licenses; those that ship with Moodle can’t. Except for the default site license, all licenses can be disabled (hidden).
Important note
The license attached to an uploaded file does not affect its visibility; it simply creates the default when it’s reused elsewhere.
You can select Default site license under Site administration | General | License | License settings. By default, the last license selected by a user is pre-selected when uploading a file via the file picker. If the Remember user license preference setting is disabled, the default site license is pre-selected.
This concludes this section on content creation features, where we covered configuring the content bank and H5P, LTI platforms and tools, filters, plagiarism prevention, and licenses. One particular type of content – assessments and grading thereof – has been ignored so far and will be covered in the following dedicated section.
Configuring grades and assessments
In addition to learning per se, assessment is a critical requirement in educational settings. Moodle offers a wide range of tools to facilitate formative, interim, and summative assessments and handles the inevitable grades that go with it.
In this section, we will cover the administrative elements of the gradebook before we deal with assessments, where we will cover how to configure assignments, quizzes and the question bank, and SCORM packages.
Configuring grades and the gradebook
The gradebook is one of the most important constructs in any LMS, and Moodle is no exception. The Moodle gradebook is a powerful, flexible, and accurate grade management system. Its flexibility and customizability result in a very high degree of complexity. Consequently, a considerable number of administrative settings are at your disposal that affect how teachers, trainers, and assessors use grades throughout the system.
Most parameters are tightly linked to the gradebook, and teachers at the course level deal with the related reports. A site-wide agreement on default values and global settings for grades should be in place for your organization.
Important note
A gradebook is a container that holds grades for all the learners in Moodle.
A grade is an item in the gradebook.
The following is a high-level overview of grades and all relevant gradebook elements:
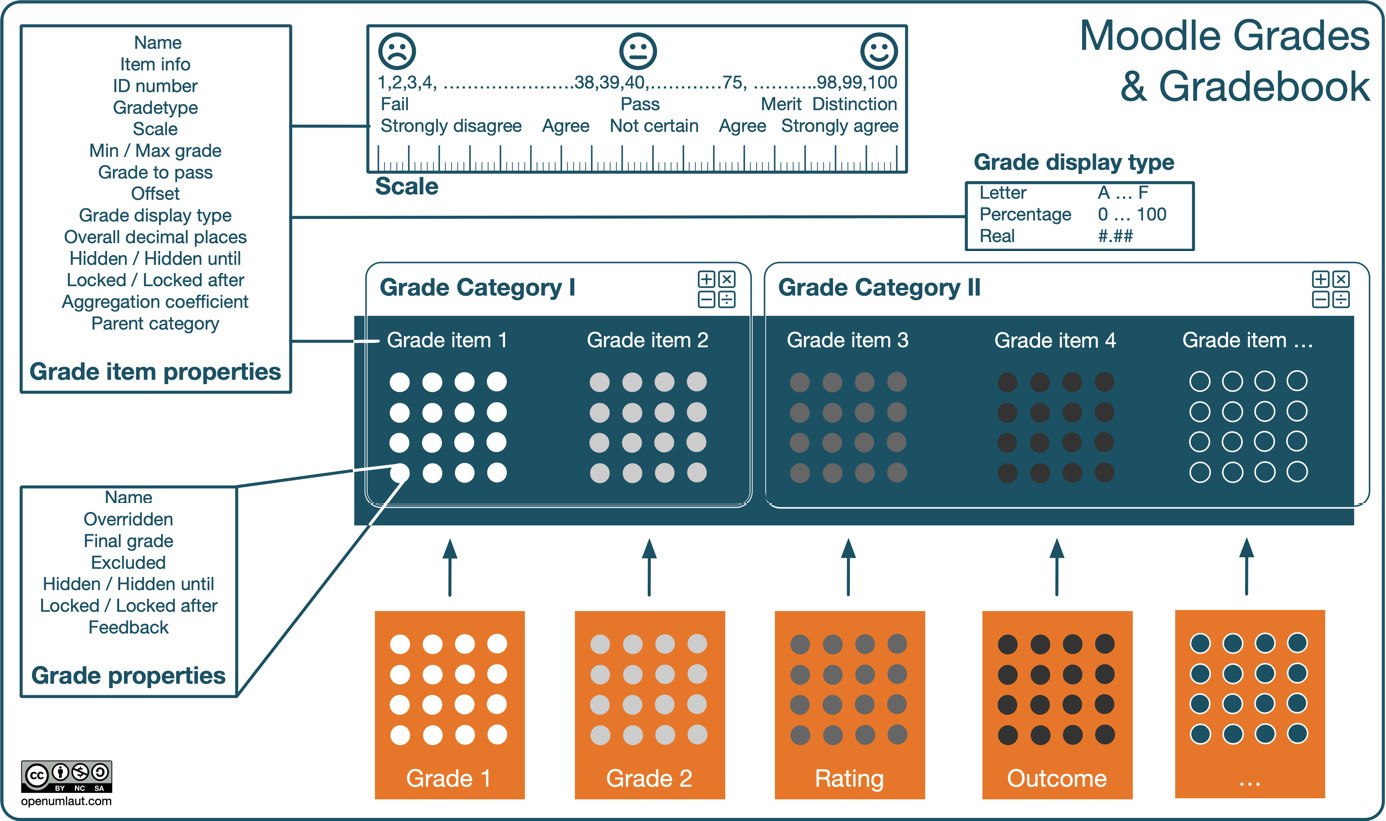
Figure 9.18 – Grades and gradebook
Additionally, the inline help for each setting is very comprehensive, as is the accompanying area in the Moodle Docs at docs.moodle.org/en/Grader_report, which contains several pages dedicated to administrators. We will only briefly describe each element in the Grades tab and highlight some key parameters, which are listed as follows:
- General settings: These parameters influence the gradebook and grades in general. Enable publishing (the ability to publish results via external URLs) is a setting that is turned off by default and is required regularly. Another setting that is changed frequently is Navigation method, in which most users prefer the Tabs option as it is consistent with the rest of Moodle.
- Grade category settings: Grades are organized into categories; you can set the relevant settings here. Different grading strategies can be leveraged with the gradebook’s aggregation system, such as sum-of-points or percentage-category.
- Grade item settings: These are settings that impact individual grades and grade items.
- Scales: Here, you can specify site-wide scales used for grading and rating. The global scales are often linked to qualifications offered by your organization.
- Outcomes: Outcomes are used by most vocational and some academic curricula to specify the expected competencies or goals of a subject being taught. Outcomes have to be enabled by going to Site administration | General | Advanced features. Most organizations prefer to use the more powerful competencies instead of outcomes.
- Letters: Many education systems use letters (A, A-, B+, …, and F) to grade items. Here, you specify which percentage range corresponds to which grading letter.
Moodle comes with several predefined gradebook reports. Report settings determines the appearance and content of the reports. If additional user-defined reports (plugins) are installed, this list is likely to have a separate configuration page for each report type (a good tutorial on creating custom reports can be found at docs.moodle.org/dev/Gradebook_reports). The different types of reports are as follows:
- Grader report: This setting includes whether to show calculations, show or hide icons, column averages, and so on. Teachers can override most of the settings in the My report preferences tab.
- Grade history: The gradebook keeps track of all the changes that are made to the gradebook entries. Here, you can specify how many entries will be displayed on the page. You can Disable grade history by going to Site administration | Server | Cleanup. On the same page, you can also specify the length of time the grade history should be kept (Grade history lifetime).
- Overview report: This consists of two settings that determine whether the ranking information is shown and how to deal with totals containing hidden grades, respectively.
- User report: This shows the settings that determine whether the ranking information is shown and how to deal with hidden items.
We have only touched upon the customization options of the gradebook since the complete gradebook management heavily depends on grading strategies deployed in your organization.
Next, we will deal with administering the three most used assessment tools in Moodle: assignments, quizzes, and SCORM.
Configuring assignments
According to MoodleDocs, the assignment activity allows students to submit work to their teacher for grading. A simplified assignment workflow is shown in the following diagram:

Figure 9.19 – Assignment workflow
The assignment workflow consists of the following three steps:
- When an assignment is set by the teacher, a range of assignment settings have to be provided, covering instructions (What), various availability dates such as the start, due, and cut-off date (When), submission types, submission settings, and whether group submissions are supported (How), plus various Other settings, such as notifications.
- The students then submit their work via one of the required submission types: online text, uploaded file(s), and/or an auxiliary commentary.
- Finally, the teacher provides feedback via one of the supported channels: comments, PDF annotations, offline grading sheets, and feedback via files. As described in the previous section, any given grades will automatically be transferred to the gradebook for the student to review.
The elements that require administrator input are assignment settings, submission plugins, and feedback plugins:
- Assignment settings: In Site administration | Plugins | Activity modules | Assignment | Assignment settings, you should specify the fields based on the requirements of your powers to be – for example, the wording of submission statements. In the second part of the screen, you can specify default values for the assignment activity.
- Submission plugins: Activated submission plugins dictate how students can submit their work. By default, the available options are online text, file, and comments. To configure each type, go to Site administration | Plugins | Activity modules | Assignment | Submission plugins | Manage assignment submission plugins.
- Feedback plugins: Activated feedback plugins dictate how teachers can grade, rate, and comment on submitted work. By default, the available options are comments, PDF annotations, offline grading worksheets, and file. To configure each type, go to Site administration | Plugins | Activity modules | Assignment | Submission plugins | Manage assignment submission plugins.
Additional submission and feedback plugins can be found at moodle.org/plugins/?q= type:assignfeedback and moodle.org/plugins/?q=type:assignsubmission, respectively. Further plugins can be installed to convert uploaded assignment submissions into PDF format for teachers to annotate. The list of available converters is available at Site administration | Plugins | Document converters | Manage document converters. At the time of writing, two document converters are available as standard plugins: Google Drive (requires OAuth 2 Google service to be enabled) and Unoconv (requires Unoconv to be installed on a server).
Important note
For PDF annotations to work correctly, Path to ghostscript must be set in Site administration | Server | System paths.
The second popular assessment module in Moodle is the quiz activity, which is the topic of the following subsection.
Configuring quizzes
The quiz activity enables teachers to create quizzes comprising questions of various types, including multiple-choice, matching, short-answer, numerical, and drag and drop.
Creating a quiz is a two-step process. In the first step, content authors populate the question bank with questions. In the second step, teachers create the quiz activity, set its options that specify the rules for interacting with the quiz, and add questions from the question bank.
Important note
Moodle stores questions used in quizzes in a question bank. Within the question bank, questions are organized into categories.
Learners take quizzes in their standard browser or, if configured, in the Safe Exam Browser. The specified question behavior determines how submitted questions are dealt with. Grading takes place automatically (except for Essay type questions), and results are pushed to the gradebook as usual. A simplified quiz workflow is shown in the following diagram:
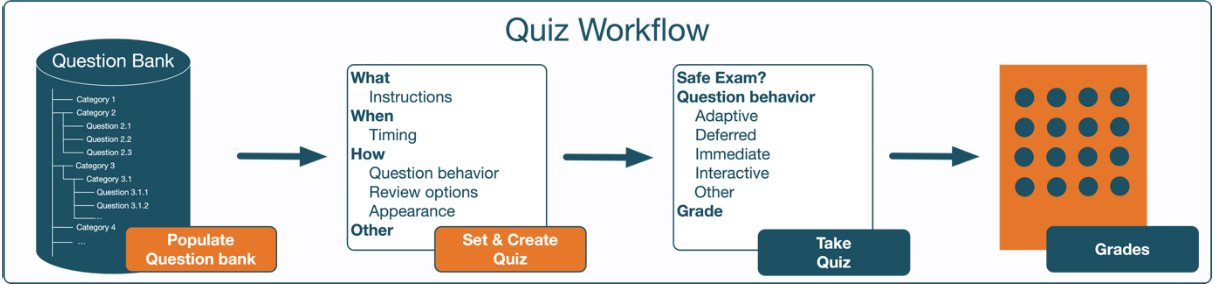
Figure 9.20 – Quiz workflow
Two parts of this process require configuration by the administrator: customizing the question bank and quiz activity and enabling the Safe Exam Browser.
Customizing the question bank and quiz activity
Moodle has a powerful question engine that supports a wide range of features, question types, and question behaviors. All three elements can be configured separately:
- Question bank features: At Site administration | Plugins | Question bank plugins | Manage question bank plugins, you can see all the available question bank features. You can change the column sort order and add question custom fields if required.
- Question types: At Site administration | Plugins | Question types | Manage question types, you should disable any question types that are not in use and might want to change the default values for the multiple-choice type.
- Question behaviors: At Site administration | Plugins | Question behaviors | Manage question behaviors, you should hide any methods through which submitted questions are dealt with that are not in use in your organization.
In the following figure, you can (hopefully) see parts of the three question-related elements:
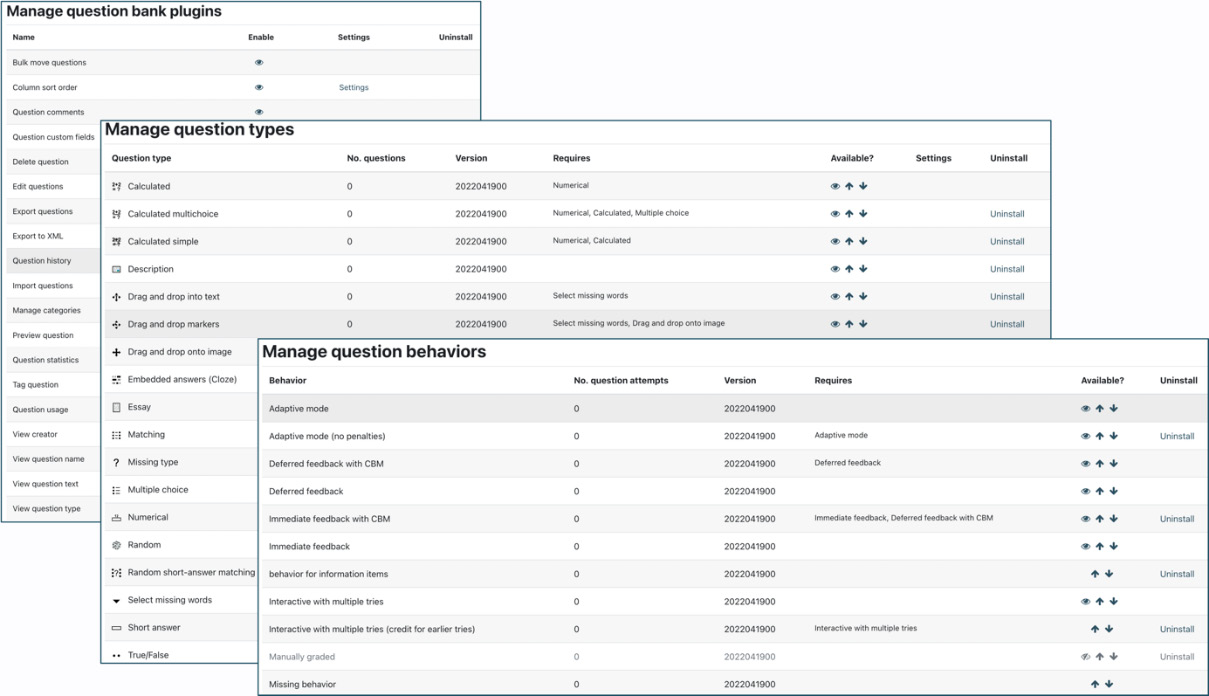
Figure 9.21 – Question bank plugins, question types, and question behaviors
In true Moodle style, all three constructs are handled as plugins, and it is possible to add additional question bank plugins, question types, and question behaviors to the system.
There is one more setting you should have a look at, namely the Auto-save delay parameter in Site administration | Plugins | Activity modules | Quiz | General settings. The specified value determines how often students’ work is automatically saved during quiz attempts.
Important note
The short auto-save delay increases the server load but reduces the chance that students lose their work.
All other settings on this screen are default values for the quiz activity and do not require further explanation. The Safe Exam Browser is often utilized when quizzes are used for examinations, as covered in the following subsection.
Enabling the Safe Exam Browser
The Quiz activity is used frequently for exams. Depending on the physical setup and the importance of the examination, different levels of security may be required. The Quiz activity offers some built-in settings in the Extra restrictions on attempts section:
- Require password: The password must be entered before access to the quiz is granted
- Require network address: Access to the quiz is restricted to the specified IP address(es) on your LAN or the internet
- Browser security: When the Full screen pop-up with some JavaScript security option is enabled, the quiz will only work in a JavaScript-enabled browser, shown full-screen, and, if technically possible, disallow certain operations such as copy and paste
If these facilities are insufficient for specific exam setups, whether classroom-based or invigilated online, Moodle offers Safe Exam Browser (SEB) support. According to its website, safeexambrowser.org, SEB is as follows:
The architecture and components of SEB in connection with Moodle are shown in the following schematic illustration (partly borrowed from safeexambrowser.org):
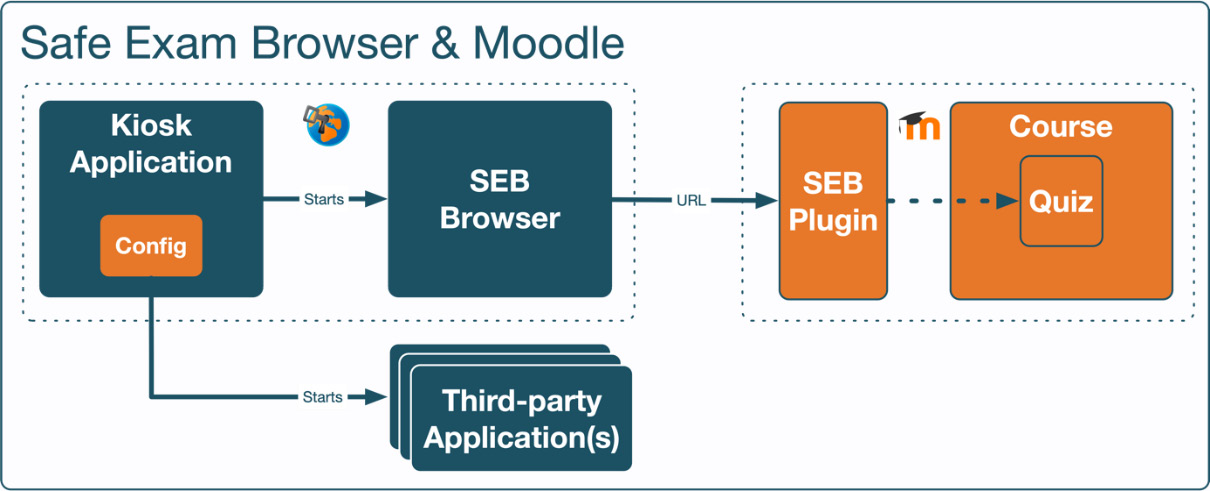
Figure 9.22 – Safe Exam Browser architecture and components
Kiosk Application locks down the computer or tablet and starts the SEB plus optional third-party applications. The Config file specifies the browser’s behavior, such as disabling features such as shortcuts, stopping audio, or hiding screen elements, and which external applications can be launched. SEB Browser loads and displays the Moodle quiz using a preset URL and hides any navigation elements such as the address bar, search engine field, and more. SEB Plugin is an extension to Moodle to facilitate the interaction between SEB and the Quiz activity.
From a Moodle administrator’s point of view, you need to configure the following components to ensure SEB support for quizzes:
- Safe Exam Browser templates: A SEB template is effectively a configuration file. The easiest way to create a SEB file is to create a quiz, configure the SEB settings manually, and download the configuration file. Then, go to Site administration | Plugins | Activity modules | Quiz | Safe Exam Browser templates, where you can create new templates (using the downloaded SEB file) and manage existing ones:
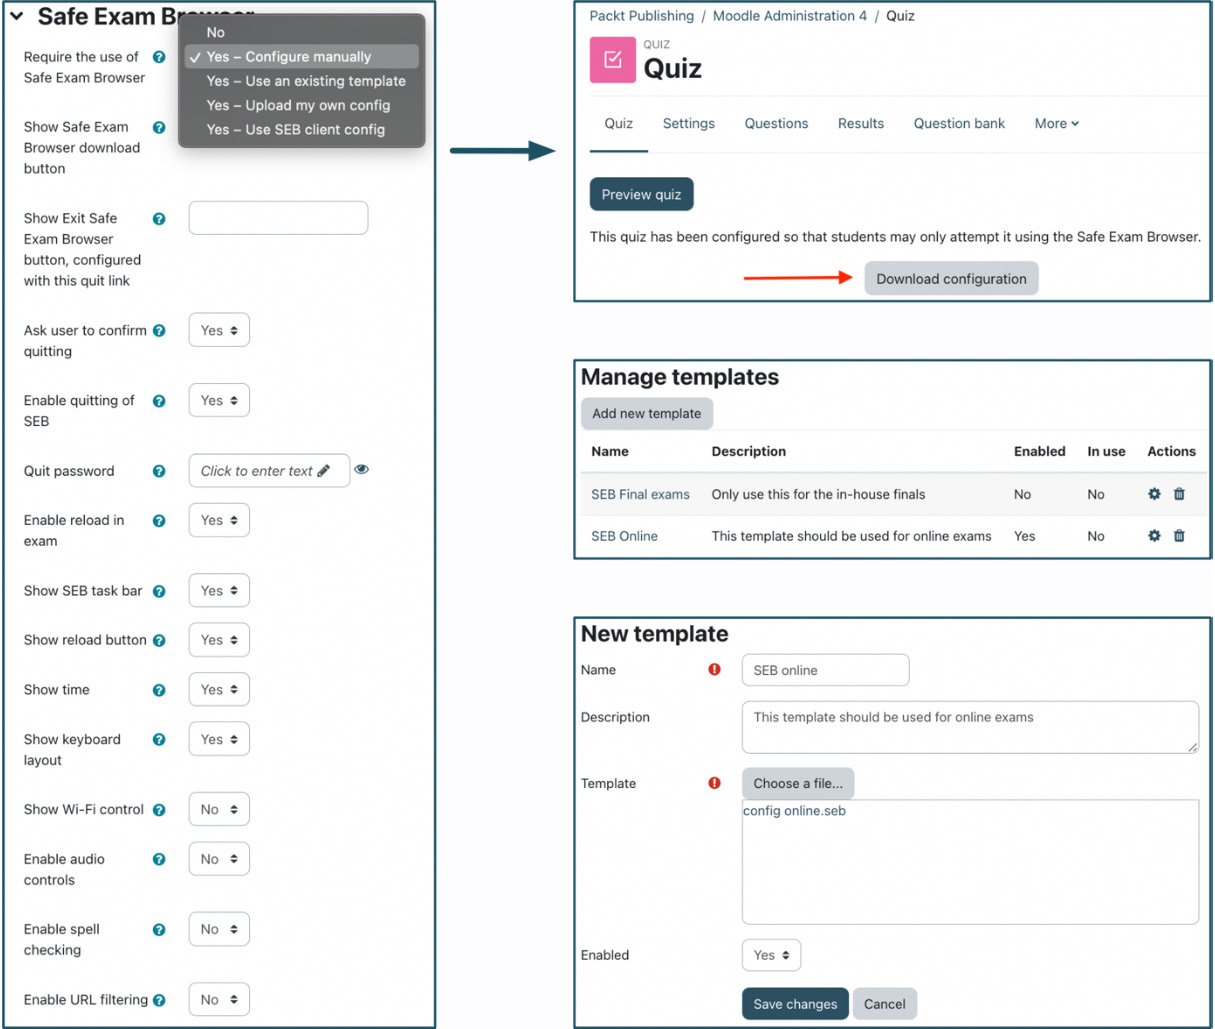
Figure 9.23– Safe Exam Browser templates
Any enabled SEB templates will be available in the Quiz activity.
- Safe Exam Browser access rules: At Site administration | Plugins | Activity modules | Quiz | Safe Exam Browser access rules, you can specify several general SEB settings, all of which have been well documented at docs.moodle.org/en/Safe_Exam_Browser.
Important note
SEB requires students to download the browser on their computer or tablet. Doing a trial run with everybody’s equipment is recommended to avoid panic attacks minutes before an important exam.
The third popular assessment module in Moodle is the SCORM activity, which is the topic of the following subsection.
Configuring SCORM
Shareable Content Object Reference Model (SCORM) is the de facto standard for exchanging learning objects across different learning management systems. Like assignments and quizzes, SCORM packages are incorporated into courses via a dedicated activity. Unlike the other two assessment tools, the SCORM activity requires little administrative configuration.
In Site administration | Plugins | Activity modules | SCORM package, there are two types of parameters:
- Default settings: These have been grouped into three categories (display, grade, and others) and are described in detail at docs.moodle.org/en/SCORM_settings.
- Admin settings: The first four settings directly impact the features available to users and are all disabled by default. SCORM standards mode enforces strict compatibility with version 1.2, whereas the other three settings allow/disallow different package types:
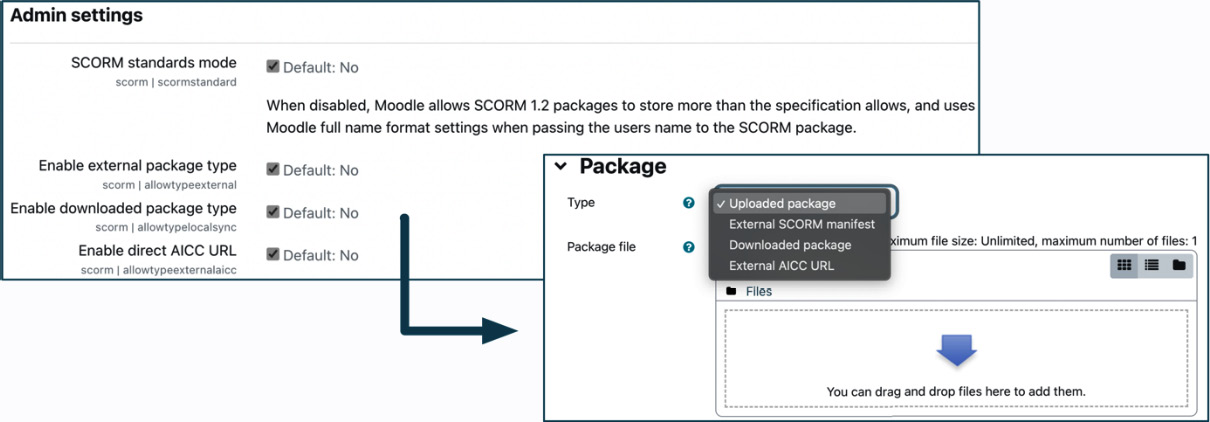
Figure 9.24 – SCORM configuration
The remaining admin settings present internal data (sessions, timeout, user ID) or debugging features. Only adjust these settings if your users experience technical issues with their SCORM packages.
This completes this section on configuring assignments, quizzes, and SCORMs. Other activities are classified as educational, such as Book, Database, Workshop, and Glossary, which haven’t been covered here. Almost all administrative settings are default values, appearance settings, or file upload limits. The tricky job of a Moodle administrator is to find a consensus among all their staff on what these parameters should be. We recommend leaving those activity-related settings at their default values unless specific requirements exist to adjust them.
Closely related to assessments are skills and incentives, which we will deal with in the following section.
Managing skills and incentives
Skills and incentives are at the heart of each assessment strategy. Since Moodle is a strategic building block of a modern learning environment, we feel the two concepts deserve a dedicated section.
Important note
A skill is the ability to perform a particular action to solve a given problem. Skills are represented in Moodle as competencies.
An incentive is a motivator to acquire a skill. Incentives are represented in Moodle as grades, feedback, badges, and certificates.
We will now focus on three skills and incentives tools being offered in Moodle, as depicted in the following diagram:
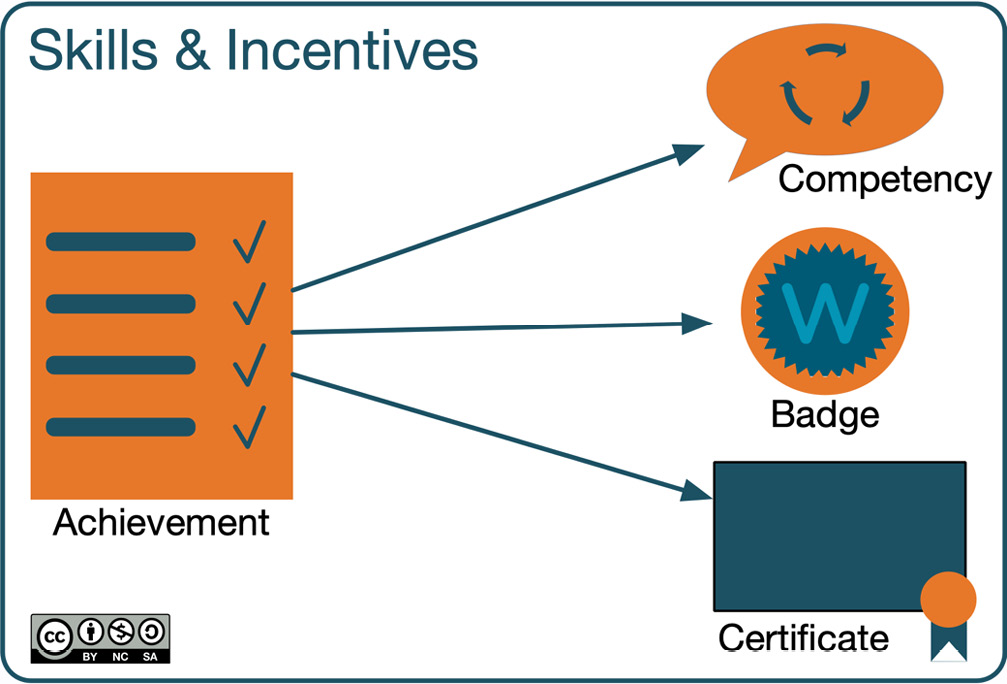
Figure 9.25 – Moodle skills and incentives
The left part of the diagram covers achievements in the form of completions at different levels, such as activity and course (or program and certification in Moodle Workplace). Various components support a range of award mechanisms; for instance, attaching a Competency once a certain number of points have been achieved in a quiz, issuing a Badge when completing a course, or awarding a Certificate after completing a program.
This section focuses on administrative tasks for the aforementioned components – competencies, badges, and certificates.
Managing competencies
Competencies describe the learner’s proficiency or level of understanding in specific subject-related skills. Moodle has powerful competency management that fully supports modeling and awarding competencies. The main components and issuing mechanisms of competencies are depicted in the following diagram:
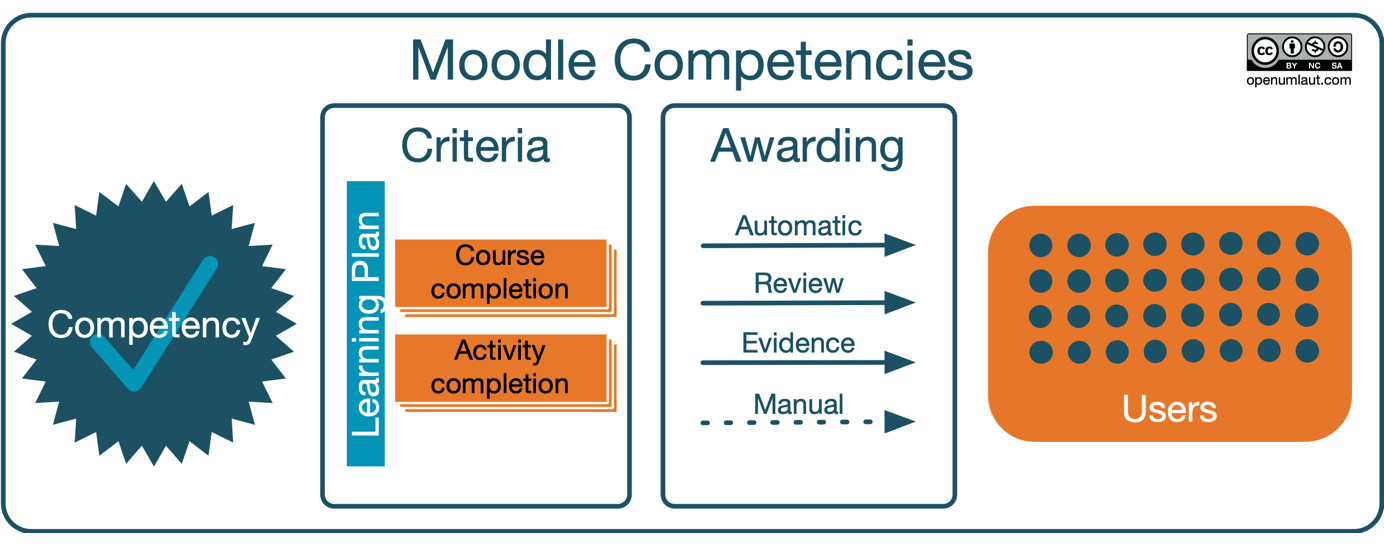
Figure 9.26 – Moodle competencies
A competency has specific properties such as name, scale (for instance, not competent, competent with supervision, competent), the competency framework it belongs to, and a parent to model competency hierarchies. A competency is usually tied to course and/or activity completions. Competencies can be part of a Learning Plan (template) that’s assigned to users or cohorts. Moodle supports different awarding mechanisms, namely Automatic upon completion, following a review process after providing additional Evidence, or Manual. In Moodle Workplace, competencies can also be awarded via dynamic rules, where competencies can be configured via the rule action.
Detailed information on competencies can be found at docs.moodle.org/en/Competencies. We will focus on the main mechanisms of how to model competencies and configure awarding mechanisms since this is done site-wide and thus requires administrative permissions.
We will use the Common European Framework of Reference for Languages (CEFR) as an exemplar competency framework since it is used across Europe and, increasingly, in other countries to measure a learner’s language skill sets. First, you need to create a competency framework at Site administration | General | Competencies | Competency frameworks, as shown in the following screenshot:
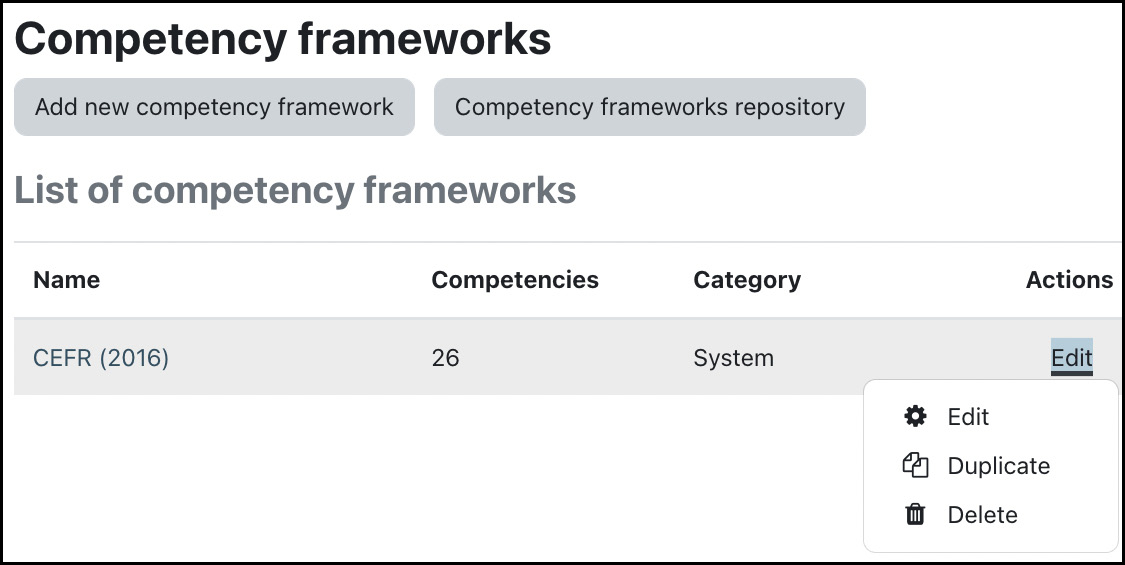
Figure 9.27 – Competency frameworks
For simplicity, we have imported the CEFR framework from the public Moodle Competency frameworks repository (via the respective button at the top). The result of the framework and its competencies (A1, A2, B1, B2, C1, and C2), along with its sub-competencies, is shown in the following screenshot:
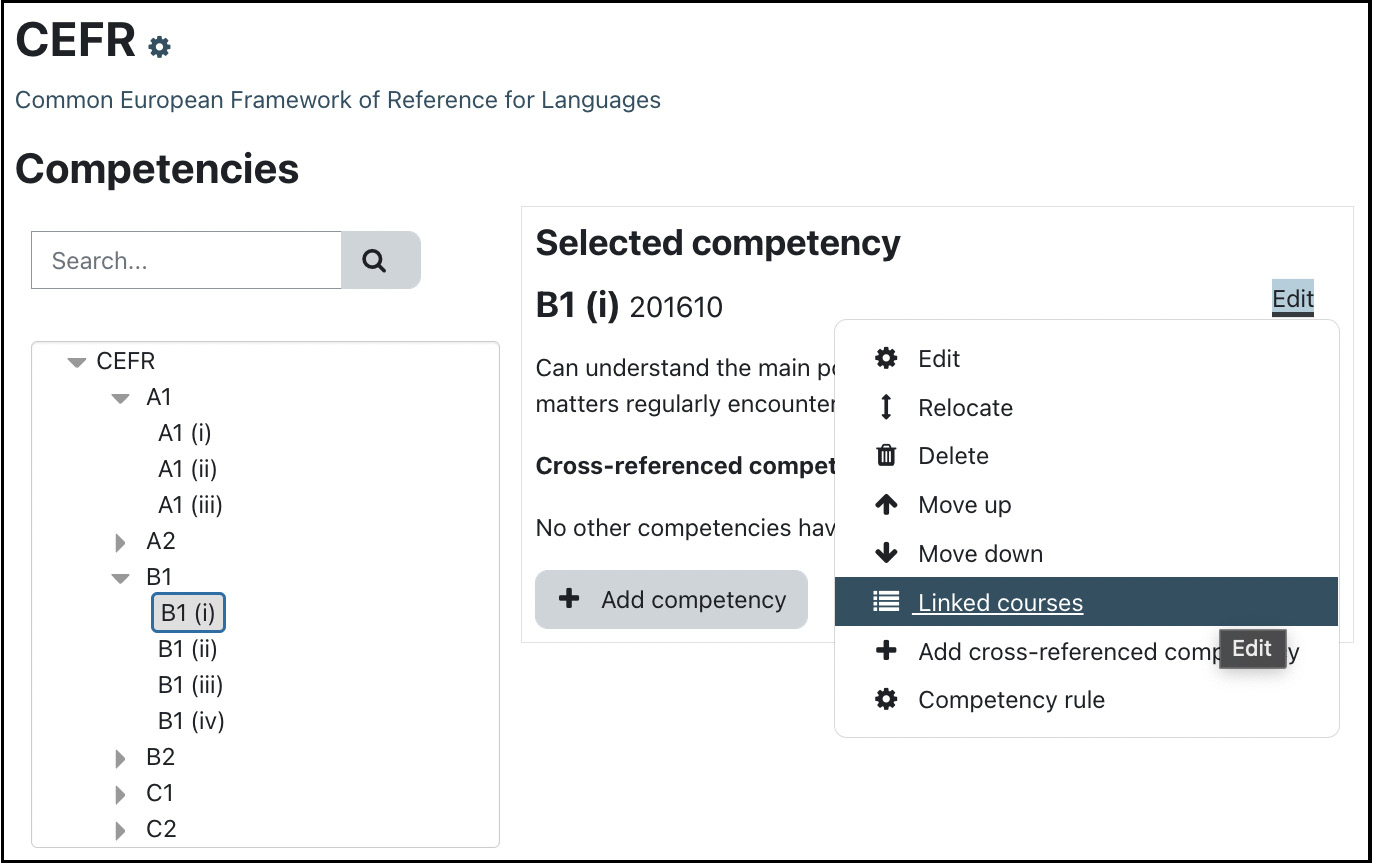
Figure 9.28 – CEFR competency framework
Once competencies have been modeled in a competency framework, the next step is to configure how to award competencies to users once they are proficient in the skill to be acquired. There are two options regarding how to award a competency to learners:
- Via course and activity completion, where proficiency is achieved by completing defined tasks. The most straightforward option is competency completion, which concludes the user’s process of achieving the competency. Attaching evidence allows users to submit a testimony of training received outside of Moodle – for instance, a link to a public webinar or a certificate of participation in an external seminar. The last option is for the learner to request a review by the instructor.
As an administrator, you do not need to configure course and activity completion since teachers or course authors do this. All that is required are the aforementioned competencies inside competency frameworks.
- Via learning plans, to ensure that groups of users achieve competency – for instance, all data protection officers. Learning plans are a means to ensure that all of your learners have targeted learning based on their goals and training needs and that it has been delivered in a structured way based on learning plan templates, which themselves are based on competencies. You can create learning plans based on the learning plan template, either manually for individual users or automatically via cohorts.
Important note
A learning plan template defines a set of competencies assigned to users.
Go to Site administration | General | Competencies | Learning plan templates and select the Add new learning plan template button to add a learning plan template. We have already created some templates, as shown in the following screenshot:
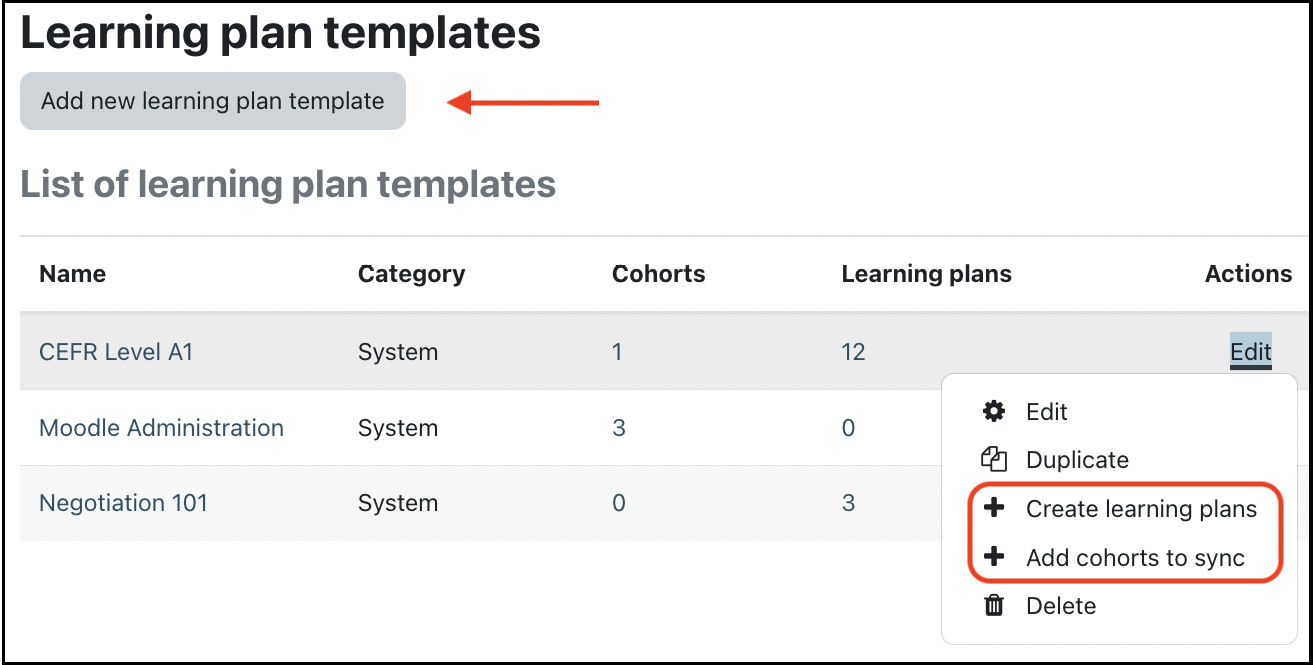
Figure 9.29 – Learning plan templates
When you select a learning plan template, you will see the already familiar competency view and also have the option to add more competencies via the Add competencies to learning plan template button.
Once a learning plan template has been finalized, you can create individual learning plans one by one via the Create learning plans option in the Edit menu or automatically via Add cohorts to sync. Users can view their learning plans via the Learning plans link in their respective user profiles, where they also have the option to provide evidence of prior learning – for instance, documentation of prior learning.
Moodle Workplace supports a third option via dynamic rules to award competencies based on flexible criteria, such as cohort membership. This awarding mechanism is described in detail at docs.moodle.org/en/Dynamic_rules.
This concludes our quick run-down of Moodle’s robust and flexible implementation of competencies, which included modeling competency frameworks and configuring awarding mechanisms via activity and course completion, as well as via learning plans. Next up is the second incentive type: badges.
Managing badges
Badges are a good way of celebrating achievement and showing learning progress. Moodle allows you to manage badges and gives you different ways to award badges. Moodle badges are fully compatible with Open Badges and can be published in any Open Badges-compatible backpack.
Badges are awarded based on various chosen criteria and will be displayed on a user’s profile. The main components and issuing mechanisms of badges are depicted in the following diagram:
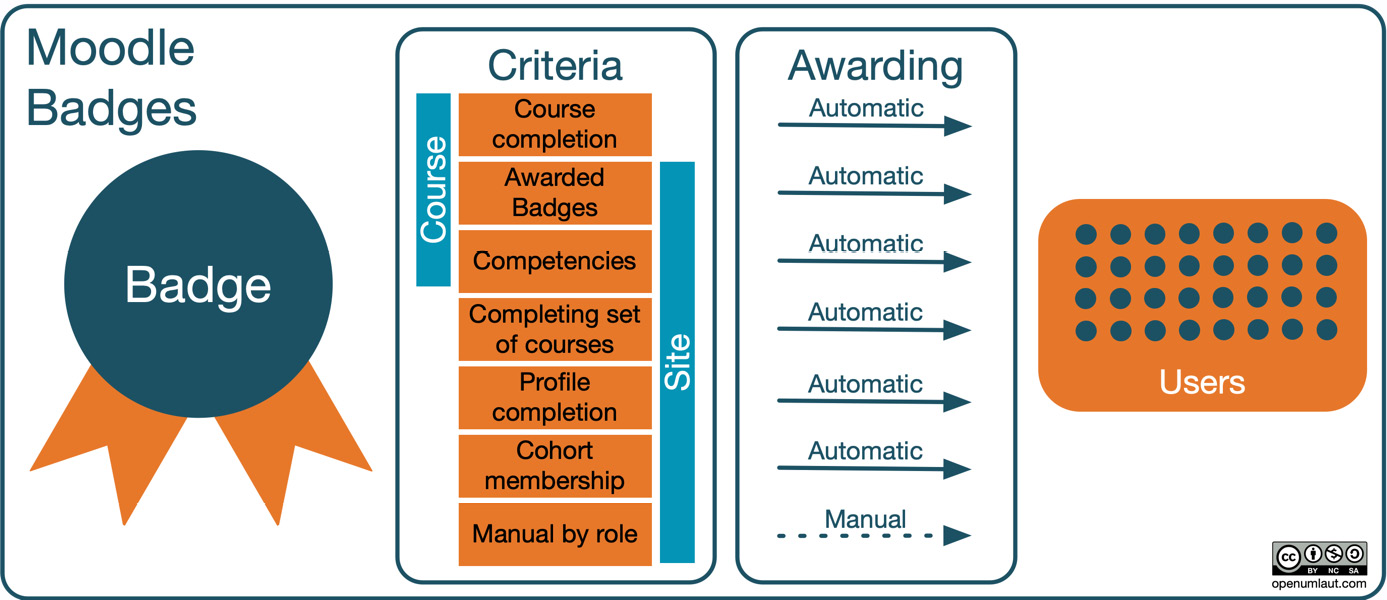
Figure 9.30 – Moodle badges
A badge has specific properties such as name, expiry date, and issuer. Additionally, badges have one or many criteria to be fulfilled to trigger their award. Some criteria only exist at the course level, while others exist at the site level. The awarding itself is automatic, except for manual assignment.
Detailed information on badges can be found at docs.moodle.org/en/Badges. We will now focus on the main mechanisms of managing and awarding badges.
Once you or some creative whiz kid in your marketing department has created the badges to be awarded to your learners, you will need to add and manage these in your learning management system. In Moodle, there are two types of badges:
- Course badges are assigned at the course level and are related to the activities and completions inside a course
- Site badges are assigned site-wide and are related to achievements, such as completing a set of courses in Moodle or a certification in Moodle Workplace
As an administrator, you are only concerned about site badges, which are managed under Site administration | General | Badges | Manage Badges. Once you have added a badge and provided its properties, you must specify the badge criteria. There are different types of course badge criteria and site badge criteria, as shown in the following screenshot comparison:

Figure 9.31 – Course badge criteria versus site badge criteria
The following badge criteria are available:
- Course completion (course): The user has completed the current course
- Awarded badges (both): The user has been awarded the selected badge(s)
- Competencies (both): The user has been awarded the selected competencies
- Manual issue by role (site): To be awarded manually by users with a particular role within the site or a course
- Completing set of courses (site): The user has completed the selected course(s)
- Profile completion (site): A user profile field has a specific value
- Cohort membership (site): The user is a member of the selected cohort(s)
As with competencies, there are two options regarding how to award a badge to a learner:
- Automatic: All preceding criteria, except Manual issue by role, trigger awarding a badge to the users who have successfully fulfilled the respective criteria
- Manual: When the Manual issue by role criterion has been selected (site badges only), a user with the correct permissions can award a badge to another user
In Moodle Workplace, badges can also be awarded via dynamic rules, where badges can be configured via the rule action. This awarding mechanism is described in detail at docs.moodle.org/en/Dynamic_rules.
Users can view their awarded badges in the Badges section of their user profile.
This completes our brief introduction to badges, where we covered Moodle’s management and awarding mechanisms. Next up is the third and last incentive type: certificates.
Managing certificates
Certificates are an excellent incentive for both formal and informal training. However, at the time of writing, they are not (yet?) part of Moodle, but they are of Moodle Workplace. However, the module works without a glitch in Moodle. We installed the Workplace certificate manager in Chapter 8, Understanding Moodle Plugins. Moodle HQ has developed the plugin, so it is safe to assume that it is here to stay. As always, we will concentrate on the administrative elements of the tool. You find the full documentation at docs.moodle.org/en/Certificates.
The certificate manager allows you to design engaging certificates and then award them to users in different ways. The tool comes with a certificate generator, which lets you design templates so that diplomas or certificates of participation can be issued. The basic workflow is shown in the following diagram:
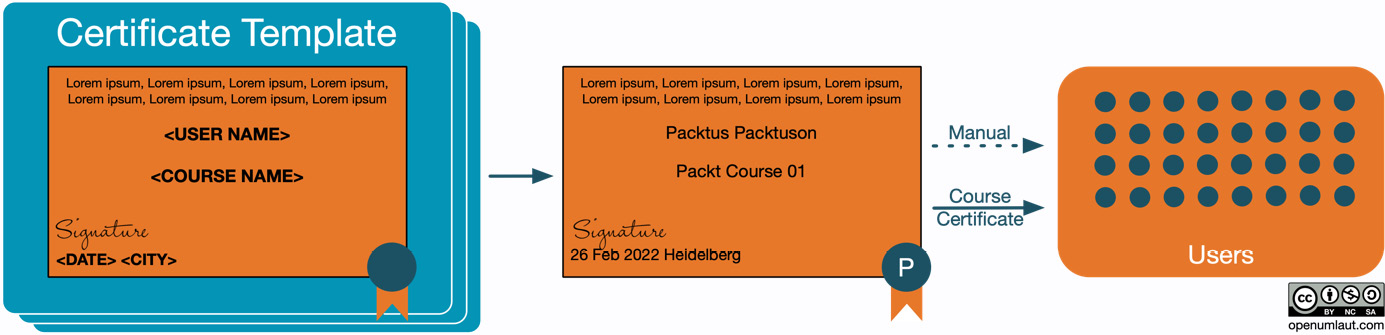
Figure 9.32 – Basic certificate workflow
Certificate templates act as a blueprint and contain static elements (organization name or logo), dynamic elements (username or certification title), and verification elements (code or digital signature). Based on the template, individual certificates are generated and assigned to users, which can be done manually or via the course certificate activity. Moodle Workplace also supports certificate issuing via dynamic rules.
We will mainly deal with the basics of certificate template management as teachers or instructors usually trigger the awarding via the aforementioned course certificate activity. Most of this content has been borrowed from Chapter 7, Skills and Incentives of Corporate Learning with Moodle Workplace, published by Packt Publishing.
You can manage certificate templates via Site administration | General | Certificates | Manage certificate templates, where you will see a list of certificate templates. In our demo instance, we have already created three certificate templates. On the right of each item, you will see several actions, some of which are the usual Moodle icons (Edit, Details, Preview, Duplicate, and Delete), while others are specific to certificates (Certificates issued and Issue certificates). We will discuss these in due course:

Figure 9.33 – Certificate templates
To create a new certificate template, select the + New certificate template button; you will then be greeted with a pop-up screen and the following mostly self-explanatory settings:
- Name: This doesn’t have to be unique, but it is recommended not to use the same name more than once.
- Course category: The certificate is available in the selected course category; it is also Available in sub-categories and courses if the option is enabled. When no course category is selected, the certificate is available across the site.
- Page width and Page height: The default values depend on your server locale. For reference, the dimensions of A4 are 297 mm and 210 mm; the ones for letter size are 279 mm and 216 mm, respectively.
- Left margin and Right margin: These are for the edge width on the left and right in mm. The default is 0.
As soon as you save the certificate template, you will be directed to the certificate designer, which we will work with next.
Certificate designer
The certificate designer lets you interactively create multi-page, multi-language certificate templates. The canvas, which has an already (very poorly) designed certificate, has the following user interface:
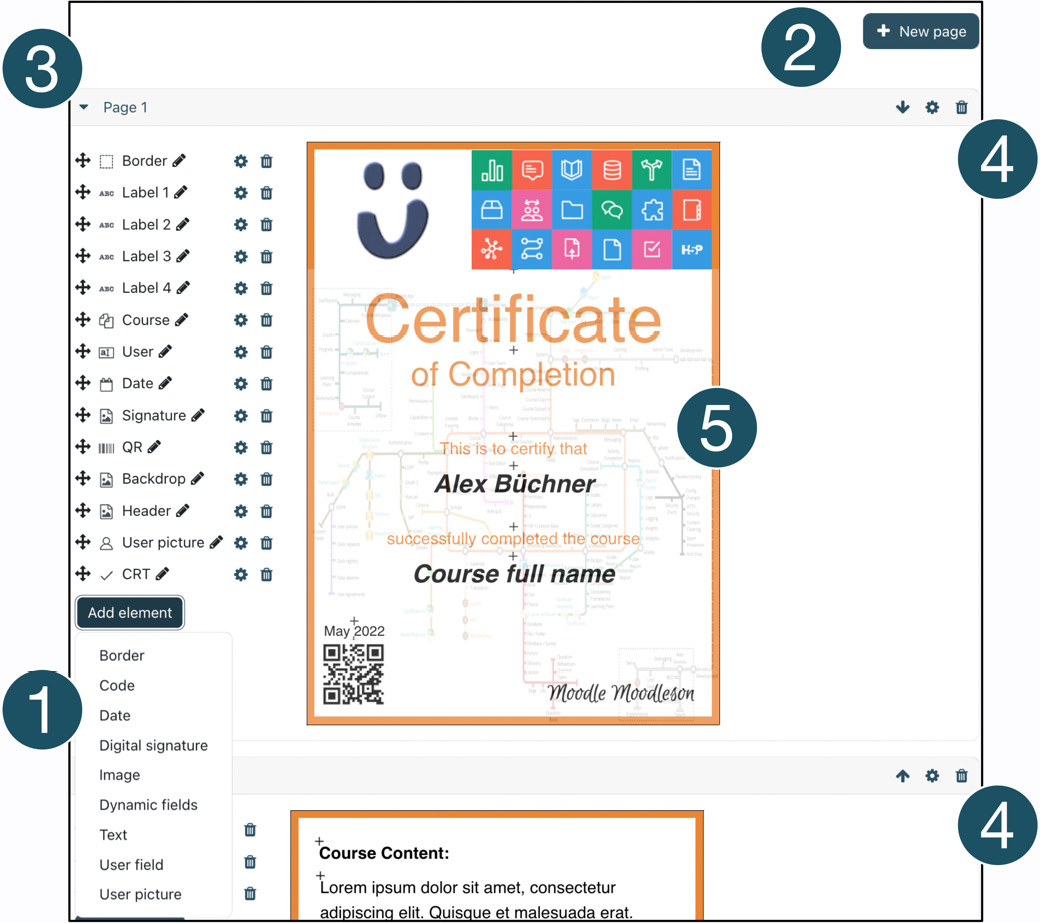
Figure 9.34 – Certificate designer
The following controls are available in the certificate designer:
- Adding elements to the certificate template. These will be covered subsequently.
- Adding a new page. You will have to set the page height and width, as well as the page margins. The default values are the ones for the current page.
- Expand and collapse the current page.
- Page actions. Here, you have the option to Move up and down (only multi-page certificates), access various Settings (dimensions of the page), and Delete (only multi-page certificates).
- Certificate canvas, which fully supports dragging and dropping elements.
Once some elements have been added to a template, each item will be listed on the left. Each item can be renamed via the Inline Editing option beside the element name or by simply clicking the label. The Settings symbol opens the parameters pop-up window for each item, while the Delete icon removes the entry. Changing the elements’ order using the standard Move icon will change which element is displayed in front of another.
Tip
To modify the element values, simply click the element on the canvas.
Now, let’s go through the different elements that can be added to a certificate template.
Adding certificate elements
To add an element to the certificate template, select it from the Add element drop-down, which opens up a pop-up menu containing element options. Each element contains the following settings:
- Element name: This identifies an element when editing a certificate. Note that this will not be displayed on the certificate.
- Element-specific settings: These, mostly self-explanatory options, depend on the added element type. For example, a text string has a font and size, whereas the date field also has a format.
- Element dimension(s): Every element has a Width, while some elements (for example, images) also have a Height.
- Element position: When you select Show more…, two more settings – Position X and Position Y – will be shown, with the apex at the top left of the certificate template. Usually, you position your image by dragging and dropping it onto the canvas; however, sometimes, it is useful to position elements manually, especially when you need to align multiple items horizontally or vertically.
We have grouped the available element-specific certificate settings into three categories – static, dynamic, and validation – which will be covered in the following subsections.
Adding static certificate elements
Static elements are fixed for every certificate issued from the certificate template, and they will be identical on every certificate that will be generated. The three static elements that are available are Border, Image, and Text:
- The certificate border is the only element that cannot be moved around on the canvas.
- You will need to upload a certificate image that has been prepared elsewhere. The supported image file types are GIF, JPE, JPG, JPEG, PNG, SVG, and SVGZ. Alternatively, you can select a shared image, which is managed centrally and acts as a simple repository for assets used on multiple certificates; for instance, your company logo or the signatures of certificate signees. You can manage shared images by going to Site administration | General | Certificates | Certificate images. If you tick the Use as a background image box, the picture will be stretched across the entire certificate and shown behind all other elements. It is recommended that you use an image with added transparency when it is used as a background.
- Certificate text is effectively a label for which you can specify Font, Size (in pt), and Colour. You also have three Text alignment options: Left, Centre, and Right. Right alignment of the text means that the element coordinates’ Position X and Position Y will refer to the top-right corner of the text box; in center alignment, they will refer to the top middle, and in left alignment, they will refer to the top-left corner:
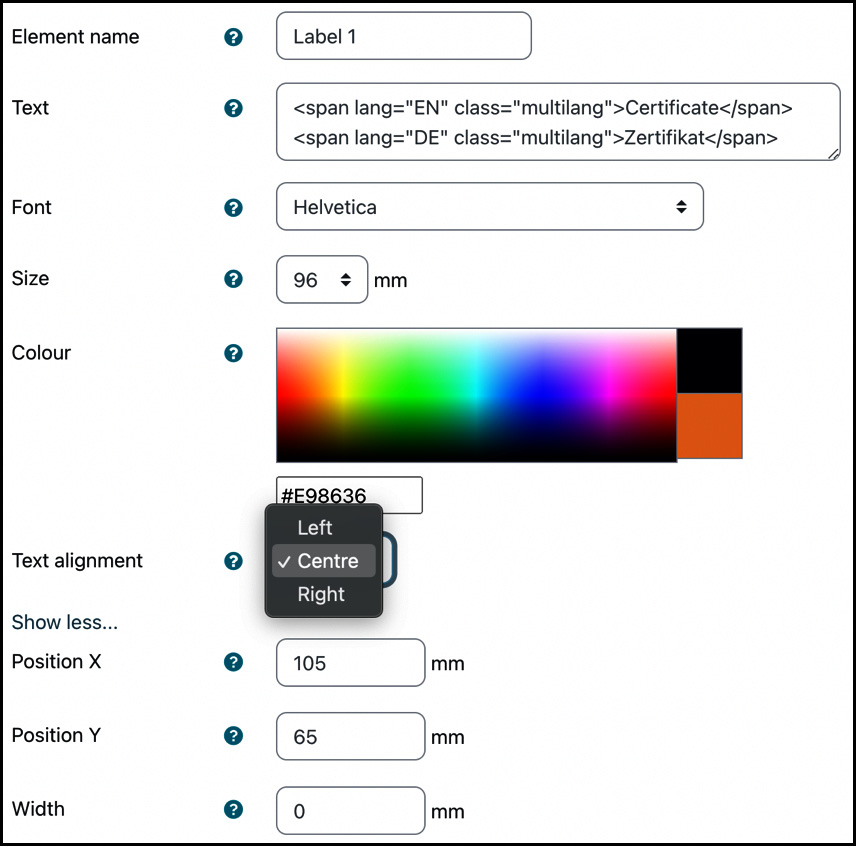
Figure 9.35 – Certificate text element
Text supports multi-lingual content to generate certificates in the user’s language via so-called lang tags. Ensure the Issue certificate in user language setting in Site administration | General | Certificates | Certificates settings is ticked, the multi-language content filter is enabled, and text fields contain multi-language tags. This generic feature will be dealt with in the Managing localization section of Chapter 10, Configuring Technical Features; you can see a brief example in the sample screenshot.
Now that we have added all the required static elements, namely Border, Image, and Text, let’s look at the different dynamic elements that can be placed on a certificate template.
Adding dynamic certificate elements
Dynamic elements will be replaced with specific data for every certificate issued from the certificate template. Thus, each dynamic element acts as a mini placeholder on the certificate template. Typical dynamic values include the receiver’s name, the course title, or simply the date when the certificate will be issued. The four dynamic elements available are Date, Dynamic fields, User field, and User picture:
- The certificate Date element adds a date field to the template, either Issued date (when the PDF will be generated) or Expiry date (when the certificate’s validity ends). You can further choose from one of the seven available Date format options. Please note that the Date format options will be adjusted according to the active language pack while editing the certificate template. While there is no limit to the number of date elements you can put on a certificate template, usually, one item is placed on the document.
- The certificate Dynamic fields element type is effectively a placeholder for several course fields: short name, full name, URL, completion grade, and, if present, custom course fields. In our example, we have selected the course’s full name, which will be displayed on the PDF once generated. In Moodle Workplace, additional program and certification fields are at your disposal.
- The certificate User field displays textual information on the certificate, which supports all plain text fields (that is, no rich text/HTML text fields) in the user profile, including custom profile fields. We have added the user’s full name on our certificate, which is almost always part of a personalized certificate.
- The certificate User picture type adds the user’s image to the template. User pictures are handled the same way as elements of the Image type; the only difference is that the picture cannot be selected since it is already set in the user profile.
This concludes this subsection on dynamic certificate elements, where we covered Date, Dynamic fields, User field, and User picture. Next up are validation elements.
Adding validation certificate elements
Certificates are regularly issued in settings where their validity is critical; for example, diplomas, compliance documents, and qualification credentials. To ensure that the certificates have been generated by the Moodle system, two validation mechanisms are offered:
- Certificate code: Every issued certificate contains a unique code, made up of 10 digits plus two uppercase letters; for instance, 0123456789AB (The last two letters are the user’s initials). This code can be displayed on the certificate in four different formats: Code only (default), Code with link, Verification URL (code without a link), and QR Code (as used in our example).
To verify the certificate’s validity (code), Moodle offers a dedicated form that can be reached via one of the four described display options. It is also possible to enter codes manually via Site administration | General | Certificates | Verify certificates, as shown in the following screenshot:
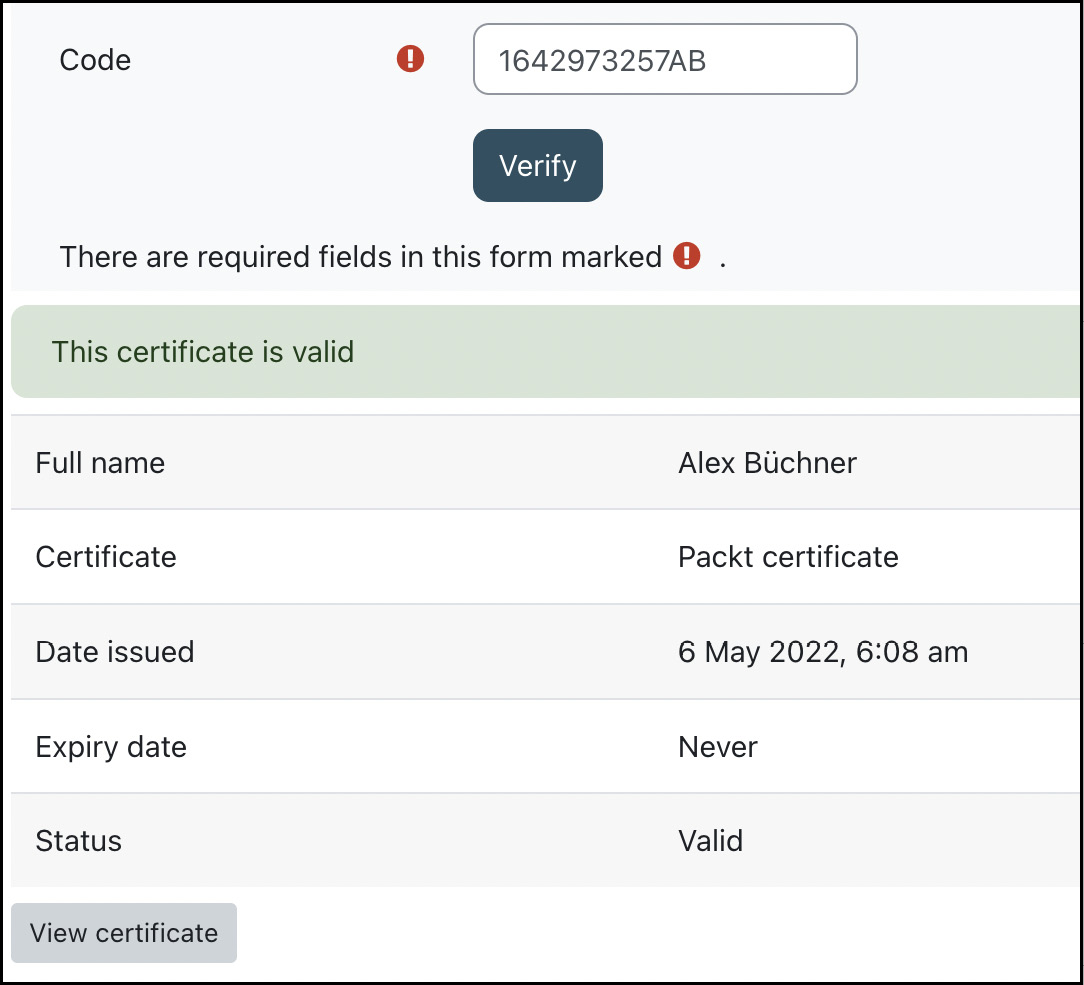
Figure 9.36 – Certificate validation
Once you select Verify, information regarding the certificate metadata is displayed. You can also access the document’s PDF version by selecting the View certificate link at the bottom.
- Digital signatures can be added to a certificate (template) based on self-signed CRT certificates that follow the X.509 standard. They offer a higher degree of security than the code element by electronically signing the generated PDF file with a self-signed certificate to prevent forgery and falsification of certificates.
It is common to sign an image in a document using a logo, a signature, or a seal, although creating signed PDFs with no in-document visualization is possible. The only compulsory field is the digital signature itself, represented as a CRT file. You will either have to use an existing CRT file from your organization or generate a self-signed certificate. Follow these three steps via the Linux command line:
openssl req -x509 -nodes -days 365000 -newkey rsa:1024 -keyout moodle.crt -out moodle.crt
openssl pkcs12 -export -in moodle.crt -out moodle.p12
openssl pkcs12 -in moodle.p12 -out moodle.crt -nodes
The first command creates a self-signed signature that’s valid for 10 years (365,000 days) and is RSA-encrypted with 1,024 bytes. It contains both the private key and the certificate part. The second step is to export the CRT file in P12 format before converting it into a PEM file. You will need to provide the CRT file – here, moodle.crt – to the digital signature on your certificate, which uses the standard key part to tag the certificate as valid and verifiable. Internally, the PDF generator uses functionality in the TCPDF library.
With that, we have listed the supported certificate elements, all of which have been utilized in our sample certificate, as shown in the following figure:
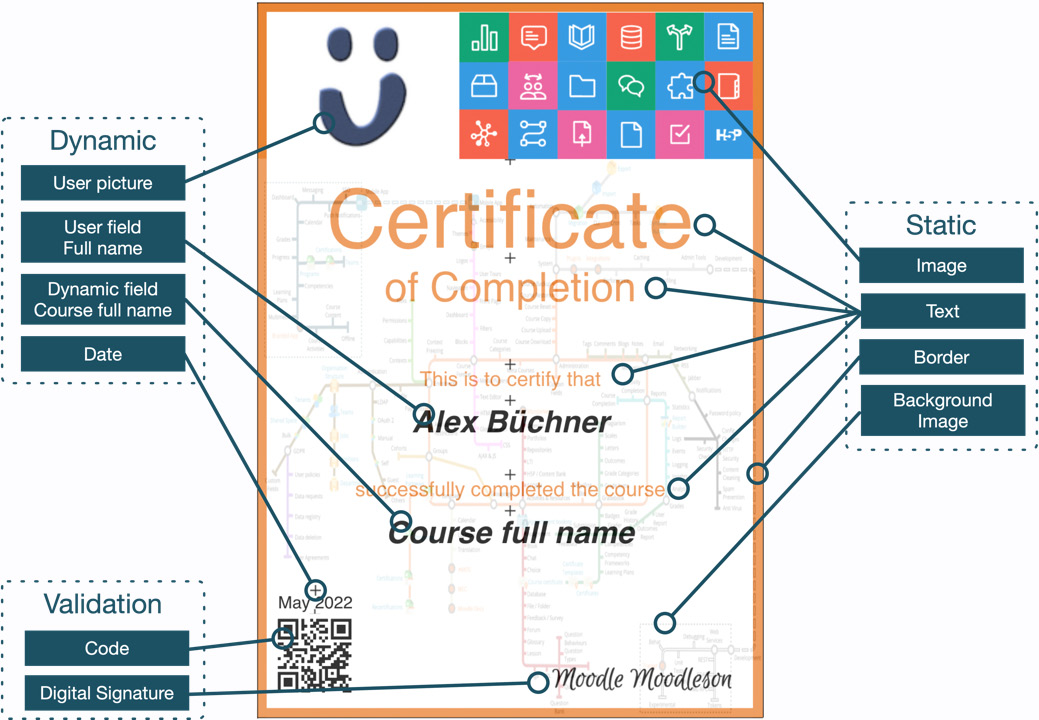
Figure 9.37 – Certificate elements
By default, all available certificate plugins are shown in alphabetical order in the certificate designer menu. If you wish to change the order of the elements or hide any elements that are not in use in your organization, go to Site administration | Plugins | Admin tools | Manage certificate element plugins and configure the list as required. It is also possible for developers to create new certificate element plugins, which will appear in this list and be treated like core elements.
Now that we have dealt with creating certificate templates, let’s look at administrative tasks for certificate issuing.
Issuing certificates
The key objective of certificates is to be awarded to users once they have completed a specific task or solved a given problem. Certificates can either be issued manually or via the course certificate activity.
To manually issue a certificate, you have to select the Issue certificates from this template icon to the right of the certificate template. This will open a pop-up form where you have to choose at least one user and, optionally, specify an expiry date or period. In the following screenshot, two users have been selected:
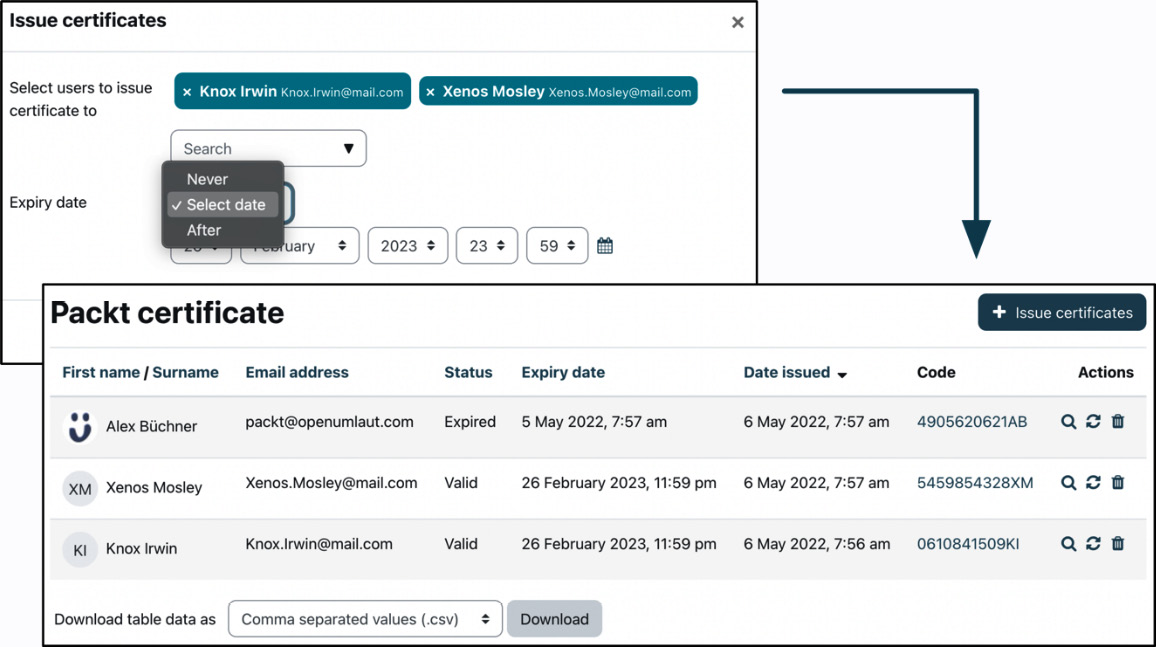
Figure 9.38 – Manually issuing certificates
For every issued certificate, no matter how it has been generated, metadata will be stored in the underlying Moodle database. Select the Certificates issued icon beside the certificate template to view this data. In addition to self-explanatory standard fields, the table shows the certificate code and a link to the verification page. In the Actions column, a Preview of the generated PDF file can be viewed, the PDF file can be regenerated on the fly and re-issued to the user (the award date and time remain unchanged), and the certificate can be revoked.
To use the Course Certificate activity, you must install mod_coursecertificate from moodle.org/plugins/mod_coursecertificate. This activity allows teachers to choose from certificate templates. Learners will then be able to download a PDF copy of the certificate themselves, and there are options to email PDF copies automatically. As all this takes place at the course level, you, as the administrator, don’t have to worry about this. More details on this activity can be found at docs.moodle.org/en/Course_certificate_activity.
One last certificate-related admin setting might be relevant: users can see their certificates on the My certificates page in their user profile. If the Show share on LinkedIn option is ticked in Site administration | General | Certificates | Certificates settings, an additional column labeled Share on LinkedIn will be shown. When users select the LinkedIn icon, the certificate will be added to their feed. You need to follow the instructions shown to receive your LinkedIn organization ID for this to work.
This completes our look at the trio of skills and incentives covered in this chapter, where we covered competency management, badge configuration, and creating and issuing certificates.
Summary
This chapter taught you how to administer any Moodle tools and features classified as educational.
First, we configured collaboration tools while covering blogs, comments, and tags. Next, we dealt with various content creation features and looked at the Moodle content bank and H5P, LTI platforms and tools, filters, plagiarism prevention, and licenses. We then configured grades and assessments, namely the gradebook and the configuration of the three activity types – assignment, quiz, and SCORM. Finally, we managed skills and incentives in the form of competencies and learning plans, badges, and certificates.
You should now be in a good position to approach all organizational stakeholders to gather relevant input to ensure a suitable setup of educational components.
Due to the high volume of configuration areas, we have divided the configuration topic into two separate chapters – educational configuration, which we dealt with in this chapter, and technical configuration, which we will cover in the next chapter.