
18
Integrating External Systems Using Moodle Web Services
In most organizations, the LMS is rarely an isolated, standalone system; instead, it is almost always part of an institution-wide infrastructure containing several best-of-breed components. Web services facilitate exchange and communication among these systems and Moodle is no exception. At the time of writing, Moodle ships with almost 700 web service functions, a number that is growing with every release.
After providing a brief overview of web services and giving some application examples, we will learn about the basic concepts of Moodle web services. Next, we will configure the generic Moodle web services functionality required for different setups. Then, we will learn how to set up the Moodle web service for another application to control Moodle. Lastly, we will learn how to set up the Moodle web service for a user as the client.
We will be covering the following topics in this chapter:
- Understanding Moodle web services
- Configuring Moodle web services
- Enabling web services for external systems
- Enabling web services for users
We will not cover any programming aspects of web services, as this is not an administrative task. You will find good documentation about the topic for users and developers at docs.moodle.org/en/Web_Services.
By the end of this chapter, you will know what web services are and how they are configured for external systems and users.
Understanding Moodle web services
This section will familiarize you with web services, how they work, and when to use them.
It has always been possible to extend Moodle via code (PHP and JavaScript). Due to Moodle’s open source code base, there is no limitation on what code a developer can modify or extend. As an administrator, this was not a satisfactory situation, as you have no control over what parts of Moodle are being changed as a result, and, equally importantly, what data is being accessed or altered.
Moodle has various APIs that provide abstract layers for certain functionalities. Examples are the Privacy API, Repository API, and File API. These are great for programmers, as they reduce the amount of code that has to be rewritten. In addition to these interfaces, Moodle provides us with an ever-growing number of web services.
Important note
Web services enable other systems to perform operations inside Moodle, and vice versa.
Why would we want this? Well, there are four scenarios we can think of:
- Other systems in your organization – for instance, the HR system – have to trigger specific actions in your LMS; for example, once new staff has been added to the system, an account must be created in Moodle, and enrolments in several courses should take place. Web services simplify this process greatly.
- Certain information stored in Moodle might have to be transferred to external applications. Examples are course completions, grades, or issued certificates, which have to be recorded in a student information system. Again, web services are predestined for the transfer of such sensitive data.
- The Moodle app we covered in Chapter 11, Enabling Mobile Learning, uses web services internally; all communication and data exchange between a mobile device and the Moodle backend takes place via web services.
- The community hub feature requires web services, which we will cover in Chapter 19, Setting Up Moodle Networking.
Why should you, as an administrator, care about web services when they have been designed for developers? Well, that’s the other advantage of web services. You can control which system can talk to your Moodle system and which features these systems are allowed to use. This way, you can manage who has access to your system and limit what they can do.
The following diagram illustrates a (very) simplistic overview of how Moodle interacts with external applications via web services:
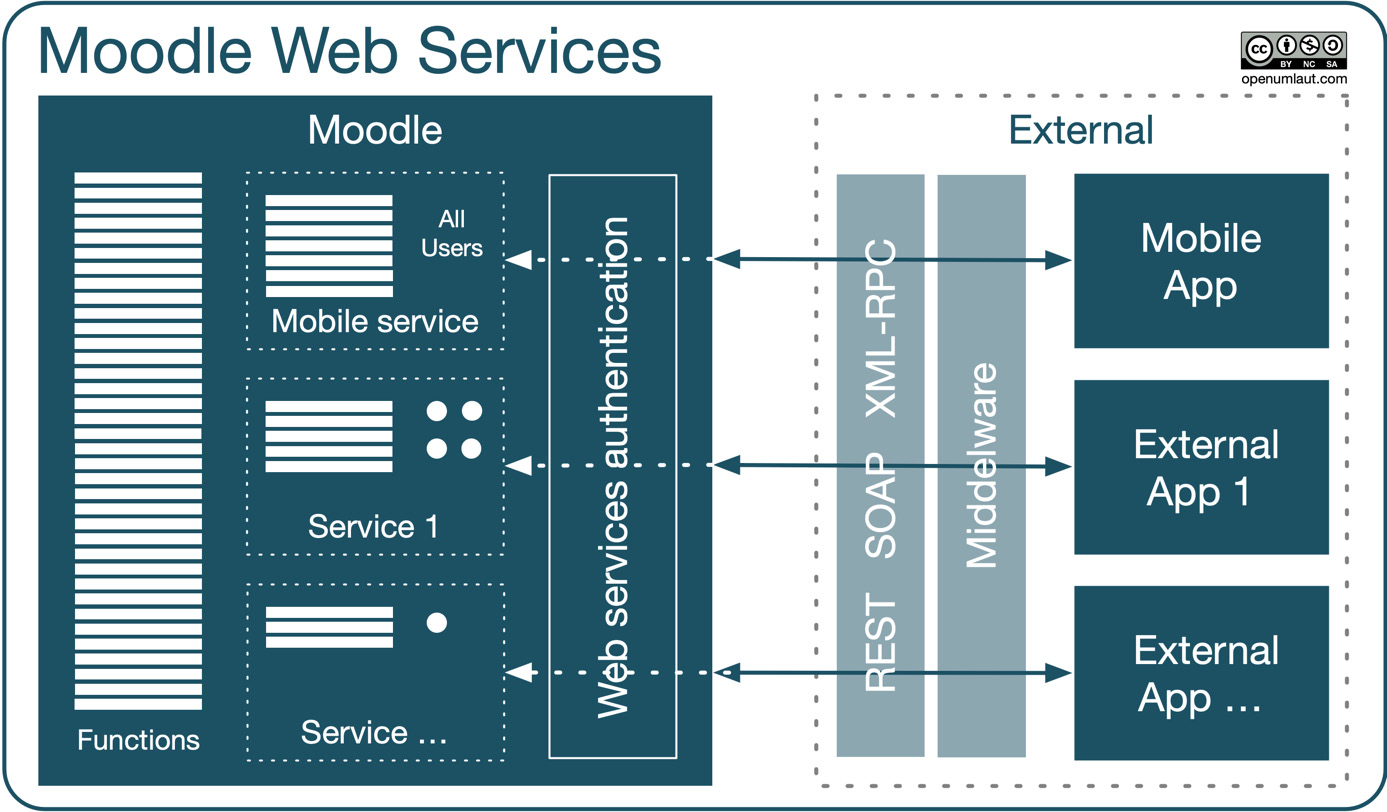
Figure 18.1 – Moodle web services
Let’s go through this schema from left to right: many Moodle features are represented as functions – for example, creating a user account or enrolling a user into a course. A service is a set thereof plus the definition of which user(s) can access the selected functions. For instance, the Moodle app uses a built-in (that is, predefined) service granting all users access to Moodle. In contrast, a custom service might only allow access to a single dedicated account.
Important note
A service is a set of functions. A service can be user-restricted, token-restricted, IP-restricted, or time-restricted.
External applications must authenticate with Moodle through the web service authentication plugin for security. Communication from external apps can be unidirectional or bidirectional, which is implicitly determined by the functions of the service. The supported web service protocols are SOAP, REST, and XML-RPC.
Web services return feedback on whether the calls or transactions have succeeded. For instance, if the creation of a user account has failed in Moodle for whatever reason, the HR system will be notified and can repeat the attempt after a predefined period. Most web services-based infrastructure requires some middleware to facilitate queueing and error handling.
Now that you have some basic understanding of Moodle web services, it is time to configure protocols, services, and functions.
Configuring Moodle web services
First, you must activate web services via the Enable web services setting in Site administration | General | Advanced features. The setting is linked to the Enable web services for mobile devices parameter on the same page; the latter cannot be enabled without the former.
Important note
Enabling web services is a potential security risk, as you grant Moodle access to outside users and systems. The mantra should always be “open up as few services and functions as possible.”
Second, you have to enable the Web services authentication plugin (Site administration | Plugins | Authentication | Manage authentication). No configuration is needed, as Moodle handles all handshake operations and communication internally.
Moodle supports two types of external services that can connect via web services:
- Built-in services: These are preconfigured services where the set of supported functions cannot be modified. The Moodle mobile web service is part of Moodle and lets users of the app interact with Moodle. We covered the app’s configuration in Chapter 11, Enabling Mobile Learning. Third-party plugins might add further entries to the list of built-in services.
- Custom services: These are user-defined services where you configure which functions can be utilized. We will focus on custom services in this chapter, allowing two types of entities to access Moodle: external systems and users as clients with tokens.
When you navigate to Site administration | Server | Web services | External services, you see the services for the two described service types. We have installed the mod_attendance plugin in our system, which installs a built-in service alongside the mentioned mobile web service. We have also created two custom services, one for testing purposes (which is disabled) and one to connect to our HR system, as shown in the following screenshot:

Figure 18.2 – Built-in and custom web services
To configure web services, it is best to go to Site administration | Server | Web services | Overview, which acts as a dashboard for setting up Moodle web services. Two checklists are shown, one to Allow an external system to control Moodle (dealt with first) and one for Users as clients with token (seen shortly):
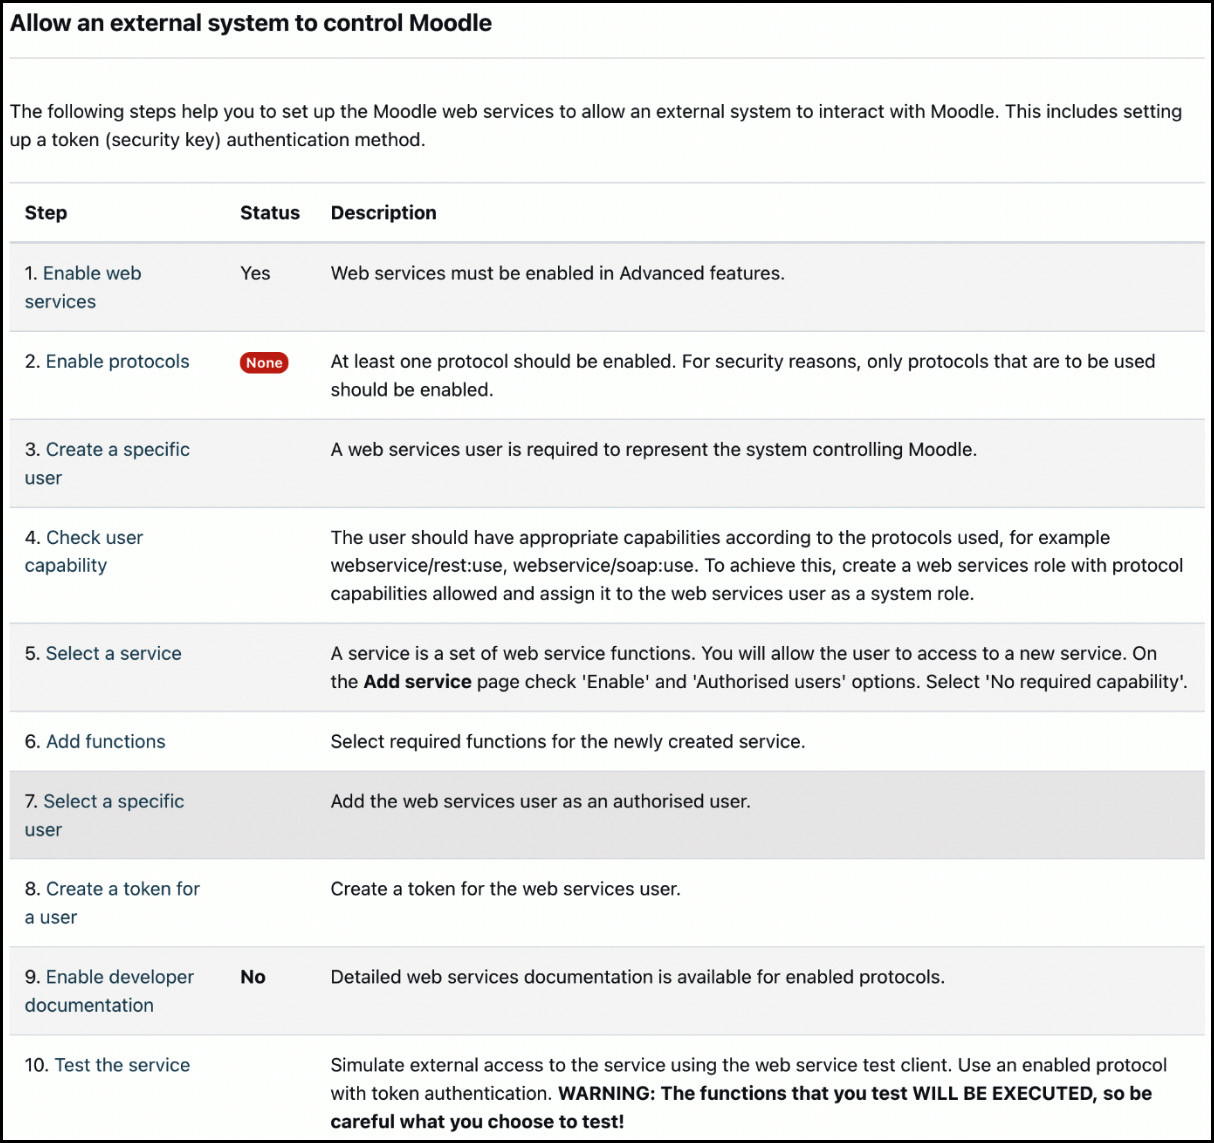
Figure 18.3 – Allowing an external system to control Moodle
We have already enabled web services (step 1). Moodle supports three web service protocols – SOAP, REST, and XML-RPC. We won’t provide details on those standards; for more information, check out docs.moodle.org/dev/Creating_a_web_service_client. At least one protocol must be enabled, which depends entirely on the external application, the protocols supported, and the developer’s preference. Clicking on the Enabled protocols link in the overview table when you go to Site administration | Server | Web services | Manage protocols will guide you to this screen. Enable a protocol by toggling the show/hide icon in the Enable column. Here, SOAP has been enabled, which is common in, but not limited to, Microsoft-based environments, as shown in the following screenshot:
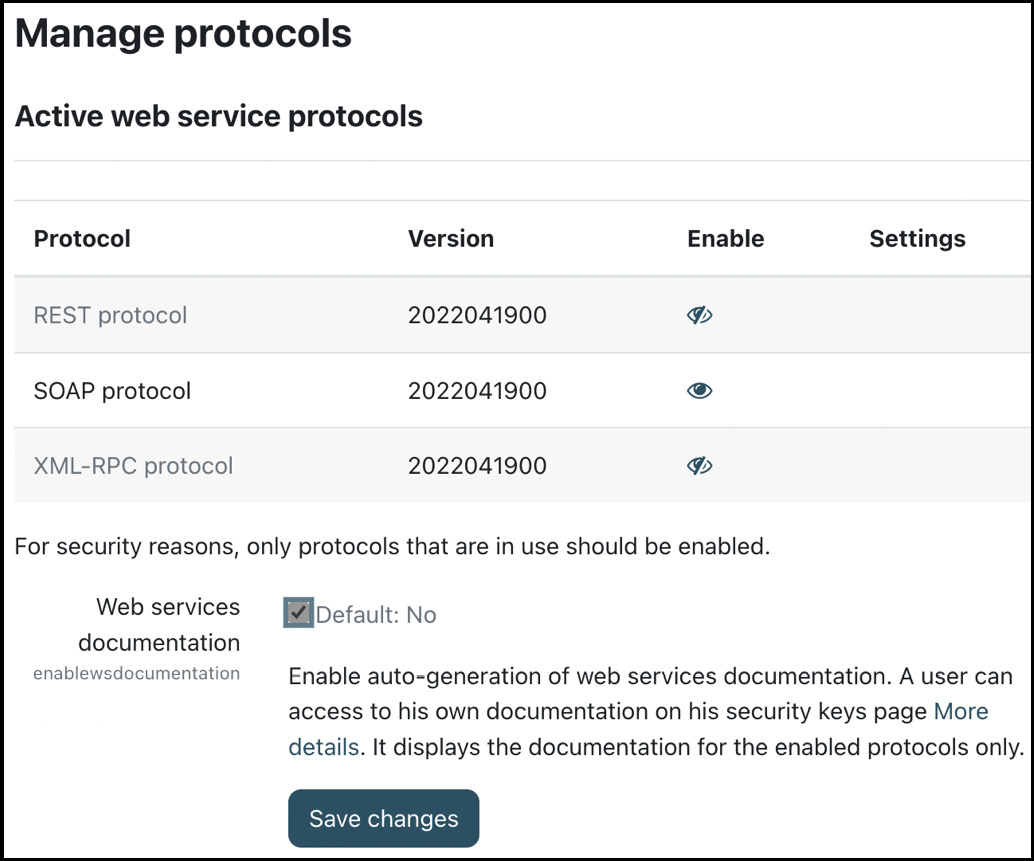
Figure 18.4 – Protocols for web services
Technically, it is possible that more web service protocols will be added in the future, for example, a Java- and .Net-compatible WSDL, but to date, this has not happened.
Important note
Depending on the protocol chosen, you might have to install the respective PHP extension – for example, php-soap.
Now that we have enabled web services and at least one protocol, let’s cover the configuration of the two types of web service accesses.
Enabling web services for external systems
An external system is an application that accesses Moodle and its data in one way or another. Eight steps have to be performed to complete the setup, which follows the workflow described on the web services overview screen:
- Create a specific user
Each application should have a separate user account. This way, you can control the capabilities each external system will use. Our user is aptly called webservice.
- Check user capability
Depending on the protocol you’ve selected, you must allow specific permissions for the user. You achieve this by creating a new role with any of the three capabilities, webservice/rest:use, webservice/soap:use, or webservice/xmlrpc:use.
This role has to be assigned to the web service user(s) in the System context.
- Select a service
A service is a defined interface that an external application can connect to, represented by a set of functions (see step 4). Selecting a service takes place at Site administration | Server | Web services | External service. You have to add a custom service:
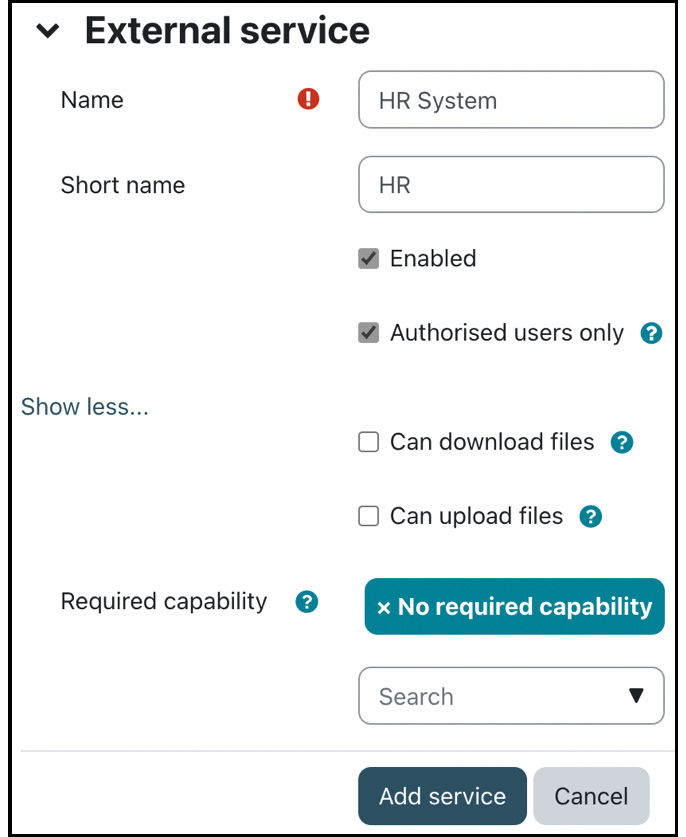
Figure 18.5 – Web services: adding a custom service
Each external service must have a given Name and a unique Short name and should be Enabled once configured. A service has to be accessed via a token. The Authorized users only setting restricts this access to selected users. All users with the token permission can access the service if it remains unchecked.
You can also specify download and upload permission for the web service with Can download files or Can upload files. In our HR role, this would be useful if you also managed profile pictures via web services. You can further restrict access by specifying the required capabilities that users need to have.
Once you have saved the service, select the Add functions link shown.
- Add functions
At the time of writing, Moodle provides almost 700(!) functions that can be accessed via web services, and even more in Moodle Workplace. The function(s) selected depend(s) on what tasks the external system has to perform and should be set up in liaison with the developer in charge. Since we are connecting to an HR system, we will allow the following user-related functions:
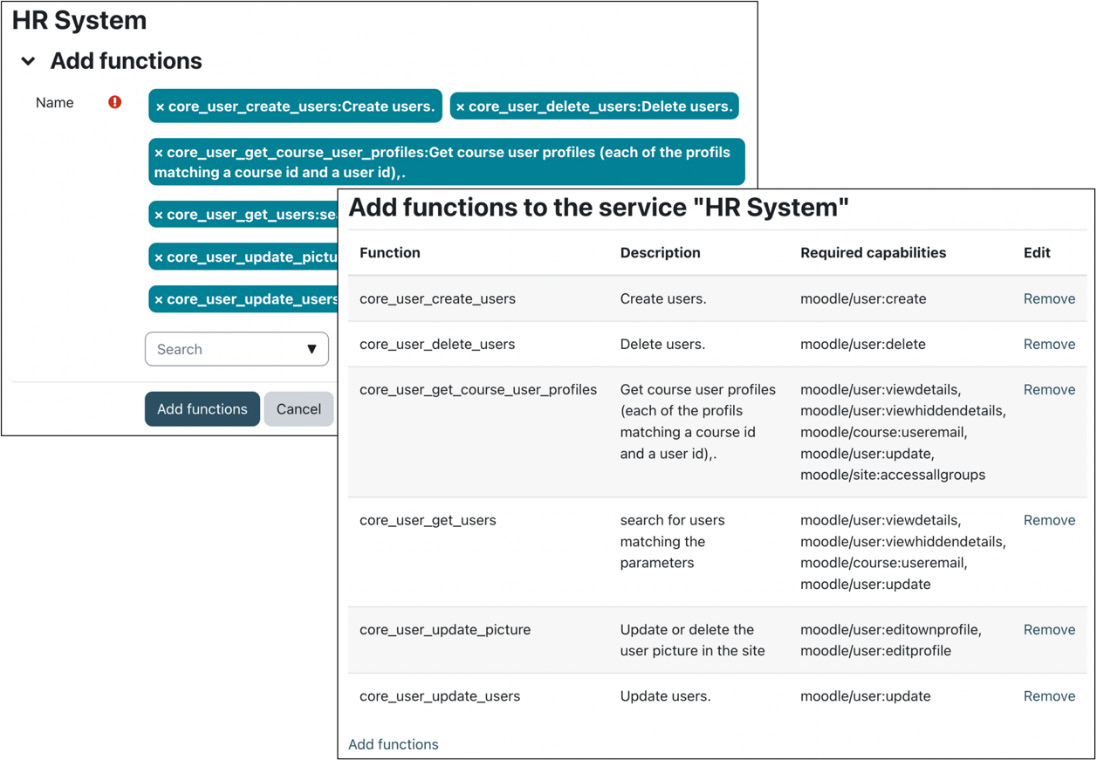
Figure 18.6 – Web services – adding functions
Once you have added the selected functions, you will be shown the required capabilities that a user must have to access the service. Ensure these have been allowed in the role assigned to the web services user.
- Select a specific user
If you selected Authorized users only when creating the preceding service, you must select this user(s), which takes place at Site administration | Server | Web services | External services, where you see a list of all the services that have been set up. Select the Authorized users link, which will guide you to the familiar user selection screen. Select the web services user you created in step 1:
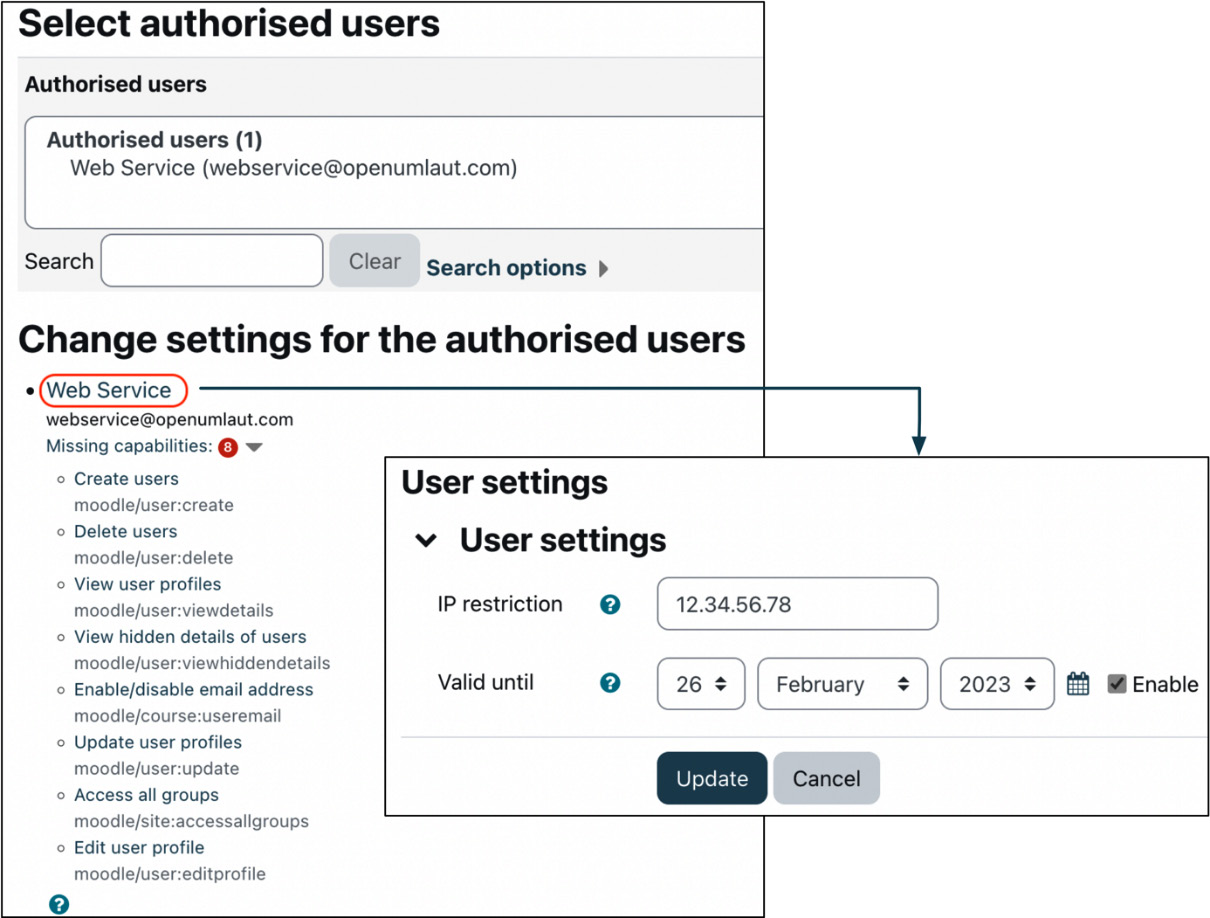
Figure 18.7 – Web services – selecting users
Moodle will check whether the account has sufficient permissions to access the selected functions. If any capabilities are missing, they will be displayed under the user selection screen in the Change settings for the authorized users section. Ensure that you add the listed capabilities to your web service’s permissions. Clicking on a username will allow you to restrict access to an IP address and set an expiry date.
- Create a token for a user
Web services use tokens for security. These are created for each user and can be added by going to Site administration | Server | Web services | Manage tokens. To add a token, select a user (or multiple users), select the service to be accessed, and optionally specify an IP address (or range) and an expiry date, as shown in the following screenshot:
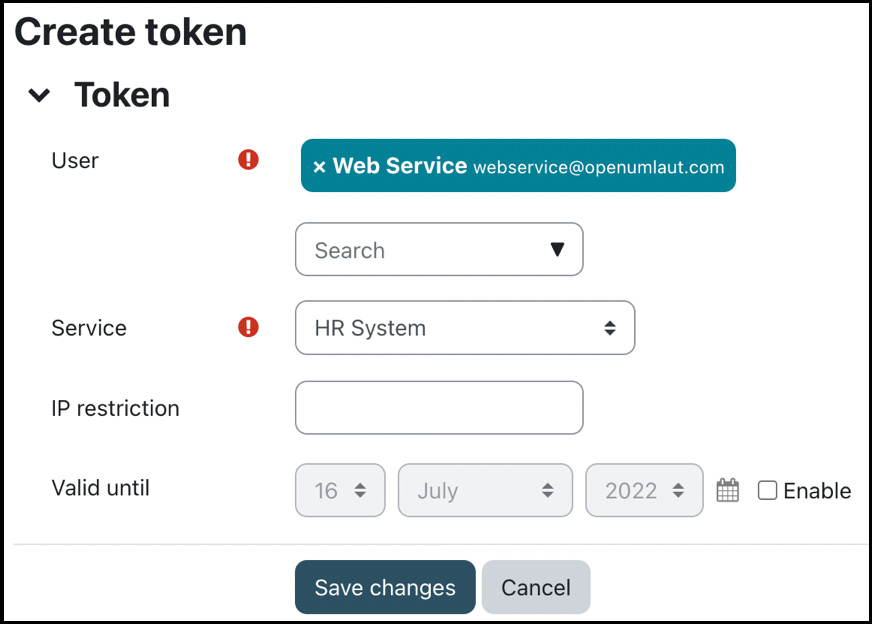
Figure 18.8 – Web services – creating a token
Users can access and reset their web services token by going to Security keys in Preferences if they have the moodle/webservice:createtoken capability.
- Enable developer documentation (optional)
Moodle can be instructed to generate documentation for developers for the selected functions in the selected protocol format. When you set up the protocols (Site administration | Server | Web services | Manage protocols), you must tick the Web services documentation option. Developers can view the documentation as part of their security keys:
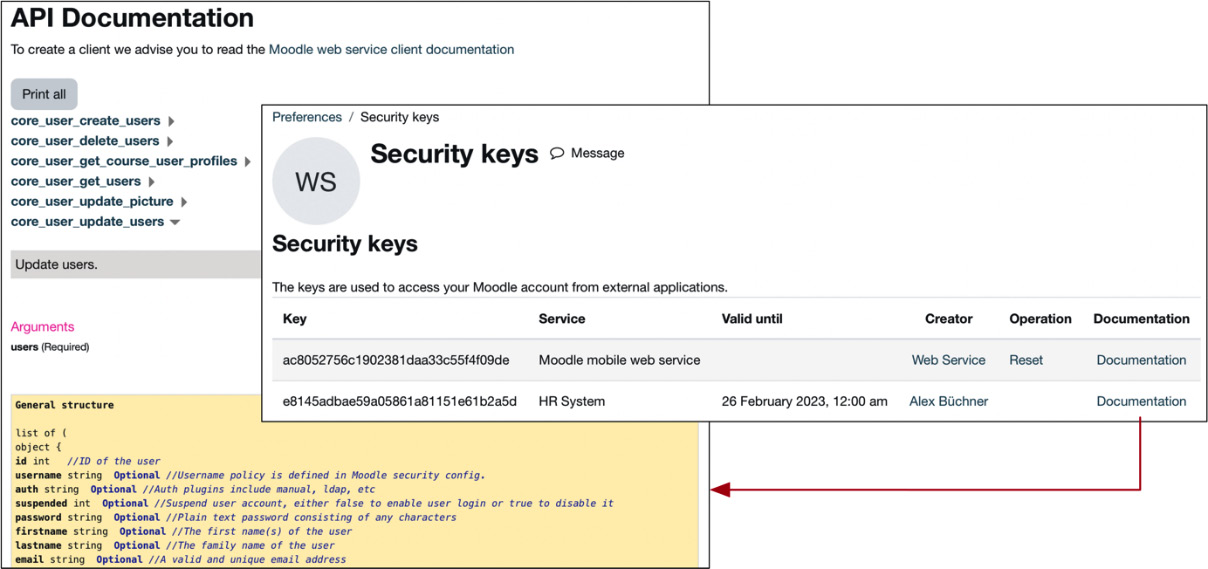
Figure 18.9 – Web services – security keys and API documentation
- Test the service
Once a web service is set up, functions have been selected, and users have been assigned, it is imperative that you test the service to ensure that it works and, more importantly, that the external system has only opened up the required functionality. Web services are tested by navigating to Site administration | Development | Web service test client. Unfortunately, the test client only supports some hardcoded functions, not those you have configured. I quote from the Moodle Docs at docs.moodle.org/en/Web_services_test_client: “The test client is not clever! It lets you choose disabled/unavailable functions (however it behaves well and produces an error in these case). This is normal because clients are going to be bad sometimes so we needed to simulate a bad client!”
Important note
Be careful with executing functions via the test client, as they perform them as though they are executed for real!
First, you have to select the Authentication method (simple for a username and password and token for a security key), Protocol, and Function settings to test. The screen that follows depends on which authentication method has been selected and which function has been chosen. Here, we used token and core_course_create_categories (you have to temporarily add the moodle/category:manage permission to your web service role for this to work):

Figure 18.10 – Web services testing
Once you have filled in the required values and executed the command, you will see a return value in the XML format. If you press the Execute button, your database will be modified, and changes cannot be reverted without manual intervention at the database level. It is also a good practice to try out some functions the web service should not be able to access:

Figure 18.11 – Web services testing
To receive a more meaningful message, change the Debug messages setting by going to Site administration | Development | Debugging and then to DEVELOPER. If the result shown contains a line containing a DEBUGINFO element, an error has occurred. Otherwise, you should check that the function performed what it was supposed to when executed. We executed the operation twice; the first run was successful – that is, the category was created. The second run wasn’t because the category already existed.
Now that we have covered how to configure web services for external applications, let us briefly look at its little brother – enabling token-based access for users.
Enabling web services for users
It is sometimes necessary for users to have to access web services directly instead of applications – for example, a developer who needs to execute test runs against the system. The process is a subset of steps already covered in the previous section and follows the Users as clients with token section on the web services overview screen:
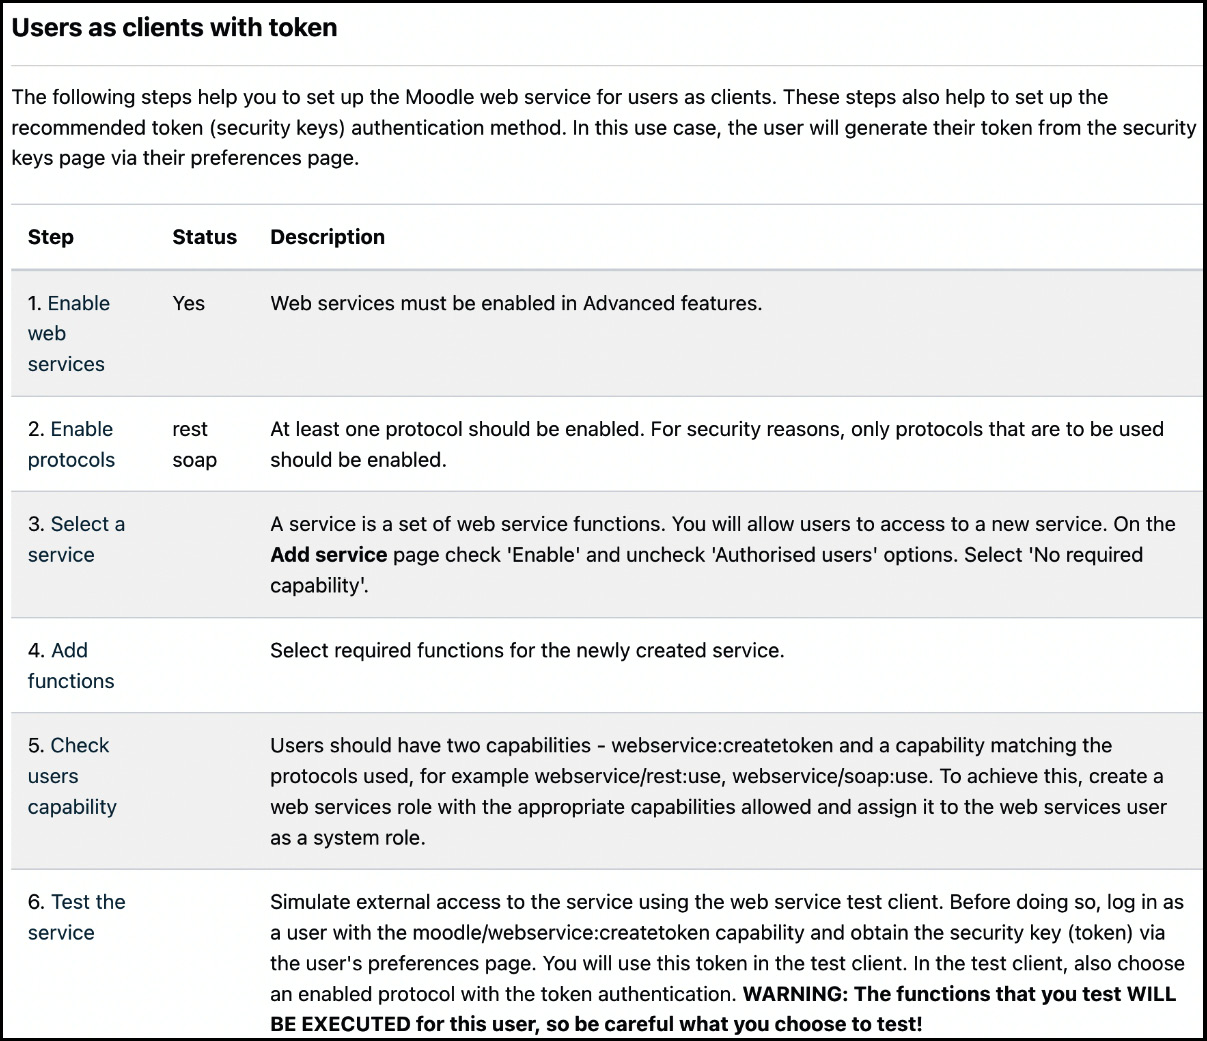
Figure 18.12 – Web services for users as clients with tokens
These steps should be familiar by now; there are only two minor deviations from the previous scenario when web services were allowed for external systems instead of users.
In step 3, the Authorized users option must be unchecked. In addition to the protocol use capabilities, the users must have the moodle/webservice:createtoken capability set to allowed (see step 5).
To test the service (see step 6), log in as the user, obtain a security token for testing, and avoid using the simple authentication method in the web service test client.
Summary
In this chapter, you learned the basics about web services and how they are configured from within Moodle. We covered the two main administrative tasks: setting up web services for external applications and enabling token-based web services for users.
All the processes covered in this chapter are identical in Moodle and Moodle Workplace; the only difference is that Moodle Workplace supports significantly more web service functions.
In the following chapter, we will cover another option for Moodle to communicate with other systems, namely via Moodle networking.