
11
Enabling Mobile Learning
In most organizations, mobile learning is becoming the norm for e-learning and forms a crucial part of curriculum delivery. Mobile learning gives learners more flexibility whenever and wherever learning takes place; it offers self-directed and independent learning, supports on-the-job training, and boosts micro-learning. Mobile devices are typically used for consumption and communication rather than authoring and administration.
Moodle has released an app for iOS and Android that allows users to interact with a Moodle system. The app is most suited for learners and supports key functionality for participants to access course content, receive notifications, upload data, monitor progress, and interact with other users. The app is an alternative to accessing Moodle via a web browser on a smartphone or tablet and has the advantage of being specifically designed for mobile usage, both online and offline.
By the end of this chapter, you will know how to prepare, configure, and customize the Moodle app. This chapter comprises the following main sections:
- Understanding Moodle’s app plans: You will be familiar with the different subscriptions Moodle offers, including the branded mobile app.
- Preparing to use the Moodle app: You will learn about preparatory steps you must take before your learners can use the app. We distinguish between accessing Moodle from mobile browsers and the app. We will then go through the centrally managed settings to enable the app and configure different authentication types. We will also briefly look at installing the app on mobile devices.
- Configuring the Moodle app: We will look through options on how the Moodle app can be configured to provide learners with a suitable mobile learning experience, including mobile features, notifications, and the app policy.
- Customizing the Moodle app’s appearance: You will learn how to adapt the app’s look and feel, which includes changing the login logo, modifying the app’s theme, and configuring app banners.
Understanding Moodle’s app plans
In this section, you will learn about the different app subscriptions offered by Moodle. The choice depends on the features you require, the number of active devices, and, as always, your budget.
Important note
The Moodle iOS and Android apps are free without any in-app purchases or hidden costs.
Moodle offers four plans to support different features and restrictions:
- Free: Basic feature set, almost no customization options, limited to 50 active devices for push notifications per month, up to two offline courses per device, and no branding options.
- Plus: Full feature set, some customization options, limited to 500 active devices for push notifications per month, up to four offline courses per device, and no branding options.
- Premium: Full feature set and customization options, unlimited push notifications and offline courses per device, and basic branding options. Sites on moodlecloud.com and instances hosted by Moodle Partners are on this tier.
- Branded Moodle App: As the name suggests, its main aim is to provide you with an app where the look and feel aligns with your corporate brand. However, on top of supporting your organization’s visual identity, the branded app comes with several additional advantages:
- A separate entry in the Apple and Google Play app stores.
- A static URL site is embedded in the app, so there is no need for your users to enter the URL of your Moodle instance when they use the app for the first time.
- Separate hosting space is provided, and advanced privacy is ensured in Moodle’s General Data Protection Regulation (GDPR)-compliant push notifications infrastructure.
- Tracks mobile engagement analytics to better understand behaviors and improve your mobile-friendly learning experience. It also gets insights into how learners use your app with personalized access to mobile engagement data.
The branded app is a subscription service provided by Moodle. Contact your local Premium Moodle Partner or check out moodle.com/app for more details.
You will find a full feature comparison table with up-to-date prices at apps.moodle.com.
To find out about your site’s plan, navigate to Site administration | General | Mobile app | Mobile app subscription. Here are screenshots from a Free and a Premium plan, also listing all features, except the ones for the branded app:
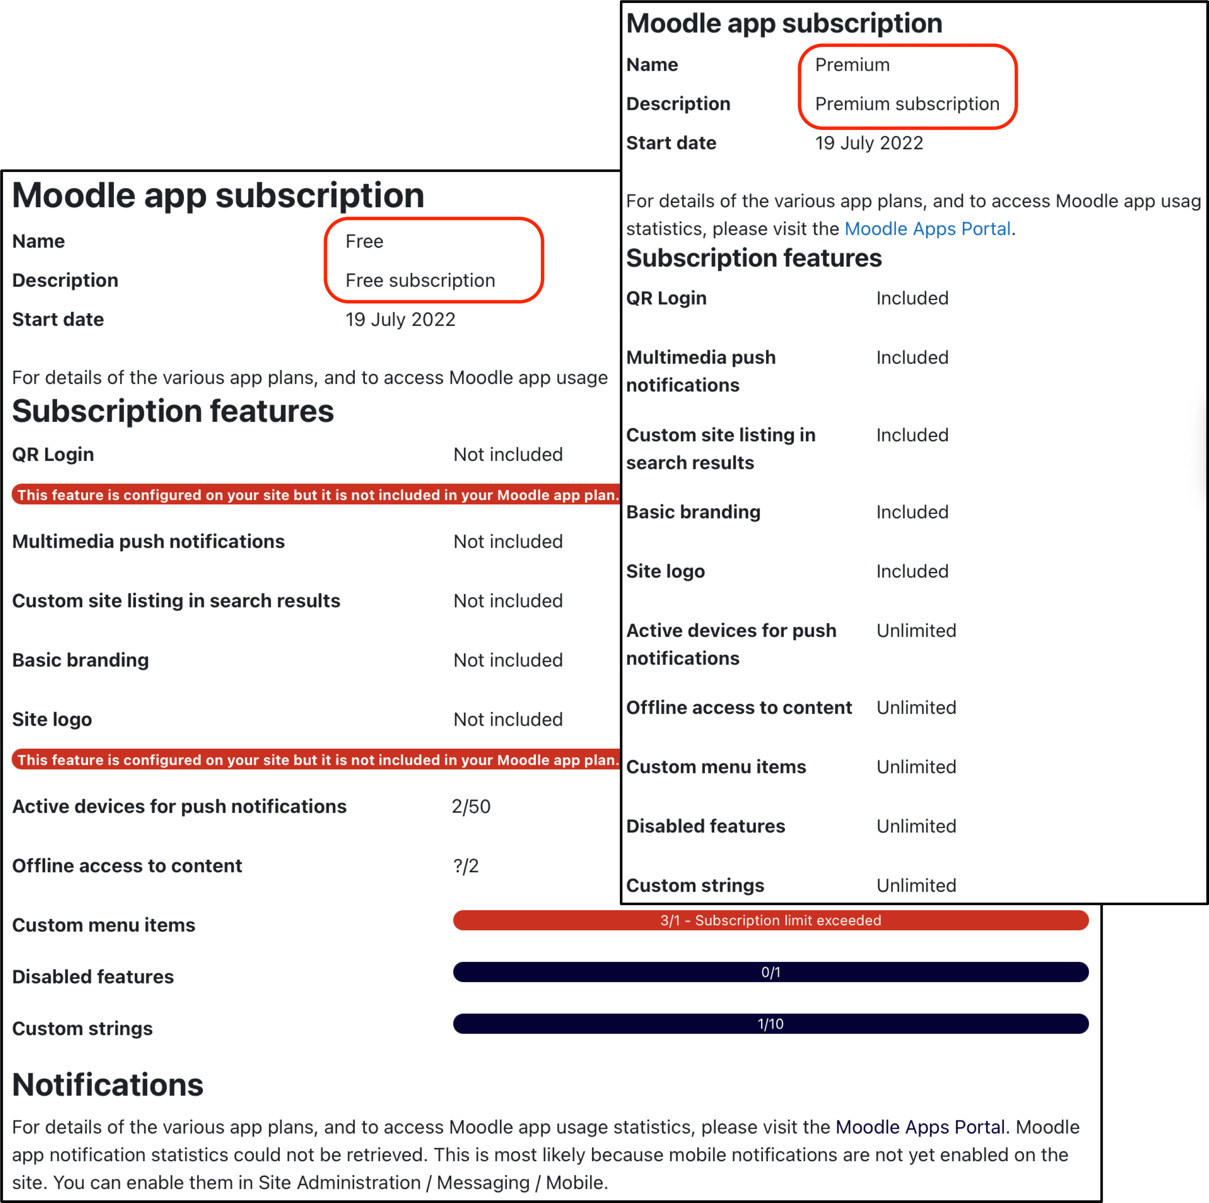
Figure 11.1 – Moodle app plans
We will describe the features of the Premium plan in this chapter as they cover all customizations that administrators can carry out. Before we start, some preparatory steps must be undertaken, as explained in the following section.
Preparing to use the Moodle app
Before users can access learning content, cooperate with others, or monitor progress from a mobile device, there are several things to consider. First, a decision must be made on accessing the LMS, either from a mobile web browser or a dedicated app. This chapter focuses on the mobile app, which has to be enabled centrally. Second, users must download and install the app before the first login. And third, users must authenticate via the mobile app. This section will cover all of these items, starting with a short introduction about ways to access the Moodle app from a mobile device.
Accessing Moodle from mobile devices
Generally, there are two ways that learners can access Moodle via a mobile device—directly via a web browser on a cell phone or a tablet, or via Moodle’s app for iOS and Android.
The web browser view is effectively the same as we have seen throughout the book, only it is optimized via responsive design for smaller screen sizes. There are three main arguments relating to using Moodle via a mobile browser—users have the same functionality available as on a desktop device, the handling is identical, and users won’t have to install an extra app on their mobile device.
The Moodle app provides an alternative view of the same data, and interactions have been optimized for mobile usage. Furthermore, offline usage and synchronization are supported, indicated by a little cloud symbol. Another advantage of the mobile app over the browser view is the support of push notifications, which we have all become accustomed to.
The following two screenshots show the difference between the two usage types when accessing the same dashboard, with the browser view on the left and the app view on the right:
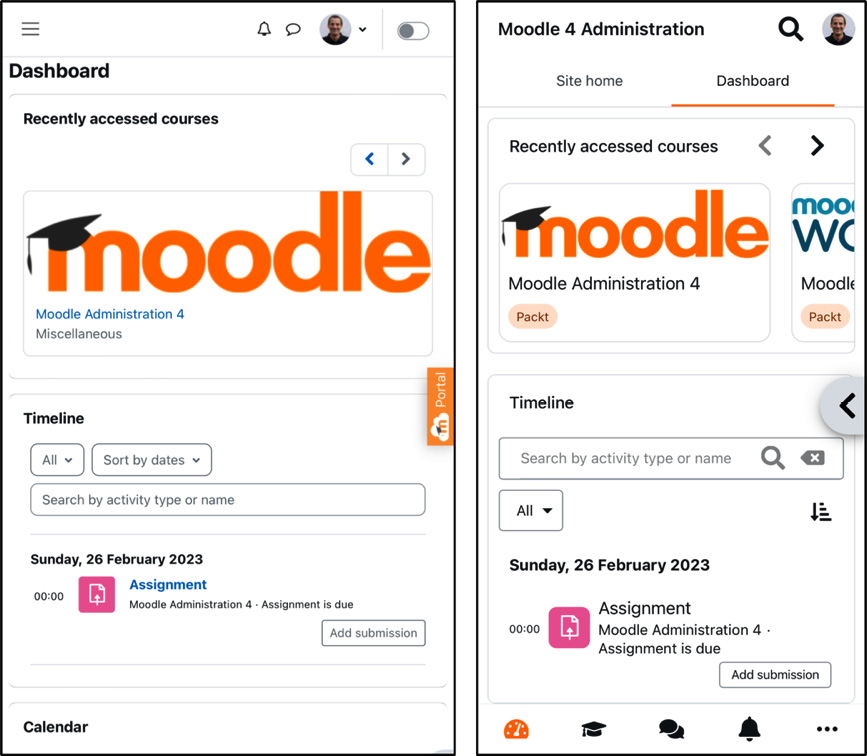
Figure 11.2 – Browser view versus app view
The following diagram shows a simplified process of what happens when Moodle is accessed from a mobile device (details for web browser access are at the top, and for app access at the bottom):
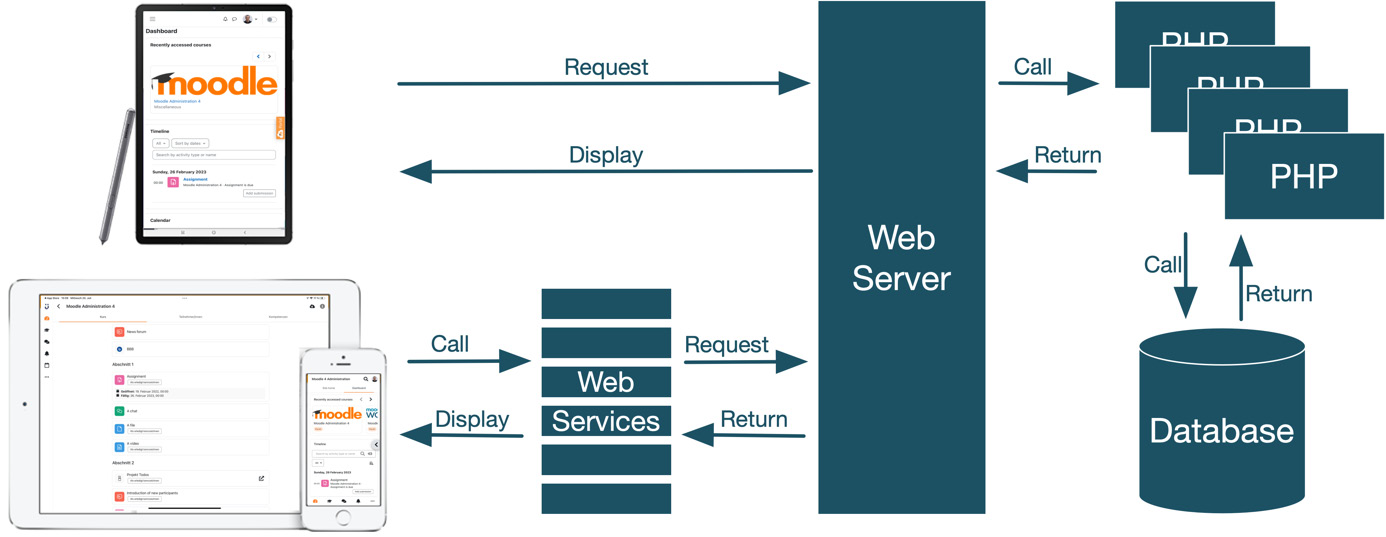
Figure 11.3 – Accessing Moodle via the browser and the app
Let’s go through the preceding diagram from left to right and back again. When a user makes requests via the web interface, the browser passes the request to the web server, which calls the responsible PHP module. The PHP module calls the database with an action (a query, update, insert, or delete operation), which returns the requested data. Based on this information, the PHP module returns data (usually in HTML or JavaScript) to the web server, which passes the information to be displayed back to the user’s browser.
When accessing a Moodle instance via the app, the process is precisely the same except for the first step, which involves calling web services requesting data from the web server. The same applies to the returning information, which is also passed through web services. Web services are the standard communication protocol between web and mobile applications. You will find more information on this topic in Chapter 18, Integrating External Systems Using Web Services.
We will be exclusively focusing on the Moodle app in this chapter. Before your learners can use the app, however, the following prerequisites must be fulfilled:
- App usage must be enabled on your site
- Users must download and install the app on their mobile devices
- Users must authenticate via the app
We will run through all three steps, starting with the app’s enablement.
Enabling the app
The process of enabling the Moodle app to interact with your Moodle site has been greatly simplified. Go to Site administration | General | Advanced features and tick the Enable web services for mobile devices option, which also activates the Enable web services setting on the same page if it isn’t already ticked:

Figure 11.4 – Enabling the Moodle app
That’s it. No other steps are required. Well, almost. You should also enable the Mobile notification option, which you can find under Site administration | General | Messaging | Notification settings. We will cover the settings of the mobile notifications plugin later in the app configuration section.
Important note
It is highly recommended that you enable HTTPS with a valid certificate. The Moodle app will always try to use a secured connection first.
Now that the app usage has been enabled, let’s look at how your users can install the app on their snazzy mobile devices.
Installing the Moodle app
Your learners must download and install the app from Apple’s App Store or Google Play. There is no charge for the app. Screenshots of both apps on the Apple App Store (on a tablet) and Google Play (on a phone) are shown as follows:
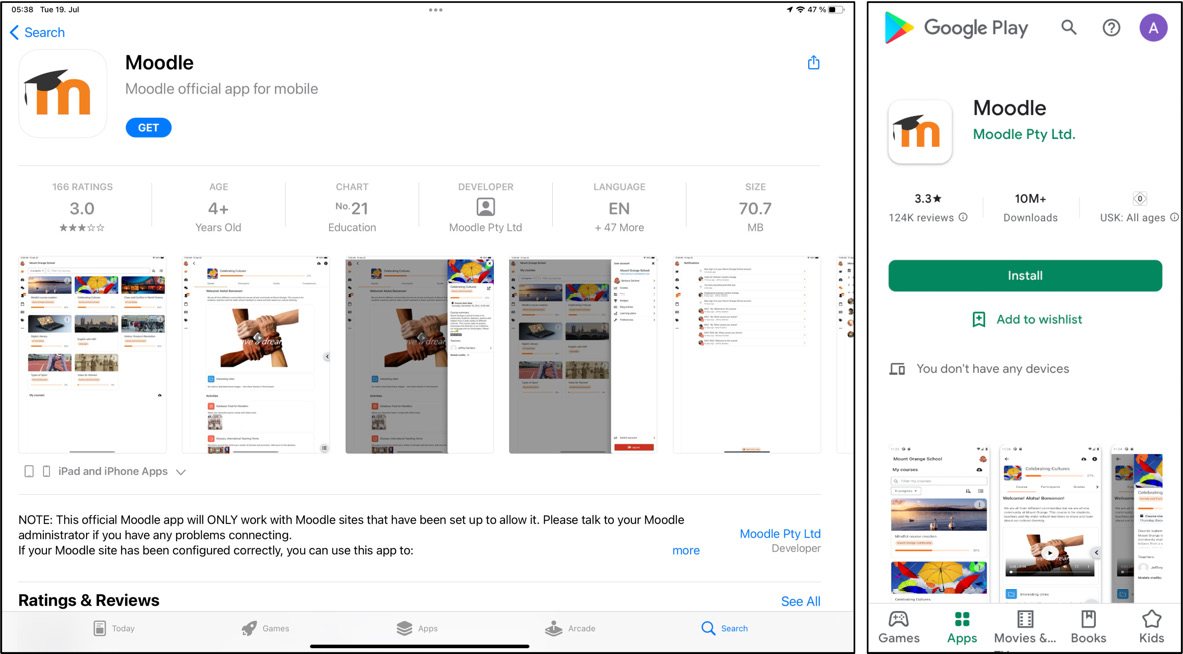
Figure 11.5 – The Moodle app for iOS and Android
To install the app, users need to follow the usual steps on their mobile devices (starting with GET on iOS and Install on Android).
Note there is also a Moodle Workplace app, which is based on the official Moodle app. It has the same functionality plus some extra features to cater for Workplace-specific features such as programs and teams.
Important note
The Moodle app only works with Moodle. The Moodle Workplace app only works with Moodle Workplace.
Don’t be discouraged by negative reviews since almost all poor feedback comes from users who expected the app to work standalone without access to an existing Moodle system. This misunderstanding leads nicely to the next enablement step—accessing your Moodle system via the app and authentication.
Authenticating on the Moodle app
Once the app has been installed and launched for the first time, each user must authenticate with the Moodle instance. Moodle supports three different login types, which have to be selected by the administrator at Site administration | General | Mobile App | Mobile authentication, as in the following screenshot:
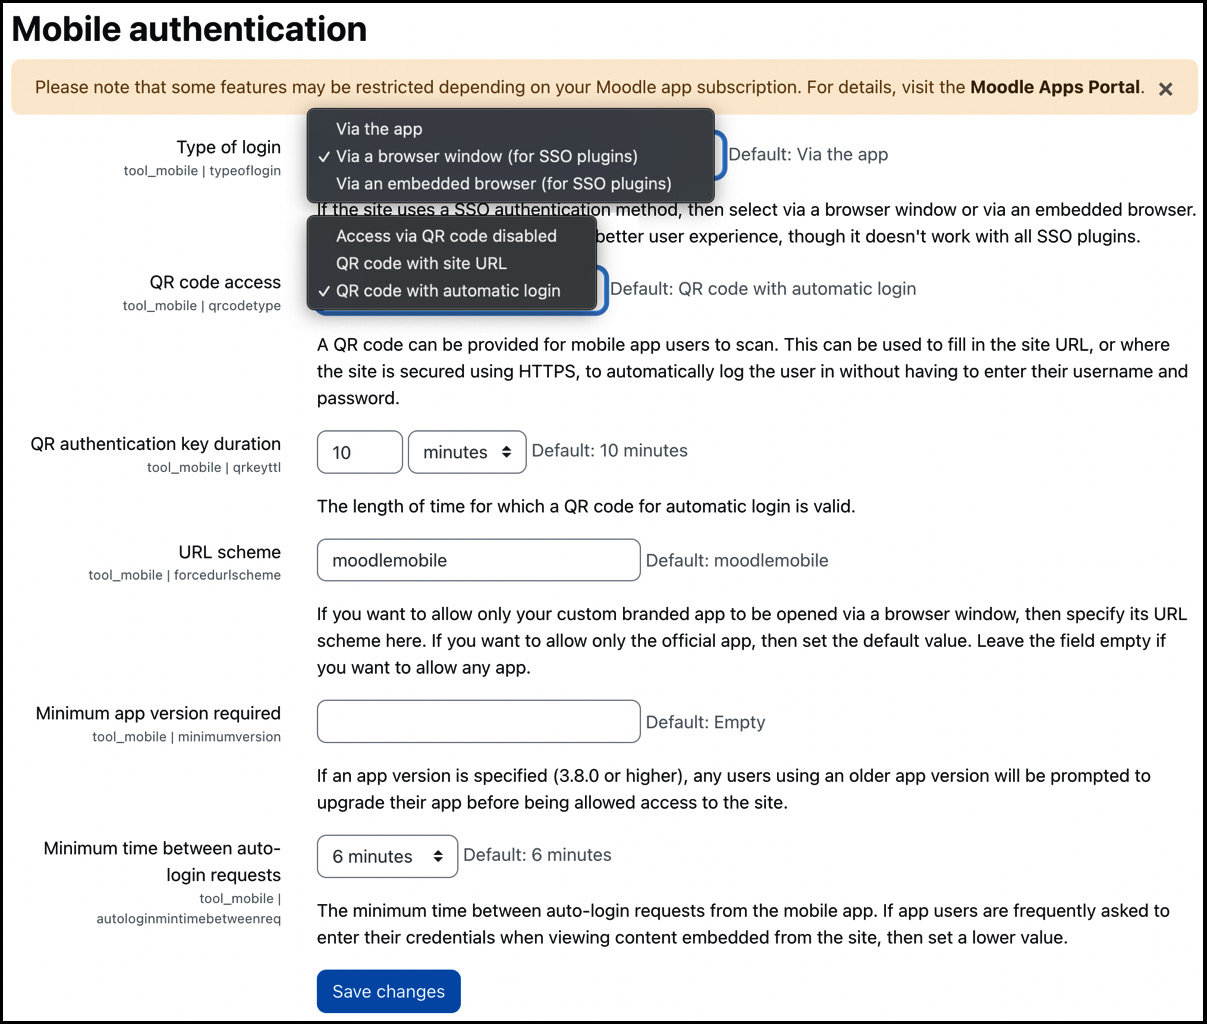
Figure 11.6 – Authentication types
The Type of login field provides the following three options:
- Via the app (default): This is the default authentication mechanism that applies to all manual accounts.
- Via a browser window (for SSO plugins): If your site uses an SSO authentication method, such as Microsoft Active Directory (MS-AD), Lightweight Directory Access Protocol (LDAP), or Open Authorization (OAuth), this mechanism opens a separate browser window where the login credentials have to be provided.
- Via an embedded browser (for SSO plugins): This is effectively the same as the previous option but provides a better user experience. However, not all authentication plugins will work in an embedded browser—for instance, when JavaScript popups are required.
QR code access is an alternative way to let users access the site by scanning the matrix barcode. QR login is unavailable on the free plan. This mode can be configured with a site URL (users must enter their credentials) or via automatic login. The QR authentication key duration parameter determines how long the QR shown in the user profile is valid. If the QR authentication same as IP check setting is ticked, users are forced to use the same network to generate and scan a QR code for login. This added security measure should remain enabled unless users report problems:
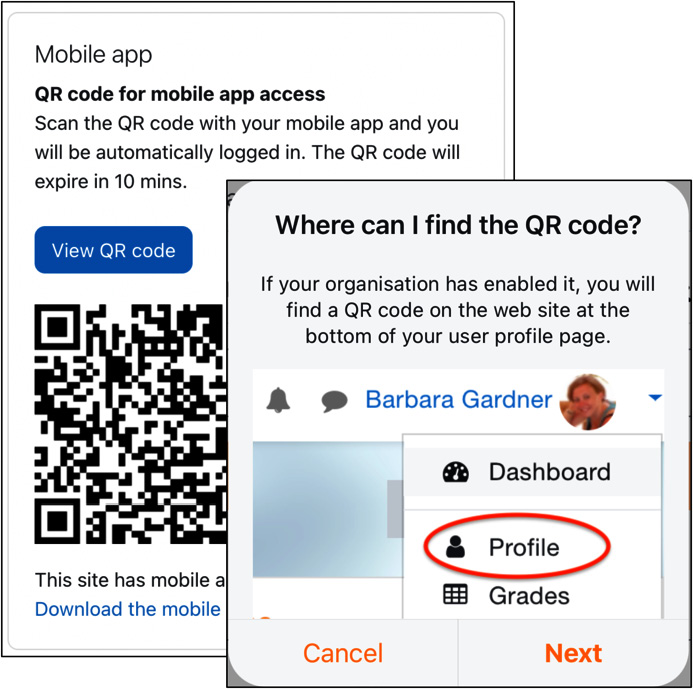
Figure 11.7 – QR login
If your organization uses a custom branded app and the Type of login field is set to one of the two SSO types, then the URL scheme option may be set. This will result in only the custom-branded app working for the site, whereas the official Moodle app will not work.
The Minimum app version required option can usually be left empty and should only be set if you want or need to force users to update to an up-to-date version of the Moodle app.
The Minimum time between auto-login requests parameter lets you specify a threshold for creating an auto-login key for the current user. The security measure will nag users with their login credentials if this threshold is set too high.
The three different login types will show up for users differently, as shown in the following sequence of screenshots:
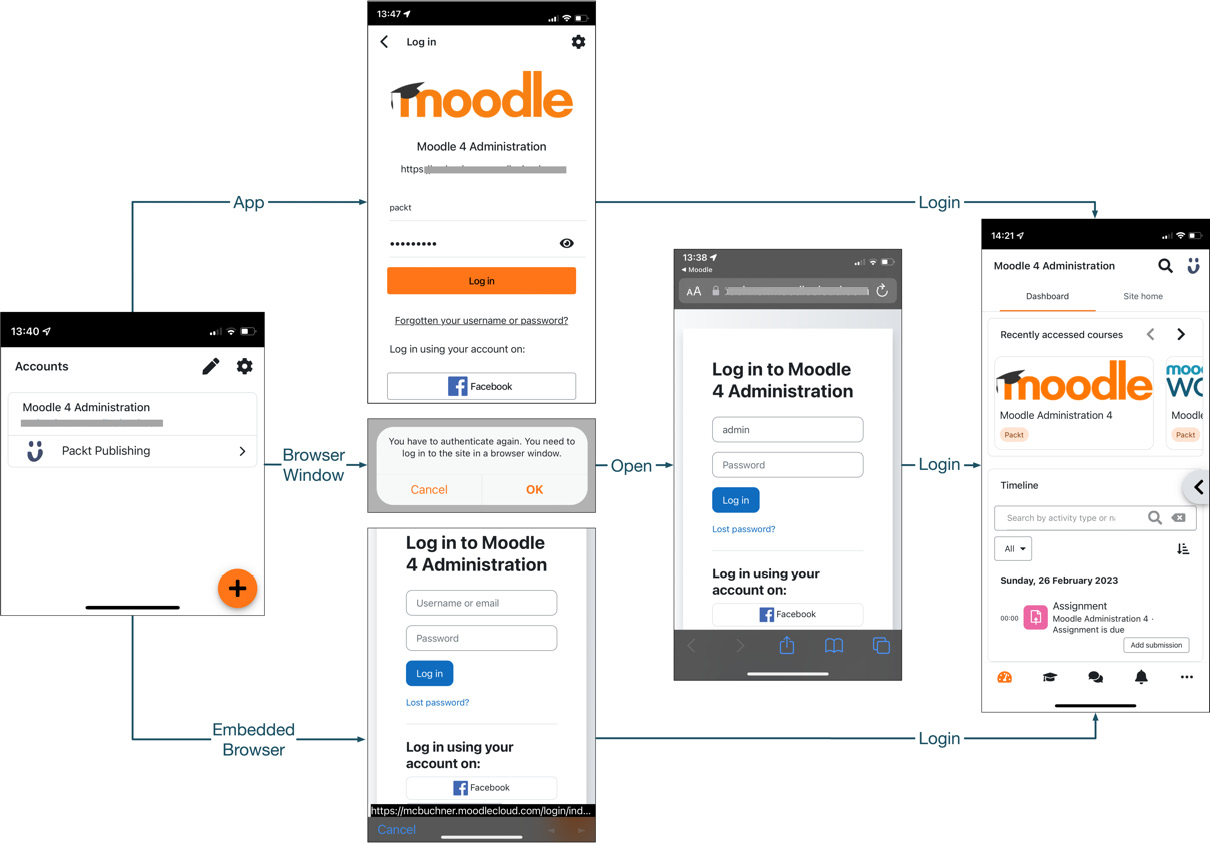
Figure 11.8 – Different mobile login types and authentication
During the initial launch, the URL must be entered; on subsequent launches, this will be pre-filled. The same applies to the login credentials unless the administrator has selected the Forced log out setting in Site administration | General | Mobile App | Mobile features. No URL has to be entered on the branded app since it is hardcoded.
Logging in via the app displays a login window as part of the app. When logging in via a browser, a notification will be displayed telling the user that the default browser on the mobile device will be opened before the redirection takes place. Once the credentials have been entered, Moodle redirects the user back to the app. The embedded browser view looks the same, but no external browser will be opened.
This concludes the section on the preparatory steps you must take before the Moodle app can be used. We first discussed two options for accessing your Moodle system from a mobile device before focusing on the mobile app for iOS and Android. Next, we enabled the app and configured authentication. We also briefly covered the installation of the app on users’ devices. Now that these steps have been completed, we will customize the app from within Moodle.
Configuring the Moodle app
The beauty of the Moodle app is that it can be customized “from the outside”—that is, by configuration only. In this chapter, you will learn how to tailor the app to your learners’ needs. The three main areas of customization are as follows:
- Mobile features
- Mobile notifications
- Mobile app policy
It is also possible to extend the mobile app’s functionality via development, which is beyond the scope of this book since programming skills are needed. More details can be found at docs.moodle.org/dev/Mobile_support_for_plugins. Let’s get started with the mobile app features.
Configuring mobile features
The Moodle app lets you customize some basic features under Site administration | General | Mobile App | Mobile features, as shown in the following screenshot:
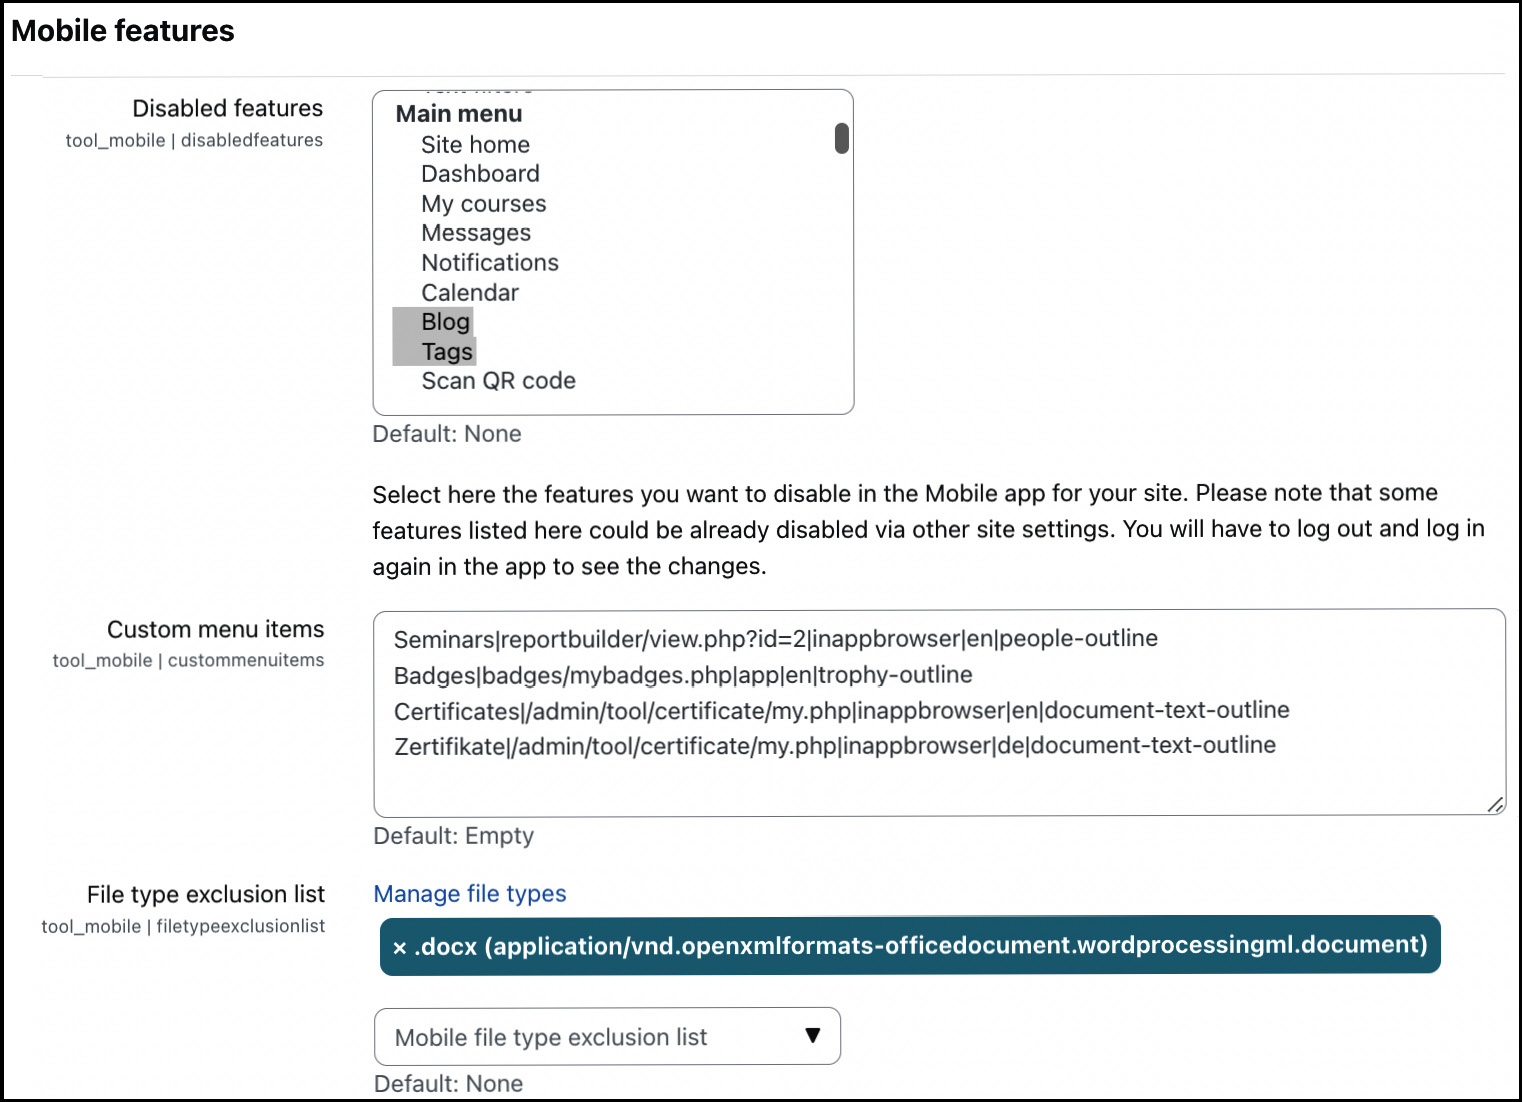
Figure 11.9 – Mobile features
The Disabled features list lets you remove features from the mobile app. It is recommended that you hide any features that are not being used to reduce the app’s complexity and improve your learners’ learning experience.
The opposite of removing features is adding items to the app’s main menu. These items have to be specified with Custom menu items. The format of each entry is as follows (all entries have to be separated by the pipe symbol):
item text|link|opening method|[language code]|[icon]
item text is the label that will appear in the app. The link parameter sets the URL that the user will be directed to. The app supports four different opening methods:
- app: For linking to items supported by the app. For instance, the link to Badges is supported since badges can also be accessed via the user’s profile.
- inappbrowser: For opening the link in a browser without leaving the app.
- browser: For opening the link in the device default browser outside the app.
- embedded: For displaying the link in an iframe on a new page on the app (no scrolling possible).
The optional language field only displays the item to users of the specified language. The link to certificates has also been provided in our sample in German.
The optional icon field is the name of an icon from ionicons.com.
The following is a screenshot from the Moodle app, where the site blog and tags have been removed, and the three custom menu items have been added. The before-and-after screenshots demonstrate the impact of custom menu changes:
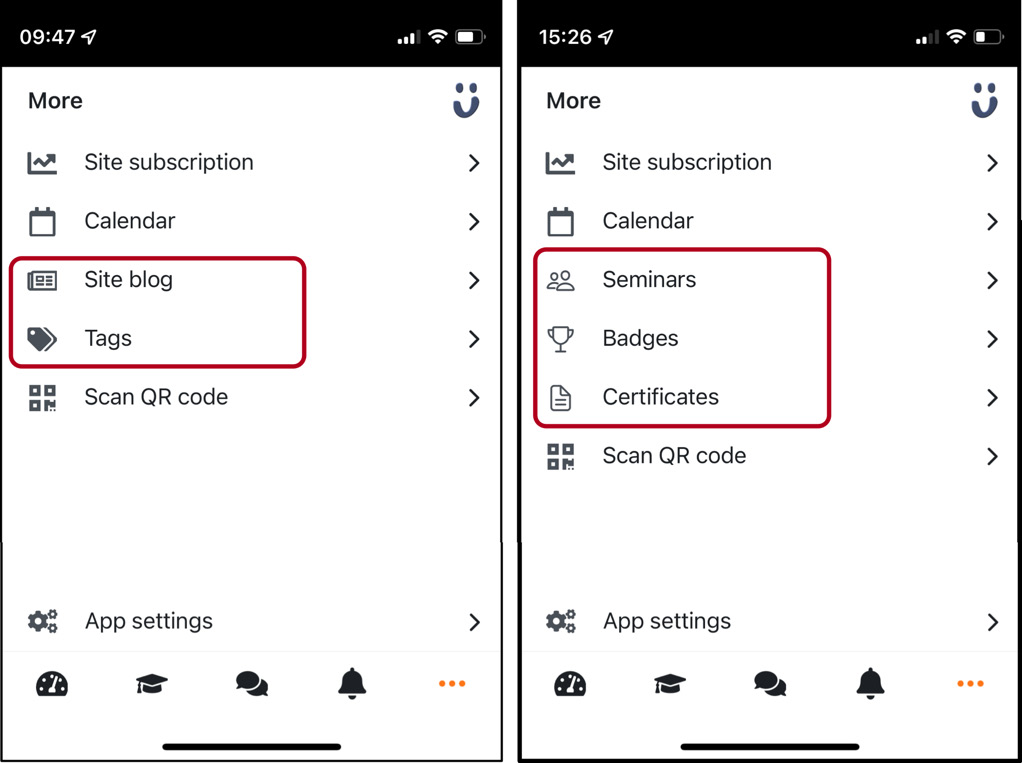
Figure 11.10 – Mobile custom menus
The File exclusion list setting lets you specify for which files a warning should be displayed if learners attempt to open them from within a course.
The app’s standard terminology is aimed at educational establishments, which might not suit your setting. The Custom language strings setting lets you modify strings used in the app. For instance, you might want to change the term student to learner or course to module, as in the following screenshot:

Figure 11.11 – Custom language strings
Words and phrases displayed in the app can be customized by adding a separate line for each entry using the following notation:
string identifier|custom string|language code
A complete list of string identifiers can be found under the Custom language strings section at docs.moodle.org/en/Moodle_app_guide_for_admins. custom string is the replacement text for the language set via the language code.
Ensure you sync the app to apply the configured changes (Site administration | Menu | App settings | Synchronization).
We already mentioned the built-in push notifications mechanism that should be activated, which we will cover in the following subsection.
Configuring mobile notifications
The Moodle app supports push notifications for both mobile platforms. We already enabled mobile notifications in Site administration | General | Messaging | Notification settings when we activated the app in the first section. To configure mobile notifications, navigate to the form shown in the following screenshot via Site administration | General | Messaging | Mobile:
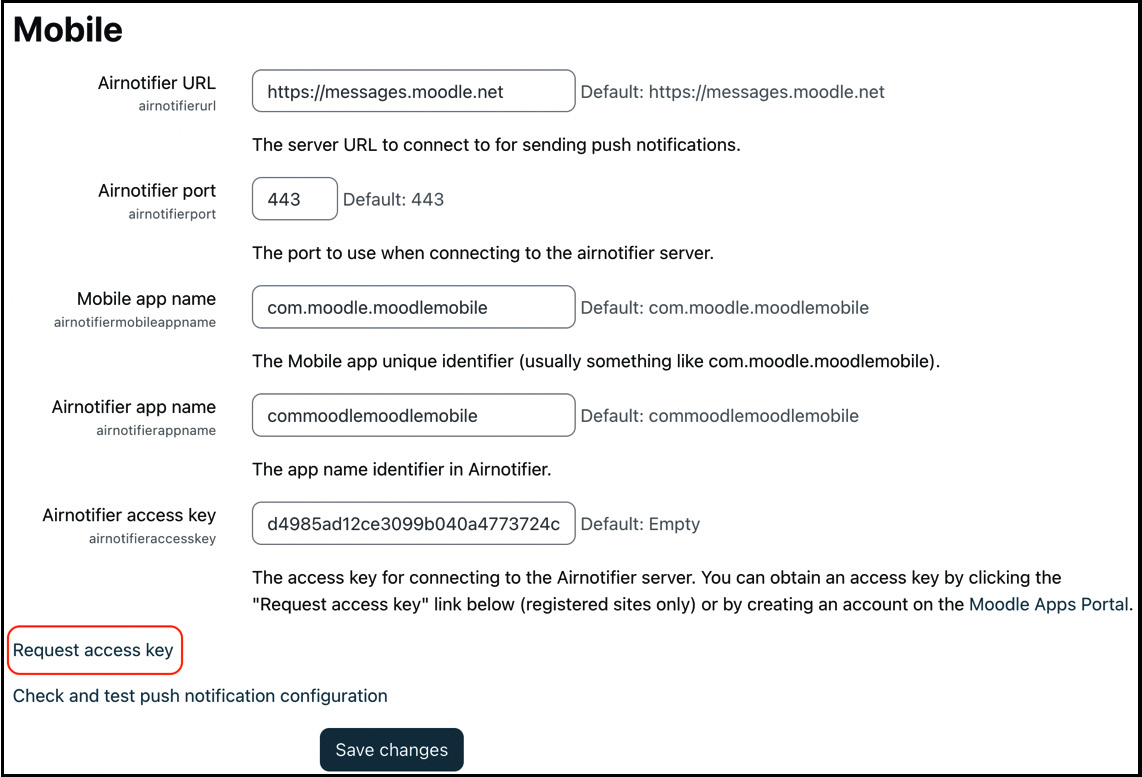
Figure 11.12 – Mobile messaging settings
The default values connect to the public Moodle messaging server. All you need to do is click on Request access key (the link at the bottom), which requires your site to be registered on the Moodle app portal at apps.moodle.com.
Select the Check and test push notification configuration link to test your mobile messaging configuration. You will see a checklist indicating the statuses of all required steps, like the one in the following screenshot:
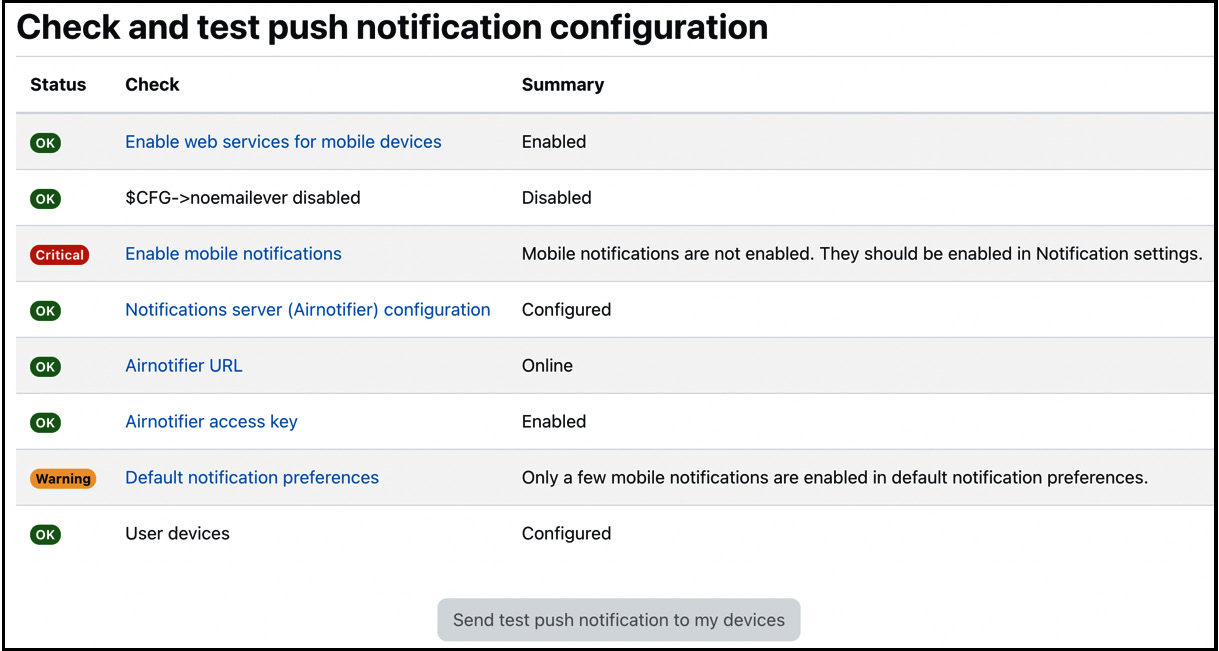
Figure 11.13 – Mobile messaging check and test push notification
There are eight items on the checklist:
- Enable web services for mobile devices: We already did this at the start of the section
- $CFG->noemailever disabled: The configuration setting to disable sending any notifications and messages mustn’t be enabled
- Enable mobile notifications: We enabled these at the start of the section; on my system, they were only turned off during configuration
- Notifications server (Airnotifier) configuration: We just went through its configuration
- Airnotifier URL: Indication of whether the messaging server is live or not
- Airnotifier access key: Again, we just requested this
- Default notification preferences: We dealt with those in the Messaging subsection in Chapter 10, Configuring Technical Features, where you can enable and lock all or some notification types in the Mobile channel
- User devices: At least one user must have logged in to your site from a mobile device
Once there are no critical statuses, you can send a test push notification to the devices that connect to the site, as illustrated in the following screenshot. Ensure that your devices are connected to the internet and that the mobile app is not open since push notifications are usually only displayed when received in the background:

Figure 11.14 – Push notification test
The following is a schematic overview of how push notifications work. Apple Push Notification service (APNS) and Google Cloud Messaging are the respective gateways for relaying push notifications on iOS and Android devices:
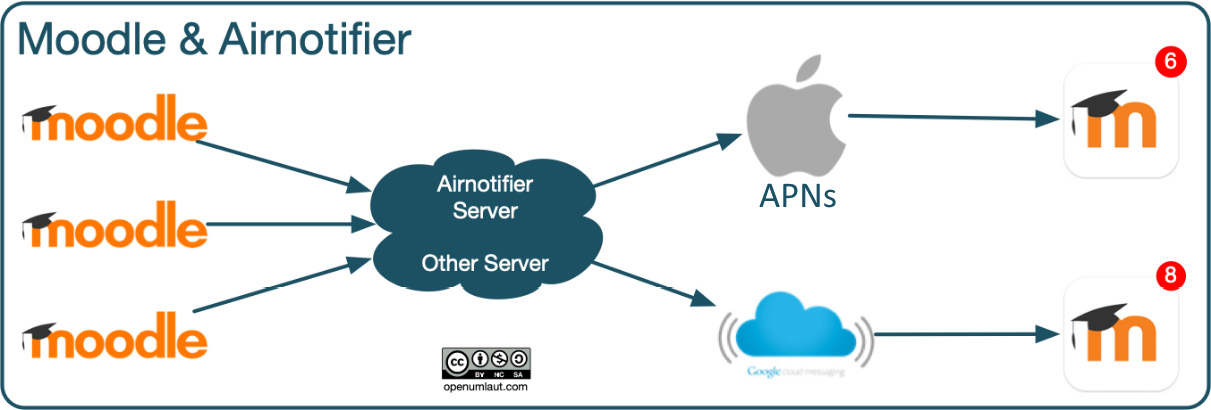
Figure 11.15 – Moodle app notifications via Airnotifier
Moodle’s messaging server is a public Airnotifier system and, therefore, carries a (small) degree of risk. This approach will not be acceptable for some privacy-conscious organizations, so it is possible to set up your own notification infrastructure, which involves setting up a local Airnotifier server. You will find instructions on how to do this and links to related resources at docs.moodle.org/en/Moodle_app_notifications.
Whether you use a public or a local notification server, you should let your users know which data the messaging facility transfers, which should be part of your mobile app policy, covered in the following subsection.
Configuring the mobile app policy
When a user logs in for the first time, any specified site policies must be consented to. The same applies when a new version of a site policy has been released. This data protection feature works the same on the web version and in the app of Moodle. For more details on data privacy, refer to Chapter 14, Complying with Data Protection Regulations.
In Site administration | General | Mobile app | Mobile settings, you configure what the user will see when navigating to the About page in the app. If the App policy URL field is left empty (default), the main site policy will be shown; if set, as in the following screenshot, the specified page will be listed:
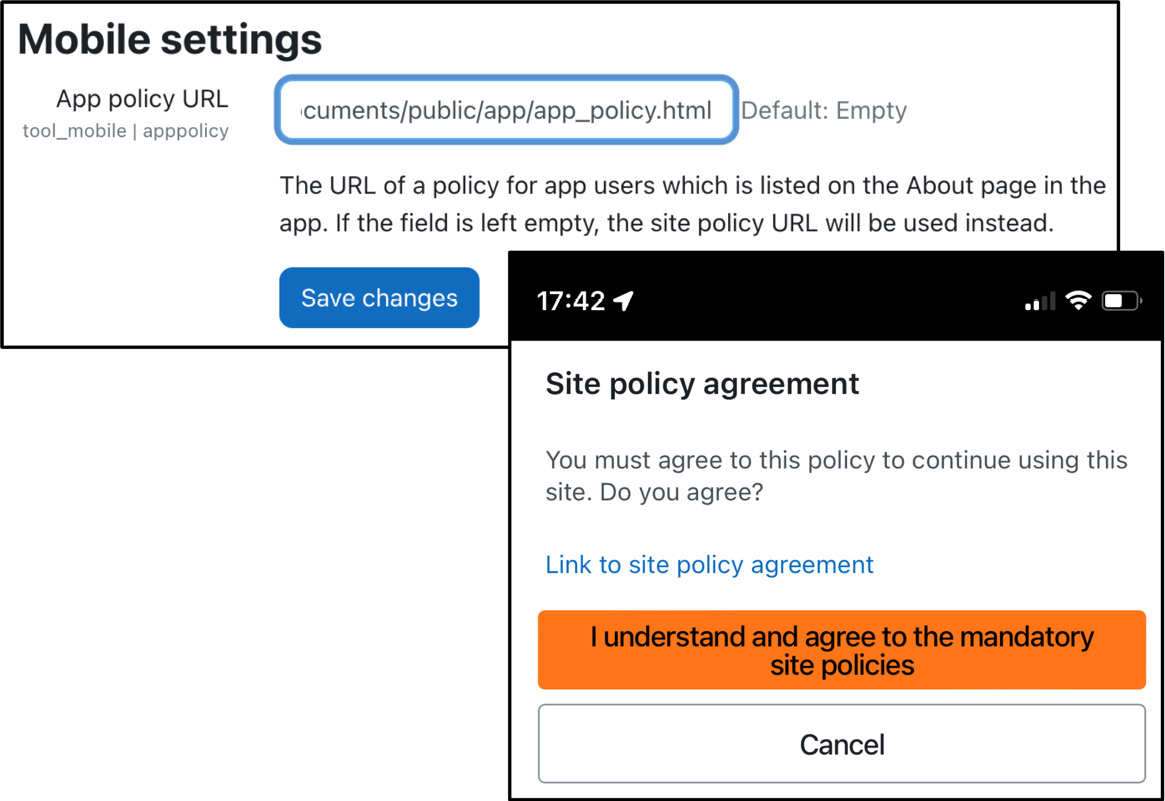
Figure 11.16 – Moodle app policy
This concludes the section on customizing the Moodle app, which dealt with various mobile features, setting up mobile notifications, and configuring the mobile app policy.
Next up is the customization of the app’s look and feel.
Customizing the Moodle app’s appearance
Most organizations use the app as is, but some wish to change the app’s look and feel. The beauty of the Moodle app is that its appearance can also be adapted from the outside—that is, from Moodle itself. The following three aspects can be adjusted:
- The app’s login logo
- The app’s look and feel via remote themes
- The app banner behavior when accessing the site via a mobile browser
Changing the app’s login logo
The app’s login screen displays the standard Moodle logo. If the site’s logo has been configured at Site administration | Appearance | Logos, it will be shown on the user’s login screen. To compare the two versions, check out the following screenshots:
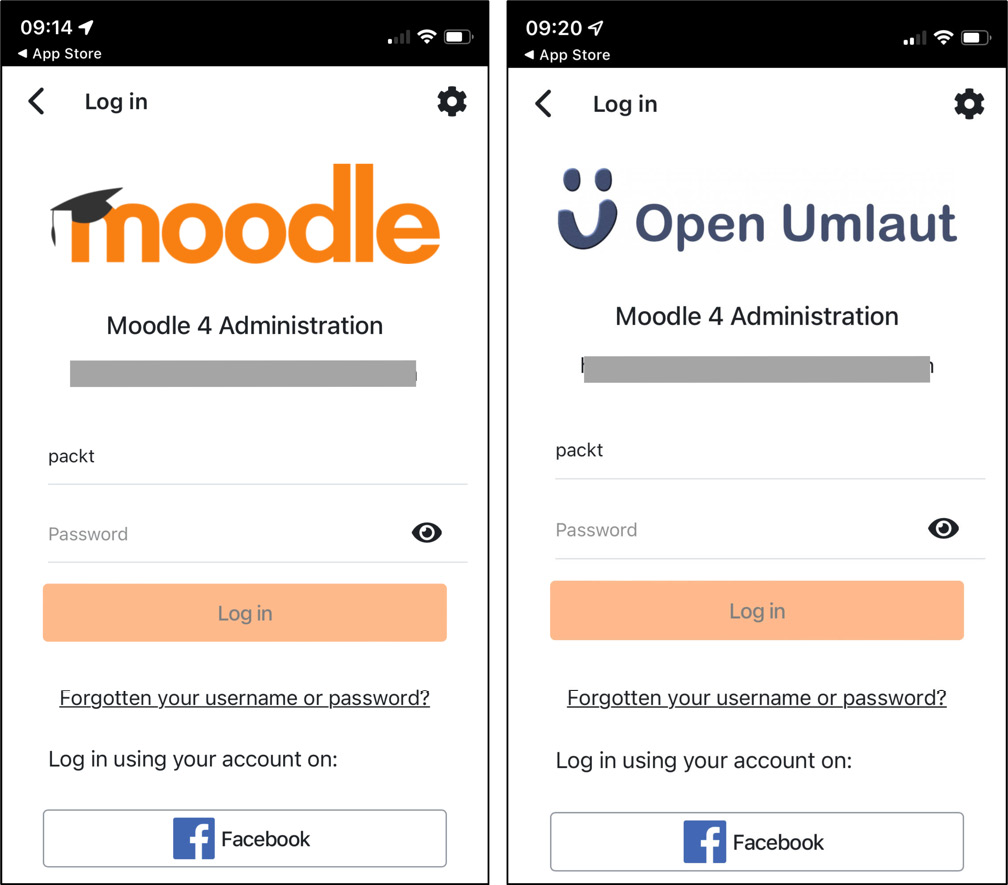
Figure 11.17 – Moodle app login logo (standard and custom)
Bear in mind that this feature is only available on the Pro and Premium app plans, respectively.
Changing the app’s look and feel via remote themes
The app makes use of remote themes; that is, the styles are specified elsewhere—in Moodle itself—and loaded dynamically to each mobile device.
A single CSS file must be provided at Site administration | General | Mobile app | Mobile appearance, which overrides the styles from the default theme; your new CSS file should contain the styles you wish to modify. Once the CSS file has been created, load it to a location where it can be accessed from your Moodle server. This can either be a public URL or locally in your Moodle instance, ideally in your custom theme or inside a local plugin. In the following screenshot, a new packt.css file has been created and uploaded to our theme folder:
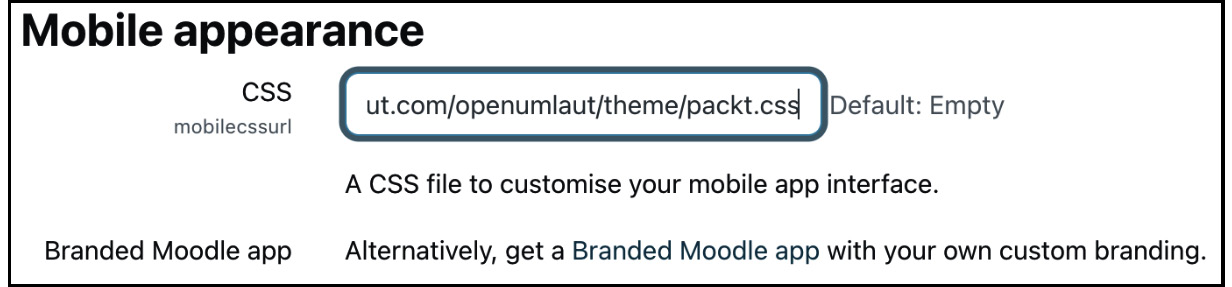
Figure 11.18 – Mobile appearance
Here is a sample CSS file that only changes a single style to modify the app toolbar’s background color to orange:
/* Change toolbar background color to orange */
.toolbar-background
{
  background: orange;
}
How do you know which elements to style in your mobile CSS file? For basic customization, check out moodledev.io/general/app/customisation/remote-themes, where some common customizations are described. For more serious app theme development, you will need to create an environment where you can run the app in a browser—for instance, Chromium. Using the browser’s developer tools allows you to inspect the HTML and identify styles you wish to change.
Important note
You must clear the cache and restart the app to apply new styles.
As with the custom CSS for the browser version of Moodle, there is virtually no limit to what can be done in the mobile CSS. To tweak your app further, you’d best involve an experienced Moodle designer or a Premium Moodle Partner.
Configuring app banners
App banners let users know that a dedicated mobile app is available when accessing the site using a mobile browser. In the following screenshot, you can see two app banners for the Moodle iOS app—the one on the left is displayed when the app has not yet been installed; the one on the right is displayed when the app has been installed:

Figure 11.19 – App banners in action
App banners are disabled by default. To activate them, tick the Enable app banners checkbox at Site administration | General | Mobile app | Mobile appearance. Bear in mind that currently in iOS, app banners are only shown in the Safari web browser. App banners for Android devices are only displayed on the Chrome browser when the app is not installed and when the conditions for its engagement heuristic have been met.
If you are using a branded mobile app, you need to provide a unique identifier for the iOS and Android app; if you are using the Moodle app, the settings may be left at their defaults, as shown in the following screenshot:
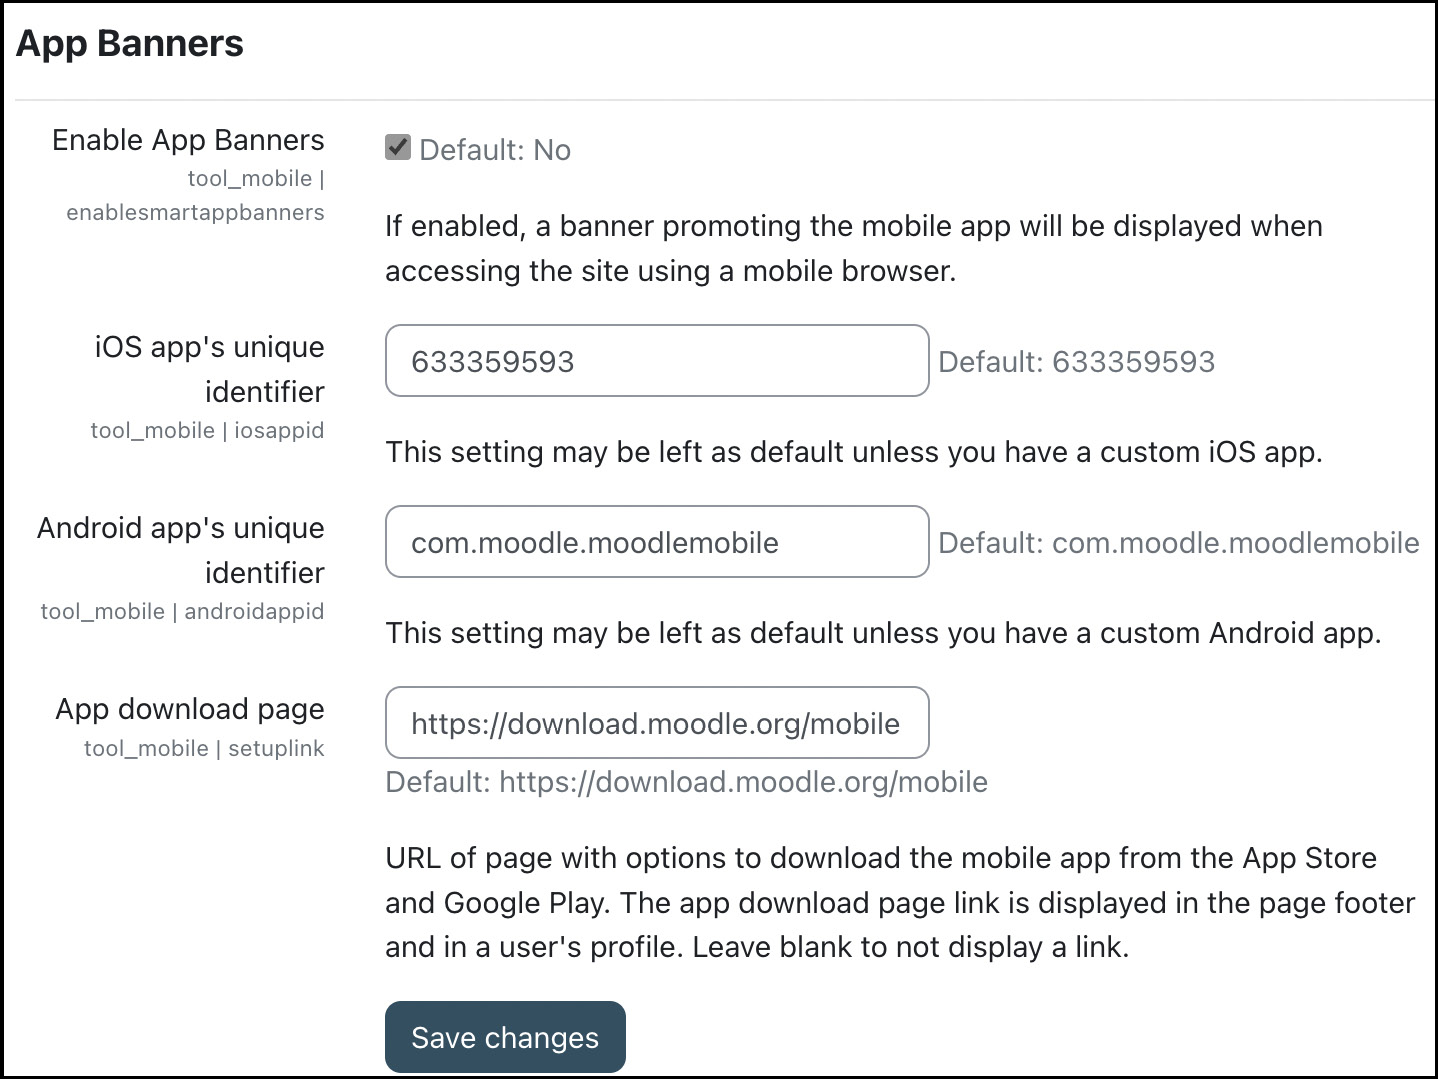
Figure 11.20 – App banners configuration
The last setting in the App Banners section is labeled App download page and indicates the URL displayed in the page footer and the user’s profile. Creating a dedicated page on your website that links to your app’s iOS and Android downloads is highly recommended if you have a branded Moodle app.
This concludes the section on customizing the app’s look and feel, which covered the login logo, remote themes, and app banners.
Summary
This chapter taught you how to prepare, configure, and customize the Moodle app.
First, we familiarized ourselves with the different subscription plans Moodle offers, including the branded mobile app.
Next, we went through the required preparatory steps before your learners can use the app. We reviewed the settings to enable the app and configured different authentication types. We also briefly looked at installing the app on mobile devices.
Then, we configured the app to provide learners with a suitable mobile learning experience, which included mobile features, notifications, and the app policy.
Last, we customized the app’s appearance, adapting the app’s look and feel by changing the login logo, modifying the app’s theme, and configuring app banners.
The paid app version has significantly more features than the free version, so it is well worth budgeting for the annual fee if your organization encourages mobile learning. If e-learning is a central part of your learning culture, you might consider the branded app. Another feature of the deluxe version is the provision of usage statistics, which brings us to the next chapter’s topic: reporting and analytics.