
4
Managing Courses and Enrolments
Moodle stores learning resources and activities in courses, which is the topic of this chapter, which has been divided into two main parts: course management and course enrolments.
In the first part of this chapter, you will learn about the following aspects of managing courses and course categories:
- Organizing courses into categories and subcategories
- Creating and managing courses
- Adding custom course fields
- Dealing with course requests
- Managing courses in bulk
In the second part of the chapter, we will cover different ways of enrolling users in courses. The enrolment mechanisms that will be covered are the following:
- Internal enrolment (manual, self, and guest)
- Cohort enrolment and synchronization
- Database-driven enrolment (LDAP, external databases, flat files, and IMS Enterprise files)
- Meta courses
- Payment-driven enrolment (payment accounts and gateways, such as PayPal)
The following diagram shows a high-level overview of how the mentioned topics (courses, categories, and enrolment methods) are connected:
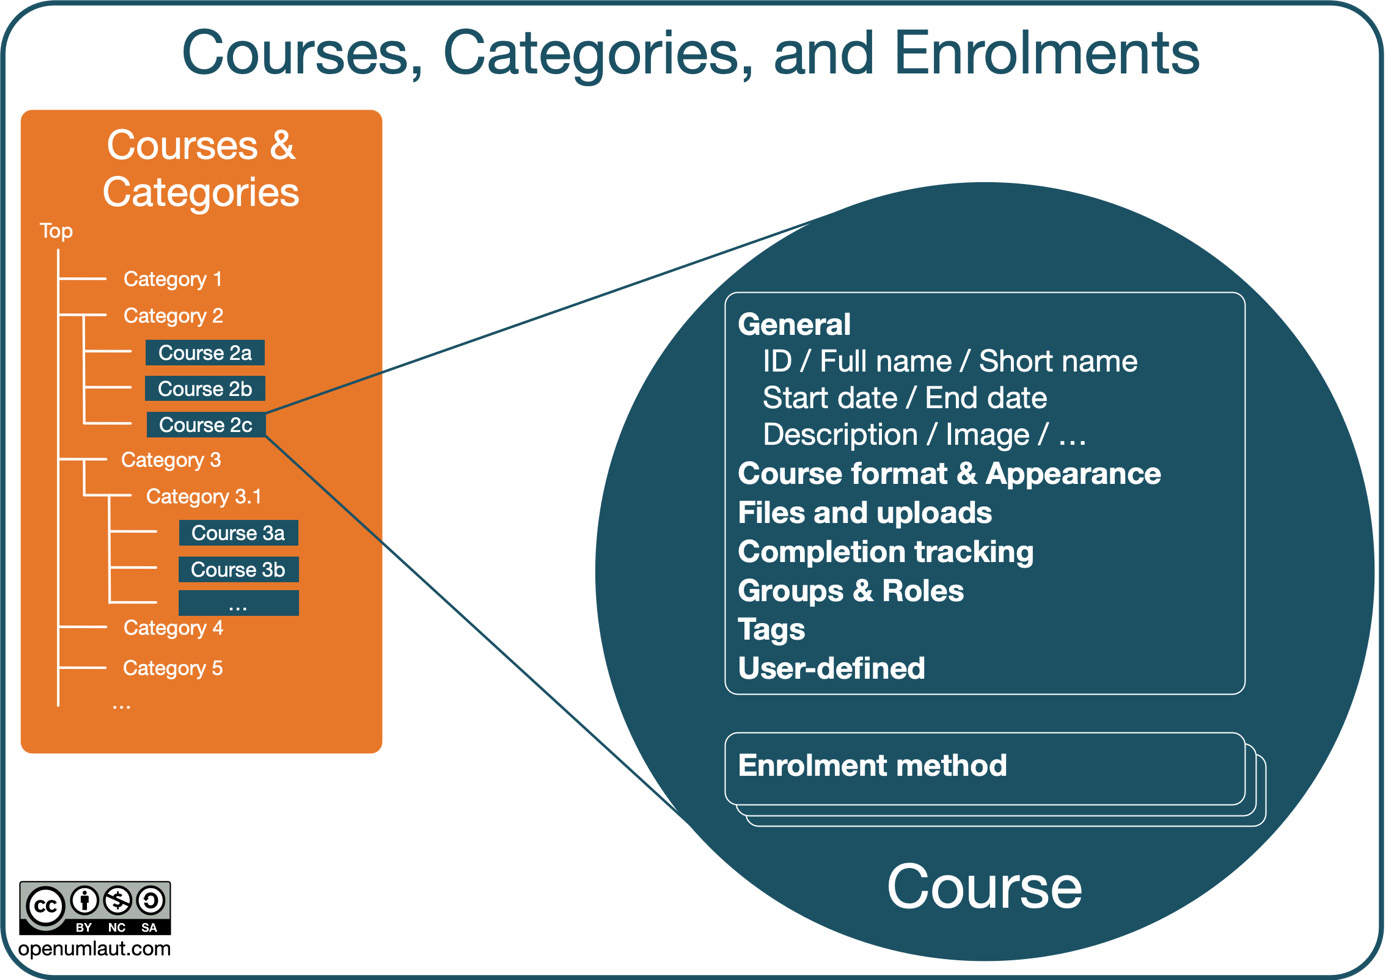
Figure 4.1 – Courses, categories, and enrolments – a high-level overview
By the end of this chapter, you will know everything about the management of courses and categories. Furthermore, you will be able to select and configure the correct enrolment method(s) for the Moodle system in your organization.
Let’s get going with course management in general and course categories in particular.
Organizing courses into categories
The role of the Moodle administrator is to manage categories and courses. This section provides an overview of course categories and introduces a running example before introducing all aspects of category management: creation, arrangement, and removal.
Providing an overview of course categories
In the previous chapter, we briefly introduced the concept of categories, which act as containers for courses. They can have subcategories, which can further have sub-subcategories, and so on.
There are different ways of organizing course and category hierarchies – for instance, by department, subject area, or semester. The following figure shows two different category hierarchies representing the same organization:
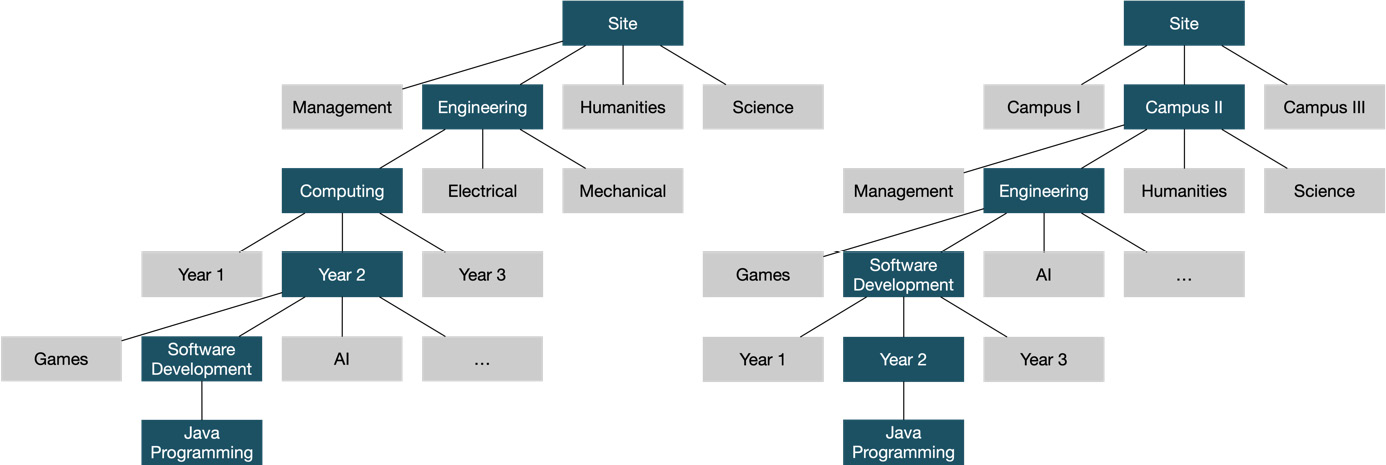
Figure 4.2 – Example category hierarchies
As you can see, each hierarchy represents the same information but in different forms. There is no right or wrong way to organize your categories and courses. The structure depends on the following parameters:
- The size of your organization
- The number of courses you offer
- The type of courses you run
- The frequency of course commencement (once a term, once a year, roll-on/roll-off, etc.)
It is highly advisable to get the structure right the first time around, as changing it is time-consuming and potentially confusing for the users. Also, try to plan ahead, thinking about whether the structure will work in the future – for example, when changing from one academic year to another (see also Chapter 16, Avoiding Sleepless Nights – Moodle Backup and Restore, where we look at end-of-year procedures).
As mentioned before, different organizations apply different categorization approaches. Some examples of the category levels are as follows:
- Campus | Department/School | Year | Subject
- Year of entry | Topic | Subject
- Customer | Subject | Proficiency level
- Trainer | Module
- Course repository | Topic
Sometimes, deep levels of categories can be off-putting, as their management is cumbersome. However, remember that only you, as the administrator, will see the entire category structure. The students and teachers will usually only see the courses that they are enrolled in or to which they are assigned unless they browse the full course index.
Important note
Developing a suitable naming convention for courses and categories is highly recommended – it simplifies maintenance and reduces unnecessary complexity.
If you require a complete separation of organizational divisions, for instance, customers or self-contained business entities in an enterprise, course categories are usually not a suitable tool. Instead, you might want to consider Moodle Workplace, which supports multi-tenancy, including entirely isolated entities with their own look and feel, structure, users, and learning spaces (see Chapter 20, Supporting Multi-Tenancy, for details). More information on Moodle Workplace can be found at moodle.com/solutions/workplace or in the title Corporate Learning with Moodle Workplace by Packt Publishing.
Now that we have shown the flexibility and versatility of category hierarchies, creating and managing your course categories is the next step.
Managing course categories
Once you have planned your category hierarchy structure, it is time to represent the organization in Moodle. Categories are administered in Site administration | Courses | Manage courses and categories, as shown in the following screenshot:
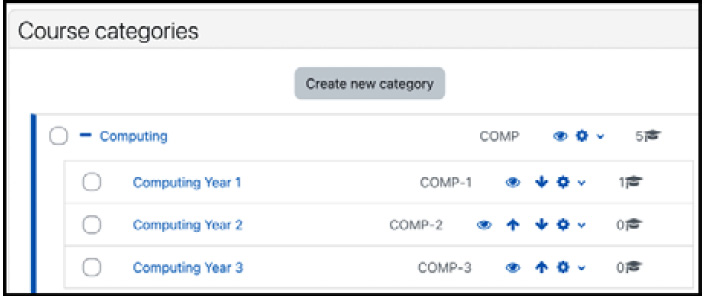
Figure 4.3 – Course categories
Initially, Moodle contains a single category called Category 1. The preceding screenshot shows that the default category has been renamed to Computing and three subcategories for years one to three have already been created.
In addition to the Course categories part of the screen, there are up to two more parts: one shows the list of Courses of the selected category, and one displays Course details once a course has been selected. This arrangement is depicted in the following diagram:
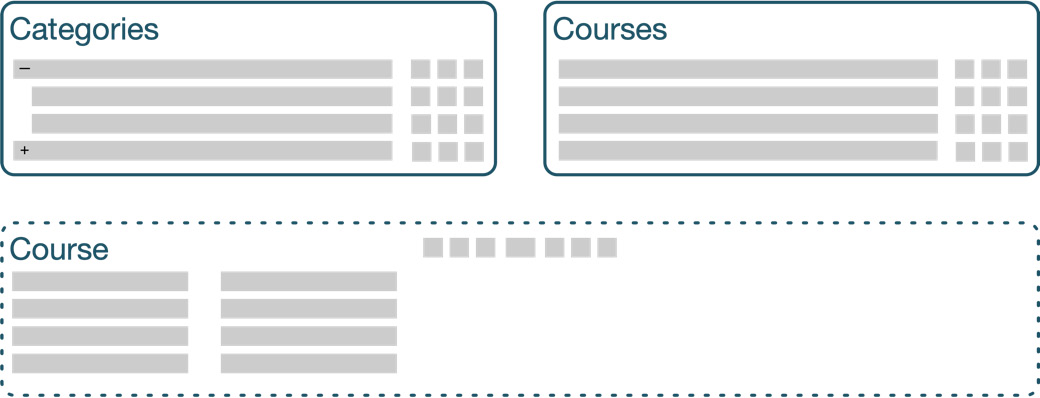
Figure 4.4 – Managing courses and categories
All three parts will be shown underneath each other on very narrow screens (tablets or smartphones). You can switch between the three views via the Viewing dropdown and show Course categories and courses (default), only Course categories, or only Courses:
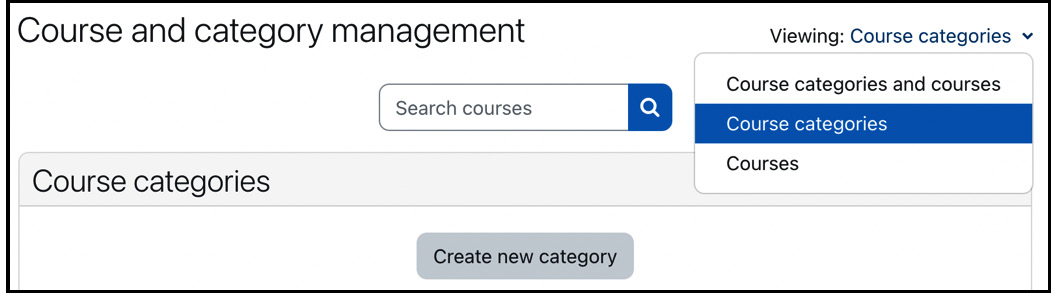
Figure 4.5 – Managing courses and categories
Now that you are familiar with the category management interface, let’s add our first course category to your Moodle site.
Adding course categories
Click on the Create new category button or go directly to Site administration | Courses | Add a category and enter a new name in the Category name field to add a new category. The Parent category drop-down menu indicates the course’s location in the hierarchy. We will leave this set to Top and come back to it shortly. It is good practice to provide the optional Category ID number and Description information; the former is used when automating certain tasks, such as user uploads, while the latter is, for example, shown in the course index:
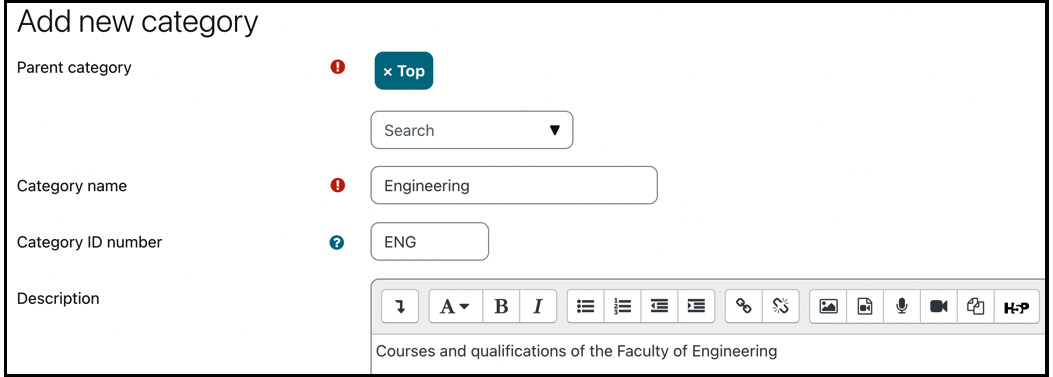
Figure 4.6 – Adding a course category
Next up is the creation of course subcategories to create a category hierarchy.
Creating course subcategories
As mentioned earlier, to improve the organization of courses, Moodle allows the creation of subcategories. You can create a subcategory by choosing an existing category and then selecting Create new subcategory from the drop-down menu in the options or adding a new category (as shown in the preceding screenshot) and moving it into a parent category using the drop-down menus on the Course categories page. For example, create the Computing Year 1, Computing Year 2, and Computing Year 3 subcategories in Computing, and then move them into Computing using the drop-down menu. Alternatively, you can select the correct parent category when creating the subcategory.
So far, we have created categories and subcategories. Now, let’s look at how to rearrange categories in case you need to modify your hierarchy.
Organizing courses and categories
The logical arrangement of categories has three main purposes:
- The category hierarchy or the order of categories is displayed on various pages in Moodle – for example, when you need to specify the category to which a course has to be restored.
- Access permissions can be granted to a category and all its subcategories – for instance, all users from the Math department have access to the Math category.
- Easier maintenance of the category structure. This only applies to the site admins and category administrators.
There are two operations to (re-)organize categories: sorting and moving.
Let’s start with moving categories around. The easiest way to change the position of categories is by using the standard up and down arrows. A more flexible way is to select one or many categories and then select a new location from the Move selected categories to drop-down before pressing the Move button. When you move a parent category, all the child categories will move with it:
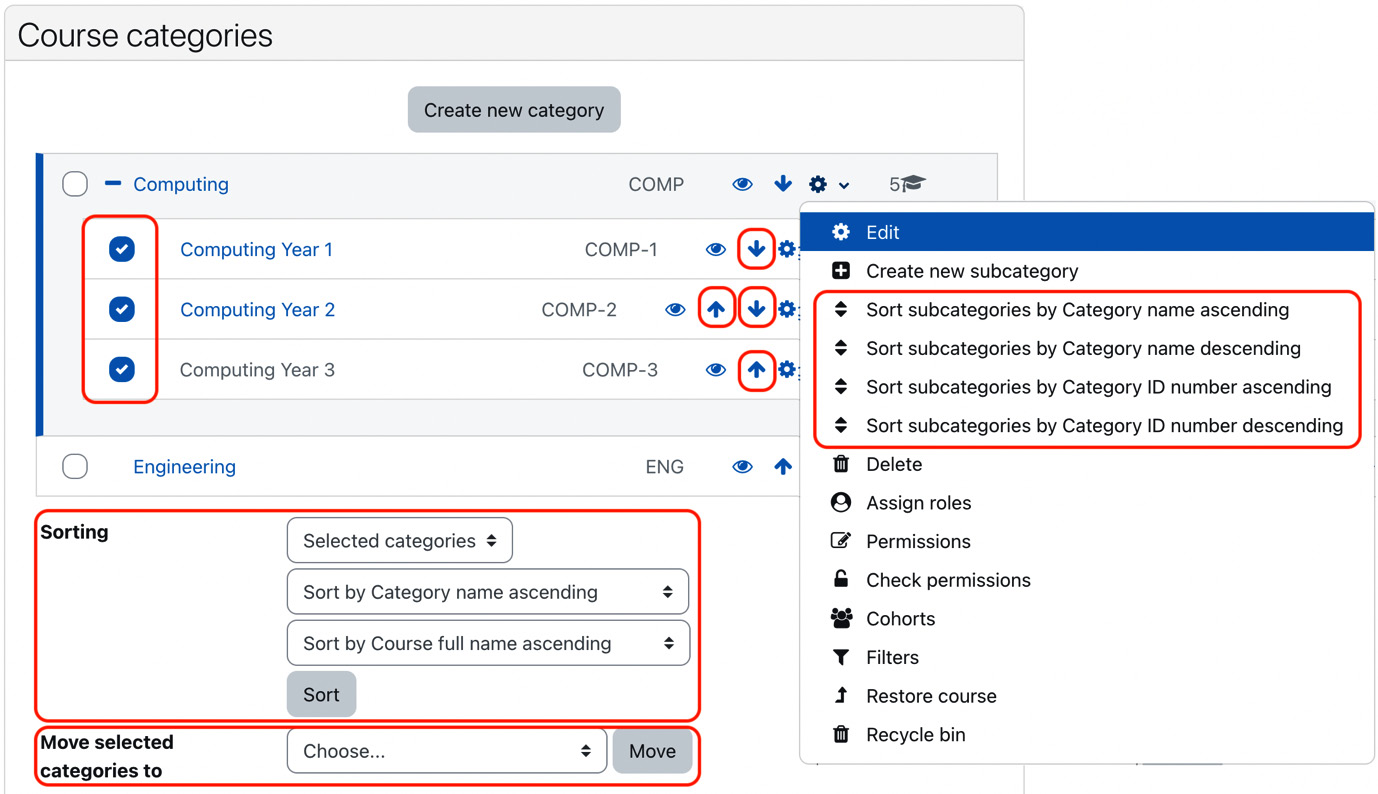
Figure 4.7 – Sorting and moving categories and courses
You have various options to sort categories. From the Sorting menu, you can choose to order by All categories, by Selected category, or by This category (which represents the current one). Categories can be sorted by their name or ID number in ascending or descending order, and they can also be unsorted (that is, you can put them in the original order when they were created). Once you have selected your option, press the Sort button.
Alternatively, you can expedite this process by selecting a sorting option from the pull-down menu for each parent category. From the options menu, several actions can be triggered, and they are as follows in the table:
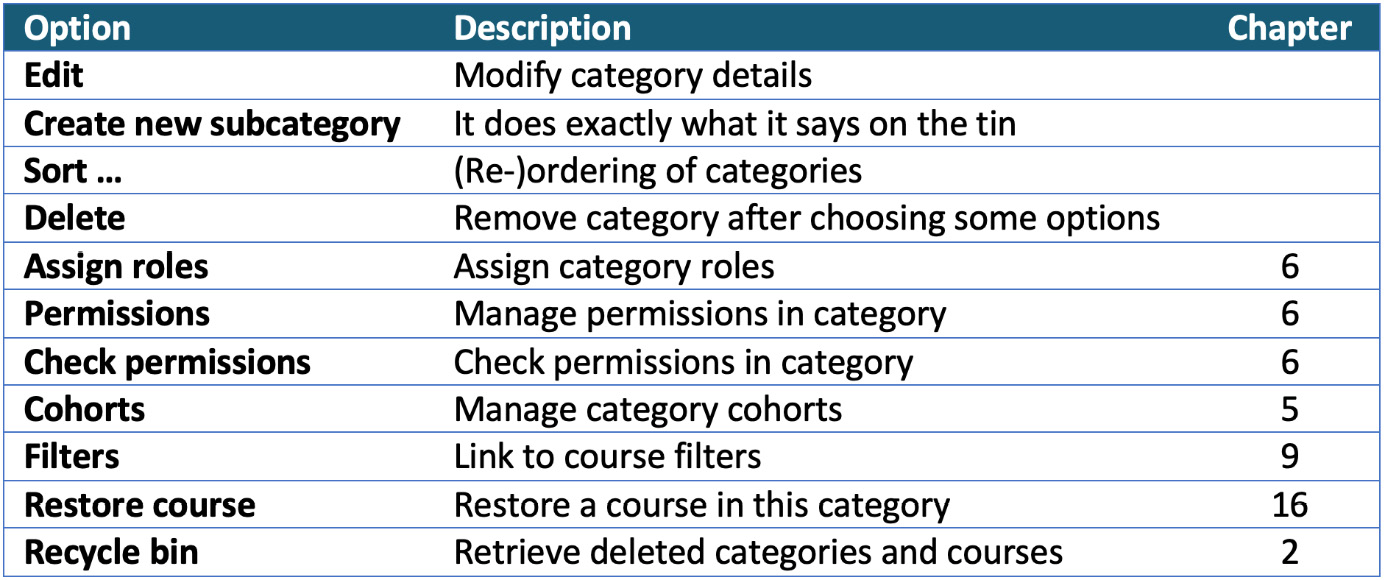
Figure 4.8 – Category options
You can also hide categories using the eye icon (such as COMP-3 in our case), which is usually done when courses within a category are undergoing development or if you want to create an experimental area (or sandpit) that is not to be seen by anybody without permission to see hidden courses. Hidden categories are only visible to site administrators or those with the moodle/course:viewhiddencourses capability.
Once you select a category, it shows all its courses in the course area, and depending on your device and screen size, this can be to its right or underneath the categories area.
While you can use the up and down arrows to reorganize courses, you can use the crossbar at the left and drag each course to its new location – a very handy feature, indeed. Courses can be sorted in ascending and descending order by their full name, short name, ID number, and time created information, and you also have an option to modify the number of courses shown per page. Hiding and moving selected courses works in the same way as it does for categories:
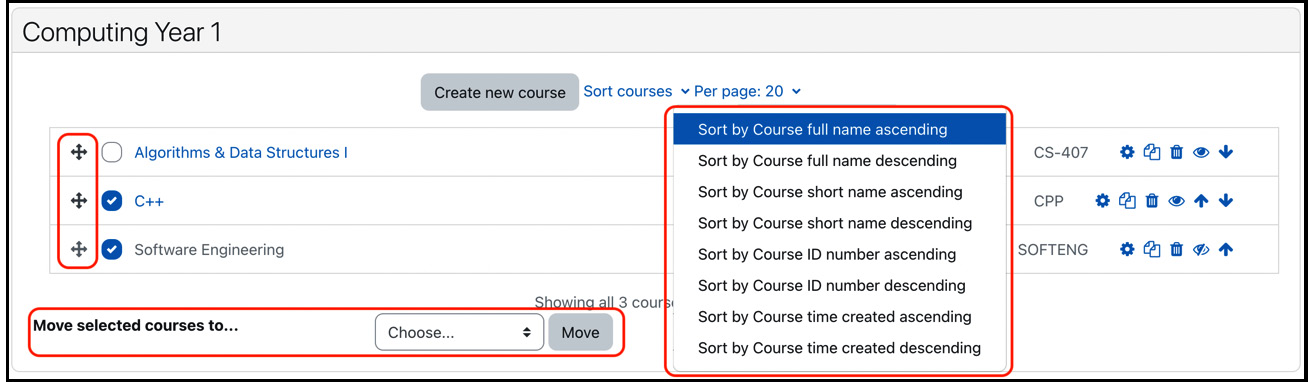
Figure 4.9 – Moving and sorting courses
To sort courses across categories, you must choose the All categories option from the Sorting menu in the Course categories section. The ordering options are the same as in the context menu shown in the previous screenshot.
Now that we have dealt with creating, modifying, and rearranging course categories, only one operation is missing: removing.
Deleting course categories
When deleting a course category using the respective option in the drop-down menu, you must decide What to do with courses and subcategories if any exist:
- Move contents to another category: You will need to select one from the Move into option.
- Delete all – cannot be undone: This step cannot be undone!
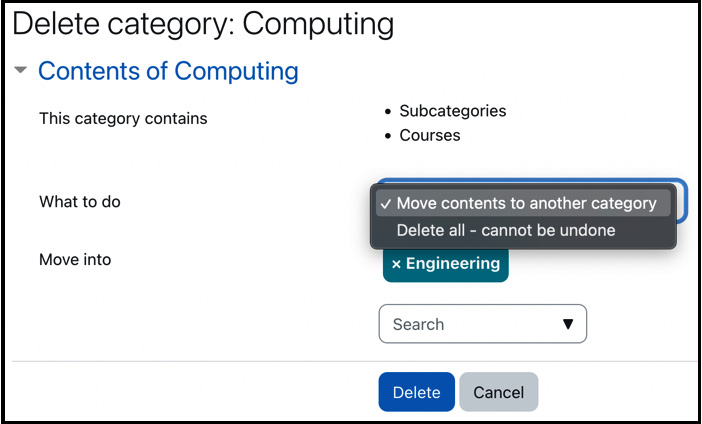
Figure 4.10 – Deleting a course category
This concludes the section on managing course categories. The next step is to move down a level from categories to courses and how to create them, which we will deal with in the next section.
Creating courses
Courses are fundamental in Moodle. Learners and trainers spend most of their time in courses since this is where teaching, learning, and collaboration take place.
Important note
We have mentioned it before, but because it is critical to administering Moodle, here it goes again: Moodle is a course-centric system!
Before we start creating our first course, let’s briefly look at a typical course creation workflow.
Course creation workflows
Different types of organizations offer different types of courses. Courses in a school are usually linked to a syllabus, whereas courses a commercial online provider offers are driven by a catalog or provided on an ad hoc basis. However, several steps are common in most course creation workflows, shown in the following diagram, where the top row shows the tasks to be carried out and the bottom row the role that is usually responsible:

Figure 4.11 – A typical course creation workflow
- Course request: Somebody requests a new course, which is often driven by a syllabus or can be an ad hoc requirement by a teacher.
- Create course: The course skeleton can be created manually or automatically; both options will be dealt with after introducing this course creation workflow.
- Notify teacher: Letting the requester know that the course has been added. Again, this can either be done manually or automatically.
- Adjust settings: The new course owner responsible for the course will add any missing information – for example, the course description.
- Populate course: The course requester is handed over an empty course or a skeleton based on a course template. It is up to the teacher to populate the course with learning content, activities, and interdependencies.
- Enrol users: There are various options for adding users to a course. This can either be an automated process driven by the admin, done manually by the teacher, or, depending on your setup, by the learners themselves. We have dedicated the entire second part of this chapter to course enrolments, so hang in there for now.
- Start course: At some stage, the course will be let loose into the wild, either from a specific start date (for instance, the beginning of the semester) or flexibly with a more dynamic setup (for example, self-paced online courses).
This process is not written in stone and might look different in your organization. Additional steps might have been added, or the order of specific tasks might be different, such as when enrolment occurs. However, the steps outlined are usually present in most course creation workflows. OK, enough processes and procedures; let’s add the first course to your Moodle system.
Creating a new course
Once the Create new course button has been pressed, Moodle directs you to the settings page where course details must be entered. When we created our first course, we already came across this screen in Chapter 3, Exploring Courses, Users, and Roles.
The following settings are available in the General and Description sections:
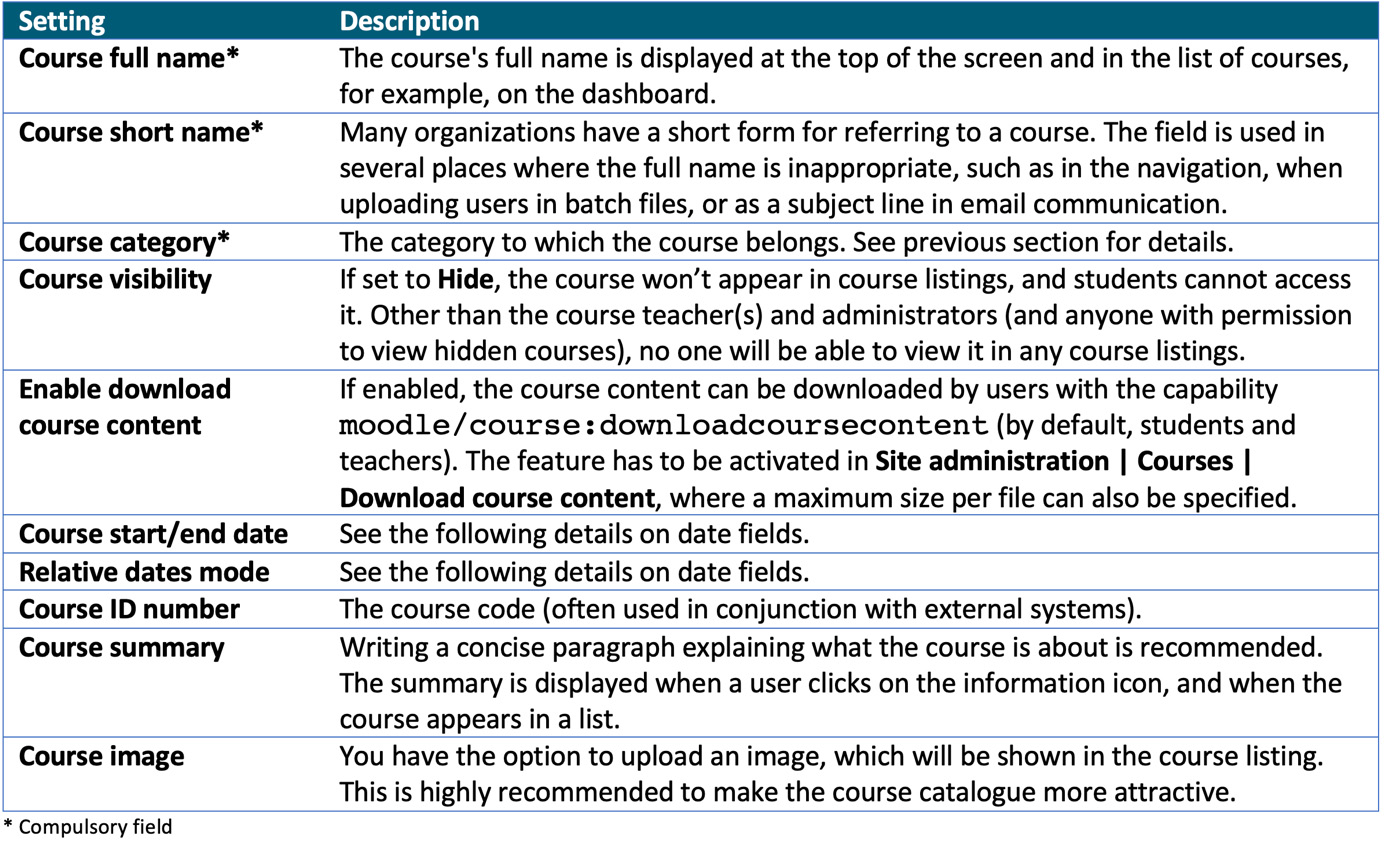
Figure 4.12 – Course settings
By default, the Course full name, Course short name, Course category, Course ID number, and Course summary fields can be modified by a teacher. You can disallow this by changing the appropriate permissions for the Teacher role by navigating to Site administration | Users | Permissions | Define roles (search for capabilities starting with moodle/course:change using the Filter box). Chapter 6, Managing Permissions, Roles, and Capabilities, will deal with this in more detail.
Course formats
The following section in the course settings lets you choose a Course format option. A course format dictates how course content will be presented to the learner. Moodle ships with four formats, but more can be installed (see the Installing third-party add-ons section in Chapter 8, Understanding Moodle Plugins). Once you have selected a course format, the screen refreshes to load the respective course format settings:
- Single-activity format: This only shows the selected activity in a course – for instance, a SCORM package, assignment, forum, quiz, and so on
- Social format: This is one main (social) forum, which is listed on the main course page – for example, a notice board
- Topics format: This is similar to the weekly format, except that each week is called a topic, and no time restriction applies
- Weekly format: In this format, a course is organized week-by-week, with a start and a finish date
You can specify the default course format for new courses by going to Site administration | Courses | Course default settings.
Course dates
While most course fields are (almost) self-explanatory, the date-related settings probably need more explanation, especially when used in conjunction with the Weekly format option just mentioned:
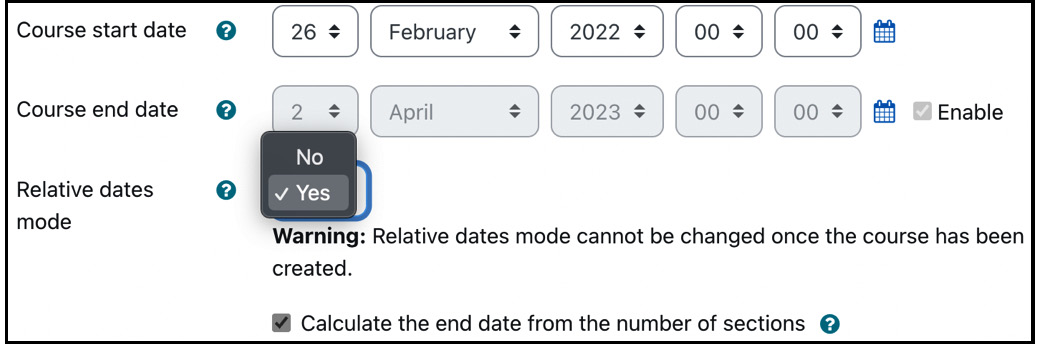
Figure 4.13 – Course date settings
Somewhat surprisingly, Moodle course dates don’t allow or restrict course access; instead, Course start date and Course end date affect whether course logs are displayed, the heading of each topic when run in Weekly format, and the status of a user’s course (in progress, future, or past).
By default, course dates are absolute; the start and end dates are the same for each user. Moodle also supports relative course dates, where each user is given an individual start and end date: the relative start date is equal to the user’s enrolment date unless the enrolment took place before the course begins, in which case, the individual start date is the one that has been specified manually, that is, the course start date.
Important note
Relative dates mode cannot be changed once the course has been created.
The following table summarizes the discussed date-related settings in a course:
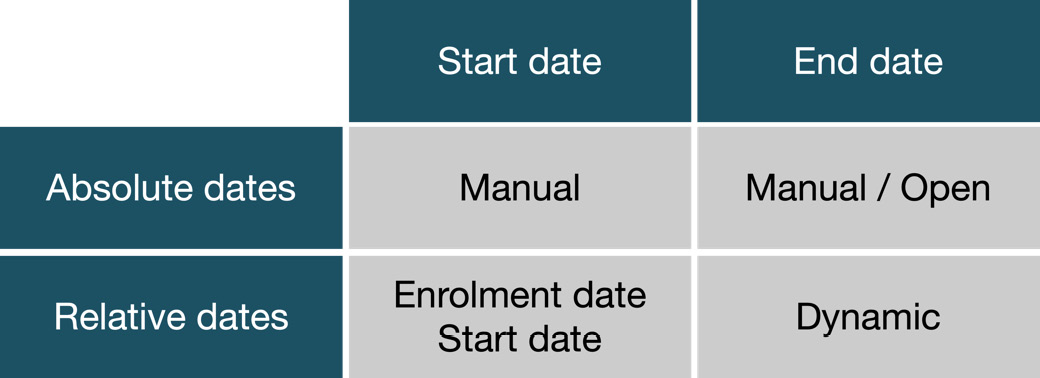
Figure 4.14 – Course date settings
The individual course status is calculated as follows, taking into account the dates and modes we have discussed:
- In progress: start date ≤ today [≤ end date]
- Past: today > end date
- Future: today < start date
The Calculate the end date from the number of sections option only appears when you run the course in Weekly format. If enabled, the course end date is calculated automatically based on the course start date (relative or absolute) and the number of sections or weeks. If course sections or weeks are added or removed, the course end date is adjusted automatically. If this checkbox is ticked, the course end date cannot be set manually.
Note that at the time of writing, Relative dates mode is an experimental setting, as it has not yet been implemented in all activities (such as Quiz) or features (for instance, restrict access). It must be enabled via the Enable course relative dates setting in Site administration | Development | Experimental | Experimental settings.
Other course fields
The remaining options in the Appearance, Files and uploads, Completion tracking, and Groups sections are as follows:
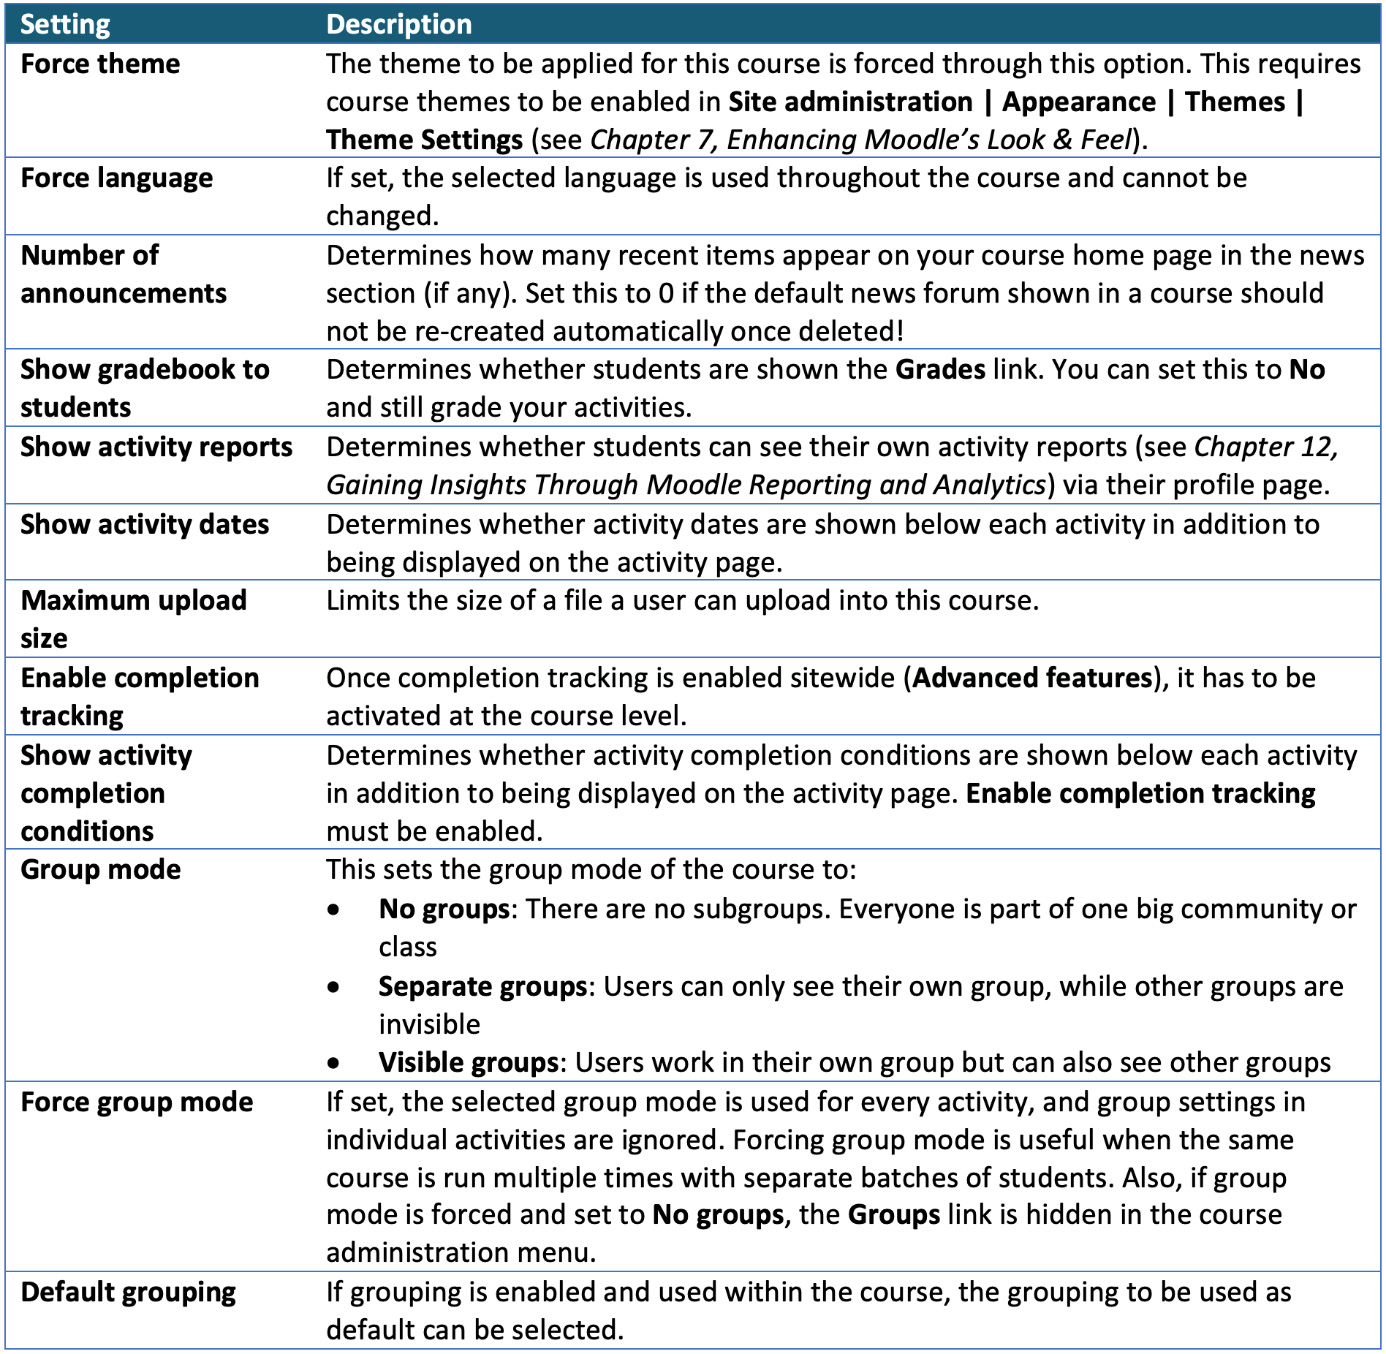
Figure 4.15 – Course settings
Once a course has been created, you can assign users to various roles in the course (such as enrolling students and assigning teachers); we have briefly covered this in Chapter 3, Exploring Courses, Users, and Roles, and have dedicated the entire Roles management section in Chapter 6, Managing Permissions, Roles, and Capabilities, to roles, and will therefore be ignoring the Role renaming part for now. The same holds for an optional Tags section, which is dealt with in Chapter 9, Configuring Educational Features.
Internally, each course is given an ID. As mentioned before, a course always belongs to a single category and cannot belong to multiple categories or be without a category. However, the home page (course id = 1) is one exception to this rule. Internally, the home page is treated as a course that neither belongs to a category nor can be deleted.
You can specify the course default settings for most parameters when creating new courses; you can find these in Site administration | Courses | Course default settings. The fields and values are identical to those described in the preceding screenshots.
All course settings you have come across so far are part of Core Moodle. Custom course fields can be added to extend the list of options covered in the next section.
Custom course fields
Course fields in Moodle are organized into course categories such as General, Course format, or Appearance. Additional categories can be created, and user-defined fields can then be placed within these new categories, which teachers can configure. You find this feature by navigating to Site administration | Courses | Course custom fields:
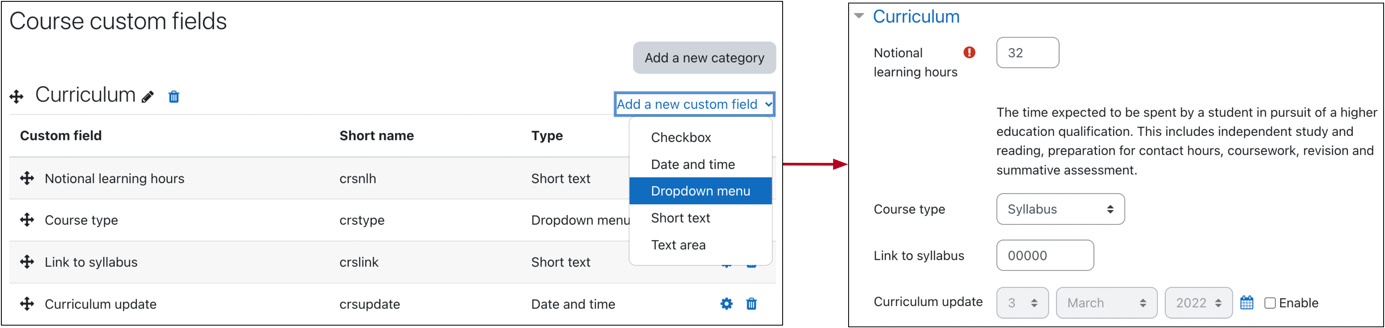
Figure 4.16 – Custom course fields
In our demo system, we have already created a category called Curriculum with four course fields: Notional learning hours, Course type, Link to syllabus, and Curriculum update. To create a new category, click the Add a new category button and rename the default name (Other fields) using the standard Edit icon. Once a category has been created, five types of profile fields can be added via the Add a new custom field dropdown menu:
- Checkbox: The values are true or false
- Date and time: Contains the date and an optional time field
- Dropdown menu: Selection of a single value from a predefined list
- Short text: A single line of text or a number
- Text area: Multiline formatted text
At Site administration | Plugins | Custom fields | Manage custom field types, you can hide or uninstall custom field types. The latter is only recommended for field types that have been installed; for those, you might also find settings that do not exist for the five described core types.
Once you have chosen your field type, you are taken to a settings screen for that field, which contains three sections:
- General settings apply to all custom fields
- Field settings contain parameters that apply only to the chosen field type
- Common course custom field settings deal with permissions and visibility
Let’s look at these three sections in a little more detail.
The General section contains the following fields: the Name field is the label displayed in the course settings and the Short name field is a unique field identifier. An optional Description field can be given, which is displayed underneath the field in the course settings. If the field is obligatory, the Required option must be set to Yes. If the value entered needs to be unique, the Unique data field must be changed accordingly:
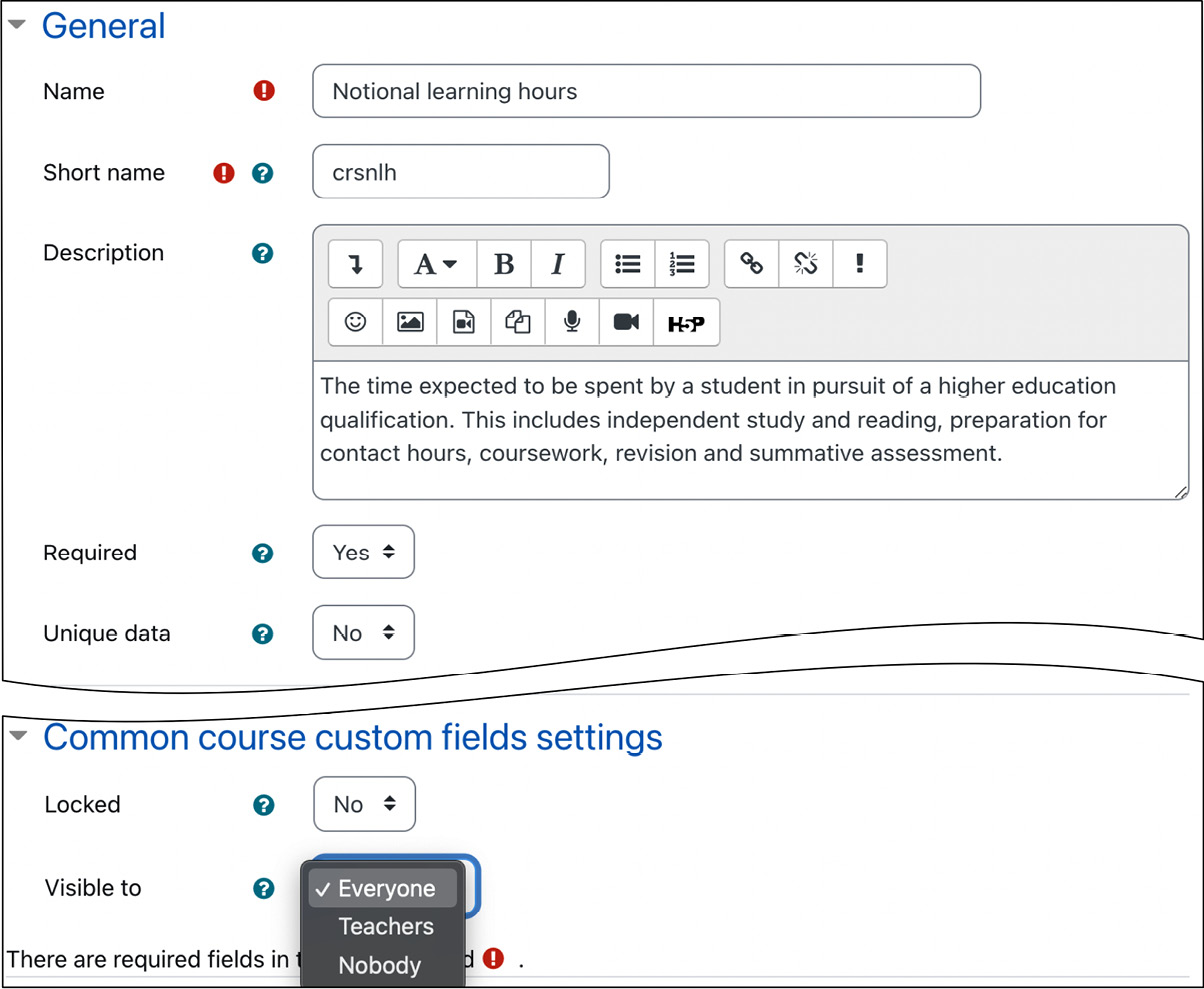
Figure 4.17 – Custom course fields (General and Common)
In addition to the general field settings, specific settings have to be provided for each profile field type:
- Checkbox: This type has only a single setting. It specifies whether the checkbox will be Checked by default in new user profiles or not.
- Date and time: The Minimum value (the start date – by default, today) and Maximum value (end date – by default, also today) settings can be enabled and specified. An optional time field can be included by checking the Include time option.
- Dropdown menu: For this type, a list of Menu options (one per line) and an optional Default value must be provided. The list consists of a single item per line. If you wish to allow empty values, leave the first entry empty. In the following screenshot, three options (Syllabus, Extra-curricular, and None) have been entered, with Syllabus being the default:
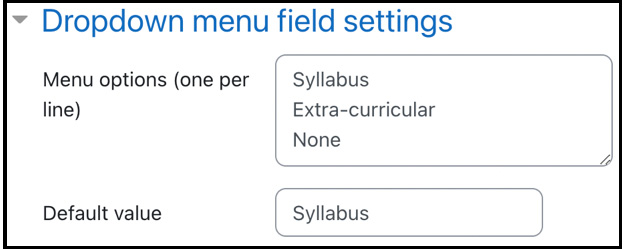
Figure 4.18 – Custom course fields in the dropdown settings
- Short text: For this type, the Default value, Form input size (as in, the textbox width), and Maximum number of characters details must be provided. Additionally, you must specify whether the field is a Password field type, which will lead to masking being turned on if enabled. The Link field lets you create dynamic links, where $$ represents the parameter that will be replaced with the entered text. In the following screenshot, we have specified https://yourorganization/syllabus/$$. The transformed link will be shown in the list of available courses or all courses. Link target specifies where this link will be opened once it’s selected:
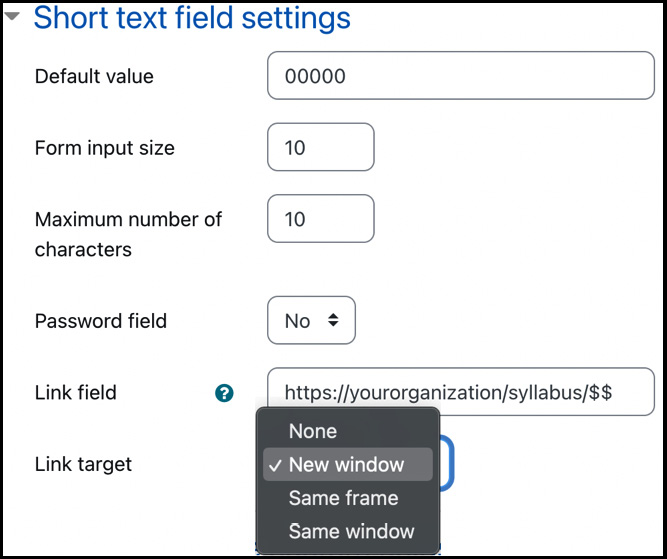
Figure 4.19 – Custom course field in the short text field settings
- Text area: This type allows users to define an optional Default value in a free-form textbox.
There are only two settings in the Common course custom field settings. The field can be Locked; that is, the teacher is prevented from modifying it. This option is useful when you have a central system for course management containing data such as internal course codes, which nobody should change. Locking is often used in conjunction with one of the following three Visible to options:
- Everyone (default): This is used for course information that teachers and students can see, and potentially users outside the course
- Teacher: Fields containing sensitive information students should not see, which can be as trivial as the teacher’s course resources for preparation
- Nobody: This is typically set by an administrator who wants to hold data on the courses, such as the aforementioned internal course code
Once all the required fields have been added, the order in which they will be displayed in the user profile can be changed using the up and down arrows.
The management of custom course fields has been described in great detail here. The same mechanism is available for other custom parameters, such as the user profile or appointment custom fields (Moodle Workplace only).
So far, we have created courses manually, a potentially time-consuming and error-prone process. To tackle these shortcomings, you have two options – course requests and bulk upload – which we will cover in the subsequent two subsections. Let’s start by partly delegating the task to teachers using course requests.
Course requests – enabling teachers to ask for new courses
Only administrators or course creators (or any other role with course creation rights) have permission to create new courses. Moodle offers a course requesting facility to streamline the procedure for requesting courses, especially in larger organizations. This feature has to be enabled by going to Site administration | Courses | Course request.
You must specify the Default category for course requests setting, which controls where the courses created upon request will be placed. You can also disable Prevent category selection if your users are familiar with the course category structure. As the courses have to be approved, you can specify the Course request notification recipient(s):
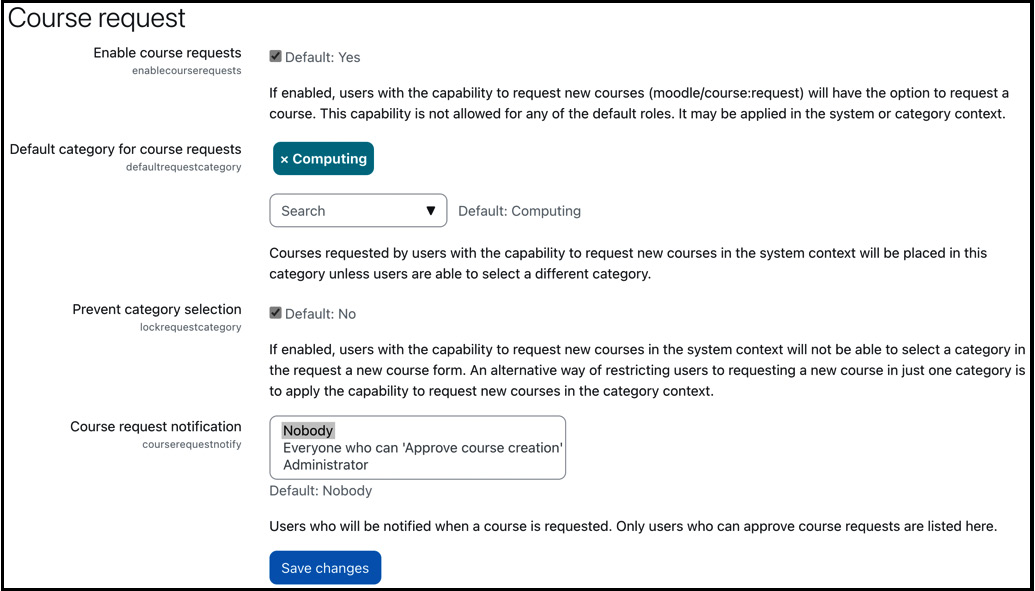
Figure 4.20 – Course requests
Once the feature is enabled, each teacher can request new courses (via the Request a course option on the My courses screen). The information that has to be provided by the requestee is as follows:
- Course full name
- Course short name
- Course category (if selected above)
- Summary
- Reasons for course request
A new item, Courses | Pending requests, appears in the Site administration section. On selection, the list of requested courses is shown, which you can then Approve or Reject by selecting the appropriate button:
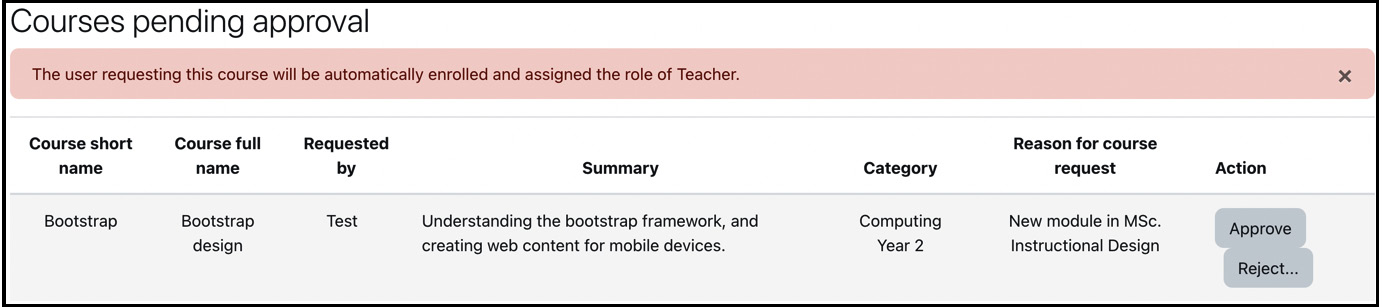
Figure 4.21 – Course approval
When you approve a course, the familiar course settings screen appears. This screen already contains the provided course values specified in the system settings. Furthermore, users who have requested the course will be automatically enrolled, and, by default, they will be assigned the teacher role. If you reject a course, a reason must be given, which is emailed to the requester.
Course requests only semi-automate the course creation process because you still have to approve or reject them manually. Uploading courses in bulk introduces a versatile way to create, modify, and remove courses without further intervention.
Managing courses in bulk
So far, all the operations in this chapter have been carried out manually. However, this process should be automated in an organization with many courses and categories. In Site administration | Courses | Upload courses, Moodle provides us with a powerful tool to manage courses in bulk. This not only lets us create new courses but it also works for updating and deleting courses, importing courses, and restoring courses from backups and course templates.
To create courses in batch mode, you will need to create a CSV file, which contains the following fields (the complete list can be found at docs.moodle.org/en/Upload_courses):
- Course information fields: These are identical to the fields on the course settings page – for example, short name, full name, and ID number. The content of each course information field has to conform to its type; for example, a date field has to be provided with a date value. Custom course fields are fully supported and must be labeled with customfield_<shortname> – for instance, customfield_duration.
To specify the category in which the course has to be placed, you have three options (in order of precedence): category (internal ID), category_idnumber (ID number), and category_path, where a forward slash surrounded by spaces must separate subdirectories ([category]<space>/<space>[subcategory]…).
The following is a sample file demonstrating all three options:
shortname,fullname,category,category_idnumber,category_path
course1,Course One,4,,
course2,Course Two,,COMP-1,
course3,Course Three,,,Computing / Computing - Year 1
Important note
Categories cannot be created in batch mode; they must exist! Alternatively, use MOOSH, a Moodle Shell, explained in more detail in Chapter 17, Working with Moodle Admin Tools.
- Enrolment fields: These let you enable and configure enrolment plugins. We will be dealing with enrolments further down in this section, so here is a sample to configure self-enrolment:
shortname,fullname,category,enrolment_1,enrolment_1_startdate
course1,Course One,4,self,06/10/14
course2,Course Two,4,manual,06/10/14
course3,Course Three,4,manual,06/10/14
At the time of writing, only the manual, self, guest, and cohort enrolment methods are supported by course uploads. To monitor progress on this missing subfeature, monitor MDL-73838 in the bug tracker database.
- Role renaming: This provides a means to rename standard roles. We will deal with roles in Chapter 5, Managing Users, Cohorts, and Authentication.
In addition to these three field types, so-called course action fields can be specified to perform an action other than creating courses:
- delete: “1” to delete a course.
- rename: Add a new course short name.
- backupfile: The absolute path of a backup file (.mbz), used as a source. This can potentially lead to performance problems (check out $CFG-> keeptempdirectoriesonbackup in Appendix, Configuration Settings).
- templatecourse: The shortname of an existing course used as a source.
- reset: “1” to reset the course and remove any user data.
Once a file has been uploaded, you will have to change the CSV delimiter and Encoding file format settings if they are incorrect. You can further specify the number of Preview rows. Then, the following import options can be configured (depending on the upload mode selected, some settings will be shown or hidden):
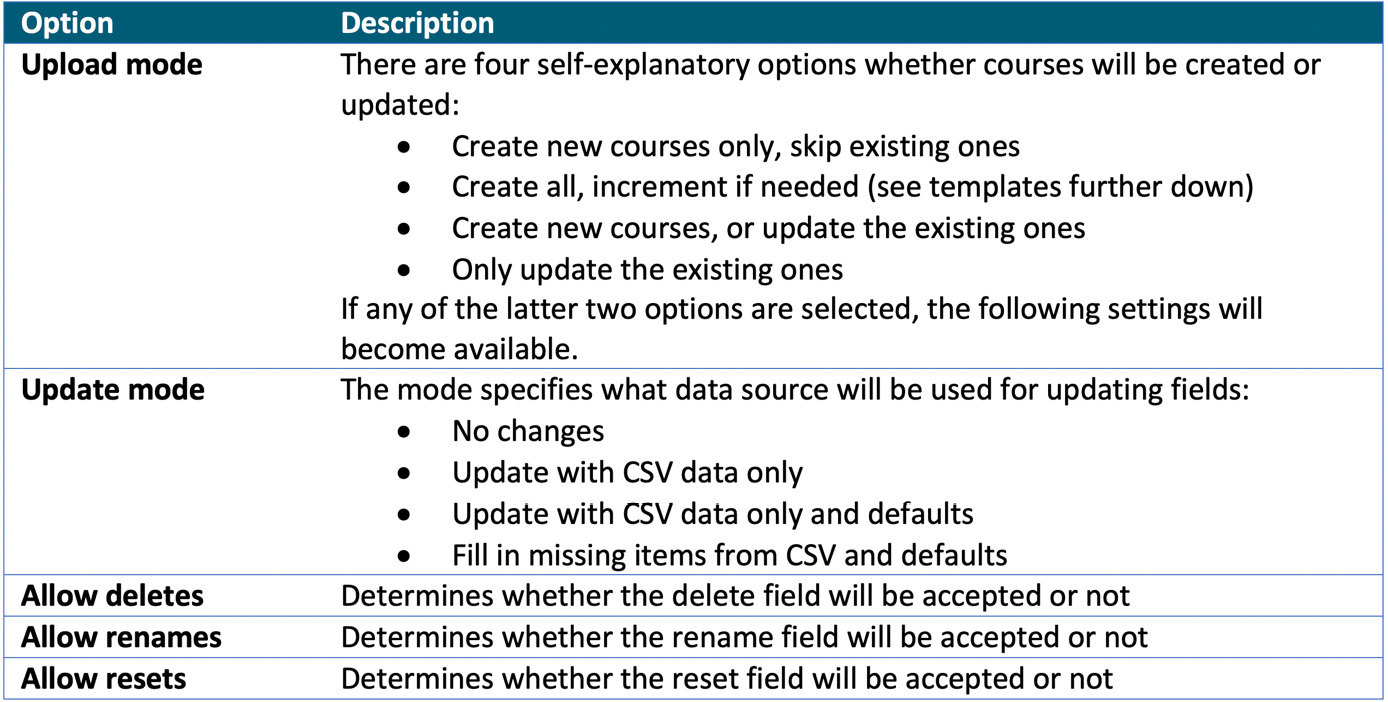
Figure 4.22 – Uploading courses
The counterpart on the screen looks as follows:

Figure 4.23 – Uploading courses
When in preview mode, you will see these import options again and the Course process settings, Default course values, and, if custom course fields have been added, Default values for each custom course category. The latter two are the values used if not provided in the CSV file and an update mode is chosen that supports defaults. The course process supports two types of templates, which require some explanation:
- Course name templates: If the CSV file does not contain a shortname column, you can use template syntax to set the name, depending on either idnumber (%i) or fullname (%f). For instance, the given Template to generate a shortname is Packt %i with Upload mode set to Create all, increment shortname if needed would result in the three courses, Packt_1, Packt_2, and Packt_3, with our previously used input file.
- Course content templates: You can either specify the absolute path of a Moodle backup file or the short name of an existing course as a content template for the newly-created course. We will be dealing with backup in Chapter 16, Avoiding Sleepless Nights – Moodle Backup and Restore, so for now, let’s assume that they have a suffix, .mbz. Suppose either option is chosen and you have opted to update existing courses. In that case, you should select the Allow resets and Reset course after upload options to remove any user data that has been added in the source course:

Figure 4.24 – Uploading courses
After selecting the Preview button, the sneak-peak list at the top of the screen will be updated based on the values chosen, which is an excellent way to trial and error your way through your CSV file before uploading it. Once courses have been uploaded, you will see the summary of results:
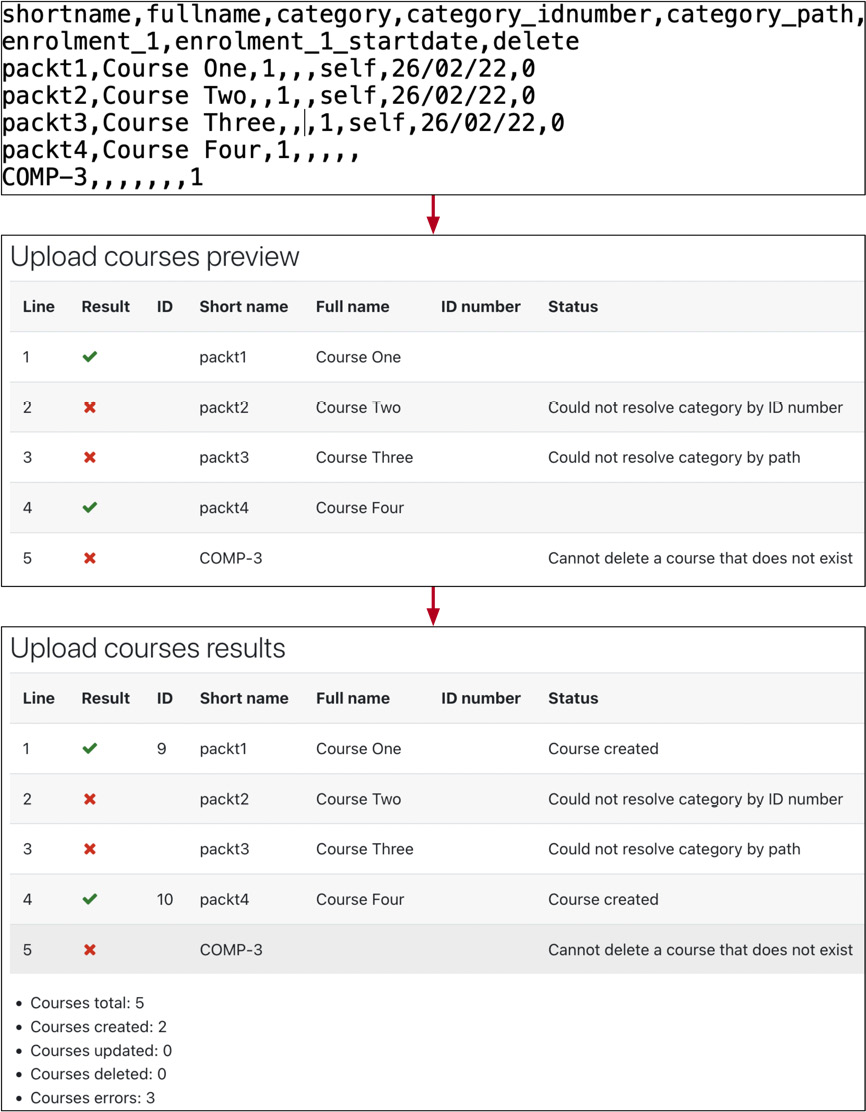
Figure 4.25 – Uploading courses
There is also a CLI tool to perform course uploads from the command line. You can find it in admin/tool/uploadcourse/cli/uploadcourse.php. You will see all the supported parameters by calling the help mode:
sudo /usr/bin/php admin/tool/uploadcourse/cli/uploadcourse.php --help
Here is an example of its usage:
sudo /usr/bin/php admin/tool/uploadcourse/cli/uploadcourse.php --mode=createall –-updatemode=dataordefaults –-file=./courses.csv -–delimiter=comma
There is an entire section on the Moodle CLI in Chapter 17, Working with Moodle Admin Tools.
This completes the first part of this chapter, where we dealt with the management of courses and categories. The second part deals with how users get access to courses via enrolment.
Understanding course enrolment
In the introductory chapter, Chapter 3, Exploring Courses, Users, and Roles, we have already touched upon enrolment. Now, we will go into more detail and look at the different mechanisms that can be set up to grant users access to courses. You may recall the basic enrolment workflow presented in the third chapter. Let’s have a look at a more detailed version:
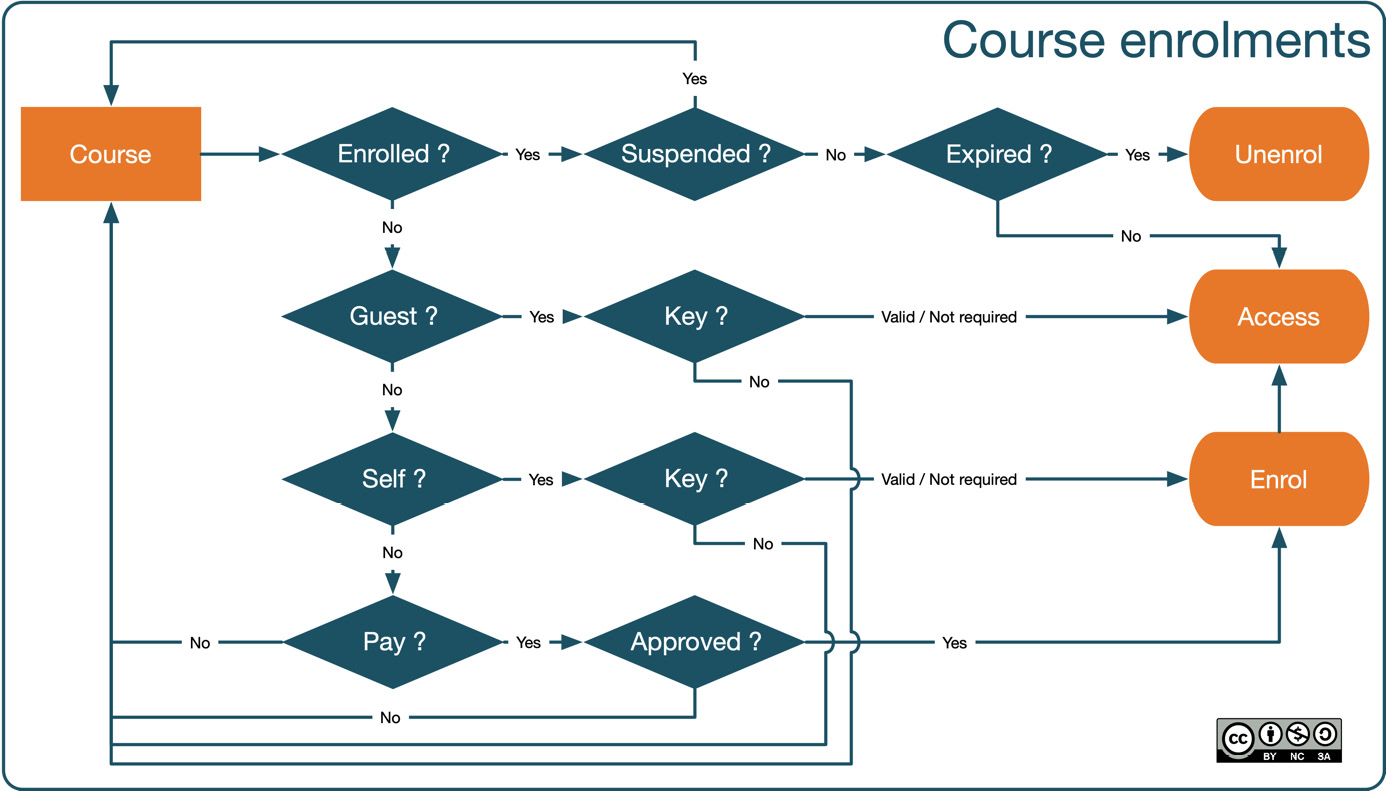
Figure 4.26 – Forms of enrolment
Let’s start from the top left, where a user attempts to access a course. Access will be granted if the enrolment has already taken place. If the user is suspended, access will be denied. If enrolment has expired, the user will be unenrolled; otherwise, access will be granted. If the user is not enrolled, Moodle checks whether guest or self-enrolment access is allowed. If either is the case, the enrolment key will be checked. If the key is correct or not required, enrolment will take place for self-enrolment, and access will be granted. As a last option, Moodle checks whether a payment is accepted and, if approved, the user will be enrolled in the courses. You might want to return to this diagram when dealing with a specific enrolment mechanism.
Students need to be given access to a course before they are allowed to use it – or, in Moodle-speak, users need to be assigned a role in the course context. They can be assigned the role automatically via cohorts or external enrolment facilities, by self-enrolling, or manually via the Participants tab inside the course.
Important note
Granting access to a course is performed via an enrolment mechanism.
The actual enrolment of students does not require administrator rights and is a task that teachers can carry out. The role of the administrator is to set up the enrolment mechanisms available sitewide. Moodle supports a wide range of enrolment options, discussed in the remainder of the chapter.
You can access the course enrolments configuration page via Site administration | Plugins | Enrolments | Manage enrolment plugins. Each supported enrolment mechanism is represented by an enrolment plugin that can be enabled and configured separately:
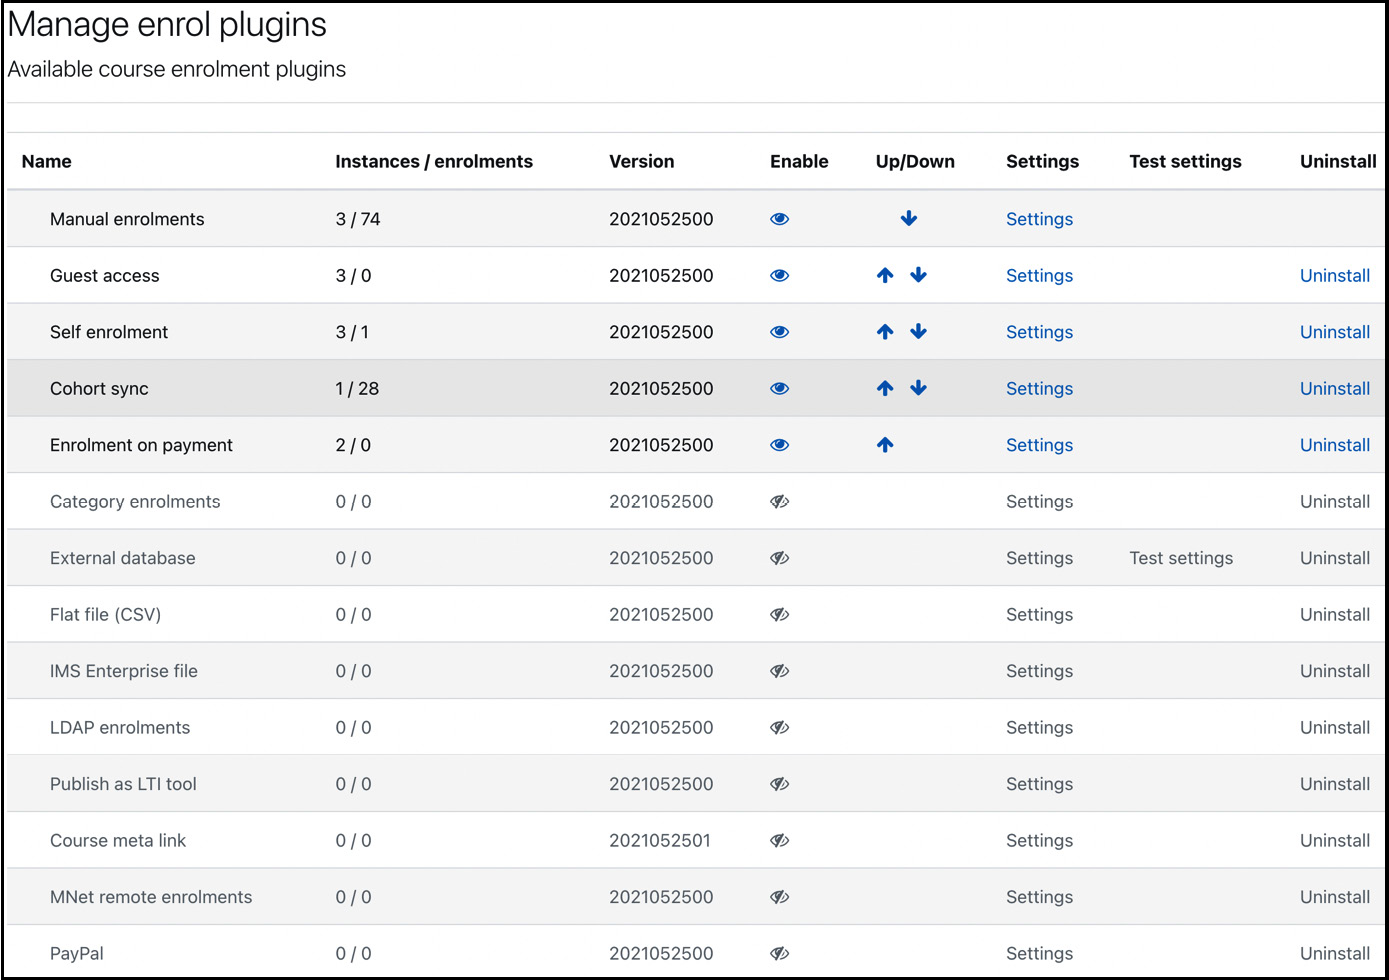
Figure 4.27 – Enrolment plugins
For every plugin, the number of instances and enrolments are shown. Each plugin can be enabled or disabled separately.
Important note
Moodle supports multi-enrolment; that is, multiple plugins can be enabled simultaneously.
The arrangement of plugins determines in which order user enrolments are checked when a user attempts to enter a course. It is recommended to give the plugins used by the majority of users higher priority over those only used sporadically, as this will benefit system performance.
All active plugins must be configured; we will deal with these settings when covering individual enrolment mechanisms. While it is possible to uninstall plugins, it is not recommended. If they are required at a later stage, they will have to be re-installed, and the preference is to simply leave them disabled.
Important note
Users need to have a user account before they can be enrolled in a course.
Each enrolment type is covered in some detail, except MNet remote enrolments, which are covered in Chapter 19, Setting Up Moodle Networking, and Publish as LTI tool, which we deal with in Chapter 9, Configuring Educational Features. We are also not covering the two legacy solutions Category enrolments (replaced by cohort synchronization) and PayPal (now a gateway in Enrolment on payment). The enrolment mechanism you choose depends entirely on the infrastructure you have in place – that is, where and in what format the enrolment data of learners is stored.
Once an enrolment form has been set up, it must be configured inside the course in which it will be used. Select the Enrolment methods options from the dropdown on the Participants tab, where you will see a list of all the active (shown) and inactive (hidden) enrolment plugins. Each enrolment method comes with a number of settings, which we will cover as part of the plugin itself:
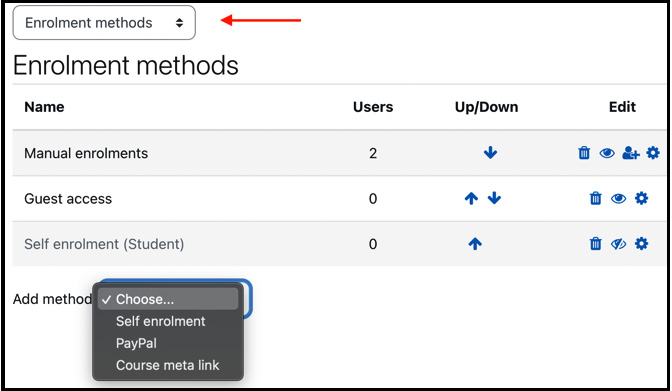
Figure 4.28 – Enrolment methods at the course level
Any non-database enrolment method enabled and configured at the site level can be added via the Add method drop-down menu. Whether a plugin automatically appears in the list of new courses depends on the Add instance to new courses parameter. Some plugins, for example, Self enrolment and PayPal, can be added multiple times in the same course, which is helpful if you need to support multiple roles.
So far, we have covered enrolment plugins in general. Now, it is time to kick off with the first type of course enrolment: internal.
Internal enrolment
Internal enrolment means that Moodle handles all enrolment without any other systems involved. Moodle supports three types of internal enrolments:
- Manual enrolment
- Self enrolment
- Guest access
We are going to cover these three internal enrolment types in separate subsections.
Manual enrolment
Manual enrolment is the default enrolment mechanism when Moodle is installed. The sitewide settings are configured at Site administration | Plugins | Enrolments | Manual enrolments:
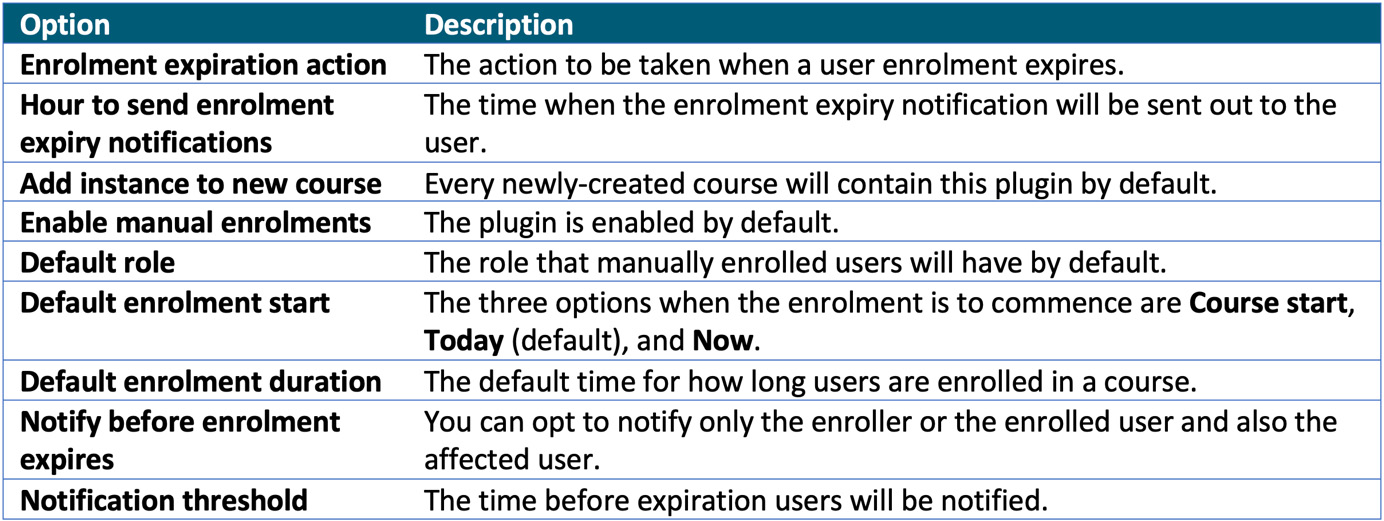
Figure 4.29 – Manual enrolment options
Once the plugin has been set up, you will see a very similar-looking screen under Enrolment methods | Manual enrolments | Settings on the Participants tab inside a course:

Figure 4.30 – Manual enrolment options at the course level
The actual enrolment of users takes place in Participants, as we have already covered in the previous chapter. What we haven’t covered yet is the suspension and expiry of enrolments. You can change these individually via the Edit symbol in the Status column of your enrolled course users:
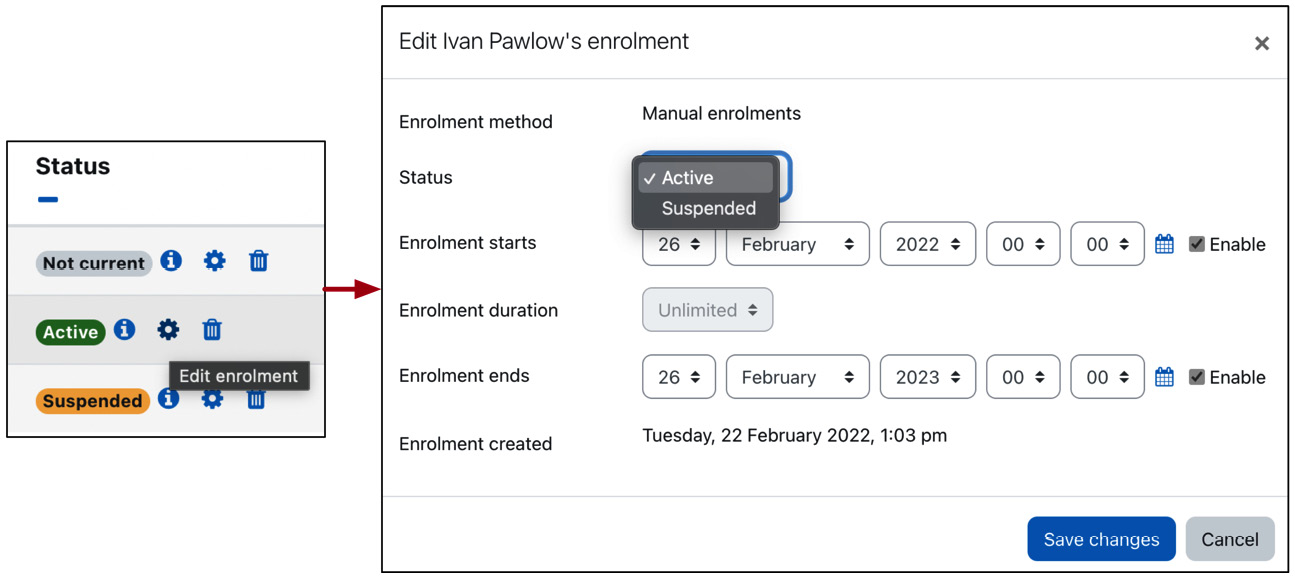
Figure 4.31 – Suspension and expiry of enrolments
To modify the enrolment data of multiple users, select them in the list of participants and choose Edit selected user enrolments from the correct section in the With selected users… dropdown. Equally, unenrol individual users via the standard Delete icon or in batch via the Delete selected user enrolments option.
A teacher can carry out all these steps, but you might decide that these tasks should be performed centrally for consistency and also to simplify their workflows. If this is the case, their role should be modified so that only administrators or dedicated users can deal with enrolments.
Self-enrolment
The concept of self-enrolment is relatively simple: users choose which courses they want to participate in. A course can contain a password, known as the enrolment key. Anyone who knows this key is allowed to add themselves to a course. An open door icon is shown beside courses that allow guest access without a password; otherwise, a closed door icon is displayed.
The enrolment key is set at the course level. The teacher must inform the students about the key and ideally limit the enrolment period to an appropriate time frame to avoid misuse.
Once the enrolment key has been set, learners must enter it when they try to access the course for the first time. Access will be granted if the key is entered correctly; otherwise, it will be denied.
Important note
Self-enrolment requires manual enrolment to be enabled.
You find the sitewide settings for self-enrolments in Site administration | Plugins | Enrolments | Self enrolment:
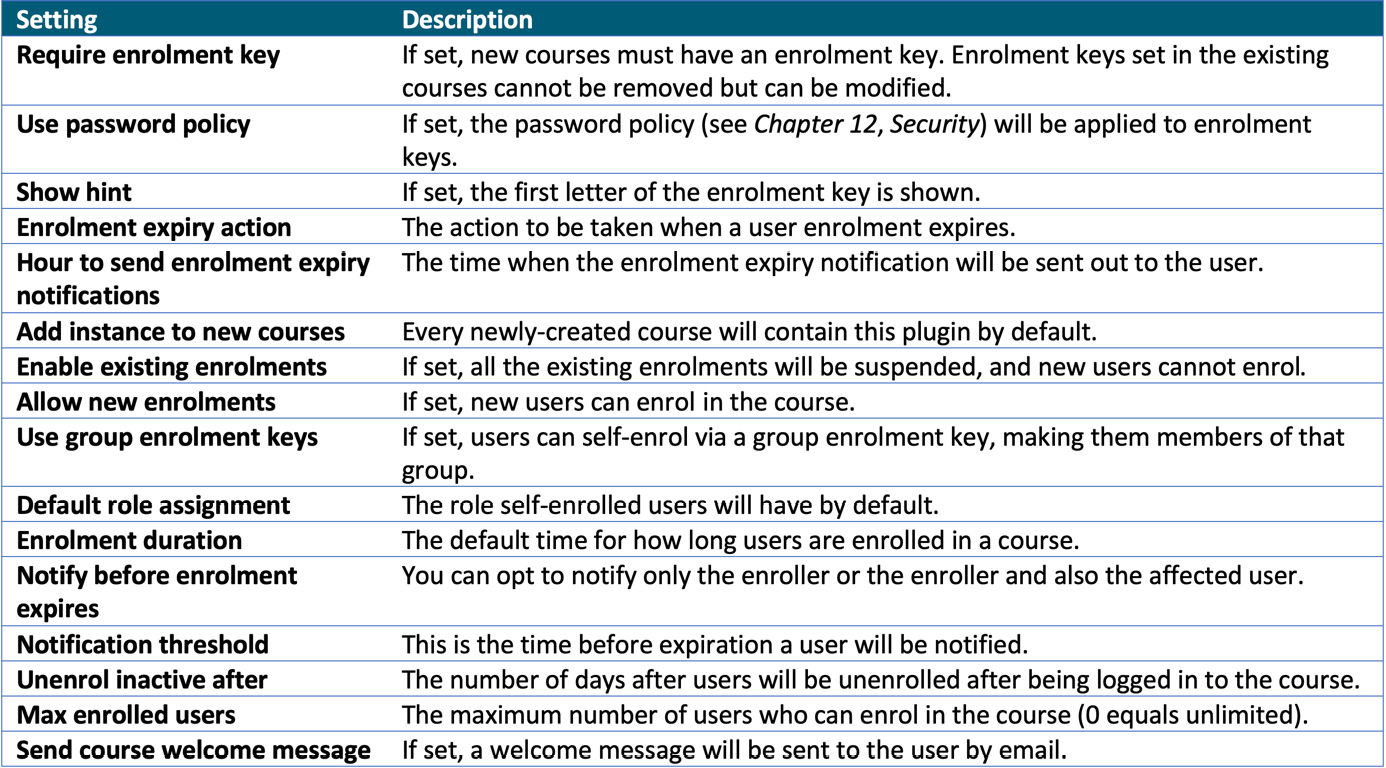
Figure 4.32 – Self-enrolment options
Once the plugin has been set up, you will be able to instantiate it at Enrolment methods | Self enrolment | Settings on the Participants tab inside a course:
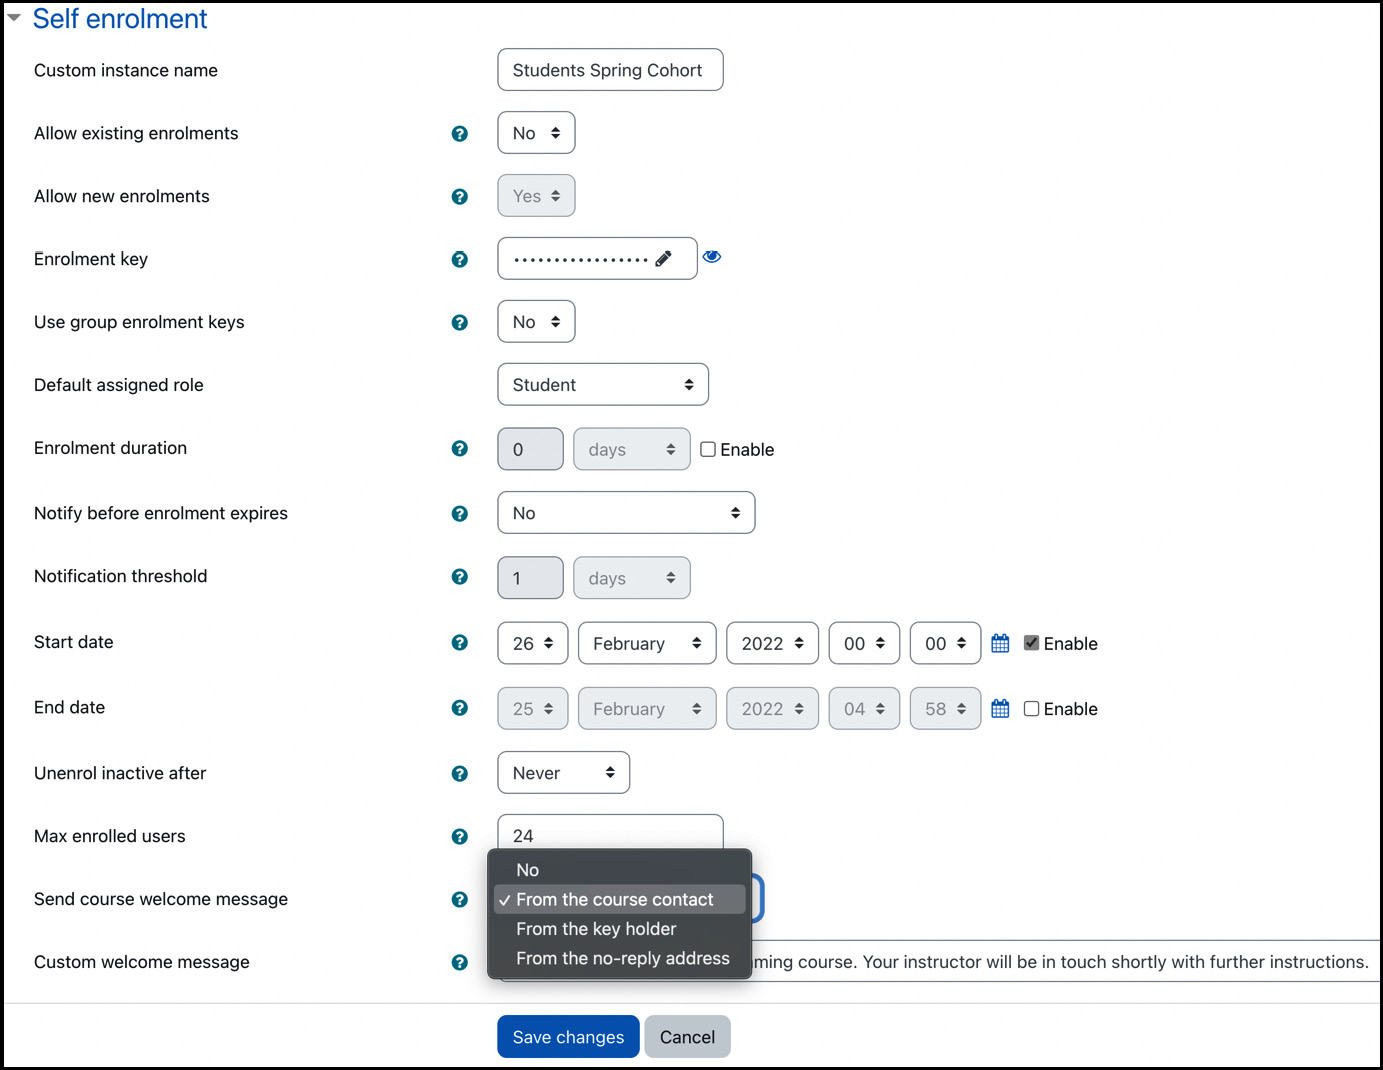
Figure 4.33 – Self-enrolment options at the course level
The settings are mostly identical to the sitewide settings described in the preceding table. The help icons next to each parameter display more details for each setting.
You can create multiple instances of the self-enrolment method, which is why you need to assign a distinguishing Custom instance name. This is useful if you need to give different user groups access to the same course – for instance, students of different cohorts or learners from multiple customers.
Guest access
Guest access can be seen as temporary enrolment. Whether authenticated on the system or not, users will be granted controlled (read-only) access to a course. Non-authenticated users will get there via the Login as a guest button on the login screen. Internally, they are being allocated a temporary user ID, which will be discarded afterward. The guest icon is shown beside courses that allow guest access.
The sitewide settings for guest access are found in Site administration | Plugins | Enrolments | Guest access:

Figure 4.34 – Guest access options
You can specify a password in the course settings for guest access. If you wish to make this compulsory, select Require guest access password. For newly-created courses, a random password will be generated (unmask the password in the course settings to view it). Removing guest access passwords from courses is not possible, but they can be modified.
The Enrolment instance defaults settings are the same as the first two of the manual and self-enrolment methods.
You can allow or disallow guest access at Enrolment methods | Guest access | Settings on the Participants tab inside a course. Here, you can also specify the password mentioned previously:
Important note
For guest access to work for users without a login, ensure the Guest login button is set to Show in Site administration | Plugins | Authentication | Manage authentication. Otherwise, guest access will only work for authenticated users.
There are two good Moodle Academy videos featuring guest access at docs.moodle.org/en/Guest_access. Additional information is also available on topics such as auto-login guests.
This concludes the subsection on internal enrolment methods. Next up is an interesting enrolment method for enrolling the same group of users in multiple courses: cohort enrolment and synchronization.
Cohort enrolment and synchronization
Cohorts are sitewide or global groups. We will cover cohorts in detail in Chapter 5, Managing Users, Cohorts, and Authentication, so for now, let’s simply assume that they are a collection of users.
Once cohorts have been created and members have been allocated, it is possible to enrol an entire cohort in a course or synchronize a cohort’s membership with a course. The two variants are shown in the following diagram:
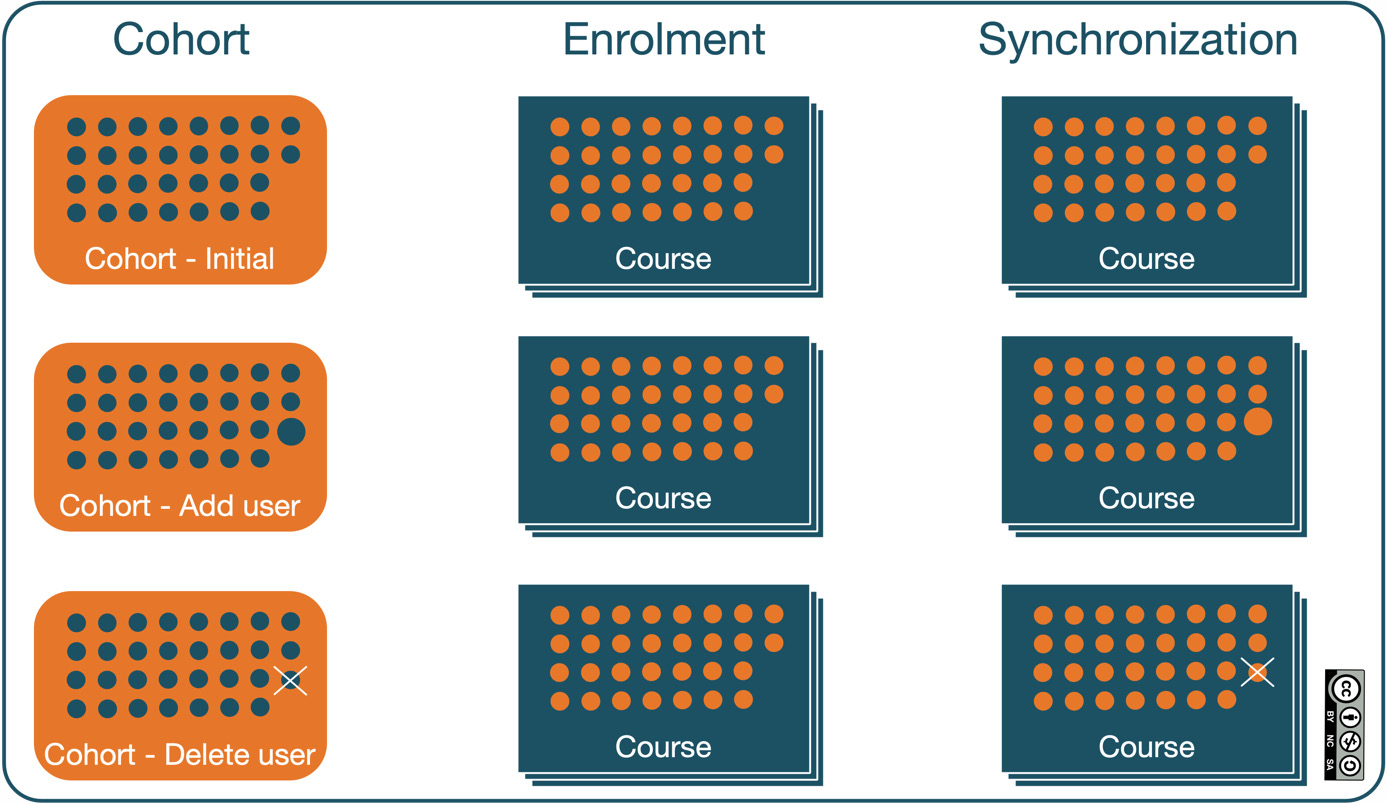
Figure 4.35 – Cohort enrolment versus cohort synchronization
Let’s use an example to explain the figure, starting with enrolment: assume you have a class called 7c with 30 students, in a school. The same class must be enrolled in eight different courses, where each course represents a subject. We only have to create cohort 7c once and then we can enrol all cohort members in each course one by one.
Alternatively, we can activate cohort synchronization with the eight courses, and Moodle will take care of the rest. If new pupils join the class, we only have to add their account to the cohort and the enrolment will be done automatically. Similarly, the pupil will be unenrolled if a cohort member is removed.
So, when do you use one-off enrolment and when do you use permanent synchronization? If the cohort is likely to remain static and enrolment is a one-off, cohort enrolment is sufficient. If, however, the cohort is likely to have a high turnover and courses have to be kept in sync, you are better off using synchronization. Beware that the removal of a cohort membership not only triggers unenrolment from a course but also the deletion of certain learning progress data.
Cohort sync is also great for organizations where groups move together between classes, such as an elementary school. Instead of moving individual users from one year to the next, you will only be dealing with cohorts of users, which is less time-consuming and more fault-tolerant.
The Cohort sync plugin (Site administration | Plugins | Enrolments | Cohort sync) only contains two parameters – the Default role value that is given to users when they are enrolled and what action to take when users are removed from an external enrolment source:

Figure 4.36 – Cohort synchronization options
We have to create a cohort and assign some members to see cohort synchronization in action. Go to Site administration | Users | Accounts | Cohorts and add a cohort by clicking on the Add new cohort tab. Give the cohort Name (in our case, 7c) and, from the Context drop-down menu, select the category in which all the courses belong to class 7c. Select System if that doesn’t apply. Cohort ID and Description are optional fields; ensure that Visible is checked. Once saved, you must assign members to the cohort by selecting the Assign icon beside it.
Once this has been successful, we can enrol the cohort (that is, all cohort members) in our course. Inside the course, go to the Participants tab, click on the Enrol users button, and select cohort 7c:
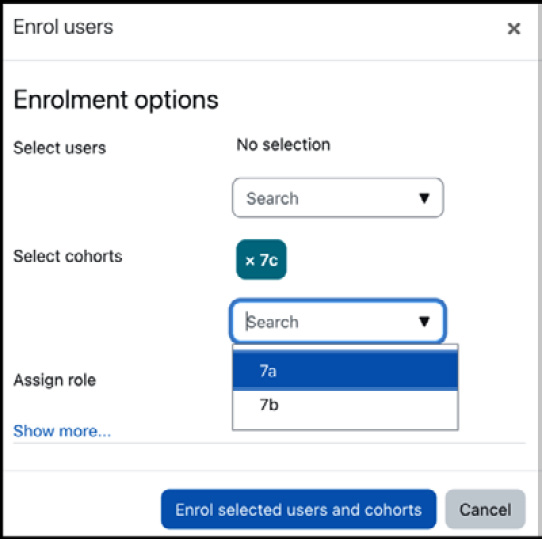
Figure 4.37 – Cohort enrolment
Once you select Enrol selected users and cohorts, all cohort members will be enrolled in the course, similar to manual enrolment. However, no further synchronization is carried out – it is effectively the same as manually enrolling all 30 users, but in a single step.
An alternative to this one-off exercise is a permanent arrangement where we set up an enrolment method instance via the familiar Enrolment methods link in the Participants tab and then select Cohort Sync from the Add method dropdown:
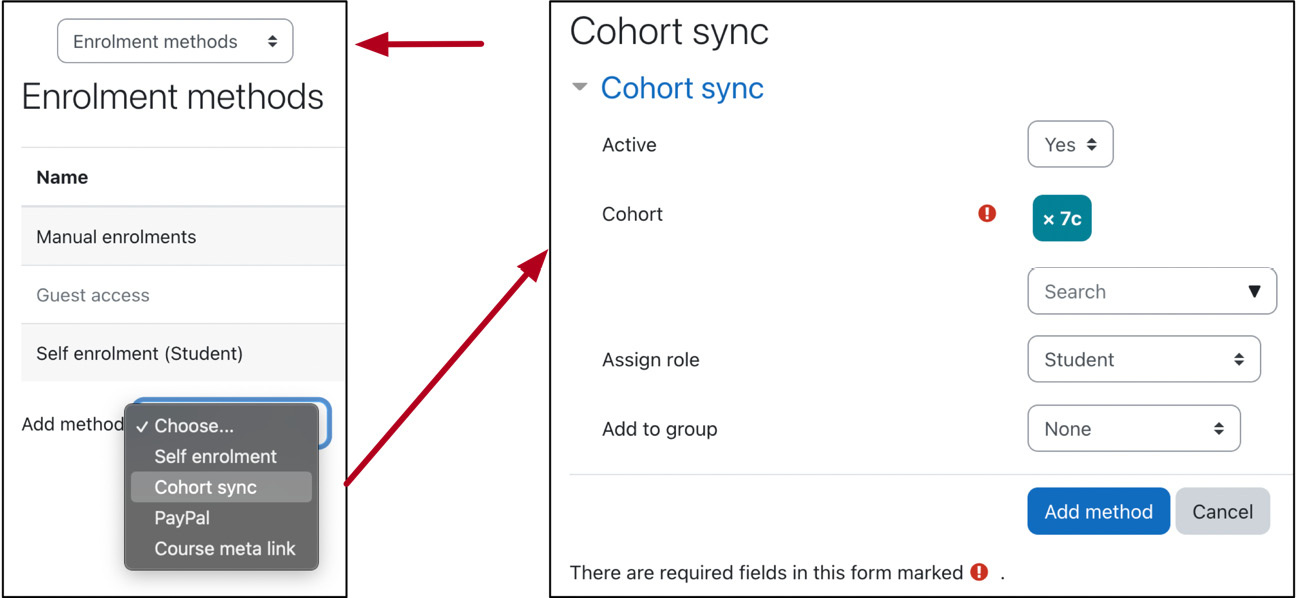
Figure 4.38 – Cohort synchronization
Once added, all users of the cohort will be enrolled. Moodle will automatically keep track of the cohort going forward—if users are added to the cohort, they will also be enrolled in the courses; if users are removed from the cohort, they will be unenrolled. As with self-enrolment, cohort synchronization allows multiple instances inside a course.
Cohort synchronization is a great way to organize your users if you have groups that must be enrolled in multiple courses. Another method that avoids manual enrolments is database-driven enrolment, which we will cover next.
Database-driven enrolment
In larger organizations, storing certain user-related information in a separate database or directory is common. If this information contains course-related information, it should be utilized for enrolment. In doing so, you minimize the necessary effort when using manual enrolment.
Important note
Unlike internal enrolment methods, database-driven enrolment cannot be configured at the course level. They are applied across the site once set up.
Four enrolment methods fall into the database-driven enrolment category, which we will cover in the following order: LDAP, external databases, flat files, and IMS Enterprise files.
LDAP
Lightweight Directory Access Protocol (LDAP) is an application standard for querying and modifying directory services. It is used by many organizations to store learner details and is, therefore, well-suited as an enrolment source for Moodle.
Important note
The PHP LDAP extension must be installed on the server for the enrolment to work.
If it is not installed, Moodle will display an error message. The module supports Microsoft’s implementation of LDAP, called Active Directory, and OpenLDAP, an open source implementation of the authentication mechanism. It is common for sites that use LDAP for enrolment to also use LDAP for authentication, which is discussed in detail in Chapter 5, Managing Users, Cohorts, and Authentication.
The principle of the enrolment method is rather simple but effective. The information stored in the data source about students, teachers, and courses is mapped to the Moodle counterparts. Enrolments are updated when a user logs in. All we have to provide are the mappings.
Moodle makes several assumptions when working with LDAP enrolment:
- Your LDAP tree contains groups that map to courses
- Each group has multiple membership entries to map to students
- Users have a valid ID number field
The LDAP settings are located at Site administration | Plugins | Enrolments | LDAP enrolments. They have been annotated with detailed explanations, hence we will not repeat them; instead, we will provide additional information where applicable. Contact your system administrator if you are unsure where to locate some of the required information.
There are seven sections of parameters that have to be provided:
- LDAP server settings establish the connection to the directory. LDAP servers with TSL encryption are also supported.
- Bind settings specify details about the credentials to access the LDAP server – that is, the provided username and password.
- Role mappings specify how user-related information is stored in the LDAP server. The roles must be set, containing a context (usually the same as the one in the server settings) and the member attribute (user IDs). It is crucial to set Search subcontexts correctly. If it is set to No, subcontexts will not be searched, but the search is potentially faster, and vice versa. Also, ensure that the User type setting matches the type of server you use – for example, MS Active Directory.
- Course enrolment settings specify how course and module information is stored on the LDAP server. It also provides options for different forms of unenrolment.
- Automatic course creation is a potentially time-saving feature. A course is created for each entry on the LDAP server in the category specified. To expedite the process and guarantee consistency among courses, you should create a course with the preferred settings and use it (its course ID) as a template for all the newly-created courses.
- Automatic course update settings let you specify which fields to update when the CLI script, enrol/ldap/cli/sync.php, is run.
- Nested groups settings let you configure support for groups of groups inside your LDAP server:

Figure 4.39 – LDAP enrolment options
Working with LDAP enrolments often requires a degree of trial and error. Creating a number of sample courses and enrolments in a playpen is recommended before applying the mechanism to your production server.
If you need to access multiple LDAP systems with different settings, there are two options:
- You will need to duplicate the enrolment plugin at the system level and modify the source code accordingly. A programmer must carry out this task, as source code changes are required in the copied module.
- You will need to upgrade to Moodle Workplace, which supports multi-tenancy authentication. Details on this powerful feature can be found at docs.moodle.org/en/Multi-tenancy_authentication.
External databases
Many organizations use a management information system, either proprietary or developed in-house, that holds information about staff and learners and the courses in which they are enrolled. It makes perfect sense to utilize this data for enrolment to Moodle. As all the information systems use a database at their core, all we have to do is to get access to the relevant data.
The bad news is that there is a plethora of database systems out there that need to be supported, from the two big commercial players, Oracle and Microsoft SQL Server, to the popular open source systems Maria DB and Postgres. The good news is that a layer called ActiveX Data Objects (ADO) exists, which does all the hard work for us. We only have to talk to the ADO layer and its internals will deal with the rest, no matter to which database it is talking.
The database must contain information on the course ID and the user ID. These two fields are compared with their counterparts you choose in the local course and user tables.
Important note
Getting your database administrator to set up a read-only view of the relevant data is highly recommended. That way, your enrolment mechanism is nicely decoupled from the database itself.
To configure database-driven enrolment, go to Site administration | Plugins | Enrolments | External database connection:
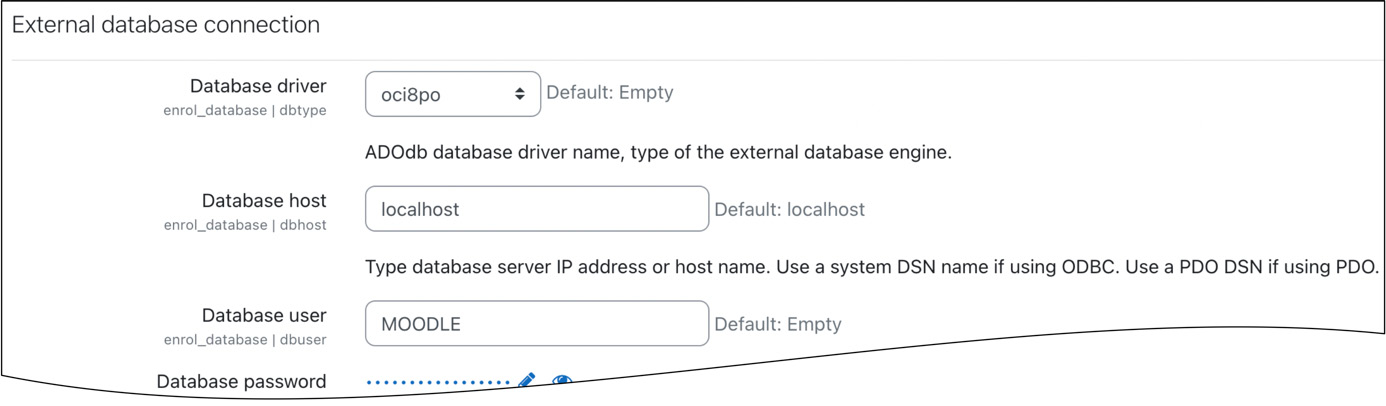
Figure 4.40 – External database enrolment options
The database connection settings have been annotated on the screen with good explanations, which we will not repeat here. Contact your database administrator if you are unsure where to locate some of the required information.
Important note
Some databases, such as Oracle, are case-sensitive; that is, field names must be provided with the correct casing for the database link to work correctly.
It is possible to test your external database settings via the respective link at Site administration | Plugins | Enrolments | Manage enrolment plugins. The thrown error messages will help you debug your settings until a valid connection is established.
Flat files
Moodle provides a flat file enrolment mechanism configured at Site administration | Plugins | Enrolments | Flat file (CSV). The method will repeatedly (via the Moodle cron process) check for and process a specially-formatted CSV file in the location that you specify. The format of the file is as follows:

Figure 4.41 – CSV enrolment file format
The following is a sample file snippet:
add, teacher, 5, Psychology1
add, student, 12, Psychology1
del, student, 17, English2
add, student, 29, English, 1207008000, 1227916800
The start and end times have to be provided together. It is recommended to use an online converter to generate the numbers since epoch.
In the text file settings at Site administration | Plugins | Enrolments | Flat file (CSV), you have to provide the absolute file location on the server. Moodle has to be able to read the file and delete it once it has been processed! You can choose to send a log file to the administrator and a notification to the user responsible for enrolments and students. External unenrol action specifies what happens when a user has been removed from the source file. Similarly, Enrolment expiration action specifies what happens to users once their enrolment has expired. The default roles in the Flat file role mapping section can be overridden with other values if required:

Figure 4.42 – CSV enrolment options
The IMS Enterprise file
The IMS Global Learning Consortium has specified an XML file format representing student and course information. Moodle can use any file that conforms to the format as its enrolment source. As with the flat file format, Moodle regularly checks for its presence; if found, it will process the file and delete it. You find details of its basic structure at docs.moodle.org/en/IMS_Enterprise.
The plugin can also create user accounts if they aren’t yet created or change user details if requested. Furthermore, new courses can also be created if they are not found on Moodle.
All other fields, including role mappings, are well-explained on screen and can be accessed at Site administration | Plugins | Enrolments | IMS Enterprise file.
This concludes the section on database-driven enrolment. Next up is a unique form of enrolment via so-called meta courses.
Meta courses – sharing enrolment across courses
Meta courses are courses that take their enrolment from other courses. They populate many courses from one enrolment or one course from many enrolments. There are two main scenarios when this is useful:
- Multiple courses want to share information or resources (meta course)
- A course is part of a qualification where students have to be enrolled in a number of courses; each course is set up as a meta course
Both scenarios are depicted in the following diagram:

Figure 4.43 – Meta course scenarios
Go to Site administration | Plugins | Enrolments | Course meta link. The list contains any roles that are not synchronized; that is, users with those roles in child courses will also be given access to their parent courses. Synchronise all enrolled users means that users will also be enrolled if they do not have a role in any parent courses. External unenrol action specifies what happens when a user has been removed from the external enrolment source – for instance, a CSV file or LDAP. The Sort course list parameter determines whether courses are being ordered as specified at Site administration | Courses | Manage courses and categories or by one of the selected sort criteria:
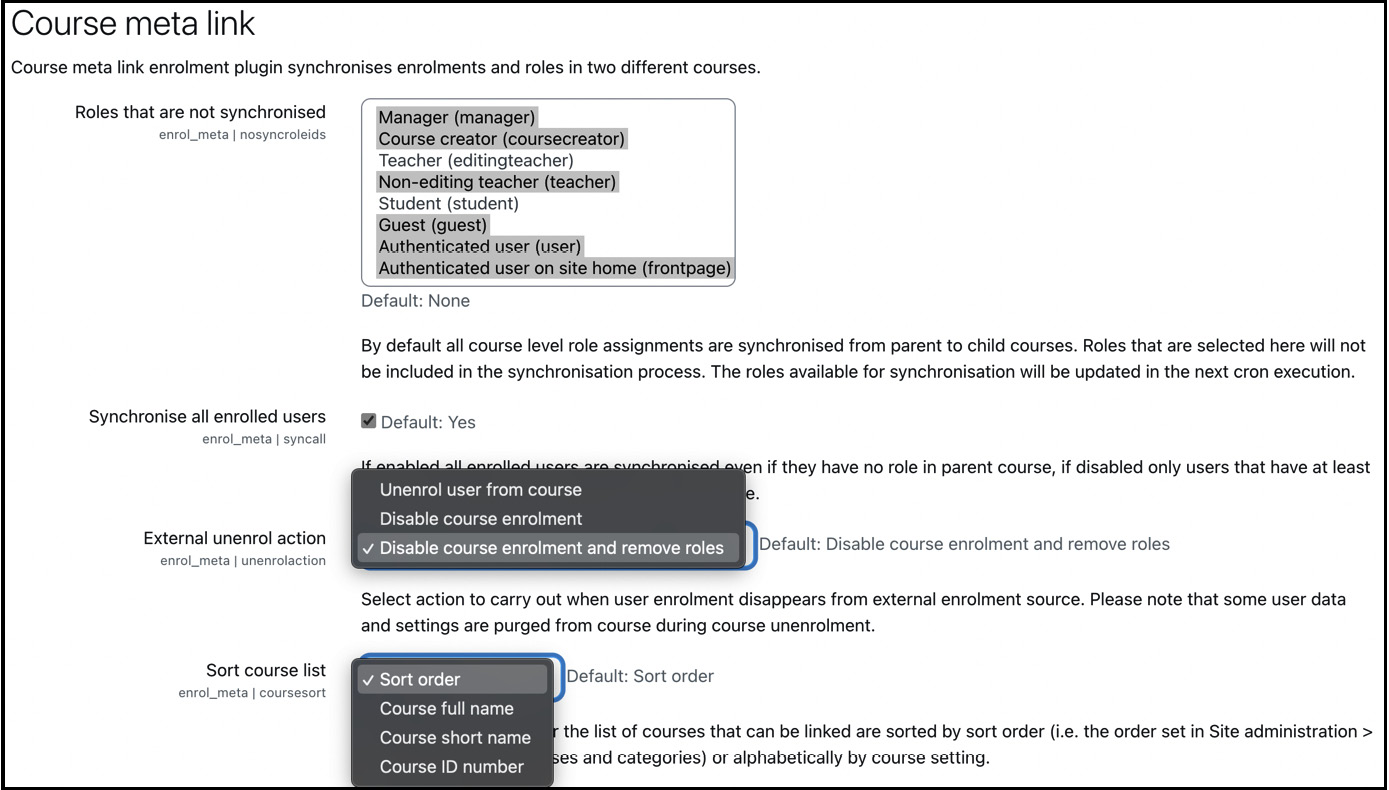
Figure 4.44 – Course meta link enrolment options
Teachers have the right to set up meta courses and manage their dependents via Course meta link under Enrolment method in the Users section of a course. While it is the role of the teacher to manage meta courses, experience has shown that the administrator is frequently asked to set these up on behalf of others.
Important note
A child course gives its enrolments to the parent course. Create a link from the parent course to the child course.
To set up the first scenario, as shown in the earlier diagram, where the meta course holds shared resources, you have to create all the four courses first and create a new course meta link instance from within the Computer Science Resources course (via Enrolment methods on the Participants tab). This instance has to link to all child courses – in our case, the three mentioned programming courses:
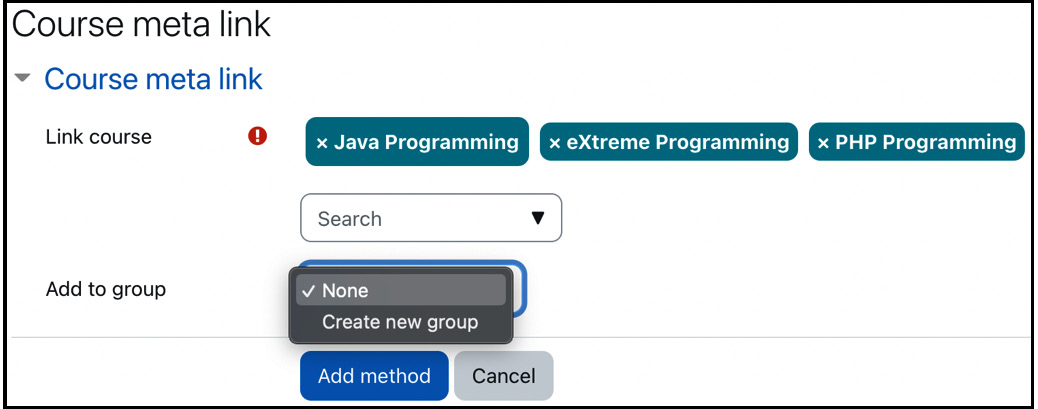
Figure 4.45 – Configuring child courses
To model the second scenario, you will have to create all 13 courses (one course for MSc Software Engineering and a course for each unit) and add a course meta link method in each of the 12 parent courses to the MSc Software Engineering course.
Meta courses are a great way to synchronize users across courses. There are scenarios where you can achieve the same with cohorts and cohort synchronization. If this is the case, working with cohorts is usually the preferred option, as they are easier to manage, particularly on larger sites.
Another alternative to meta courses is Programs in Moodle Workplace, where courses can be bundled flexibly via sets, including support for hierarchical sequences of courses. You will find a good introduction to programs at docs.moodle.org/en/Programs.
So far, all enrolment methods have been driven by organizational parameters, such as course access, passwords, or time. The last type of enrolment we want to dedicate some time to is payment.
Enrolment with payment
Moodle comes with a basic payment mechanism that allows you to charge users for courses via different payment systems. The concept behind Moodle payments is as follows:
- A payment gateway represents a payment service – for instance, PayPal, Stripe, or Alipay
- A payment account supports one or many payment systems
- Paid course enrolment is tied to a payment account
The following table visualizes the three mentioned mechanisms:
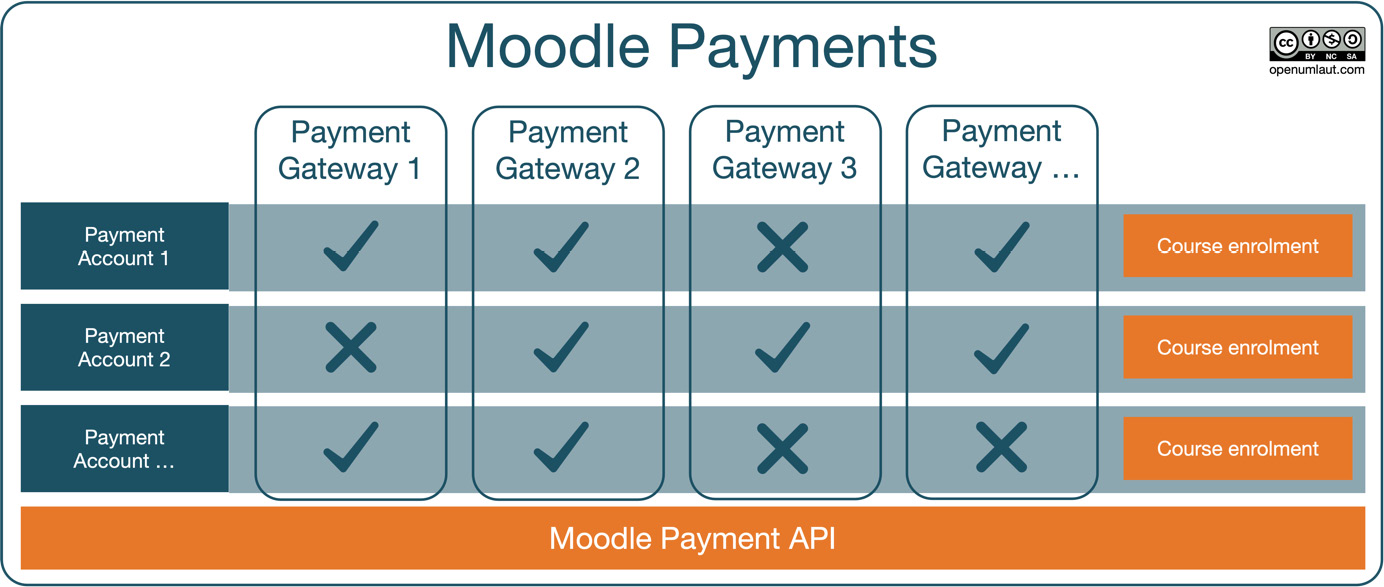
Figure 4.46 – Moodle payments
To create your first payment account, navigate to Site administration | General | Payments | Payment accounts, and press the Create payment account button. You must provide an Account name that will be used when the enrolment instance is set up later. Optionally, you can also provide an ID number, which is only necessary when the account is matched against an external system.
You can create multiple payment accounts if your organization requires separate payment gateways for different courses. On our system, we have also created a test account, which has been disabled:
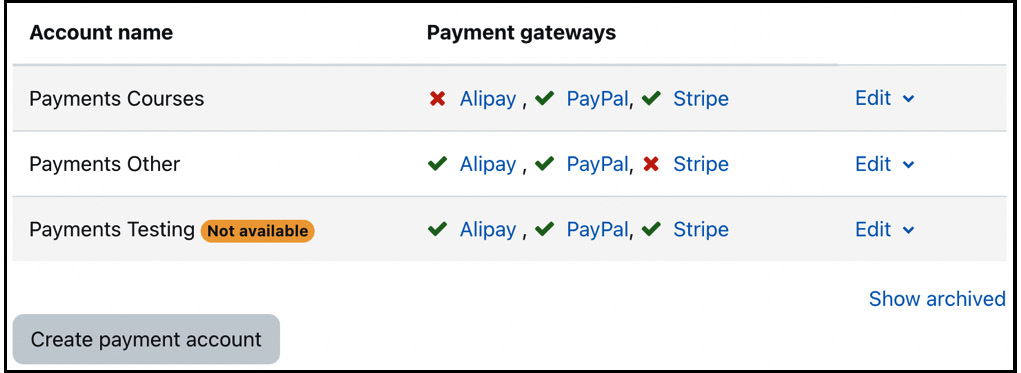
Figure 4.47 – Payment accounts
Moodle ships with a single payment gateway, namely PayPal. Additional gateways can be installed via moodle.org/plugins/?q=type:paygw. We will deal with installing plugins in Chapter 8, Understanding Moodle Plugins.
For each payment account, all payment gateways are shown, including ticks or crosses, to indicate whether a gateway has been configured or not. So, how do you configure a payment gateway? You simply click on the gateway’s name, which gets you to the configuration for this particular payment account. Here, we are only going to cover the PayPal gateway since it ships with Moodle:
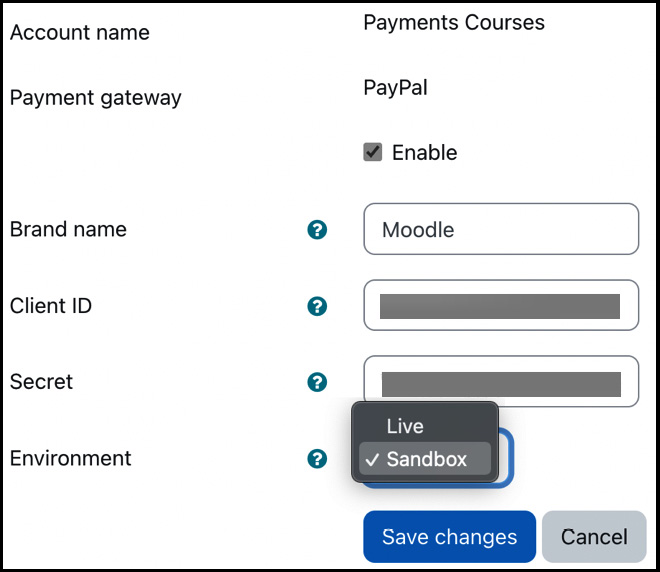
Figure 4.48 – PayPal gateway configuration
Brand name is optional and overrides the business name on the PayPal site. PayPal provides the Client ID and Secret information via developer.paypal.com/api/rest. You will be shown the two values once you have logged in. Bear in mind that you require a PayPal business account to go live. Finally, you can change Environment from Live to Sandbox for testing purposes.
Before payment plugins can be used for enrolment, you must enable them in Site administration | Plugins | Enrolments | Manage enrolment plugins. Technically, this is all you have to do to set up payment accounts and gateways as an administrator.
For completeness, here is the final step to create a payment instance inside a course (as usual, via the Enrolment methods option Enrolment on payment in Participants):
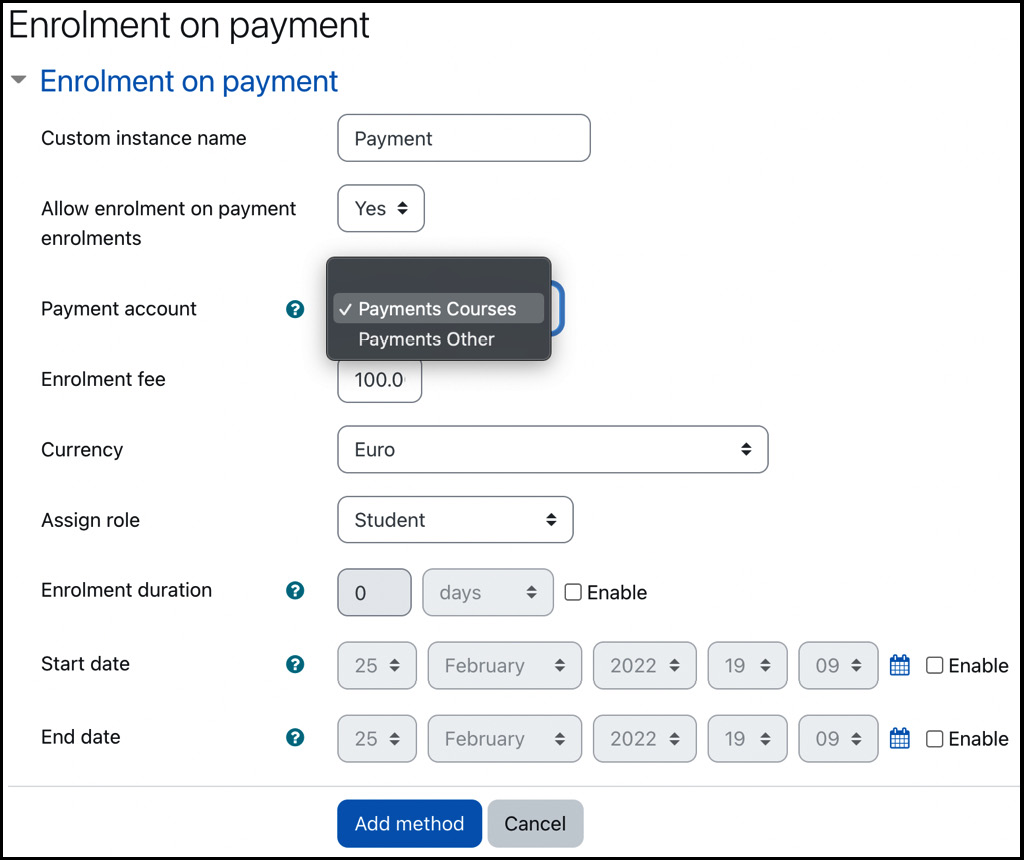
Figure 4.49 – Enrolment on payment configuration
The only fields that deviate from the standard fields of other enrolment methods are the following:
- Payment account: Select one of the payment accounts you have set up.
- Enrolment fee: The amount you charge for the course.
- Currency: The currency of your fee. You must create separate enrolment method instances for each currency to charge users in different currencies.
Multiple instances can be created for the Enrolment on payment method. This setup is useful if you wish to charge different amounts in different currencies or roles or if you have a mixture of paying and non-paying learners.
Once a user wants to enrol in a pay-for course, the following dialogue will appear (our chosen payment account also includes the third-party payment gateway, Stripe):
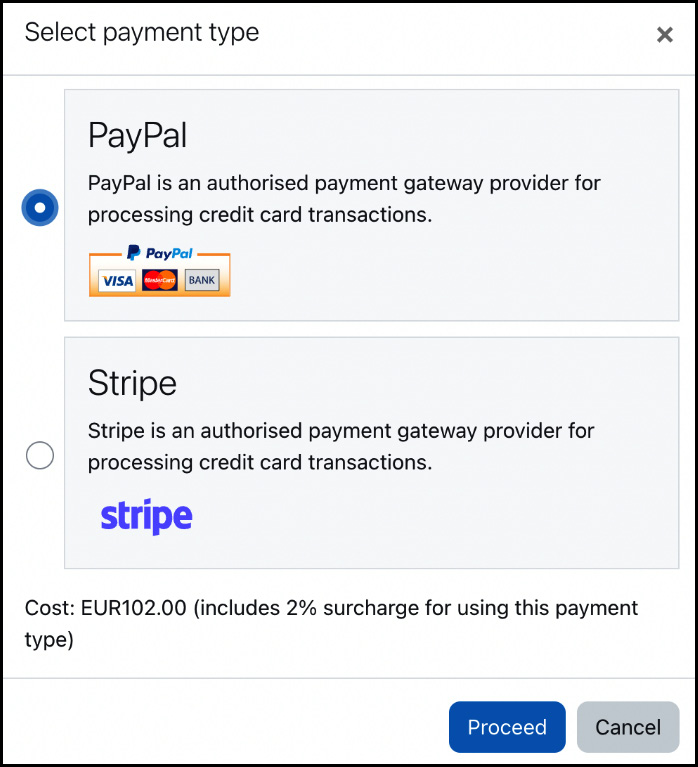
Figure 4.50 – User’s payment selection
Once the payment has been successful, the user will be enrolled in the course. You might have spotted the 2% surcharge displayed at the bottom. You can specify the surcharge for each payment gateway at Site administration | Plugins | Payment gateways | Manage payment gateways | Settings. On this screen, you can also see the currencies each payment gateway supports.
Enrolment by payment provides a flexible means to offer a mix of chargeable and non-chargeable courses. If you require a more advanced shopping cart solution to be integrated into Moodle, you might want to consider commercial services such as Course Merchant or Magento. These systems support more sophisticated workflows, such as bulk purchasing, payment on tax invoice, and price bandings.
This concludes the comprehensive section on enrolments, where we introduced enrolment principles and covered enrolment plugins. By now, you should be able to set up and configure the mix of enrolment mechanisms that is right for your organization and Moodle system.
Summary
Phew! That was a lot to take in. The complexity of courses, their management, and various facets of enrolments demonstrate a typical Moodle conundrum: the features are very powerful and flexible, but this versatility comes at a price in the form of complexity. Moodle has done a great job in mastering this balancing act, but nonetheless, there is usually a steep learning curve to be mastered.
In this chapter, you learned everything about courses and categories. As we have discovered, courses are fundamental to Moodle, as they contain all the learning activities and content prepared by teachers and used by students. Even Moodle’s home page is a course, but we will deal with this later when we customize the look and feel of your LMS.
While it is possible to delegate many course-related tasks to non-administrators – we will deal with this in Chapter 6, Managing Permissions, Roles, and Capabilities – you, as the administrator, are often required to set up the overall course and category structure. There are also plenty of course- and category-related settings that we deliberately did not deal with in this section but will cover throughout the book. Examples are various options in Site administration | Appearance | Navigation that drive what is shown in the navigation bar, and Site administration | Appearance | Courses where there is information about how the course catalog is structured. Both topics will be discussed in Chapter 7, Enhancing Moodle’s Look and Feel.
Closely related to courses is the enrolment of users; it is important to understand the difference between enrolment, which we covered in this chapter, and authentication, which we will discuss in detail in the next chapter dealing with user management.