1
Installing Moodle
In this first chapter, we’ll start by installing Moodle.
After providing an overview describing the most suitable setup, we will outline the necessary software and hardware requirements before covering the following installations:
- Installing Moodle in a LAMP environment
- Installing Moodle via the command-line interface (CLI)
- Upgrading Moodle manually and via the CLI and Git
We won’t be covering the installation on operating systems other than Linux, but we will provide some pointers to resources for Windows and macOS.
Moodle can be scaled from a single instructor to an entire institution. We will only cover basic installations and present solutions to some common problems. We will also assume you are familiar with basic Linux system administration.
In this chapter, we will be covering the following topics:
- Preparing your Moodle installation
- Installation in a LAMP environment
- Installation via the command-line interface
- Updating Moodle
Preparing your Moodle installation
Before you start installing Moodle, you have to decide which setup is right for your organization. Once you have decided, there are several hardware and software prerequisites you have to fulfill before you can get started.
Choosing your best setup
There are many different environments in which you can set up Moodle. The three main criteria that will help you determine the correct setup are as follows:
- Flexibility: If you want to have complete control over your system, install plugins, be able to tweak system settings, and make frequent changes to the setup, you should host your own server. However, if your preferred choice is to only administer Moodle while somebody else is looking after the operating system, the web server, and backups, it is better to opt for a professionally-hosted setup, particularly the offerings provided by authorized Moodle Partners.
- Scalability: This is entirely driven by the number of active learners and educators logged in to Moodle simultaneously. Moodle on a small server will not be able to cope with hundreds of concurrently logged-in users. On the other hand, a load-balanced cluster would be overkill for a small institution with a few dozen learners. The following table provides some indicative setups for different types of educational organizations:

Figure 1.1 – Moodle setups depending on user numbers
Please bear in mind that these are only indicative numbers that are not written in stone and also depend on the other factors mentioned here.
Each Moodle instance must be installed on a dedicated or shared server, either hosted in-house or externally. If you decide to go down the hosted route, avoiding a cheap hosting package is highly recommended as those systems are not optimized for Moodle usage; their one-size-fits-all approach will significantly impact the system’s performance, especially with an increasing number of concurrent users.
Moodle HQ offers hosting on moodlecloud.com; however, these packages come with some limitations (the numbers depend on the chosen plan): user limits, storage limits, no way to install plugins or custom themes, and the inability to modify some hard-coded admin settings. If these restrictions are acceptable, hosting on moodlecloud.com might be suitable for your organization.
- Cost: Budgetary constraints will undoubtedly play an important role. Unless you already have the appropriate infrastructure in place, it will likely be more cost effective to host your Moodle system externally as it saves you from purchasing servers and renting a 24/7 data connection that caters to your users’ needs. The licensing cost will be significantly higher if you use commercial operating systems, web servers, and database systems instead of an open source solution. Either way, Moodle is designed to support a wide range of possible infrastructures suitable to your organization’s IT policy.
In addition to these three criteria, which influence the decision about the underlying infrastructure, other factors, such as in-house expertise, compatibility with other systems, IT policies, personal preference, and existing resources, will impact your decision.
We will be covering the most popular operating system for hosting Moodle – Linux. For other operating systems or setups, such as in virtualized environments or on multi-server clusters, please consult your local Moodle Partner (moodle.com/solutions/certified-service-providers). Some hosting companies offer quick one-click installations; while the resulting Moodle system is sufficient for experimental sites, it is certainly unsuitable for production environments.
Fulfilling Moodle prerequisites
Several hardware and software requirements must be satisfied before we can start installing Moodle.
Hardware requirements
These requirements apply if you host Moodle yourself or if it is hosted on an external server (shared, virtual, dedicated, or clustered). On cheaper hosting packages, the hardware configuration is often insufficient to run Moodle efficiently:

Figure 1.2 – Moodle hardware
Let’s take a look at these requirements in more detail:
- Disk space: Moodle itself takes up approximately 1 GB of disk space. However, this only provides you with a naked system and does not consider the space you require for any learning resources. The faster the disks, the better. RAIDed disks are recommended but are not essential on smaller installations.
- Memory: A good rule of thumb is to have 1 GB of RAM for every 5 to 10 concurrent users. You have to double this calculation on Windows-based systems due to the higher overhead of the operating system. Of all the hardware components, RAM will impact Moodle’s performance the most.
Important note
The more RAM, the better; the faster the RAM, the better.
- CPUs: Processor type and speed are essential too, but not as important as RAM. As always, the faster the CPU, the better, and the more cores a CPU has, the more powerful it will be.
- Network: While Moodle can run on a standalone machine, its full potential is in a networked environment. Fast network cards are essential, as is good upload and download speed if the LMS is accessed over the internet.
Now, let’s look at the software requirements.
Software requirements
While it is recommended to have the latest version installed, for Moodle 4, you must have the following components up and running on your server (release-specific notes can be found at moodledev.io/general/releases):
- Database: Moodle officially supports the following database systems: MySQL (version 5.7 or later utilizing the ACID-compliant InnoDB storage engine), PostgreSQL 10+, MariaDB 10.2.29+, Aurora MySQL (on Amazon Web Services), Microsoft SQL Server 2017+, and Oracle 11.2+.
- Web server: Apache is the preferred web server option, but Moodle works well with any other web server that supports PHP, such as Microsoft IIS.
- PHP: PHP 7.3.0 is the minimum PHP version for running Moodle 4; PHP 7.4.0 is the minimum version from Moodle 4.1 onwards. PHP 8 is also supported. You might have to change some PHP settings in the php.ini or .htaccess file (for more details, see docs.moodle.org/en/Installing_Moodle).
- PHP extensions: Moodle makes use of several extensions, most of which are compiled into PHP by default. They are as follows:
- Compulsory extensions: curl, ctype, dom, fileinfo, gd, hash, iconv, intl, json, mbstring, openssl, pcre, simplexml, spl, xml, xmlreader, zip, and zlib
- Recommended extensions: exif, soap, sodium, tokenizer, and xmlrpc
- Conditional extensions: mysql, odbc, and pgsql (depending on the database) and ldap, ntlm, and others (depending on the authentication mechanism used)
Depending on your specific setup, additional software might be required. It is assumed that the database, web server, PHP, and extensions have been installed correctly, as this is not an LMS administrator task. Once this is the case, we are ready to go.
Important note
To access Moodle, a modern web browser (the latest version of Firefox, Google Chrome, Edge, or Safari) is required.
Before we start the installation process, it is worth familiarizing yourself with Moodle’s releases and versions.
Understanding Moodle versions
Moodle versions follow a strict calendar that is published and updated regularly on moodledev.io/general/releases. If a planned feature is not ready for the imminent release, it will be moved to the next version; that is, a release date will never be changed, but the time when features will be introduced might be.
The release frequency for major versions (4.0, 4.1, and so on) is twice a year (the second Monday of May and November).
Moodle releases minor versions (4.1.1, 4.1.2, and so on) on the second Monday of March, May, July, September, and November. The same applies to unscheduled releases in the case of a severe security issue or serious regression being fixed.
Moodle distinguishes between two types of releases:
- Standard support release: Bugs will be fixed for 12 months, and security issues will be provided for 18 months
- Long-term support release: Bugs will be fixed for 12 months, and security issues will be provided for 36 months
The simplified release calendar is shown in the following timeline; you can find a more detailed version at moodledev.io/general/releases:

Figure 1.3 – Moodle releases
When Moodle 4.0 was released in April 2022, versions 3.9 to 3.11 were still supported. By the time Moodle 4.1 is released, only version 3.9 will be supported since its lifetime has been extended (hence the long-long-term support label) to give admins more time to upgrade to the version 4 branch.
If you wish to stay up-to-date with future releases, check Moodle’s roadmap at moodledev.io/general/community/roadmap, where you will find the current plans for the future technical development of all Moodle’s products and services.
OK, enough of version numbers and release dates. Let’s learn how to install (the latest version of) Moodle.
Installation in a LAMP environment
Moodle is developed in Linux using Apache, MySQL, and PHP (known as the LAMP stack). If you have a choice, this is the preferred environment to use. There is an ongoing debate about whether PostgreSQL is the more suitable database option, but we will stick with MySQL/MariaDB as this is the system most administrators are familiar with. Also, some organizations are bound to Microsoft SQL or Oracle. If this is the case, please refer to the respective installation guide, as this is beyond the scope of this book.
The high-level installation process is shown in the following process diagram:

Figure 1.4 – Moodle installation process
We will go through each phase in the remaining subsections, covering each installation step in a Linux environment. The process is the same for other operating systems, which we won’t cover; here are some pointers that should get you started:
- For Windows servers with a small number of users, the XAMPP-based Moodle distribution is suitable. XAMPP is a free Apache distribution that contains MySQL and PHP (as well as Perl) and exists for several operating systems. The Moodle distribution for Windows makes full use of XAMPP and is located at download.moodle.org/windows. The installation works on all the latest Windows PCs and server variants.
- For larger Windows installations, you have to install Moodle manually, which involves installing a database server (MS SQL or any other supported system), a web server (Microsoft IIS or Apache), and PHP separately. You can find details about this process at docs.moodle.org/en/Windows_installation.
- MAMP is a free distribution that contains Apache (and Nginx), MySQL, and PHP for macOS. Like its Windows counterpart, the Moodle distributions for macOS are only intended for local installations and not for production environments. Moodle4Mac is available as universal binaries via MAMP, located at download.moodle.org/macosx.
Now, let’s go through the installation process, starting with downloading Moodle.
Downloading Moodle
Go to download.moodle.org and select the latest release:
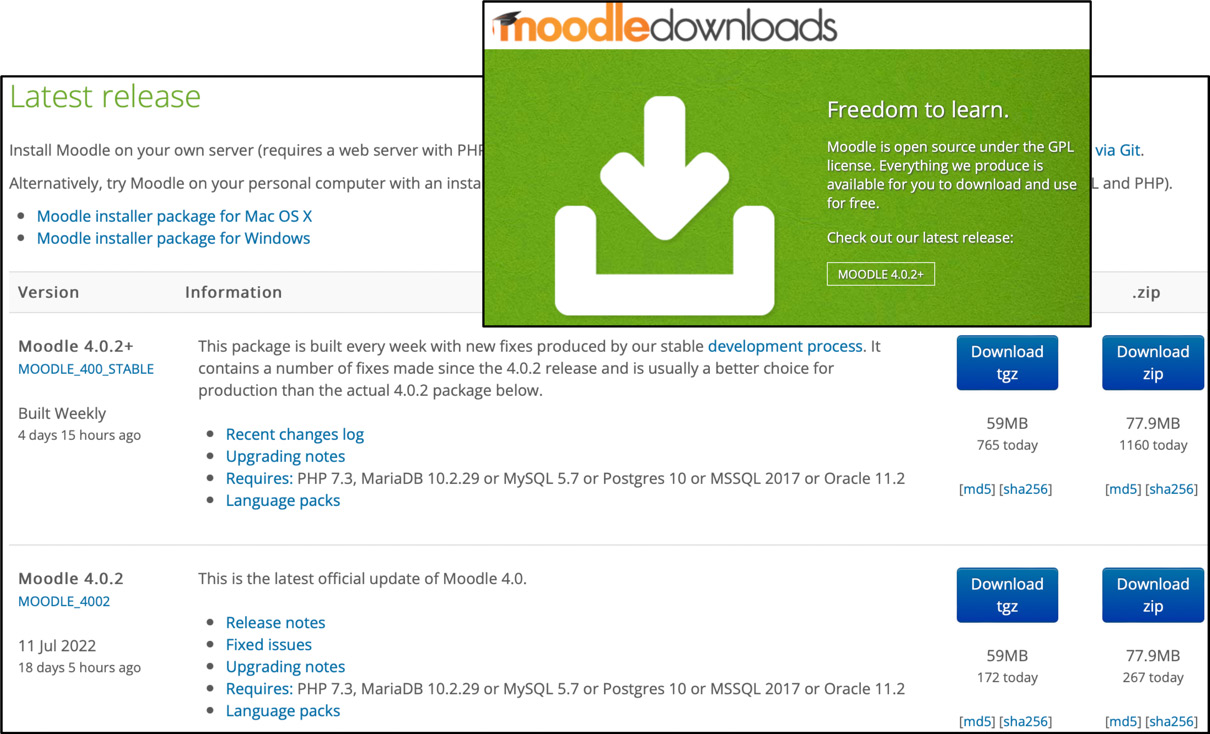
Figure 1.5 – Moodle downloads
A newer version is likely to be available by the time you read this. If you wish to go with the 4.0.x version this book has been written for, select Other supported releases; otherwise, feel free to go with the latest stable build; most content in this book will still be applicable.
There are five types of builds available on Moodle’s download site:
- Latest release: There are two releases for the current version of Moodle: the latest stable build and the latest official release. The latest stable version is created weekly (every Wednesday) and is the best choice for a new server. The latest official release contains the stable build and new fixes, but the version will not have gone through the weekly code review and might contain unresolved issues.
- Other supported releases: The Moodle development team maintains older versions than the current ones, as outlined in the release schedule earlier.
- Security-only-supported releases: Critical fixes impacting security or data loss will be provided for one further release, but no other bug fixes will be back-ported. See the information on Moodle versions provided earlier.
- Legacy releases: For older versions, the last build is made available. However, these are not maintained any further.
- Development releases: Moodle also gives you the option to download beta releases of the software (if available) and the latest development release. These should only be downloaded for testing or development purposes, never in production environments!
Each version is made available in two compressed formats: TGZ (use the tar command to uncompress) and ZIP (use the unzip command to extract it). You can download them by clicking on the respective link or, if you have (secure) shell access, retrieving the file directly by using the wget command:
wget http://download.moodle.org/moodle/moodle-latest.zipImportant note
The location where you install Moodle is referred to as dirroot.
If you make use of Moodle Shell (MOOSH), which is described in more detail in Chapter 17, Working with Moodle Admin Tools, you can use the following command to download the latest stable branch of Moodle:
moosh download-moodleOnce you have moved the file to the location where you want to install it on your web server (dirroot), extract the file using the unzip command or tar if you downloaded the TGZ version:
unzip moodle-latest.zip
tar xvfz moodle-latest.tgz
If you place the entire folder in your web server documents directory, the site will be located at www.yourwebserver.com/moodle. To access your site from www.yourwebserver.com, copy the contents directly into the main web server’s documents directory.
Important note
The URL via which Moodle is accessed is referred to as wwwroot.
Once the download step has been completed, you must create the database that Moodle uses to store its data.
Creating the Moodle database
Moodle requires a database where it can store its information. While sharing an existing database is possible, creating a separate database for Moodle is highly recommended. Adding a new database can either be done via a web interface, as provided for hosted servers, or via the command line.
Using a hosted server
Most hosting providers provide a dedicated web interface to carry out basic database operations. Alternatively, you can use phpMyAdmin, open source software that allows you to manage MySQL databases over the web. phpMyAdmin is part of most Linux distributions and many control panels, but it is often configured not to allow new databases to be created. If this is the case, you must create the database from the database manager in your control panel.
phpMyAdmin allows you to perform both steps – creating a database and adding a new user – in a single action, as shown in the following screenshot. We will create a user, packt, and also check the Create database with same name and grant all privileges option:
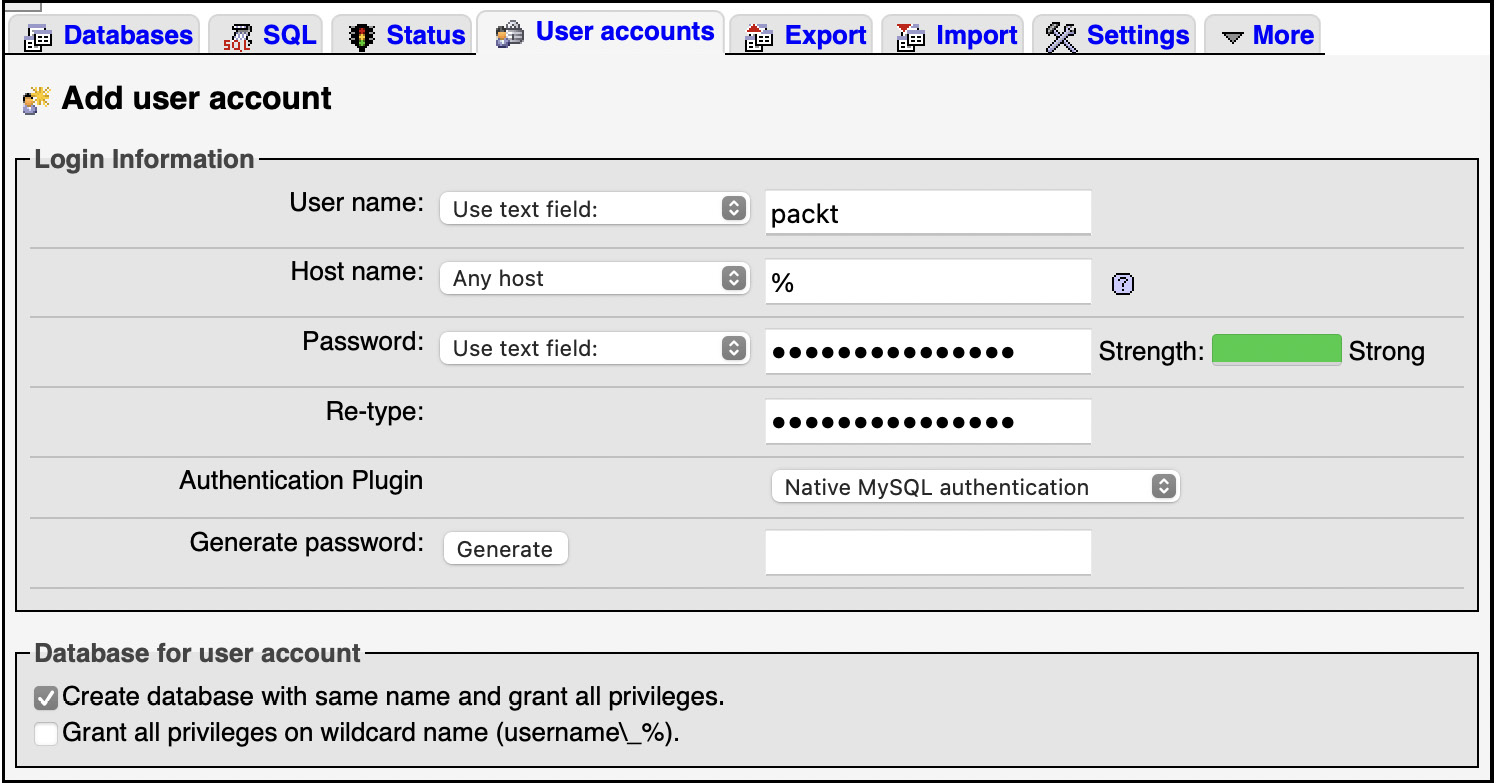
Figure 1.6 – Creating a Moodle database and user in phpMyAdmin
While you can use an existing database user account, creating a dedicated user for the Moodle database is good practice.
Important note
Do not use the MySQL root account for your Moodle database!
You don’t need to create any tables; Moodle will populate the database during installation.
Creating the Moodle database via a web interface is simple, but most technical administrators prefer to work via the command line.
Using the command line
If you don’t have access to a web interface to create MySQL databases and user accounts, or if you prefer to use a Linux shell, you can perform these steps via the command line:
- Start the database command-line tool by entering mysql -root -p and enter the password at the prompt.
- Create a database (called packt) by entering CREATE DATABASE packt; (all MySQL commands must be terminated with a semicolon).
- Set the default character and collation order to UTF8 by entering ALTER DATABASE packt DEFAULT CHARACTER SET utf8 COLLATE utf8_unicode_ ci;.
- Create a user and password (here, packt@localhost and password, respectively) and grant database access permissions by entering GRANT SELECT, INSERT, UPDATE, DELETE, CREATE, CREATE TEMPORARY TABLES, DROP, INDEX, ALTER ON packt.* TO packt@localhost IDENTIFIED BY 'password';.
- Exit the MySQL command tool by entering QUIT.
It is necessary to reload the grant tables using the following command line:
mysqladmin -u root -p reloadWith that, you have set up the database. All you have to do now is create Moodle’s data directory. Then, you can start installing Moodle itself.
Creating the Moodle data directory
Moodle stores most of its information in the database you have just created. However, uploaded files such as assignments, course images, or user pictures are stored in a separate directory. This data directory in Moodle is usually referred to as moodledata.
Important note
The location that holds your Moodle data files is referred to as dataroot.
Later, the Moodle installer will attempt to create this directory, but in some setups, this operation will fail due to security restrictions. To be on the safe side, it is better to create moodledata manually or via a web-based file manager, as provided by some systems.
Important note
It is crucial to create moodledata on your server where it cannot be accessed publicly – that is, outside your web directory.
moodledata is where all the uploaded files by course authors and learners will be stored, so ensure this is adequately dimensioned. You may also consider creating moodledata in a separate partition.
Any moodledata permissions should be rwxrwx--- (chmod –R 0770 moodledata). If you use 0777, everybody on the server will have access to the files.
Change the user and group of the directory to that of your web server (usually, this will be apache or www-data and nobody or www-data) by entering chown –R apache:nobody moodledata.
If you don’t have permission to create the data directory in a secure location, create the .htaccess file in your home directory and ensure it contains the following two lines:
order deny,allow
deny from all
These two settings prevent files from being accessed without users having permission to do so.
We have completed the first three steps – downloading Moodle, creating the database, and preparing moodledata – which are the prerequisites for running the installer script.
Running the installer script
The installer script performs two main actions – populating the database and creating the configuration file, config.php. The Moodle installer is initiated by entering the URL of wwwroot (the location where you copied Moodle) into your web browser; Moodle will recognize that it hasn’t been installed yet and start the process automatically.
The Moodle installer has to set a session cookie. If your browser has been configured to trigger a warning, make sure you accept that cookie.
The first screen lets you choose the language to be used during installation – this is not the locale used for Moodle, only the language for the installation:
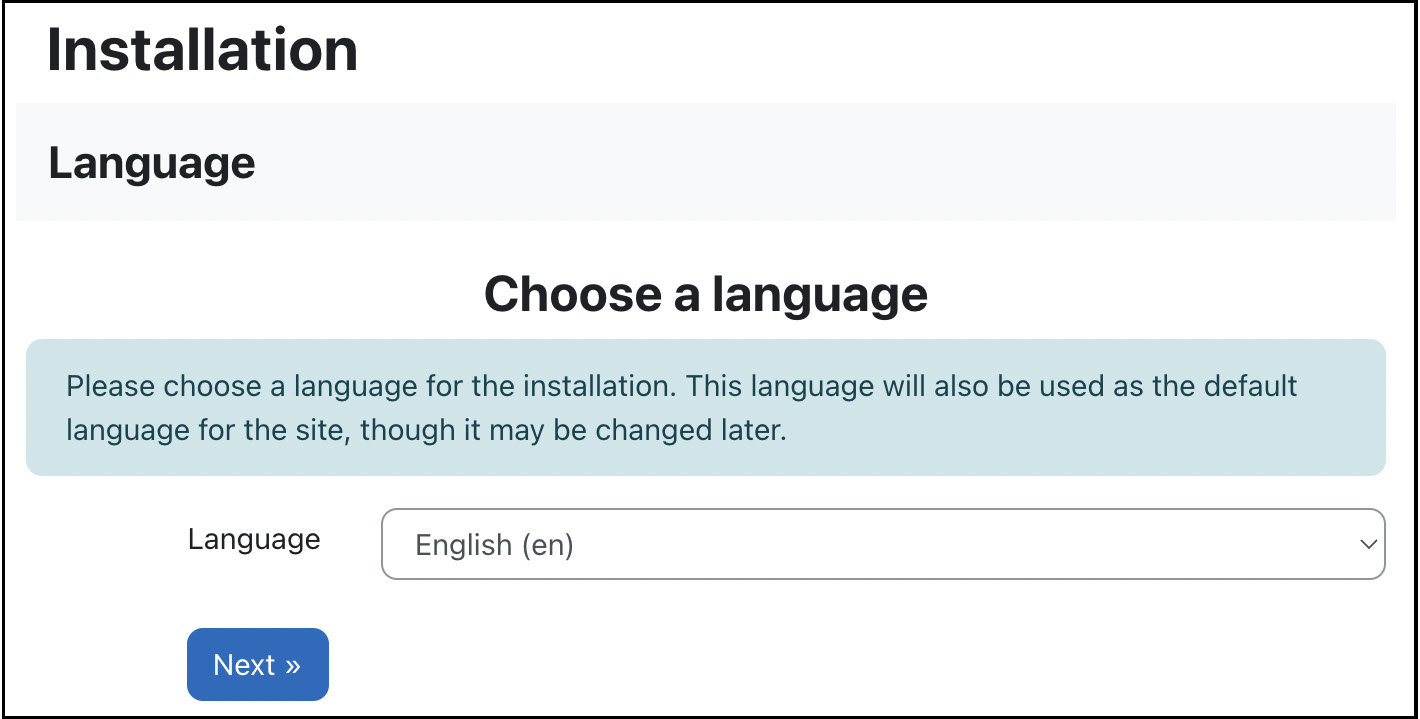
Figure 1.7 – Moodle installation – Choose a language
The following screenshot displays the expected values for the Web address entry of the site (wwwroot), the Moodle directory (dirroot) entry, and the Data directory (dataroot) entry; you might have to modify the Data directory entry if the location of your moodledata differs:

Figure 1.8 – Moodle installation – Confirm paths
If dataroot cannot be located or does not have the correct permissions, an error message containing details will be displayed. The same applies if dataroot is accessible directly via the web and is not secure.
You must select which database you wish to use on the following screen. Only the drivers for MySQL, MariaDB, Aurora MySQL, and PostgresSQL are installed on my system. The respective PHP extension must be installed first if you wish to use other database systems such as Oracle or MS SQL Server:
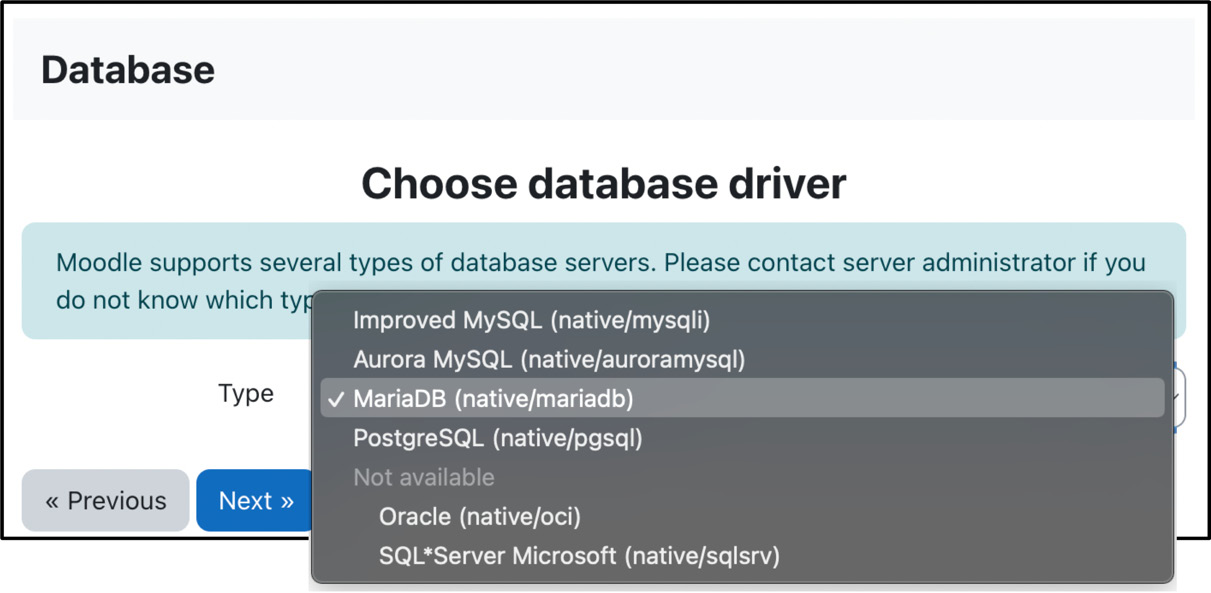
Figure 1.9 – Moodle installation – Choose database driver
This interface uses the configuration details previously established. The following screenshot shows the required fields but will look slightly different if you have chosen a database driver other than MySQL:
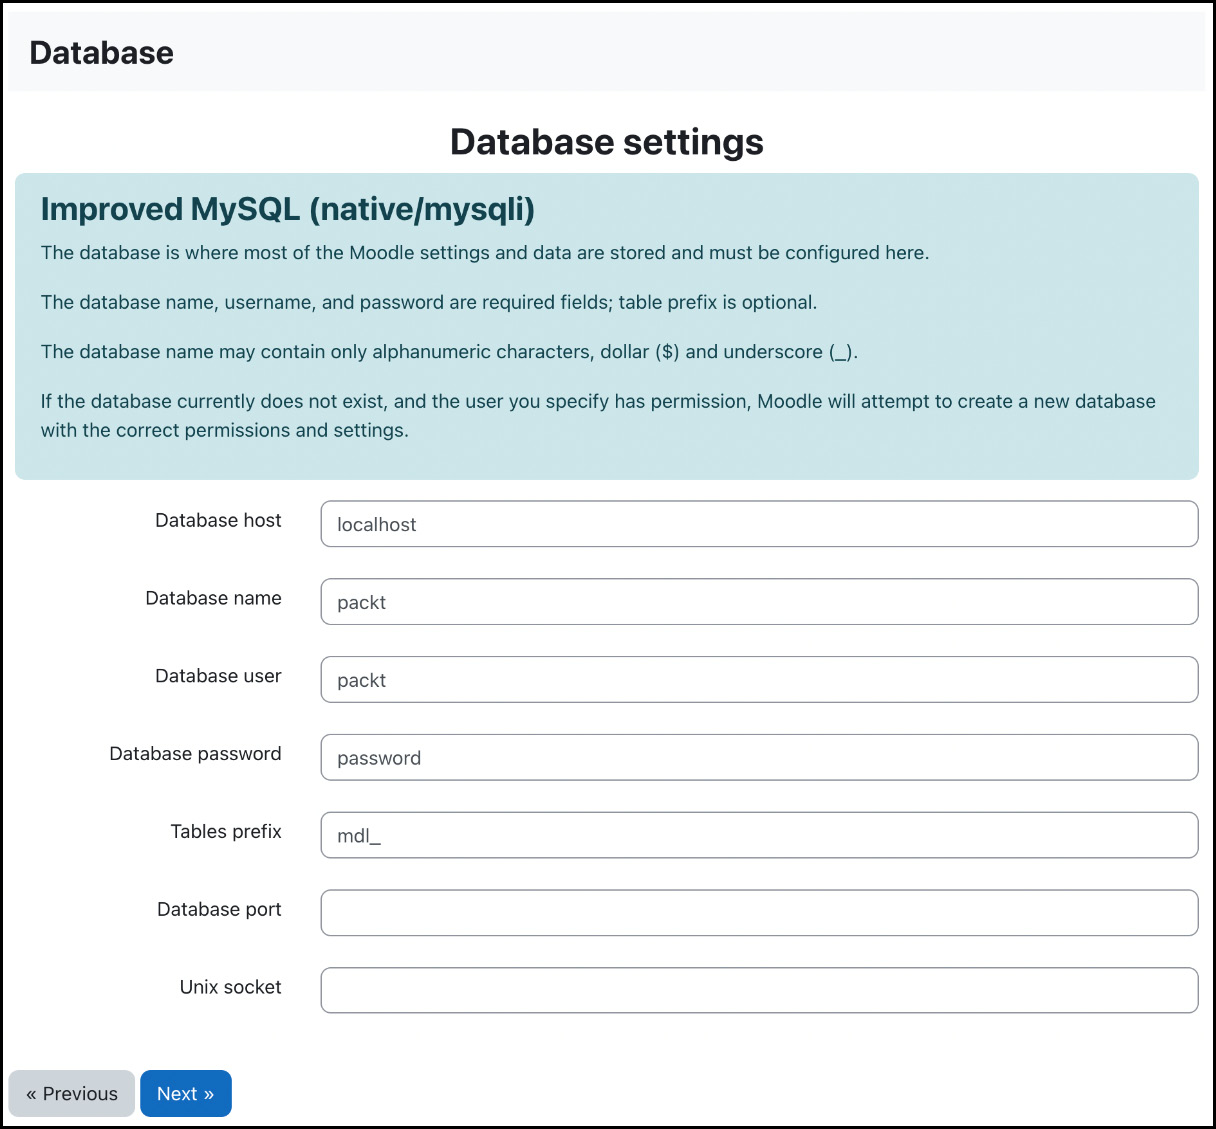
Figure 1.10 – Moodle installation – Database settings
The Database host entry’s default is localhost (127.0.0.1), which is correct if the database is located on the same server as the web server. If it is located on a separate server, specify the IP address (preferably unresolved to improve performance).
All the tables the Moodle installer will create will be prefixed with mdl_. The Tables prefix entry should only be changed if you run multiple Moodle installations using the same database.
Next, the Moodle installer checks whether certain components have been installed. Not all the modules are compulsory – see the Moodle prerequisites section of this chapter and the notice on-screen. The installer also verifies the critical PHP settings. If any of the tests have not passed, you must go back to the Software requirements section to resolve any problems and restart the installation process after the issues have been fixed. Otherwise, some features may not work, or the installer will not continue, depending on the importance of the module:
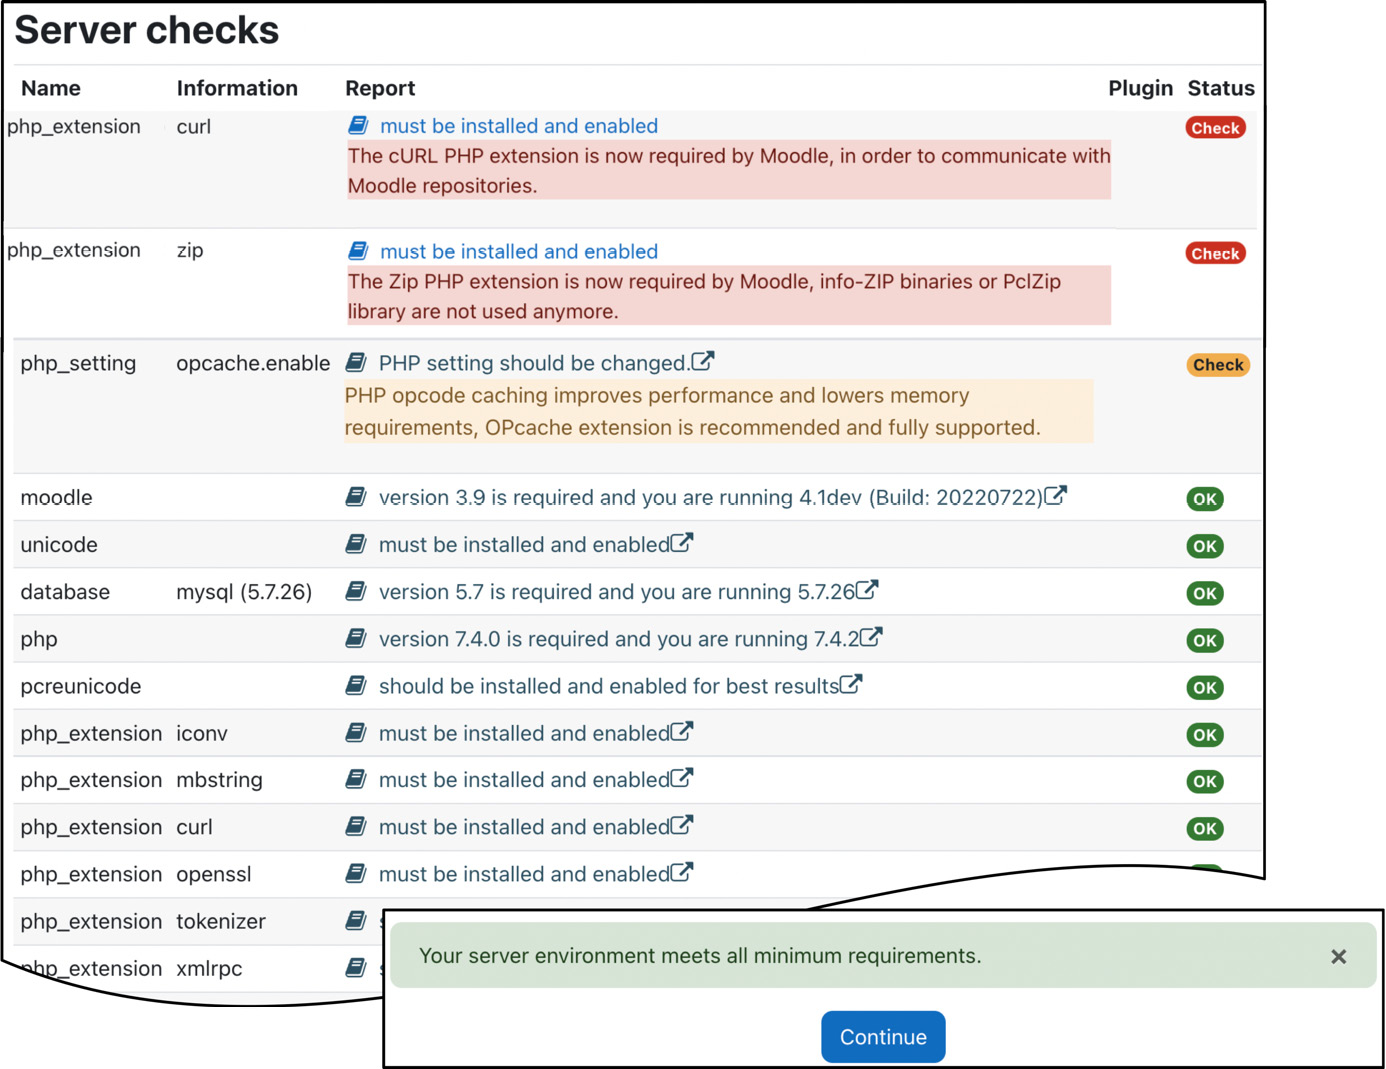
Figure 1.11 – Moodle installation – Server checks
When you have confirmed the server check screen, the installer will display Moodle’s copyright notice, which you must confirm. The appearance of this screen also means that the Moodle configuration file, config.php, has been successfully created. The installer will display the config file’s content if the creation fails (usually because of incorrect permissions). You will have to copy the text from the screen and paste it manually into config.php in your dirroot.
Once you have accepted the agreement (you can find the full text of the GPL license at docs.moodle.org/dev/License), all the database tables will be created. This process might take a few minutes.
Once the table has been created and populated, you will see the screen where you can set up the administrator account. The default Username is admin, which should be changed for security reasons. You must fill in the following self-explanatory fields: New password, First name, Surname, and Email address. In Chapter 5, Managing Users, Cohorts, and Authentication, all other fields will be explained in great detail:
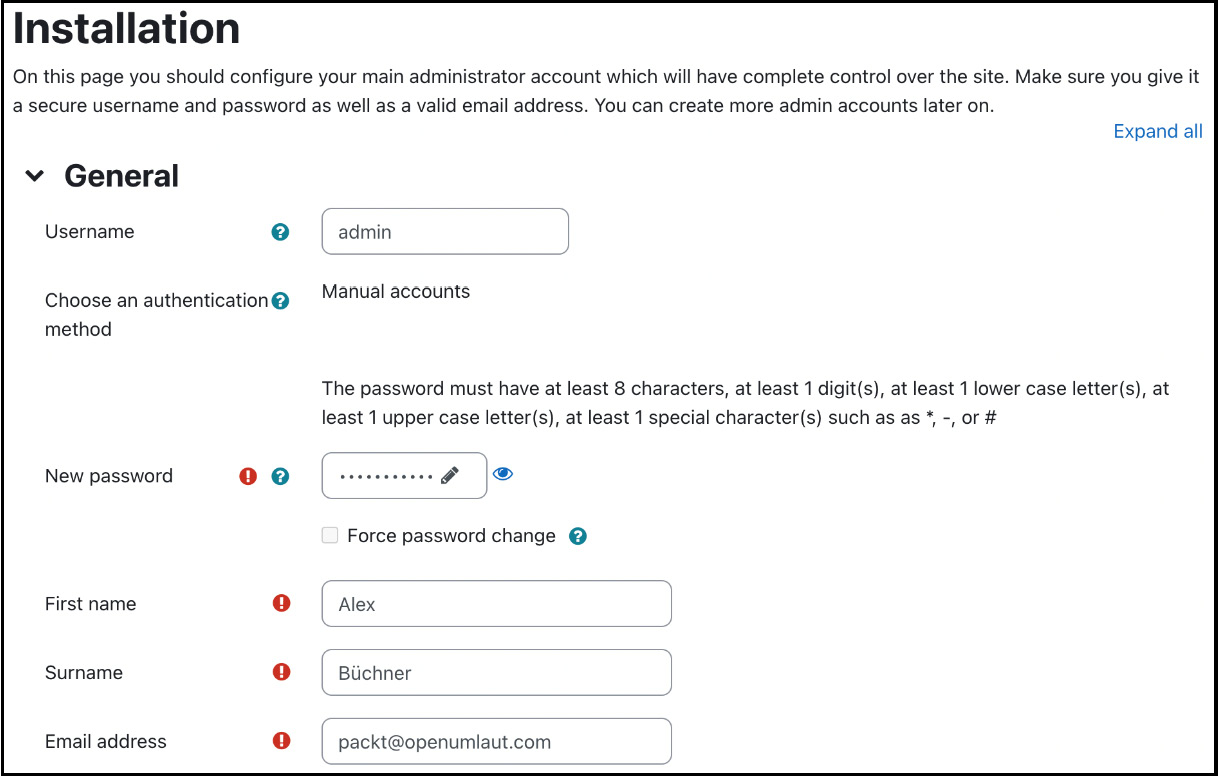
Figure 1.12 – Moodle installation – setting up the admin account
The last screen of the installation script asks you to enter some home page settings; namely, Full site name, Short name for site, and Site home summary. These home page settings can be modified later (see Chapter 7, Enhancing Moodle’s Look and Feel).
Change the Default timezone entry to the location of your server, not your location. The installer allows you to turn on Self registration. Leave this disabled for now until you have read Chapter 5, Managing Users, Cohorts, and Authentication. You must also provide a Support email (for your user queries) and a No-reply address (to avoid email issues).
Once this information has been entered and the screen has been confirmed, you are ready to start using Moodle. However, first, you must set up the execution of Moodle’s maintenance script.
Setting up the cron process
Moodle has to perform plenty of background tasks regularly.
Important note
The cron script, executed by the cron process, performs Moodle’s background tasks.
An entire page has been dedicated to cron in the Moodle documentation; you can find it at docs.moodle.org/en/Cron. You must set up the cron process; otherwise, any timed Moodle features, such as scheduled backups, sending forum notifications, statistics processing, and so on, will not work.
The script, cron.php, is located in the admin directory and can be triggered manually through a web browser (if allowed in the security settings). Once executed, the output from the script (<yoursite>/admin/cron.php) is shown on-screen, and you have to navigate back to your Moodle system manually.
There are several ways to call the cron script. The most popular option is via the wget command:
wget –q –O /dev/null http://<yoursite>/admin/cron.phpHowever, if this does not suit your setup, check out docs.moodle.org/en/Cron for alternatives.
Most control panels allow you to set up scheduled tasks via a cron job management tool. Bear in mind that this is not part of Moodle but part of your hosting package. Alternatively, you can create a crontab entry, a file located in the /etc directory that contains all the system-wide cron entries. This file can also be edited manually using crontab -e, but ensure you get the syntax right!
To run the CLI cron script every minute, add the following line, replacing <yourpath> with the directory where your Moodle system is located (dirroot):
* * * * * /usr/bin/php <yourpath>/cron.php >/dev/nullImportant note
It is highly recommended to run the cron process every minute!
That’s it. Moodle is now ready to go. Two optional steps you should quickly run through are covered in the next section.
Finalizing the installation
To make sure that Moodle is running without problems, go to Notifications in the Site administration menu of the General tab:

Figure 1.13 – Moodle installation – checking system notifications
In the case of my installation, there are two issues – the cron script has not been configured and the mobile app is not enabled. I need to fix the former issue; the latter can wait until Chapter 11, Enabling Mobile Learning. Other messages might appear in the Notifications area, and you should resolve them promptly.
Moodle provides some statistics about its usage on moodle.net/stats, and to be included in these figures, you have to register your Moodle site via Site administration | General | Registration. Registration with Moodle is optional and free, and you decide what information will be made public.
Important note
Even if you opt out of providing any usage patterns for your site, it is still highly recommended to register to receive information on new Moodle releases, security alerts, and other important news.
The following is the registration form, alongside a screenshot from the public statistics:
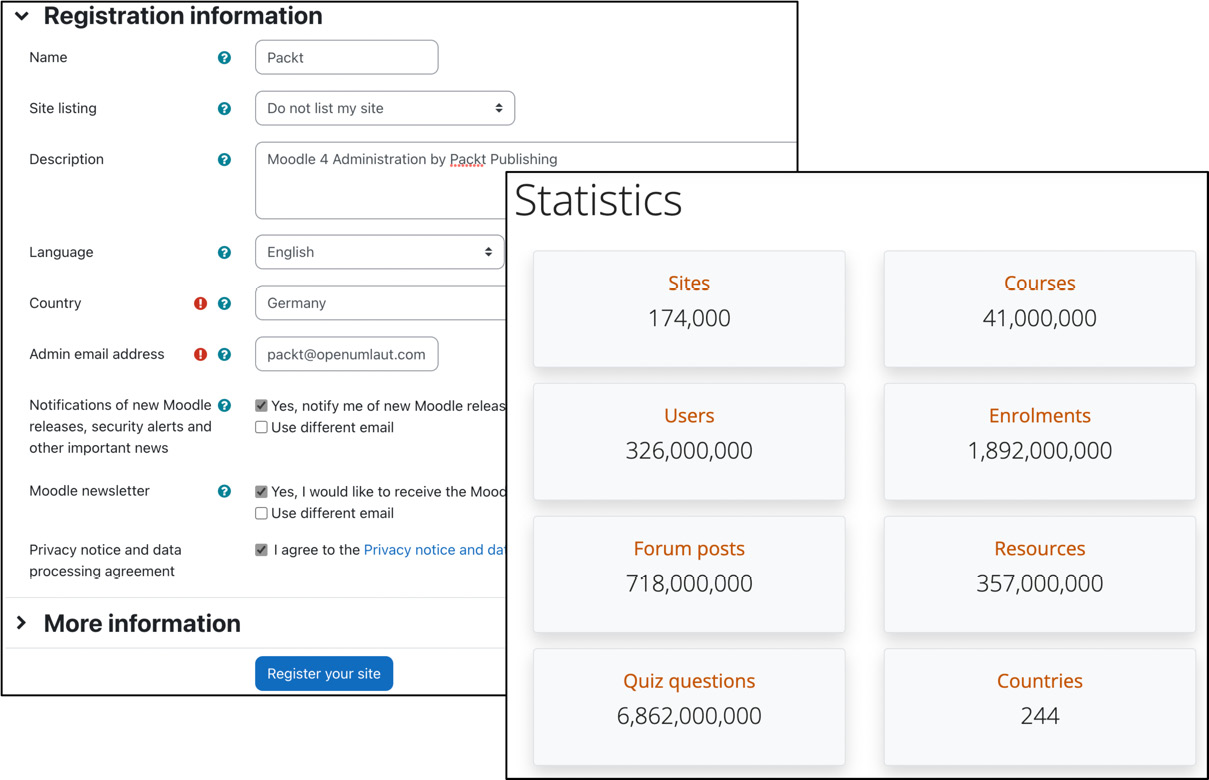
Figure 1.14 – Moodle registration and statistics
This concludes the installation process for Moodle in a LAMP environment. If you have encountered any issues that have not been covered in these instructions or if your setup differs from the one described, go to docs.moodle.org/en/Installing_Moodle, where more installation details are provided, and exceptions are covered in great detail.
An alternative to installing Moodle via the web interface is via the command-line interface (CLI), which is the topic of the following section.
Installation via the command-line interface
Moodle provides a CLI that lets you perform several administrative tasks from the Unix shell prompt. There is no CLI for Windows-based systems. CLI-based installations are useful if you need to automate setups, for example, in an environment where you host multiple Moodle instances.
The CLI is not for the faint-hearted, so be careful when using it. You must execute the installation script as the web server user, usually www-data or apache. You can run the installation script, install.php, in interactive mode (you will have to enter any parameters by hand) or in non-interactive mode, where the script will run silently.
From your dirroot, you can initiate the interactive script as follows:
sudo –u www-data /usr/bin/php admin/cli/install.phpSomething more interesting is the CLI’s non-interactive mode, as this can be used for scripting and automation purposes. A list of all the available parameters can be displayed using the --help command:
sudo –u www-data /usr/bin/php admin/cli/install.php --helpThe output of the executed command is shown in the following screenshot:
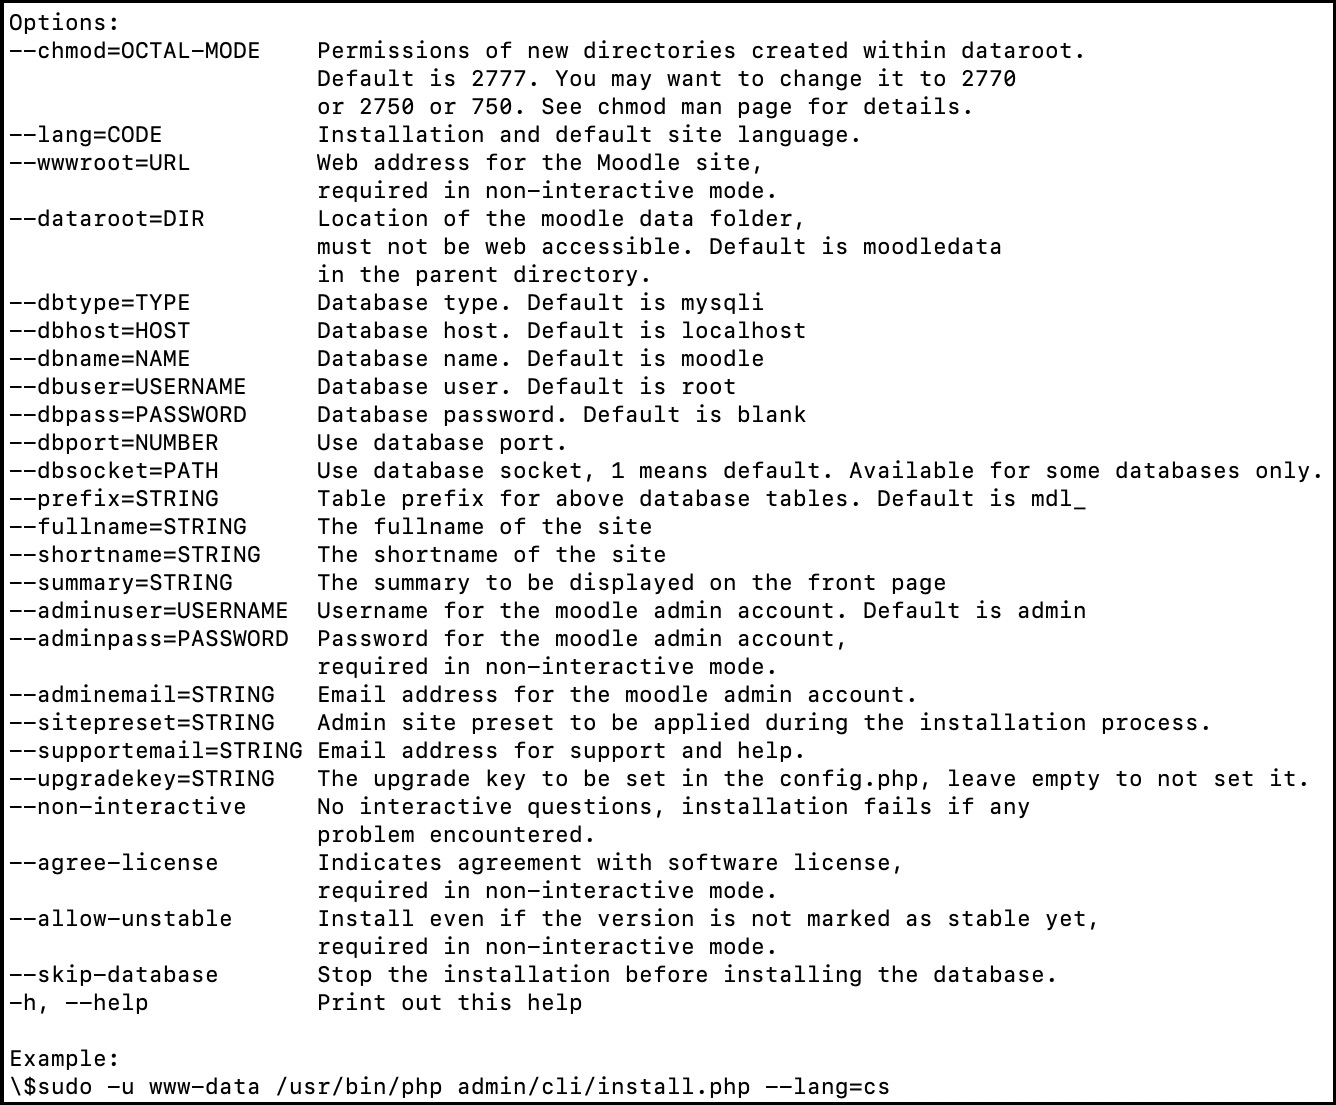
Figure 1.15 – Moodle installation via the CLI
An example command line would look similar to the following, where you will have to adjust the parameters to your local setup:
sudo -u www-data /usr/bin/php admin/cli/install.php --wwwroot=http://123.54.67.89/moodle --dataroot=/var/moodledata/ --dbtype=mysqli --dbhost=localhost --dbname=moodle --dbuser=moodle --dbpass=password --fullname=moodle4 --shortname=moodle4 --adminpass=Password123! --non-interactive --agree-licenseMore Moodle tasks can be administered via the CLI, for example, resetting passwords or putting Moodle in maintenance mode. We will show the relevant syntax at the appropriate places throughout this book and have also dedicated a section to the CLI in Chapter 17, Working with Moodle Admin Tools.
Once your Moodle system is up and running, you need to ensure that it is kept up to date. Updating Moodle manually and via the command line is covered in the following section.
Updating Moodle
We provided an overview of Moodle’s release calendar earlier in this chapter. There is usually no need to install every single minor point release; however, there are several scenarios when you should upgrade your Moodle system:
- Security patches have been issued
- New features have been added
- Bugs have been fixed that affect your setup
- A major version is released
- The support cycle of your setup comes to an end
There are principally two ways Moodle systems can be updated: you can run updates manually (using the web interface or the CLI) or stay up to date using Git commands. Both procedures will be described in this section.
Either way, before you start, ensure you put Moodle in maintenance mode to ensure that no other user is logged in during the update. Go to Site administration | Server | Maintenance mode, choose Enable for Maintenance mode, and enter a maintenance message:
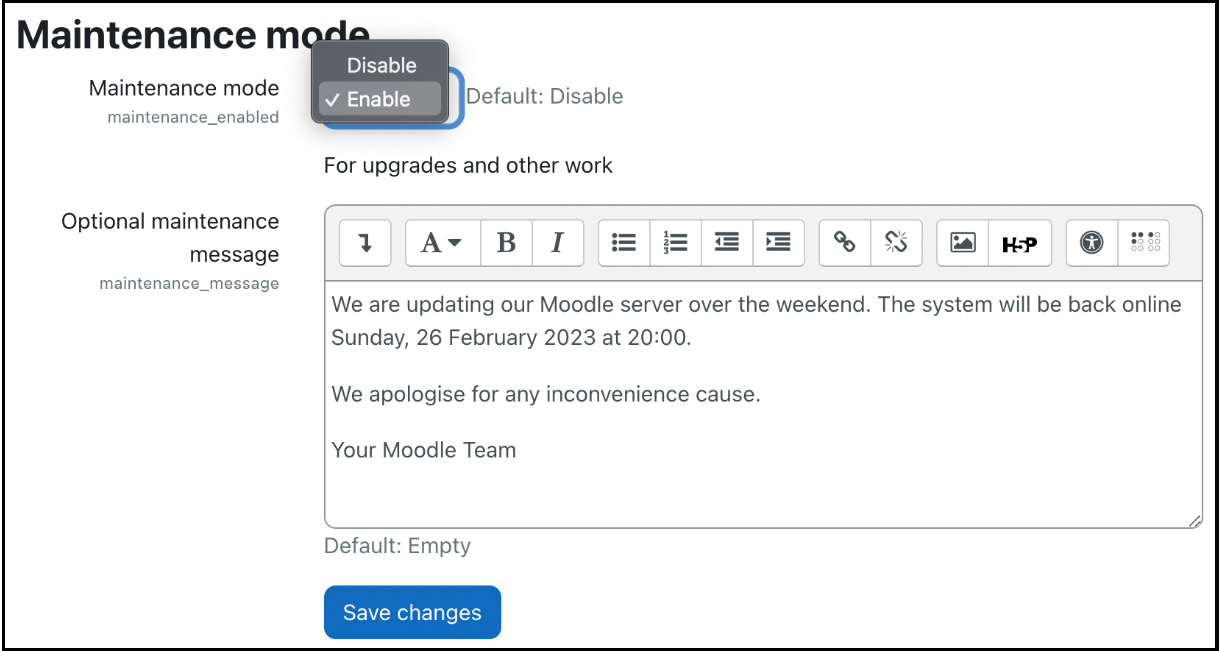
Figure 1.16 – Enabling maintenance mode
You can also put Moodle in maintenance mode using its CLI, as follows:
sudo –u www-data /usr/bin/php admin/cli/maintenance.php --enableUsing the --enablelater=MINUTES flag, you can specify the period before entering CLI maintenance mode, which is useful when you run an automatic update.
To change back to normal mode, use the --disable parameter instead of --enable, as follows:
sudo –u www-data /usr/bin/php admin/cli/maintenance.php –disableOnce Moodle has been put in maintenance mode, you are ready to update your Moodle system.
Updating Moodle manually
The high-level process for updating Moodle manually is as follows:

Figure 1.17 – Updating Moodle
If you update from a previous version of Moodle, the process is the same. However, double-check the upgrading document at docs.moodle.org/en/Upgrading for any version-specific issues.
Important note
You have to be at least on version 3.6 to update directly to Moodle 4. If you’re upgrading from earlier versions, you must upgrade to 3.6 as a first step.
Before you install a new update, it is highly recommended that you run a backup of your Moodle system. While most updates will run smoothly, a backup will be required if you have to revert the system to the pre-updated version. Backups will be covered in detail in Chapter 16, Avoiding Sleepless Nights – Moodle Backup and Restore. Ensure that you run a system backup that includes the database, moodledata, and dirroot (in particular, config.php).
Now, let’s go through the update workflow step by step:
- New version
Once you have created a backup, it is time to replace the old version of dirroot with the latest code. Simply copy the new files over the existing ones; existing files will be overridden, except config.php, which is not part of the download bundle.
Alternatively, you can rename the old dirroot folder and create a new directory. However, you must copy the following files and directories from your old directory to your new dirroot:
- config.php
- .htaccess (if present)
- Any theme folders that have been created
- Any modified language packs
- The content of the local directory
- Any third-party modules and custom code not located in local
Once you go to the location of your Moodle site and log in as an administrator, the system will recognize that a new version is available and kick off the installer automatically.
The first screen displays the build of the new version (here, 4.0.2) and asks you to confirm that you wish to go ahead with the upgrade:
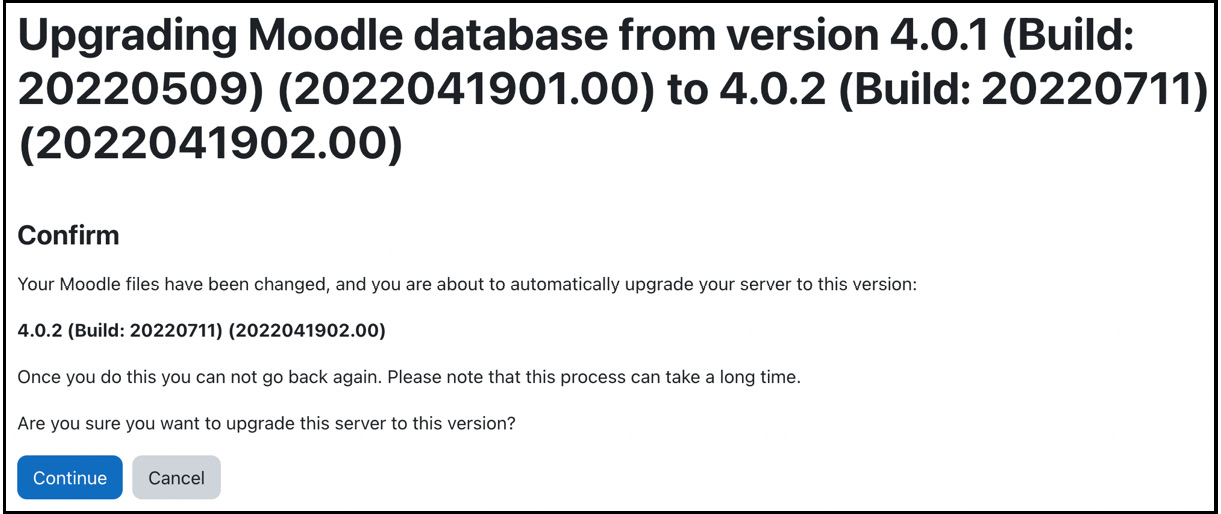
Figure 1.18 – Updating Moodle – New version
- Server checks
Next, a screen is displayed that links the release notes and performs the same server check as the one described during installation.
- Plugins check
Moodle plugins, whether core (Standard) or third-party (Additional), sometimes cause problems when upgrading Moodle. The Source/Status column highlights any actions required or problems found, and you should resolve any issues. Refer to Chapter 8, Understanding Moodle Plugins, for more details:
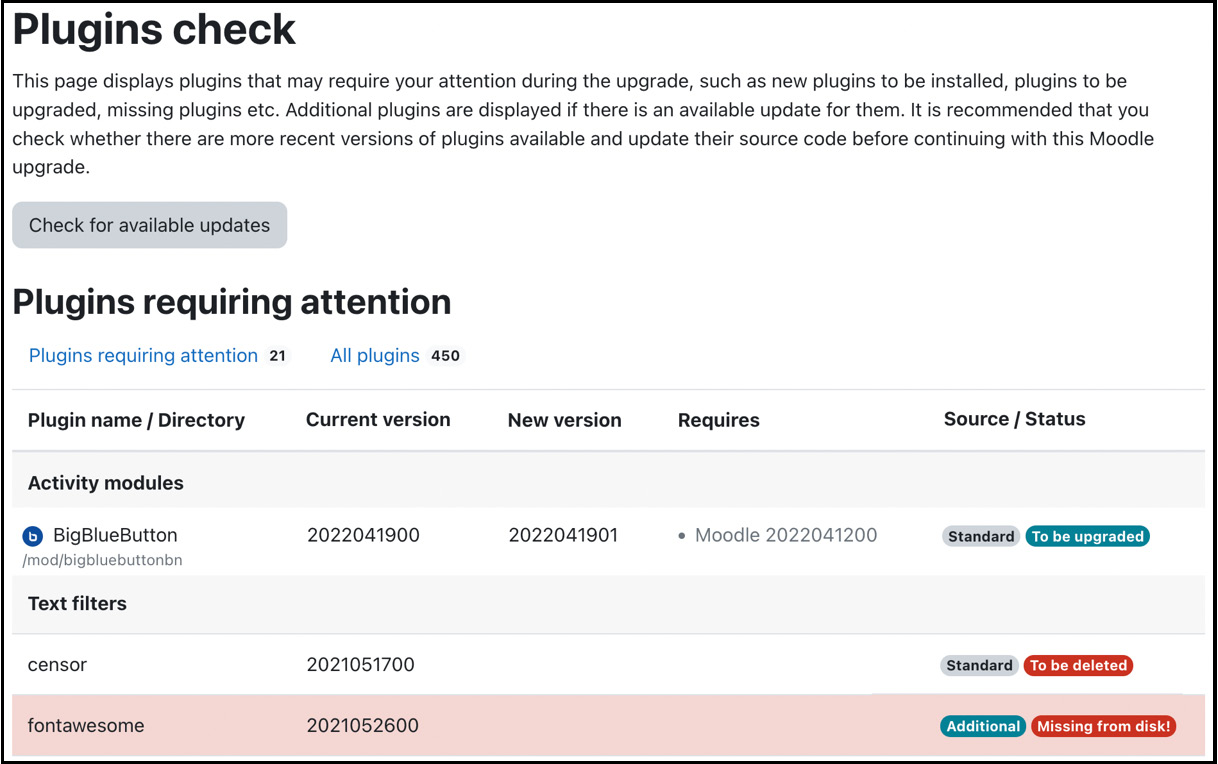
Figure 1.19 – Updating Moodle – Plugins check
- System upgrade
Once this screen has been confirmed, the actual system upgrade starts, during which new database fields are created, and data is modified if and when necessary.
- New settings
Any new system settings added to Moodle are shown and can be changed straight away. For example, in the following screenshot, a new Number of participants per page parameter has been added:
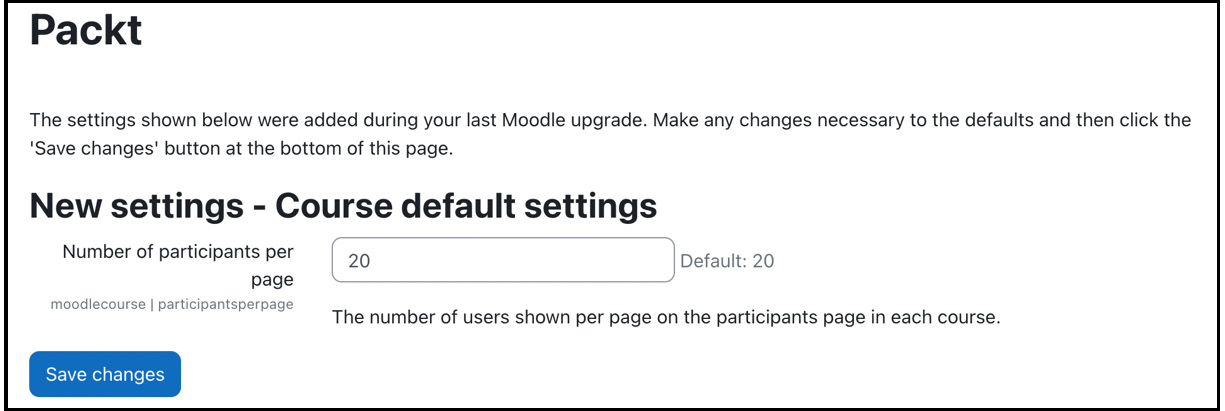
Figure 1.20 – Updating Moodle – New settings
Once the upgrade process has been completed, check the Notifications page. Also, don’t forget to turn off Maintenance mode!
An alternative to manually updating Moodle is to utilize the CLI, which we will cover in the following subsection.
Updating Moodle via the CLI
As expected, Moodle updates can also be run using the already-discussed CLI. Once you have backed up your data and updated to the latest version, all you need to do is run the following script:
sudo –u www-data /usr/bin/php admin/cli/upgrade.php --non-interactiveUpdating Moodle via the CLI is even more powerful when combined with the Git checkout of the Moodle source code. That is what we’ll look at next.
An alternative approach exists to keep a current version up to date, which uses the open source versioning system Git. All checked-in Moodle code is made available via this method, which only allows you to update the modules that have changed.
Setting up Git is a cumbersome process, which is beyond the scope of this book. You can find details at docs.moodle.org/en/Git_for_Administrators. However, once set up, Git is a very streamlined system, particularly in conjunction with the CLI mentioned earlier. The following is a sample script that gets the latest version of the source code, puts Moodle in maintenance mode, merges the old code with the new, runs the upgrade script, and disables maintenance mode:
git fetch
sudo -u www-data /usr/bin/php admin/cli/maintenance.php
--enable
git merge origin/cvshead
sudo -u www-data /usr/bin/php admin/cli/upgrade.php
sudo -u www-data /usr/bin/php admin/cli/maintenance.php
--disable
The execution of the git fetch command can be seen in the following screenshot:

Figure 1.21 – Fetching the new Moodle version
If you have changed any core code, potential conflicts might arise and must be resolved (Git will prompt you to do so).
Most commercial Moodle providers use Git to keep their Moodle instances up to date. If you feel comfortable using shell scripts, this should be your preferred method since it streamlines the update workflow and reduces the number of issues that can arise.
There is one last issue we haven’t covered yet: when do you know that updates are available? That’s what update notifications are there for.
Update notifications
Moodle can notify you about a newly available version via email or message. To support this feature, the Automatically check for available updates setting under Site administration | Server | Update notifications has to remain enabled, as follows:
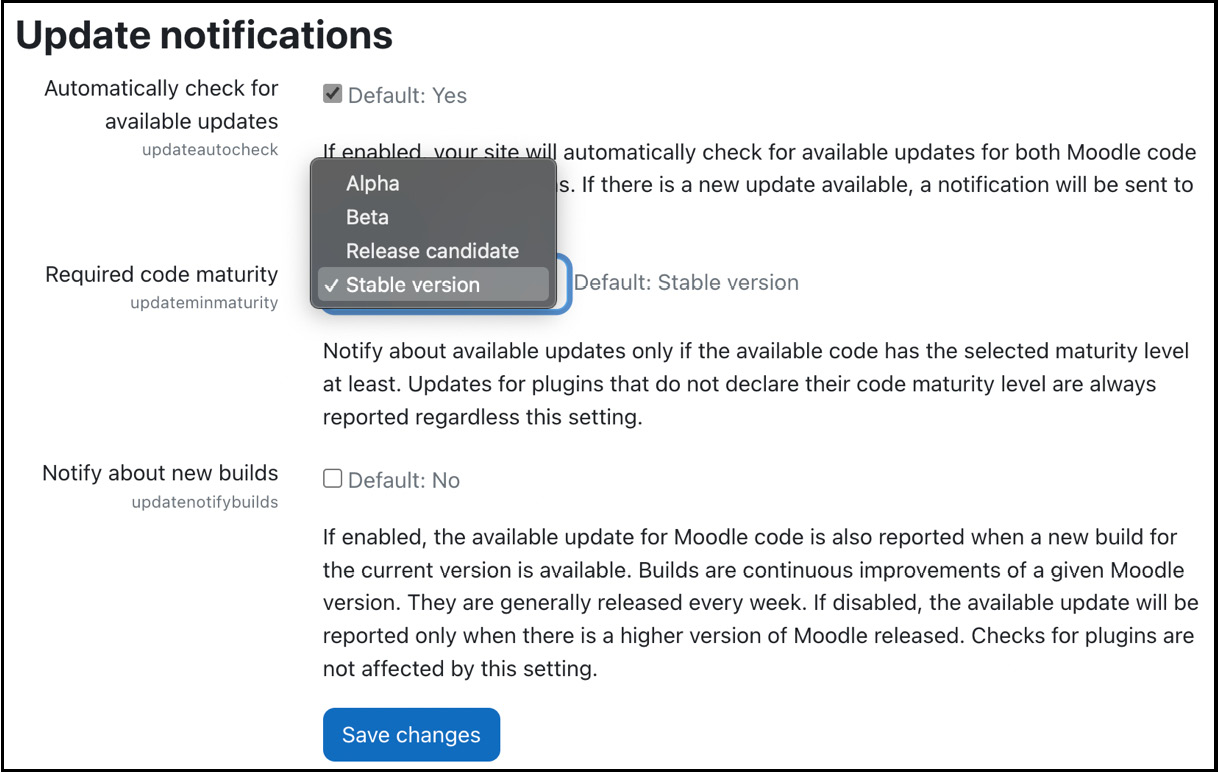
Figure 1.22 – Update notifications
On your production site, the Required code maturity option should be set to Stable version; other maturity levels should only be considered on test instances. The same holds for the Notify about new builds parameter.
Alternatively, you can check for updates (core and plugins) by going to Site administration | General | Notifications. This information is updated every 24 hours via the cron process you set up earlier and takes into account the update notification settings. You can also initiate the request via the Check for available updates button:

Figure 1.23 – Update notifications
This concludes this section on updating your Moodle site, both manually and via the command line.
Summary
This chapter taught you how to install and update Moodle.
After providing an overview describing the most suitable setup, we outlined the necessary software and hardware requirements and described Moodle’s versioning strategy and release calendar.
Then, we covered Moodle’s installation via the web and its powerful CLI. We did the same for Moodle upgrades, where we briefly introduced Git.
The fact that Moodle uses a portable software architecture and facilitates standard open source components allows it to be installed on multiple platforms. However, this also means that different peculiarities and quirks must be considered in different environments.
Now that your system is up and running, in the next chapter, we’ll look at the components of Moodle, which will give you a better understanding of the system and how to administer it.
