
14
Complying with Data Protection Regulations
Data privacy is all about the protection of personal data. Depending on its setup, Moodle potentially stores a significant amount of sensitive data such as IDs, addresses, grades, and exam submissions. With the introduction of the General Data Protection Regulation (GDPR), a legally binding framework has been introduced and is fully supported in Moodle.
This chapter will teach you the tools to configure your Moodle site to comply with data protection regulations.
Important note
Disclaimer: The advice in this chapter is provided for informational purposes only and not be construed as legal or professional advice.
After some legal background on the GDPR, you will learn about the following topics:
- Designating a privacy officer: You will learn how to set up a privacy officer role and activate the privacy officer functionality.
- Managing policies: We will look at the configuration of Moodle’s policy handler before creating and updating versioned policies. We will further monitor user agreements and deal with minors in your Moodle system.
- Configuring the data registry: We will set up data registry categories and purposes before assigning them to contexts.
- Managing data requests: Finally, we will manage subject access requests to deal with data rectification (message), data access (export), and data erasure (deletion).
We will conclude the chapter with a Moodle privacy checklist. Before we cover the mentioned topics, let’s get used to some legal terminology.
Understanding Moodle privacy
May 25, 2018: GDPR applies to all European Union (EU) residents.
One week earlier: Moodle 3.5 is released, supporting some but not all GDPR features.
It was the first time that Moodle was forced to implement a set of features to comply with legislative regulations (gdpr-info.eu). The implementation of all required features was completed in version 3.6, and the functionality was backported to three releases—another first for Moodle.
While GDPR only applies to EU residents or sites that are hosted in the EU, there are two reasons why the regulations are potentially relevant to all Moodle systems:
- If a single user on your system (student, employee, supplier, and so on) is or will be from the EU, you are obliged to comply with the regulation. Or, in more legalese: any individual or organization that stores or processes personal information on an identifiable person from an EU member state (regardless of whether the processing or storage of information occurs in the EU or not).
- The EU’s data protection laws have long been regarded as the gold standard and have been wholly or partly adopted by numerous countries outside the EU.
Before we configure the privacy and policy settings in your Moodle system, I need to bore you with some GDPR fundamentals. There is some terminology used throughout the GDPR that you will come across when configuring Moodle privacy, as presented in the following screenshot:
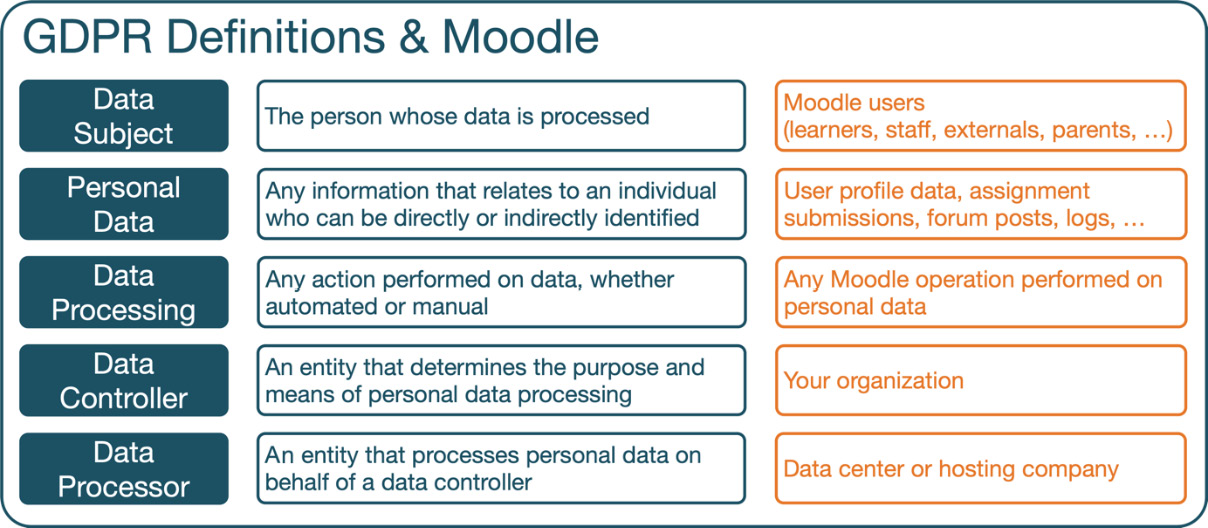
Figure 14.1 – GDPR terminology
To summarize Figure 14.1, a data subject’s personal data is processed by a data processor on behalf of a data controller. In Moodle speak, user-related data is stored in your data center or by a third-party hosting company, as instructed by your organization.
Important note
The main objective of GDPR is the protection of personal data.
Moodle stores personal and non-personal data, and it is the personal data GDPR is concerned about and that we need to protect. Data subjects (Moodle users) have far-fetching rights concerning their stored and processed data, which have been summarized in the following screenshot, alongside the respective Moodle feature:

Figure 14.2 – GDPR data subject rights
From a Moodle user’s—sorry—from a data subject’s perspective, access to these rights can be gained via the Privacy and policies section in the user profile and might look like this:
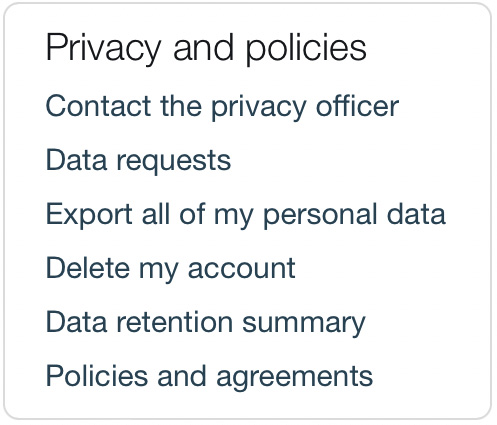
Figure 14.3 – GDPR data subject rights (Moodle user profile)
So, why couldn’t Moodle just implement GDPR in its core and label the product as GDPR-compliant? Unfortunately, such a hardcoded approach is impossible since different factors must be considered and hence configured. Examples are the users’ ages (kids are better protected than adults), the type of data that is stored (age or gender, for example, might be acceptable in one Moodle system but not another), and local or internal regulatory constraints overruling GDPR—in particular, retention periods of data.
Important note
There is no one-size-fits-all Moodle GDPR setup. Correct configuration and implementation of processes and procedures are required.
What might be perceived as a shortcoming of GDPR is actually its strength because it caters to all kinds of setups in different contexts. For Moodle administrators, this has two key implications:
- You need to liaise with a legal expert. You know, the people in grey suits who charge by the minute.
- You need to configure Moodle’s privacy settings, policies, and processes in line with what the grey suit told you.
The GDPR also specifies seven principles for the lawful processing of personal data. Furthermore, privacy implementations must be supplemented by required documentation in case of an audit, infringements, or complaints. Both items are beyond the scope of this book and will not be dealt with in this chapter, but the grey suit will be able to assist you on these matters.
Enough legal speak, so let’s get started. Moodle has dedicated an entire Privacy and policies section to the topic, which we will cover in the remainder of the chapter. First, we need to designate a privacy officer, which is dealt with in the following section.
Designating a privacy officer
Once the Moodle privacy features have been set up, someone will have to deal with the day-to-day requests from users and any other privacy-related issues. Moodle has named this function privacy officer, and we are sticking to this term here.
The Moodle administrator regularly takes on this role for smaller instances, often a separate function in larger systems. Either way, we recommend setting up a dedicated user account to deal with any privacy-related tasks.
To establish a privacy officer in Moodle, the following three steps are required:
- Create a new Privacy Officer role.
- Assign the role to your designated privacy officer(s) in the System context.
- Activate Moodle’s privacy officer functionality.
The context type where the role may be assigned must be set to System. The following screenshot arrangement shows the capabilities that must be set to Allow. The simplest way to find them is to search for dataprivacy and policy, respectively:
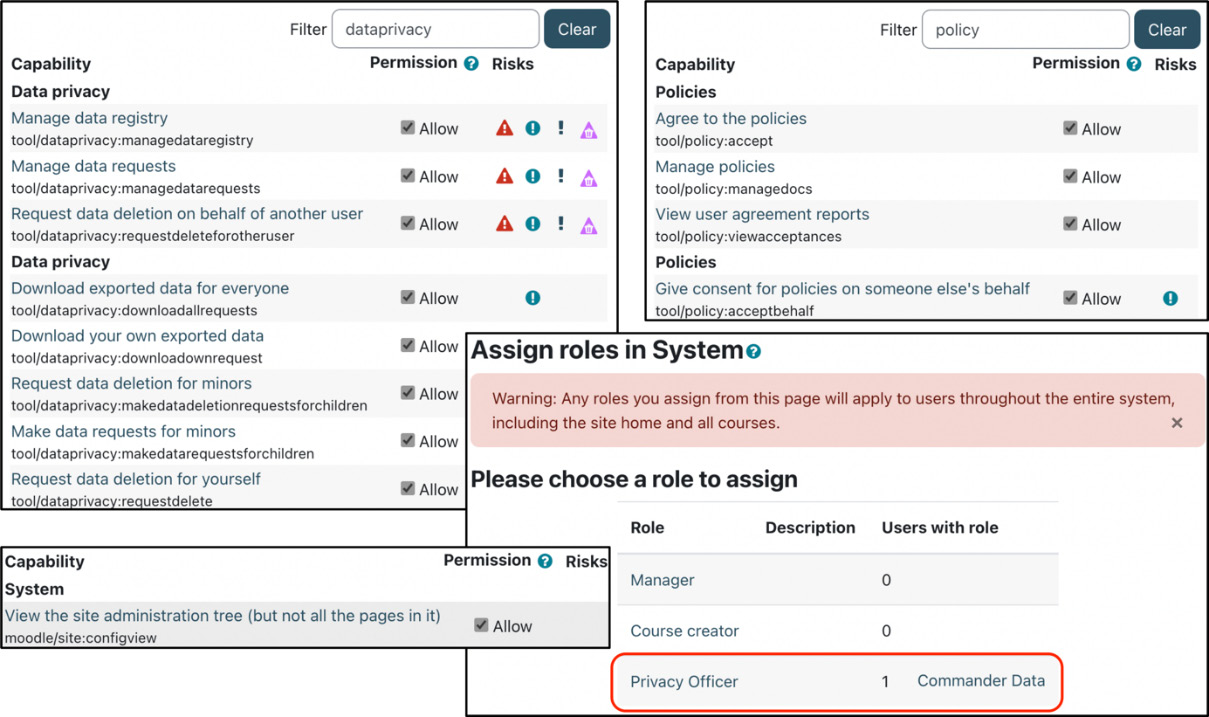
Figure 14.4 – Privacy Officer role definition
For more details on creating and assigning roles, refer to Chapter 6, Managing Permissions, Roles, and Capabilities.
The new role must be selected in Privacy officer role mapping in Site administration | Users | Privacy and policies | Privacy settings. This role mapping and the moodle/site:configview capability will grant assigned privacy officers access to the relevant site administration menu items as shown:
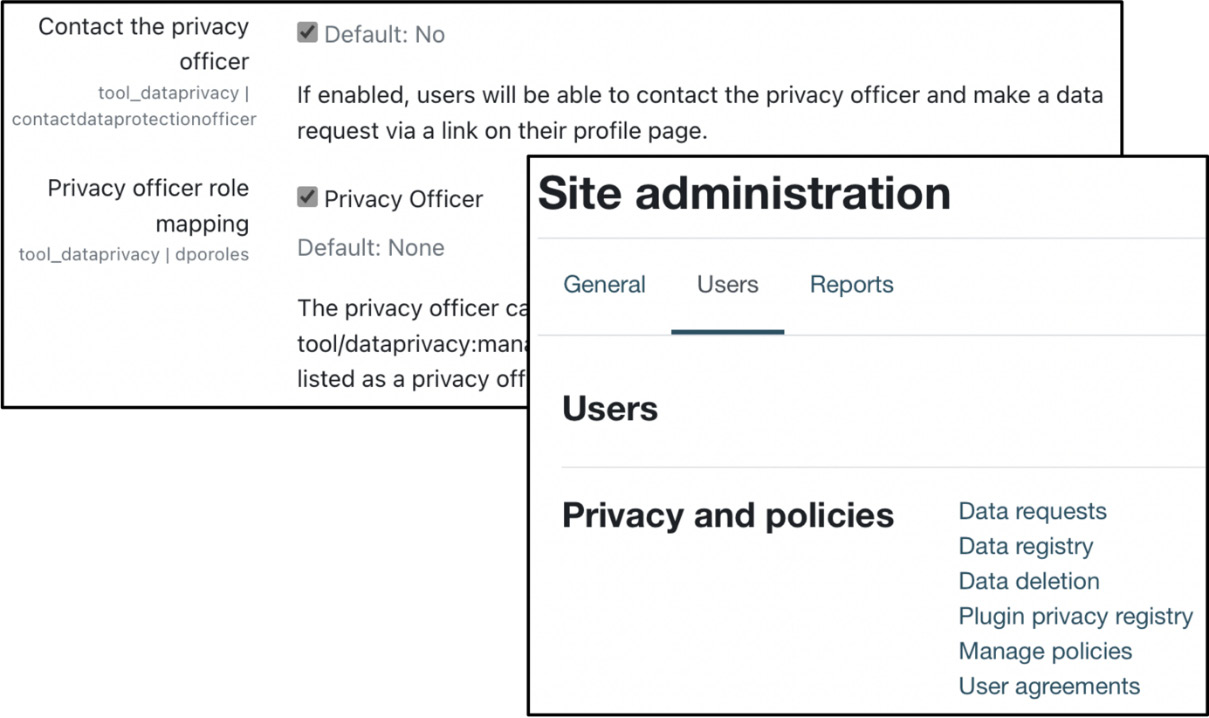
Figure 14.5 – Activating Privacy Officer functionality
Once the Contact the privacy officer option has been enabled, users will have access to the feature via the Privacy and policies section in the user profile, as shown in Figure 14.3. It is recommended to keep this feature deactivated until you have configured all required privacy elements. We’ll start with the right to be informed, implemented in Moodle as policies.
Managing policies
Moodle has implemented a policy tool that lets you define multiple policies, supports policy versions, tracks user agreements, and can deal with the consent of minors.
To give you an initial understanding of how Moodle policies are structured, have a look at the following diagram:
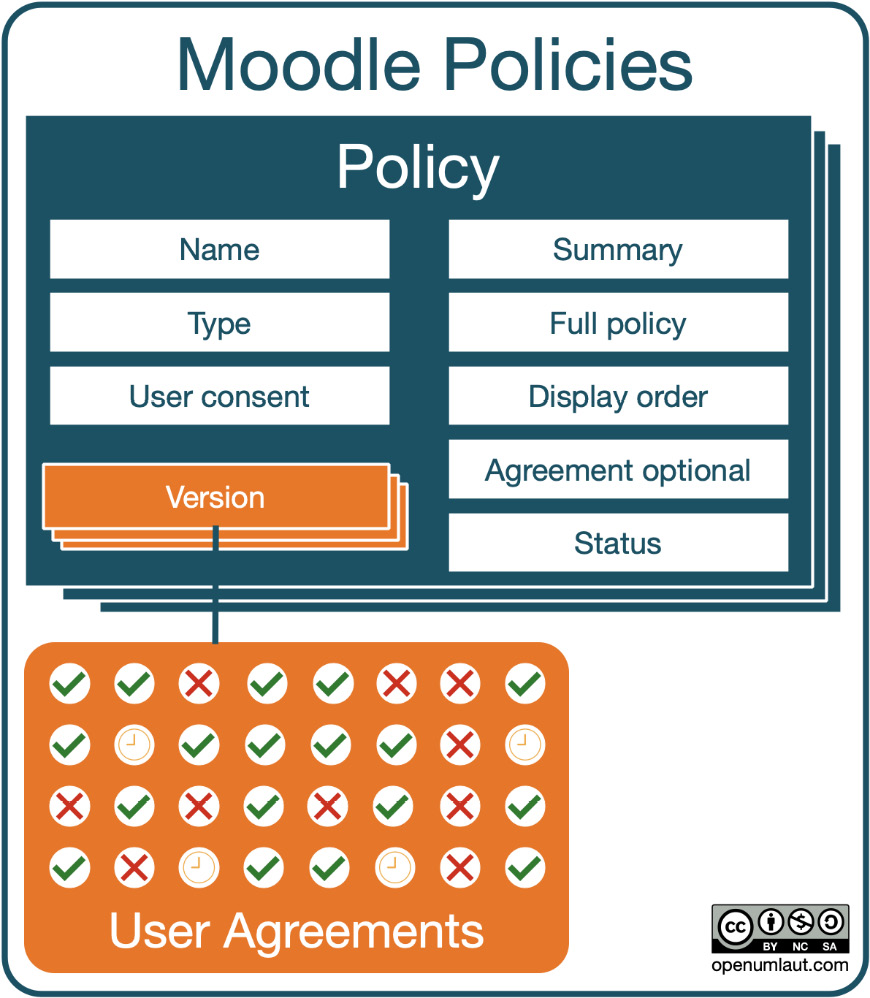
Figure 14.6 – Moodle policies
A site can have multiple policies; for example, you might have three policies: one handling user data privacy, one dealing with cookies, and one covering third-party plugins and external data.
Each policy can have multiple versions. Every time there is a change in a policy, a new version is created, which might have to be consented to by your users. For each version that is not labeled as a minor change (typos or cosmetic adjustments), Moodle keeps track of user agreements.
In this section, you will learn how to configure and monitor the following policy features:
- Choosing a site policy handler
- Creating and updating policies, including policy versions
- Monitoring user agreements
- Dealing with minors (in Moodle, not in life)
Before we create our first policy, we first need to choose a site policy handler.
Choosing a site policy handler
The Moodle site policy handler determines how data policies and user consent are managed. Moodle ships with the following two policy handlers:
- Default (core): You can specify a Site policy URL parameter, which has to be agreed to by all registered users, and a Site policy URL for guests parameter
- Policies (tool_policy): You can manage multiple site, privacy, and other policies, including policy versions, and monitor different types of user consent
The core policy handler is a one-size-fits-all method and does not support advanced policy functionality. We recommend not using this “old” tool. The remainder of this chapter focuses on tool_policy, which you must enable at Site administration | Users | Privacy and policies | Policy settings by selecting the Site policy handler type, as illustrated in the following screenshot:

Figure 14.7 – Site policy handlers
A separate privacy policy can be specified for the Moodle app in the App policy URL parameter in Site administration | General | Mobile app | Mobile settings. If left empty, the global Site policy URL parameter will be used instead. We have dealt with the app policy in Chapter 11, Enabling Mobile Learning.
Site policy handlers have been implemented as plugins. Technically, future data protection frameworks from other regulations may be developed and made available in Moodle.
Now that we have chosen the correct policy handler, let’s create our first policy.
Creating policies
Policies are managed in Site administration | Users | Privacy and policies | Manage policies. In our system, we have already created three policies—one is active, and two are in draft status, as seen here:

Figure 14.8 – Policies and agreements
Every user who logs on to your Moodle site for the first time must agree to any active privacy notice; two users have already done so, and the others are still missing.
When you select the New policy button, you will be presented with the following screen:
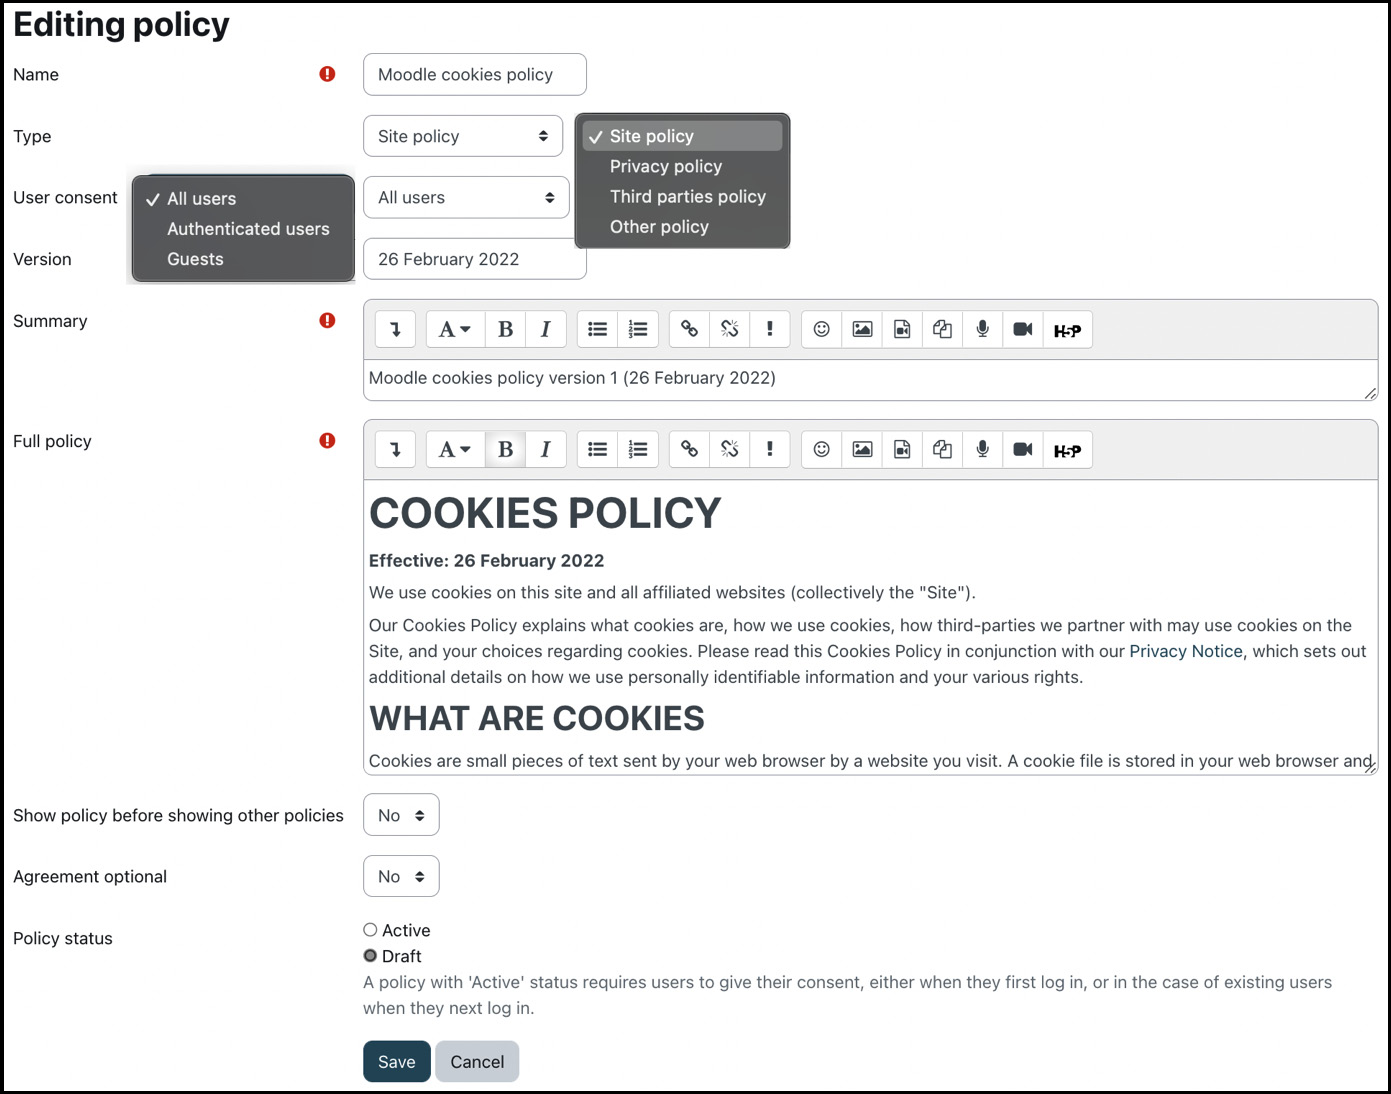
Figure 14.9 – Creating a new policy
In addition to the self-explanatory Name field, the following fields have to be provided:
- Type: The available options are Site policy, Privacy policy, Third parties policy, and Other policy. The policy type does not impact the policy behavior and is for display purposes only.
- User consent: Does the policy apply to All users, Authenticated users, or only Guests? Guest policies don’t have to be given consent to; instead, if a user browses the site or logs in as a guest, a modal notice window is shown at the bottom of the page with links to all policies that have been defined for guests or all users:

Figure 14.10 – Guest policies
- Version: You should come up with your own versioning convention. Most sites use the date, a version number, or a combination thereof. If the version of an edited policy hasn’t been changed, Moodle automatically appends a version number to it.
- Summary: A short description of the policy, which will be shown on the acknowledgment screen.
- Full policy: That’s the policy’s full (legal) text.
- Show policy before showing other policies: Should this be the first policy to be shown when multiple policies are present? An alternative way to change the order of policies is by using the up and down arrows on the Policies and agreements screen.
- Agreement optional: Optional agreements are displayed but can be declined by users without consequences.
- Policy status: As soon as you switch the status from Draft to Active, users (except administrators) have to consent to the policy at login.
Be careful with creating too many try-out policies: as soon as you have set a policy to Active once, it cannot be deleted anymore! All you can do is change its status back to Draft, but it’ll be in your system indefinitely unless you manually remove it at the database level.
If you modify a policy, Moodle creates a new version, which we will cover in the following subsection.
Updating policies (versioning)
Due to the fact that data protection is a legal requirement, a history of the entire policy trail must be kept. This auditability applies to policies (covered first) and user agreements (covered next).
Important note
When you edit a policy, Moodle will create a new version.
When editing a user policy, you will likely change its name and/or content (summary or full policy). Either way, two fields are relevant for the handling of the policy:
- Version: Each version number within a policy trail has to be unique. If you don’t change it, Moodle will automatically amend it with a version number.
- Policy status: If the status of the policy is active, you can choose whether the edited version is a minor or major change. Minor changes do not have to be consented to by users; major ones do.
You can view the version trail of a policy via the View previous versions option in the Actions column on the Manage policies page. Users can also view current and out-of-date versions via the Policies and agreement link in the Privacy and policy block in their profile. Here is a sample where our cookies policy has three versions:

Figure 14.11 – Policy versions
Once you have created and updated your policies, you can manage their user agreements, as covered in the following subsection.
Monitoring user agreements
A user agreement spells out the rights and responsibilities of all involved parties.
Important note
A user agreement is a legally binding contract between a data subject (Moodle user) and the site’s owner, operator, or provider (data controller or data processor).
Given the contractual nature of user agreements, you, the privacy officer, or anybody who has been granted permission (tool/policy:viewacceptances) must keep track of user agreements. You can view the status of each agreement in Site administration | Users | Privacy and policies | User agreements:
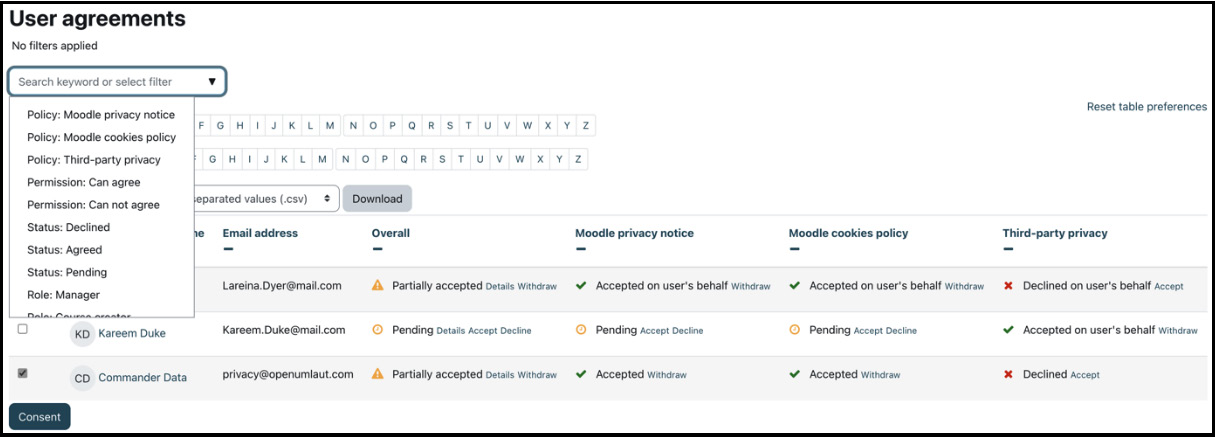
Figure 14.12 – User agreements
User agreements for a particular policy may also be viewed via the Manage policies page by clicking the link in the Agreements column. You can filter the table by Policy (and its versions), Permission, Status, and Role. For each user and each policy, one of the following statuses is shown:
- Accepted: The user has consented to the policy.
- Pending: The user has not (yet) consented to the policy.
- Declined: The user has rejected the policy. This status only exists for optional agreements.
Any user with the tool/policy:acceptbehalf capability can give consent on a user’s behalf. This operation is relevant in scenarios where written consent has been obtained offline or consent has to be given on behalf of minors, which we will deal with next.
Dealing with minors
The GDPR attaches particular importance to protecting children’s personal data. Minors (users younger than the age of digital consent) may be prevented from consenting to privacy policies. Instead, someone (usually a parent or guardian) must give consent on their behalf.
To deal with users agreeing to policies, you need to make use of the tool/policy:accept capability. Depending on the percentage of minors on your site, you can choose between two different approaches, as outlined next (partly borrowed from docs.moodle.org/en/Policies#Minors).
Sites with minors as the majority of users
This approach prevents all users from accepting policies except those you explicitly grant permission to—for instance, teachers or staff. Here are the steps you would need to take:
- Set the tool/policy:accept capability to Prohibit in the Authenticated user role.
- Create a new role with the tool/policy:accept capability set to Allow, and set context type where the role may be assigned to System.
- Assign the new role to all users who are allowed to agree to policies.
For instructions on modifying and creating roles, refer to Chapter 6, Managing Permissions, Roles, and Capabilities.
Sites with minors as the minority of users
The approach is the opposite of the previous one and prevents nobody from accepting a policy except individually selected users (minors). Follow these steps:
- Create a new role with the tool/policy:accept capability set to Prohibit, and set context type where the role may be assigned to System.
- Assign the new role to all users who are NOT allowed to agree to policies.
To avoid the overhead of dealing with paper-based policies and signatures that must then be accepted on their behalf in Moodle, consider the Parent role we covered in Chapter 6, Managing Permissions, Roles, and Capabilities.
The scenario we covered dealt with minors already authenticated on your site. When you expect minors to sign up for new accounts, you also need to verify their digital age of consent, which we will cover in the following subsection.
Verifying the digital age of consent
If you have self-registration activated and anticipate minors signing up to your site, you should enable the Digital age of consent verification setting at Site administration | Users | Privacy and policies | Privacy settings, as illustrated in the following screenshot:
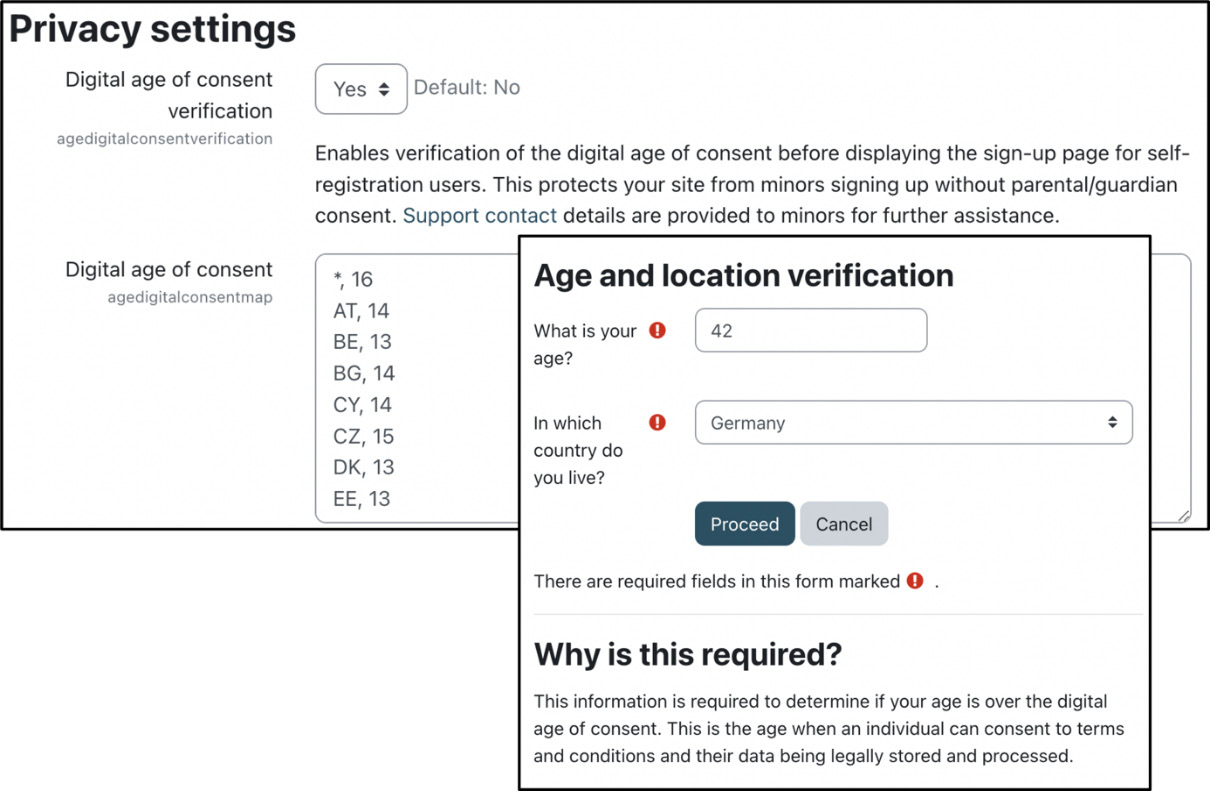
Figure 14.13 – Digital age of consent
You can further specify the Digital age of consent setting and the age in any country where it differs from the default. Enter each age on a new line with the format country code, age. The default age is indicated by * in place of the country code. The two-letter country codes are as specified in ISO format.
Once enabled and configured, users will have to provide their age and select a country of residence before they are allowed to proceed.
This concludes the section on privacy policies. The second part of the chapter deals with the data registry, which is needed for managing data requests.
Configuring the data registry
One of the information types that users can request under the GDPR is a list of all data processing and the reasoning behind it, including its retention period. The data registry contains that information, represented in categories and purposes.
Important note
Categories are used to organize the data in Moodle.
Purposes describe the usage (legal reason and retention period) of the data.
You will find the data registry in Site administration | Users | Privacy and policies | Data registry, which displays the following explanation:
The data registry enables categories (types of data) and purposes (the reasons for processing data) to be set for all content on the site – from users and courses down to activities and blocks. For each purpose, a retention period may be set. When a retention period has expired, the data is flagged and listed for deletion, awaiting admin confirmation.
This note perfectly sums up the objective of the data registry. The structure of the data registry is depicted in the following diagram:
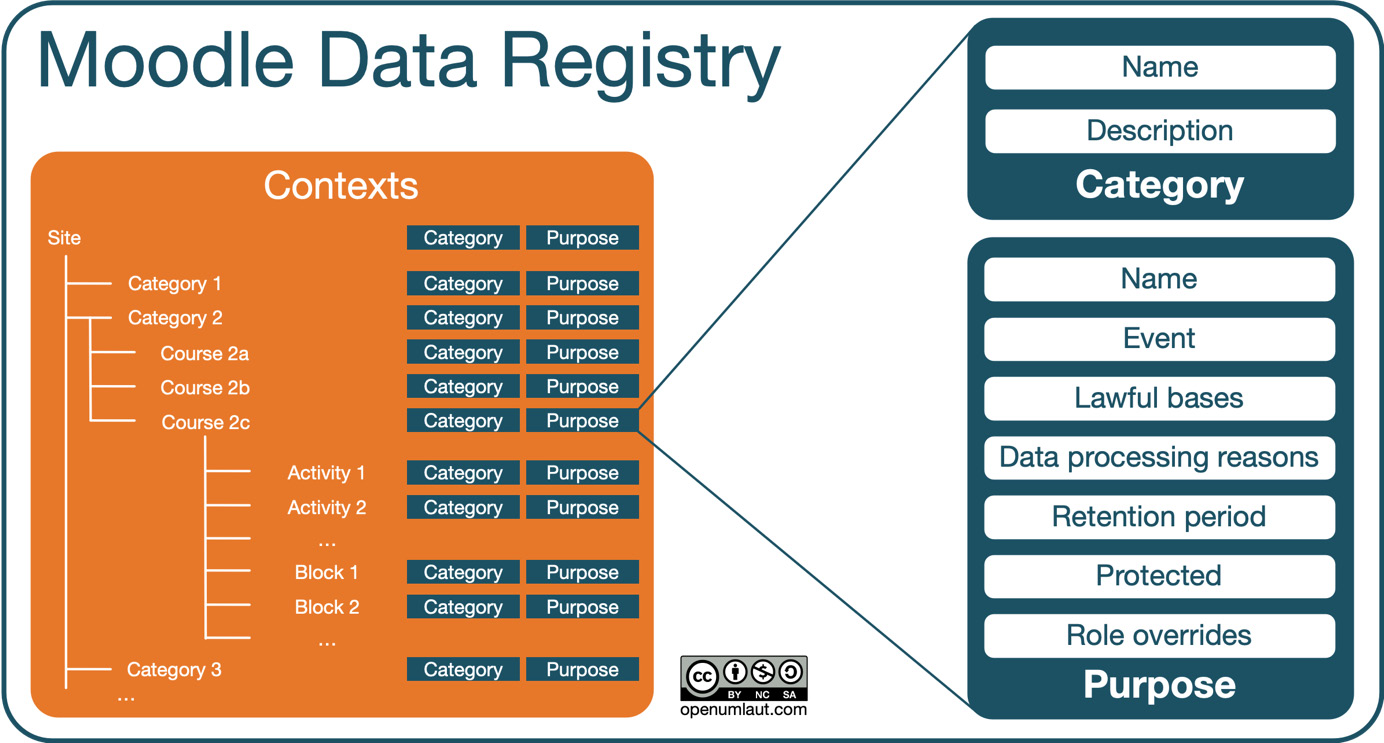
Figure 14.14 – Data registry
Every context in the system, from Site to users and categories, all the way down to individual course activities and blocks, is assigned a category and a purpose. Before we can manage data requests, we first need to configure these categories and purposes, which we will cover in the following two subsections.
Managing data registry categories
Select the Categories item from the Edit menu in Site administration | Users | Privacy and policies | Data registry to access data registry categories. Use the plus button to add new entries; we have already created three data registry categories, as follows:
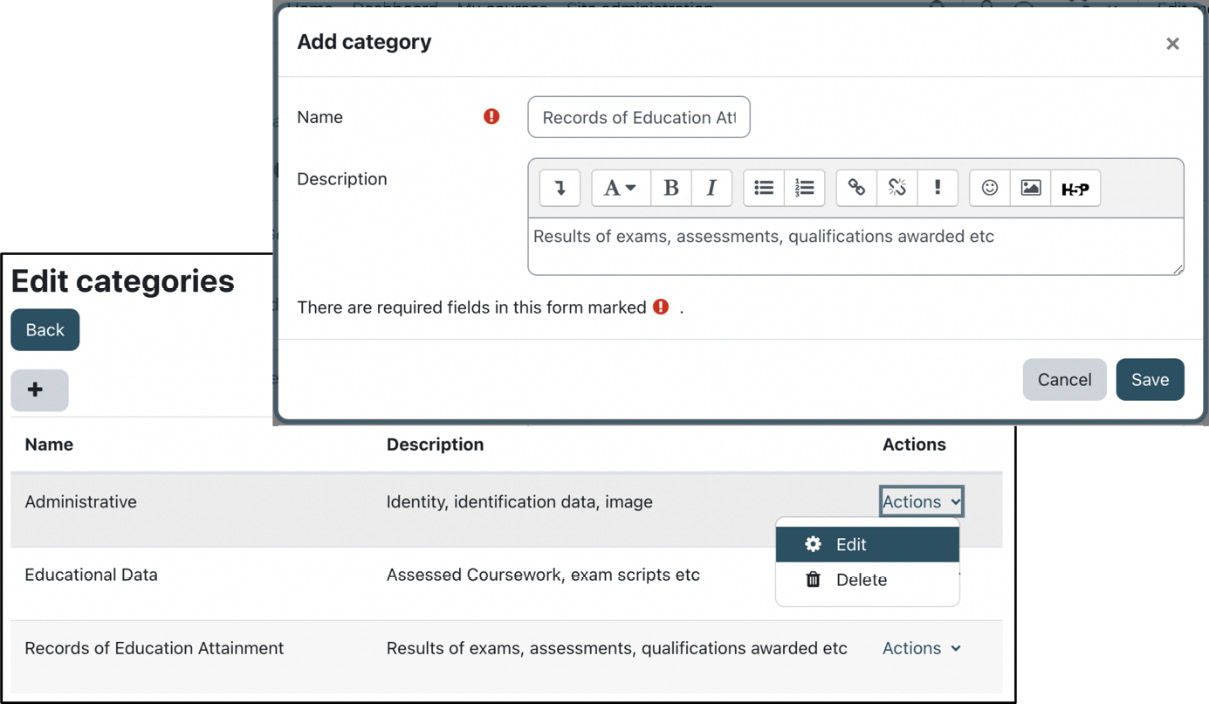
Figure 14.15 – Data registry categories
Before you can assign added categories to contexts, we need to create data registry purposes.
Managing data registry purposes
Select the Purposes item from the Edit menu in Site administration | Users | Privacy and policies | Data registry to access data registry categories. Use the plus button to add new entries; we have already created some data registry purposes, as follows:
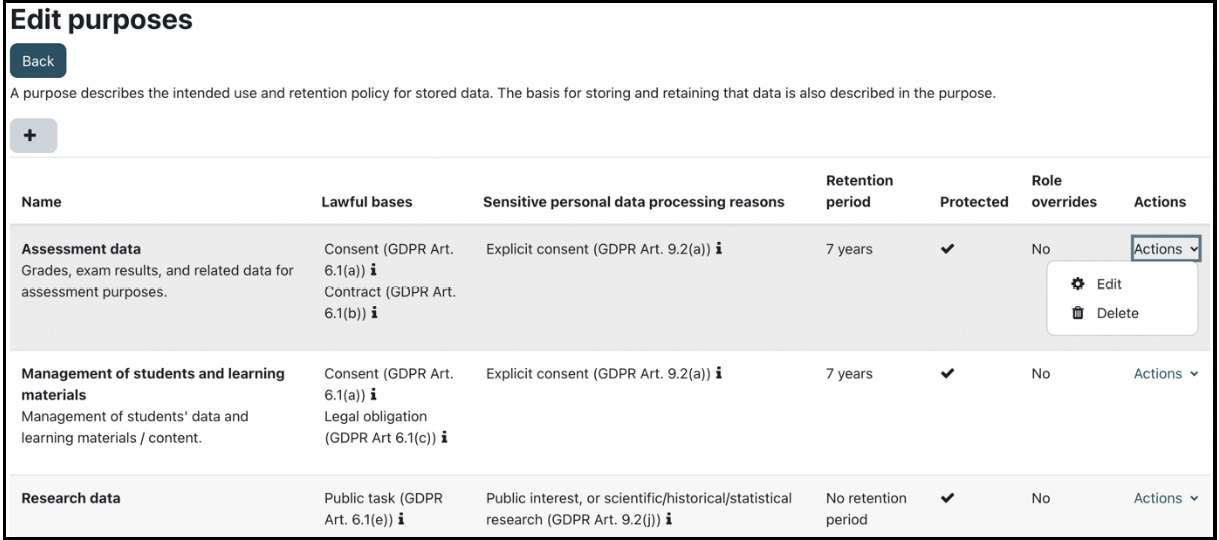
Figure 14.16 – Data registry purposes
Each purpose has the following properties:
- Name and Description: These should be self-explanatory.
- Lawful bases: Select at least one of the available options that serve as the lawful basis. Lawfulness is one of the seven GDPR principles.
- Sensitive personal data processing reasons: Select at least one of the available reasons that exempt the prohibition of processing personal data. Purpose limitation is another GDPR principle.
- Retention period: The retention period for course content is measured from the course end date an activity is in. For a user, it is from the last login time for any user who is no longer enrolled or has already been deleted.
- Protected: Specify whether this data is protected from erasure by the user or not. If set, the retention of this data has a higher legal precedent over a user’s request to be forgotten. This data will only be deleted after the retention period has expired.
- Role overrides: This option is only available when you edit a purpose. The default retention policy can be overridden for specific user roles, allowing you to specify a longer or shorter retention policy. A user account is only expired when all of their roles have expired.
The options, including their GDPR articles for lawful bases and sensitive personal data processing reasons, are shown in the following screenshot:

Figure 14.17 – Data registry purpose
Now that you have created data registry categories and purposes, you can assign them to contexts, as shown in the following subsection.
Assigning categories and purposes to contexts
In the data registry, for every context in your Moodle site, a category and purpose must be set, and thus the data retention period for that context. You should set the category and purpose at the site level; once this is set, all lower contexts will inherit from that level.
You can then set different categories and purposes for different context levels, such as having a specific course with a longer or shorter retention period, thus overriding the inherited values.
The Data registry interface is shown in the following screenshot:
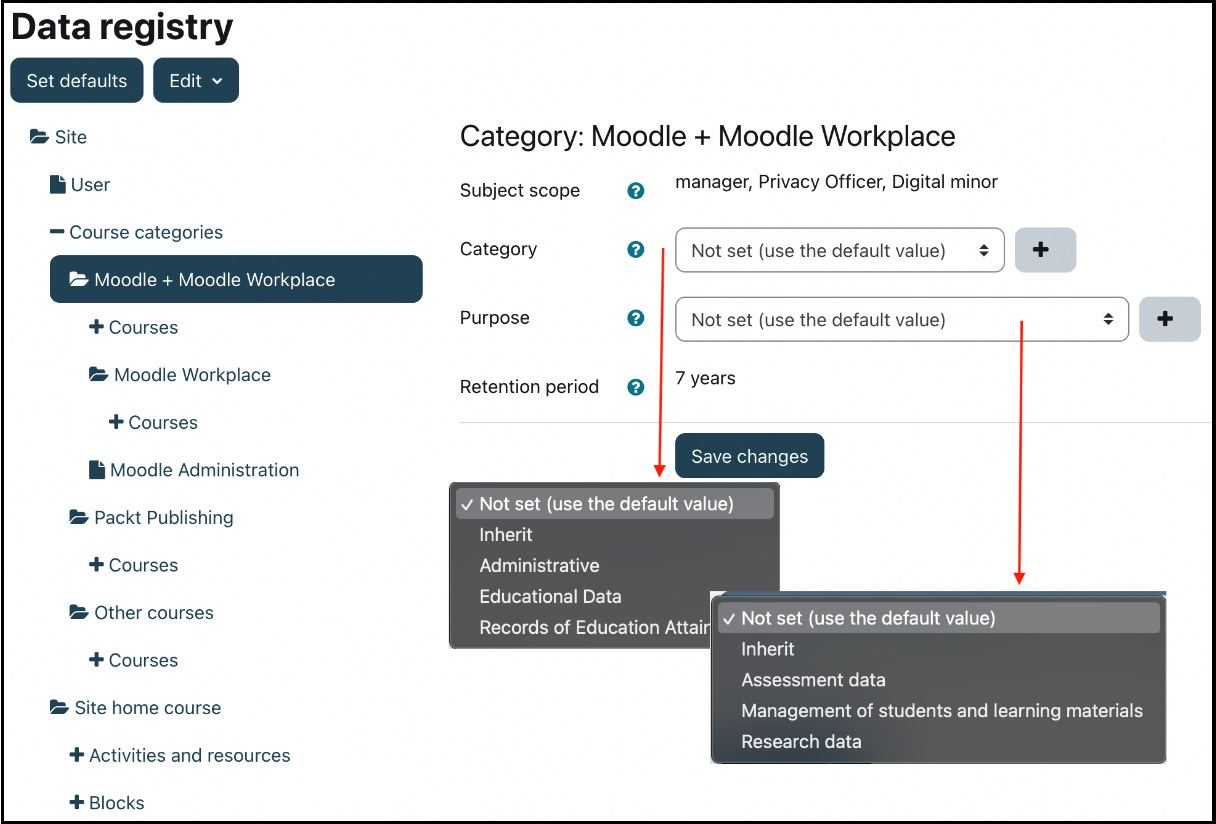
Figure 14.18 – Assigning categories and purposes to contexts
For each context, the following values are stored:
- Subject scope: The roles that may be assigned in this context
- Category: In addition to the categories specified, you have the Not set (use the default value) and Inherit (use the category from the parent context) options
- Purpose: In addition to the purposes specified, you have the Not set (use the default value) and Inherit (use the purpose from the parent context) options
- Retention period: The period is displayed as specified in the selected purpose
To specify default values, select the Set defaults button, where you can edit the default values for course categories, courses, individual activities, and blocks. The hierarchy of contexts is—from top to bottom—site, category, course, activity, and block. We covered contexts in great detail in Chapter 6, Managing Permissions, Roles, and Capabilities.
All Moodle core plugins fully comply with the Moodle Privacy API (docs.moodle.org/dev/Privacy_API). It is highly recommended that you only install third-party plugins that also support the Privacy API, which you can verify in the plugin privacy compliance registry at Site administration | Users | Privacy and policies | Plugin privacy registry. All installed Moodle plugins are listed alongside information on personal data stored and whether they comply with the Privacy API or not. Any flagged plugins storing personal data will not be able to be exported or deleted through Moodle’s privacy system. Privacy-friendly plugins are labeled as such in the Moodle plugins database at moodle.org/plugins. You can see an example of this here:
Figure 14.19 – Privacy-friendly plugins
Users can view the data registry information (core and third-party) via the Data retention summary link in their profile. You can remove this link by unticking the Show data retention summary option in Site administration | Users | Privacy and policies | Privacy settings.
Once the data registry has been completed, it will be used by data deletion processes, which are part of the data requests covered in the following section.
Managing data requests
Users have different options to request information or amendments to their data via their profile menu:
- Contact the privacy officer (Message)
- Request a copy of their personal data (Export)
- Request the deletion of their personal data (Delete)
The following diagram illustrates the workflow of data requests, also known as subject access requests:

Figure 14.20 – Data request workflows
To manage all data requests, go to Site administration | Users | Privacy and policies | Data requests, where you see a screen like this:
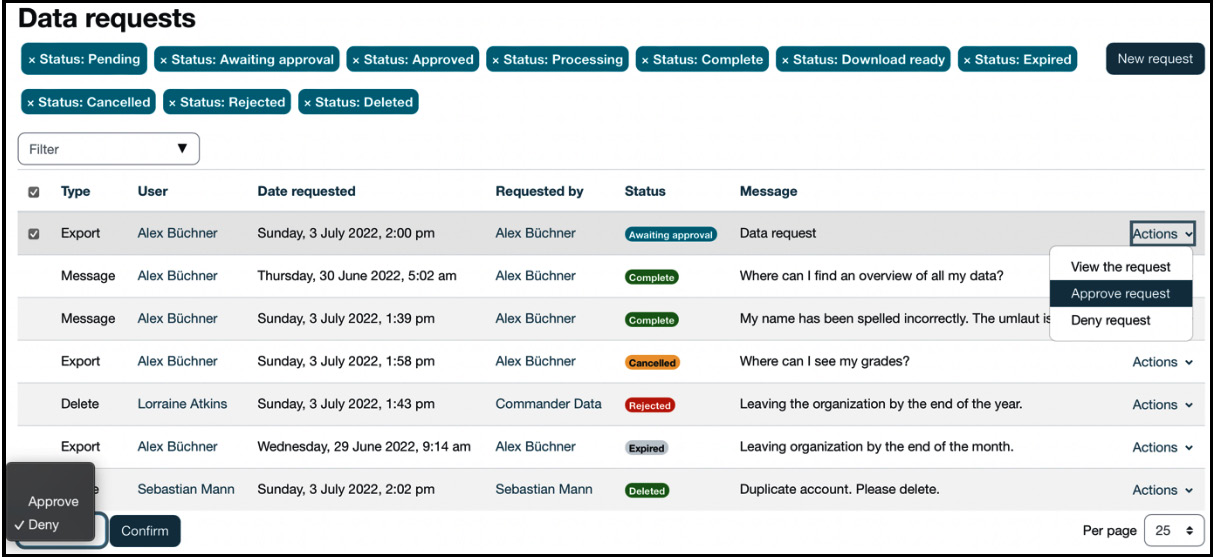
Figure 14.21 – Data requests
The message workflow is straightforward: a user contacts the privacy officer via the contact form in their user profile. The privacy officer will be notified, and can then act upon the message and mark the request as complete. This option covers the data subject’s right to rectification—that is, the right to ask for the correction of data they believe is inaccurate.
The other two workflows—export and deletion—require a little more attention and will be dealt with in the following two subsections.
Data export
Data subjects have the right to access their personal data, and the data export feature facilitates this GDPR right.
User requests to export all their data are initially labeled as Awaiting approval. As long as no action has been taken, users can Cancel their requests. The privacy officer either has to Approve or Deny the export requests; once approved, requests will be queued and processed during the next cron run (Processing). When completed, the user will be notified that the data export status has been changed to Download ready. When the specified period has passed, the status will change to Expired, and downloading will be disabled.
The data export format is JSON and complies with the GDPR right to portability, where the data has to be in a structured, commonly used, and machine-readable format. The download comprises a zipped bundle of files, including field descriptors.
Three parameters have an impact on the data export workflow, which you can configure at Site administration | Users | Privacy and policies | Privacy settings:
- Automatic data export request approval: The approval step is skipped, and the export is approved automatically.
- Data request expiry: The time that approved data requests will be available for download before expiring. If set to zero, then there is no time limit.
- Include logs when exporting: Whether or not user-related log entries are included in the export.
Data export covers the right to access in the GDPR. The right to erasure is covered by data deletion, which is the topic of the following subsection.
Data deletion
Data subjects have the right to ask for their data to be erased, provided that this doesn’t conflict with legitimate reasons against this right. The latter half of this sentence is tricky, as “legitimate reasons” might differ not only between organizations but also between Moodle instances, user types (roles), courses, and even individual activities. We specified this information in the data registry, which is taken into account during data deletion processing.
The initial stages of the data deletion process are identical to the data export workflow: requests are put in a holding area where they wait for approval; they can then be approved or denied by the privacy officer unless the user has canceled the request.
The data erasure is processed during the next cron run considering data retention periods specified in the data registry. Depending on how granular you have specified data retention values, this might trigger the removal of some data straightaway, whereas other data might not be deleted for years. The following basic timeline illustrates when data is erased during the deletion processing and when it is kept until the end of the expiry period:

Figure 14.22 – Retention period – protected versus not protected
You can view data for which the retention period has expired by navigating to Site administration | Users | Privacy and policies | Data Deletion and choosing a context (Course, User, Activities and resources, and Blocks). In my system, the retention period for personal data is 7 years. I didn’t want to wait that long, so I created a test retention period of a single day to demonstrate its behavior, as follows:
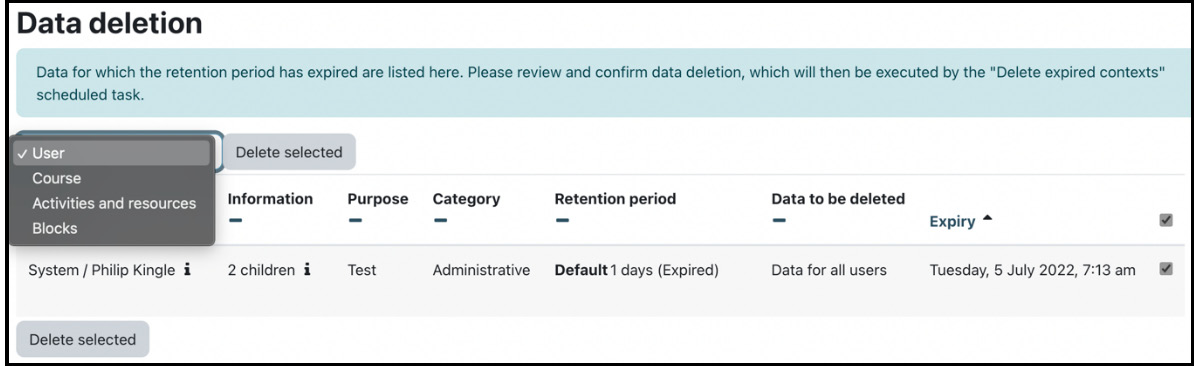
Figure 14.23 – Data deletion
Each entry shows privacy-related information about the data to be deleted—here, it is a user. You need to confirm the irreversible data deletion, which will be executed during the next cron run.
Three parameters have an impact on the data deletion workflow, which you can configure at Site administration | Users | Privacy and policies | Privacy settings:
- Automatic data deletion request approval: The approval step is skipped, and the deletion is approved automatically
- Create automatic data deletion requests: When users are deleted manually, a data deletion request will be created automatically
- Consider courses without end data as active: This option has been explained in detail in the inline help and details nicely how the retention period for course users is calculated:
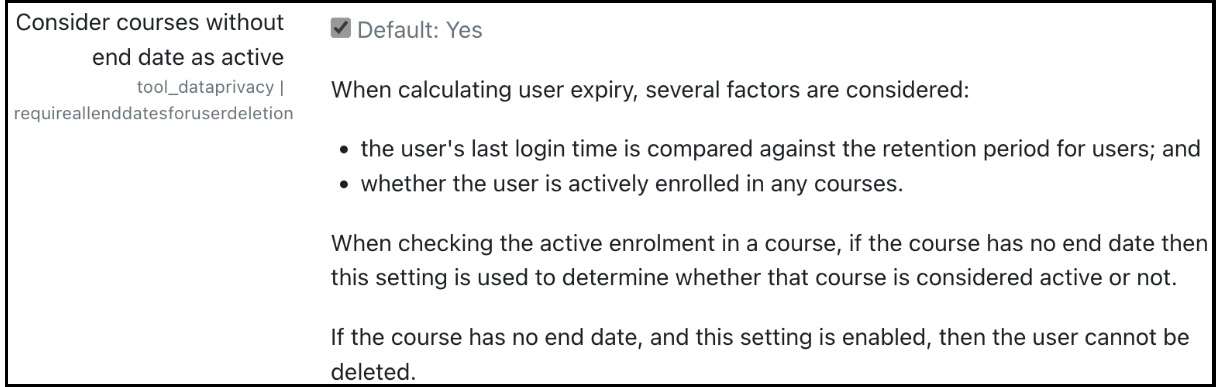
Figure 14.24 – Data retention calculation for user expiry
This concludes the section on managing data requests, where we covered Moodle’s data privacy tools to deal with the following GDPR user rights:
- Right to rectification (Message)
- Right to access (Export)
- Right to erasure (Delete)
To conclude the chapter, we have summarized its content and provided its key messages in a Moodle privacy checklist.
Summary
May 25, 2018: The GDPR applies to all EU residents.
One week earlier: Moodle 3.5 is released, supporting some but not all GDPR features.
We started the chapter on Moodle privacy with those two events in May 2018. Now that you have read through the chapter and hopefully realized the complexity of ensuring the compliance of all IT systems, can you imagine the hectic week all stakeholders had to configure Moodle systems? For those old enough to remember, dealing with the Y2K bug was peanuts compared to complying with GDPR.
This chapter introduced some legal background on the GDPR. We then designated a privacy officer by setting up a dedicated role and activating the Privacy Officer functionality.
Next, you learned all you need to know to manage policies. We configurated Moodle’s policy handler before creating and updating versioned policies. We then monitored user agreements and dealt with minors in your Moodle system.
Then, we configured your data registry, setting up data registry categories and purposes before assigning them to contexts.
Finally, we managed data requests, dealing with data rectification (Message), data access (Export), and data erasure (Delete).
As a summary, here is a short Moodle privacy checklist. While this enumeration is by no means complete, it gives an indication of the elements you are responsible for as a Moodle administrator and/or Moodle privacy officer:
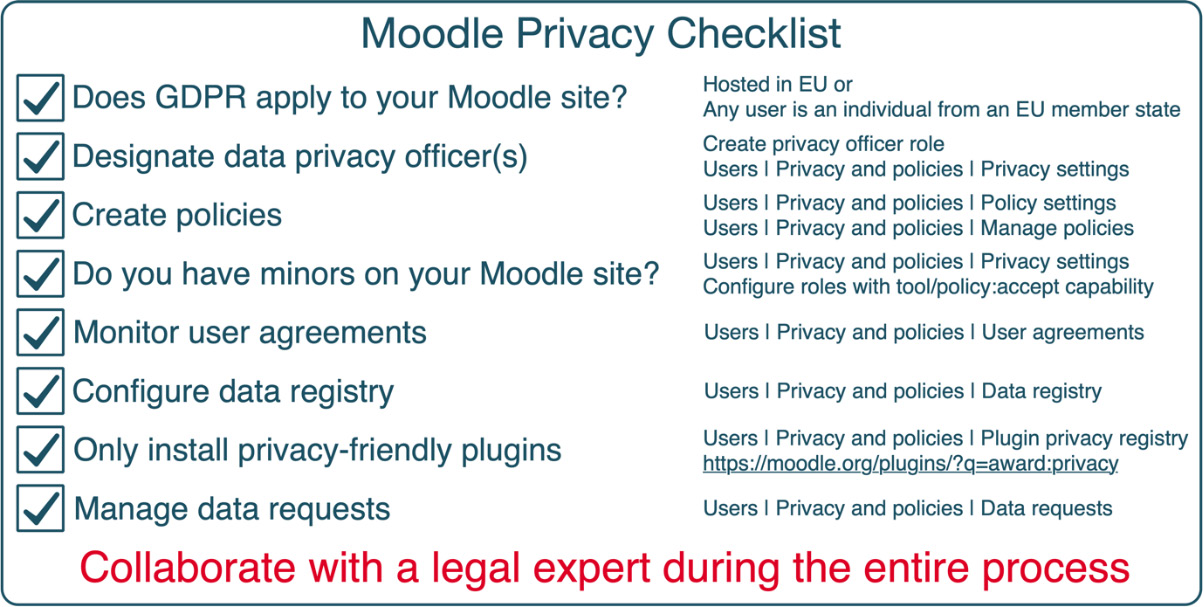
Figure 14.25 – Moodle privacy checklist
Now that your system hopefully complies with data privacy and all the grey suits are happy, let’s ensure Moodle performs to its full potential. In the following chapter, we will optimize Moodle to guarantee adequate scalability and hence, a good user experience.