
5
Managing Users, Cohorts, and Authentication
This chapter will teach you how to manage users in your Moodle system. We will first look at what information is stored for each user and how we can extend their profiles. We will then perform several standard user actions before dealing with cohorts. Finally, we will deal with a wide range of user authentication mechanisms. We will cover the following topics:
- Understanding user profiles
- Performing standard user actions (manual and bulk)
- Creating user accounts manually (including batch upload)
- Managing cohorts (including batch upload)
- Configuring user authentication (internal, external, service providers, and system)
The following diagram shows a high-level overview of the aforementioned topics (users, cohorts, and authentication) and how they are connected:
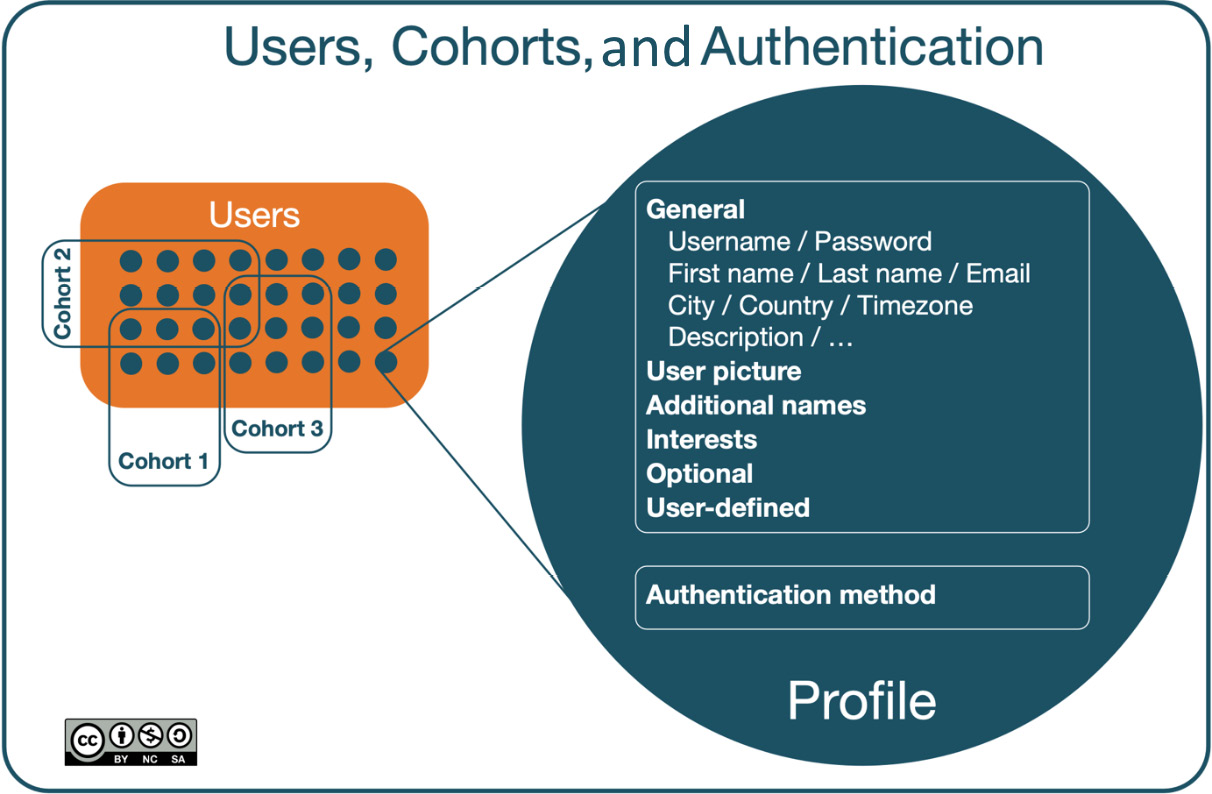
Figure 5.1 – Users, courses, and authentication – a high-level overview
By the end of this chapter, you will be able to manage all aspects of user accounts and user authentication. This is a lot to take in, so we’d better get going!
Understanding user profiles
Other than guests, each user has a profile containing information about them. We will first deal with the information stored for each user and how it is organized in Moodle.
You can view your own profile by selecting the Profile item in the drop-down menu beside your name at the top of the screen. Click on the Edit profile link in the User details section to change your profile details. To modify the profiles of other users, click on the Edit icon beside their name by navigating to Site administration | Users | Accounts | Browse list of users.
Profile fields
Moodle user profiles are divided into pre-defined categories, which cannot be changed via the Moodle user interface:
- General: Standard user fields
- User picture: Image of the user
- Additional names: Phonetic name, middle name, and alternate name
- Interests: Tags for networking activities
- Optional: Additional user information
In addition to these static profile field categories, Moodle allows us to create user-defined profile categories and fields. Before dealing with custom profile fields, we will cover the pre-defined fields grouped by the aforementioned categories.
User profile fields – General
The following screenshot shows the profile fields of the General category:

Figure 5.2 – User profile fields – General
Most of these items are self-explanatory, but there are a few things you need to know about each of them. Here is a brief description of each profile element, along with tips to use them effectively:
- Username: A unique username has to be provided. By default, only alphanumeric lowercase characters, underscores (_), hyphens (-), periods (.), or the at symbol (@) are allowed. Suppose you also want to use other characters in usernames, such as umlauts (¨). In that case, you will have to enable these by going to Site administration | Security | Site security settings and turning on Allow extended characters in usernames. It is important to remember that you ought to have administrator rights to change the username.
If you wish to use the email address as the username, consider the Allow login via email option (at Site administration | Plugins | Authentication | Manage authentication). That way, users have two alternatives to log in, their username and their email address.
Important note
If your users don’t already have a unique identifier that can be (re)used as their Moodle username, such as an email address or a staff ID, it is highly recommended to develop a consistent naming scheme for usernames, for example, firstname.lastname for smaller institutions or startyear.firstname.lastname.index for larger organizations.
- Choose an authentication method: This menu allows changes to the user’s authentication method. While useful for testing and development purposes, it is highly recommended that you do not select any disabled option from this menu. You cannot change the auth method of the main admin account. We’ll look at authentication methods in detail in the second half of this chapter.
Important note
An incorrect authentication method prevents users from logging in, or even completely deletes their account!
- Suspended account: Select this option to prevent a user from logging in. This is useful as a disciplinary measure or in case of a more prolonged absence, for instance, a sabbatical term. There is no expiry date on the suspension, so you must manually change this back.
Important note
Account suspension is not the same as enrolment suspension. The former affects users and the latter, individual course enrolments.
- New password: When creating manual accounts, a password must be provided for security reasons. If the user ought to change the given password on their first login, the Force password change option has to be selected. You can unmask (reveal) your own password but not that of other users. However, administrators can override the existing passwords of users.
If Password policy is enabled (in Site administration | Security | Site security settings), the password must adhere to this policy. Refer to Chapter 13, Ensuring Moodle Security, for more details on password policy.
- First name and Surname: These are compulsory fields for users, for which diacritical marks (ä, â, à, á, …) are fully supported.
- Email address: This is a compulsory field and should be unique. Ensure the address is correct since Moodle makes regular use of it, for example, to notify users who have forgotten their username or password.
Some organizations still do not make use of email addresses. As it is a mandatory field, there are two typical workarounds in this scenario.
The first option is to develop a unique dummy email address scheme or void email addresses solely used for identification purposes. While this solves the problem technically, it limits the user experience significantly because communication among users or notifications generated by Moodle cannot be sent.
The second alternative is to activate duplicate email addresses (enable Allow accounts with same email in Site administration | Plugins | Authentication | Manage authentication) and have users with an email address responsible for groups of learners, for example, a teacher for a class or a supervisor for workers. While this approach is not ideal from a privacy perspective – user-specific messages could potentially be read by multiple persons – at least somebody knows what is going on and can then communicate it to the intended recipients.
- Email display: Choices can be made as to who can see the user’s email address. The self-explanatory choices are Hide my email address from non-privileged users, Allow everyone to see my email address, and Allow only other participants to see my email address (default). Administrators and teachers (with editing rights) will always see email addresses, even if they are hidden.
- MoodleNet profile: Link to the user’s MoodleNet profile, which has to be a WebFinger-compliant URI. We will deal with MoodleNet in Chapter 19, Setting Up Moodle Networking.
- City/town and Select a country: These are used to further identify users by their geographical location.
- Timezone: This is used to convert time-related messages on the system (such as assignment deadlines) from the local time (typically, the server time) to the correct time in whichever zone the user has selected. It is necessary as your users may be geographically spread across multiple time zones. The default city, country, and time zone can be specified by navigating to Site administration | Location | Location settings.
- Description: This provides additional information about the user. As an administrator, you can leave the field empty.
Additional fields might appear in the user’s profile, for example, Preferred theme or Email charset, but this requires the settings to be changed elsewhere. We will mention these when the respective topics are being dealt with.
User profile fields – User picture
The second category is called User picture, and, as the name suggests, it deals with the image attached to a user’s profile.
Simply drag it to the New picture pane or select the image from the file picker to upload a new picture. The image cannot be larger than the maximum size listed; if your image is too large, it is recommended to reduce its size to a minimum of 100 x 100 pixels. The supported formats are GIF, PNG, and the JPEG family; however, be careful with transparent backgrounds as they might cause issues in some browsers.
The Picture description field is used as an alt tag, a description of the image used for nonvisual browsers; it is in conformance with accessibility guidelines.
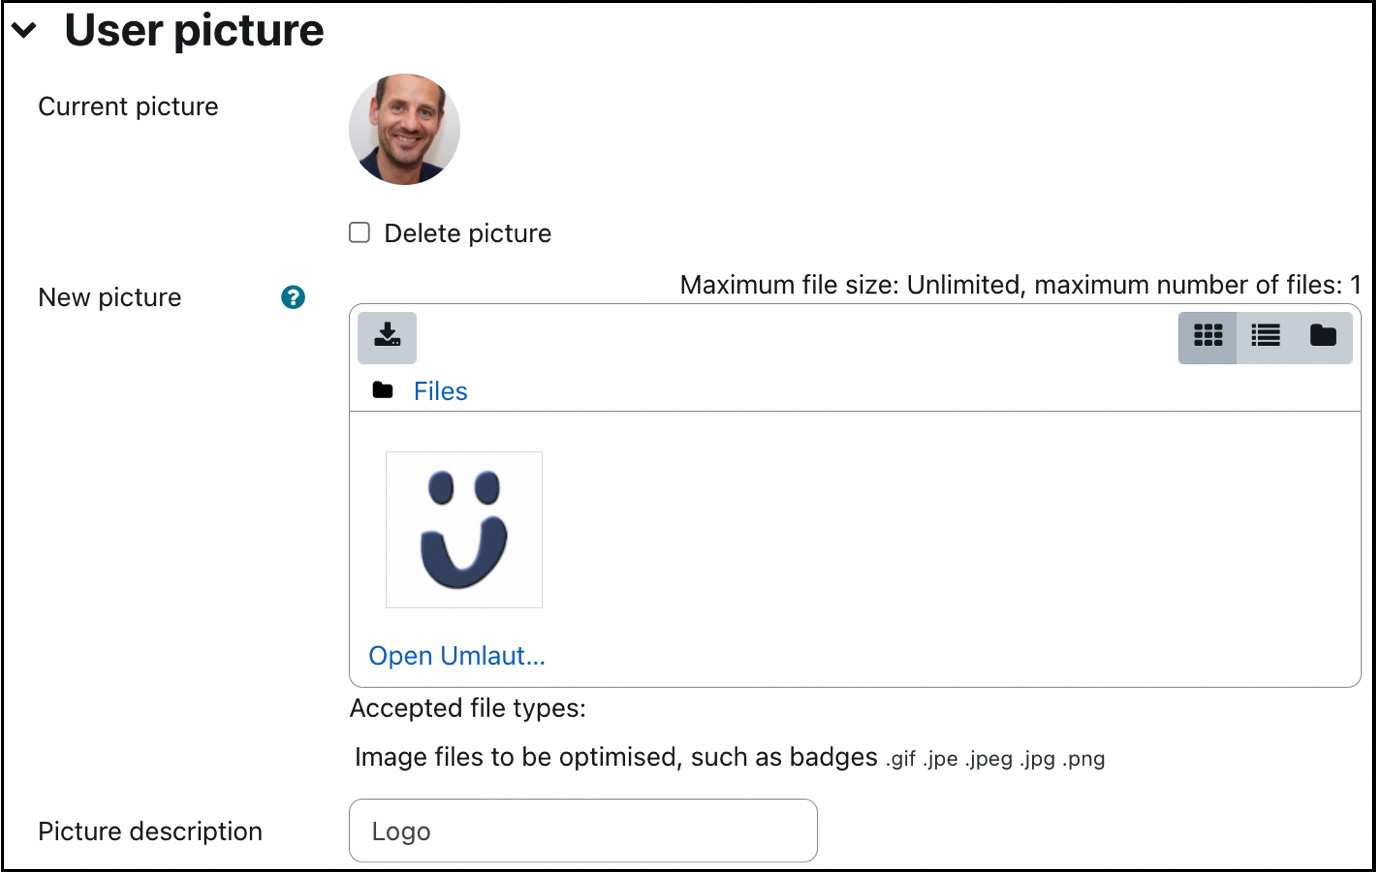
Figure 5.3 – User profile fields – User picture
Once a picture has been assigned, it will be shown in place of the None label. To remove the picture, check the Delete checkbox, and the picture will be removed when the profile information is updated.
Moodle will automatically crop the image to a square and resize it to 100 x 100 pixels for the larger view and 35 x 35 pixels for the smaller thumbnail view.
Important note
Two thumbnails are created automatically during the upload process, which reduces the file size to approximately 4 KB. An administrator can view all the uploaded user pictures via the <moodleurl>/userpix URL.
Moodle also supports Gravatars, so-called globally recognized avatars. Once you select the Enable Gravatar option on Site administration | Users | Permissions | User policies, Moodle will attempt to fetch a user profile picture from gravatar.com if the user has not uploaded an image.
If you suspect that your learners will likely misuse this feature by uploading inappropriate images, you can disable the functionality. Go to Site administration | Security | Site security settings and tick the Disable user profile images checkbox. Remember that once this feature is disabled, pictures cannot be assigned to any users (except the administrator), nor will it be possible for teachers to represent groups in courses with images.
User profile fields – Additional names
This Additional names section comprises the following fields:
- First name – phonetic and Surname – phonetic: The primary use case for the field pair is in Far East languages where users have an original and a Romanized version or a phonetic name displayed (for instance, Pinyin).
- Middle name: In some cultures, it is common to have three or more names that are displayed.
- Alternate name: This can be a nickname, a handle, or an alias used in specific pedagogical settings, for example, in gamification or role-playing scenarios.
User profile fields – Interests
Interests, such as hobbies or professional activities, can be entered one by one. To remove a tag, select its label. The given List of interests represents tags displayed in the user’s profile. You can find more information on tagging at docs.moodle.org/en/Tags and in Chapter 9, Configuring Educational Features.
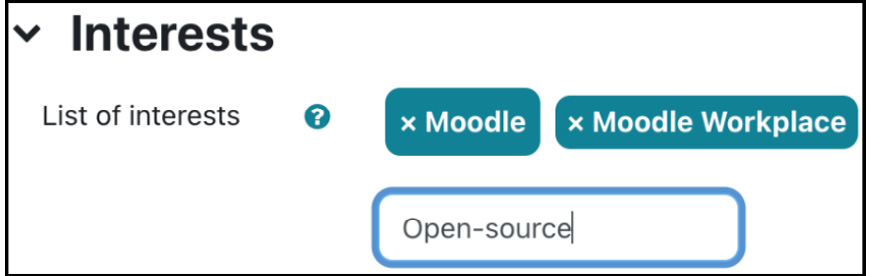
Figure 5.4 – User profile fields – Interests
User profile fields – Optional
More personal details are grouped under the Optional category:
- ID number can contain a student or staff number and is usually used in synchronization tools, such as HR systems.
- Institution and Department might be used for campus and faculty in a university. If you are using Moodle Workplace, do not confuse these two fields with departments that are part of the organization structure, including department frameworks, positions, job assignments, and managers.
- Phone, Mobile phone, and Address should be self-explanatory.
Some organizations rename unused fields to ones required in their setup. For more information on this, refer to the Localization section in Chapter 10, Configuring Technical Features.
This concludes the explanation of pre-defined user profile fields. The list can be extended by custom fields covered in the following section.
Creating user-defined profile fields
Moodle allows new arbitrary fields to be added to user profiles. We have already described the management of user-defined fields in the previous chapter when we dealt with custom course fields. Since the exact mechanism is used for user profile fields, we only deal with account-specific idiosyncrasies.
We just learned that profile fields are organized into categories (for instance, General, User picture, Interests, and Optional). Additional categories can be created, and user-defined fields can be placed within these new categories. This feature can be found by navigating to Site administration | Users | Accounts | User profile fields.
Unlike in custom courses, a default category, called Other fields, is already present, which can be deleted or renamed via the standard Moodle icons. To create a new category, click the Create a new profile category button at the bottom of the user profiles once the profile fields have been added.
The five profile field types in courses (checkbox, date/time, drop-down menu, text area, and text input) exist for users, plus one more: social. Let us go through the differences in the field-specific settings:
- Checkbox: This is the same as in custom course fields.
- Date/time: Instead of minimum and maximum value, the two date boundaries are Start year and End year, respectively. There also exists an Include time? option, though you cannot specify a default time.
- Drop-down menu: This is the same as in custom course fields.
- Social: This new field type lets you specify social network IDs, such as the user’s Skype handle. The options you can see in the Network type list were formerly hard coded in the user profile. Let’s hope the list will be updated to the 21st century soon to support social media platforms such as Facebook, Twitter, Instagram, and TikTok, instead of outdated services such as ICQ and AIM.
If you upgrade from Moodle 3.x and any of these services are populated, they will be retained and converted automatically.

Figure 5.5 – User profile fields of type social
- Text area: This is precisely the same as in custom course fields.
- Text input: This is the same as the Short text field in courses, but some fields have been renamed: Form input size is now Display size, and Maximum number of characters is now Character limit. Why? I have absolutely no idea!
Each field type in user-profile fields has the same parameters as custom course fields with three notable differences:
- The fields are arranged slightly differently, and the common field settings Locked and Visible have been moved to the General section.
- The options in Who is field visible to? have been adjusted as follows. Instead of Teachers, there are now two options to choose from, namely Visible to user and Visible to user, teachers, and admins.
- The only additional setting available is Display on signup page?. When self-registration is enabled, several default fields must be provided at signup. If a custom field should also be displayed on the signup page, the option must be set to Yes. This feature can be helpful in commercial training settings when additional information, such as the learner’s address or previous qualifications, is required.
To demonstrate how user profile fields work, let’s assume a school where you wish to extend the user profile with a new profile category called Parental responsibilities comprising fields such as Contact person and Relationship:
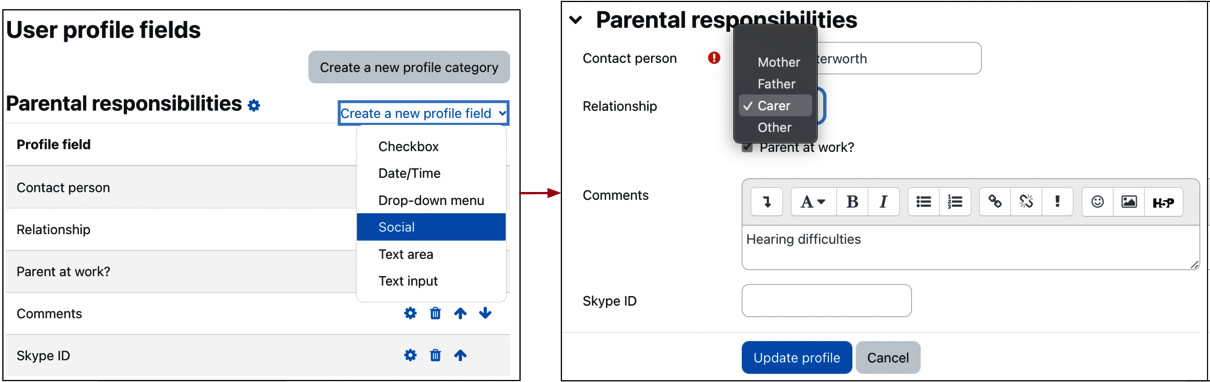
Figure 5.6 – User profile fields example
This completes the subsection dealing with custom user profile fields, extending standard user profiles. The third and last component of user profiles is user preferences, which we will cover next.
User preferences
Some more fields technically belong to the user profile, but they have been placed in the Preferences section, which can be accessed via the drop-down menu beside the user icon in the toolbar. The reason why this has been done is that you can disallow users from editing their profile altogether (via the moodle/user:editownprofile capability) and let them specify preferences via dedicated forms:
- Preferred language: The default language of the system is shown and can be changed to the user’s preferred language. We will deal with localization in Chapter 10, Configuring Technical Features.
- Forum preferences: Email digest type determines how a user receives posts from forums to which a subscription exists. There are three possible choices, which are No digest (single email per forum post), which is the default, Complete (daily email with full posts), or Subjects (daily email with subjects only). The Forum auto-subscribe setting dictates whether users are automatically subscribed to forums to which they post. The Use experimental nested discussion view option makes available a new discussion view; at the time of print, the feature is still in trial mode.
- If Forum tracking is enabled, posts that have not yet been read will be highlighted, which improves forum usability. When sending forum post notifications, users can choose whether they should mark the post as read or not to impact forum tracking.
- Editor preferences: This option determines which editor should be used when entering information in text areas. Unless the user has special requirements or preferences, this should be left as the Default editor option. In Chapter 7, Enhancing Moodle’s Look and Feel, you’ll learn more about editors.
- Calendar preferences: The user’s choice of calendar and event-related settings. Calendars will be discussed in a dedicated section in Chapter 10, Configuring Technical Features.
- Content bank preferences: This setting determines the visibility of content the user has created (public or unlisted). We will cover content as part of the H5P integration section in Chapter 8, Understanding Moodle Plugins.
- Message preferences: These settings control privacy and notification preferences. We will deal with messaging as part of the Communications section in Chapter 10, Configuring Technical Features.
- Notification preferences: The user can choose the channels for different notification types. We will deal with messaging as part of the Communications section in Chapter 10, Configuring Technical Features.
The default preferences of some settings (email, forums, and content bank) can be specified by navigating to Site administration | Users | Accounts | User default preferences.
This completes the section on user profiles, where we covered standard and custom profile fields and briefly looked at various user preferences. Now that we know what a user profile looks like, let’s start interacting with users.
Performing standard user actions
So far, you have learned what type of user information Moodle holds and how to extend the data stored in each profile. Now, it is time to work with existing users on your system, which consists of browsing and filtering user accounts and applying bulk actions.
Browsing users
The quickest way to view your Moodle user accounts is by navigating to Site administration | Users | Accounts | Browse list of users. Initially, a list of users is displayed, ordered by First name. Thirty users are shown at a time, and, if applicable, you can navigate via the « and » links or jump directly to another page by selecting a number. Each column can be sorted in ascending or descending order by clicking on the column header.
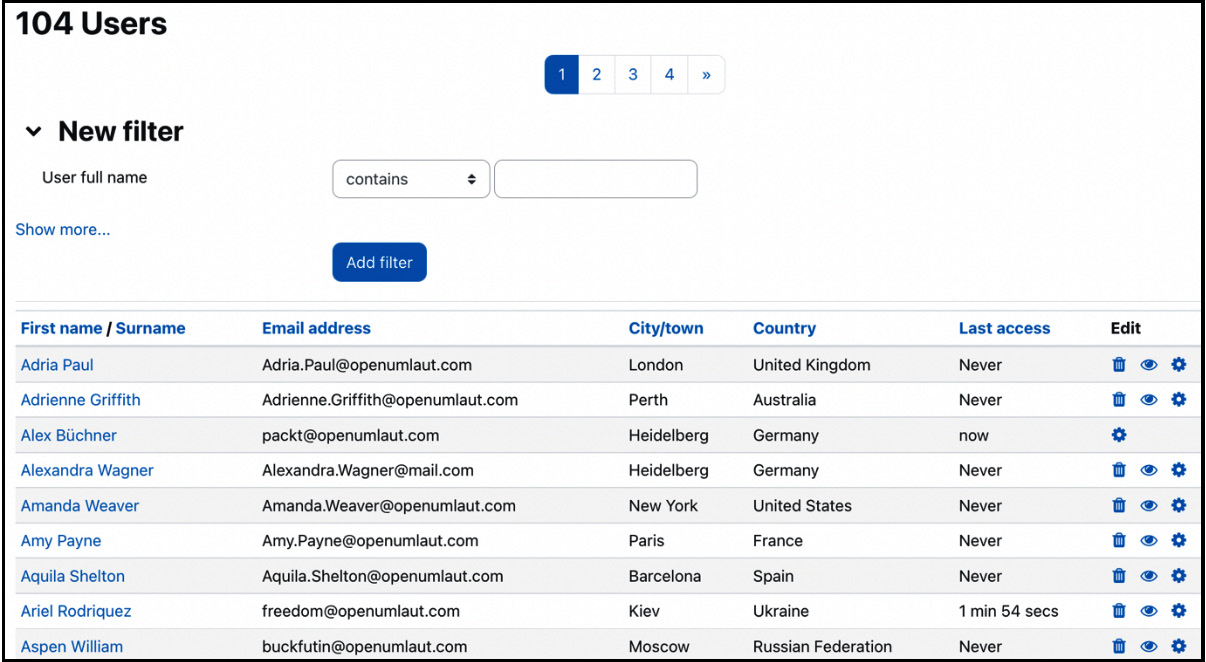
Figure 5.7 – Browsing user accounts
You can view an individual’s profile by clicking on a user’s name. In addition to the fields we introduced in the first section of this chapter, you can see Login activity showing First access to site, Last access to site, and the Last IP address login took place from.
You can specify which identity information (username, ID number, email address, phone numbers, department, institution, city, and country) about the users is shown in this list and other places. Go to Site administration | Users | Permissions | User policies and select the fields that should be shown in the Show user identity list. This only applies to users with the moodle/site:viewuseridentity capability.
Important note
To masquerade as another user, use the Log in as option in a user’s profile.
When you look at the profile of another user account, you will see a Log in as link in the Administration pane, which lets you masquerade as another user. This feature is useful when tracking down issues you cannot locate as an administrator. To view all the user profile fields of a user or modify any of them, as discussed earlier, click on the Edit profile link. To modify any of the user’s preferences, select the respective link.
Go back to the user list and click on the standard Delete icon in the rightmost column to delete a user. A confirmation screen has to be answered before the user is irreversibly removed. Actually, the user is only removed from Moodle’s user interface. Internally, the user is retained in the database with the deleted flag turned on, which is necessary so that certain user contributions don’t disappear, for instance, forum posts. Technically, a user account can be reinstated by changing the delete flag manually in the database.
To suspend a user account, toggle the Show/Hide icon, which triggers the account suspension, as discussed in the User profile fields section.
Related to browsing accounts is filtering, which narrows down the number of user entries you are dealing with. This refinement mechanism is particularly helpful on sites with a large number of user accounts.
Filtering users
We may often be required to search for a particular user or a set of users. Moodle provides a flexible filtering mechanism to refine the list of displayed users. In basic mode, you can filter by the user’s full name, which is the first and last name combined. The following filter operations are available, all of which are case insensitive:
- Contains: The provided text has to be contained in the field
- Doesn’t contain: This is the opposite of contains
- Is equal to: The provided text has to be the same as the value of the field
- Starts with: The field has to begin with the provided text
- Ends with: The field has to end with the provided text
- Is empty: The field has to be empty
For example, when adding a filter, such as User full name starts with “cl”, all users whose name begins with cl are displayed. Take a look at the following screenshot:
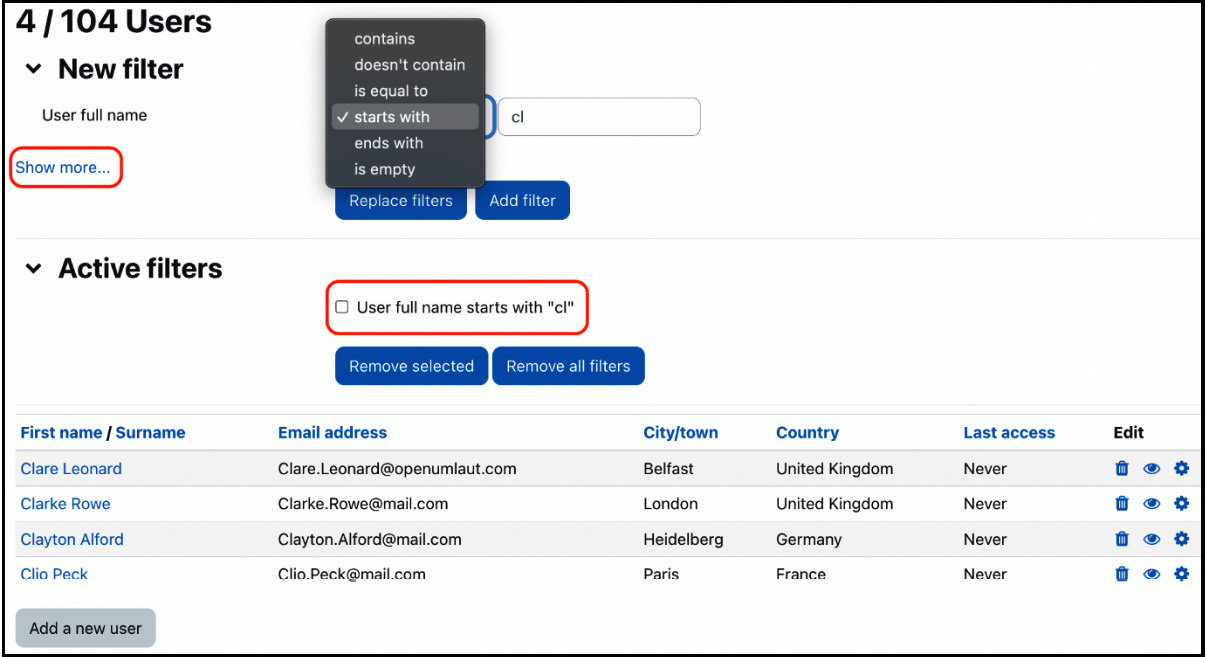
Figure 5.8 – Filtering user accounts I
You can see that the added filter is now active, which becomes more useful once multiple filters have been added (switch to advanced mode via the Show more… link). Now, we can apply filters to a wide range of fields:
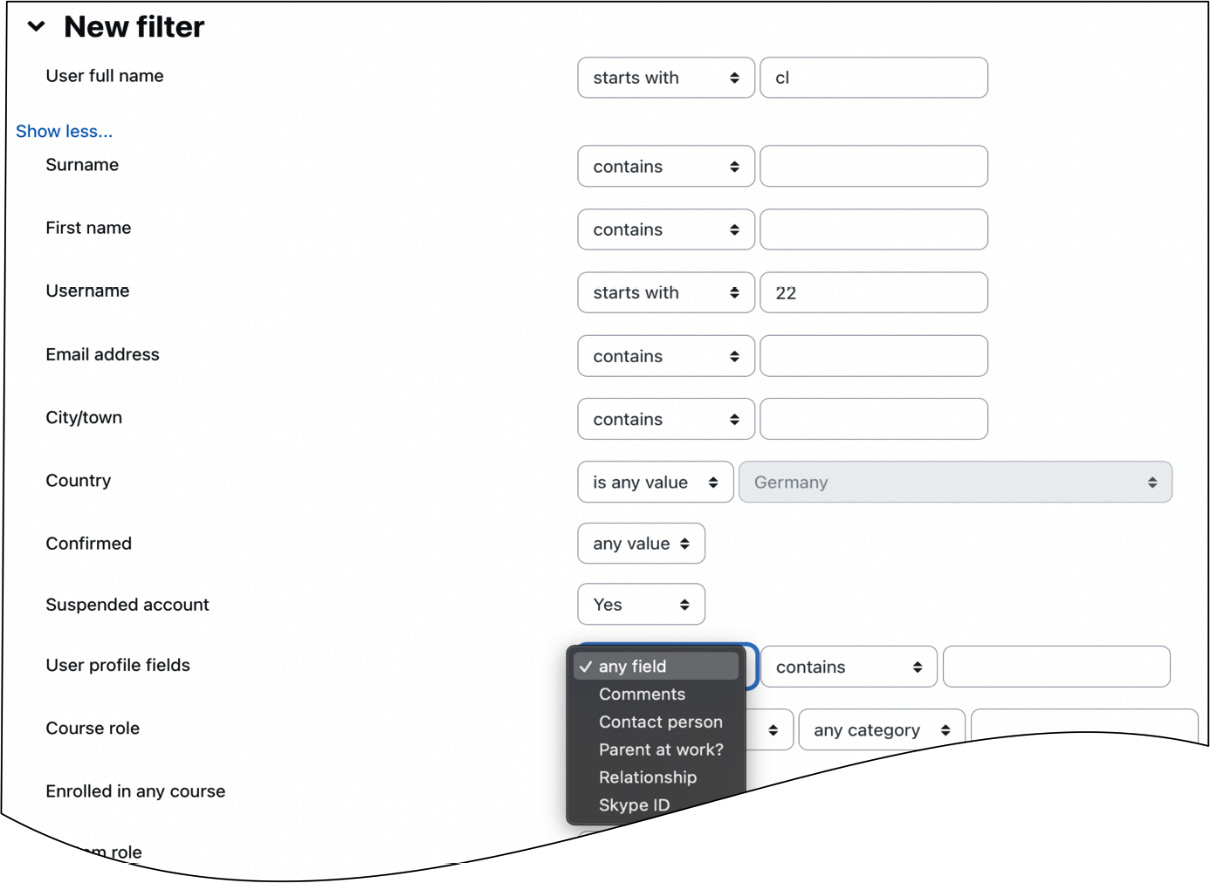
Figure 5.9 – Filtering user accounts II
For instance, in the preceding screenshot, we look for all users whose username starts with 22 (assuming the naming scheme starts with the year of entry) and whose account has been suspended. Using this mechanism, it is possible to add as many filters as required.
Every time a filter is added, it will be shown in the Active filters frame and applied to the user data in Moodle.
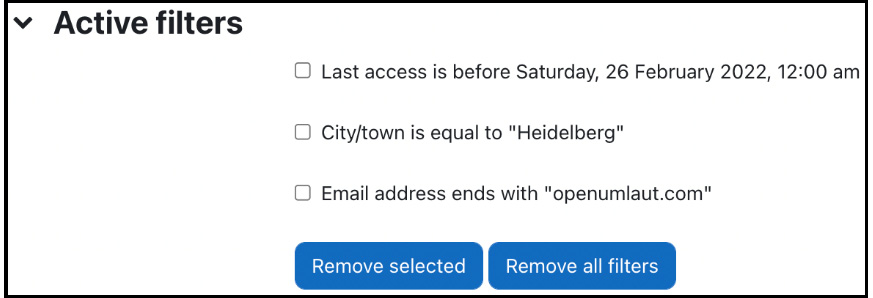
Figure 5.10 – Filtering user accounts III
Here, three self-explanatory filters have been added. It is now possible to delete individual filters (select the filter and click on the Remove selected button) or Remove all filters.
The filter criteria for text fields have been described earlier in this section. Depending on the field type, some additional operations can be used, as listed in the following table:

Figure 5.11 – Filtering operations
The Authentication criterion offers a selection of all the supported authentication methods. We will deal with these later in the chapter. If user profile fields have been specified, an additional User profile fields criterion is shown, offering a choice of all the user-defined fields (as specified earlier).
The current filter settings are saved and can be used the next time you log in. Not only that but they are also saved for bulk user actions, which are covered in the next section.
Bulk user actions
Bulk actions allow an administrator to perform a single action on multiple users, for example, forcing a password to change or sending a message. To illustrate how bulk user actions work, have a look at the user actions funnel depicted in the following diagram:
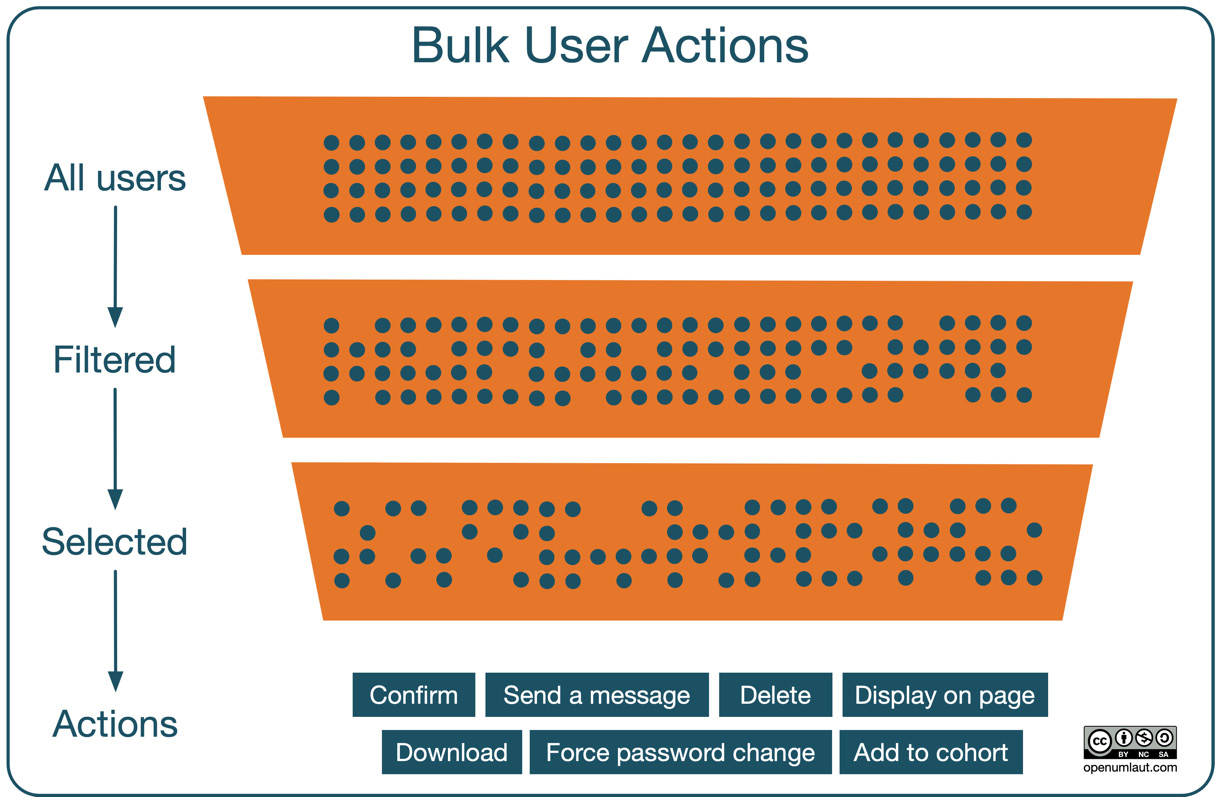
Figure 5.12 – Bulk user actions funnel
The three layers of the funnel have the following characteristics:
- The top layer shows all users in the system (tenant in Moodle Workplace)
- The middle layer contains all users after active filters have been applied
- The bottom layer comprises any users left after you have narrowed down the list by selecting users manually
Various bulk actions can then be applied to this group of chosen user accounts by going to Site administration | Users | Accounts | Bulk user actions.
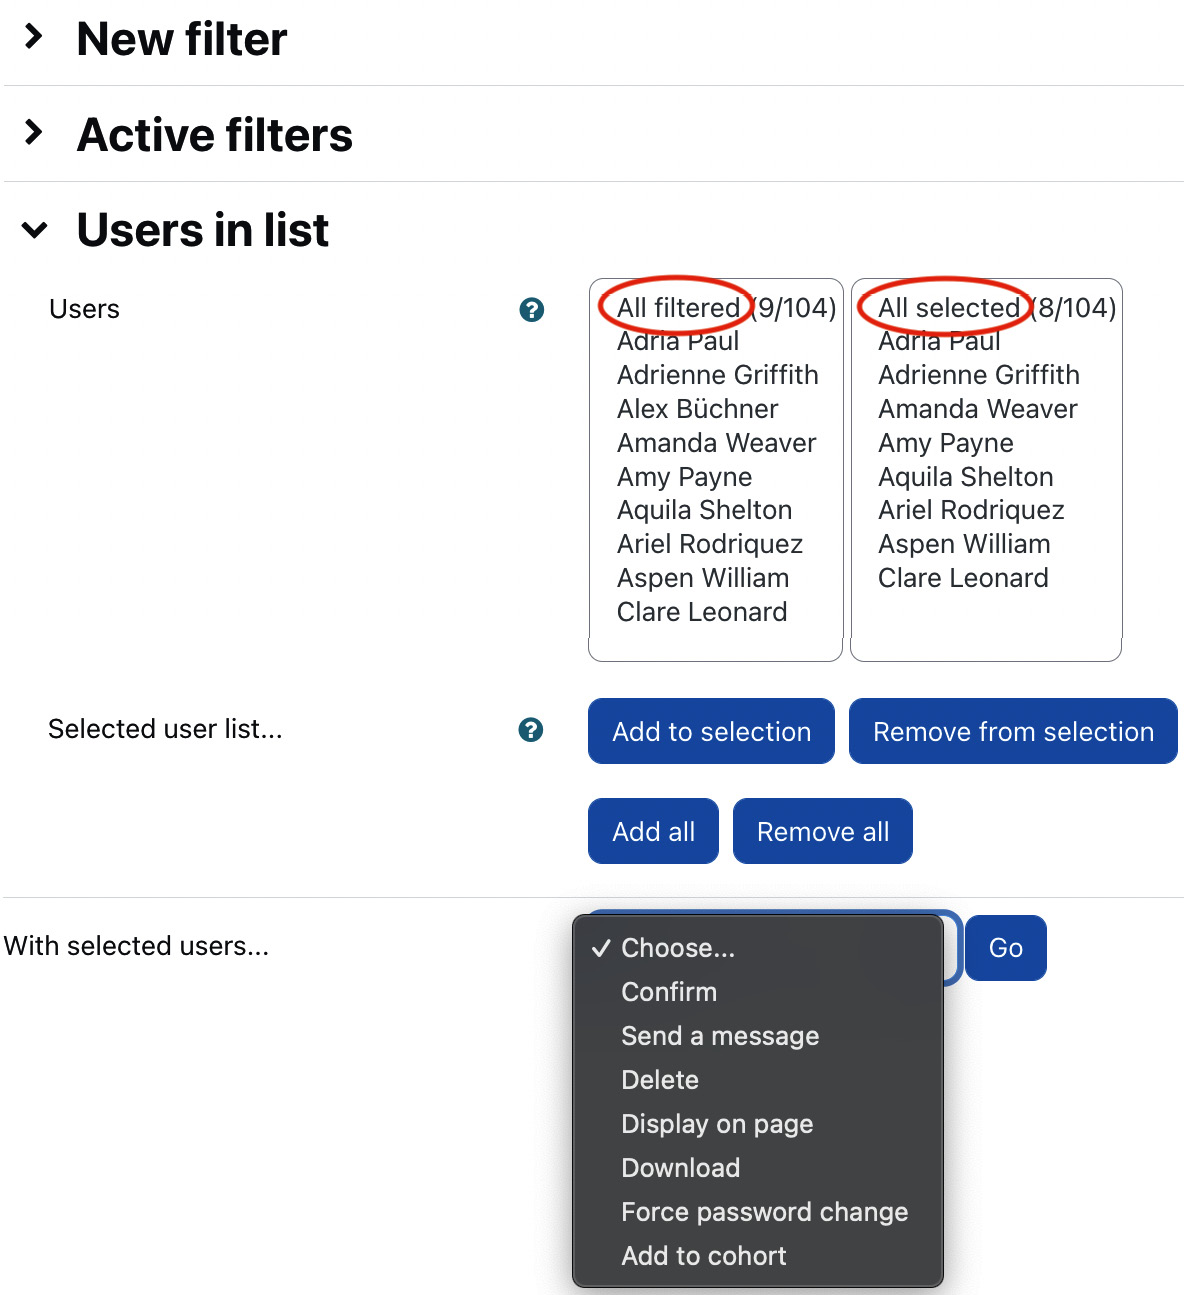
Figure 5.13 – Bulk user actions I
The screen contains three main sections. The first two parts are the familiar New filter and Active filters sections. Interestingly, filters already created will also show up on this screen since they have been saved.
The third part displays the users that match the specified filter criteria in the All filtered list. Before you can do anything with the users, you must move them to the All selected list using the Add to selection button. In the preceding screenshot, all users except one have been moved across. To move them back to the All filtered list, select the users and click the Remove from selection button. Two shortcut buttons exist, which allow you to add all users from the All filtered list to the All selected list and use Remove all to move them in the opposite direction.
The advantage of this approach is that you can apply several filters in succession and select the respective users, for example, in a setting where the usernames start with the year of entry. Suppose you wish to select all the users from 2022 and 2023, filter for all usernames that start with 22, and select all the entries that show up in the results. You can then delete the filter and repeat the filtering with the value 23.
When the Go button for the With selected users... drop-down menu is clicked, the operation selected will be performed on the users from the All selected list. The available operations are shown in the following table:
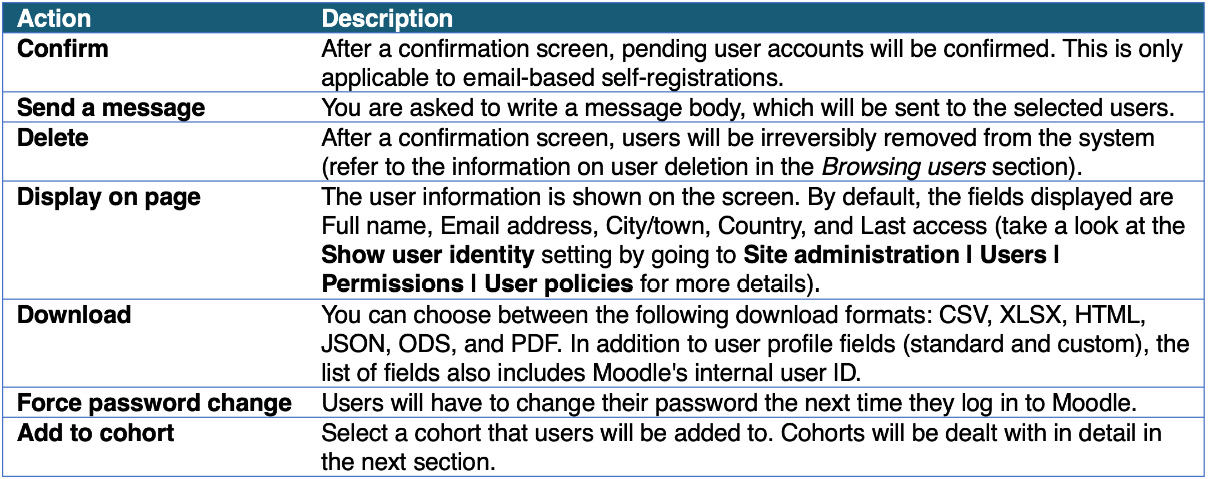
Figure 5.14 – Bulk user actions II
Now that we know how to deal with existing users, let’s look at how they are added to the system.
Creating user accounts manually
There are two ways to manually create accounts for users to get access to your system:
- Adding individual users
- Uploading users in bulk, including their user pictures
In the following three sections, you will learn how to perform and support each type.
Adding individual users
To add user accounts manually, go to Site administration | Users | Accounts | Add a new user. Alternatively, you can navigate the list of users and select the Add a new user button at the bottom of the screen. You will see the same form you saw earlier when you edited the user’s profile.
Important note
Adding users manually should be the exception, not the rule. It is highly recommended to automate the process.
You should avoid adding individual users manually as much as possible, as it is a very time-consuming, cumbersome, and potentially error-prone procedure. However, there are situations when you cannot avoid it, for example, when a student joins a school halfway through the term or an external trainer requires access to Moodle but is not part of the organization’s staff database.
If you have more than one user to add, use Moodle’s batch uploading facility, which we will look at next.
Bulk uploading and updating user data
Uploading users in bulk allows importing multiple user accounts from a text file or updating user accounts that already exist in your system.
Learner information is often available in existing applications, such as the internal student management information system or HR database, which can export data to an Excel spreadsheet or directly to a text file. The data represented in the CSV file is then loaded to the Moodle database, and, if specified, users are enrolled in courses and added as members to cohorts. This process is shown in the following workflow diagram:
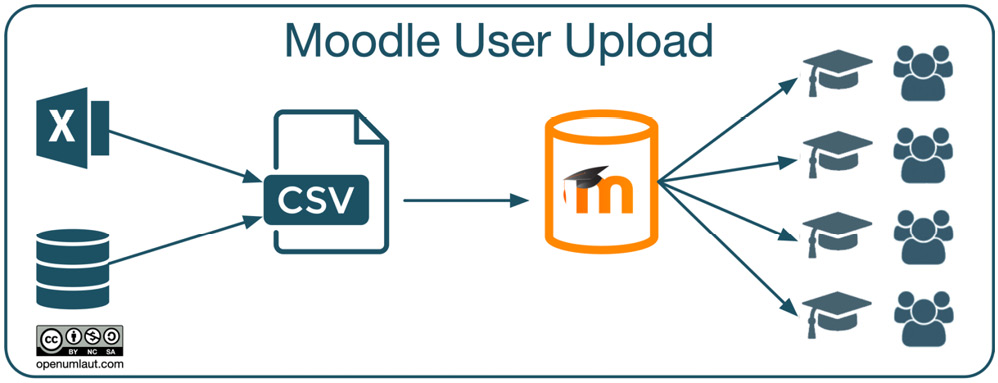
Figure 5.15 – Bulk user upload
You will find excellent and detailed instructions on uploading and updating users in batch mode at docs.moodle.org/en/Upload_users. We will focus on the key elements and upload workflows to supplement the well-documented feature.
The text file format
Before uploading users, you must generate a text file conforming to a specific format. Its general format is a Comma Separated Value (CSV) file, a flat text file format. While creating CSV files manually (using a plain text editor or a spreadsheet application) is possible, the files are usually generated automatically by a system hosting the user data.
The format of a text file is as follows:
- Each line of the file must contain a single record
- Each record must be a series of data that are separated by delimiters
- The first record of the file must contain the list of field names defining the structure of the rest of the file
An example of a valid input file is as follows:
username, password, firstname, lastname, email
galmond, pwd, Graham, Almond, [email protected]
earmstrong, pwd, Eleanor, Armstrong, [email protected]
jarnold, pwd, Joanne, Arnold, [email protected]
The first line contains the list of provided fields, while the remaining three lines represent individual users to be uploaded.
Moodle’s upload function supports the following types of data fields:
- Required: Compulsory fields that must be included
- Password: Password fields
- Optional: If no value is provided, specified default values will be used
- Custom: User-defined profile fields
- Enrolment: Dealing with courses, roles, and groups
- Cohort: Adding users as members to cohorts
- System: Assigning and unassigning system roles to and from users
- Special: Modifying and deleting user accounts
We will be going through each field type to understand better how Moodle’s user batch upload works and how you can use it in your setting.
Required fields
When adding new users, only firstname and lastname are compulsory. When updating records, only username is required. You might recall that the user profile has a few more compulsory fields, such as the username or email address. A default value must be specified via a template if these fields are not provided. We will deal with templates later in this chapter.
The sample file is an example of an input file containing five fields, including the required firstname and lastname.
Password
The password value is required unless Create password if needed and send via email has been enabled. If this is the case, a welcome email with a one-off password will be sent to the respective user the next time the cron process runs.
Note
If you set password to changeme, the user will be forced to change the password when they log in for the first time. A better way to do this is using the Force password change option.
Optional fields
As the name suggests, optional fields do not have to be specified—if they are not included in the text file, default values are taken, if present. These optional fields are as follows:
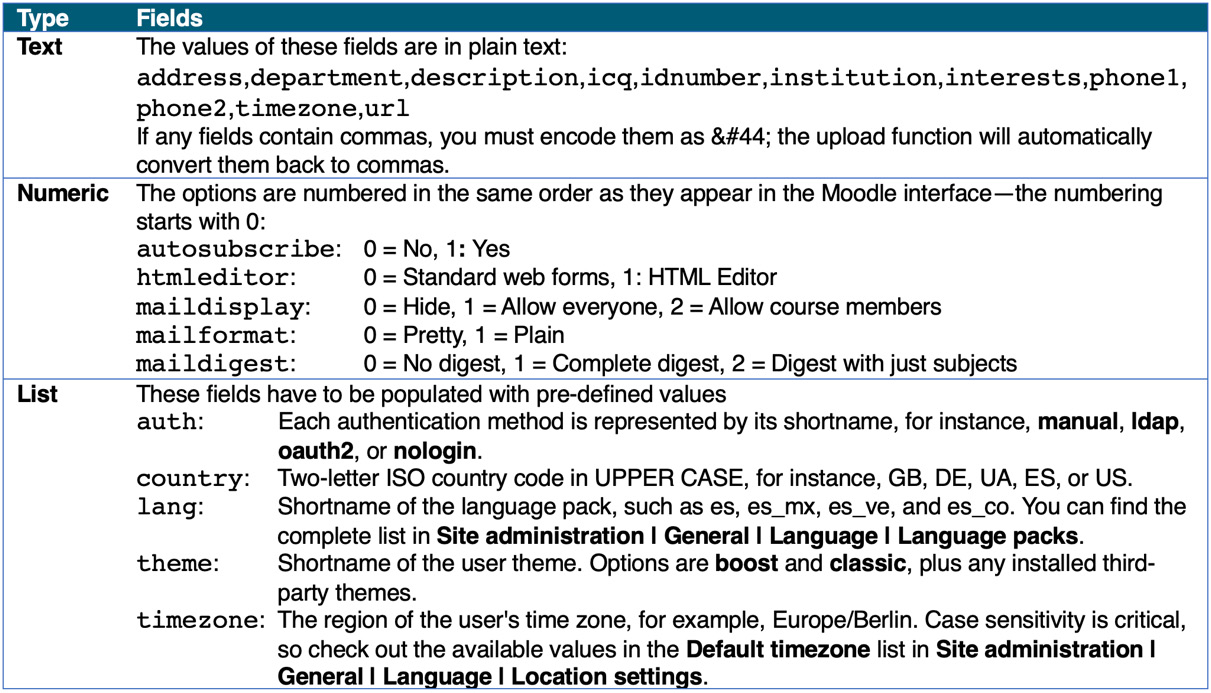
Figure 5.16 – User upload (optional fields)
It is crucial to include empty fields when the default setting has to be used. These must be left empty even if it is the last field in each record. An empty field is represented by two consecutive commas, as shown in the sample file:
username, password, firstname, lastname, email, city
galmond, changeme, Graham, Almond, [email protected], Kyiv
earmstrong, , Eleanor, Armstrong, [email protected],
jarnold, , Joanne, Arnold, [email protected], Doha
A city field has been added in the preceding sample file, and the default city has been set to Paris. After uploading the file, the city value for Graham Almond is set to Kyiv, and that for Joanne Arnold is set to Doha. The city value for Eleanor Armstrong has been left empty and will be set to the default value of Paris. Some password fields have also been left empty.
Custom profile fields
Any user-defined fields you have specified (in our case, those for parental responsibilities) can also be used as part of the batch upload process. Each field must be preceded by profile_field_; for instance, the field representing the Skype ID would be labeled profile_field_skype_id.
Custom fields are treated in precisely the same way as optional fields. If specified, the values are taken; otherwise, default values will be used, if present.
Enrolment fields
Enrolment fields allow you to assign roles to users; you can enrol them in courses and assign them to groups. Roles will be covered in detail in Chapter 6, Managing Permissions, Roles, and Capabilities.
Each course has to be specified separately by course1, course2, course3, and so on. The course name is the course’s short name and the only compulsory enrolment field. Each corresponding type, role, group, enrolment start time, enrolment period, and enrolment status must have the same postfix: type1, role1, group1, enroltimestart1, enrolperiod1, and enrolstatus1 correspond to course1.
It is further possible to set a user’s role in a course. Each role has a role short name and a role ID, either of which can be specified. If the type is left blank or no course is specified, the user will be enrolled as a student. The enrolment period sets the enrolment duration in terms of days; the enrolment status suspends a user from a course when it’s set to 1.
If you want to assign users to groups in a course (group1 in course1, group2 in course2, and so on), you have to specify the group name or ID. If a specified group does not exist, it will be created automatically.
The following example demonstrates some of the enrolment features:
username, course1, role1, course2
galmond, Advanced, editingteacher, Staff
earmstrong, Advanced, examiner, Staff
jarnold, Basic, 3, Staff
The course1 field and its corresponding role1 and course2 are optional enrolment fields. Graham Almond (galmond) will be assigned the editingteacher role in the Advanced course, and Eva Armstrong (earmstrong) will be assigned the examiner role. Jonny Arnold (jarnold) will be editingteacher (the role ID is 3) in the Basic course. All three users will be assigned the student role in the Staff course (no role has been specified, hence the default is set).
Cohort fields
Cohort fields allow you to add users as members to cohorts. Like enrolments and groups in courses, the field name has to be suffixed by a counter: cohort1, cohort2, and so on. An example file snippet is as follows:
username, firstname, lastname, cohort1, cohort2
pupil1, Pupil, One, 7a, drama
pupil2, Pupil, Two, 7a, archery
Users can be added to system cohorts as well as context cohorts. Cohorts will be dealt with after this main section.
System role
If you need to assign users a system role, you must specify this via sysrole1, sysrole2, and so on. The field’s value has to be shortname of the role, for instance, manager or coursecreator.
You can also unassign a system role from a user by preceding the role name with the minus symbol, for example, -manager or -coursecreator.
Special fields
The following special fields are supported:
- oldusername: When changing a username, you must provide the current value
- deleted: When removing a user, you will set deleted to 1
- suspended: When suspending a user, set suspended to 1; to activate, set it to 0
Special fields are the last category of text file format. Once you have created your user file, it is time to upload users to Moodle, which we will tackle next.
Uploading users
Uploading users is a four-step process, as shown in the following diagram:
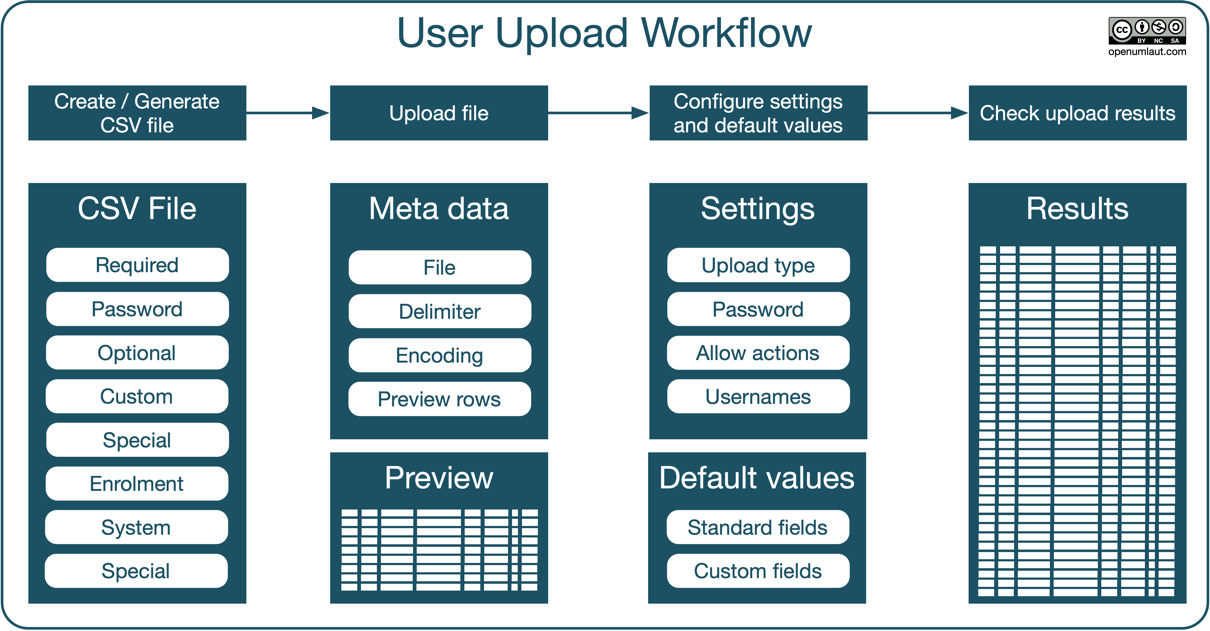
Figure 5.17 – User upload workflow
The workflow comprises the following four steps:
- Creating or generating the CSV file
- Uploading the file, specifying metadata, and viewing the data preview
- Configuring upload settings and default values
- Checking upload results
We already covered step 1 in the previous subsection, so let’s jump straight to the second and third phases. To upload or update users in batch mode, go to Site administration | Users | Accounts | Upload users, where the following settings are available:
- File: The name of the text file.
- CSV delimiter: Specify whether the delimiter is a comma (default), semicolon, colon, or tab. In most European locales, for instance, German, French, and Dutch, the default delimiter is a semicolon!
- Encoding: The encoding scheme of your uploaded file specifies the locale in which it has been saved (the default is UTF-8).
- Preview rows: The number of rows displayed on the preview screen.
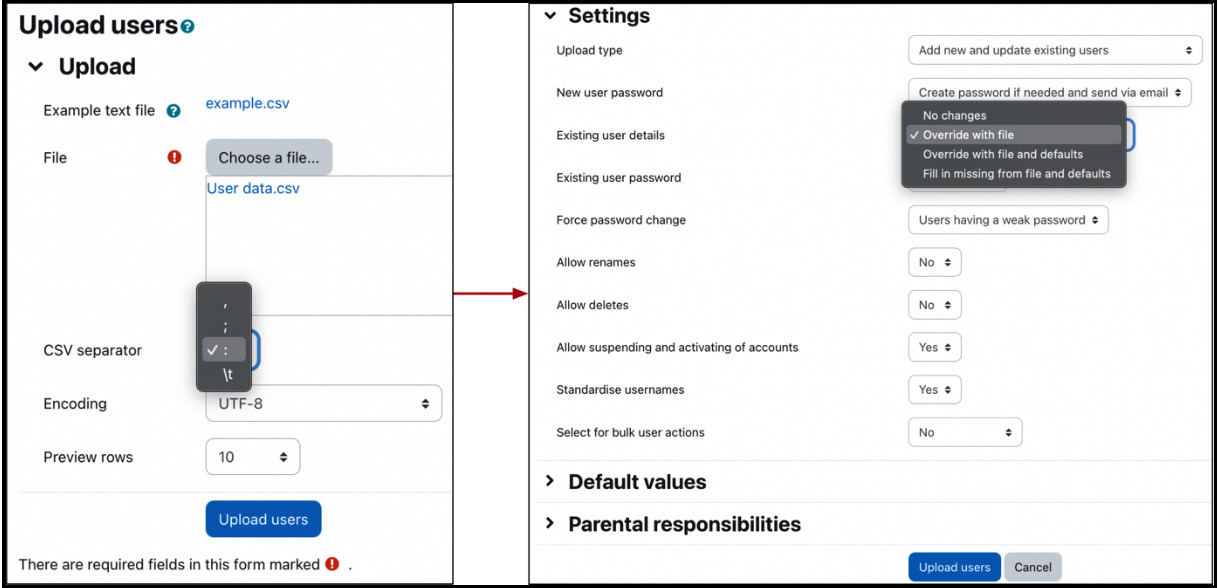
Figure 5.18 – Upload users configuration
Once this screen has been confirmed, you will see the following four sections:
- Upload users preview: A sneak peek of the specified number of rows that will be uploaded. Records that are to be skipped will not be shown.
- Settings: Different options, which depend on the selected upload type.
- Default values: All the user fields for which default values can be set.
- Custom values: Any user-defined fields grouped by category, if present.
Remember that not all settings exist for all upload types; they will remain hidden if they are not applicable. The following table shows which settings are available for which upload type:

Figure 5.19 – Upload users settings
Here is a brief description of each Upload users setting:
- New user password: Moodle requires either a password in the file (Field required in file) or the cron process will generate a one-off password automatically if none is specified (Create password if needed and send via email).
- Existing user details: Specifies what action is performed on the existing user details when an account is updated. The options are No changes, Override with file, Override with file and defaults, and Fill in missing [fields] from file and defaults.
- Existing user password: Specifies what happens with users’ passwords when the user details are updated. The password can be left unchanged (No changes) or overridden (Update).
- Force password change: Specifies when to tag accounts requiring users to change the password (Users having a weak password, None, and All).
- Allow renames: Specifies whether the changing of usernames is allowed. This only applies to the special oldusername field.
- Allow deletes: Specifies whether removing user accounts is allowed. This only applies to the special deleted field.
- Allow suspending or activating of accounts: Specifies whether deactivating or activating user accounts s is allowed. This only applies to the special suspended field.
- Prevent email address duplicates: Multiple users can have the same email address (as discussed in the Understanding user profiles section). This setting will only show if Allow accounts with same email on Site administration | Plugins | Authentication | Manage authentication is enabled.
- Standardise usernames: Removes any invalid characters from usernames (extended characters, unless allowed, as well as spaces) and ensures that all characters are lowercase.
- Select for bulk user operations: You can specify whether New users, Updated users, or All users should be selected for bulk operations. You will see the names in the user list for Bulk user actions.
Default values have been mentioned a few times so far; now, it is time to deal with them alongside templates.
Setting default values and templates
Moodle’s user batch upload function supports default values that are used if no value has been set. Default values cover all user profile fields that can be uploaded as well as user-defined custom fields.
Each text-based field can be populated using a template. This feature is helpful for optional fields, such as the URL of students’ websites, and is compulsory for required fields if they’re not specified in the CSV file, for example, username and email. Moodle will warn you if the latter is the case. For example, in the following screenshot, Username template has not been provided, which is indicated by the red warning message:
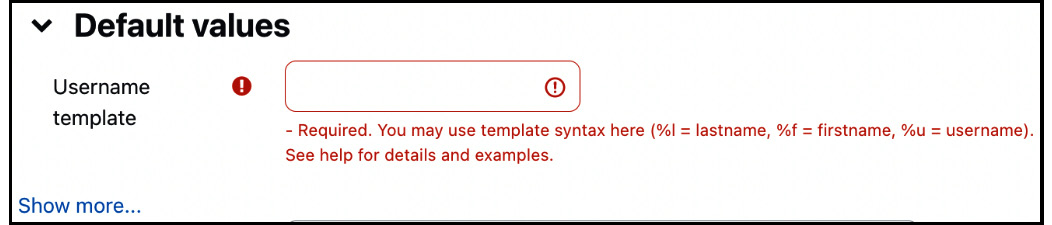
Figure 5.20 – Template missing
The template (or pattern) will create a value based on the values of other fields and the standard characters you specify. A template can comprise the following content:
- Replacement values: The value is substituted by the corresponding profile field
- Template modifiers: The value is converted or truncated based on the modifier
- Standard text: Plain text is included without any modification
The following table hopefully clarifies the preceding concepts:
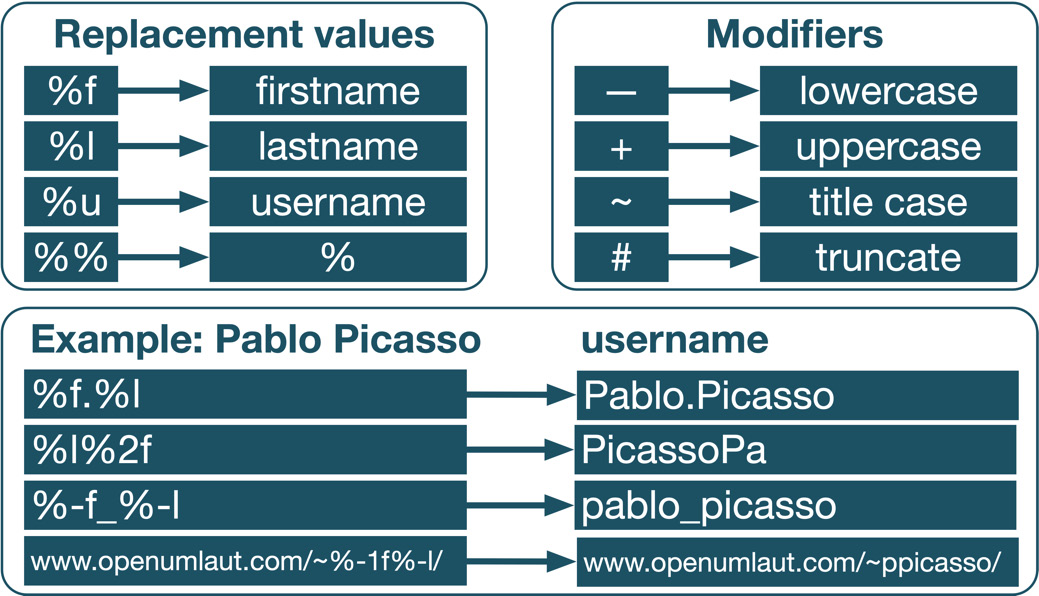
Figure 5.21 – Template content
There are four replacement values, indicated by a percentage. For example, if the username should be the first name of a user, followed by a period, and then the surname, the template would look like %f.%l.
Four modifiers can be included between the % sign and any of the three code letters (l, f, and u), where the hash represents a decimal number. The last template is an example embedding the replacement values inside other text; in this case, it is a URL representing a user’s home page.
This completes the third step of our user upload workflow. The last step is to load and review the actual user data.
Loading of data
Once all the settings have been specified, the default values have been provided, and the Upload users button has been pressed, Moodle will finally start the actual importing process.
Important note
It is highly recommended that you create a test file with a smaller number of dummy records first to ensure that the syntax is correct.
Moodle displays a large table that contains all the user fields that have been added and/or changed. It also shows the status of each field, including any problems or errors that have occurred.
A message is displayed at the end of the results screen, summarizing the upload process. It contains the number of users created and updated, those with a weak password (according to the password policy), and the number of errors. Take a look at the following screenshot:

Figure 5.22 – Reviewing upload results
It is recommended that you immediately identify invalid user accounts and modify their user settings manually or fix the upload file and do a re-run.
Bulk user operations provide a versatile means to create and update textual user data. However, one type of user information that CSV files cannot process exists: profile images. Moodle comes with a dedicated feature that deals with user pictures. Let’s take a look at it in the next section.
Uploading user pictures
As described so far, the process of uploading users does not support profile images; instead, user pictures must be uploaded separately. The workflow to upload user images is simple yet effective, as depicted in the following diagram:
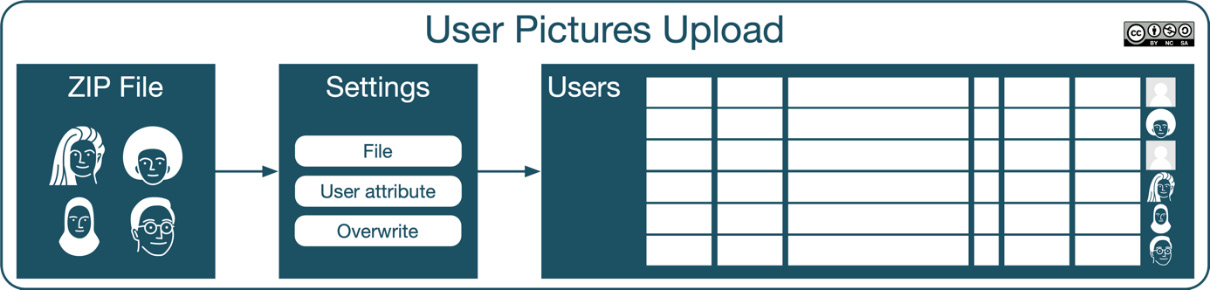
Figure 5.23 – User pictures upload workflow
The upload user picture tool can be found at Site administration | Users | Accounts | Upload user pictures. The images to be uploaded have to be archived in a ZIP file. Each image filename inside the compressed file must conform to the following format: attribute.ext.
The User attribute to use to match pictures field is set to any of these values: username, idnumber, or (the internal user) id. This attribute is used to match the picture to an existing user, and you have to select the attribute in the respective pull-down menu. ext is the filename extension (.jpg, .gif or .png). The image filenames are not case sensitive.
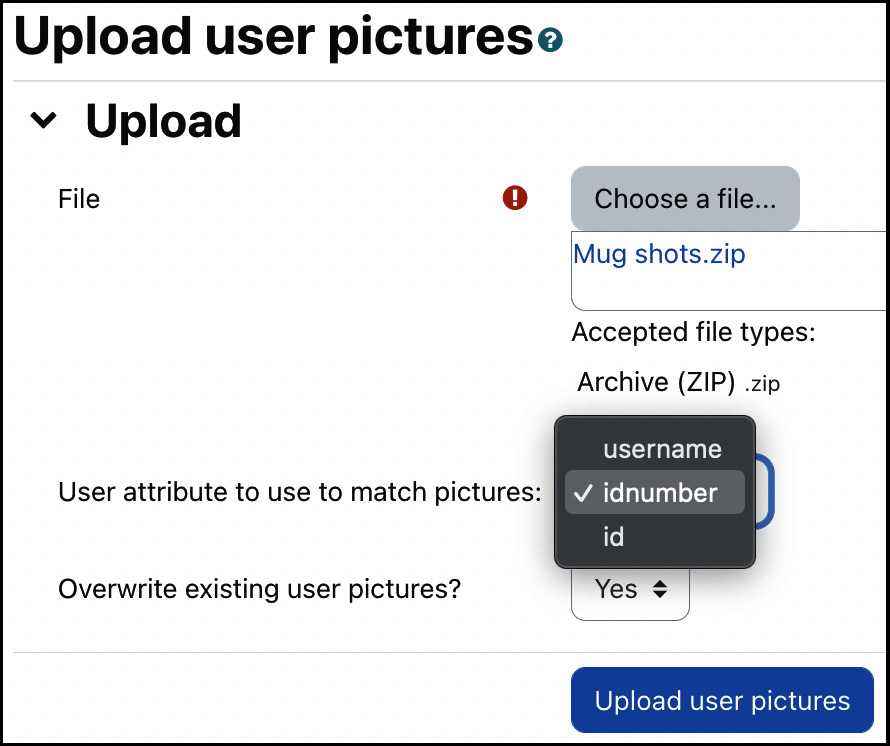
Figure 5.24 – Upload user pictures
For example, if the username consists of the first name’s initial and a surname (%1f%l, if expressed in template style), the valid filenames are psmith.png, lcohen.png, and mstripe.png. If the users exist, the pictures will be added to their profiles; otherwise, they will be ignored. If a picture already exists for a user, it will only be replaced if you have enabled the Overwrite existing user pictures? option.
So far, we have only looked at individual users on an account-by-account basis. Moodle thrives on being a learning system that supports communication and collaboration among learners and teachers. To support working together, users can be arranged in two ways: groups and groupings at the course level, and cohorts at the system or category level. We have already come across groups in the previous chapter and during the user batch upload, so let’s have a closer look at cohorts now.
Managing cohorts
We have already come across cohorts in Chapter 4, Managing Courses and Enrolment, and in the introductory diagram of this chapter.
Important note
Cohorts are groups that are used to logically cluster related users.
So far, we mainly mentioned cohorts in the context of enrolments; however, cohorts are utilized by Moodle in various places, such as the following:
- Course enrolments and synchronization
- Cohort themes provide a user experience to a pre-defined group of users, for example, visually impaired learners
- Report audiences to limit access of a report to cohorts
- Execute actions automatically, such as notifying or issuing a certificate to a cohort as part of dynamic rules (Moodle Workplace only)
Zooming in on the cohort element, we can see its structure and properties:
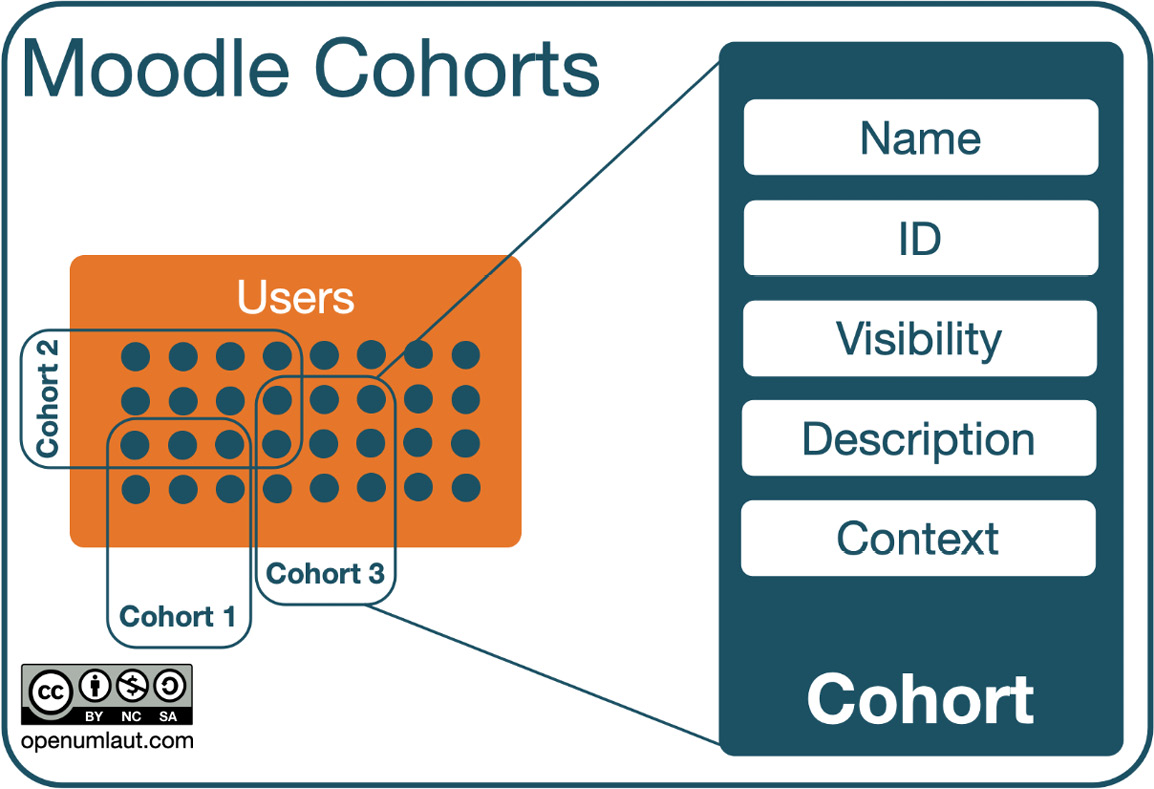
Figure 5.25 – Cohorts (high-level)
Let’s have a closer look at how to create and manage cohorts. To do this, navigate to Site administration | Users | Accounts | Cohorts.
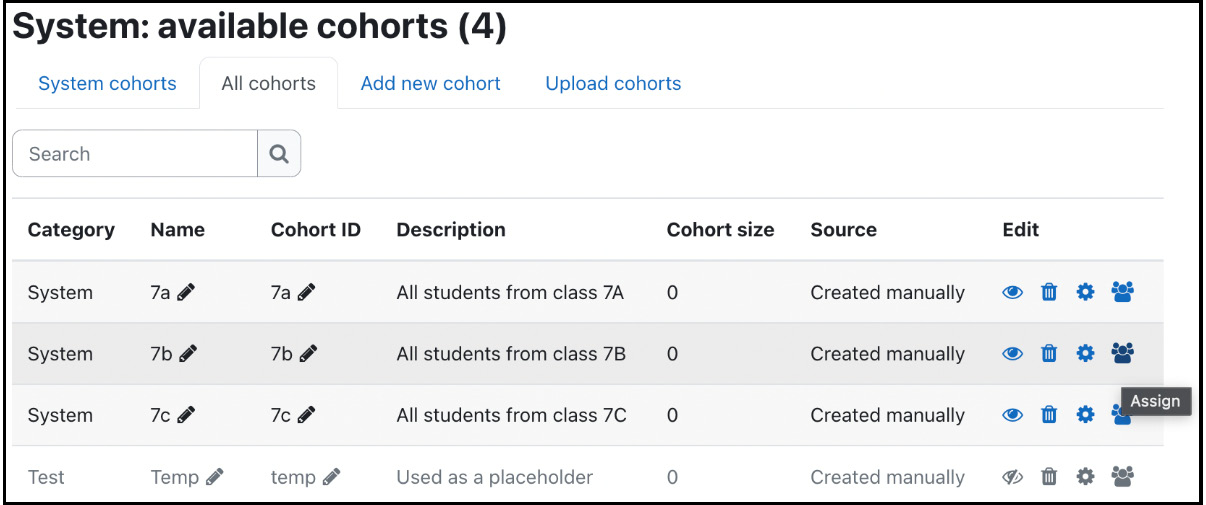
Figure 5.26 – Available cohorts
The details of each cohort and its standard actions (hide, delete, edit, and assign) are provided. The All cohorts tab provides an almost identical view, displaying system and category cohorts.
To create a cohort, select the Add new cohort tab and specify the cohort’s properties. Context is the scope of the cohort that indicates where the cohort can be used; the options are System (global or site-wide) and a selected category. Cohort ID is optional, but it is good practice to set this as it will be used for different operations, such as when adding bulk users.
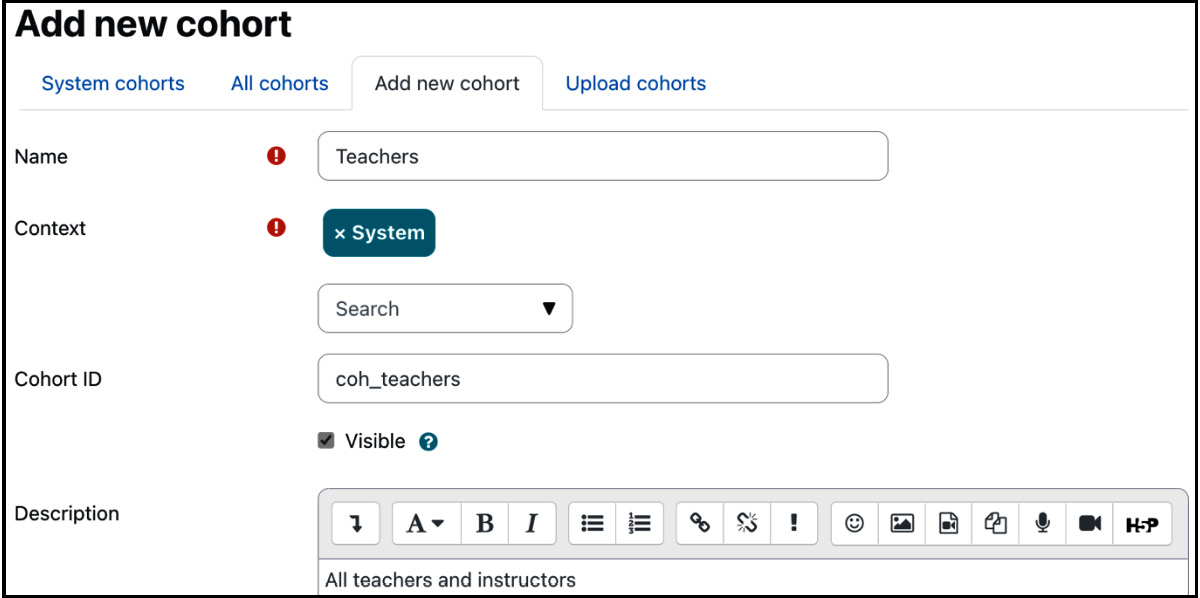
Figure 5.27 – Adding a cohort
Once you have added a cohort, you will return to the list of all cohorts. Now, you should add members to it by selecting the Assign icon, which will display the familiar user selection screen to add or remove cohort memberships.
Important note
Removing users from a cohort will unenrol them from all courses where cohort synchronization has been enabled!
Instead of adding cohorts manually, you can perform this task in a batch via the Upload cohorts tab. The principle is the same as adding users in batch mode, as described in the previous section. Here is a sample file representing the cohorts used earlier:
name, contextid, idnumber, description, visible
7a, 1, 7a, All students from class 7a, 1
7b, 1, 7b, All students from class 7b, 1
7c, 1, 7c, All students from class 7c, 1
Temp, , , Used as a placeholder, 0
You can find details on uploading cohorts, including optional and additional fields, at docs.moodle.org/en/Upload_cohorts.
Now that you know everything about user accounts and the information stored about them, let’s look at how to authenticate them with Moodle.
Configuring user authentication
Authentication is the process of getting access to a system. Moodle supports a significant number of authentication types. Furthermore, Moodle supports multi-authentication, that is, concurrent authentication from different authentication sources. For example, your organization might use an LDAP server containing user information for all your staff, and OAuth2 for students, but it wishes to manage part-time users locally.
In the second half of this chapter, we will explore user authentication and the overall management of authentication plugins before covering common authentication settings. Then, we will deal with all authentication methods, which have been grouped into four categories: internal, external, provider, and system.
Exploring user authentication
Remember the basic authentication workflow we looked at in Chapter 3, Exploring Courses, Users, and Roles. Now, we can have a look at a more complete picture, as shown in the following diagram:
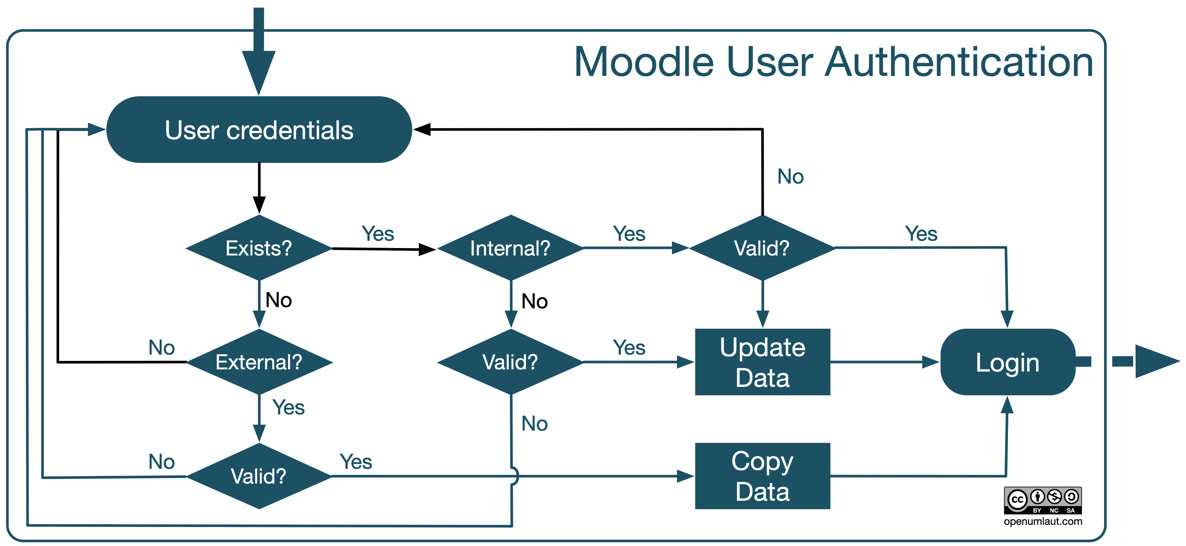
Figure 5.28 – Authentication workflow
Let’s start from the top, where the user enters their user credentials, for example, username and password. Bear in mind that this could take place automatically, for example, in a single sign-on setup or via a service provider login. Moodle checks whether a profile exists for the user. If it does and the account is authenticated via an internal mechanism, Moodle only has to check whether the credentials are valid.
If the user profile doesn’t exist, which is often the case the first time a user attempts to log in, Moodle checks for any enabled and configured external provider-based authentication mechanisms. If there is a valid entry, an account will be created, any existing data for which a mapping exists will be copied to the local user profile, and access will be granted.
Once the profile exists and authentication is external or via a provider, Moodle checks whether the credentials are valid for the set authentication method. If this is the case, any modified data in the source will be updated, and access will be granted.
Managing user authentication
To access all the authentication plugins, go to Site administration | Plugins | Authentication | Manage authentication. You will see a list of available authentication plugins. Each plugin can be activated/deactivated by toggling the show/hide icon. The settings for each type discussed in this section are accessed by their respective links or directly through the link in the plugins menu once the authentication method is active.
You can also change the order in which Moodle attempts to authenticate users via the up and down arrows.
Important note
The order in which authentication plugins are applied will impact how long it takes for users to log in, so make sure that the main ones are at the top.
The Users column gives you an indication of the number of registered users for each authentication mechanism.
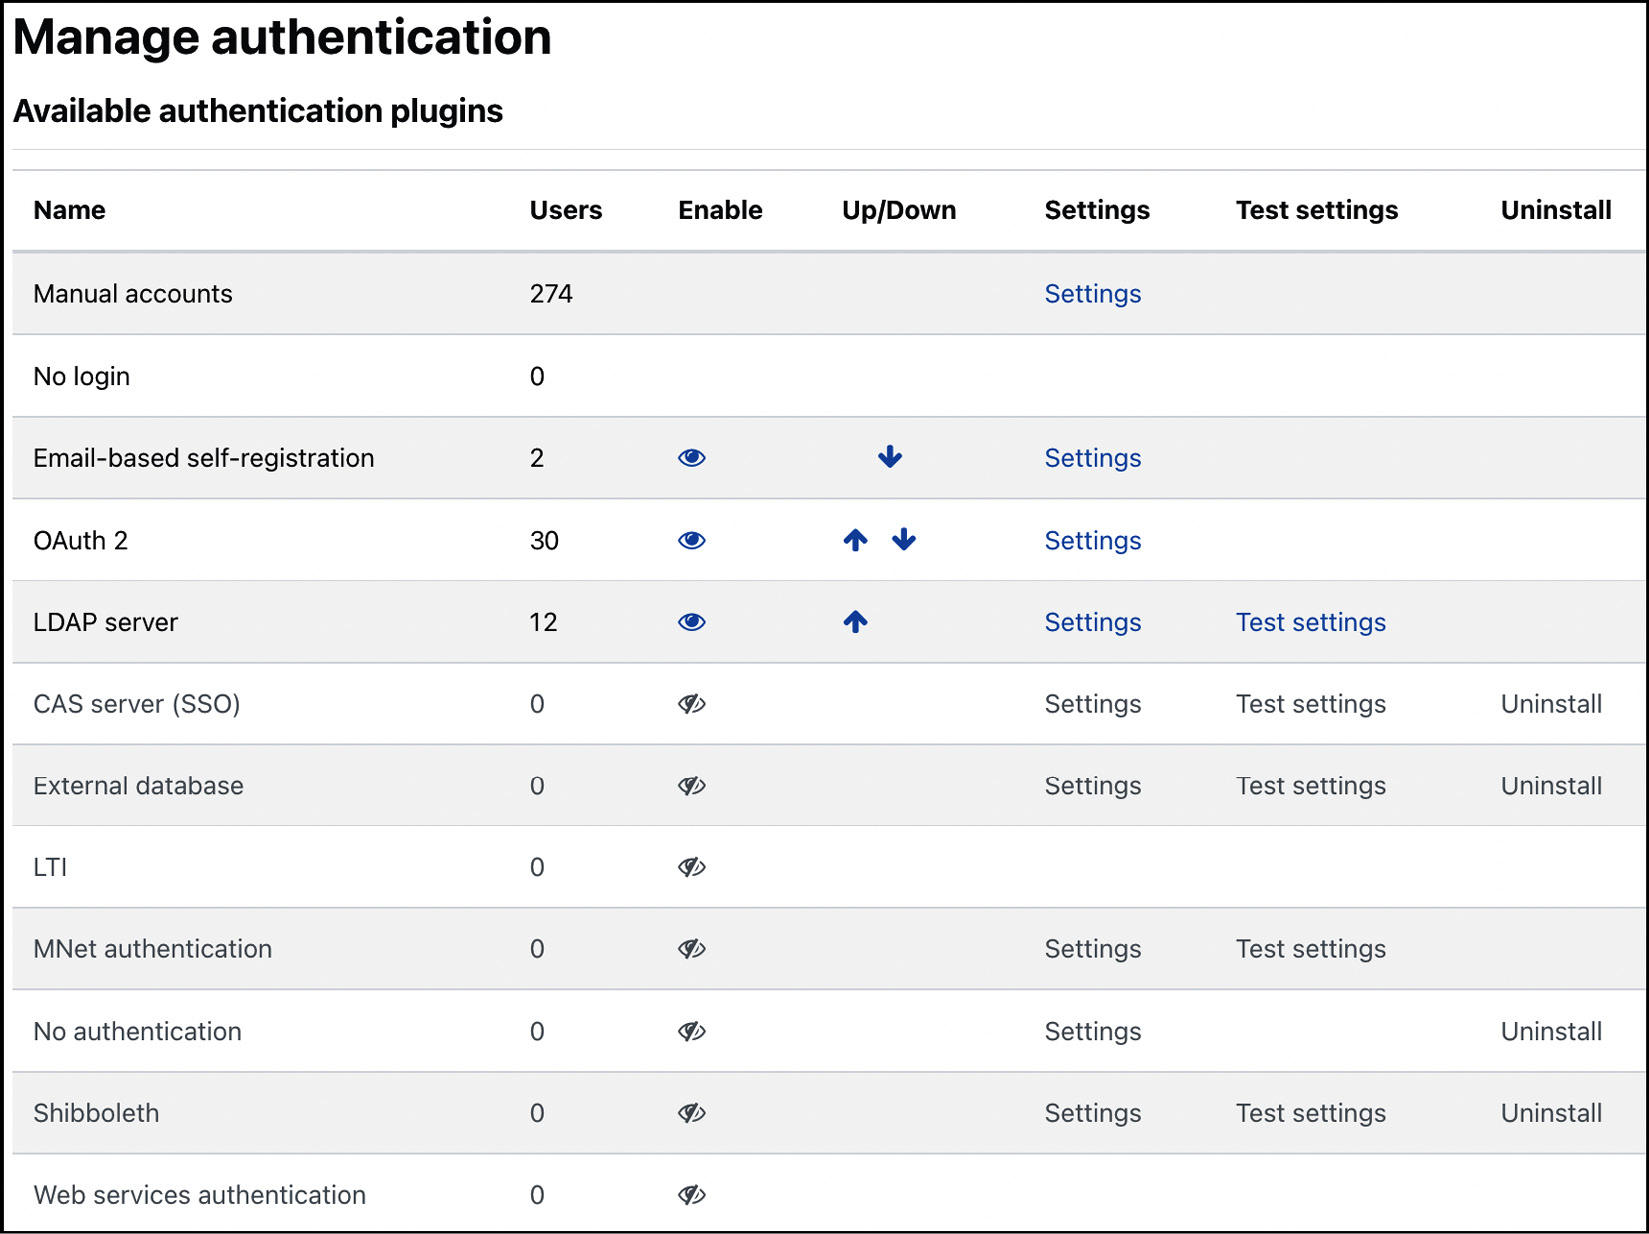
Figure 5.29 – Authentication plugins
Additional authentication methods are supported by external plugins on moodle.org/plugins/?q=type:auth, for example, OpenID and SAML2. Once installed (refer to the Installing third-party add-ons section in Chapter 8, Understanding Moodle Plugins), they will appear in the list alongside all the core authentication methods. It is not recommended that you remove plugins via the Uninstall option—delete them at the system level instead.
The following diagram illustrates a clustering of Moodle authentication plugins:
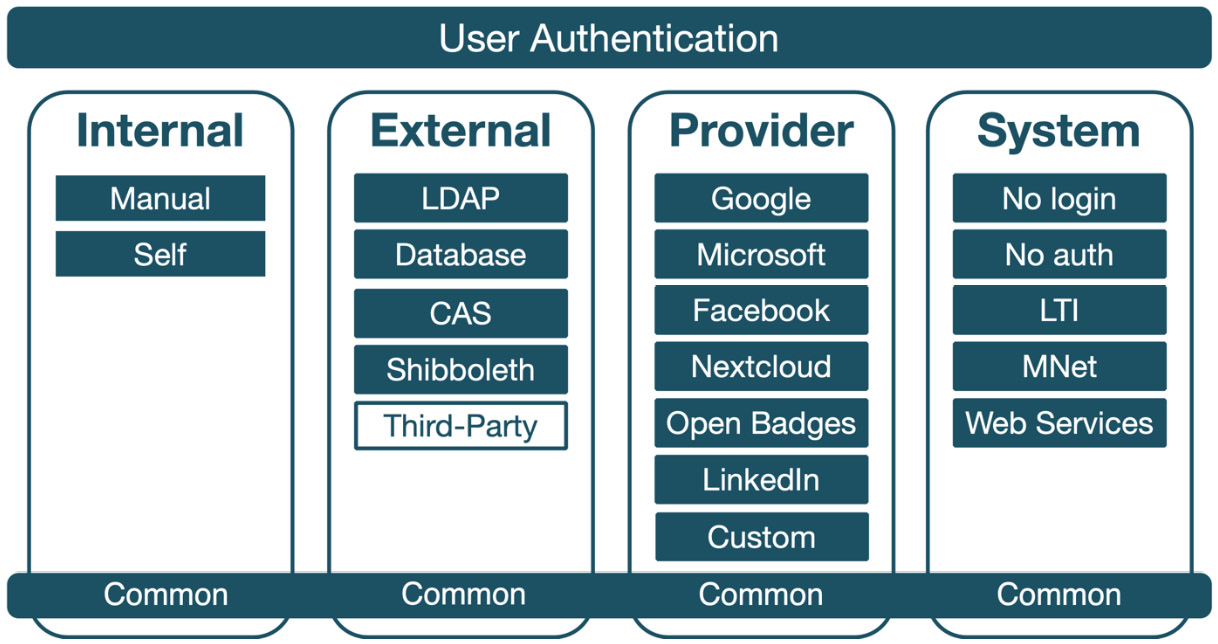
Figure 5.30 – Authentication plugins grouping
This grouping also forms the structure of the remainder of the chapter, starting with common authentication settings all mechanisms share.
Common authentication settings
First, let’s look at the common authentication settings, which you will see under the list of available plugins. Whatever your preferred authentication system(s) is, several common settings apply across all methods:
- Self registration: Specify which plugin, if any, is used for self-registration (refer to the next section for details).
- Allow login via email: Users can log in via their username or email address as long as the latter is unique.
- Allow accounts with same email: In some settings, users will have to share the same email address. We discussed this topic in the Understanding user profiles section.
- Prevent account creation when authenticating: Some authentication mechanisms, for instance, LDAP, support the creation of new accounts. If this is prevented, you must ensure that the accounts are created by other means.
- Autofocus login page form: When enabled, the cursor on the login page will always jump directly to the username input field if it is empty or to the password field otherwise.
- Guest login button: By default, guest access to your Moodle system is allowed. If you disable this, which is recommended for most educational and commercial sites, the guest login button will not be shown on the login screen.
Important note
Ensure to disable guest access to your Moodle system to prevent unwanted registrations.
- Limit concurrent logins: You can specify the number of simultaneous browser logins. Once the number has been exceeded, the oldest session will be terminated. This limitation is useful in exam scenarios where you might allow only a single concurrent login.
- Alternate login URL: By default, users have to log on to Moodle via the standard login screen. However, to change the source of the login credentials (username and password), enter the correct URL here. This redirect is necessary if you wish to have a login block on a separate web page, such as your home page. Details of this mechanism are shown in the Customizing the login subsection in Chapter 7, Enhancing Moodle’s Look and Feel.
- Forgotten password URL: Moodle has a built-in mechanism to deal with lost or forgotten passwords. You should enter its URL here if you use an authentication method with its own password-recovery system.
- Instructions: It is good practice to provide information on how to sign up for the system and what format the username should have (this only applies to self-registration). There are default instructions if it’s left blank.
- Allowed/Denied email domains: You can restrict the email domains for self-registration that are allowed/not allowed on your system when new user accounts are created, for example, openumlaut.com or .edu.
- Restrict domains when changing email: If enabled, the allowed/denied email domain settings will also be applied when an email address is changed.
- ReCAPTCHA public/private key: This is the key to display the reCAPTCHA element on the signup form/to communicate with the reCAPTCHA server (refer to the Email-based self-registration section).
Some common authentication settings will make more sense once we have dealt with the authentication methods they impact. Let’s start with internal authentication methods.
Internal authentication methods
Internal authentication methods handle all authentication within Moodle; no other system is connected. There are two internal authentication methods: manual accounts and email-based self-registration.
Manual accounts
Manual account authentication is simply the verification at login that the entered user credentials (username and password) stored in Moodle are correct.
Important note
The main Moodle administrator account is always a manual account.
There are two types of settings for all manual accounts created: password expiry and the locking of user fields. Both can be changed by navigating to Site administration | Plugins | Authentication | Manual accounts.
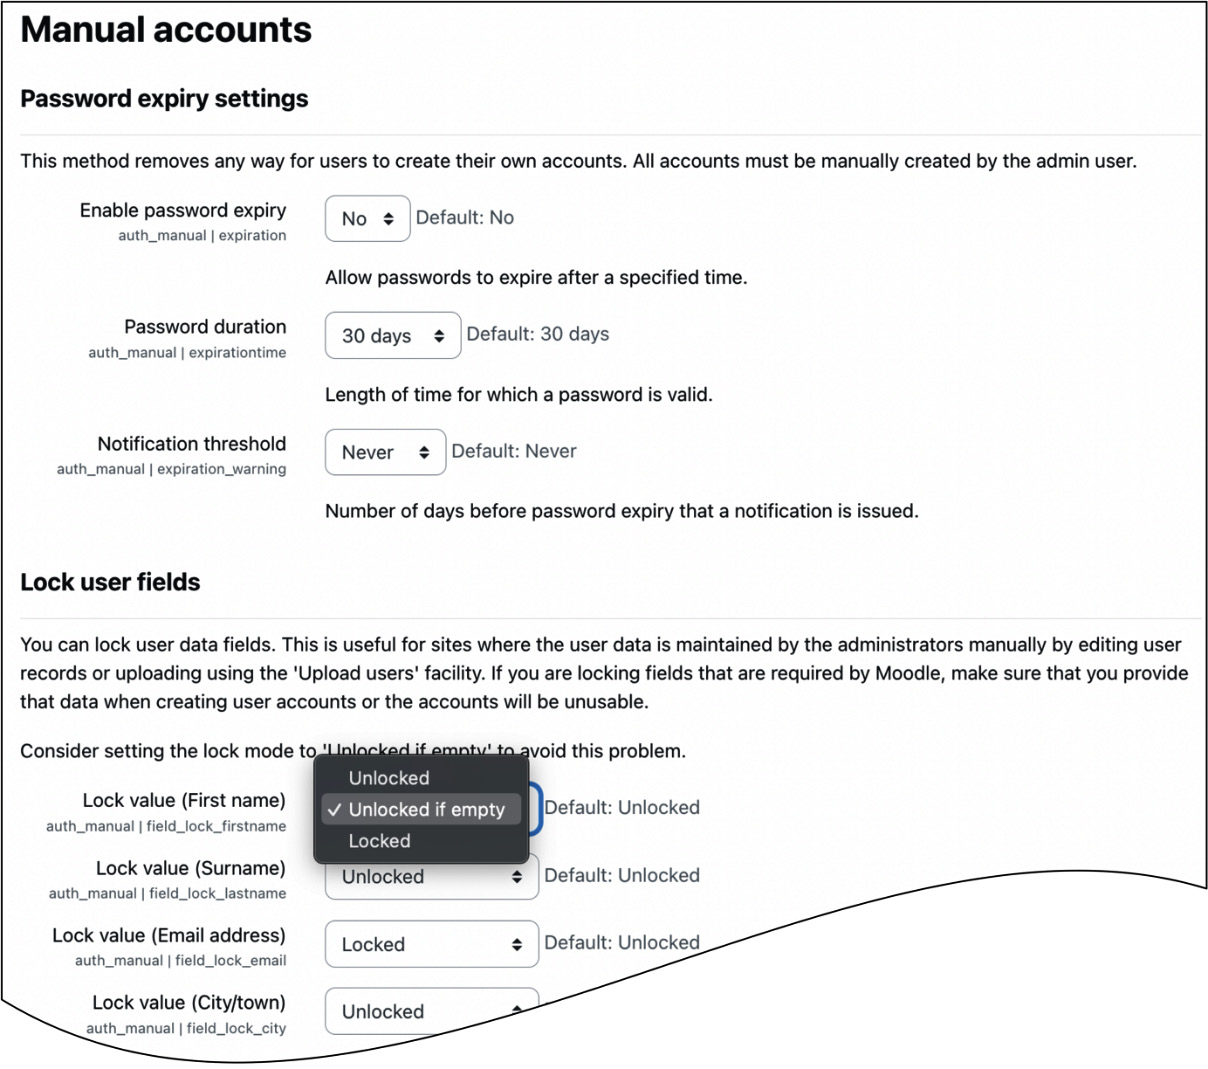
Figure 5.31 – Manual accounts settings
Password expiry lets you choose how long a password is valid via the Password duration setting before it has to be changed by a user. Notification threshold lets you specify when a user is notified of the password rotation.
You can lock fields for accounts that are manually created or uploaded via batch files. This locking mechanism is helpful whenever you do not want users to be able to change specific data in their user profiles—young students may misuse the Description field, the ID number may be used internally to link to other systems, the company might have provided the email address, and so on.
By default, all fields are Unlocked. If a field is Locked, the user will not be able to change its value. If you lock any compulsory fields, you either have to ensure they are populated correctly, or you set their lock state to Unlocked if empty. The latter will force the user to enter the value the next time they log in and lock the field afterward.
Accounts verified by the manual authentication method are usually created manually or via user batch upload. Both operations have been described in detail in the first part of this chapter, where the latter effectively automates manual account creation. Two other authentication mechanisms mimic adding user accounts manually: web services, which we deal with in the System authentication methods section later on, and Email-based self-registration, which we cover next.
Email-based self-registration
Moodle supports a mechanism that allows users to create accounts without any intervention or knowledge of the administrator. When new users sign up with Moodle via the Create new account button on the login screen, they can choose their new username and password. Once this step has been completed, a confirmation mail is sent to the user’s email address, containing a secure link that must be confirmed to activate the account. The signup screen looks like this:
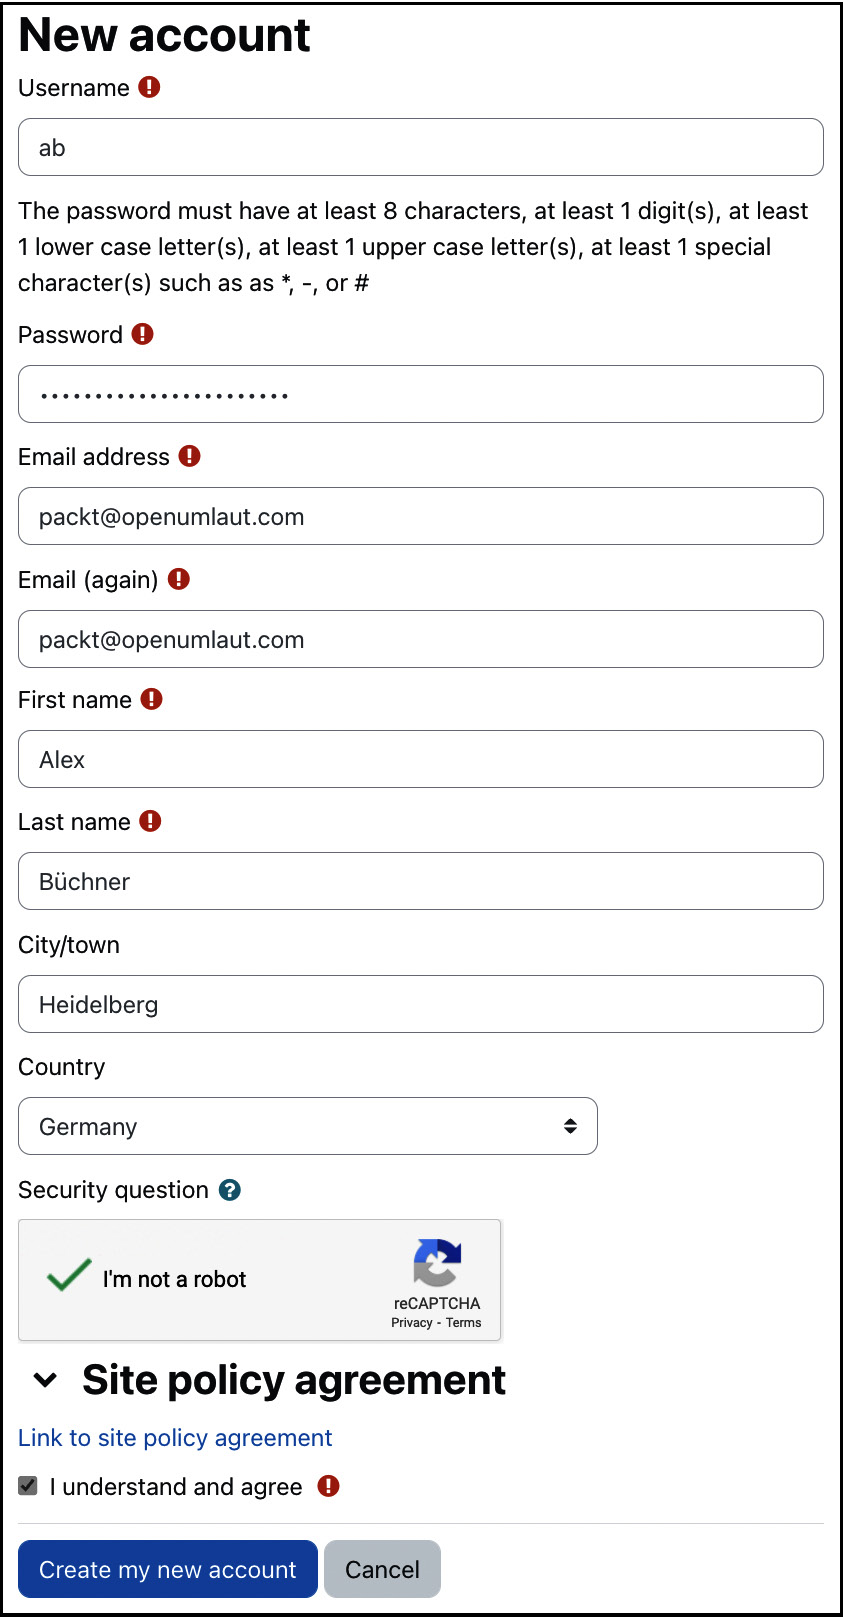
Figure 5.32 – Self-registration signup screen
We explained how to add more items to the signup screen (via the Display on signup page option) when dealing with user-defined profile fields. This feature is often invaluable in commercial training settings when additional data, such as the learner’s address, a participant’s dietary requirements, or a customer number, has to be gathered.
Moodle supports a reCAPTCHA mechanism activated on the pictured signup screen. The facility is used to avoid automated signups by bots. To enable this facility, you must sign up for an account at www.google.com/recaptcha, add the public and private key in Common settings in the Manage Authentication area, and enable the reCAPTCHA element.
Important note
The PHP cURL extension must be installed for reCAPTCHA to work.
The same locking settings can be set for self-registration as for manual accounts (go to Site administration | Plugins | Authentication | Email-based self-registration). Also, the same restrictions apply as described earlier. Additionally, you have the Enable reCAPTCHA element option.
If a user policy has been specified when you navigate to Site administration | Users | Privacy and policies | Policy settings, a link to the agreement with the confirmation checkbox is shown on the signup screen. We will deal with more complex user consent handling as part of the GDPR set up in Chapter 14, Complying with Data Protection Regulations.
If the confirmation email cannot be sent, for instance, because of technical issues, go to the list of users, where you will find two links beside the account entry: one to confirm the account and one to resend the email.
Before we move on to the next authentication method, here is a short checklist for setting up self-registration (apart from enablement, all steps are optional):
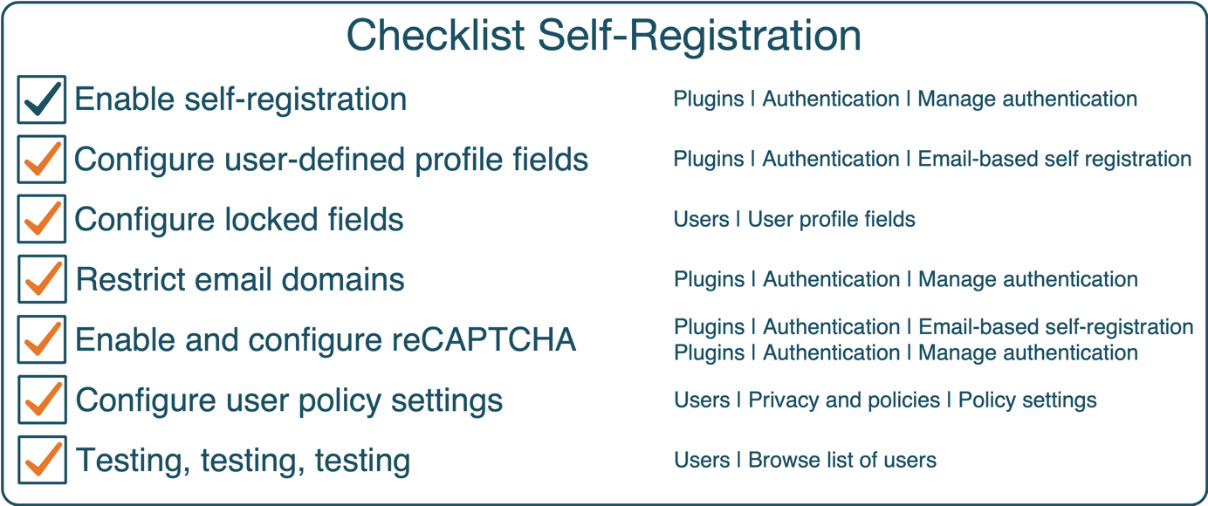
Figure 5.33 – Checklist for self-registration
Allowing users to register accounts on your site comes with a degree of risk since you have no control over who – humans or bots – is coming to your site (assuming it is publicly accessible). Therefore, it is highly recommended to test self-registration thoroughly and regularly check your new users list.
Now that we have covered internal authentication, it is time to look over the (Moodle) fence and deal with external methods.
External authentication methods
External authentication methods require a separate, connected system to handle authentication. We will cover two external authentication methods in detail (LDAP and databases) and two more we only briefly describe (CAS and Shibboleth).
LDAP server
In the previous chapter, we had already seen a basic introduction to LDAP when dealing with course enrolment. Now, let’s look at how it can be utilized for single sign-on (SSO) authentication. We will only cover the basic LDAP settings and exclude advanced setups, such as multiple LDAP servers and secure LDAP. These configurations are documented in great detail at docs.moodle.org/en/LDAP_authentication.
The principle of the LDAP authentication method is relatively simple but effective—if the entered username and password are valid, Moodle creates a new user account in its database if it doesn’t already exist. Once it does exist, that is, from the second login onwards, the credentials are checked against LDAP for validity.
Important note
The PHP LDAP extension must be installed on the server for LDAP authentication to work.
Go to Site administration | Plugins | Authentication | LDAP server to see the settings, which also cover Active Directory (Microsoft’s implementation of LDAP). There is a significant number of parameters that you must set to communicate with an LDAP server. The settings have been amended with detailed explanations (which I will not repeat). Instead, additional information is provided wherever applicable. Contact your system administrator if you are unsure where to locate some of the required information.
Two parts must be populated to make Moodle work in your LDAP setup: server settings and data mappings, discussed in the following paragraphs.
There are ten sections of LDAP server settings that have to be provided:
- LDAP server settings: These establish the connection to the directory. LDAP servers with SSL encryption are also supported.
- Bind settings: These specify details about the credentials needed to access the LDAP server. If you have multiple bases, it is recommended that you put them in order of importance as Moodle stops searching once it has found an entry. For example, if you have ou=Students and ou=Staff and your students make up 90% of the logins, it is recommended that you put them before their lecturers unless staff is given priority.
- User lookup settings: These describe how and where user details are stored on your LDAP directory. Make sure you select the correct user type. The same applies to the distinguished name in the bind settings for multiple contexts. It is crucial to set Search subcontexts correctly. If it is set to No, subcontexts will not be searched, but the search is potentially faster, and vice versa.
- Force change password: This specifies whether and how users must change passwords when accessing Moodle for the first time.
- LDAP password expiration settings: These are concerned with password lapsing and how this is being dealt with.
- Enable user creation: This lets you activate a mechanism that is similar to self-registration, but, in addition to this, an account is created with the values from your LDAP.
- System role mapping: This specifies which LDAP user groups will have manager and course creator permissions in Moodle, respectively.
- User account synchronization: This setting specifies what Moodle should do with local user accounts when these have been deleted on the LDAP server.
- NTLM SSO: This describes how, in a Windows-based environment with MS-AD and NTLM active, users can log in via the Windows domain without re-entering their credentials when accessing Moodle. Check out docs.moodle.org/en/NTLM_authentication for details.
The second half of the admittedly very long screen contains the LDAP data mapping. It is common for user profile information to be stored in the LDAP server. To connect user profile fields and the Active Directory, a mapping has to be provided by specifying their counterparts in the directory for each field in Moodle (including user-defined profile fields). All the fields are optional. Default values are used if you leave any of the fields blank:
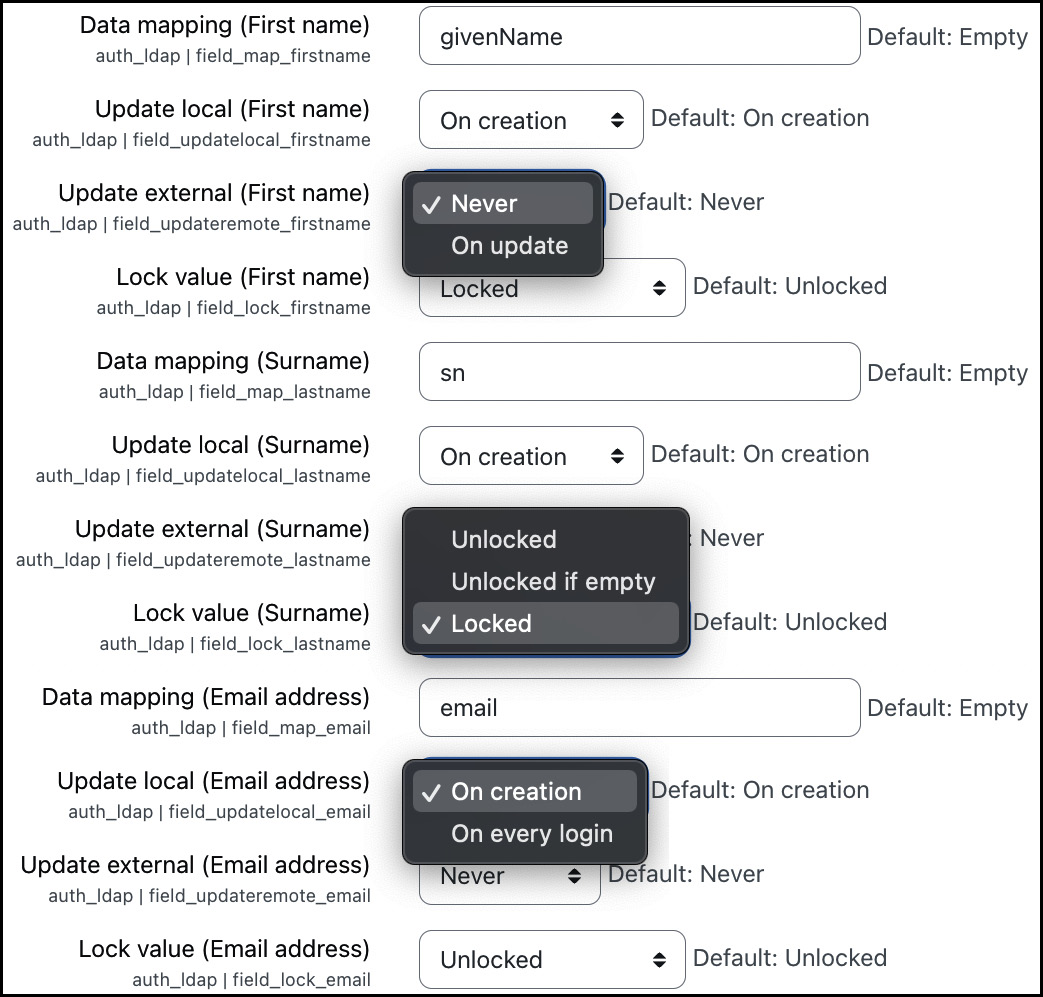
Figure 5.34 – LDAP authentication (data mapping)
If you provide the field information, you will have to set four parameters for each data field, as follows:
- Data mapping: This is the field name in the external database representing the value in Moodle.
- Update local: For each external user, information is stored locally. You can update this information using On creation (this is faster but potentially not up-to-date) or On every login (this is a bit slower, but it’s always up to date).
- Update external: If a user updates the data field’s value in Moodle, you can decide whether you want to write this information back to the external database (On update) or not (Never). Often, the external database is a read-only view, preventing Moodle from updating data in it.
- Lock value: You can specify whether the user can modify the value. As explained earlier, the settings (Unlocked, Unlocked if empty, and Locked) are identical to the lock field.
If you use Microsoft’s Active Directory MS-AD, check out the data mapping section in docs.moodle.org/en/LDAP_authentication for details.
Setting up LDAP authentication can be a bit of trial-and-error. Verifying that the connection works can be assisted by the Test setting facility located in the list of available authentication plugins. More detailed error messages will be displayed, which will help you identify any SSO connection issues.
When using LDAP, you might encounter a situation where you wish to assign courses to users before they have logged in to the system for the first time. This scenario regularly applies before the start of the academic year. The problem is that the local user accounts do not exist yet, and you cannot access this information as it is only stored in the external directory. There are two ways around this conundrum:
- Create the user accounts via batch files and set the auth field to ldap; that way, you effectively mimic the initial logging in of each user.
- Set up the LDAP users sync job scheduled task. Tasks are covered in Chapter 15, Optimizing Moodle Performance.
LDAP is effectively a specialized and lightweight database for authentication purposes. Authentication against LDAP is very similar to authentication against external databases, which is the topic of the following subsection.
External databases
Most large organizations use a student or management information system—either open source (good), proprietary (bad), or developed in-house (worst)—which holds information about staff and learners. It makes perfect sense to utilize this data for authorization to Moodle. Since all information systems use a database at their core, all we have to do is to get access to the relevant data.
IT departments are usually not too keen for external systems to connect directly to their database. A mechanism that has proven valuable is the read-only view, which has several advantages:
- A view can be prepared for Moodle usage; only required fields are shown in the required format
- There’s no write-access to the database
- If the database schema of the information system ever changes, only the view has to be adapted, not the Moodle configuration
The external database authentication method contains two types of parameters that you have to provide by going to Site administration | Plugins | Authentication | External database: connection settings and data mappings.

Figure 5.35 – External database authentication
The database connection settings have been amended with good explanations. Contact your database administrator if you are unsure where to locate some of the required information.
Important note
Some databases, such as Oracle, are case sensitive, and field names must be provided with the correct casing for the database link to work correctly.
The second half of the settings screen contains the data mapping. User profile information is stored in the external database. To connect the user profile fields and the database, a mapping has to be provided where a counterpart in the external store has to be provided for each field in Moodle, including user-defined profile fields. All the fields are optional, and default values are used if you leave any fields blank.
Most facilities covered in the LDAP section are also available for external database authentication:
- Creating user accounts via batch files (set the auth field to db)
- Automating synchronization via the task scheduler, Synchronise users task
- Testing the database connection
To sum up the topic, here is a checklist for external authentication methods:
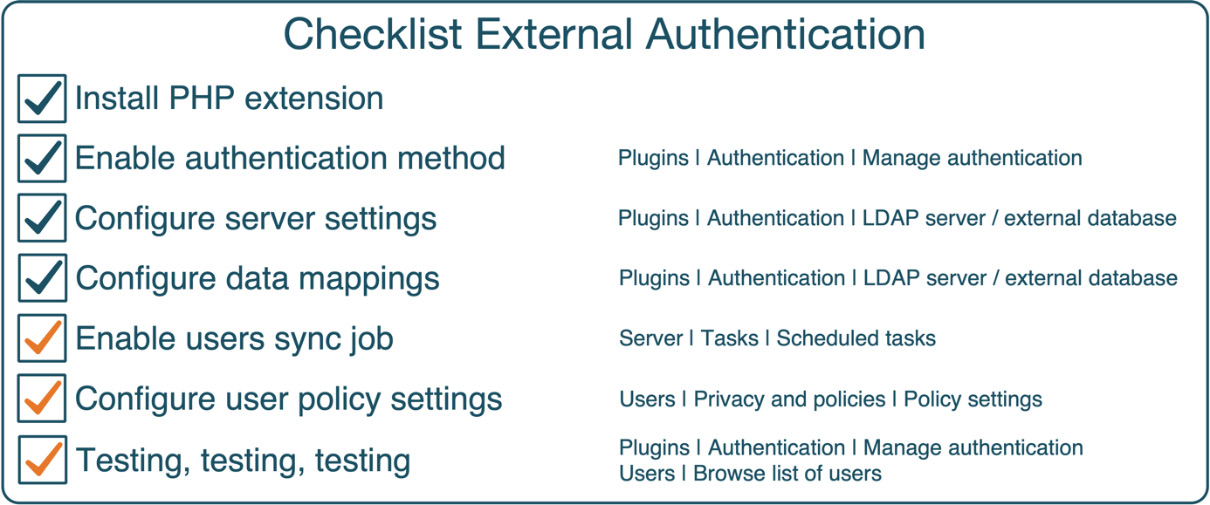
Figure 5.36 – Checklist for external database authentication
Hopefully, the previous two subsections gave you an insight into how external authentication mechanisms work in Moodle. Two more methods fall in the same category: CAS and Shibboleth.
Other external authentication mechanisms
Moodle supports some additional external SSO authentication methods that are not utilized as often as LDAP, external databases, and OAuth 2; we only briefly touch upon them:
- CAS Server (SSO): Central Authentication Service (CAS) is an open source authentication server based on Tomcat and supports single sign-on in a web environment. CAS is particularly popular in environments that comprise multiple authentication sources and consumers. It utilizes LDAP and, therefore, requires the PHP LDAP modules to be installed.
- Shibboleth: Shibboleth is SAML-based open source middleware that provides single sign-on across organizational boundaries. Privacy, security, and flexibility in terms of multi-setups are at the heart of Shibboleth. However, the price to pay is a complicated setup process detailed in the local readme file at <YOURSITE>/auth/shibboleth/README.txt. More information on Shibboleth can be found at www.internet2.edu/products-services/trust-identity-middleware/shibboleth.
All authentication mechanisms covered so far are either internal to Moodle (manual accounts and self-registration) or usually local to the organization but external to Moodle (LDAP or database). Moodle also supports provider-based authentication services via OAuth 2, which we will cover next.
Service provider-based authentication (OAuth 2)
OAuth 2.0 is the de facto industry standard protocol for user authorization. OAuth 2 authentication enables users to access Moodle via buttons on the login page using their credentials from popular service providers, such as Google, Microsoft, Facebook, and LinkedIn.
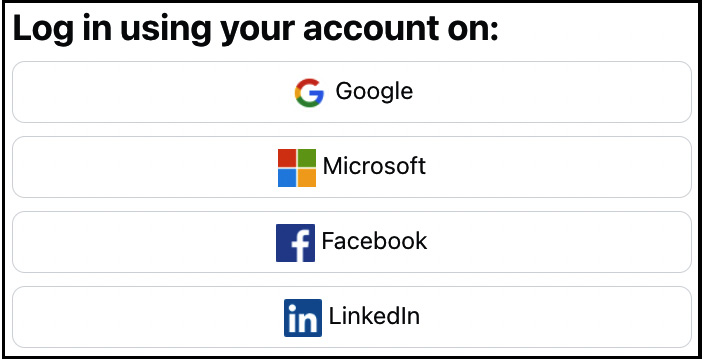
Figure 5.37 – Authentication via OAuth 2 service providers
Before we dive into the configuration of service provider-based authentication, have a look at the interaction diagram, which illustrates how OAuth 2 works in a Moodle context:
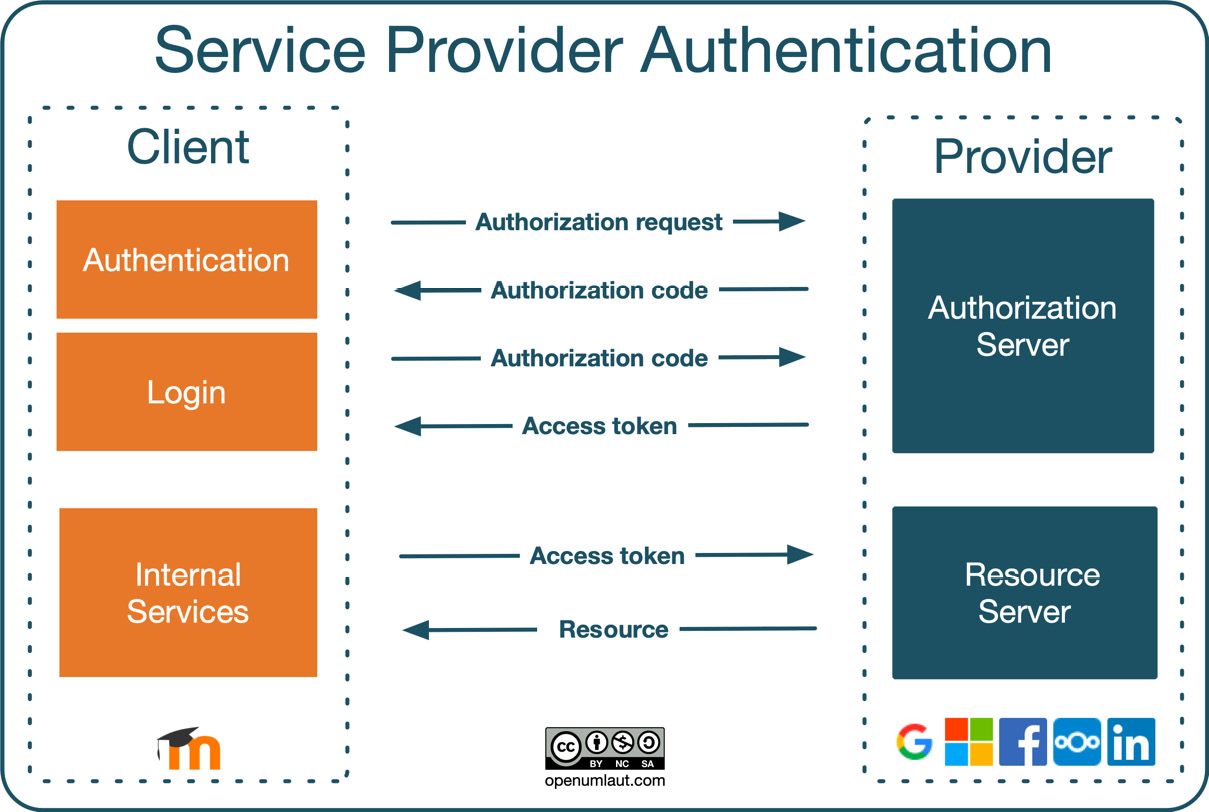
Figure 5.38 – OAuth 2 interactions
An OAuth service provider is an external system (“in the cloud”) that provides identity (via the authorization server) and API access (via the resource server) by issuing OAuth access tokens to a client (Moodle). Let’s go through the interactions from top to bottom:
- A user sends an authorization request; that is, a user logs in to the service provider via the client. This step is initiated via the service provider buttons on the Moodle login screen.
- The authorization server issues an authorization code if the entered credentials are valid. Once this has taken place, the user is authenticated with Moodle. If account creation is enabled (the Prevent account creation when authenticating setting), a new account will be created. Otherwise, the user will be prompted to link the authorization to an existing account with the same email address. An entry can be found in the Linked logins section in the user’s preferences.
- An access token will be issued when the user logs in using the stored authorization code. A scheduled task exists to regularly update the OAuth 2 tokens (coreoauth2 efresh_system_tokens_task).
- Moodle uses this access token for any internal services that require a resource from the service provider, for instance, a link to files in a repository. Some internal services require a system account to be connected.
The preceding interaction process is a very crude summary of how OAuth 2 authentication works in Moodle, but this should be sufficient to understand the overall concept. OK, enough of the high-level stuff; let’s start setting up service provider authentication.
The first step is to configure OAuth 2 services in Site administration | Server | Server | OAuth 2 services.
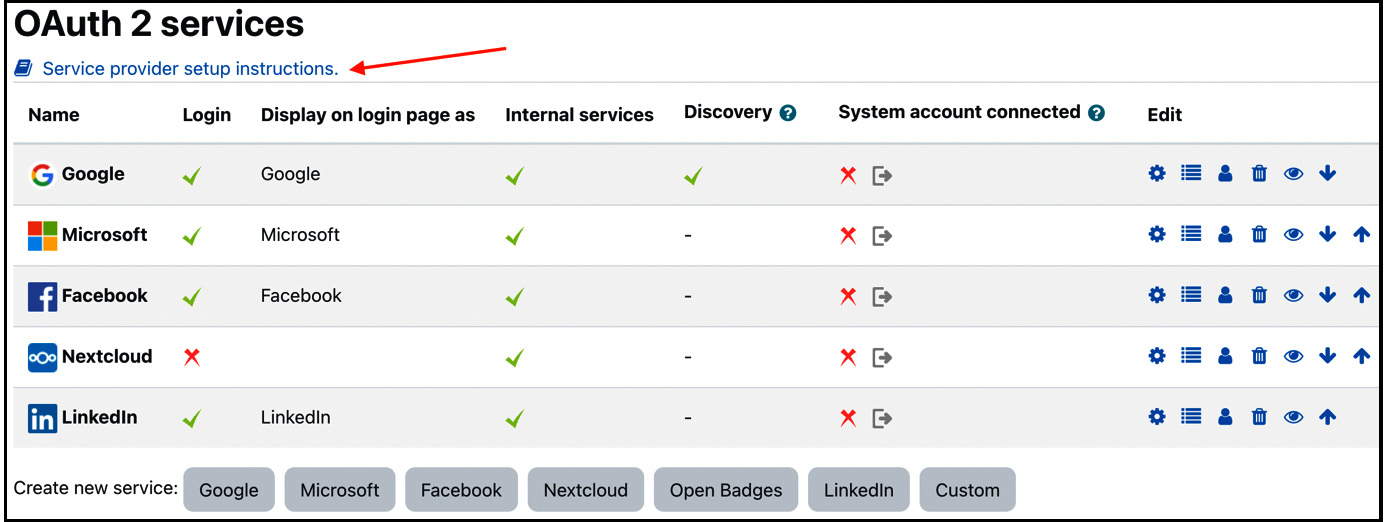
Figure 5.39 – OAuth 2 services
At the bottom, you can see all supported service providers. Select the respective button to add a preconfigured service, which will direct you to the form to create a new service. The service specifications are already populated – all you must do is add the Client ID and the Client secret details of the respective service provider.
How do you get the client ID and secret? The issuer provides these, so setup must be done at their end, not in Moodle. There is a Service provider setup instructions link for the six supported prominent OAuth 2 providers at the top of the screen.
Important note
It is recommended to leave all fields at their default values for pre-defined service providers, except Client ID, Client secret, and Service base URL.
If you wish to set up a service provider not listed, you can create a Custom service. The form is identical to the pre-defined services but without any pre-populated values. You find details about the purpose of each parameter at docs.moodle.org/en/OAuth_2_services.
Once the service has been created (pre-defined or custom), the standard actions are available in the Edit column, plus two more actions that require some more explanation:
- Configure endpoints: Endpoints are the URLs that Moodle uses to make OAuth 2 authentication requests. These have already been added for pre-defined services and shouldn’t be changed; for custom services, the mandatory endpoints are authorization_endpoint, token_endpoint, and userinfo_endpoint.
- Configure user field mappings: Here, you define how the provider’s response from userinfo_endpoint should be mapped to Moodle user fields. It is recommended to at least configure firstname, lastname, and email since these are compulsory fields in Moodle’s user profiles.
Once the service provider has been configured properly, it can be used by the OAuth 2 authentication plugin, which has to be enabled at Site administration | Plugins | Authentication | Manage authentication. Like all other authentication plugins, OAuth 2 lets you configure any locked fields, and there are no additional configuration options as the service provider setup controls all behavior.
As with other authentication methods, let’s conclude the section with a checklist, which hopefully comes in useful when you have to configure OAuth 2 authentication:
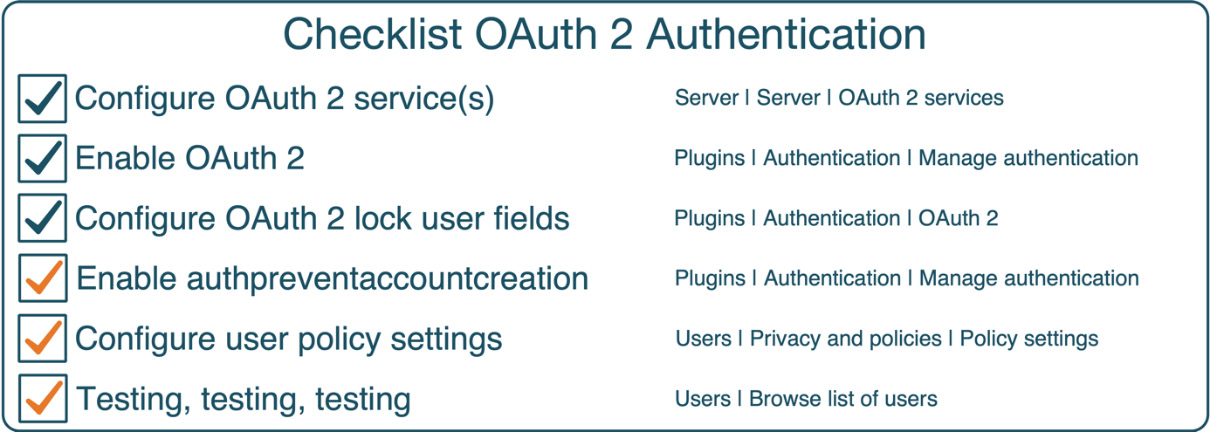
Figure 5.40 – Checklist for OAuth 2 authentication
We have now covered all the authentication mechanisms that ship with Moodle and belong to the first three pillars of our authentication plugin grouping. The fourth category comprises system authentication methods, which we are covering next.
System authentication methods
Moodle contains authentication methods, which are required by certain features to function correctly:
- No login: This plugin has no settings and cannot be disabled or uninstalled. Its sole purpose is to suspend users from logging in to your Moodle system, which takes place in the user’s profile by selecting the authentication method in the Choose an authentication method drop-down list.
- No authentication: When this method is enabled, users can create accounts without any kind of authentication or email-based confirmation. It is highly recommended that you do not use this method since it creates a very insecure Moodle site and should only be used for testing or development purposes. Only user fields can be locked in the same way as described earlier.
- MNet authentication: Moodle networking allows the connection of multiple Moodle sites in a peer-to-peer or hub style. See Chapter 19, Setting Up Moodle Networking, for details.
- LTI: This plugin has the sole purpose of facilitating the login to LTI producers. LTI will be discussed in Chapter 9, Configuring Education Features.
- Web services authentication: This plugin authenticates users via external clients communicating with Moodle via web services (see Chapter 18, Integrating External Systems Using Web Services, for details). The authentication plugin has no settings.
This concludes the section on user authentication. While there has been a lot of content, you are highly likely only to require information on manual accounts plus the method(s) you are utilizing in your organization. Since no two authentication setups are the same, you will soon be familiar with all the quirks and idiosyncrasies of your authentication infrastructure and the plugin(s) that connect it.
A last piece of advice: be on good terms with your system, database, and network admins. They will grant you access to your LDAP directory or the organization’s authentication database system and open up the ports you need to connect to service providers and web services. Buy them a coffee or bribe them with other niceties!
Summary
Phew! That was a lot to take in for one chapter.
The first part of this chapter demonstrated the different ways Moodle provides to manage users. We first looked at what information is stored for each user account and how their profiles can be extended. We then performed several standard manual and bulk user actions before dealing with cohorts.
In the second part, we dealt with different types of user authentication, namely internal, external, service providers (via OAuth 2), and system. Due to the variety and complexity of authentication methods, we covered prominent plugins in more detail than others.
Authentication has become a complex topic, and we only touched upon methods supported in Moodle core. Other methods such as Microsoft Azure AD or Open ID as well as mechanisms such as two-factor authentication, one-time passwords, and user key authentication are beyond the scope of this already packed chapter and are catered for via plugins at moodle.org/plugins/?q=type:auth.
One aspect of authentication we didn’t mention at all is multi-tenancy. Assume a setup where different users have to connect via different authentication mechanisms of the same type; for instance, staff authenticates via SAML_internal, and customers and partners via SAML_external. There are two options for how this can be facilitated:
- Duplicate the authentication plugin at the system level and modify the source code accordingly. A programmer must carry out this task as source code changes are required in the copied module. Be careful with this approach, as this might not work when Moodle is updated to a newer version.
- Consider Moodle’s big brother, Moodle Workplace, which supports multi-tenancy authentication. To get a feel for how this works, have a look at docs.moodle.org/en/Multi-tenancy_authentication. At the time of writing, the following authentication methods support multi-tenancy: manual, email-based self-registration, OAuth 2, and SAML 2 (as a third-party plugin).
The next step is to grant user roles, that is, the rights as to what they are allowed to do and what they are not. This will be dealt with in the next chapter.