There's more than one way to back up files to a server: You can run a backup program on the client machine and specify a drive and folder on the server as the backup storage location, or you can originate the backup from the server and select files on one or more clients (as explained earlier, client computers are the ones that receive services from a server).
Before you create your backups, you must decide exactly what you want to accomplish. Several different kinds of backups are possible, each of them appropriate for certain situations:
A complete image of your hard drive includes copies of all folders, files, and programs. This backup allows you to restore your computer to its previous state after a disk failure. A complete image of a drive is sometimes described as a clone.
An incremental backup only includes copies of the files that have been installed or have changed since the last backup. Incremental backups are faster than complete backups because they don't include the unchanged files that are already part of your backup.
A selective backup only includes the important files and programs on your computer. This backup is generally faster and takes up less space on the backup drive than a complete backup because it does not include things like temporary files, old log files, and downloads that you will never use again.
A data-file-only backup can be useful when you expect to restore the backup to another computer that already has the operating system and application programs installed. You can also re-install the operating system and programs from their CDs or other media. If you do choose this option, remember to check each program's website for the latest patches and upgrades before you try to use that program.
A limited backup includes only one or more specific types of files, such as music, photos, or documents. This kind of backup is usually a supplement to a more complete backup that includes all the essential programs and files on a drive.
The backup programs provided with Windows, Mac OS X, and most versions of Linux and Unix are entirely adequate for most people, but there are plenty of other backup programs with additional features and options (often related to automatic scheduled backups). Backup programs are often supplied with network-attached storage (NAS) devices and external USB hard drives. The important thing to remember about using any backup program is that you must store your backed-up files separately from the originals: You can store the backup on a second hard drive on the same computer (not a good idea, however, because it doesn't protect against fire or theft); on a set of CDs, DVDs, or data tapes; or on a computer or other storage device connected to the original computer through a network or the Internet. A network is a great way to move your backup data to another computer for storage, but you will still want some kind of backup on removable media stored off-site to protect your data from fire or theft.
Note
The backup methods described in this chapter will work equally well on a network without a designated file server; you can use any other computer or network storage device on the same network as the destination for your backup files.
Microsoft has supplied a backup program with most versions of Windows, including XP and Vista. This example uses Windows XP, but the general principles are the same for any backup program.
To use the Windows Backup program, follow these steps:
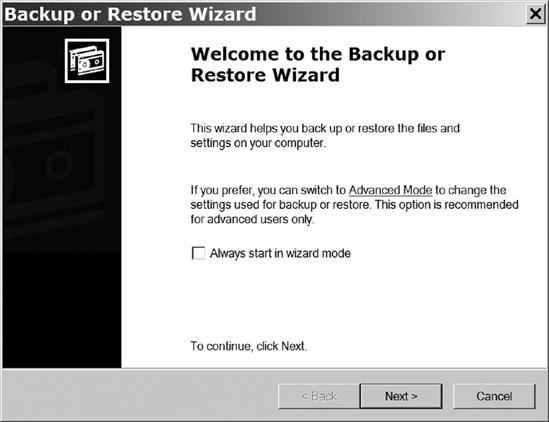
From the Windows Start menu, select All Programs (or Programs if you're using the Classic Start Menu)▸ Accessories ▸ System Tools ▸ Backup. The Backup or Restore Wizard window shown in Figure 9-7 will open.
Click Next to advance to the next screen. The wizard will ask if you want to make new backups or restore files that you saved earlier. Select the Back up file and settings option and click Next.
The wizard will ask what you want to back up. To save all the information on the computer, select the All information option; this option will allow you to create a new copy of the original hard disk, but this copy takes up a lot of storage space. To create a more selective backup, select the Let me choose option.
Click Next to advance to the next screen. The wizard will ask where you want to store the backup.
Click the Browse button to open the Save As dialog. Use either the Save In field or the finder window to navigate through the network to the folder on the file server where you want to store the backup file. Choose that folder and click the Save button and then the Next button in the wizard window.
The wizard will show you the details about the backup you are about to create. If everything is correct, click Finish. The backup program will start.
To restore data from your backup files, run the same Windows Backup program but select the Restore files and settings option in the Backup or Restore Wizard.
The reason you're making backups is to protect your data against loss or damage. The most common problems that will destroy your original files are caused by either human error—you really didn't mean to reformat that hard drive, did you?—or damage to a disk drive. When either of those events occur, restoring the files from a network server is easy enough, but if you lose your files because of a fire, a power surge, a lightning strike that damages the server along with the client computers, or some other major disaster, the backup files on the dead server won't do you much good. Therefore, creating at least one set of backup files on a set of DVDs, tapes, or removable hard drives and storing them in another location such as a friend's home or office or a safe deposit box at your bank is always good practice.
In Windows XP Home Edition, the Backup utility doesn't automatically load when you install the operating system. Apparently, somebody at Microsoft thought that Home Edition users didn't need to back up their data. Go figure.
To install Windows Backup from the XP Home Edition CD, follow these steps:
Place the XP CD in your computer's drive.
When the Welcome message appears, select Perform additional tasks.
Select the Browse this CD option.
Open the ValueAdd folder and then the Msft folder and finally the Ntbackup folder.
Run the Ntbackup.msi program. This will start a wizard that installs the Backup program.
Most versions of Windows Vista (except Vista Starter and Home Basic) include an automatic utility that can store backup files on a network server, but it doesn't run until you turn it on.
To configure the Vista Backup utility, select Start ▸ All Programs (or Programs in the Classic start menu)▸ Accessories ▸ System Tools ▸ Backup Status and Configuration. The Backup Status and Configuration tool shown in Figure 9-8 will appear.
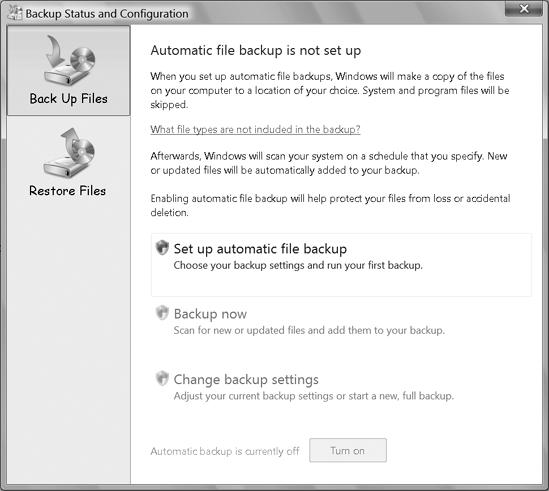
The Backup Status and Configuration tool will step through a series of windows that request the specific information needed to run automatic backups.
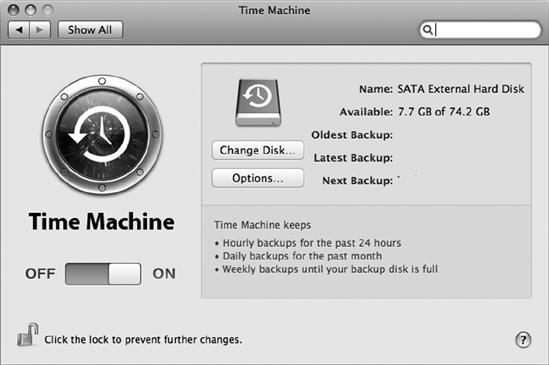
The same general principles apply to creating and restoring backups on a Mac: Make backups on a regular schedule and store the backup files on a file server, removable media, or both. The Time Machine program included in OS X can automatically create backups to an external drive or a networked drive, as shown in Figure 9-9. Several alternative Mac backup programs can also send backup files to a network, including:
Before you trust your critical files to any backup program, run some tests to confirm that the program can accurately restore those files, including the metadata embedded inside them. Some Mac backup programs designed for earlier versions have trouble dealing with OS X files.
Linux and Unix users have a wide choice of backup programs, including several that can originate the backup process from either the server (pulling backup data from client computers) or from individual client computers (pushing the backup files to a server). The Linux Online! website includes an up-to-date list of backup programs at http://www.linux.org/apps/all/Administration/Backup.html. Distributions with graphic environments such as Gnome and KDE usually include at least one graphic backup program. One possible backup solution on computers running Linux, Unix, or Mac OS X is to use rsync over SSH to an external system, and schedule it via cron. This doesn't have a nice graphical front end, but it gets the job done securely and efficiently, because rsync does not copy bytes across the network that already exist on the other side—it only copies the "changed" bytes.
Server-side programs run on the server and collect backups from each client computer. BackupPC is a good choice as a server-side Linux backup program because it can back up Windows, Linux, and Mac computers through a network. BackupPC is available for download from http://backuppc.sourceforge.net.
Amanda, the Advanced Maryland Automatic Network Disk Archiver (http://www.amanda.org/), is another server-side backup program that supports Windows and multiple versions of Linux and Unix.