Chapter 2. HelloWorld: An OpenCL Example
In order to introduce you to OpenCL, we begin with a simple example program. This chapter demonstrates the code required to set up and execute a kernel on an OpenCL device. The example executes a simple kernel that adds the values stored in two arrays and saves the result in another. This chapter introduces the following concepts:
• Choosing an OpenCL platform and creating a context
• Enumerating devices and creating a command-queue
• Creating and building a program object
• Creating a kernel object and memory objects for kernel arguments
• Executing a kernel and reading its result
• Checking for errors in OpenCL
This chapter will go over the basics of each of these steps. Later in the book, we will fill in the details of each of these steps and further document OpenCL. In addition to these topics, we will also introduce the CMake-based build system used for the sample code in the book. Our purpose here is to get you running your first simple example so that you get an idea of what goes into creating an application with OpenCL.
Building the Examples
All of the sample code was set up to build using CMake (www.cmake.org), a cross-platform build tool. CMake has the ability to generate build projects for many platforms and development tools including Eclipse, Code::Blocks, Microsoft Visual Studio, Xcode, KDevelop, and plain old UNIX makefiles. Some of these development tools are cross-platform (e.g., Eclipse, Code::Blocks), and some are specific to a particular OS such as Xcode for Mac OS X and Visual Studio for Windows. You are free to use whichever development tool and platform work for you. The only requirement is that you have some implementation of OpenCL on your platform to build and run against. For the purposes of explanation, this section will review how to set up your build environment for a few select platforms and tools. If your platform is not among the ones covered here, you should be able to use these sections as a guide for building in your desired environment.
Prerequisites
Regardless of your platform, you are going to need a copy of CMake. An installable package for Windows, Mac OS X, and various flavors of Linux/UNIX is available on the CMake Web site (www.cmake.org). On Ubuntu Linux, for example, you can also install CMake directly from the package manager using sudo apt-get install cmake.
In addition to CMake, you will also need an implementation of OpenCL. As of this writing, we are aware of at least the following implementations:
• Mac OS X 10.6+: Starting in Snow Leopard, Mac OS X has shipped with an OpenCL implementation. If you download and install the Xcode development tool, you will have access to the OpenCL headers and libraries.
• Microsoft Windows: AMD provides access to OpenCL on Windows through the ATI Stream SDK available from AMD’s developer Web site. The ATI Stream SDK contains various OpenCL sample programs along with the required headers and libraries. The OpenCL implementation itself works with the standard ATI Catalyst drivers on supported GPUs. The ATI Stream SDK also provides support for multicore CPUs (from either AMD or Intel). NVIDIA also provides its own OpenCL implementation as part of its GPU Computing SDK, which also contains OpenCL headers and libraries. As of this writing, the NVIDIA implementation provides acceleration only for NVIDIA GPUs (no CPU devices). Intel provides an implementation of OpenCL as well, but currently only for CPUs that support AUX or SSE4.1 (or higher).
• Linux: Both AMD and NVIDIA provide their development SDKs on many flavors of Linux, including Ubuntu, RedHat, and openSUSE. Intel’s Linux SDK supports SUSE Enterprise Server and Red Hat. These SDKs are similar to their Windows counterparts in that they contain the OpenCL libraries and headers along with various sample programs.
After installing CMake and OpenCL—assuming the necessary compiler tools are present—you should be able to build the sample code from the book. The sample code relies on FindOpenCL.cmake to find your OpenCL implementation. For details on this project, visit the findopencl page on http://gitorious.org/findopencl. This file is included in the sample source download from the book’s Web site.
The sample code for the book is structured into the following directories:
• /CMakeLists.txt: the primary CMake input file for a project
• /cmake/: contains the FindOpenCL.cmake file required for finding an OpenCL implementation
• /src/Chapter_X: contains the example programs for each chapter along with the CMakeLists.txt files required for building the sample
Mac OS X and Code::Blocks
If you are developing on Mac OS X, you have many choices for development tools including Eclipse, Xcode, and Code::Blocks. Here we show you how to build and execute the code using the Code::Blocks tool.
First, to generate the Code::Blocks project files, in the root directory of the sample code (assuming you unzipped the code to the directory /CL_Book):
CL_Book$ mkdir build
CL_Book$ cd build
CL_Book/build$ cmake ../ -G "CodeBlocks - Unix Makefiles"
If CMake is successful, it will generate Code::Blocks project files for each of the samples. Note that if you wish to just build from the command line rather than an IDE on the Mac, omitting the (-G) argument to cmake will generate makefiles that can be built by just typing make.
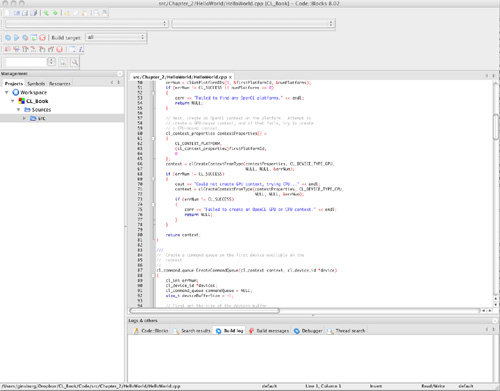
The main project file will be named CL_Book.cbp, located at the root of the created build folder. If you open this file in Code::Blocks, you should see a project in your workspace like the one in Figure 2.1. All of the samples can now be built simply by clicking Build from the Code::Blocks build menu.
Figure 2.1 CodeBlocks CL_Book project
Microsoft Windows and Visual Studio
If you are developing on Microsoft Windows, you can use CMake to generate projects for any version of Microsoft Visual Studio. On Windows, the CMake installer will install the cmake-gui, which is the most straightforward way to generate a project. In addition to installing CMake, you will need to install an implementation of OpenCL such as the ATI Stream SDK or NVIDIA GPU Computing SDK. In the case of the example in this section, the ATI Stream SDK v2.1 was installed using the downloadable installer.
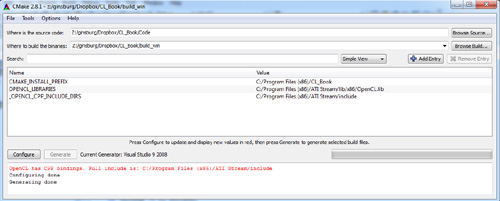
After installing CMake, simply open the cmake-gui and point the GUI to the location where you have unzipped the source code, as shown in Figure 2.2. Create a folder to build the binaries underneath that base directory and set that as the location to build the binaries in the GUI. You can then click Configure and choose the version of Microsoft Visual Studio you are using. Assuming you installed OpenCL, CMake should automatically find its location. If it is not found, manually adjust the directories in the GUI. Finally, click Configure again and then Generate, and the Visual Studio projects will be generated.
Figure 2.2 Using cmake-gui to generate Visual Studio projects
After generating the project in cmake-gui, open the ALL_BUILD project from within Visual Studio, as shown in Figure 2.3. Building this project will build all of the example programs for the book. Each of the individual examples will also have its own Visual Studio project, and you can build and run the examples directly from within Visual Studio. This also allows you to use OpenCL-based profiling/debugging tools for Visual Studio such as the ATI Stream Profiler when running the example code.
Figure 2.3 Microsoft Visual Studio 2008 Project

Linux and Eclipse
Finally, if you are developing on Linux, there are a large number of choices for a development environment. Many users will prefer to just use command-line make, but for those who wish to use an integrated development environment (IDE), CMake can generate projects for Eclipse, KDevelop, and Code::Blocks. After installing CMake and Eclipse CDT on Linux, the process of generating a project using CMake is much the same as on the other platforms. You will need to install an implementation of OpenCL. As of now, the three choices are the ATI Stream SDK, the NVIDIA GPU Computing SDK, or the Intel CPU SDK.
After installing an OpenCL implementation from one of the SDKs, you can generate the Eclipse project file using cmake. In order to have access to the source code in the generated Eclipse project, it is important that you create your CMake build directory outside of the source tree (at a level above the highest-level CMakeLists.txt). For example, if you have unzipped the code to the directory /devel/CL_Book, you would create the project as follows:
/devel$ mkdir build
/devel$ cd build
/devel/build$ cmake ../CL_Book -G "Eclipse CDT4 – Unix Makefiles"
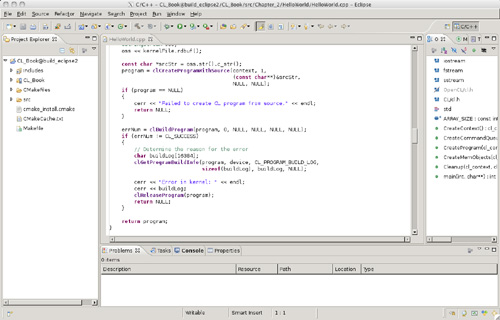
This will generate an Eclipse-compatible project in your build/ folder. In order to use this project in Eclipse, select File, Import to import that project as a General, Existing project. Provide the full directory path to your build/ folder, and Eclipse should automatically detect a CL_Book project that can be imported into your workspace. After importing the project, you should have a full project in your workspace with the sample code as shown in Figure 2.4.
Figure 2.4 Eclipse CL_Book project
HelloWorld Example
The remainder of this chapter will cover the HelloWorld sample located in src/Chapter_2/HelloWorld. In Listing 2.1 the main() function from the example program is reproduced along with the source code to the kernel. The main() function either implements or calls functions that perform the following operations:
• Create an OpenCL context on the first available platform.
• Create a command-queue on the first available device.
• Load a kernel file (HelloWorld.cl) and build it into a program object.
• Create a kernel object for the kernel function hello_kernel().
• Create memory objects for the arguments to the kernel (result, a, b).
• Queue the kernel for execution.
• Read the results of the kernel back into the result buffer.
Each of the steps that this program performs will be covered in detail in the rest of this section.
Listing 2.1 HelloWorld OpenCL Kernel and Main Function
HelloWorld.cl:
__kernel void hello_kernel(__global const float *a,
__global const float *b,
__global float *result)
{
int gid = get_global_id(0);
result[gid] = a[gid] + b[gid];
}
HelloWorld.cpp:
int main(int argc, char** argv)
{
cl_context context = 0;
cl_command_queue commandQueue = 0;
cl_program program = 0;
cl_device_id device = 0;
cl_kernel kernel = 0;
cl_mem memObjects[3] = { 0, 0, 0 };
cl_int errNum;
// Create an OpenCL context on first available platform
context = CreateContext();
if (context == NULL)
{
cerr << "Failed to create OpenCL context." << endl;
return 1;
}
// Create a command-queue on the first device available
// on the created context
commandQueue = CreateCommandQueue(context, &device);
if (commandQueue == NULL)
{
Cleanup(context, commandQueue, program, kernel, memObjects);
return 1;
}
// Create OpenCL program from HelloWorld.cl kernel source
program = CreateProgram(context, device, "HelloWorld.cl");
if (program == NULL)
{
Cleanup(context, commandQueue, program, kernel, memObjects);
return 1;
}
// Create OpenCL kernel
kernel = clCreateKernel(program, "hello_kernel", NULL);
if (kernel == NULL)
{
cerr << "Failed to create kernel" << endl;
Cleanup(context, commandQueue, program, kernel, memObjects);
return 1;
}
// Create memory objects that will be used as arguments to
// kernel. First create host memory arrays that will be
// used to store the arguments to the kernel
float result[ARRAY_SIZE];
float a[ARRAY_SIZE];
float b[ARRAY_SIZE];
for (int i = 0; i < ARRAY_SIZE; i++)
{
a[i] = i;
b[i] = i * 2;
}
if (!CreateMemObjects(context, memObjects, a, b))
{
Cleanup(context, commandQueue, program, kernel, memObjects);
return 1;
}
// Set the kernel arguments (result, a, b)
errNum = clSetKernelArg(kernel, 0,
sizeof(cl_mem), &memObjects[0]);
errNum |= clSetKernelArg(kernel, 1, sizeof(cl_mem),
&memObjects[1]);
errNum |= clSetKernelArg(kernel, 2, sizeof(cl_mem),
&memObjects[2]);
if (errNum != CL_SUCCESS)
{
cerr << "Error setting kernel arguments." << endl;
Cleanup(context, commandQueue, program, kernel, memObjects);
return 1;
}
size_t globalWorkSize[1] = { ARRAY_SIZE };
size_t localWorkSize[1] = { 1 };
// Queue the kernel up for execution across the array
errNum = clEnqueueNDRangeKernel(commandQueue, kernel, 1, NULL,
globalWorkSize, localWorkSize,
0, NULL, NULL);
if (errNum != CL_SUCCESS)
{
cerr << "Error queuing kernel for execution." << endl;
Cleanup(context, commandQueue, program, kernel, memObjects);
return 1;
}
// Read the output buffer back to the Host
errNum = clEnqueueReadBuffer(commandQueue, memObjects[2],
CL_TRUE, 0, ARRAY_SIZE * sizeof(float),
result, 0, NULL, NULL);
if (errNum != CL_SUCCESS)
{
cerr << "Error reading result buffer." << endl;
Cleanup(context, commandQueue, program, kernel, memObjects);
return 1;
}
// Output the result buffer
for (int i = 0; i < ARRAY_SIZE; i++)
{
cout << result[i] << " ";
}
cout << endl;
cout << "Executed program successfully." << endl;
Cleanup(context, commandQueue, program, kernel, memObjects);
return 0;
}
Choosing an OpenCL Platform and Creating a Context
The first step required to set up OpenCL is to choose a platform. OpenCL uses an installable client driver (ICD) model where multiple implementations of OpenCL can coexist on a single system. For example, in a system with an NVIDIA GPU and an AMD CPU, you might have one implementation on your system for the CPU and another for the GPU. It is also common for a single implementation to support multiple devices such as the Mac OS X OpenCL implementation or the ATI Stream SDK (which supports ATI GPUs and Intel or AMD CPUs). It is up to the application to choose the platform that is most appropriate for it.
The HelloWorld example demonstrates the simplest approach to choosing an OpenCL platform: it selects the first available platform. In the next chapter, we will discuss in more detail how to query an OpenCL platform for information and choose among the available platforms. In Listing 2.2 the code from the CreateContext() function of the HelloWorld example is provided. First, clGetPlatformIDs() is invoked to retrieve the first available platform. After getting the cl_platform_id of the first available platform, the example then creates a context by calling clCreateContextFromType(). This call to clCreateContextFromType() attempts to create a context for a GPU device. If this attempt fails, then the program makes another attempt, this time at creating a CPU device as a fallback.
Listing 2.2 Choosing a Platform and Creating a Context
cl_context CreateContext()
{
cl_int errNum;
cl_uint numPlatforms;
cl_platform_id firstPlatformId;
cl_context context = NULL;
// First, select an OpenCL platform to run on.
// For this example, we simply choose the first available
// platform. Normally, you would query for all available
// platforms and select the most appropriate one.
errNum = clGetPlatformIDs(1, &firstPlatformId, &numPlatforms);
if (errNum != CL_SUCCESS || numPlatforms <= 0)
{
cerr << "Failed to find any OpenCL platforms." << endl;
return NULL;
}
// Next, create an OpenCL context on the platform. Attempt to
// create a GPU-based context, and if that fails, try to create
// a CPU-based context.
cl_context_properties contextProperties[] =
{
CL_CONTEXT_PLATFORM,
(cl_context_properties)firstPlatformId,
0
};
context = clCreateContextFromType(contextProperties,
CL_DEVICE_TYPE_GPU,
NULL, NULL, &errNum);
if (errNum != CL_SUCCESS)
{
cout << "Could not create GPU context, trying CPU..."
<< endl;
context = clCreateContextFromType(contextProperties,
CL_DEVICE_TYPE_CPU,
NULL, NULL, &errNum);
if (errNum != CL_SUCCESS)
{
cerr <<
"Failed to create an OpenCL GPU or CPU context.";
return NULL;
}
}
return context;
}
Choosing a Device and Creating a Command-Queue
After choosing a platform and creating a context, the next step for the HelloWorld application is to select a device and create a command-queue. The device is the underlying compute hardware, such as a single GPU or CPU. In order to communicate with the device, the application must create a command-queue for it. The command-queue is used to queue operations to be performed on the device. Listing 2.3 contains the CreateCommandQueue() function that chooses the device and creates the command-queue for the HelloWorld application.
The first call to clGetContextInfo() queries the context for the size of the buffer required to store all of the device IDs available on the context. This size is used to allocate a buffer to store the device IDs, and another call is made to clGetContextInfo() that retrieves all of the devices available on the context. Normally, a program would iterate over these devices querying for information to choose the best (or multiple) of the devices. In the HelloWorld sample, the first device is selected. In Chapter 3, we cover how to query devices for information so that you can select the most appropriate device for your application. After selecting the device to use, the application calls clCreateCommandQueue() to create a command-queue on the selected device. The command-queue will be used later in the program to queue the kernel for execution and read back its results.
Listing 2.3 Choosing the First Available Device and Creating a Command-Queue
cl_command_queue CreateCommandQueue(cl_context context,
cl_device_id *device)
{
cl_int errNum;
cl_device_id *devices;
cl_command_queue commandQueue = NULL;
size_t deviceBufferSize = -1;
// First get the size of the devices buffer
errNum = clGetContextInfo(context, CL_CONTEXT_DEVICES, 0, NULL,
&deviceBufferSize);
if (errNum != CL_SUCCESS)
{
cerr << "Failed call to
clGetContextInfo(...,GL_CONTEXT_DEVICES,...)";
return NULL;
}
if (deviceBufferSize <= 0)
{
cerr << "No devices available.";
return NULL;
}
// Allocate memory for the devices buffer
devices = new cl_device_id[deviceBufferSize /
sizeof(cl_device_id)];
errNum = clGetContextInfo(context, CL_CONTEXT_DEVICES,
deviceBufferSize, devices, NULL);
if (errNum != CL_SUCCESS)
{
cerr << "Failed to get device IDs";
delete [] devices;
return NULL;
}
// In this example, we just choose the first available device.
// In a real program, you would likely use all available
// devices or choose the highest performance device based on
// OpenCL device queries.
commandQueue = clCreateCommandQueue(context,
devices[0], 0, NULL);
if (commandQueue == NULL)
{
cerr << "Failed to create commandQueue for device 0";
return NULL;
}
*device = devices[0];
delete [] devices;
return commandQueue;
}
Creating and Building a Program Object
The next step in the HelloWorld example is to load the OpenCL C kernel source from the file HelloWorld.cl and create a program object from it. The program object is loaded with the kernel source code, and then the code is compiled for execution on the device attached to the context. In general, a program object in OpenCL stores the compiled executable code for all of the devices that are attached to the context. In the case of HelloWorld, only a single device is created on a context, but it is possible to have multiple devices, in which case the program object will hold the compiled code for each.
In Listing 2.4, the HelloWorld.cl file is loaded from disk and stored in a string. The program object is then created by calling clCreateProgramWithSource(), which creates the program object from the kernel source code. After creating the program object, the kernel source code is compiled by calling clBuildProgram(). This function compiles the kernel for the attached devices and, if successful, stores the compiled code in the program object. If there is any failure during compilation, the build log is retrieved using clGetProgramBuildInfo(). The build log will contain a string with any compiler errors that were produced by the OpenCL kernel compilation.
Listing 2.4 Loading a Kernel Source File from Disk and Creating and Building a Program Object
cl_program CreateProgram(cl_context context, cl_device_id device,
const char* fileName)
{
cl_int errNum;
cl_program program;
ifstream kernelFile(fileName, ios::in);
if (!kernelFile.is_open())
{
cerr << "Failed to open file for reading: " << fileName <<
endl;
return NULL;
}
ostringstream oss;
oss << kernelFile.rdbuf();
string srcStdStr = oss.str();
const char *srcStr = srcStdStr.c_str();
program = clCreateProgramWithSource(context, 1,
(const char**)&srcStr,
NULL, NULL);
if (program == NULL)
{
cerr << "Failed to create CL program from source." << endl;
return NULL;
}
errNum = clBuildProgram(program, 0, NULL, NULL, NULL, NULL);
if (errNum != CL_SUCCESS)
{
// Determine the reason for the error
char buildLog[16384];
clGetProgramBuildInfo(program, device, CL_PROGRAM_BUILD_LOG,
sizeof(buildLog), buildLog, NULL);
cerr << "Error in kernel: " << endl;
cerr << buildLog;
clReleaseProgram(program);
return NULL;
}
return program;
}
Creating Kernel and Memory Objects
In order to execute the OpenCL compute kernel, the arguments to the kernel function need to be allocated in memory that is accessible to it on the OpenCL device. The kernel for the HelloWorld example was provided in Listing 2.1. The kernel in this example is a simple function that computes the sum of the values at each element in two arrays (a and b) and stores it in another array (result). In Listing 2.5, a kernel object is created for the "hello_kernel" that was compiled into the program object. The arrays (a, b, and result) are allocated and filled with data. After these arrays are created in host memory, CreateMemObjects() is called, which copies the arrays into memory objects that will be passed to the kernel.
// Create OpenCL kernel
kernel = clCreateKernel(program, "hello_kernel", NULL);
if (kernel == NULL)
{
cerr << "Failed to create kernel" << endl;
Cleanup(context, commandQueue, program, kernel, memObjects);
return 1;
}
// Create memory objects that will be used as arguments to
// kernel. First create host memory arrays that will be
// used to store the arguments to the kernel
float result[ARRAY_SIZE];
float a[ARRAY_SIZE];
float b[ARRAY_SIZE];
for (int i = 0; i < ARRAY_SIZE; i++)
{
a[i] = (float)i;
b[i] = (float)(i * 2);
}
if (!CreateMemObjects(context, memObjects, a, b))
{
Cleanup(context, commandQueue, program, kernel, memObjects);
return 1;
}
The code for the CreateMemObjects() function is provided in Listing 2.6. For each array, the function calls clCreateBuffer() to create a memory object. The memory object is allocated in device memory and can be accessed directly by the kernel function. For the input arrays (a and b) the buffer is created with memory type CL_MEM_READ_ONLY | CL_MEM_COPY_HOST_PTR, which means that the array will be read-only by the kernel and copied from host memory to device memory. The arrays themselves are passed as an argument to clCreateBuffer(), which causes the contents of the arrays to be copied into the storage space allocated for the memory object on the device. The result array is created with type CL_MEM_READ_WRITE, which means that the kernel can both read and write to the array.
Listing 2.6 Creating Memory Objects
bool CreateMemObjects(cl_context context, cl_mem memObjects[3],
float *a, float *b)
{
memObjects[0] = clCreateBuffer(context, CL_MEM_READ_ONLY |
CL_MEM_COPY_HOST_PTR,
sizeof(float) * ARRAY_SIZE, a,
NULL);
memObjects[1] = clCreateBuffer(context, CL_MEM_READ_ONLY |
CL_MEM_COPY_HOST_PTR,
sizeof(float) * ARRAY_SIZE, b,
NULL);
memObjects[2] = clCreateBuffer(context, CL_MEM_READ_WRITE,
sizeof(float) * ARRAY_SIZE,
NULL, NULL);
if (memObjects[0] == NULL || memObjects[1] == NULL ||
memObjects[2] == NULL)
{
cerr << "Error creating memory objects." << endl;
return false;
}
return true;
}
Executing a Kernel
Now that the kernel and memory objects have been created, the HelloWorld program can finally queue up the kernel for execution. All of the arguments to the kernel function need to be set using clSetKernelArg(). The first argument to this function is the index of the argument. The hello_kernel() takes three arguments (a, b, and result), which correspond to indices 0, 1, and 2. The memory objects that were created in CreateMemObjects() are passed to the kernel object in Listing 2.7.
After setting the kernel arguments, the HelloWorld example finally queues the kernel for execution on the device using the command-queue. This is done by calling clEnqueueNDRangeKernel(). The globalWorkSize and localWorkSize determine how the kernel is distributed across processing units on the device. The HelloWorld example takes a very simple approach of having a global work size equal to the size of the array and the local work size equal to 1. Determining how to distribute your kernel efficiently over a data set is one of the most challenging aspects of using OpenCL. This will be discussed in many examples throughout the book.
Queuing the kernel for execution does not mean that the kernel executes immediately. The kernel execution is put into the command-queue for later consumption by the device. In other words, after the call is made to clEnqueueNDRangeKernel(), the kernel may not yet have executed on the device. It is possible to make a kernel wait for execution until previous events are finished. This will be discussed in detail in Chapter 9, “Events.” In order to read the results back from the kernel, the HelloWorld example calls clEnqueueReadBuffer() to read back the result array (memObjects[2]).
The third argument to clEnqueueReadBuffer() is a Boolean blocking_read that determines whether the call should wait until the results are ready before returning. In this example, blocking_read is set to CL_TRUE, which means that it will not return until the kernel read is done. It is guaranteed that operations that are put into the command-queue are executed in order (unless the command-queue is created with CL_QUEUE_OUT_OF_ORDER_EXEC_MODE_ENABLE, which was not done in the HelloWorld example). As such, the read will not occur until execution of the kernel is finished, and the read will not return until it is able to read the results back from the device. Therefore, once the program returns from clEnqueueReadBuffer(), the result array has been read back from the device to the host and is ready for reading or writing. Finally, at the end of Listing 2.7, the values in the results array are output to the standard output.
Listing 2.7 Setting the Kernel Arguments, Executing the Kernel, and Reading Back the Results
// Set the kernel arguments (result, a, b)
errNum = clSetKernelArg(kernel, 0, sizeof(cl_mem),
&memObjects[0]);
errNum |= clSetKernelArg(kernel, 1, sizeof(cl_mem),
&memObjects[1]);
errNum |= clSetKernelArg(kernel, 2, sizeof(cl_mem),
&memObjects[2]);
if (errNum != CL_SUCCESS)
{
cerr << "Error setting kernel arguments." << endl;
Cleanup(context, commandQueue, program, kernel, memObjects);
return 1;
}
size_t globalWorkSize[1] = { ARRAY_SIZE };
size_t localWorkSize[1] = { 1 };
// Queue the kernel up for execution across the array
errNum = clEnqueueNDRangeKernel(commandQueue, kernel, 1, NULL,
globalWorkSize, localWorkSize,
0, NULL, NULL);
if (errNum != CL_SUCCESS)
{
cerr << "Error queuing kernel for execution." << endl;
Cleanup(context, commandQueue, program, kernel, memObjects);
return 1;
}
// Read the output buffer back to the Host
errNum = clEnqueueReadBuffer(commandQueue, memObjects[2],
CL_TRUE,0,
ARRAY_SIZE * sizeof(float), result,
0, NULL, NULL);
if (errNum != CL_SUCCESS)
{
cerr << "Error reading result buffer." << endl;
Cleanup(context, commandQueue, program, kernel, memObjects);
return 1;
}
// Output the result buffer
for (int i = 0; i < ARRAY_SIZE; i++)
{
cout << result[i] << " ";
}
Checking for Errors in OpenCL
In the HelloWorld example and throughout the book, the example code demonstrates checking for error codes returned by OpenCL functions. At this point, we want to mention the mechanism by which OpenCL reports errors. In terms of error reporting, there are two types of functions in OpenCL: those that return OpenCL objects and those that don’t. For example, in this chapter we saw that clCreateContextFromType() returns a cl_context object. However, the function clSetKernelArg() does not return a new object. clSetKernelArg() returns an error code to the caller, and clCreateContextFromType() takes a parameter as its last argument that is a pointer to the error code generated by the function.
These two functions illustrate the simple rule in OpenCL in terms of reporting errors:
• OpenCL functions that return cl_xxx objects take a last argument that is a pointer to a returned error code.
• OpenCL functions that do not return objects will return an error code.
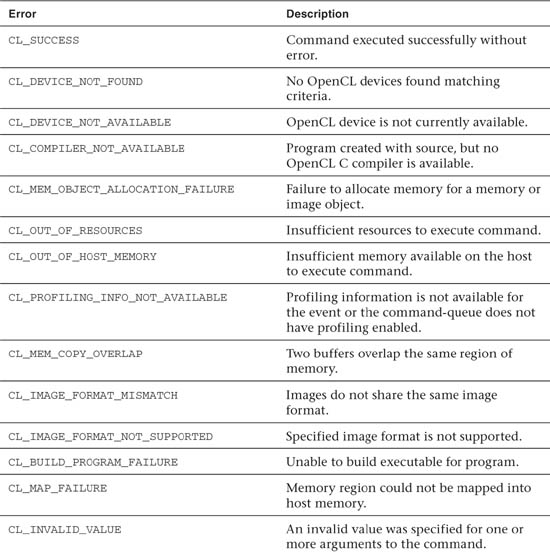
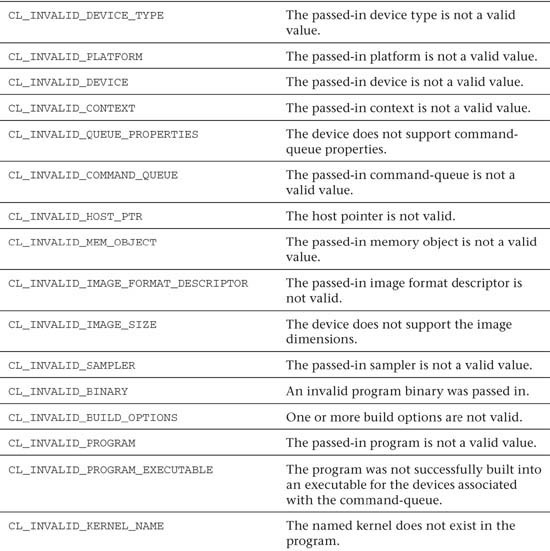
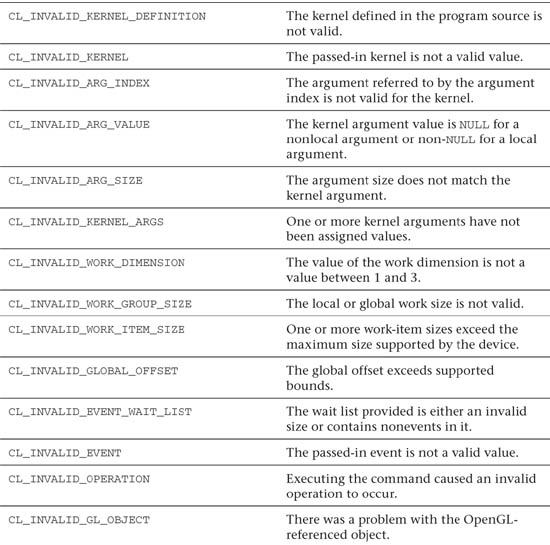
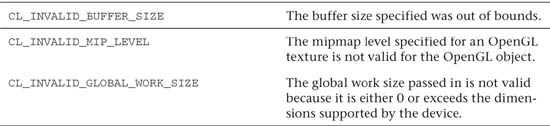
There are a large number of potential errors in OpenCL. Each API call can return a subset of these errors. The list of possible error codes in OpenCL is provided in Table 2.1.